Design of an Internal Wave Generator for
Experimental Applications
by
Christopher Dimitriou
Submitted to the Department of Mechanical Engineering
in partial fulfillment of the requirements for the degree of
Bachelor of Science in Mechanical Engineering
at the
MASSACHUSETTS INSTITUTE OF TECHNOLOGY
June 2008
@ Christopher Dimitriou, MMVIII. All rights reserved.
The author hereby grants to MIT permission to reproduce and
distribute publicly paper and electronic copies of this thesis document
in whole or in part.
Author ...
Dep"ment
\ N ("> \Certified by..
of I/trehanical E•eineering
)
May 9, 2008
...Thomas Peacock
Associate Professor
Thesis Supervisor
Accepted by
~LrT7John H Lienhard V
Professor or Mechanical Engineering
Chairman, Undergraduate Thesis Committee
ARCHIES
&SA HUSEJTs INS E
" ': :qcIHNOL!7Y
N
G
AUG
14
2008
Design of an Internal Wave Generator for Experimental
Applications
by
Christopher Dimitriou
Submitted to the Department of Mechanical Engineering on May 9, 2008, in partial fulfillment of the
requirements for the degree of
Bachelor of Science in Mechanical Engineering
Abstract
This thesis presents the design of an internal wave generator for experimental appli-cations. It is based on the previous design by Gostiaux, Didelle, Mercier and Dauxois, however it is constructed on a smaller scale to be of use in one of the smaller tanks in the Nonlinear Dynamics Lab at MIT. The generator operates by forming a traveling sinusoidal boundary that results in a single internal wave beam propagating through the fluid medium. The boundary is created by stacking 12 plates on top of each other, and using a rotating camshaft to drive them in a sinusoidal fashion. Measurements of the oscillation of each plate shows that the motion induced in each plates by the camshaft is very close to sinusoidal, and that the generator can successfully produce oscillations of amplitudes as low as 3 or 4mm. Schlieren images show that the gener-ator is capable of producing a single wave beam, with minimal disturbances in other directions. In addition, the direction of the wave beam can be controlled by the speed of rotation of the camshaft, and wave beams of different widths can be produced by altering the camshaft design.
Thesis Supervisor: Thomas Peacock Title: Associate Professor
Acknowledgments
I would like to thank Mani Mathur for providing a great deal of help with the test-ing/experimentation that was done with the wave generator. Also Andy Gallant for coming up with the design for the camshaft and its fabrication, and Professor Peacock for his overall guidance, and giving me the opportunity to work on a very interesting senior thesis project.
Contents
1 Introduction 13
1.1 Motivations for experimental studies of internal waves ... 13
1.2 Current methods used to generate internal waves . ... 14
1.3 Goal of internal wave generator ... . . 15
2 Designing the Wave Generator 17 2.1 Dimensional constraints ... ... 17
2.2 Driving mechanism of the plates ... .. 18
2.2.1 Use of circular disks to approximate sinusoidal motion . . .. 18
2.2.2 Components of camshaft assembly . ... 22
2.2.3 Generating the traveling sinusoid . ... 23
2.2.4 A more versatile camshaft design . ... 24
2.3 Other design considerations ... .... 25
3 Performance of wave generator 27 3.1 Plate oscillations ... ... . 27
3.1.1 Sinusoidal front ... ... 28
3.2 Direction of beam propagation ... ... 28
4 Conclusion 35 A Matlab scripts 37 A.1 Simulating the kinematics of a plate driven by an eccentric disk . . . 37
List of Figures
2-1 Solid model of the setup of the wavemaker. The wave propagates off of the
open end of the box where the plates are protruding. The top of the box is shown as uncovered to indicate the rectangular holes of the plates where
the camshaft assembly is placed ... ... ... . . 18
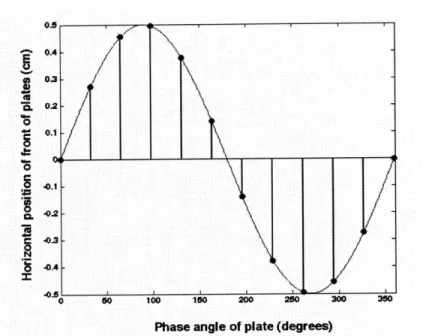
2-2 Figure showing how relative positioning of plates forms an entire sinusoid
wavelength ... ... .. 19
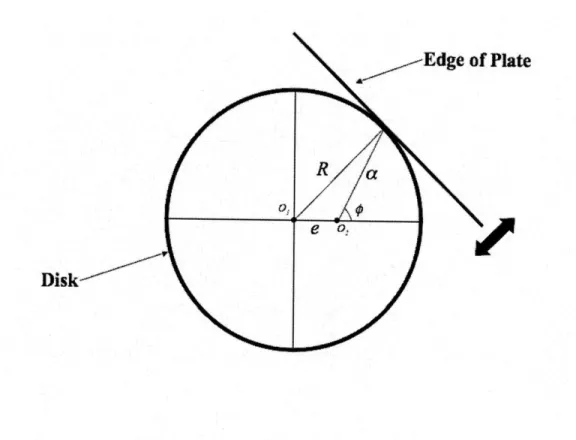
2-3 Figure showing how circular disk rotating about an eccentric point produces
sinusoidal motion. The disk is rotated about the point 02, which is offset
from its center... ... ... 20
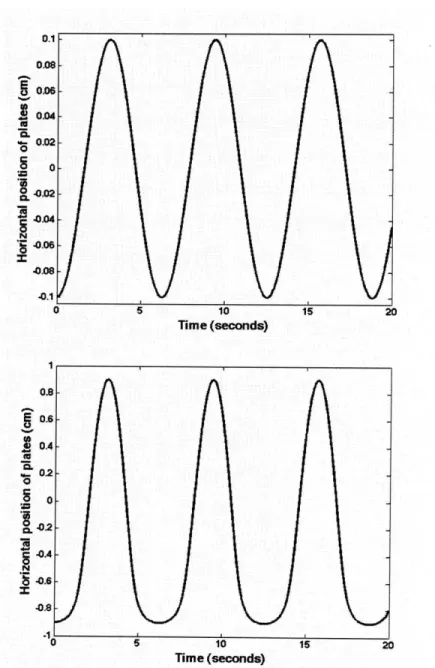
2-4 Sinusoidal motion of two plates being driven by disks of radius (R) 1cm.
The top plot shows a disk with a value of e of 0.1cm (small), while the bottom disk has a value of e of 0.9cm (large). Each disk is rotated about 02 at an angular speed of 1 rad/s, so the values on the x-axis are in seconds. Note how the motion of the plate in the top plot closely resembles a sinusoid,
while sinusoidal motion in the second plot breaks down. ... . 21
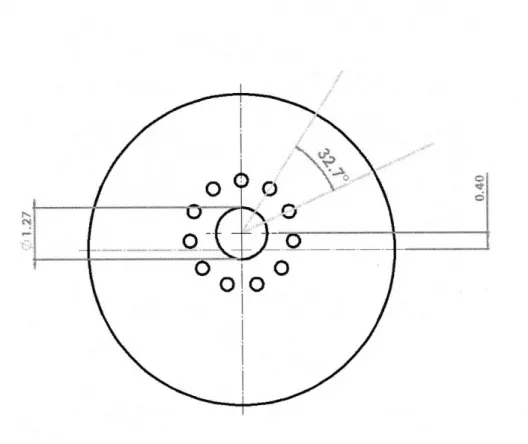
2-5 A drawing of the disk indicating placement of the 1/2 inch hole (center at
02) as well as the secondary holes. Only one of each of the secondary holes
is drilled in each of the 12 disks ... .. 22
2-6 Solid model of entire camshaft assembly. The nut and thread that tightens
the entire assembly onto the large shaft is not shown. . ... 23
3-1 Measurement of the relative positions of the plates at two instances in time.
3-2 Qualitative schlieren image of the wavebeam produced by the generator with the camshaft rotating at a speed of 27RPM. The amplitude of oscillation of
all the plates is 8mm. ... ... 30
3-3 Qualitative schlieren image of wavebeam produced by the generator at
27RPM, with the amplitude of oscillation of each plate being set to 8mm.
The direction of rotation of the camshaft is reversed from Figure 3-2. . . . 31
3-4 Qualitative schlieren image of wavebeam produced from the generator with
the camshaft rotating at a faster rate (resulting in a steeper angle of propa-gation). In this image only the middle plates are oscillating at an amplitude
List of Tables
Chapter 1
Introduction
Internal waves are gravity driven disturbances that propagate within a fluid medium, as a result of a density stratification in the fluid. For a fluid in hydrostatic equilib-rium, gravitational forces are balanced by buoyant forces, so the fluid remains stable. However, if a perturbation occurs in a stratified fluid, a propagating wave occurs due to the action of restoring forces. Internal waves are particularly interesting because the direction of propagation of energy (or the direction of the group velocity) is in fact perpendicular to the direction of the phase velocity - on the other hand, for a typical wave occurring on the surface of a fluid the direction of the group and phase velocity is the same.
1.1
Motivations for experimental studies of
inter-nal waves
Both the ocean and the atmosphere are continuously stratified, and as a result in-ternal waves occur frequently in these media. A good understanding of the physical mechanisms behind internal waves is therefore invaluable, because they can lead to phenomena such as ocean mixing, or have an effect on climate variations. As is always the case, a theoretical model model is always more valuable when it can be verified using a number of different experiments, so flexibility in experimental techniques is
important. A typical experimental setup for studying internal waves involves the following three processes:
(1) Creating a density stratification in the fluid
(2) Generate the internal waves using some type of mechanism
(3) Use a visualization technique to observe the behavior of the waves
In the current setup in the Nonlinear Dynamics Lab, the first process is carried out using the well known double bucket system. Either the Synthetic Schlieren method, or Particle Image Velocimetry (PIV) can be used for the third process of flow visual-ization. In order to actually generate the internal waves, a rigid, oscillating body is required - what is typically used is either a cylinder or a large topography.
1.2
Current methods used to generate internal waves
As mentioned above, the most commonly used experimental technique for generating internal waves is to oscillate a rigid body within the fluid. A classic example of this is the oscillating cylinder. When a cylinder is placed in a stratified medium, and made to oscillate in the direction of the stratification, four wavebeams will be created that propagate away from the cylinder. The angle between the direction of propagation of the wavebeams will be dictated by the Brunt Vaisal frequency and the frequency of oscillation of the cylinder. The relation between the angle, and these two values, is given as follows [1]:
w = Nsin (1.1)
Where N is the Brunt Vaisalhi frequency, w is the frequency of oscillation of the cylinder, and 0 is the angle between the direction of propagation of the wavebeams and the vertical. The Brunt Viisilli frequency is given by the following relation [2]:
N2 gdp (1.2)
Po dz
respect to the vertical direction (this value is constant in most of the experimental applications due to the desire of a linear density stratification).
1.3
Goal of internal wave generator
The oscillating cylinder method of generating waves lacks some of the functionalities that are desired for certain experimental applications. One of the main drawbacks of this method is the fact that it produces four wavebeams - two in an upward direction and two downwards. A generator capable of producing a single beam would be particularly useful for experiments where one would like to observe a single beam interacting with topographies, or changes/discontinuities in density stratification.
Chapter
2
Designing the Wave Generator
2.1
Dimensional constraints
The design of the wave generator is based on that described by Gostiaux, Didelle, Mercier and Dauxois in their paper [3]. However, due to the desire to utilize the generator in a much smaller tank, there are several restrictions on its dimensions.
The inner width of the tank it is used in is 20cm, so the width of the generator is restricted to a value smaller than this. Due to the nature of the experiments that were to be conducted involving the generator, it was decided that the height of the beam produced should be no greater than 15cm. This was achieved by vertically stacking twelve 1/2 inch thick UHMWPE plates of width and length 13cm. The plates are stacked within a box that is open at the front end, and they are constrained such that movement is allowed in the horizontal direction only. This is accomplished by slotting the side walls of the box, and attaching rods to the sides of the plates so that the rods slide through the slots. The dimensions of the slots were set such that the vertical distance between the surfaces of adjacent plates is 0.04 inches. For clarity, figure 2-1 in the following page illustrates the overall setup of the plates within the box. Due to the ability of the plates to move in the horizontal direction, they can be driven in a particular way such that their motion causes an internal wave that propagates off of the front of the plates. The way that this is accomplished is described in the following section
Figure 2-1: Solid model of the setup of the wavemaker. The wave propagates off of the open
end of the box where the plates are protruding. The top of the box is shown as uncovered to indicate the rectangular holes of the plates where the camshaft assembly is placed.
2.2
Driving mechanism of the plates
As described by Gostiaux, Didelle, Mercier and Dauxois, the movement that is desired from the plates is a traveling sinusoid. This can be accomplished by oscillating each plate in the horizontal direction in a sinusoidal fashion (with an amplitude typically ranging between 3mm and 1cm), with each plate having a fixed phase difference from the next adjacent plate. If each of the 12 plates has a 32.70 phase difference from the next adjacent plate, then the 12 plates will form an entire wavelength.
To accomplish this, rectangular holes are machined through each plate (these can be seen in figure 2-1) through which a camshaft is passed. The camshaft imposes the relative positions of each plate so that they form a sinusoid, and when it rotates
it drives the plates such they form a traveling sinusoid.
2.2.1
Use of circular disks to approximate sinusoidal motion
The design of the camshaft is a particularly important part of the generator, as it dictates how the plates move with respect to each other and therefore what kind
M
45
0
f.j0
=
Phase angle of plate (degrees)
Figure 2-2: Figure showing how relative positioning of plates forms an entire sinusoid
wavelength.
of wavebeam will be produced. In order to have the camshaft produce a sinusoidal motion, circular disks were used as the cams, and each of them was attached to the rotating shaft about an eccentric point (i.e. offset from their centers). Figure 2-3 below illustrates this.
In figure 2-3, 01 is the location of the center of the disk, 02 is the location about which the disk rotates (and where the rotating shaft passes through). The angle q is the angle of rotation about the eccentric point 02, while R is the radius of the disk. The value e is the distance between 01 and 02 (the offset of the center of rotation). The length a varies as the disk rotates about point 02 - it thus depends on 0. Using the cosine rule, we can write this dependance between a and q.
R2 = 2 + e 2 - 2aecoso (2.1)
Equation 2.1 can be solved in for a in terms of ¢, and the following relation results:
Plate
Figure 2-3: Figure showing how circular disk rotating about an eccentric point produces
sinusoidal motion. The disk is rotated about the point 02, which is offset from its center.
As equation (2.2) shows, the variation in the value of a with respect to q is not strictly sinusoidal. However, if e is relatively small compared to R, then equation (2.2) can be approximated as follows:
a 4 -e cos 5 ± R (2.3)
For a disk rotating about 02 with a constant angular speed, this is a sinusoidal motion with a peak to peak amplitude of 2e. Because the value of a dictates the motion of the plates in the generator, they too will oscillate with a peak to peak amplitude of
2e, in an approximately sinusoidal fashion.
To verify the validity of equation (2.3) for small values of e, plots were made of a as a function of q for small and large values of e, using equation (2.2). These plots are shown in the following page, (figure 2-4) and they illustrate how the sinusoidal motion of the plates begins to break down when the size of e (relative to R) becomes too great.
CL 0 S a. =OP a Time (seconds) 0 0 S i a .5 z Time (seconds)
Figure 2-4: Sinusoidal motion of two plates being driven by disks of radius (R) 1cm. The
top plot shows a disk with a value of e of 0.1cm (small), while the bottom disk has a value of e of 0.9cm (large). Each disk is rotated about 02 at an angular speed of 1 rad/s, so the values on the x-axis are in seconds. Note how the motion of the plate in the top plot closely resembles a sinusoid, while sinusoidal motion in the second plot breaks down.
2.2.2
Components of camshaft assembly
The camshaft assembly consists of 12 circular stainless steel disks, each of a diameter of 7.62cm and a thickness of 0.5cm . Each disk has a 1/2 inch (1.27cm) hole drilled at a point that is 4mm offset from the disks center. This hole is the point about which each disk is rotated. The 4mm offset, which is the value of e as indicated in figure 2-3, sets an 8mm peak to peak amplitude for each plate. A secondary hole is drilled in each of the 12 disks, however for each of the disks this hole is placed in a different location. The purpose of the secondary hole is to set the relative phase differences between adjacent disks. These holes are of a smaller diameter, and are positioned on each disk as shown in figure 2-5 below. When the camshaft is assembled, 2 shafts
Figure 2-5: A drawing of the disk indicating placement of the 1/2 inch hole (center at 02)
as well as the secondary holes. Only one of each of the secondary holes is drilled in each of the 12 disks.
are placed through all of the disks. The first shaft is the rotating shaft - it is placed through the large holes in the disks and is responsible for the rotation of the disks.
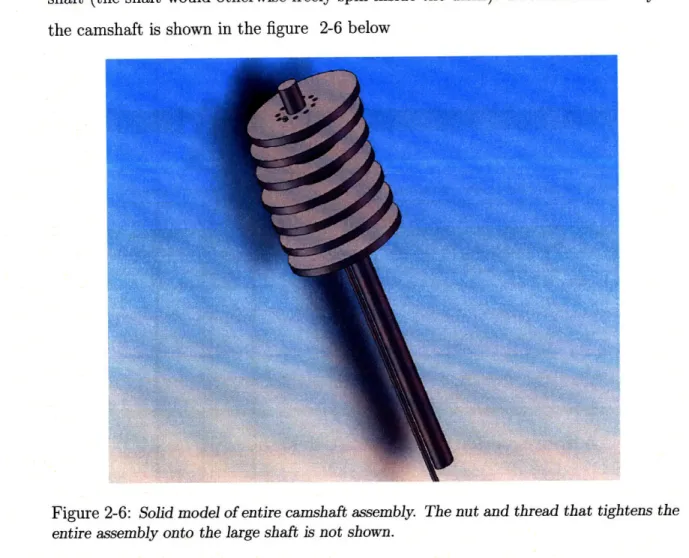
The second, smaller shaft, is placed through the small holes in the disks. Its purpose is to align the small holes of the disks in the vertical direction. Due to the location of the small holes, each disk now has a phase difference of 32.70 from its adjacent disk (For 12 disks, this results in the top and bottom disk having the same phase). Plastic spacers are placed between each disk, and a nut and thread on the top and bottom of the large shaft is used to tighten the shaft, spacers and disks onto each other. By tightening the entire assembly, the disks are forced to rotate with the large shaft (the shaft would otherwise freely spin inside the disks). The entire assembly of the camshaft is shown in the figure 2-6 below
Figure 2-6: Solid model of entire camshaft assembly. The nut and thread that tightens the
entire assembly onto the large shaft is not shown.
2.2.3
Generating the traveling sinusoid
To verify that the assembly described above does in fact cause the plates to produce a travelling sinusoid, it is necessary to consider equation (2.2). Equation (2.2) describes
the motion of a single plate that is being driven by a circular cam. For a front of 12 plates, the position of each plate can be described as follows.
an = -e cos (wt + (n - 1)(32.70)) ± R2 - e2 Sin 2 (wt + (n - 1) (32.70)) (2.4)
Where an is the position of the nth plate in the front (n = 1...12) w8 is the angular
speed of the driving shaft, and t is time. This equation can be approximated by noting that the maximum variation of the first term due to the rotation of the shaft is e, which is 4mm for this particular assembly. The maximum variation of the second term (within the square root) due to rotation is R - v/R2 - e2. For R = 7.62cm and
e = 4mm this variation is only 0.105mm, which is negligible. The term within the
square root can thus be regarded as constant, and equation (2.4) can be approximated as follows.
an -e cos (wt + (n - 1)(32.70)) ± R (2.5)
This is identical to the equation of a typical traveling wave, where the position along the direction of propagation of the wave is replaced by a term including the discrete
plate number n.
2.2.4
A more versatile camshaft design
A more versatile camshaft design was also considered that would allow the plates
to oscillate at different amplitudes using the same stainless steel disks. It involved machining slots into the stainless steel disks, such that the position of shaft relative to the center of each disk could be adjusted. This would eliminate the need for machining different disks in order to make the plates oscillate at different amplitudes. However, the idea was discarded in favor of the design described above after realizing that it tended to make the plates oscillate in an unpredictable fashion.
2.3
Other design considerations
Along with everything mentioned so far, several other factors were taken into account in the design and fabrication of the wave generator. After testing different camshaft assembly designs, it became obvious that an important requirement of the wave gen-erator was for all of the plates to oscillate within 5% of their specified value. In several instances an alternative camshaft was tested that produced variations in the amplitudes of the plates of up to 25%. This resulted in a less "clean" wavebeam, and also produced secondary wavebeams in different directions.
One of the reasons why the amplitudes of the plates varied so much was due to deflections in the shaft. The camshaft assembly was initially designed to utilize a 0.2 inch steel shaft as the rotating shaft. At a length of 20cm, this shaft was quite fragile and was susceptible to plastic deformation. Any such deformations would result in the disks no longer rotating about a fixed point, and would thus create variations in the oscillation amplitudes of the plates. In order to avoid this problem, the diameter of the shaft was increased to 1/2 an inch. In addition to this, all of the holes in the disks were machined as precisely as possible (using a CNC mill) so that both the relative phase between the plates, and their amplitudes, would be as accurate as possible.
Secondary wavebeams were also produced by the oscillation of the top and bottom plates, due to the fact that they are essentially free ends and are not surrounded on both sides by another plate. This effect can be mitigated by smoothly bringing the amplitudes of the plates at the top and bottom down to zero - i.e. having the top plate oscillate at Omm, the next plate at 2mm, the next at 4, then 6, and the plates in the middle at 8mm. The free corners of the outer shell of the wave generator were also likely to create secondary wavebeams, due to oscillations of the entire wave generator. To prevent this from occuring, the wave generator was firmly clamped to a rigid part of the tank, such that it does not oscillate in any direction.
However, even when the generator is rigidly clamped to the tank such that it can-not move, the large, sharp features such as the outside corners of the wave generator
may still create secondary wavebeams. If these features are close enough to the oscil-lating plates, then the flow created by the moving plates may pass over the corners, resulting in a wavebeam that appears to be produced by the corner of the genera-tor. This particular problem was addressed by attaching a large plate flush with the bottom corner of the wave generator, such that the sharp corner is effectively moved farther away from the moving plates.
Chapter 3
Performance of wave generator
3.1
Plate oscillations
Once the wave generator was constructed and assembled, several tests were conducted to ensure that it operated as specified by the design. The first of these tests was to
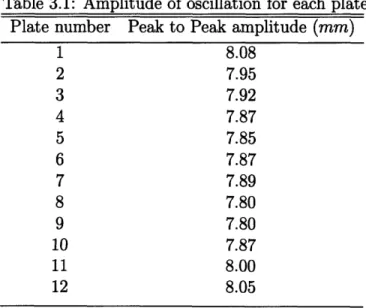
measure the amplitude of oscillation of each plate, to see whether or not they were within the desired value, and that there was not too much of a variation between the amplitude of each plate. The table below shows the amplitudes as measured by a micrometer.
Table 3.1: Amplitude of oscillation for each plate Plate number Peak to Peak amplitude (mm)
1 8.08 2 7.95 3 7.92 4 7.87 5 7.85 6 7.87 7 7.89 8 7.80 9 7.80 10 7.87 11 8.00 12 8.05
As can be seen, the measured amplitudes are all within 0.2mm of their desired value,
8mm. This is only a 2.5% variation which is a desirable result. The amplitude
of oscillation of the plates is an important aspect of the generator's design because irregular amplitudes tend to create less "clean" wavebeams.
3.1.1
Sinusoidal front
While the measurements given in table 3.1 show how accurate the amplitude of oscillation of each disk is, they do not show whether or not the wave generator is producing a traveling sinusoid at its front. In order to accomplish this, the generator was set up in the tank and a video was captured of the movement of the plates while the shaft was spinning. A Matlab routine was set up that measured the relative position of each plate from the video, and determined the time evolution of the position of each plate. By plotting the position of each plate at a different time, it was possible to evaluate whether or not the generator was producing a traveling sinusoid. In figure 3-1 in the following page, the relative position of each plate is plotted at two given instant in time. As can be seen, the positions of the plate closely approximate a sinusoid. When the images are strung together to form a video, then the appearance of a traveling sinusoid becomes clear.
3.2
Direction of beam propagation
The next tests involved setting up the wave generator in the tank, filling the tank with the double bucket method to produce a linear density stratification, and then using the synthetic schlieren method to capture qualitative images of the waves that the generator produces. This was able to provide an indication of how clean the wavebeam is, i.e. whether it produces a single wavebeam with minimal secondary disturbances.
Plate Number
Plate Number
Figure 3-1: Measurement of
There is a change in phase of
the relative positions of the plates at two instances in time.
E from the top and bottom plots 00-1% rr•n E C .2
i
E
C 0 0 ,oI
e i-0 EFigure 3-2: Qualitative schlieren image of the wavebeam produced by the generator with
the camshaft rotating at a speed of 27RPM. The amplitude of oscillation of all the plates is 8mm.
wave generator is positioned at the top left corner of the image, and it is tilted so that the front aligns with the direction of propagation of the wavebeam. The camshaft is rotated at a speed of 27 RPM - the speed of rotation of the camshaft influences
the angle of propagation of the wavebeam (the relation between the two is given in equations (1.1) and (1.2)). At higher speeds of rotation, the direction of propagation of the beam will be steeper.
The image was actually obtained using a qualitative preview option with the flow visualization software (Digiflow). However the image quite clearly shows the lines of constant phase along the direction of propagation of the wavebeam. Also evident from the image are some secondary disturbances -most notably an upwardly propagating
to the "free end" effect that has been described in chapter 2 - the top plate of the generator has no plate above it so it tends to produce an upward disturbance as well. As noted previously, this effect can be avoided by smoothly bringing the amplitudes of the outer plates down to zero.
Figure 3-3 below shows the wavebeam that is produced when the camshaft is rotated in the opposite direction
Figure 3-3: Qualitative schlieren image of wavebeam produced by the generator at 27RPM,
with the amplitude of oscillation of each plate being set to 8mm. The direction of rotation of the camshaft is reversed from Figure 3-2.
As can be seen from this image, the main wavebeam is propagating in the upward direction. However, in this image the secondary disturbances are more pronounced -the bottom right corner of -the generator seems to produce a considerable disturbance in the downward (as well as sideways) direction. Also evident from the image is the reflection of the wavebeam from the surface of the water. In this instance the
camshaft was rotated at a speed of 27 RPM, but the density stratification of the fluid is slightly different so the angle of propagation of the wavebeam is slightly different in figures 3-3 and 3-2.
The next image (figure 3-4) is of the wave generator producing a beam with a different angle of propagation, due to the higher speed of rotation of the camshaft.
Figure 3-4: Qualitative schlieren image of wavebeam produced from the generator with
the camshaft rotating at a faster rate (resulting in a steeper angle of propagation). In this
image only the middle plates are oscillating at an amplitude of 8mm - the outer plates
oscillate at smaller amplitudes.
Figure 3-4 shows a very clean wavebeam, with minimal secondary disturbances in the upward direction. This is in part due to the use of a camshaft assembly that has the outer plate amplitudes smoothly going to zero - figures 3-2 and 3-3 did not utilize the same camshaft assembly. Another reason for less secondary disturbances is the addition of the long (vertical) plate which extends from the bottom front corner
of the generator to the bottom of the tank. The vertical plate effectively "moves" the bottom front corner of the generator further down, resulting in less unwanted disturbances. The speed of rotation of the camshaft in this image is 35 RPM - this higher speed resulted in a steeper wavebeam compared to the previous two images.
Chapter 4
Conclusion
This particular design of an internal wave generator provides a great deal of versatility for experimental applications. Based on the camshaft assembly setup, it is possible to generate wavebeams of different widths, as well as alter the phase difference between each plate in order to change the number of wavelengths represented by the plate front. The amplitude of oscillation of each plate can be changed as well, and as shown by the measurements in table 3.1 there is an overall variation in the amplitudes of the plates of ±0.14mm. The camshaft assembly can therefore be set up so that the oscillations of each plate are considerably smaller, without having these variations affect how clean the generated wavebeam is. Nevertheless, it is reasonable to set a safe lower limit for the peak to peak amplitude of the plates at somewhere around
3-4mm.
While the basic design principles behind the wave generator are fairly simple, a large portion of the design process was actually spent optimizing the wave generator for its experimental applications. The most important issue that needed to be ad-dressed during the optimization process was the elimination of the secondary (and unwanted) disturbances that the wave generator produced. Since it was often difficult to detect where these disturbance were coming from, the problem had to be addressed from an empirical standpoint. Certain key components (such as the camshaft) went through several design iterations in order to address this problem. Section 2.3 de-scribes some of the other changes as well - these are all extremely important and
Appendix A
Matlab scripts
A.1
Simulating the kinematics of a plate driven by
an eccentric disk
%This script gives the motion of one of the plates as time progresses, it
%is a sinusoidal motion as long as the offset of the axis of rotation from
%the center of the disk is not too large.
%the equation for amplitude as a function of theta:
%a(theta)=r * cos( asin((b/r)*sin(theta)) + b*costheta)
r=1 b=0. 01 theta= [0:0.01: 20] a=zeros(1 ,2001) for i=1:2001 %radius of disk %offset/eccentricity of disk %angle of the disk
%amplitude of one of the disks
a(1,i)=r*cos(asin((b/r)*sin(theta(1,i))))+(b*cos((theta(1,i)))); end
plot (theta,a)
xlabel('angle (or time if w=1)') ylabel('amplitude of plate')
A.2
Analyzing the motion of the plates from a set
of images
The following is a short script and function (courtesy of Manikandan Mathur) that were used to quantify the relative position of each plate from a string of images that were taken when the generator was operating (i.e. while the camshaft was spinning).
Defining the function:
function [distance] = dist(xl,yl,x2,y2)
distance = sqrt((xl-x2).^2 + (yl-y2).^2); Analyzing the images:
xlin = 1:1:1268; ylin = 1:1:1024; [x y] = meshgrid(xlin,ylin);
deltaxn = 280; deltaxnl = 36; thresh = 20; scale = 120/776; slope = 2.1;
x1(1) = 640; y1(l) = 1024 - 40;
x1(2) = x1(1) - deltaxn; yl(2) = yl(1) - (1/slope)*deltaxn;
x2(1) = x1(1) + deltaxnl; y2(l) = yl(1) - slope*deltaxnl;
x2(2) = x2(1) - deltaxn; y2(2) = y2 (1) - (1/slope)*deltaxn;
x3(1) = x2(1) + deltaxnl; y3 (1) = y2 (1) - slope*deltaxnl;
x3(2) = x3(1) - deltaxn; y3 (2) = y3(1) - (1/slope)*deltaxn; x4(1) = x3(1) + deltaxnl; y4(1) = y3(1) - slope*deltaxnl;
x4(2) = x4(1) - deltaxn; y4(2) = y4(1) - (1/slope)*deltaxn; x5(1) = x4(1) + deltaxnl; y5 (1) = y4 (1) - slope*deltaxnl;
x6(1) = x5(1) + deltaxnl; y6(1) = y5(1) - slope*deltaxnl; x6(2) = x6(1) - deltaxn; y6(2) = y6 (1) - (1/slope)*deltaxn; x7(1) = x6(1) + deltaxnl; y7 (1) = y6(1) - slope*deltaxnl; x7(2) = x7(1) - deltaxn; y7 (2) = y7(1) - (1/slope)*deltaxn; x8(1) = x7(1) + deltaxnl; y8(1) = y7 (1) - slope*deltaxnl; x8(2) = x8(1) - deltaxn; y8 (2) = y8(I) - (1/slope)*deltaxn; x9(1) = x8(1) + deltaxnl; y9 (1) = y8(1) - slope*deltaxnl; x9(2) = x9(1) - deltaxn; y9 (2) = y9(1) - (1/slope)*deltaxn; x10(1) = x9(1) + deltaxnl; y10(1) = y9(1) - slope*deltaxnl; x10(2) = x10(1) - deltaxn; y10(2 ) = y10(1) - (1/slope)*deltaxn; x11(1) = x10(1) + deltaxnl; y11(l) = y10(1) - slope*deltaxnl; x11(2) = x11(1) - deltaxn; y11(2) = y11(1) - (1/slope)*deltaxn;
x12(1) = x11(1) + deltaxnl; y12(1) = y11(1) - slope*deltaxnl;
x12(2) = x12(1) - deltaxn; y12(2) = y12(1) - (1/slope)*deltaxn;
% a = imread('image_0000.bmp'); % imshow(a); hold on % plot(xl,yl,'g') % plot(x2,y2,'g') % plot(x3,y3,'g') % plot(x4,y4,'g') % plot(x5,y5,'g') % plot(x6,y6,'g') % plot(x7,y7,'g')
% plot(x8,y8,'g') % plot(x9,y9,'g') % plot(x1O,ylO,'g') 7 plot(x11,y11,'g') % plot(x12,yl2,'g') for i = 1:1:600, i if i<=10,
filename = strcat('image000' ,num2str(i-1),'.bmp');
else if i<=100 filename = strcat('image_00',num2str(i-1),'.bmp'); else filename = strcat('image_0',num2str(i-1),'.bmp'); end end a = imread(filename); a = a - mean(mean(a));
tempxl = xl(1):(-1):xl(2); tempyl = interpl(xl,yl,tempxl,'linear');
intensityl = interp2(x,y,a,tempxl,tempyl,'*cubic');
ss = find(intensityl>thresh); xposl(i) = tempxl(ss(1)); yposl(i) = tempyl(ss(1));
disti(i) = dist(xposl(i),yposl(i),xl(1),yl(l));
tempx2 = x2(1):(-1):x2(2); tempy2 = interp1(x2,y2,tempx2,'linear');
intensity2 = interp2(x,y,a,tempx2,tempy2,'*cubic');
ss = find(intensity2>thresh); xpos2(i) = tempx2(ss(1)); ypos2(i) = tempy2(ss(1));
tempx3 = x3(1):(-1):x3(2); tempy3 = interpl(x3,y3,tempx3,'linear'); intensity3 = interp2(x,y,a,tempx3,tempy3,'*cubic');
ss = find(intensity3>thresh); xpos3(i) = tempx3(ss(1)); ypos3(i) = tempy3(ss(1));
dist3(i) = dist(xpos3(i),ypos3(i),x3(1),y3(1));
tempx4 = x4(1):(-1):x4(2); tempy4 = interpl(x4,y4,tempx4,'linear');
intensity4 = interp2(x,y,a,tempx4,tempy4,'*cubic');
ss = find(intensity4>thresh); xpos4(i) = tempx4(ss(1)); ypos4(i) = tempy4(ss(1));
dist4(i) = dist(xpos4(i),ypos4(i),x4(1),y4(1));
tempx5 = x5(1):(-1):x5(2); tempy5 = interpl(x5,y5,tempx5,'linear');
intensity5 = interp2(x,y,a,tempx5,tempy5,'*cubic');
ss = find(intensity5>thresh); xpos5(i) = tempx5(ss(1)); ypos5(i) = tempy5(ss(1));
dist5(i) = dist(xpos5(i),ypos5(i),x5(1),y5(1));
tempx6 = x6(1):(-1):x6(2); tempy6 = interpl(x6,y6,tempx6,'linear');
intensity6 = interp2(x,y,a,tempx6,tempy6,'*cubic');
ss = find(intensity6>thresh); xpos6(i) = tempx6(ss(1)); ypos6(i) = tempy6(ss(1));
dist6(i) = dist(xpos6(i),ypos6(i),x6(1),y6(1));
tempx7 = x7(1):(-1):x7(2); tempy7 = interpl(x7,y7,tempx7,'linear');
intensity7 = interp2(x,y,a,tempx7,tempy7, '*cubic');
ss = find(intensity7>thresh); xpos7(i) = tempx7(ss(1)); ypos7(i) = tempy7(ss(1));
dist7(i) = dist(xpos7(i),ypos7(i),x7(1),y7(1));
tempx8 = x8(1):(-1):x8(2); tempy8 = interpl(x8,y8,tempx8,'linear');
intensity8 = interp2(x,y,a,tempx8,tempy8,'*cubic');
ss = find(intensity8>thresh); xpos8(i) = tempx8(ss(1)); ypos8(i) = tempy8(ss(1));
tempx9 = x9(1):(-1):x9(2); tempy9 = interpl(x9,y9,tempx9,'linear'); intensity9 = interp2(x,y,a,tempx9,tempy9,'*cubic');
ss = find(intensity9>thresh); xpos9(i) = tempx9(ss(1)); ypos9(i) = tempy9(ss(1));
dist9(i) = dist(xpos9(i),ypos9(i),x9(1),y9(1));
tempxlO = x10(1):(-1) :x0(2); tempylO = interpl(xlO,ylO,tempxlO,'linear'); intensitylO = interp2(x,y,a,tempxlO,tempylO, '*cubic');
ss = find(intensitylO>thresh); xposlO(i) = tempxlO(ss(1)); yposlO(i) = tempylO(ss(1)
distlO(i) = dist(xposlO(i),yposlO(i),x10(1),ylO(1));
tempxll = x11(1):(-1):x11(2); tempyll = interpl(xll,yll,tempxll,'linear');
intensityll = interp2(x,y,a,tempxll,tempyll,'*cubic');
ss = find(intensityll>thresh); xpos11(i) = tempxll(ss(1)); yposll(i) = tempyll(ss(1)
distll(i) = dist(xposl(i),yposll(i),xll(1),yll(1));
tempxl2 = x12(1):(-) :x12(2); tempy12 = interpl(x12,yl2,tempxl2,'linear');
intensity12 = interp2(x,y,a,tempxl2,tempyl2,'*cubic');
ss = find(intensityl2>thresh); xposl2(i) = tempxl2(ss(1)); yposl2(i) = tempyl2(ss(1)
distl2(i) = dist(xposl2(i),yposl2(i),x12(1),yl2(1));
end
distl = distl*scale ; amp1 = max(distl) - min(distl); dist2 = dist2*scale ; amp2 = max(dist2) - min(dist2); dist3 = dist3*scale ; amp3 = max(dist3) - min(dist3); dist4 = dist4*scale ; amp4 = max(dist4) - min(dist4); dist5 = dist5*scale ; amp5 = max(dist5) - min(dist5); dist6 = dist6*scale ; amp6 = max(dist6) - min(dist6); dist7 = dist7*scale ; amp7 = max(dist7) - min(dist7);
dist8 = dist8*scale ; amp8 = max(dist8) - min(dist8); dist9 = dist9*scale ; amp9 = max(dist9) - min(dist9);
distlO = distlO*scale ; amplO = max(distlO) - min(distlO);
distil = distll*scale ; ampll = max(distll) - min(distll);
distl2 = distl2*scale ; ampl2 = max(distl2) - min(distl2);
for i = 1:961,
time = i*l/8;
plot([distl(i) dist2(i) dist3(i) dist4(i) dist5(i) dist6(i)
dist7(i) dist8(i) dist9(i) distlO(i) dist1l(i) distl2(i)],'*-k','Linewidth',2) title(strcat('time = ',num2str(time),' s'),'Fontsize',16,'Fontweight','bold')
M(i) = getframe;
close all end
Bibliography
[1] Kundu, Pijush K., Cohen, Ira M., (2004). Fluid Mechanics. (Third Edition) pp 252. San Diego, Elsevier Academic Press
[2] Kundu, Pijush K., Cohen, Ira M., (2004). Fluid Mechanics. (Third Edition) pp 249. San Diego, Elsevier Academic Press
[3] Gostiaux, L., Didelle, H., Mercier, S., Dauxois, T., A novel internal waves gener-ator, Experiments in Fluids 1, 42 (2007) 123-130

