DESIGN OF AN INSTRUMENTED WORKPART FOR
AIRCRAFT WING-BOX ASSEMBLY
ROBOTIC
byLEIGHTON KAINA
MASSACHUSETTS INSTITUTE OF TECHNOLOGYOCT
14
2010
LIBRARIES
SUBMITTED TO THE DEPARTMENT OF MECHANICAL ENGINEERING IN PARTIAL FULFILLMENT OF THE REQUIREMENTS FOR THE DEGREE OF
BACHELOR OF SCIENCE AT THE
MASSACHUSETTS INSTITUTE OF TECHNOLOGY
JUNE 2006
@ 2006 Massachusetts Institute of Technology All rights reserved
) It- ~.r /)
ARCHE.S
Signature of Author:
Department >fMechanical Engineering May 12, 2006
Certified By:
Ford Professor of
Accepted By:
Professor Harry Asada Mechanical Engineering
T
Joh
nesis Supervisor
n H. Lienhard V Professor of Mechanical Engineering Chairman, Undergraduate Thesis Committee Z,
DESIGN OF AN INSTRUMENTED WORKPART FOR ROBOTIC
AIRCRAFT WING-BOX ASSEMBLY
by
LEIGHTON KAINA
Submitted to the Department of Mechanical Engineering on May 12, 2006 in partial fulfillment of the requirements for the Degree of
Bachelor of Science at the Massachusetts Institute of Technology
ABSTRACT
The idea of an underactuated robotic arm used in aircraft wing assembly and production was created to improve the wing-box assembly process. In order to display the robots capabilities and areas of improvement, a suitable testing device would be most helpful. This project attempts to achieve an appropriate environment by creating a wing-box assembly imitating what would be found at a manufacturing plant. Secondly, the use of beacons to allow for the robot's careful positioning will help it identify certain tasks needed to be fulfilled. The initial design of the wing-box underwent various changes in order to account for financial and physical disturbances. These changes could have compromised the strength of the entire structure however, after the completion of the wing-box, the durability of the assembly surpassed any expectation. The beacon was
designed under different specifications which addressed the problem of overall size and ease of assembly. While two of the designs addressed only one of those requirements separately, the third balanced the assembly problems while minimizing the size of the beacon. The third prototype was determined to be most desirable for production. The use of these projects will hopefully lead to the development of innovative technology in aircraft manufacturing.
Thesis Supervisor: Harry Asada
1. Introduction
The aircraft manufacturing industry is constantly looking towards innovation in the assembly process to improve overall production. One step of the process which is in need of transformation involves the aircraft wing assembly. Due to its small size and complex geometry, the manual process is slow and tedious. To solve the problems which arise in wing-box production, a unique robot is being developed at MITI, which enters the wing-box and performs assembly inside of it using a novel concept which attempts to redefine the task from manual to robotic labor.
Figure 1: An assembly worker at an aircraft manufacturing plant attempts to piece together parts of an airplane. The
project currently under development at MIT hopes to improve the process with the use of robotics.
An underactuated robotic arm that functions on gravitational forces rather than motor output was designed for the specifics involved in the wing-box assembly operation. In order to verify the accuracy of their design, an environment similar to that in large aircraft manufacturing plants must be developed.
The underlying motivation for this project involves the testing of the robot design in order to prove its capabilities in the working environment. This task will be completed in two parts, first, a design and production of a low-cost wing-box which closely mimics actual parts, and second, creating a beacon which will primarily be used as a positioning reference for the robot, enabling it
to identify its environment. Other responsibilities carried out by the beacon include part and task identification.
2. Project Background
The underactuated arm consists of a series of linkages which are released under
gravitational forces caused by the tilting of the table on which the arm rests. The motor controlling the angle of tilt is the only one used in the robot, keeping the entire system within the size
limitations of the wing-box access portholes. These portholes allow various entry points into the wing-box assembly throughout the wingspan. When the arm rises into the assembly from the porthole, the tilt table begins to lean in a calculated direction, carefully releasing the arm to the desired location. Figure 2a below shows a CAD representation of the unactuated arm inside of the wing-box mounted on the tilt table while Figure 2b displays the released linkages.
(a) (b)
Figure 2: In (a) the unactuated arm rises up into the wing-box through an access hole while the base remains outside.
Figure (b) shows the released arm. Note its channel shaped links which allows the smaller linkages to rest, minimizing the overall size of the robotic arm.
The testing of this robot will allow for improvement, if necessary, in its design. By creating a suitable testing mechanism, the robots performance can establish itself as a strong candidate to
redefine the assembly process while finding ways to progress this elaborate concept of an underactuated system used for manufacturing.
3. Methods
As previously stated, this project takes place in two sections, the wing-box assembly and the beacon component, both used for testing purposes. To avoid confusion, each portion will be
discussed independently.
3.1 Wing-Box Design
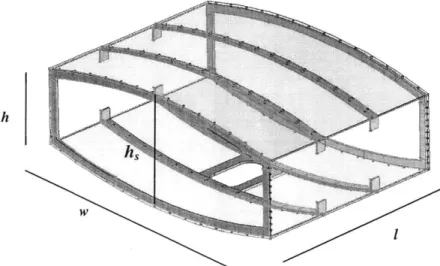
The wing-box assembly is most important in testing the capabilities of the robot. Without the use of proper facilities, a mock design with a slight degree of accuracy is needed in order to test and assure proper function of the robotic arm. Specifications of an actual wing-box assembly is unknown, therefore an appropriate design must be approximated as accurately as possible. Using the appropriate design software, the concept displayed below in Figure 3 was developed.
h
Figure 3: Initial CAD model of the wing-box assembly.
The initial design for the wing-box consists of the front and rear frame, connected by the top, bottom and side panels. For viewing purposes, the top, bottom and side panels were designed with the intention of using acrylic sheets (shown transparent in Figure 3). The frame however, would be made from Alloy 6061 aluminum stock. To strengthen the entire structure, aluminum braces would also be incorporated and attached to the acrylic panels. Also seen above, to allow for an access porthole, the bottom panel would be made from multiple pieces, joined together by the braces, with a piece of aluminum cut and joined to form an opening approximately the size of the robotic arm.
Due to its enormous size, building the wing-box poses great difficulty and a large time commitment. Taking into account the cost of the materials, the entire structure will also be a definite financial burden.
3.2 Beacon Design
The beacon component, though less time consuming than the wing-box assembly, requires much more planning rather than building. With the help of a 3D-Printer, the task of building a designed prototype is made simple, allowing for multiple designs and easy testing. As previously stated, the difficulty lies in the design itself.
The beacon's main purpose is to serve as a method of identifying different sets of tasks required of the robotic arm. Placing multiple beacons in various arrays throughout the wing-box represents tasks similar to what is required in the actual manufacturing process. Each beacon must imitate assembly elements such as screws and rivets, which need to be fastened by the robot. This requirement puts a large size constraint on the structure since fasteners are much smaller than the wing-box itself. Attempting to model an entire electrical system into the size of a screw, on the order of magnitude of just a few inches at most, is a demanding job.
The beacon design must incorporate an LED which is able to flash at a variable rate. The frequency at which each beacon flashes is how the robot differentiates each set of tasks. This calls for the use of an electronic timer or possibly an oscillator which can be programmed to control each beacon's frequency. To carry this out, a PIC microcontroller will be added to each beacon and programmed independently. With the use of a microcontroller, a circuit board is added to the necessary components, making it more difficult to stay within the size constraint. Finally, the last element involves the power supply for the entire circuit. The battery used to run the beacon must have enough voltage to power each element while minimizing the overall size. Figure 4 shows a basic schematic of all the elements that are used to operate the beacon.
V+-R V =- PIC _v
LED
Figure 4: Schematic diagram of electrical components. V varies depending on the appropriate battery for each
prototype. The PIC microcontroller takes in the voltage from the battery and controls the output voltage to the LED, therefore if we assume a constant output voltage of 3V from the PIC to the 2V LED, an R value of 1002 is suitable.
The schematic diagram in Figure 4 must be built into a printable circuit board for two reasons. The first advantage of having a printed circuit board (PCB) is to minimize the size of the beacon. By building the board in a layout editor, it is much easier to reduce the size of the beacon before spending the time to build it, even though it may cost more to have them professionally made. The second and perhaps more important asset of using a PCB is the ease of assembly. Since one of the goals in the project is to create numerous beacons, having a PCB accelerates the entire process by minimizing the amount of soldering and mounting required.
4. Development
4.1 Wing-Box Assembly
After researching suppliers on the internet, it was discovered that sizes available for both aluminum stock and acrylic sheets were limited, and because of this, many alterations to the initial design was made. To simplify the building process, the length, 1, of the wing-box was reduced to 4
ft from our initial design of 5 ft because sheets were only available in 4 ft and 6 ft lengths. It would
have been possible to buy sheets 6ft in length and cut it down, however, we also benefited from the savings in financial costs, on the order of a few hundred dollars, by keeping it shorter.
Another addendum to the previous design was building the front and rear panels. Instead of building each panel in 4 identical parts as was planned, the entire structure would require six, joined by steel brackets held together by 10-32 bolts. This was also due to the lack of available
sizes of aluminum stock and the size restrictions of the waterjet machine used to cut the shapes of each part out of the stock.
In building the initial design, the model failed to account for economic costs. The cost of the aluminum and acrylic was not anticipated to be so high. To alleviate financial matters, the
thickness of the aluminum frames on the front and the rear were cut down from 1" to /4" which resulted in savings of nearly $100 per piece of stock ordered, a total savings of $600. The acrylic sheets, which were initially " and " thick for the side panels and the top and rear panels, respectively, were both reduced to half their original thickness saving over $400. By reducing the thickness of the entire design, a total savings of over $1000 was made over the original model. The only downside to the size reduction was that the strength of the entire structure was compromised.
Reducing the thickness of the acrylic sheets created uncertainty revolving around load
The " loss in the frame's thickness helped to alleviate some of the total load, however whether it was sufficient enough or not was still uncertain. Therefore, in order to lighten the load on the side panels, the idea of braces running throughout the structure to support the top and bottom panels was
scrapped in hopes that the front and rear frames would be able to support the entire weight.
The final change to the original design was using one acrylic sheet to build the entire bottom panel, instead of multiple pieces. The concern about doing this before was figuring out how to cut the access hole in the middle of the large acrylic sheet. In previous attempts, students cut the band-saw blade in order to run it through a hole in the sheet, and then welded the blade back up so it would be functional. Instead, the use of a hand-held jigsaw would be much simpler to use and less work to complete. Doing so immensely simplified the assembly process by a matter of days.
After all of the changes were made, the final concept was redesigned and is shown below in Figure 5.
Figure 5: CAD drawing of final design. Note the removal of the braces and the difference in the bottom panel. The
length of the structure is also reduced to I = 4 ft.
4.2 Beacon Prototypes
The beacons, which are currently under development, are designed to fulfill the task of testing the robot's performance inside of the wing-box assembly. To do so, 3 designs were created which
address different areas of importance, focusing more on flexibility and size. Financial matters are of little concern (which was not the case with the wing-box) since the price difference between different components are on the order of cents, or a few dollars at most. The different designs for the packaging of the electronic components each excel in the area which the other is weakest, the middle design being fairly balanced between the other two. The first of the three prototypes is
shown below in Figure 6.
...._. 0 .50 _ 0.500
0.30
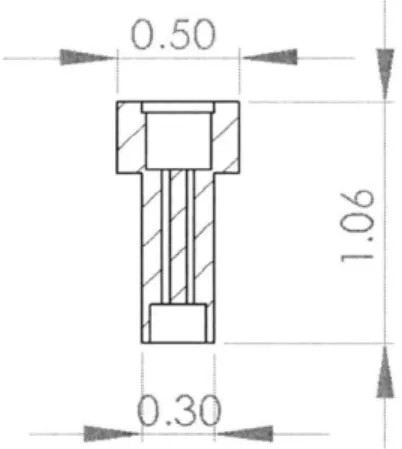
Figure 6: Cross-sectional view of prototype I. Measurements are given in units of inches.
Prototype I in Figure 6 above is the smallest of all three designs. It uses two 1.5 V button cell batteries connected in series to give a total discharge of approximately 3 V. Due to the small battery size, the overall size of the package is limited by the PCB which rests on top of the batteries. The entire structure measures a little over an inch long which quite accurately models a typical fastener. While this design addresses the need for size minimization, it fails to account for ease of
assembly.
As the cross-section shows, the batteries are place below the PCB and the PIC, also blocking the pathway for the LED leads to pass through. With this configuration, production becomes difficult and very time consuming. The LED leads would have to be redirected and avoid any contact with the batteries. Even though the 3D-Printer can quickly build a prototype, soldering
the components and avoiding any interruptions between them is nearly impossible without careful equipment. Prototype II focuses on the limitations of Prototype I.
Prototype II, the biggest of the three, is also the simplest to assemble. This is due to the use of a single coin battery, though larger than the button cells in Prototype I & III, carries 3.6 V which by itself is sufficient to run the circuit. Because of its large diameter, the battery can be placed on top of the PIC & PCB instead, allowing direct access for the LED leads to the circuit board. This configuration can be found in Figure 7.
1.00
OWN-,
...
0 .30
Figure 7: Cross-sectional view of Prototype II. Measurements are given in units of inches.
This design makes the process of creating multiple beacons much faster. The downside to this approach is its wide head, making the beacon considerably larger than the previous proposal. This option would be most appropriate in large batches, and considering what is needed for this project, would be more desirable than Prototype I.
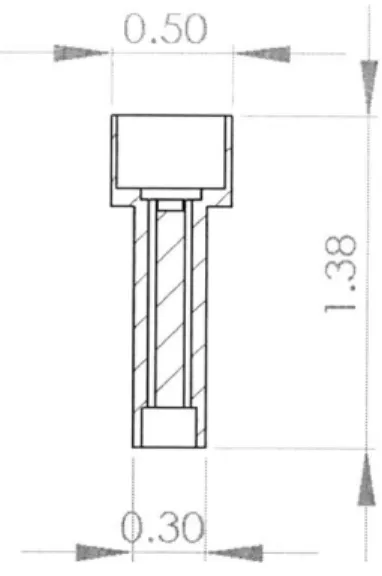
The third design, Prototype III, balances the strengths and weaknesses of I & II, focusing on both minimizing the size of the packaging, and also the ease of assembly. Shown in Figure 8 below, this design uses the two button cell battery configuration found in the first prototype, however, the battery's actual diameter is slightly larger than the PCB. With this the PCB can once again be used, as in the second design, to separate the batteries from the LED for easy assembly.
0.301
Figure 8: Cross-sectional view of Prototype III. Measurements are given in units of inches.
Prototype III is the most probable design for the specifications previously discussed. Its shape and size resembles a common bolt and the assembly can be performed in just a few minutes. Although the two battery configuration is used, soldering the terminals from each battery would be not much more difficult than if we had used a single coin battery as the second design calls for.
5. Discussion
5.1 Completed Wing-Box
After successfully building the designed wing-box assembly, its sturdiness was found to be most unexpected. After dismissing the use of braces and thicker acrylic sheets, it was assumed the entire structure would be quite unsteady in certain positions. Instead, the structure is quite sound and able to stand alone in spite of its size. Once appropriately mounted, the wing-box will serve quite well testing the robotic arm. With its large size, updating the testing components and placing them throughout the inner walls will be simple enough without any risk of damage to the robot.
5.2 Beacon Discussion
The process of creating a working prototype has been delayed by the PCB production. Despite this, the packaging has been developed with the help of the 3D-Printer. Proper testing
should follow within the near future to determine the practicality of their function.
5.3 Problems with Production
Throughout the project, many problems arose which created multiple difficulties that had not been anticipated. The largest bottleneck in the process was the lack of workspace and proper equipment. Attempting to build a large scale assembly in a classroom sized workshop resulted in many injuries and mishaps. The cutting and drilling of the aluminum and acrylic was nearly
impossible given the machines available. A second attempt at this project would be most beneficial if larger work environments were available.
When trying to assemble a device of this magnitude, a helper would most likely cut the manufacturing time in half, and also avoid problems in drilling. Putting holes in an acrylic sheet 8 ft long and 4 ft wide on a press with a one foot round table requires creative improvising in order to carefully support the weight across the entire length of the material.
6. Conclusion
The wing-box assembly process continues to create problems in the aircraft manufacturing process. From first hand experience, it is possible to state that improvements in this area will not only expand production, but also improve safety within the work environment by minimizing injury. The use of automated robots able to traverse the narrow confines of the assembly and perform the tasks done manually is a concept worth pushing towards realization.
Building the wing-box in order to help improve and display the capabilities of the research performed at MIT will be useful to the project. With the use of the designed beacons, proper testing can be completed to show results first hand to companies in search of innovation. Although many problems arose throughout the process, the final completion of the wing-box assembly surpassed its expectations. Upon completion of working beacon prototypes, testing should be able to take place shortly after.
Reference:
1. Asada, H. and Roy, B. "Dynamics and Control of a Gravity-assisted Underactuated Robot Arm for Assembly Operations inside an Aircraft Wing-Box." Proc. Of the 2006 IEEE International Conference on Robotics and Automation, Orlando, May 2006.