MITLibraries
Document Services Room 14-0551 77 Massachusetts Avenue Cambridge, MA 02139 Ph: 617.253.5668 Fax: 617.253.1690 Email: docs@mit.edu http://libraries. mit.edu/docsDISCLAIMER OF QUALITY
Due to the condition of the original material, there are unavoidable
flaws in this reproduction. We have made every effort possible to
provide you with the best copy available. If you are dissatisfied with
this product and find it unusable, please contact Document Services as
soon as possible.
Thank you.
Some pages in the original document contain color
Design and Implementation of Nanoscale Fiber Mechanical
Testing Apparatus
by
Jordan Brayanov
Submitted to the Department of Mechanical Engineering in Partial Fulfillment of the
Requirements for the Degree of
Bachelor of Science
at the
Massachusetts Institute of Technology
June, 2004
©2004
Jordan Brayanov, All Rights Reserved
The author herby grants to MIT the permission to reproduce and to
distribute publicly paper and electronic copie.9f s document in whole or in part.
711
C r
Signature of Author ...
.
Department of Elocal Engneering and Computer Science and Department of Mechanical Engineering May 7, 2004
Certified by ...
...
~~~...,,,,Ian W. Hunter Professor of Mechanical Engineering and Professor of Biological Engineering Thesis Supervisor
il
Accepted by ...
Ernest G. Cravalho .,~~ ~ ~~~~~~~~~~ near PA X vr -1 - 1 r:- -MASSACHUSEMS INSTItE OF TECHNOLOGY OCT 2 8 2004rProessor oI lviecnamcal engineering
Design and Implementation of Nanoscale Fiber Mechanical
Testing Apparatus
by
Jordan Brayanov
Submitted to the Department of Mechanical Engineering on May 7, 2004 in Partial Fulfillment of the Requirements for the
Degree of Bachelor of Science in Mechanical Engineering
ABSTRACT
The rapid growth in the synthetic manufacturing industry demands higher resolution mechanical testing devices, capable of working with nanoscale fibers. A new device has been developed to perform single-axis tensile tests on fibers with diameter
ranging from 50 nm to 10 lim. The device is capable of performing simple extension tests
to determine the fiber's strength as well as high-frequency dynamic tests to look at fiber recovery rates, dampening, and fatigue. The force resolution obtained using a quartz strain gauge and a Zeaman interferometer was in the order of 1 nN and the forces measured by the instrument ranged over 10 orders of magnitude.
This paper will present the design the Nanofiber tester, which offered better performance than any currently available commercial instruments and will discuss the subtleties around the implementation of the instrument, which is yet to be completed.
Thesis Supervisor: Ian W. Hunter
TABLE OF CONTENTS
ABSTRACT
...
2
TABLE OF CONTENTS ... 3 LIST OF FIGURES ... 4ACKNOWLEDGEMENTS
...
5
1. INTRODUCTION ... 6...2. HISTORY, BACKGROUND, AND JUSTIFICATION ... 7
2.1. INDUSTRIAL HISTORY ... 7
2.2. AVAILABLE TESTING EQUIPMENT ... 9
2.2.1. Instron MicroTester ...
9
2.2.2. Shimadzu AGS-J Series Autograph ...
9
2.2.3. MicroTensile Device ... 10
2.3. JUSTIFICATION ... 1...1 1 3. THEORETICAL ANALYSIS ... 12
3.1. ATOMIC BASIS OF ELASTIC MODULUS IN SOLIDS ... 13
3.2. STRESS-STRAIN CHARACTERISTICS ... 14
3.3. BEAM BENDING ... 15
4. NANOFIBER TESTER DESIGN ... 16
4.1. F3ER LOADING ... 16
4.2. FORCE MEASUREMENTS ... 16
4.3. NOISE ISOLATION ... 18
4.3.1. Mechanical Vibrations ... 18
4.3.2. Temperature Fluctuations ...18
5. NANOFIBER TESTER IMPLEMENTATION ... 19
5.1. VIBRATION ISOLATION TABLE AND PROTECTION ENCLOSURE ... 19
5.2. LASER INTERFEROMETER SYSTEM ... 21
5.3. FORCE TRANSDUCER ... 21
5.4. FORCE ACTUATORS ... 22
5.4.1. Linear Translation Stage ... 22
5.4.2. Piezoelectric Actuator ... 23
5.5. FIBER HOLDER ... 23
5.6. INSTRUMENT SUMMARY ... 24
7. CONCLUSION ... 25
REFERENCES ... 26
List of Figures
Figure 1. Two models in the DuPont pavilion at the New York World's Fair
playing tug-of-war with a nylon stocking to dramatize its strength. 2 Figure 2. Kevlar containing product. 3 Figure 3. Instron MicroTester in an Experimental Mechanics Laboratory. 4 Figure 4. Shimadzu AGS-J Series Autograph 5
Figure 5. Typical stress-strain curve for 316 stainless steel. 7
Figure 6. A bent cantilever beam under a point load applied at the tip. 8 Figure 7. Tuning the stiffness of a miniature quartz cantilever 9 Figure 8. Nanofiber tester design diagram 10
Figure 9. Fiber loading setup 11
Figure 10. Force measurement setup 12 Figure 11. Force-displacement characteristics of a set of 3 miniature quartz strain
gauges 12
Figure 12. Newport Elite 3 active isolation workstation 14 Figure 13. Outside view of Nanofiber tester 15 Figure 14. Agilent Laser Interferometer System 16
Figure 15. Quartz strain gauge 16
Figure 16. Aerotech ABL1000 Air-bearing linear translation stage 17 Figure 17. Physik Instrumente P-840 Piezoelectric Actuator 18
Figure 18. Fiber holder 19
Acknowledgements
I would like to express my gratitude to Professor Ian Hunter for the opportunity he gave me to work on this project. I would also like to thank him for his support and encouragements in conducting this research and interpreting the results. I would like to thank Dr. Andrew Tabemrner for helping me and my colleague Nasko resolve issues with the laboratory equipment and also debug our system. Last, but not least, I would like to thank my colleague and friend Atanas "Nasko" Pavlov for his passion and support throughout the numerous hours spent in lab working on the Nanofiber Tester.
1. Introduction
The manufacturing of synthetic materials is an engineering area that has steadily grown in scope, while shrinking in size over the past century. The synthesis of new materials allows advancements in the fields of engineering, medicine, textile, and many others. Using modem computer-based simulations scientists can predict many of the properties of the new materials even before those have been manufactured. However, actual testing must be performed on all materials to validate predicted properties.
Many synthetic materials are created in the form of fibers and the main reason for this is that most polymers create fiber-like polymeric chains, which twist together, forming macro-scale fibers. Fibers are also convenient because they can easily be weaved into different shapes with uniform properties. An example is the aromatic polyamide Kevlar (poly[p-phenyleneterephtalamide]) which is synthesized as bundled fibers, typically woven into lightweight bulletproof vests and protective gear or used in composite parts of high-performance vehicles [DuPont, 2004]. Woven Kevlar retains the strength and density of the individual fiber, improving the handling and manufacturability of Kevlar-based items.
While the application of synthetic fibers is immense, testing their physical properties at the single fiber level has become challenging. Manufacturers are dealing with fibers with diameters less than 1 .m; they need to accurately measure forces smaller than 10 N and fiber elongations in the order of 10 nm in order to characterize the mechanical properties of those fibers. A new testing device has been developed to perform single-axis mechanical tests on nano-scale fibers, which is capable of measuring the forces and displacements involved. This paper presents the design and implementation phases in the development of the new instrument and compares its performance to the currently available commercial instruments.
2. History and Background
This chapter will present a brief historical overview of the development of the synthetic fiber manufacturing industry. It will also present the typical challenges faced by engineers and scientists working in the area. The chapter will conclude by presenting typical testing equipment currently used in synthetic fiber development.
2.1. Industrial History
Invented in October 1938 in the DuPont research labs, nylon is the first commercially available synthetic fiber. In less than five years nylon becomes one of the most important materials in the textile industry; because of its strength and low price the demand for it grows exponentially. Even today, 66 years later, nylon is one of the most commonly used materials. Figure 1 shows an example of early 1940's nylon products' advertisement.
DLLUX
Figure 1. Two models in the DuPont pavilion at the New York World's Fair playing tug-of-war with a nylon stocking to dramatize its strength.
In 1964 in another DuPont laboratory Stephanie Kwolek's research leads to the development of the Kevlar fiber, the first man-made material to be used in the modem generation concealable body armor. Kevlar is an organic fiber, with a combination of properties allowing for high strength with low weight, high chemical resistance, and high cut resistance. Kevlar is also flame resistant; does not melt, soften, or flow; and the fiber properties are unaffected by immersion in water.
The use of Kevlar fibers is not limited to body armor. As Figure 2 shows Kevlar can be found in most modem products. Bulletproof, fireproof and wear resistant equipment is all made of Kevlar; high-strength lightweight automobile and motorcycle
components are also Kevlar based; aerospace engineers prefer Kevlar over any other currently existing synthetic material.
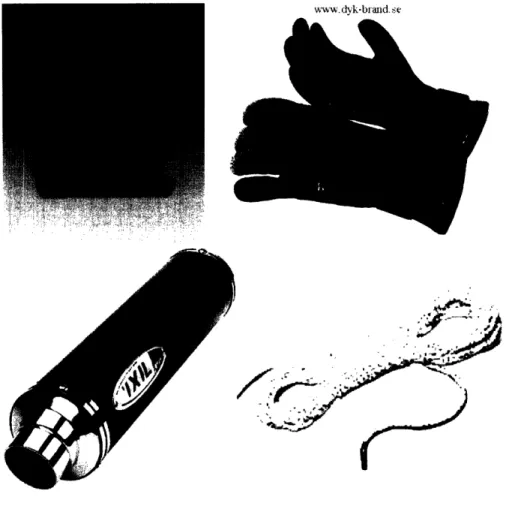
www. dyk-brand. se
-Figure 2. Kevlar containing product.
Upper left: bulletproof vest; Upper right: protective gloves; Lower left: racing motorcycle exhaust pipe; Lower right: climbing rope.
The development of strong materials still continues, both for new fibers and for new ways to use them. As strong and light Kevlar is, it still has some disadvantages. In its most famous application as a bulletproof material Kevlar is not perfect as it is very stiff, so consequently the wearer suffers loss of movement - a disadvantage when used by police officers who need to react quickly. Kevlar also absorbs water and is therefore more susceptible to enviro nmental influences than some graphite based materials. Despite its incredible tensile strength, Kevlar also has relatively poor compressive properties and so there are still improvements, which can be made.
One current development in the search for strong fibers is the attempt to mass
produce spider silk. It has been discovered that spider silk is typically much stronger and lighter than steel and has a tensile strength of up to 2GPa. However, most modem measurement equipment lacks the capabilities to work with spider silk fibers because of their dimensions. Hence, the material has not been studied is detail, sufficient for its synthesis.
. . . .
2.2. Available Testing Equipment
This section will provide a brief presentation of few fiber testing instruments which are available as either commercial products or laboratory equipment and are used for testing small fibers.
2.2.1. Instron MicroTester
The nstron MicroTester [Instron, 2004] is a single-axis mechanical testing device, capable of applying up to 400 N of pulling force and offering a displacement of
up to 150 mm. It has a 500 N force resolution, 200 nm displacement resolution and
500 nm positioning accuracy. Figure 3 shows a typical MicroTester laboratory setup.
Figure 3. lnstron MicrolTester in an Experimental Mechanics Laboratory.
While allowing for both dynamic and static measurements forces and displacements, the MicroTester is limited by its low resolution and its mediocre positioning accuracy. The device is not nano-scale fibers.
in a wide range of
force and position
suitable for tests on
2.2.2. Shimadzu AGS-J Series Autograph
Available in 6 versions, the Shimadzu AGS-J universal tester offers a wide range of single axis mechanical tests. Forces applied range from 8 mN to 2 kN and the maximum displacement is 1100 mm. Displacements is registered via an optical encoder,
offering a resolution on 10 m. The load cell offers a force resolution in the order of
lmN. Figure 4 shows a laboratory setup of the Shimadzu AGC-J mechanical tester.
w
I
I ' @|l n
I
t
LI
Figure 4. Shimadzu AGS-J Series Autograph.
Despite the wide working range, the AGS-J is incapable of handling single fibers, where the forces involved and the displacements that need to be resolved fall beyond the resolution of the device.
2.2.3. MicroTensile Device
The MicroTensile Device (MTD), built in the Department of Mechanics and Aeronautics in the University of Rome is capable of applying forces in the range 0.1 mN
to 10 N [Branca and Marrinozzi, p.2526]. The MTD uses a load cell and closed-loop
actuators to perform controlled displacement on the sample. A laser interferometer system is used in the device to measure displacement with effective resolution of 100 nm. The MTD was developed in 1999 but is still unavailable for commercial use. Its resolution and accuracy are greater than those of most industrially used equipment; yet the use of a load cell limits the force sensitivity, making the device inappropriate for nano-scale fiber tests.
2.3. Justification
The objective of this thesis was to design and implement a mechanical testing device that allows single-axis tensile testing of nano-scale fibers. As seen in Chapter 2.2., currently available equipment is incapable of performing tests on such small fibers. However, the industry is pushing the limits of the commercially available instruments, craving for higher resolution and better accuracy. Thus the need for a new instrument is growing.
3. Theoretical Analysis
3.1. Atomic Basis of Elastic Modulus in Solids
Solid materials are composed of either single type or a mixture of atoms, arranged in a rigid configuration. The elasticity of a material depends on both the forces between atoms as well as their structural arrangement. The interatomic forces behave like springs and oppose both tensile and compressive deformations in the structure. The magnitude of the forces generated between any two atoms depends mainly on the type of bond that holds the atoms together. A typical example is a single electron covalent bond, characterized by bond energy in the range 200 to 500 kJ/mol, while a hydrogen bond has 2 orders of magnitude smaller energy [Ashby and Jones, p. 17-24]. Bond energy describes how much energy is required to break the bond. Under the assumption that the force in a bond stays constant as the bond is stretched, Equation 3 shows how the bond energy
(Ebod), the bond displacement to break (Xbreak), and the force in the bond (Fbod) are
related.
1
Ebond =2 bondXbreak ()
Equation 3 shows that the structure of a material is equally, if not more, important to its chemical composition in governing the mechanical properties of the material. One of the most common examples is the arrangement of carbon atoms in diamond and graphite. The chemical composition of both is identical, while their mechanical properties are quite different. The stability and strength of a diamond come from its crystalline structure, not from its chemical composition.
Polymeric fibers have a different type of structure than most solids. Instead of having a crystalline lattice, most polymers have long organic chains in which the building blocks - the monomers - are held together by covalent bonds, while multiple long polymeric chains are held together by ionic and hydrogen bonds. This configuration increases the significance of the material structure on the material properties over that of the chemical composition.
3.2. Stress-Strain Characteristics
Under tension or compression a material will undergo a change in length, dependent on the material properties and geometry. Generally this basic mechanical constitutive relationship can be expresses as
F = kAL, (2)
where F is the force applied to the material, k is the material's effective stiffness and AL
is the change in the length of the material. In the case of an isotropic material, one in which the material properties are uniform within the whole volume, with an uniform geometry a more general deformation relationship is developed, namely
a =E(,
where a is the stress (imposed force divided by area), is the strain (percentage change in
length), and E is the elastic modulus of the material, also known as the Young's modulus
[Crandall, p.82].
For most engineering applications constant, which yields a linear dependence materials. However, as Figure 5 shows, the
small stresses and strains.
the Young's modulus is considered to be between the stress and the strain in isotropic linear dependence is valid only for relatively
CDnwentioI S1nalimn
Figure 5. Typical stress-strain curve for 316 stainless steel.
As seen on Figure 5 the non-linear portion of the stress-strain curve is much wider that the linear one; hence it is worthwhile studying and analyzing.
3.3. Beam Bending
Applying a force at the tip of a cantilever beam bends the beam and creates a
resistive force, opposing the force applied. The bending of the cantilever is governed by a single second-order differential equation, Equation 4 [Senturia, p.214]
82w M
ax2 -
E
ax 2 EJ1 (4)
where is the deflection of the beam as a function of the distance x from the support [see Figure 4], M is the internal moment, E is the Young modulus of the material and I is the material moment of inertia. If the force applied at the tip is modeled as a point force Fext,
than the internal moment becomes
where L is the overall length of the beam. Figure 6 depicts the geometry of the problem.
Figure 6. A bent cantilever beam under a point load applied at the tip.
Combining Equations 4 and 5 leads to the differential equation
2__
e t
(L-x)
ax2
ElI (6)
which is a linear, second-order ODE. The boundary conditions needed for the solution of Equation 6 come from the support, where
(0) = 0
do
dxx=o
(7) =
The solution to Equation 6 is then found out to be [Senturia, p.216]
Co= F 2 1-
2EI !3LJ
and the maximum deflection, which occurs at the tip where the force is applied is
COtip 3 Fext
Equation 9 shows a linear relationship between the force applied at the tip of a cantilever and the displacement of that tip. Therefore the cantilever behaves like a linear spring with a spring constant k, where
(8)
(9)
3EI
L3 (10)
In the case of a rectangular cross-section beam of width W and height H the moment of inertial of the beam becomes
WH3
1=
--(11)
12
which transforms k of a rectangular cross-section beam into
EWH3
k 4LH (12)
4L3
Equation 12 shows that the stiffness of the cantilever beam is proportional to the
third power of the beam thickness and inversely proportional to the third power of its
length. This provides the basis of "tuning" the stiffness of a cantilever beam over a wide range by slightly altering the beam geometry. Figure 7 depicts the change in the stiffness
of a miniature quartz cantilever.
10I 10 10 100 4UU 2UU
Height (in) Length (mam)
Figure 7. Tuning the stiffness of a miniature quartz cantilever.
Note on Figure 7 that while the dimensions (thickness and length) of the beam
change along a linear axis by factors of 3 to 5, the stiffness of the beam changes along a logarithmic scale by over 3 orders of magnitude. This effect offers great flexibility in
cases where one wants to design a set of transducers of similar dimensions, capable of measuring wide range of forces over a small range of displacements. The code used to
create Figure 7 is located in Appendix A.
I I II
4. Nanofiber Tester Design
The overall device specifications and functional requirements were established prior to the design phase. They were provided by the MIT Institute for Soldier Nanotechnologies (ISN) and were used as guidelines during the design and implementation stages of the tester. The specifications provided are listed in Table 1.
Table 1. Nanofiber tester specifications.
SPECIFICATION RANGE OF VALUES UNITS
I~~~~~
~Fibers
Fiber Diameter 50 to 20000 nm
Fiber Length 10 to 50 mm
Young's Modulus 1 to 40 GPa
Instrument
Maximum Displacement 50 mm
Displacement Resolution 10 nm
Maximum Force 10 N
Force Resolution 1 nN
Types of Measurements Tensile modulus, yield stress, elastic and plastic behavior, failure
stress, damping ratio
Using the former specifications as guidelines the instrument was designed as shown in Figure 8. Power supplies, controllers, and amplifiers and not shown in the figure but were part of the instrument and will be discussed in later parts of the design section.
4.1. Fiber Loading
Controlling the load applied to the fiber as well as the fiber's extension rate were the two most important functional requirements of the tester. As specified in Table 1 the instrument must be capable of extending a piece of fiber up to 50 mm in 10 nm increments, while resolving all tensile forces created in the fiber larger than 1 nN. These functionalities were achieved with the configuration shown in Figure 9.
Figure 9. Fiber loading configuration.
The linear translation stage was used to provide crude motion in the range 0 to 50 mm, offering positioning resolution of 20 nm. The piezoelectric actuator was used to provide fine tuning of the position with its sub-nanometer positioning capabilities. The quartz strain gauge was used to measure the tensile force in the fiber; the details of the strain gauge functionality are presented in Section 3.2.
The configuration shown in Figure 7 of the piezoelectric actuator mounted on top of the linear translation stage allows for many types of single-axis mechanical tests. For example, dynamic extension can be performed with the PZT, while the linear stage holds at various points along its travel. Alternatively, the linear stage can extend the fiber continuously while the PZT oscillates. Using a closed-loop feedback with the readings from the strain gauge the instrument can also perform load controlled tests.
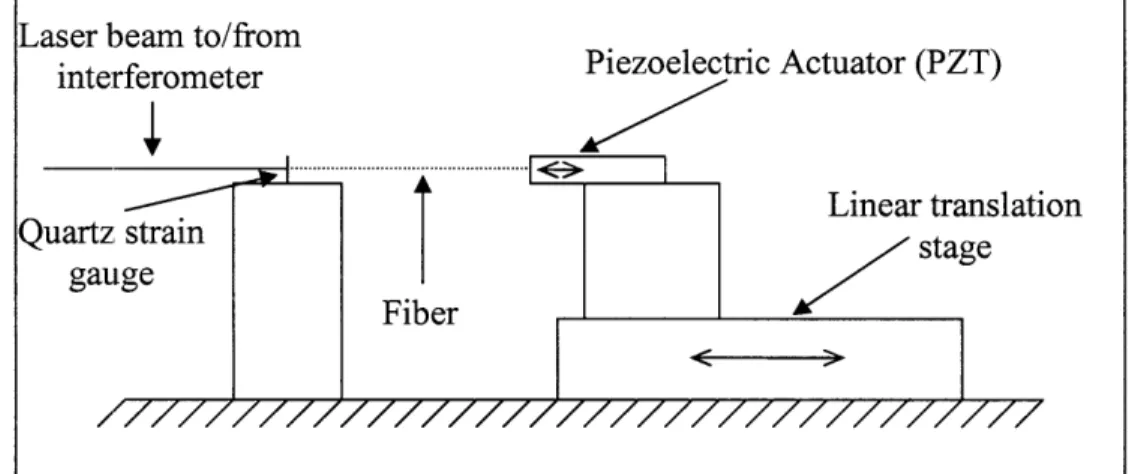
4.2. Force Measurements
Tensile forces in the fiber were measured using a quartz strain gauge together
with a split beam Zeman interferometer [Figures 8, 9]. The strain gauge was a quartz
cantilevered beam on one side of which the fiber was attached to the free tip and on the other side the laser interferometer was measuring the deflection of the beam. A diagram with a detail view of the exact configuration is provided in Figure 10.
Laser beam to/from
;,,,, ~ n,- ... Piezoelectric Actuator (PZT)
Laser beam to/from
Figure 10. Force measurement setup.
Using the results obtained in Chapter 3.3. for the force-displacement constitutive relationship for a simply supported cantilever, Equation 9
=L3F
3=
F,
3EI
the displacement a measured by the laser interferometer could be converted into a force
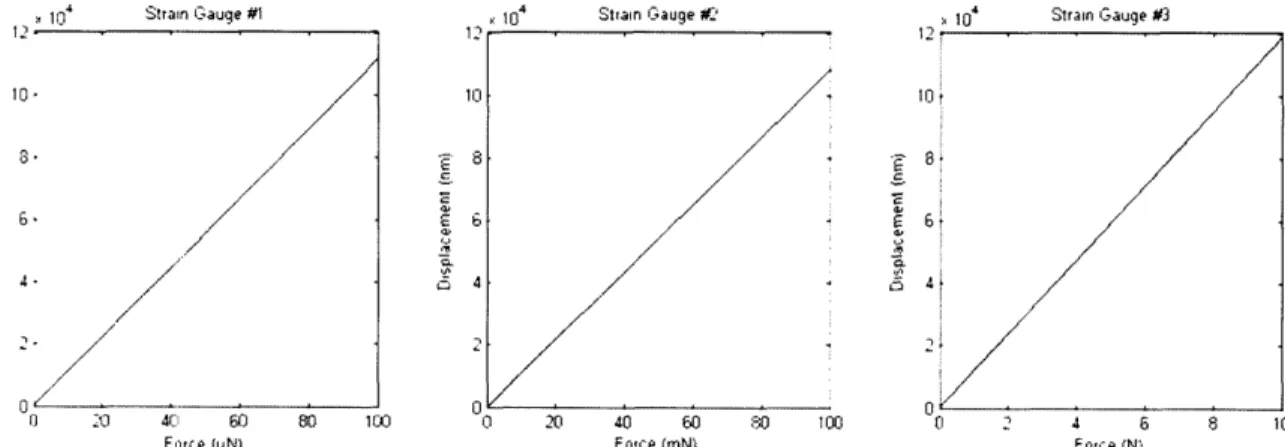
measurement by simply knowing the dimensions of the cantilever. Furthermore, using the discussion and analysis, provided in Chapter 3.3. a set of 3 strain gauges was designed to measure forces ranging from 1 nN to 10N, covering 10 orders of magnitude. The dimensions of those strain gauges together with their operating limits are listed in Table 2. Figure 11 offers a visualization of the force-displacement characteristics of the strain gauges.
. 1 O'I Strain Gauge 104 Strain Gauge 2 ; 104 Strain Gauge #3
12 . to. // 10 -/ / / x / ES 4.-2 / I / 10 8 E6 C: 4 / /7' / £ /, // /.~~~~~~~~~~~~~~~~~~~ 0 _-t 4(£ 6 80 1 00 20 40 60 100 0 2 4 6 8 10 Force (uN) Force (N) Force (N)
Figure 1 1. Force-displacement characteristics of a set of 3 miniature quartz strain gauges
The three strain gauge design allows for a quick and easy adjustment of the fiber tester to different fiber sizes and provides a resolution which beats all requirements imposed by ISN and listed in Table 1. The ranges of each strain gauge overlap, so that theoretically only the first and third strain gauge can cover the whole range of forces, but a middle strain gauge is used to provide a better force resolution in the middle of the operating range. One advantage of the current design is that the strain gauges are
interferometer Quartz strain gauge
>F
I I 1) 0 '- C- ,relatively cheap and can be made to meet new specifications, in cases where this is required.
Table 2. Strain Gauge Characteristics.
SPECIFICATION STRAIN GAUGE STRAIN GAUGE STRAIN GAUGE
1 2 3
Minimum force 5.4nN 5.5 /,N 506 /,N Force resolution 0.54 nN 550 nN 50.6 /,N Maximum force' 0.108 mN 0.11 N 10.1 N
Maximum deflection 120 tim 120 tm 120 ,tm
4.3. Noise Isolation
Due to the precision requirements imposed on the instrument, keeping the noise level down was considered a critical part of the project. Two main sources of noise were considered and the instrument was designed so that the effect of both noise sources is minimized.
4.3.1. Mechanical Vibrations
The first and most interfering noise source for the Nanofiber tester was the mechanical vibrations created by floor fluctuations or air movement. These vibrations could propagate into the strain gauge and introduce error in the force measurements. They could also decrease the positioning precision of the linear stage or the piezoelectric actuator.
In order to minimize the effect of the vibrations, the instrument was designed so that it can be built on an active vibration isolation table. An active vibration isolation table was chose over a passive vibration isolation table because of its better frequency response at low frequencies; however, the active table's smaller operating range meant that experiments could not be performed while an operator is interacting directly with the table.
4.3.2. Temperature Fluctuations
The second noise source that could interfere with the fiber tester was the temperature fluctuations in the instrument. The laser interferometer system requires a steady temperature in order to operate accurately and to provide the precision required for the force measurements. Also, temperature fluctuations could lead to dimension changes in the supporting structures and thus to more measurement errors.
Since main source for temperature fluctuations was found out to be the light coming into the instrument, an opaque enclosure was designed to keep the instrument isolated from light interference at all times.
1 The strain gauges are capable of measuring forces beyond their maximum rating in Table 2, but the errors in these measurements will become significant.
5. Nanofiber Tester Implementation
Following the guidelines set in the design phase and described in Chapter 4, the instrument was successfully assembled. This chapter will describe the assembly process as well as the separate components which are part of the instrument.
5.1. Vibration Isolation Table and Protection Enclosure
Described as one of the critical components for a successful implementation in Section 4.3.1. the vibration isolation table was one of the first component of the tester to be considered. After thorough research the most appropriate system was determined to be the Newport Elite 3 Active Isolation Workstation [Newport, 2004], shown in Figure 12, because of its excellent noise canceling characteristic, load capabilities, and fast response.
Figure 12. Newport Elite 3 active isolation workstation. (courtesy of www.newport.com)
For the implementation of the Nanofiber tester we used the three actuator version of the active isolation workstation which could support loads up to 330 kg and offered us a mechanical low-pass filter which attenuated every vibration over Hz in the vertical and 6Hz in the horizontal direction by over 10 times. The performance of the workstation was only limited by its vertical travel, which was only 25 /tm. The small travel required the operator to step away from the table after putting anything on it and wait for the table
to servo out all vibrations and go into isolating regime.
Throughout the instrument implementation only one problem with the active isolation workstation was discovered. Initially the table was installed in a portion of the lab where a large metal plate had been embedded in the concrete floor. This plate created vibrations, which the active table control could not completely isolate and the
workstation repositioned to a part of the lab where the floor was solid concrete the stability issue was resolved.
The second noise-critical component of the system was identified in the design phase to be the protective enclosure which served also as a temperature shield. The frame of the enclosure was build from extruded aluminum profiles and side panels were made from opaque black acrylic. Figure 13 shows a photo of the front outside view of the Nanofiber tester.
figure 13. Outside view of Nanotiber tester.
The aluminum construction offered a high structural strength with low weight and combined with the acrylic panels isolated the instrument from most external agents. On Figure 13 the top of the construction is missing for easier access to the instrument's components.
5.2. Laser Interferometer System
The second component integrated into the Nanofiber tester was an Agilent high precision laser interferometer system [Agilent, 2004]. The Agilent system was chosen because of its high precision and modularity allowing for easy custom system adaptation. Another important feature of the Agilent laser interferometer system was the PCI based data acquisition card that was part of the system and which was used to stream data into the controlling PC. Figure 14 shows the layout of the laser interferometer system used in the Nanofiber tester.
Figure 14. Agilent Laser Interferometer System.
The Agilent system was based on a Zeaman interferometer, which improved the displacement resolution to 0.6 nm. However, aligning the system was a bit more complicated than it would have been if the system was based on a Michelson interferometer as better overlap between the transmitted and the reflected beam was needed.
5.3. Force Transducer
As described in Chapter 4, the force in the fibers was measured using a set of quartz strain gauges. Each strain gauge was made from pure quarts and coated on one side with 2 nm silver mirror. The strain gauge is held in a plastic vice, secured in place
with two screws. The fiber is attached to it with UV cured epoxy. The configuration is
shown in Figure 15.
The vice holding the strain gauge was printed on a 3D Systems stereo lithographic printer and was mounted on a solid aluminum block in order to dampen vibrations propagating from the table to the strain gauge.
5.4. Force Actuators
Following the guidelines from Section 4.1. the force actuating part of the Nanofiber tester was built using two actuators: a linear translation stage and a piezoelectric actuator, mounted on top of the linear stage. In this section both components will be described in detail.
5.4.1. Linear Translation Stage
The linear translation stage chosen for our project was the Aerotech's air-bearing ABL1000 [Aerotech, 2004]. The stage was chosen primarily because of its low noise, high precision, and fast response. A secondary factor in favor of the ABL1000 was its IEEE1394 (Firewire) interface in a combination with a software controller. On the left of Figure 16 is shown the ABL1000 mounted in place and on the right of Figure 16 is shown its power supply-amplifier-encoder unit.
F igure 1 . Aerotecl ALl UUU Air-tearnng linear translation stage.
Left: ABL1000; Right: Power supply/amplifier/encoder unit.
Installation, calibration, and operation of the linear translation stage were simple and well described in the instruction manuals. No difficulties were faced in integrating and using the stage into the Nanofiber tester. The software controller provided with it was well documented and easy to work with.
5.4.2. Piezoelectric Actuator
The piezoelectric actuator (PZT) used in the implementation of the fiber tester was the Physik Instrumente P-840 [Physik Instrumente, 2004]. It was a medium load, closed loop controlled actuator, capable of applying up-to 50 N of force in both tension and compression and offering a displacement of up-to 15 tm. The P-840 (Figure 17, left) was controlled from an analog feedback control unit (Figure 17, right) via a TI-6052E
data acquisition card.
Figure 17. Physik Instrumente -84U Pliezoelectric Actuator.
Left: P-840 mounted on the ABL1000; Right: Analog feedback control unit.
The interface between the P-840 and the ABLOOO1 linear translation stage was an aluminum fixture, rigidly mounted to the stage and completely encapsulating the PZT. The aluminum fixture was designed so that its resonance frequency is outside of the effective range of the piezoelectric actuator and therefore would not interfere while a dynamic test is conducted.
5.5. Fiber Holder
As discussed in Section 5.3. one end of the fiber was co nNected to the strain
gauge (Figure 15). The second end had to be co nNected to the piezoelectric actuator.
Two difficulties were faced in the mounting process: the fiber needed to be aligned with the axis of the PZT and the weight of the fixture, holding the fiber in place, had to be small. To resolve both issues an aluminum fixture was designed (Figure 18) which allowed for a regular medical needle to be mounted in it and then the fiber could be glued inside the needle. The weight of the fixture was under 500 miN, which was less than 1% of the force the PZT could exert. The concentric design ensured good alig nment at all times during an experiment.
Figure 18. Fiber holder.
5.6. Instrument Summary
After all the components were manufactured and tested, the Nanofiber tester was assembled. Following the diagram provided in Chapter 4, Figure 6 the instrument was laid out on top of the vibration isolation workstation and the protective enclosure was built around it. Figure 19 shows a top view of the completed Nanofiber tester.
tigure 19. Completed Nanotiber tester.
The functionality of the instrument strictly followed the design guidelines. The beam coming from the laser head was sent through the interferometer and into the strain gauge, measuring the displacement of the tip of the strain gauge. The fiber was mounted between the strain gauge and the PZT and was extended by motions in both the linear stage and the piezoelectric actuator. The system was controlled and data was collected from a PC (not shown in Figure 19) via a Texas Instruments TI-6052E data acquisition board the Agilent's laser interferometer data acquisition system.
7. Conclusion
Two were the key steps towards the successful implementation of the Nanofiber tester: the design of the system according to the INS requirements and the identification of appropriate components for it. The resolution specifications could not have been met without the use of the laser interferometer and the custom designed and made strain gauge. There is no commercially available force transducer, capable of measuring forces down to 1 nN and covering 10 orders of magnitude. The dynamic tests would be impossible without the use of a high-frequency piezoelectric actuator. However, a single piezoelectric actuator could not meet the positioning and fiber extension requirements, therefore the use of a second transducer was inevitable. The ABL1000 air bearing stage proved to be the best in its class, offering high precision in a combination with a high speed.
Once the components of the system were obtained, the assembly of the instrument was fairly straightforward. The alignment of the laser paths and the precision manufacturing of the mounts and fixtures were the most consuming part of the process. Several iterations had to be performed on most manufactured parts until the final versions were created.
Isolating the instrument from mechanical and thermal noise was a difficult task, which would have been impossible without the active vibration isolation workstation. With no vibration isolation the signal to noise ratio in the laser interferometer data drops down by more that 105 times, making the data useless for high-resolution applications. The effect of temperature was not so great; yet the data were considerably clearer after the thermal fluctuations were minimized.
The final stage in the manufacturing of the Nanofiber tester is the controlling software and the GUI. Several software components have already been implemented, but are not presented in this paper, because they are still considered work in progress. Programming the interface and the controls is done in Microsoft Visual Studio .NET and is taking advantage of its managed extensions, since some of the code needs to be implemented in Visual C++, while the rest is written in Visual Basic.
References
Aerotech [Website]: http.://www.aerotech.com/products/airbearing/abllOO00.html. 2004.
Agilent Technologies [Website]: http://we.home.agilent.com/cgi-bin/bvpub/agilent/Product/
cp_Product.jsp?NA V ID=-11595.0.00. 2004.
Ashby, M and Jones, D. Engineering Materials 1 Introduction to their Properties and
Applications. Second Edition. Oxford: Butterworth-Heinema nN, 1996
Branca, F.P. and Marrinozzi, F. Microtensile device for stress: Elongation tests on
nonstandard specimens. Review of Scientific Instruments. 71 (6):2526-31. 2000
Crandall, S.H., Dahl, N.C., and Lardner, T.J. An Introduction to the Mechanics of Solids. Second Edition. New York: McGraw-Hill 1999.
Dupont [Website]: www.dupont.com/kevlar. 2004.
Instron [Website]: www.instron.com/products/universal_material/microtester.asp. 2004.
Newport [Website]: http://www.newport.com/store/product.asp?id=3003&lang=1, 2004
Physik Instrumente [Website]: http://www.physikinstrumente.de/products/prdetail.php?secid=1-16,
2004.
Appendix A. Analysis Scripts
...---. straingauge.m
---%%
Strain Gauge Calculations
E = 450e9; %Young's modulus of quartz
1 = [5:0.5:25]*le-3; %Length of the strain gauge (m)
W = 2e-3; %Width of the strain gauge (m)
h = [200:100:10001*le-6; %Thickness (height) of the strain gauge (m)
[L,H] = meshgrid(l,h); k = E*W*H.^3/4./L.^3; figure; surf(L*le3,H*le6,k); xlabel('Length (mm) '); ylabel('Height (\mum)'); zlabel('Beam Stiffness (N/m)'); 11=25e-3 hl=50e-6; wl=le-3 12=25e-3 h2=350e-6; w2=3e-3 13=25e-3 h3=1250e-6; w3=6e-3 kl = E*wl*hl^3/4/11A3; k2 = E*w2*h23/4/12^3; k3 = E*w3*h3^3/4/13^3; F1 = [l:100000]*le-9; F2 = [l:100000]*le-6; F3 = [l:10000l]*le-3; dell = F/kl; del2 = F2/k2; del3 = F3/k3; figure; subplot (1,3,1) plot(Fl*le6,dell*1e9); xlabel('Force (\muN) '); ylabel('Displacement ( nm) '); title('Strain Gauge #1'); subplot(1,3,2); plot(F2*1e3,del2*1e9) xlabel('Force (mN)'); ylabel('Displacement (nm) '); title('Strain Gauge #2'); subplot(1,3,3); plot (F3,del3*le9); xlabel('Force (N) '); ylabel('Displacement ( nm) '); title('Strain Gauge #3');