Design and Implementation of an Online
Laboratory for Introductory Digital Systems
by
Judy Tsai
Submitted to the Department of Electrical Engineering and Computer
Science
in partial fulfillment of the requirements for the degree of
Master of Engineering in Electrical Engineering and Computer Science
at the
MASSACHUSETTS INSTITUTE OF TECHNOLOGY
August 2005
@
Massachusetts Institute of Technology, 2005. All rights reserved.
A uthor ...
...
Department of Electrical Engineering and uomputer Science
August 5, 2005
Certified by ...
Anantha Chandrakasan
Professor of Electrical Enpineering
ervisor
Accepted by ...
...
Arthur C. Smith
Chairman, Department Committee on Graduate Students
MASSACHUSETTS INSTITUTE OF TECHNOLOGY
AUG 1 4 2006
BARKER
Design and Implementation of an Online Laboratory for
Introductory Digital Systems
by
Judy Tsai
Submitted to the Department of Electrical Engineering and Computer Science on August 5, 2005, in partial fulfillment of the
requirements for the degree of
Master of Engineering in Electrical Engineering and Computer Science
Abstract
In this thesis, I designed and implemented an online, web-based laboratory system for the Introductory Digital Systems Laboratory course at MIT (6.111). The intent is to allow a student access to a 6.111 labkit, program it, and view the results without ever entering the physical lab room. The lab architecture consists of primarily of two portions: a server and a client. The server programs the Xilinx FPGA on the labkit, and it controls the logic analyzer used to observe the labkit signals. The client is a Java applet that can send code to the server and retrieve logic analyzer data from the server. The user can view and manipulate the retrieved data through the client. The applet is embedded in a web page, along with a video stream that shows the labkit setup live to the user. The user interface is designed to be accessible from any browser, independent of platform.
Thesis Supervisor: Anantha Chandrakasan Title: Professor of Electrical Engineering
Acknowledgments
Many, many thanks to Professor Anantha Chandrakasan for giving me this oppor-tunity to work on a project that was educational, interesting, and useful. I came to him looking for a project that suited my interests as well as his needs, and this WebLab was the right one. It was also nice to revisit one of my favorite classes from my undergraduate career. Just as much thanks goes to Frank Honore, who met with me regularly and helped with certain portions of the project. His encouragement and support for the project helped get things done and kept me on track.
I would also like to thank Nathan Ickes and Kyle Gilpin for helping me become familiar with the new 6.111 labkits and corresponding labs. Their patience in dealing with my many questions was certainly something I'm grateful for.
Thanks also go to the Jesns del Alamo, Jud Harward, and Jim Hardison from the iLabs group and Gerardo Viedma from the 6.302 WebLab group for taking the time to meet with me and give input and insight on my project.
Finally, I would like to thank my loved ones for giving me support all my life and helping me get where I am now. Grandpa & Grandma, thank you for supporting my education. Dad, thank you for giving me the love of engineering. Mom, thank you for your generosity, patience, and constant encouragement and care. Kelvin, thank you for dealing with and helping me cope with my own insanity for the last five years.
Contents
1 Introduction 13
1.1 M otivation . . . . 13
1.2 Related Work . . . . 14
1.3 Contributions of Thesis . . . . 15
2 The Introductory Digital Systems Laboratory 17 2.1 Course Overview . . . . 17
2.2 Laboratory Kit . . . . 18
2.3 Laboratory Assignments . . . . 18
2.3.1 Traffic Light Controller . . . . 20
2.3.2 Memory Checker . . . . 20
3 The Introductory Digital Systems Online Laboratory 21 3.1 High-Level Architecture Overview . . . . 21
3.2 Client and Server Interaction . . . . 22
4 The WebLab Client 27 4.1 Experiment Procedure . . . . 27
4.2 U ser Interface . . . . 29
4.3 Code and Class Architecture . . . . 34
5 The WebLab Server 37 5.1 Physical Setup . . . . 37
5.2 U ser Interface . . . . 39
5.3 Code and Class Architecture . . . .
5.3.1 Main Server Application . . . .
5.3.2 Xilinx Application Execution . . . . 5.3.3 Communication with the Logic Analyzer 5.3.4 Simulation of Inputs with RS-232 . . . . 6 Conclusion
6.1 Summary of Work
6.2 Future Improvements
A Java Classes API for the A.1 BitArray . . . . A.2 PointArrayObject . . . A.3 PointArray . . . . A.4 PointArraySet . . . . . A.5 Graph . . . . . . . . . . . . Client . . . . . . . . . . . . . . . . . . . .
B .NET Classes API for the Server B.1 BitArray . . . . B.2 XilinxISERunner . . . . B.3 GPIBlnterface . . . . B.4 HPDataParser . . . . . . . . . . . . . . . . . . . . . . . . 40 40 41 42 42 45 45 46 49 49 50 52 52 53 57 57 58 59 62
List of Figures
2-1 Introductory Digital Systems Labkit . . . . 19
3-1 High-Level Architecture of Introductory Digital Systems Online Lab-oratory . . . . 22
3-2 Interaction Diagram of a Complete Experiment Run . . . . 23
4-1 The Introductory Digital Systems Online Lab Client . . . . 28
4-2 The Load Code Window from the 6.111 WebLab Client . . . . 32
4-3 The Trigger Setup and Plot Setup Windows from the 6.111 WebLab C lient . . . . 33
5-1 The Introductory Digital Systems Online Lab Server . . . . 39
A-1 Graph Definitions . . . . 54
List of Tables
3.1 Client-to-Server Commands . . . . 25
4.1 Client Toolbar Buttons . . . . 30
Chapter 1
Introduction
When learning about electrical engineering, lectures and textbooks can teach the the-ory, but laboratory experimentation is what really gives the student practical intuition of the material in real life applications. The internet has become an increasingly pop-ular tool for educators, giving their students access to course material at any location that can connect to the internet. Remote learning allows the course material of one school to be available to students as far as in other countries. The traditional labora-tory cannot share in this convenience, as it is physically limited by the lab equipment and setup location. However, if a student can remotely manipulate an experiment setup and receive the results, the benefits are almost as good as physically being in lab. The Introductory Digital Systems Online Laboratory builds the bridge between the in-lab experience and the off-campus student.
1.1
Motivation
A popular electrical engineering laboratory at MIT is Introductory Digital Systems
Laboratory (course number 6.111) [9]. The class uses labkits that include a field-programmable gate array (FPGA), which is essentially a chip with field-programmable logic. Hardware code with the desired logic is programmed onto the FPGA, and the
FPGA is connected to other hardware (such as LEDs, memory, etc.) to complete
whatever the user is trying to implement. The main draw of the class is the hands-on
experience of designing and debugging hardware. Lab equipment, however, is very expensive, and access to the hardware and lab space is limited. The goal of this web-based laboratory system (WebLab) is to allow students in this course to run experiments remotely. The hope is to alleviate demands for lab space and equipment while providing additional flexibility and convenience for MIT students taking the course. The potential of sharing the laboratory curriculum of 6.111 to students around the world is an added benefit.
There are currently four labs designed for the lab kits available to the class: an introductory lab to familiarize with the lab kit, a traffic light finite-state machine, a memory tester, and 2D finite impulse response filter (used with image processing). The traffic light and memory tester labs are implemented in this basic web architec-ture.
1.2
Related Work
Remote experimentation is not a new idea. Several research groups have worked on various web laboratory systems for their respective educational institutions. Some of the systems [1, 5] used National Instrument's LabVIEW to provide remote access to their experiment setup. The system in [1] allows users to work with an inverted pendulum system, while [5] allows users to manipulate a heat exchanger system. LabVIEW software provides the tools necessary to communicate with experiment hardware, as well as provide graphical user interface and remote access utilities, in particular the DataSocket API [11]. [6] also uses DataSocket technology to make real time data of flagpole instrumentation available to users. In [1], a video stream of the lab setup was also made available to the user, and issues encountered with third party software are discussed. [3] discusses a web laboratory for a computer networks class and has the additional goal of online team interaction. All of these designs used a client-server architecture.
The previous examples were systems created for specific labs. One of the MIT iCampus projects called iLabs aims to create an architecture that would allow other
educators to easily implement their own online labs [7]. Two MIT classes have already implemented online labs [2, 4] using this architecture. The design has an additional component to the standard client-server architecture called a service broker. The ser-vice broker relays all messages between the client and server, and it provides common services such as user authentication and results storage. The service broker would be generically coded, so educators using iLabs would not be restricted to specific development environments. The architecture allows educators to focus on designing clients and servers specific to their courses, leaving common services to the service broker in between the clients and servers. In [2], students find device characteris-tics by remotely taking measurements of actual diodes or transistors under varying voltage and current settings. [4] takes measurements of a feedback circuit that has variable values, such as gain, that are determined by the user. The results are shown in various graphs, such as Bode plots.
The labs using iLabs shared architecture are for batched experiments, where ex-periment setup is sent once and the results are returned once the exex-periment is com-pleted. Labs such as [1] and [5] are interactive experiments, where a user receives and sends data to the server in real-time as the experiment is running. A sensor experiment, like the Flagpole Instrumentation Project [6] at MIT, is where the user observes the experiment in real-time but doesn't affect the setup.
1.3
Contributions of Thesis
This project brings the in-lab experience of Introductory Digital Systems into the virtual world of the internet. Remote access to laboratory equipment and software is provided to an off-campus student through use of the WebLab. Students can compile Verilog code and program labkits remotely. There is no direct access of the Xilinx software or output files, so the WebLab is not exposing licensed software to the students. The 6.111 WebLab is an architecture for interactive experiments; it sends logic analyzer setup commands and labkit inputs in real-time. Results are shown through a simulated logic analyzer display in the client and a real-time video stream.
A major portion of the 6.111 WebLab acts as a remote logic analyzer controller and
simulator, and to our knowledge, this feature is unprecedented and can be used in future online labs development.
Chapter 2
The Introductory Digital Systems
Laboratory
An understanding of the 6.111 course is necessary to understand the goal and intent of this project. This chapter explains the Introductory Digital Systems Laboratory course, including the labkit that the in-lab experience is focused around and the as-signments used with the labkit. Two laboratory asas-signments are described in greater detail to get a sense of the in-lab experiments we are trying to recreate through the online experience.
2.1
Course Overview
Introductory Digital Systems Laboratory [9] teaches students how to be engineers that can design and implement complex digital systems. The fundamental knowledge needed for digital design are taught in lectures, such as digital logic, boolean algebra, timing, and finite-state machines. They are also educated on the commonly used components in digital systems, such as memory, analog-to-digital/digital-to-analog converters, and FPGAs. In order to apply their knowledge, the students learn Verilog, a hardware language for digital logic. Each student has a lab station, where they have their own labkit, computer, signal generator, and logic analyzer/oscilloscope.
They work on their code in development software, such as ModelSim or Xilinx ISE.
Their labkits are programmed with their logic, and experience with lab equipment is gained during the project development and debugging. Along with problem sets, lab assignments, and exams, the class has a final team project, teaching students how to present ideas, work in a team, and design and build their own digital system.
2.2
Laboratory Kit
The labkit for 6.111 is a small hardware station with all the essential components needed for creating complex digital systems builtin [10]. The heart (or brains) of the labkit is the FPGA, and the model of the FPGA is Xilinx's Virtex-I XC2V6000. The kit also has the expected essentials: breadboards, LEDs, clocks, switches, and buttons. It supports various types of video and audio encoding, along with having the corresponding connectors. There are also connectors for the logic analyzer, as well as connectors for other digital interfaces (RS-323, PS/2). Memory is another feature component built onto the kit; two SRAM chips are hardwired to the FPGA. Programming the FPGA is usually done through the JTAG interface (done in this thesis), but it can be done through a compact flash card.
The student can add-on items to the kit on the breadboard or through connectors. Because so much is already built into the labkits, additional parts to complete lab assignments are minimal, so the labkit is ideal for remote use.
2.3
Laboratory Assignments
The laboratory assignments ask students to implement specific digital systems using the labkit. Students must design the state machines and figure out the timing and handling of signals. These designs are interpreted into Verilog. The code is compiled and then programmed onto the FPGA on the labkit. The students then debug the system in action, using measurement equipment (i.e. logic analyzer) to observe the signals. Two lab assignments already designed for the course are implemented (with some modifications) in the WebLab architecture.
r--4 r-Cd 0 0 -4 ce 0 0 Cfl 0 -C b c.'-19
2.3.1
Traffic Light Controller
The traffic light lab is the first lab assignment that involves the design of a digital system. The system controls traffic lights at a typical intersection in both direction, along with a walk signal. One street is a main street, and the second is considered a side street. The only difference in the behavior is that the main street has a longer green light than the side street in normal situations. The walk signal allows for pedestrian passages by making traffic lights in both directions red. Another input aside from the walk signal is a side street sensor. When there is a lot of traffic on the side street, the main street green light period decreases, while the side street light increases. Part of the assignment is also to allow the user to change the time variables of the light periods through the setting of switches. However, the WebLab currently has limited input functionality (buttons only, no switches), so a modification to the assignment is made so that these values are hard coded.
2.3.2
Memory Checker
Memory is a commonly used component in digital systems. The purpose of the memory checker lab is to design a system that verifies the writing and reading func-tionality of a RAM chip. Alternating between the 4-bit values of 0x3 and OxC, the system writes to 16 address spaces on the RAM chip (4-bit addresses from OxO to OxF, higher address bits are grounded). Once all 16 addresses are written to, the system then reads all 16 addresses and verifies that the value read is the value writ-ten. If a mismatch is found, the system stops, and the error LED is lit. If the check goes without error, the success LED is lit. There are also LEDs designated to show if the system is writing or reading to the RAM. Different addresses are accessed at 1-second intervals so that data and address values can be shown on hex LEDs to be viewed by the user. The only input into the system is a reset signal to start over the writing/reading process.
Chapter 3
The Introductory Digital Systems
Online Laboratory
This chapter describes the overall structure of the online laboratory for Introductory Digital Systems, describing the high-level architecture and the sequence of communi-cation between client and server.
3.1
High-Level Architecture Overview
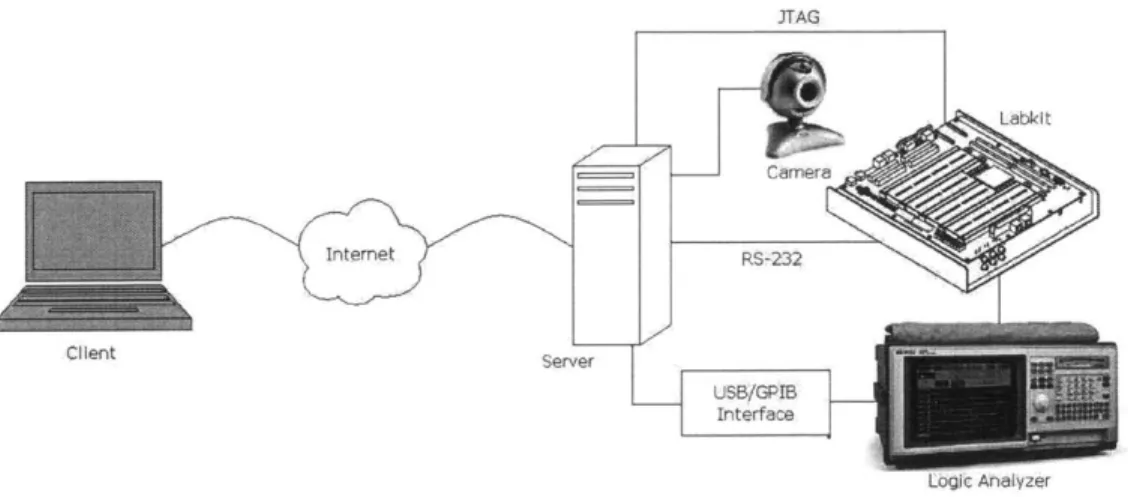
Similar to previously done WebLabs, the 6.111 WebLab consists primarily of two parts: the server and the client. This simple structure covers the basic needs of the project. The end user interacts with the client, the server controls the experiment, and the client and server communicate on the internet through standard protocols. In order to simplify the scope of the project, the system was designed with the assumption that security and multiple users are not concerns.
The client portion is the interface used by the student to access the laboratory equipment and run experiments. The client is a Java applet embedded in a web page, which also has a media player that accepts streamed video from the server. The user sends experiment requests through the client, which delivers the information to the server through the internet.
The server portion is software that runs on a computer residing in the physical
JT AG
Client Server
Logic Analyzer
Figure 3-1: High-Level Architecture of Introductory Digital Systems Online Labora-tory.
laboratory. The server computer is hooked up to lab equipment, which is controlled
by the software. The software takes experiment requests, sets up the equipment, runs
the experiment, and gathers the results for the requesting user.
The client and server are both described in greater detail in Chapter 4 and Chap-ter 5, respectively.
3.2
Client and Server Interaction
The client and server communicate with each other by sending packets of bytes to each other through sockets. The client uses polling to check for messages from the server, while the server handles incoming messages with events.
The client sends commands whenever prompted by the end user. Commands are sent as text messages, which are parsed at the server end. Each command starts with a four-letter word that represents the action requested for the server. For example, if the client wants button 2 to be pushed on the labkit, the command BTN2 is sent to the server. If the action requires more information, the additional information is appended to the end of the command. See Table 3.1 for a complete list of commands. When data from the client is received, an event is fired at the server, which causes
Connect to Server
LoadCode
Send Code
Labldt Programmed
Set Trigger Value
Trigger Set
Request Single Run
Push Reset (Button 0) Plot Data Modify Plot Update Plot
Connect
DATA + Verilog File Acknowledge File Received
XXST Acknowledge XXST XNGD Acknowledge XNGD XMAP Acknowledge XMAP XPAR Acknowledge XPAR XBIT Acknowledge XBIT XIMP Acknowledge XIMP
TRIG + Trigger Information Acknowledge TRIG
RUNI BTNO Logic Analyzer Data
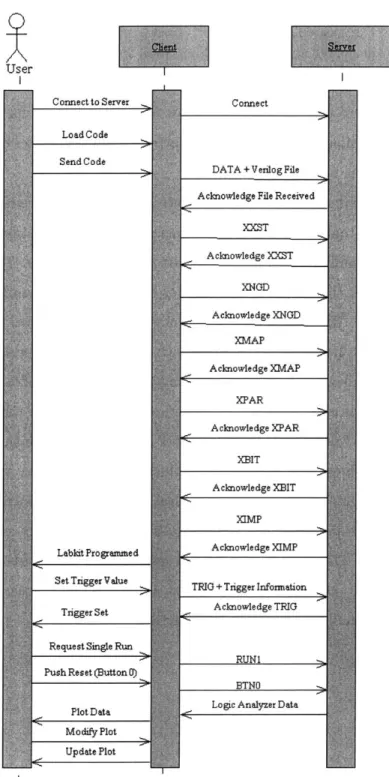
Figure 3-2: Interaction diagram of a complete experiment run. The order of execution of actions by the user and messages between the client and server for a successful pro-cedure is shown. Actions between the user and the client represent user interactions with the GUI, such as button clicks or status displays. Actions between the client and server represent commands being sent and server responses to those commands.
23
complete, parses the command, and figures out what action to take. Most commands will require the server to send something back to the client to show whether or not the command was completed successfully. This acknowledgement is usually a byte that is either zero respresenting success or a nonzero number for an error. If there is other information, like command line outputs or logic analyzer data, it is attached behind the status byte.
For most commands, the client will wait for a response from the server for ac-knowledgement that the command sent was processed. Verification is needed to help keep order of commands and prevent invalid states of the server. The exception is for button pushes; if the button push failed for some reason, the user can simply resend the button push. Right after the client sends a command, a timer is started, and the client checks the incoming buffer every two seconds for new packets. When a new packet is received, the client keeps checking the buffer until there are no more bytes in the buffer. Once all the data is received, the client displays the success or failure of the command, along with whatever other data resulted from that command.
Figure 3-2 shows the sequence of actions between the user and the client and between the client and the server in a typical, successful experiment run. The actions between the user and the client represent GUI interactions, such as button clicks and status displays. The WebLab experiment procedure is described in greater detail in Section 4.1. The actions between the client and server are commands sent and server responses to commands, as previously described.
Table 3.1: Client-to-Server Commands
Command TRIG<Signal
name><Signal value>
Description
Sets up the trigger in the logic analyzer. The data re-trieved from the logic analyzer depends on the trigger setup. <Signal name> is the five ASCII character value representing the name of the signal the logic analyzer will trigger off. <Signal value> is the value that the previously named signal will trigger at. For example, the default command for the memory checker lab is TRIGRADDR9, which means to trigger the logic an-alyzer when the address bits of the RAM is 0x9.
DATA<file contents> Copies the student's Verilog file onto the server com-puter. <file contents> is the data from the toplevel Verilog file the student wants to submit. <file
contents> is taken from the top text box in the Load Code window.
XXST Runs XST, the synthesis engine, on the server.
XNGD Runs NGDBuild, which creates the NGD file that de-scribes the logic, on the server.
XMAP Runs MAP, which maps the logic to the specific FPGA
hardware, on the server.
XPAR Runs PAR, which figures out how to place and route the
logic to specific locations on the FPGA, on the server.
XBIT Runs Bitgen, which creates the bitstream file used to
program the FPGA, on the server.
XIMP Runs iMPACT, which programs the FPGA, on the server.
Continued on Next Page...
Table 3.1 - Continued
Command Description
RUN1 Tells the logic analyzer to do a single run to acquire data. When the client sends this command, it waits for logic analyzer data from the server.
STOP Stops the logic analyzer waiting for data.
BTNx Simulate the pushing of button x on the labkit, where
x is a value from 0-7. Button 0 is assumed to be the reset signal.
Chapter 4
The WebLab Client
The user's interaction with the server and lab equipment is through the lab client. The lab client is a Java applet, embedded on a web page along with Windows Media Player. The Java applet allows the user to send Verilog code to the server and manipulate data retrieved from the logic analyzer in lab. The user can also send inputs (such as button presses) to the labkit. The embedded media player allows the user to view a live (though delayed) video stream of the labkit and observe the results of their code. In order to view all of these components, the student will need to have Java (version 1.4.2 or greater) and Windows Media Player/ActiveX plug-ins installed in their browser. Plug-ins for those technologies are available for various browsers across platforms, so the user should be able to use the client independent of which system they use.
4.1
Experiment Procedure
Prior to using the 6.111 WebLab, the student needs to have their Verilog code written and ready to be compiled. All code modules must be in one file, and it must contain the top module provided by the course. This top-level module has all the necessary input and output signals represented from the labkit, so the student needs to use this module in order for their code to work with the kit.
The current implementation of the 6.111 WebLab allows the user to trigger off
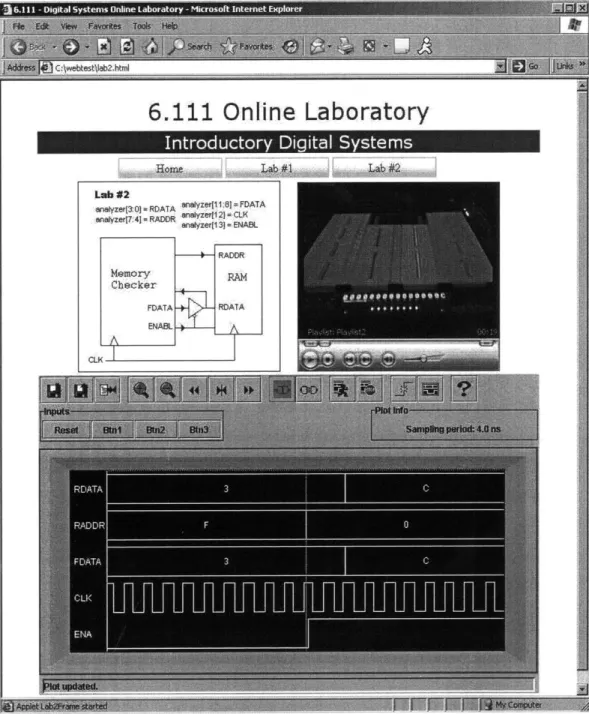
Figure 4-1: The Introductory Digital Systems Online Lab Client. This screenshot includes the webpage the applet is embedded in. The diagram describing the available signals and which logic analyzer probes are connect to them is in the upper left. The embedded Windows Media Player is next to the diagram, showing the labkit in action. The plot panel in the client applet shows the results of a logic analyzer acquisition.
any of the 16 signals the logic analyzer tracks. Either the logic analyzer can trigger off an edge of a single signal, or it can trigger off a value given for a 4-bit signal (i.e. Ox9 for signals 0 through 3). The student assigns specific signals to logic analyzer channels in their code.
The student submits their code to the server through the lab client applet. The contents of the top Verilog file is loaded into the client and sent to the server. When the student is notified by the client that the setup is complete, the student can begin to remotely work with the lab hardware.
To receive logic analyzer data, the student sends commands to the logic analyzer to acquire data. Students can change the trigger requirements through the client. Also, button pushes can be sent to the project (such as a reset signal). The student requests for a single run, which tells the logic analyzer to capture the first occurrence of the specified trigger. The client waits for logic analyzer data from the server and graphs the results in the plot area. (The student can also stop the acquisition if it is taking too long, and if the logic analyzer doesn't find the trigger within 30 seconds, it times out.) The student can then manipulate the plot, moving the plot left or right in time or zooming in or out. Plot data can be saved and later loaded back into the applet without having to run the experiment again.
As the student is working with the applet, a live video stream is concurrently running on Windows Media Player. The remote web camera in the laboratory shoots the labkit; students can observe the effects of their code (LEDs, etc.) as it is running on the labkit.
4.2
User Interface
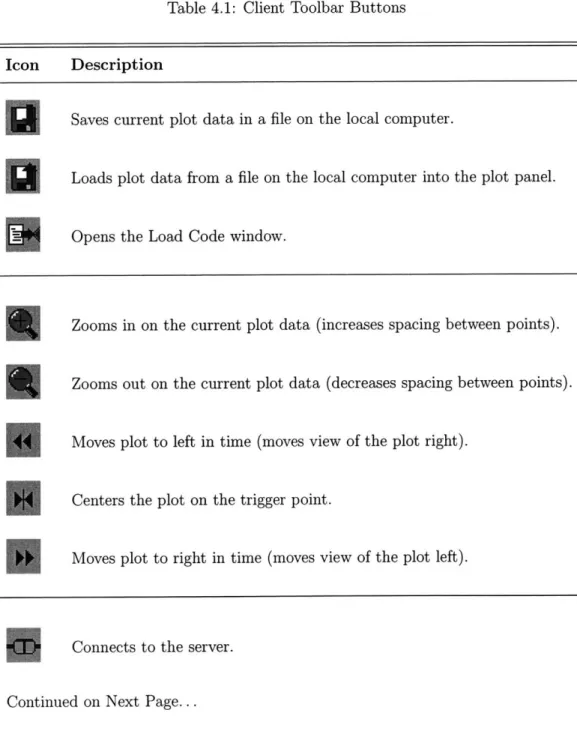
The main area of the applet has a tool bar that gives the user access to all of the necessary functions of the client. A complete description of the tool bar buttons can be found in Table 4.1. Plot data received from the server can be saved to a file on the student's local computer and later loaded back into the client, using the first two tool bar buttons. The third button opens the Load Code window. The next
section of buttons are for manipulating the loaded plot. The next two buttons are for connecting to and disconnecting from the server; the student can only interact with the lab setup or compile files when the client is connected. Next are the two buttons that start and stop the logic analyzer data acquisition. The last pair of buttons are setup menus for triggering the logic analyzer and viewing the plot.
Table 4.1: Client Toolbar Buttons
Icon Description
Saves current plot data in a file on the local computer.
Loads plot data from a file on the local computer into the plot panel.
Opens the Load Code window.
Zooms in on the current plot data (increases spacing between points).
Zooms out on the current plot data (decreases spacing between points).
Moves plot to left in time (moves view of the plot right).
Centers the plot on the trigger point.
Moves plot to right in time (moves view of the plot left).
Connects to the server.
Table 4.1 - Continued
Icon Description
Disconnects from the server.
Run a single data acquisition cycle.
Stop any acquisiton activity.
Open Trigger Setup window.
Open Plot Setup window.
Version information about 6.111 WebLab.
The Load Code window is used to read the top Verilog project file, send it to the server, and request the compilation and programming of the FPGA in lab. The first button opens the load dialog for the user, where the top Verilog file is selected. The contents of the file are loaded in the top text box, where last minute edits can be made to the text. The second button sends the text to the server and starts the process of setting up the kit with the code. The status bar shows the progress of server, while the results of completed actions are loaded into the bottom text box. When the process is completed, the labkit is programmed with the necessary code, and the logic analyzer is setup with the values from the Trigger Setup window. The last button allows the user to abort the process at any point.
Figure 4-2: The Load Code Window from the 6.111 WebLab Client.
The Trigger Setup window contains the signals that are available to be triggered off of. The first combo box lists the available signals. All 16 channels of the logic analyzer are available for triggering, either as an individual signal (Labx for channel x) or a group of four signals (Lab [x+3: x] for channels x through x+3). The second combo box lists possible trigger values for the selected trigger signal. If the user wants to trigger off one channel, the possible values are rising edge, falling edge, or either. If the user wants to trigger off a group of four channels, the second combo box will show values from OxO to OxF. Below the combo boxes, the user can change the sampling period (time between sample points), which is listed in nanoseconds. To set up the in-lab logic analyzer with the current values in the window, the user clicks the "Send" button, which sends a command to the server to set up the logic analyzer.
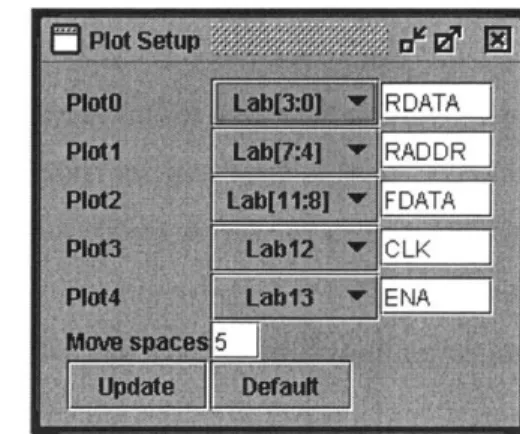
Figure 4-3: The trigger setup window (left) and the plot setup window.
The Plot Setup window allows the user to change which graphs are shown in the plot window. The plot panel shows five plots at once, and plots can be either one-channel signals or four-channel signals. The user can label each plot to their choosing, and the label can have up to five characters. The user can also change how many samples the "Move Plot Left" and "Move Plot Right" buttons move the plot. The "Update" button updates the plot panel with the current setup values in the window. The "Default" button resets all values to the default values, which currently are standard signals for the memory checker lab.
The simulated labkit inputs are located in the main applet window below the tool bar. Four buttons are available as inputs to the labkit, represented in the top Verilog file as signals buttonO (labeled "Reset" in the client), buttoni, button2, and button3. Clicking a client button sends a request to the server to simulate a button being pushed for one second, regardless of how long the client button is pushed.
The plot panel takes up most of the applet area. Logic analyzer output data is drawn here, which can come from the server or a file on the local computer. The user manipulates the plot through tool bar buttons. The markings at the top represent the location of each sample. The sampling period (time between each sample) is listed above the plot panel next to the inputs.
There is a status text box below the plot panel that is updated whenever the status of the client changes, such as when the server is connected or data is received.
4.3
Code and Class Architecture
Most of the applet code is contained in the applet class LabFrame. The bulk of the LabFrame class is GUI and handling events from the GUI, such as button presses. Interaction with the server is also done in this class, and this was implemented using Java NIO API for socket communication. Using sockets allowed for fast, easy com-munication between the Java client and the .NET-developed server. Commands that are sent to the server are determined by the GUI events. LabFrame also deals with file loading and saving, including the loading of the Verilog file that is sent to the server. It checks the Verilog file size before it is sent, and it may append "6.111" to the end of file if it is a certain size. (See Section 5.3.1 for details on this file modification.)
Timers are set in this class for polling and checking for responses from the server.
The plot panel used for graphing the logic analyzer data consists of several classes. The PlotPanel class is the actual UI component that is added to the applet. It contains a Graph object, which actually paints the plots. The PlotPanel object handles the double buffering that prevents flickering when the plot repaints itself. The rest of its methods involve manipulating (or basically passing on command requests to) the Graph object.
The Graph class is what draws the plots. It is also a container of PointArray objects. A PointArray object is an individual plot; the client is currently set up to have five plots on the plot panel. Whenever the Graph class is refreshed, it redraws each contained plot by giving each PointArray object its bounds and the space requirements (i.e. plot heights and spacing between plots). The Graph class also keeps track of the range of data points in view, the spacing between points, and the trigger location, and these values are kept consistent among all the PointArray objects it contains. Graphical borders are also drawn here to simulate a logic analyzer view and provide aesthetics.
There are two classes that implement the PointArrayObject interface class, which is the object type that the Graph holds: PointArray and PointArraySet. The PointArray is, as the name implies, an array of points that can be either high or low
at any time. The PointArray holds the values for a period of time for one digital signal. It keeps track of the height of the graph, spacing between points, starting point in the array for drawing, and the name of the signal. A PointArraySet holds more than one PointArray to represent multiple-bit signals. It maintains the same information as PointArray, but it draws a plot for grouped signals.
The final class is the BitArray class. The purpose of this object is to easily manipulate arrays of bits and retrieve the equivalent byte array. The PointArray class uses a BitArray to store its data. There is a similar class implemented in C# for the server.
Chapter 5
The WebLab Server
One software entity controls most of the lab hardware for the 6.111 WebLab, and that is the lab server. The server was developed in Microsoft .NET in C#, and this choice was mainly due to the availability of legacy software from iLabs. The source code from iLabs later proved unnecessary, but the choice of development platform was still appropriate since the USB/GPIB interface had software libraries already developed in .NET. The only equipment not controlled by the lab server is the web camera, and its video stream is served using an open source media player called VLC [12].
5.1
Physical Setup
The setup for the server is comprised of several pieces of hardware. A server com-puter is needed to run the server software as well as control the numerous equipment components. The meat of the laboratory course is the labkit, or more specifically, the
FPGA contained in the labkit. In order to observe the signals in the labkit, a logic
analyzer is needed to read signals off the labkit. Most laboratory equipment have GPIB interfaces that allow easy communication with control devices, and the logic analyzer chosen for use in this project is no exception. A USB/GPIB interface is used to connect the server computer to the logic analyzer. To simulate labkit button pushes of the physically-absent user, the server software talks to the labkit through a serial interface. The final piece of hardware is the web camera, which captures video
data of the lab setup to stream to the user.
" Server Computer: The server was developed and currently running on a
Win-dows XP Professional PC. The PC has an Intel Pentium 4 3.20GHz processor, with 2GB of RAM. The server should be able to run on significantly lower speci-fications, though. The server computer is running Internet Information Services
(IIS) as the web server for hosting the WebLab page and the client applet.
" 6.111 Labkit: The labkit is described in detail in Section 2.2. It is programmed
via a JTAG interface, which is connected to the server computer through a serial port.
" Logic Analyzer: The logic analyzer is the HP 1663AS, the logic analyzer/digital
oscilloscope combination used in the 6.111 lab prior to 2004. The 1663AS has 34 channels for data acquisition, though only 16 of them are used for the 6.111 WebLab. It has a GPIB interface, which is a standard in digital communication in test and measurement equipment.
" USB/GPIB Interface: In order for the logic analyzer to be controlled
re-motely, it has to be connected to a PC via its GPIB interface. The Agilent
82357A USB/GPIB Interface is used to provide this bridge. The interface comes
with a software package that makes writing programs for the interface fairly straightforward.
" Web Camera: A web camera is used to capture a live video stream of the lab
setup. A Logitech QuickCam Zoom is currently being used in conjunction with VLC Media Player [12], which delivers the output stream. The video stream is served using MMS (Microsoft Media Services) protocol, so the video stream can be viewed with Windows Media Player. VLC runs concurrently with the WebLab server, and the video stream is sent through a different socket port than the one used for WebLab client/server communication.
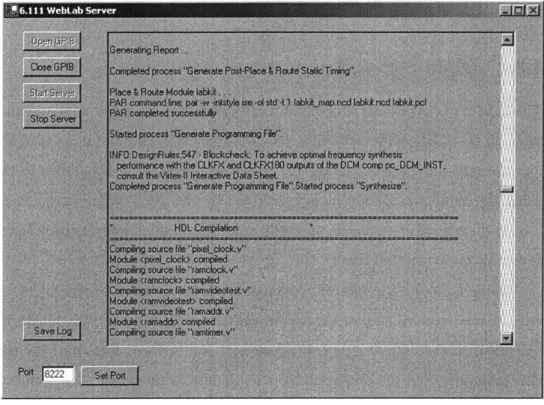
Figure 5-1: The Introductory Digital Systems Online Lab Server.
5.2
User Interface
The GUI for the server is minimal; not much is done on the server side in terms of user interaction. To run the server, the application needs to be started by someone in lab. The server is connected to the logic analyzer by clicking the "Open GPIB" button, and it starts listening for clients on the local machine with the "Start Server" button. The logic analyzer and port connections can also be disconnected in a similar manner. When clients connect and commands are received, the large text box displays the status of the server and prints received commands. When code is being compiled and programmed onto the labkit, results from the Xilinx ISE applications are also printed into this status text box. The contents of the text box can be saved into a text file on the server machine using the "Save Log" button.
There is only one setup option currently implemented. The user can change the port the server listens to on the local machine when the server is stopped.
5.3
Code and Class Architecture
5.3.1
Main Server Application
The LabServerForm class compiles into the lab server Windows application. It con-tains all the GUI components that are displayed, including the main text area that logs the requests made to the server. Socket communication is handled in this class using the Windows Sockets library provided by the .NET Framework. It is event-based; when a client connects, an event is fired, and the server begins a new thread to handle the connected client.
Before acting on the received command, the server needs to check if a complete request was received. First, the server sees if the input buffer was filled. If it was not filled, all the data was probably received. If it is filled, there may be more data still coming in, and the server waits for more data in the buffer. When more data is received, it does the same check. The buffer size is 1460 bytes, and a possible problem can occur when client data size can be evenly divided by 1460. Either the server will think that the client has disconnected (which it assumes when the event is fired for data arrival but no data is in the buffer) or the event will never fire since no more data is coming, and the command is not processed by the server. This problem is avoided
by never having data divisible by 1460 bytes sent to the server. If a sent command is
divisible by 1460 bytes, the client adds "6.111" to the end of the command. Whenever the server finds five bytes in the data buffer, it checks to see if it is "6.111". If it is equivalent, then the server knows the five characters are just excess and ignores it. Otherwise, it is five more bytes of data that must be considered. Commands sent to the server are only greater than 1460 bytes when it involves sending the student's Verilog code. A problem would arise if the last five bytes of the Verilog code happens to be "6.111" and the sum of the size of the Verilog file plus the DATA command is five more than a number divisible by 1460, but that is incredibly unlikely.
Commands received from the client are parsed and then appropriately handled. (See Table 3.1 for a list of valid commands.) A thread is created for each received command, allowing commands sent from the client to occur concurrently or allowing
one command to abort the process of a previously sent command. This class also copies submitted Verilog files to the local server computer and delivers command acknowledgements and logic analyzer data to the client.
5.3.2
Xilinx Application Execution
Six Xilinx applications need to be run in order to translate a project in Verilog into something that can be programmed onto the FPGA. The programs are part of Xilinx Integrated Software Environment version 6.3i [16], and they are xst, ngdbuild, map, par, bitgen, and impact. Each step has input arguments and files, with the output files of one step usually being the input files of the next step. There are three Verilog files in the project that are compiled: labkit.v, userio.v, and top.v. labkit.v is the top-level file of the project needed to interface with the labkit, and this file is provided by the course [10]. The labkit .v file is slightly modified for this course; labkit .v uses the userio module to handle button signals through the serial port instead of the actual buttons on the labkit. (See Section 5.3.4 for more on userio .v.) top .v is the file submitted by the student. This file is overwritten every time someone submits their Verilog file that contains all their modules. top. v is similar to the labkit .v file. It passes through all the labkit signals (except the button signals) and abstracts away this information so the student is only concerned with receiving the button signals in their logic, not the source of the button signals. The top. v file must contain all the modules in the student's Verilog project. The current WebLab implementation does not allow for multiple Verilog files to be sent to the server, so all modules must be in one file.
The XilinxISERunner library has methods that execute Xilinx programs from the command line. Each time a method is executed, a new process is created to run the application. Upon completion, the output of the program and the return value are stored in an object called ProcessResult, and the ProcessResult is the returned object of the executed XilinxISERunner method. ProcessResult is a simple class that contains an integer for the return value and a string for output text.
5.3.3
Communication with the Logic Analyzer
The GPIBInterf ace class is for communicating with objects on the GPIB, which in this case is the logic analyzer. The libraries provided by the Agilent USB/GPIB inter-face [17] opens and closes the connection to the device, sends commands and queries, and retrieves responses to queries. To avoid having to repeatedly type hard-to-remember logic analyzer commands and GPIB interface methods, the GPIBInterf ace class provides the methods to make specific requests to the logic analyzer.
Logic analyzer data comes in the form of a large packet of bytes, usually around
60 kilobytes. Not all of the information in this packet is necessary for the WebLab.
The HPDataParser class is for retrieving specific pieces of information from the byte packet without having to remember byte locations. The class also gathers the four pieces of information relevant to this lab (number of data points, trigger location, sample period, and captured data) into a packet, and this newly formed packet is what is sent to the client. The data is also organized in a manner that is easier for the client to handle.
The HPDataParser uses the BitArray class. The BitArray class was implemented to allow of easy manipulation for arrays of bits. Most of the data manipulation in this project involves using byte arrays, and the BitArray class can return its data as a byte array. There is a similar class implemented in Java for the client.
5.3.4
Simulation of Inputs with RS-232
The SerialInterf ace class deals with all the serial port (RS-232) communication. Since no one is physically in lab to push the buttons on the labkit, the button signals must be simulated. Button push simulation is done through communicating with the serial port on the labkit and using the FPGA to receive the signals as button pushes. The Verilog code for the virtual buttons is in userio.v and was written by Frank Honor6. Eight buttons are represented by one byte. To change the state of the buttons, a byte is sent to the serial port and stored in a register. When a button is not pushed, its signal is high; when it is pushed, the signal goes low. To simulate
a button push, the bit corresponding to that button would need to be written low and then written back high. For example, to simulate a one-second push of button
0 (represented by the lowest bit), the user sends OxFE (all bits except bit 0 high) to
the serial port, waits one second, and then sends OxFF to the serial port.
The WebLab was developed using .NET Framework version 1.1, which strangely does not have serial port communications support. A third party library called Se-rialPortNet [13] is used for this purpose. The SeSe-rialPortNet library provides easy methods to select a port, set baud rates, open and close serial connections, and send and receive data to the port. It emulates the serial port support in .NET Framework version 2.0, minimizing changes in code if development is switched to a later version of the framework.
Chapter 6
Conclusion
The current version of the Introductory Digital Systems Online Laboratory allows remote users to compile Verilog code, program a labkit, and read signals through a logic analyzer. Plot data can be manipulated in the client, and it can be saved and viewed later without using the server. While the current WebLab is functional, it is a basic architecture that acts a starting point and can be expanded for future improvements. Since the current implementation is a prototype, access to this project is limited to the 6.111 WebLab development team.
6.1
Summary of Work
A remote experimentation system using web-based technologies was designed and
implemented in this project. Despite the client and server being developed in different platforms and languages, communication across the Internet between the client and server was accomplished and works efficiently. While parts of the project are specific to the 6.111 course, a major portion acts as a remote logic analyzer controller. There are currently no other projects freely available that control a logic analyzer through the internet; this utility can be expanded for other lab setups in the future.
On the client side, the Java applet provides the student with a user interface that is similar to the in-lab logic analyzer. The bulk of the work occurs on the server side, leaving the client to focus on the display of data and minimize the use of resources
on the student's computer. The commands sent to the server are blocked from the user, preventing misuse of the communication channel between the client and server.
A video stream provides the user with a real-time view of the lab setup, adding to the
feel of using an actual, remote labkit and not some simulated setup. Logic analyzer data can be saved for later and viewed in the client, without having to be connected to server.
The server accepts commands from a remote client, parses it, and does an action requested by the client. When a Verilog file is submitted, it sets up the files on the server computer and runs the Xilinx applications needed to program the labkit
FPGA. It communicates with a logic analyzer using the GPIB interface, allowing for
signal setup and data acquisition control. The server also does most of the parsing of the logic analyzer data. By sending only the relevant information to the client, the amount of data sent becomes small, allowing for quick data transfers to the client and less data manipulation on the client side. The server simulates button pushes using an RS-232 connection with the labkit. Concurrently, a video stream is sent to the client using third-party software.
6.2
Future Improvements
The system developed in this thesis is only a basic structure; there are still several issues that need to be addressed. The architecture was designed to be modular and allow for easy expansion and modification for those who continue the 6.111 WebLab development as well as groups that wish to adapt the project to their own needs.
One original goal was to implement streaming data through sockets and have simulated LED displays in the client. This would allow a faster real-time display of the labkit state than what the video display provides, which currently has about a six second lag on average even when accessed on campus. While streaming byte data was not a problem, data acquisition hardware was inadequate. The logic analyzer's data acquisition method was not appropriate for this purpose. If data acquisition (DAQ) hardware can be acquired for this project, it would allow for fast signal sampling and
signal inputs, which would also replace the current RS-232 method of sending inputs to the kit.
With any web-based system, security is always an issue, and this was not really considered in the current version of the 6.111 WebLab. Future versions should deal with session control and user identification.
One user maximum is assumed in this project. Currently, when more than one client tries to communicate with the server, only the first client that connects can talk to the server. Subsequent clients can connect to the server, but attempts to send messages to the server while still connected to the first client will cause the following clients' applets to crash. Future versions should fix this; the server will need to figure out how to queue users and allocate access to lab resources.
A potential fix to the above problems is also another potential revision to the 6.111 WebLab, and that is to integrate it with the iLabs architecture. During the
development of this project, the iLabs architecture was only available for batched experiments. A version for interactive experiments is currently in development, and hopefully this lab can be one of the first to implement that architecture when it is released. The main portion that needs to be implemented is the interface between the 6.111 WebLab and the service broker in the iLabs architecture.
Appendix A
Java Classes API for the Client
This appendix contains the API for the classes that support the Java applet client. It is not a comprehensible API, but it shows the important features of each of the classes that the main applet class uses.
A.1
BitArray
This is the BitArray class. The code was originally written in C#, and then a Java version was written. The purpose of this class is to easily manipulate arrays of bits. The bits are stored in a byte array.
Constructors
public BitArray(int length)
Returns a new BitArray whose contents consists of the provided byte array and has the given amount of bits.
Parameters length The number of bits in the BitArray.
public BitArray(byte[] -array, int length)
Returns a new BitArray whose contents consists of the provided byte array and has the given amount of bits.
Parameters _array The byte array representing the data of the BitArray. length The number of bits in the BitArray
Methods
public int getLength ()
Get the length of the BitArray.
Returns The number of bits the BitArray holds.
public void setLength(int -length)
Set the length of the BitArray.
Parameters _length The number of bits the BitArray should hold.
public byte[] toBytes()
Returns a byte array that represents the contents of the BitArray. To figure out how many bits are in the array, use getLength(.
Returns A byte array representing all the bits in the BitArray.
public boolean getIndex(int i)
Get the bit value at the given index.
Parameters i The index for the desired bit value.
Returns A boolean representing the bit at index i.
public void setIndex(int i, boolean value) Set the bit at the given index to the given value.
Parameters i The index of the bit that needs to be set. Returns A boolean representing the value of the indexed bit.
public String toStringBinary()
Return a string of l's and O's representing the contents of the BitArray. Returns A string representing the BitArray in binary.
A.2
PointArrayObject
The PointArrayObject interface represents the individual plots held in the Graph object. This is to allow the Graph object hold different kinds of plots. Currently, two classes implement this interface: PointArray and PointArraySet. The former is a 1-bit digital signal, while the latter is a multiple-bit signal (actually consisting of more than one PointArray). Originally, this class supposed to be an Iterator/circular buffer as well, but streaming graphs ended up not being implemented. Those methods are not listed here.
Methods
public int getHigh()
Returns the high value, which is the highest point the graph is drawn on.
Returns The topmost point of the graph (in terms of pixel y-coordinate wrt to
Canvas).
public void setHigh(int high)
Sets the maximum height the PointArrayObject should draw itself. Parameters high Integer value representing highest point of drawing.
Returns the low value, which is the lowest point the plot draws itself.
Returns The lowest point of the graph (in terms of pixel y-coordinate wrt to Canvas).
public void setLow(int low)
Sets the lowest height the PointArrayObjectshould draw itself. Parameters low Integer value representing lowest point of drawing.
public int getLength()
Returns the length of the PointArrayObject, which is how many bits are represented in the array.
Returns The length (number of bits represented).
public void setLength(int length)
Sets the length of the PointArrayObject, which is the number of sample points rep-resented in the array.
Parameters length The new length (number of sample points represented).
public int getSpacing()
Returns the number of pixels between sample points when drawn.
Returns The spacing between sample points in pixels.
public void setSpacing(int spacing)
Sets the spacing of the PointArrayObject, which is the number of pixels between each sample point when drawn.
Parameters spacing The new spacing of the plot.
public String getName()
Returns the name of the PointArray signal. The name is usually drawn next to the plot by the Graph object.
Returns A String with the name of the PointArrayObject.
public void setName(String name) Sets the name of the PointArray.
Parameters name The new name of the plot.
public void drawPoints(Graphics _g, Rectangle _r )
Draws the plot representing the data the PointArrayObject contains. Parameters _g The Graphics object that will draw the plot.
r The Rectangle object representing the Graph area that holds all the plots.
public void add(int index, BitArray pa)
Adds a BitArray to the PointArrayObject. This is basically adding an entire signal. An index is needed if the PointArrayObject holds more than one signal.
Parameters index For a PointArrayObject the holds multiple signals, this value represents which of those signal to replace.
pa The BitArray representing a set of data for one signal. This data replaces the data at the given index.
A.3
PointArray
The PointArray represents a 1-bit signal. It tells a Graphics object how to draw the data it holds. Only methods not listed in the PointArrayObject interface will be listed here.
Constructors
public PointArray(int length, String name)
Returns a new PointArray that holds the given number of sample points and has the given name.
Parameters length The number of sample points in the PointArray. name The name of the PointArray.
Methods
public void resetO
Resets the graph. It makes sure the current index in the plot is at the first point (starting point) that is to be drawn.
public boolean next()
Gets the values of the signal at the current index, and then increments the current index to point at the next value.
Returns A boolean representing the value at the current index.
public boolean get(int _i)
Gets the value of the signal at given point in time (sampling index). Parameters _i The desired point (index) of the signal.
Returns The value of the point requested.
public void add(BitArray _p)
The add method from the PointArrayObject expects an index, which is useless here since the PointArray only has one signal. So when that method is called, the index is ignored, and this method is called instead. It replaces the data in the PointArray with the input BitArray.
Parameters _p The BitArray representing the new data.
A.4
PointArraySet
A PointArraySet is like a PointArray, but it holds more than one signal. It
methods not listed in the PointArrayObject interface will be listed here.
Constructors
public PointArraySet(int length, String name)
Returns a new PointArraySet that holds the given number of sample points and has the given name.
Parameters length The number of sample points in the PointArraySet.
name The name of the PointArraySet.
Methods
public int getMinLength()
Returns the length of the shortest contained signal. This method is find the maximum amount of points that can be held in the PointArraySet if, for some reason, the signals it contains are different lengths.
Returns The length of the shortest signal. public int getSize()
Returns the size, which is how many 1-bit signals the PointArraySet contains. Returns The size (number of 1-bit signals).
public void setSize(int size)
Sets the size of the PointArraySet, which is the maximum number of 1-bit signals it contains.
Parameters size The new size (number of bits represented).
A.5
Graph
The Graph object holds the area that the plots are drawn on. It is also a container of PointArrayObject objects. The characteristics that are common to all plots (starting point, trigger point, etc.) are kept track of in this class. This class also draws the borders. The PlotPanel class contains a Graph object. Both the PlotPanel and Graph classes were derived from a third party, open source package of classes for plotting
2D graphs [18].
Methods
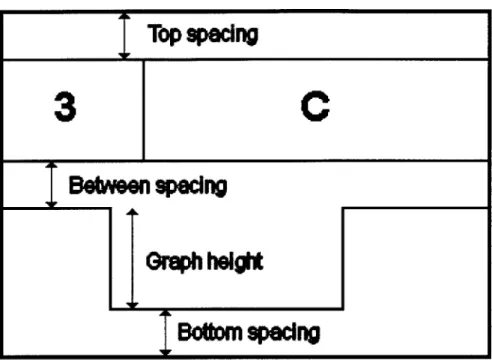
public void setGraphSettings()
Sets the plot limits for each of the contained plots. If changes were made to any of the plot limits (like spacing between graphs or graph heights), this method should be
run.