Characterization of a Robot Arm for use in Acoustic Experiments by
Davis Wamola
Submitted to the Department of Electrical Engineering and Computer Science in Partial Fulfillment of the Requirements for the Degrees of
Bachelor of Science in Electrical Engineering and Computer Science and Master of Engineering in Electrical Engineering and Computer Science
at the Massachusetts Institute of Technology May 24, 2002
Copyright 2002 Davis Wamola. All rights reserved.
The author hereby grants to M.I.T. permission to reproduce and distribute publicly paper and electronic copies of this thesis
and to grant others the right to do so.
Author
Department of Electrical Engineering and Computer Science May 24, 2002
Certified by
Barbara Shinn-Cunningham B.U. Thesis Supervisor
Certified by
Prof. Nathaniel I. Durlach M.I.T. Thesis Supervisor
Accepted by
Arthur C. Smith Chairman, Department Committee on Graduate Theses
Characterization of a Robot Arm for use in Acoustic
Experiments.
by
Davis W. Wamola
Submitted to the Department of Electrical Engineering and Computer Science on May 24, 2002, in partial fulfillment of the
requirements for the degrees of
Bachelor of Science in Electrical Engineering and Computer Science and
Master of Engineering in Electrical Engineering and Computer Science
Abstract
In this thesis, I characterized the motion of a robot arm, which is used to position a speaker in an echoic room at a distance of 1m around a subject’s head under computer control. I also made some initial measurements of the acoustic transfer function from the speaker on the robot arm to a microphone in the center of the room as a function of speaker location. I wrote and implemented code in MATLAB to control placement on the robot arm and record experimental measurements.
Thesis Supervisor: Nathaniel I. Durlach
Title: Senior Lecturer, Research Lab of Electrical Engineering MIT
Thesis Supervisor: Barbara Shinn-Cunningham
Title: Professor, Department of Cognitive & Neural Systems and Biomedical Engi-neering, Boston University
Acknowledgments
I would like to especially thank Barbara Shinn-Cunningham and Nathaniel I. Durlach for making this thesis possible in the first place. Without their encouragement and support I would not have been writing my Master’s thesis today. Additionally, a great deal of the design of the system is a result of my interactions with Tim Streeter and Norbert Kopco. I would also like to thank the MIT graduate fellowship for their financial support and my academic advisor Paul Penfield for all the years of advice and encouragement.
Of course none of this would have been possible without my family and my friends, so thank you Mom and Dad, Betty, Angela, and Hilda. You made me who I am today.
Contents
1 Introduction 13
1.1 Background: Transfer Function Measurement with Maximum-Length
Sequences . . . 13
1.2 Head Related Transfer Functions . . . 14
1.3 Related Work . . . 16
2 Experimental Design 17 2.1 Description and Setup . . . 17
2.2 Tools . . . 18
2.3 M otion M easurements . . . 18
2.4 HTRF M easurements . . . 19
3 Results 21 3.1 Elevation and Azimuth M easurements . . . 21
3.2 Control Software . . . 22
3.2.1 Experimental M ATLAB code . . . 23
3.2.2 Real-time Processor Visual Design Studio . . . 24
3.3 KEM AR HRTF . . . 24
4 Results 29 4.1 Robot Arm’s Performance . . . 29
4.2 Software Implementation . . . 30
4.4 Conclusion . . . 32
A Tables 33
B Figures 41
C Code 43
C.1 MATLAB code controlling arm motion . . . 43 C.2 M ATLAB code to play and record M LS signal . . . 46
List of Figures
3-1 Measures of Elevation Error: Mean=0.12; Std Dev=0.60 . . . 21
3-2 Measures of Azimuth Error: Clockwise Mean=0.13; Std Dev=0.61 An-ticlockwise Mean=-0.07 Std Dev=0.70 . . . 22
3-3 Raw M LS signal measured with TDT . . . 25
3-4 Magnitude response with no sound presented . . . 26
B-1 RPvds diagram of the circuit on the RP2 . . . 41
List of Tables
A.1 RoboArm Technical Specifications . . . 34
A.2 Elevation M easurements at 5 degree steps . . . 35
A.3 Elevation Measurements at 10 degree steps . . . 36
A.4 Elevation Measurements at 45 degree steps . . . 36
A.5 Azimuth M easurements at 5 degree steps . . . 37
A.6 Azimuth Measurements at 10 degree steps . . . 39
Chapter 1
Introduction
One aspect of psychoacoustics research examines how subjects perceive the location of a sound source in the presence of echoes and reverberation. To automate these experiments, the Boston University’s Psychoacoustics Laboratory recently acquired a robot arm. The robot arm positions a speaker under computer control in an echoic room about 1m around a subject’s head. The robot arm was installed in the summer of 2000 in a small room whose acoustics are not yet well understood. The goal of this thesis is to analyze the motion of the robot arm and characterize its motion. In addition, some initial measurements will be made of the acoustic transfer function from the speaker on the robot arm to a microphone in the center of the room as a function of the speaker location.
1.1
Background: Transfer Function Measurement
with Maximum-Length Sequences
For room acoustic impulse responses, a very long impulse response must be measured due to the echoes and reverberation, and an excitation signal must have high energy to counteract acoustic noise and quantization error in the analog-to-digital converter. A maximum-length sequence (MLS) has mathematical properties that make it very useful as an excitation signal for measurement in acoustics[5]. Vanderkooy has
ex-plored the pathology of MLS systems in the presence of distortions of various kinds extensively in a paper. Use of MLS to measure the impulse response of a linear sys-tem is not new and can be traced back several decades [2]. Binary MLSs are periodic two-level pseudorandom sequences of length L = 2N - 1, (N is an integer) which yield, in theory, an impulse under circular autocorrelation [3]. The basic idea is to apply an analog version of an MLS to a linear system, sample the resulting response, and then cross correlate that response with the original sequence. The result of the cross correlation is essentially the system impulse response (circularly convolved).
Under ordinary conditions, the impulse response obtained from an MLS measure-ment is identical to that obtained directly by periodic impulse excitation, except that noise and distortion immunity is now comparable to that of time-delay spectrometry (TDS). MLS also allows a wide variety of windows and delays to be applied as simple post-processing operations after the computation of the impulse response [4]. Thus, with periodic pulse and MLS methods, one can simply select the initial part of the impulse response by multiplication with a suitable window function and then Fourier transforms the result to obtain a nearly reflection-free transfer function. Of course, perfect elimination of reflection effects demands a sophisticated deconvolution oper-ation based on a detailed knowledge of both the polar response of the loud speaker as well as the room’s characteristics, knowledge that is generally unavailable. MLS methods are quite general and mathematically elegant in dealing with this. They can be employed in any application in which the system impulse response or transfer function must be measured accurately in the minimum amount of time under adverse experimental conditions.
1.2
Head Related Transfer Functions
Head-related transfer functions (HRTFs) describe how the signals at a listener’s ears vary with the position of the sound source. As sound travels from the source to the eardrum of a listener it is transformed by interactions with the listener’s head, neck, torso and outer ear. This transformation, which is unique to each listener, varies with
the location of the sound source relative to the head. The listener’s Head Related Transfer Function (HRTF) describes it. In the far field (more than 1m), as for the speaker mounted on the robot arm, the HRTF is independent of distance, (except for an overall change in level) but varies with azimuth and elevation. One part of current spatial hearing research tries to determine how subjects perceive the location of such a sound source in the presence of echoes and reverberation using measures of reverberent HRTFs. Typical approaches for obtaining HRTFs involve placing a sound source at the desired location relative to the head of a subject who has microphones placed in his or her ear canals.
In order to automate HRTF measurements, a robot arm controlled by a computer program was acquired to help in positioning the sound source around subject in the room. Using the robot arm allows for accurate, repeatable measurements as well as efficient use of time for both the subject and the experimenter. The robot arm was installed last summer in a room whose acoustics are not yet well understood. In fact, one goal of the research in the laboratory is to characterize how echoes and reverberation influence HRTFs in this room.
The primary goal of the current work is to characterize the robot arm itself to allow the psychoacoustics group to begin to use it in their experiments. First, I analyzed the motion of the robot arm and characterized its motion. Measuring the robot arm’s motion is essential to knowing the kind of reliability users can expect when using the arm in experimental studies. Should the robot arm turn out not be as accurate as required then the problem can be remedied or even accounted for in experimental findings. After that, I took some initial measurements of the acoustic transfer function from a speaker mounted on the robot arm to microphones placed in the ear holes of our humanoid dummy, Knowles Electronics Manikin for Acoustic Research (KEMAR). KEMAR is a physical model of the average human head and torso. Measurements were made as a function of the speaker’s location relative to KEMAR. For this, I used another real time processor connected via an amplifier to the speaker and microphones to produce and collect sound samples. I then used MLS methods to determine the impulse response of the system.
1.3
Related Work
Robotic arms have been used extensively in research and industry. Each is usually cus-tomized to a user’s needs. Tucker-Davis Technologies (TDT) developed the RoboArm 360, the arm used in the current experiments. The RoboArm 360 is designed to pro-vide a lightweight, low-cost solution for transducer positioning. The robot arm is made of carbon fiber rods that are very lightweight and strong. Two servomotors with optical encoders power the RoboArm 360. The motors are industrial-grade gear motors offering ample, but not dangerous, torque and speed capabilities.
There are no significant documented uses of this particular model; hence, there was a need to conduct independent experiments to determine the arm’s performance. Determining what factors contribute to inaccuracy in the system will help ensure that measurement techniques are as accurate as possible. For instance, initial observations show inaccuracies in the system due to backlash associated with the gear motors. This backlash results in two undesirable facets of system operation. In addition to general positioning errors (typically less than 1 degree) the gear motor backlash results in non-zero system damping. This will be explored a little more later on.
Chapter 2
Experimental Design
2.1
Description and Setup
The RoboArm is mounted overhead to a secure metal plate (mounted on ceiling beams) ten feet from the floor. The RoboArm comes standard with the tube lengths cut for operation when mounted to a nine-foot ceiling. It also has some software provided that controls the arm via a graphical user interface; however, this interface is not very useful for repeated experiments and will be replaced by custom soft-ware written by experimenters. The vendor provides technical specifications for the RoboArm. The speaker provided was replaced with a BOSE cube speaker that is more responsive, but slightly heavier, a factor that will need to be accounted for in motion measurements. Its weight is still within the robot arm’s calibrated limits.
According to the manual, the RoboArm should be housed in a room that is at least 10 by 10 by 9 feet. With these dimensions the RoboArm will have full movement including +/- 70 degrees of elevation and 360 degrees of rotation. The actual room containing the RoboArm is not completely rectangular. The main area of the room measures 11 by 11 by 10 feet. There is a smaller square portion to one side by the door of approximately 5 by 5 feet. For my purposes, the room’s shape will not adversely affect my measurements.
2.2
Tools
Tools were constructed to hand measure the actual loudspeaker location when it was moved by the RoboArm. A laser pointer mounted on a mechanical protractor was used to measure the elevation of the speaker. The protractor was mounted onto a plank with metal screws. The plank is part of a 2-part construction nailed together to form perpendicular axes. The vertical axis contains the elevation-measuring laser pointer while the horizontal axis has a level and a directional compass.
The whole setup is mounted on a tripod stand. The level is used to make sure the horizontal axis is always at zero elevation and also flat in the x-y plane. This also ensures that the vertical axis is at 90 degrees elevation, parallel to the z-axis by virtue of the construction of the axes.
A plumb line hung from the base of the motor assembly is used to make sure the tripod is placed at the center of the arm’s rotation in the x-y plane. The height of the tripod is then adjusted to coincide with where the center of the user’s head should be, which is about 52” from the floor (according to the RoboArm specifications). Measurements of elevation and azimuth were made from the center of the imaginary sphere of radius 1m.
2.3
Motion Measurements
Due to the mechanical parts of the assembly, it would be hard to measure any move-ments less than a few degrees with reasonable accuracy. Measuremove-ments were made in one plane at a time as follows:
• First, measure only movements in the vertical plane (along zero azimuth) for
movements of 5 degrees at a time and measure the elevation manually.
1. Calculate the error margin for each motion as well as the maximum and minimum error.
2. Increase the arm’s movement to 10 and 45 degrees and repeat measurement of the elevation manually.
• Second, measure only movements in the horizontal plane (along zero elevation)
in the same way described above, except start azimuth movements by moving clockwise to maximum rotation (360 degrees) and back, then in the anticlock-wise direction to maximum rotation and back.
• Finally, measure movements in 3D. Since it is difficult to measure movements
in 3D with reasonable accuracy, the strategy employed was to move the robot arm randomly in space and then send it back to the origin (zero elevation and zero azimuth). It is assumed, in this approach, that any errors in the arm’s motion will be translated to errors in the robot arm’s position when it returns to the origin. Thus, measure the offset from the origin to determine these errors. Averaging over the range of motion will help determine whether errors are dependent on range of motion or the type of motion.
2.4
HTRF Measurements
For the HRTF measurements on KEMAR, a tall wooden chair was placed in the middle of the room to have the head at approximately the right height in the middle of the sphere on which the robot arm can position the arm. The height above the floor is great enough that the first echo off the floor arrives with a large enough delay to allow the direct sound impulse response to die out before the first echo is observed. KEMAR sits on the wooden chair with its head against a headrest, much like would be done with human subjects. This is done to reduce movement as much as possible. Microphones mounted on earplugs were inserted into KEMAR’s ears.
A head-tracking device can be used to center the head on the coordinate axis in the center of the room. A computer connected via optical (audio) cables to a Tucker-Davis Technologies (TDT) signal processing system controlled the sound source. The output of the D/A converter of the TDT system was fed into a PA4 amplifier and then into the BOSE cube speaker. The microphones in KEMAR’s ears measured the raw acoustic responses. The signal from the microphones was then sent to a microphone amplifier and into an A/D converter in the TDT system, where it was stored on the
computer. These raw signals were analyzed to get the HRTFs for KEMAR and the room.
Using a level that is too high results in clipping, while using a low level decreases the signal-to-noise ratio and hence degrades the measured HRTF. The maximum sound source level that would not result in clipping was used for each angle of interest. The best level was determined empirically through trial and error to maximize level without clipping.
Data acquisition was performed using TDT’s RP2.1 Real-Time Processor. With this hardware, not only can you acquire data on two channels at up to 100 kHz, but you can also process the data while it is being acquired. The heart of the RP2.1 is a Sharc DSP and a library of signal processing components that can perform real-time math on the data as it is being acquired. Data is transferred to a PC over a USB interface to any program supporting ActiveX at 120 kHz for 32-bit data and 240 kHz for 16-bit data. With TDT’s RP Visual Design Studio (RPvds), you can create your own real-time DSP circuits in a drag-and-drop environment. The use of RPvds will be talked about in a later section.
The ActiveX Interface is used to download data from the RP2.1 to any software that supports Active X, including MATLAB. All the numerical and graphical analysis of the collected data was done on MATBAB.
Chapter 3
Results
3.1
Elevation and Azimuth Measurements
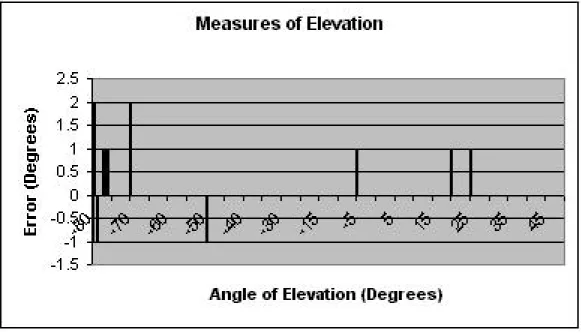
Prior to MLS measurements, measures of the RoboArm’s accuracy were made. Mea-surements were taken for various degrees of elevation and azimuth. Figure 3-1 graphs the errors for movements in the vertical position in increments of 5 degrees. The mean errors is only 0.12 degrees ,for the most part, the robot arm was very accurate.
Figure 3-1: Measures of Elevation Error: Mean=0.12; Std Dev=0.60
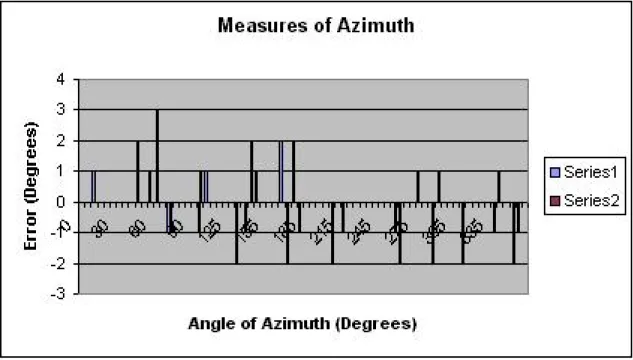
increments of 5 degrees. The mean error is also very small in comparison to the range of motion.
Figure 3-2: Measures of Azimuth Error: Clockwise Mean=0.13; Std Dev=0.61 Anti-clockwise Mean=-0.07 Std Dev=0.70
Measurement error was also small using larger steps of elevation and azimuth. Tables of these measurements can be seen in Appendix B. Built into the system is a ”pause” function that slows the arm down as it gets to within half a degree of its goal, so as to minimize errors due to backlash. Due to the mechanical nature of the RoboArm, timing discrepancies or frictional forces may cause small errors in the RoboArm’s reference coordinate. As long as the system is operating correctly the RoboArm will maintain its position. In general, it is a good idea to re-zero the system after each session to ensure that the system has not become misaligned. Small alignment differences due to backlash are, however, not totally avoidable.
3.2
Control Software
Programming the arm to perform repeated movements was an important part of the MLS measurements. This allows future experimenters to automate both their
measurements and data collection in real time.
There are two parts to coding the robot arm. There is matlab code with ActiveX handles to control the motion as well as collect sample measurements. Then there are virtual circuits designed on the Real-time Processor visual design studio that control the behavior of the circuits on the RP2.
3.2.1
Experimental MATLAB code
The MATLAB code moves the device around in a semi-circle in front of the subject and changes the elevation and azimuth.
Before running the code, the robotic arm should to be at a zeroed location. To do this you need to open the RoboZero application (shipped with the arm) and position the arm in the zeroed location. Determining the zero location is completely at the experimenter’s discretion. The code for the robot arm will use this as a reference point for all future movements. When the MATLAB code robo360.m is run, it first records the robot arm’s initial position as the default position for use at the start and at the end of the measurement. It also sets some parameters for the minimum and maximum elevation and azimuth and loads a filter for frequencies below 1kHz and above 20kHz.
It then loads the object file motor1.rco that provides the ActiveX interface to control the RoboArm. It sets the target positions, TargetA stands for the elevation and TargetB stands for the azimuth. It then sets the SoftTrgs for each target (1 and then 2) to move the arm to the target position. It continuously checks what the current azimuth and elevation are using the GetTagVal parameter. To minimize errors due to backlash, the program includes a pause function that is applied when the robot arm is very close to the target position (within half a degree). Once it is at the correct azimuth and elevation it will wait for stabilization to occur.
After completing the movements, it moves back to the default position, unloads the object file from the RP2 and waits for further instructions. While looping through the various positions, calls are made to the MLS measuring function to play and record sound samples for each position. This information is then saved to a buffer on the
RP2 and finally to a file on the PC.
3.2.2
Real-time Processor Visual Design Studio
RPvds (Real-time Processor visual design studio) programs the signal processor for stimulus generation and data acquisition using a drag and drop design. Circuits generated can be saved as RP control object (file.rco) files for use with other software such as MATLAB, Visual C++ and other applications that have ActiveX controls. Circuits are compiled, loaded, and run on an RP2. Users can also control the properties of the circuit, including the running and stopping of the circuit and the modification of signal parameters. Most processing components support some number of parameter ports that have an initial value and are later changed ’dynamically’ while the chain is running. An example of this is shown in the appendix in Figure B-2 where the index of the serial buffer is initially set to zero, but can then be changed dynamically using ActiveX controls and the parameter tag called ”indexPlay”.
The two primary MATLAB function calls for using ActiveX controls are described below:
• actxcontrol(): adds an ActiveX control to your program.
• Invoke(): calls the ActiveX methods used with a control object file (*.rco).
Soft triggers are another kind of signal generated by the user program to control pieces of the circuit. An example of one such call to start playing the signal in the circuit in Figure B-2 that has two triggers to control an RSFlipFlop is shown below:
Invoke(RP, ’SoftTrg’, 1);
3.3
KEMAR HRTF
In this section, a sample impulse response measurement is taken in reverberant room conditions for one sound source position. Measurements were from a position 1m from the center of KEMAR’s head using maximum-length sequences.
The procedure used to record the HRTFs was to first read a pre-generated MLS of 32,767 (215) bytes containing -1’s and +1’s into MATLAB[1]. Two sequences were concatenated and the result is played from the BOSE cube speaker through an amplifier. This was repeated 10 times and the responses are averaged and recorded. The response to the second half of the double sequence is cross-correlated with the original sequence (using periodic or circular cross-correlation) to obtain the impulse response. The impulse response is sampled at 44.1 kHz. No post compensation for the sound delievery and recording system was applied to preserve the room effects.
Figure 3-3 shows the raw MLS recorded by the system. A lot of noise is evident even before the onset of the the signal (before 4ms). This is low frequency room noises at about 6Hz. There is also a low signal-to-noise ratio which can be compensated for by increasing the amplification of the output signal to the speaker. More emperical measurements would help determine a better signal level to prevent this effect. For all figures, the measurements for the right microphone are in red and those for the left microphone are in blue.
0 100 200 300 400 500 600 700 800 -4 -3 -2 -1 0 1 2 3 4x 10 4 Time [ms] Sampled MLS Measurements
Figure 3-3 also shows there is a difference in amplitude between measurements taken with the left and right microphones in free space. Compensating for the dif-ference in sensitivity of the left and right microphones entails multiplying the raw response of the right microphone by a boosting factor (approximately 1.22).
Figure 3-4 shows the magnitude of the DFT of the measurements taken with the microphones in free space in the center of the room with the sound off to show the noise floor. The noise has a larger amplitude for lower frequencies as expected and decreases as the frequency increases.
10-2 10-1 100 101 102 90 100 110 120 130 140 150 160 170 180 Frequency [kHz] Amplitude [dB]
Impulse Response on a Semilog Scale
Figure 3-4: Magnitude response with no sound presented
A sample reverberent magnitude response at zero degrees for both elevation and azimuth would show that the magnitude response has the same mean at zero degrees. At higher frequencies, pinna effects increase and small asymmetries have large effects. However, a sample measurement at zero degrees doesn’t show the acoustical effects such as an increase in the magnitude response, for the microphone in the ear closer to the source in comparison to the one further away, as the angle increases.
measurement showing the application of the TDT system for MLS measurements. The procedure is very stable and fast. Results are perhaps less reliable due to the low signal-to-noise ratio and would require some pre-filtering of the noise. Extensive experimentation with different sound source levels is required to determine the best signal level. Nevertheless, 10-fold averaging helped give slightly better measurements. Other improvements include addition of signal post-filters to remove excess noise in the room. Care must be taken not to remove reverberation effects if the noise is not uniform.
Chapter 4
Results
4.1
Robot Arm’s Performance
The overall performance of the robot arm was very good. It achieves very accurate movements for both small and large displacements, with little bias in the error mar-gins. Due to the rather inaccurate measurement techniques used in this study, the actual performance limits of the system are unknown. (In some cases, manual mea-surement error may be longer than the RoboArm positioning error). an even higher accuracy might be the case. The control programs give the user a greater degree of control over the way the arm behaves. The provided software engages the pause func-tion when the arm is within half a degree from it’s target. With further analysis of the arm, this can be further optimized to account for the weight, range of movement, and timing constraints.
The heavier weight of the BOSE speaker did not seem to affect the accuracy of the robot arm. The robot arm was designed to carry a maximum payload of up to 5lbs and the BOSE speaker is well within these bounds. Weight of BOSE speaker may have other unforeseen side effects on the RoboArm motion, but at this point its performance is very good.
There is a slight perturbation in the motor assembly just above the second motor. This ’wiggle’ may lead to added inaccuracy in motion of the arm and will need adjusting by the manufacturer.
Initially, errors in the software provided lead to jerky motion of the arm and de-layed reaction that may also account for some of the inaccuracy in the measurements. However, using custom software eliminates these sources of error by ensuring proper flow of control and making sure to clear the control object file from the RP2 at the end of each session. Using custom software also eliminates errors due to limitations in motion of the robot arm that were not accounted for in the provided software. The burden is on the experimenter to ensure that the target positions do not fall outside the possible range of motion of the arm throughout the experiments.
However the effects of backlash cannot be completely eliminated even while using custom software to control the arm. In summary, the robot arm can be relied upon to operating correctly and maintain its position during any one experimental run. However, it is a good idea to re-zero the system after each session to ensure that the system has not become misaligned. Small alignment differences due to backlash tend to accumulate with time.
4.2
Software Implementation
The current software has not yet been integrated. It consists of two separate prgram that run independently. The first program (called rb360.m) controls the robot arm via the first USB port to one of the RP2 modules. The second program (called mls play rec.m) plays the MLS signal from the file mls16.dat through the PC’s second USB port. This second port connects the second RP2 module and then to the BOSE speaker via a PA4 amplifier and collects the measurements from two micro-phones connected to separate input channels on the same RP2. The user has to be able to distiguished which RP2 module is connected to which port when running the controls. This can be done by switching on the RP2 modules sequentially and then using the provide USB monitoring software called zUSBmon to see the RP2 connecting to the USB ports on the PC.
The GUI based software provided with the arm still provides the best way to zero the arm before beginning experiments. It allows for both small and large movements
at the click of a button. This can also be done via matlab, but would require several commands to load the code and then define movement in elevation and azimuth. A future goal is to integrate this GUI software into the final end user program. The end user program will also allow the experimenter to run both the control program and the signal sampling programs in tandem.
The software is very portable; however, the hardware is not. MATLAB can be found on many platforms, and therefore the scripts can be run from a a unix envi-rontment in batch mode to automate the task.
4.3
Further Research Topics
This section points out interesting research questions related to this project. For this Master’s thesis, I did not expect to find complete or even satisfactory answers to the question of absolute accuracy or the way the non-zero damping of the RoboArm’s motion affects user’s perception. However, the project gave us the opportunity to reflect on new findings and to work in the direction of finding new and promising solutions. As a result, these questions may provide a basis for future research:
1. How can the non-zero damping be reduced in experimental measurements? Ob-viously we cannot completely eliminate non-zero damping in the physical mo-tion, but perhaps it can be programmed into experimental systems to allow sufficient time before measurements are taken or even deconvolved from final data samples.
2. What degree of accuracy in the position of the RoboArm is acceptable? Does this improve on previous manual methods in a significant way? Previous experi-ments using manually-placed sound sources have had to deal with this problem. Do inaccuracies in the RoboArm still have to deal with this or are the inaccu-racies small enough to be ignored?
3. Will user-implemented control programs improve the motion characteristics? This can perhaps make the motion smoother and eliminate bugs in the supplied
software. On the other hand, because the programs will be untested, there is the potential for introducing more undiscovered bugs, as is the case with any programming effort.
4. How does the presence of the arm itself affect the room’s acoustics? Do the motors introduce noise not previously encountered in manual experiments and how can this be accounted for?
4.4
Conclusion
The robot arm performed well in test and the custom software achieves many of the target design criteria. It brings together new ideas that are a mix of past and future developments in psychoacoustics. The tried and tested methods of MLS measure-ment techniques and bonded with an efficient and accurate robotic arm to produce even better HRTF measurements. In designing this system I considered alternative solutions and had to improvise with available tools and materials to achieve the goals of getting a reliable and usable system up and running. These tradeoffs offer opportu-nity for future development. Specifically, the sysmtem would benefit from examining the decrease performance of the arm with a heavier speaker, ways of implementing a user interface to the matlab environment for non-programmers, and finally looking into optimizing the programs and utilize the full potential of the real-time processor on the RP2 modules.
Appendix A
Tables
Table A.1: RoboArm Technical Specifications
Motors 2 servomotors with optical encoders
Weight 50lbs fully assembled
Max. Payload 5lbs
Radius 36”
Position of Head 40” from floor (assuming 10 foot ceiling)
Angular Resolution 1 degree
Max. Angular Velocity 60 degrees/sec
Max. Elevation +60 degrees (+48 actual) and -50 degrees (-80 actual)
Max. Azimuth 360 degrees
Speaker Original
Power Cable 20 feet
THD < 0.1 percent (1kHz) at 88 dB spl
Frequency Response +/- 10 dB from 500Hz-2000Hz
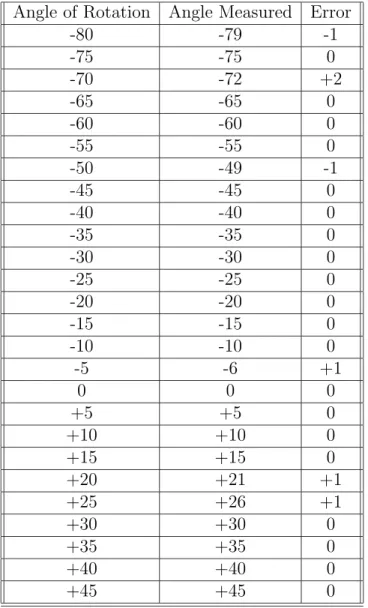
Table A.2: Elevation Measurements at 5 degree steps
Angle of Rotation Angle Measured Error
-80 -79 -1 -75 -75 0 -70 -72 +2 -65 -65 0 -60 -60 0 -55 -55 0 -50 -49 -1 -45 -45 0 -40 -40 0 -35 -35 0 -30 -30 0 -25 -25 0 -20 -20 0 -15 -15 0 -10 -10 0 -5 -6 +1 0 0 0 +5 +5 0 +10 +10 0 +15 +15 0 +20 +21 +1 +25 +26 +1 +30 +30 0 +35 +35 0 +40 +40 0 +45 +45 0
Table A.3: Elevation Measurements at 10 degree steps
Angle of Rotation Angle Measured Error
-80 -80 0 -70 -70 0 -60 -60 0 -50 -50 0 -40 -41 +1 -30 -30 0 -20 -20 0 -10 -12 +2 0 0 0 +10 +10 0 +20 +20 0 +30 +30 0 +40 +40 0
Table A.4: Elevation Measurements at 45 degree steps
Angle of Rotation Angle Measured Error
-45 -45 0
0 0 0
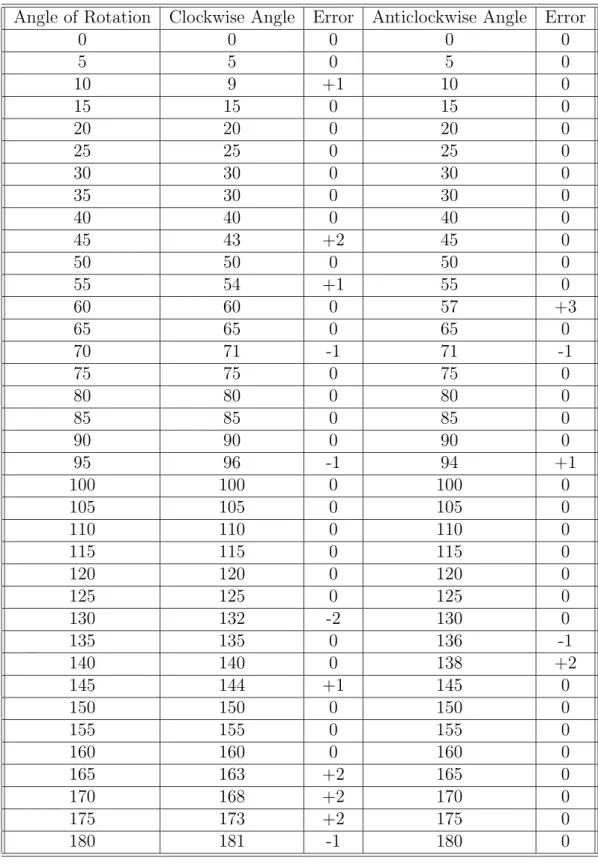
Table A.5: Azimuth Measurements at 5 degree steps
Angle of Rotation Clockwise Angle Error Anticlockwise Angle Error
0 0 0 0 0 5 5 0 5 0 10 9 +1 10 0 15 15 0 15 0 20 20 0 20 0 25 25 0 25 0 30 30 0 30 0 35 30 0 30 0 40 40 0 40 0 45 43 +2 45 0 50 50 0 50 0 55 54 +1 55 0 60 60 0 57 +3 65 65 0 65 0 70 71 -1 71 -1 75 75 0 75 0 80 80 0 80 0 85 85 0 85 0 90 90 0 90 0 95 96 -1 94 +1 100 100 0 100 0 105 105 0 105 0 110 110 0 110 0 115 115 0 115 0 120 120 0 120 0 125 125 0 125 0 130 132 -2 130 0 135 135 0 136 -1 140 140 0 138 +2 145 144 +1 145 0 150 150 0 150 0 155 155 0 155 0 160 160 0 160 0 165 163 +2 165 0 170 168 +2 170 0 175 173 +2 175 0 180 181 -1 180 0
Angle of Rotation Clockwise Angle Error Anticlockwise Angle Error 185 185 0 185 0 190 190 0 190 0 195 195 0 195 0 200 200 0 200 0 205 205 0 207 -2 210 210 0 210 0 215 216 -1 215 0 220 220 0 220 0 225 225 0 225 0 230 230 0 230 0 235 235 0 235 0 240 240 0 240 0 245 245 0 245 0 250 250 0 250 0 255 255 0 256 -1 260 262 -2 260 0 265 265 0 265 0 270 270 0 270 0 275 274 +1 275 0 280 280 0 280 0 285 285 0 287 -2 290 290 0 289 +1 295 295 0 295 0 300 300 0 300 0 305 305 0 305 0 310 310 0 312 -2 315 315 0 315 0 320 320 0 320 0 325 325 0 325 0 330 330 0 330 0 335 335 0 336 -1 340 339 +1 340 0 345 345 0 345 0 350 350 0 352 -2 355 356 -1 355 0 360 360 0 360 0
Table A.6: Azimuth Measurements at 10 degree steps
Angle of Rotation Clockwise Angle Error Anticlockwise Angle Error
0 0 0 0 0 10 8 +2 10 0 20 20 0 20 0 30 30 0 30 0 40 40 0 40 0 50 47 +3 50 0 60 60 0 62 -2 70 70 0 69 +1 80 80 0 80 0 90 90 0 90 0 100 100 0 100 0 110 114 -4 110 0 120 120 0 122 -2 130 130 0 130 0 140 140 0 140 0 150 149 +1 152 -2 160 160 0 160 0 170 170 0 170 0 180 180 0 180 0 190 190 0 190 0 200 200 0 200 0 210 210 0 210 0 220 220 0 217 +3 230 230 0 230 0 240 240 0 240 0 250 252 -2 248 +2 260 260 0 260 0 270 270 0 271 -1 280 280 0 280 0 290 293 -3 290 0 300 300 0 299 +1 310 309 +1 309 +1 320 320 0 320 0 330 330 0 330 0 340 340 0 340 0 350 350 0 350 0 360 362 -2 360 0
Table A.7: Azimuth Measurements at 45 degree steps
Angle of Rotation Clockwise Angle Error Anticlockwise Angle Error
0 0 0 0 0 45 45 0 45 0 90 89 +1 85 +5 135 135 0 135 0 180 180 0 180 0 225 222 +3 220 -5 270 270 0 270 0 315 313 +2 315 0 360 360 0 360 0
Appendix B
Figures
Appendix C
Code
C.1
MATLAB code controlling arm motion
%azimuth parameters (between 180 and -180)
max az = 90; min az = −90; az step = 30;
%elevation parameters (between 70 and -70)##should be between 48 and -80
max el = 10; min el = −10; el step = 20;
10
Def aultAz= 0; %default position at start and end of measurement Def aultEl= 0;
f h= 20000; %don’t filter frequencies above 20 kHz f l = 1000; %don’t filter frequencies below 1 kHz
disable arm = 0; %Make sure the arm is ready to go before running script
20
%%
% Main looping section
%%
% Initialize RB360
if (disable arm==0) 30
RB360=actxcontrol('RPco.x',[5 5 26 26]);
if (invoke(RB360,'ConnectRP2','USB',1)==0) %connects RP2 via USB er='Unable to Connect to RP2 for Robot Arm'
return end
if (invoke(RB360,'LoadCOF','C:\tdt\RoboArm360\motor1')==0) % Loads circuit er='Unable to load COF File for robot arm'
return end
invoke(RB360,'Run'); %Starts Circuit 40
end
n=0;
loopmin el=min el; loopmax el=max el; loopel step=el step;
% loop through azimuths
loopel step=loopel step∗−1; % this will cause elevation to loop up
temp max=loopmin el; % and down to save time moving the arm 50
temp min=loopmax el; loopmin el=temp min; loopmax el=temp max;
% loop through elevations
f or el = loopmax el:(−1∗loopel step):loopmin el n=n+1;
% move robot arm azimuth
if (disable arm==0) 60
invoke(RB360, 'SetTagVal', 'TargetB', az); invoke(RB360, 'SoftTrg', 2);
% move robot arm elevation
invoke(RB360, 'SetTagVal', 'TargetA', el); invoke(RB360, 'SoftTrg', 1);
curel=invoke(RB360, 'GetTagVal', 'CurAngleA');
%wait until gets to right elevation
while(curel<el−0.5 | curel>el+0.5); 70
curel=invoke(RB360, 'GetTagVal', 'CurAngleA'); pause(0.1);
end
%wait until gets to right azimuth
curaz=invoke(RB360, 'GetTagVal', 'CurAngleB'); while(curaz<az−0.5 | curaz>az+0.5);
pause(0.1);
end 80
pause(.5) %wait for arm to stop oscillating end
end end
% move to default azimuth
invoke(RB360, 'SetTagVal', 'TargetB', 0); invoke(RB360, 'SoftTrg', 2);
% move to default elevation 90
invoke(RB360, 'SetTagVal', 'TargetA', 0); invoke(RB360, 'SoftTrg', 1);
% Clean up the COF and stop the arm
invoke(RB360, 'ClearCOF'); invoke(RB360, 'Halt');
C.2
MATLAB code to play and record MLS signal
%Continous acquistion example using a Rambuffer
%This program reads from a rambuffer once it has cyled half way through the buffer
Circuit Path='c:\My Documents\Davis Thesis\MLS\mls_play_rec.rco';
RP=actxcontrol('RPco.x',[5 5 26 26]);
invoke(RP,'ClearCOF'); %Clears all the Buffers and circuits on that RP2
invoke(RP,'LoadCOF',Circuit Path); % Loads circuit’
invoke(RP,'Run'); %Starts Circuit’ 10
Check state
double (state) = invoke(RP,'GetStatus');%converts value to bin’ if bitget(state,1)==0;%checks for errors in starting circuit’
er='Error connecting to RP2'
elseif bitget(state,2)==0; %checks for connection’ er='Error loading circuit'
elseif bitget(state,3)==0
er='error running circuit'
else 20
er='Circuit loaded and running' end
npts=80000; % size of the buffer
buf pts = npts/2; %number of points to write to buffer
LEVEL = −21; %Best Signal Level for 1m distance w/out clipping Fs=44.100; %Sampling rate
REPETITIONS=10;
%Load the MLS signal generator file and Data file to store results 30
mls = load('mls15.dat'); mls = (mls==0)∗−1 + mls; morg = −mls; mls = [ml mlsData = f open('c:\My Documents\Davis Thesis\MLS\mlsData.dat','w');
%Create a data array to feed into the RP2 signal generator
mls = mls/max(abs(mls))∗32750∗10^(LEVEL/20); n = [mls mls];
if invoke(RP,'GetStatus')==7
40 % Start Playing
% Load up entire buffer with MLS signal array
invoke(RP, 'WriteTagV', 'datain', 0, n);
% Main Looping Section
f or i = 1:REPETITIONS
%Start play and record simultaneously
invoke(RP, 'SoftTrg', 1);
curindexPlay=invoke(RP, 'GetTagVal', 'indexPlay'); 50
curindexRec=invoke(RP, 'GetTagVal', 'indexRec');
% Wait until first half of Buffer fills
while((curindexRec<buf pts)|(curindexPlay<bufpts)) curindexRec=invoke(RP, 'GetTagVal', 'indexRec'); curindexPlay=invoke(RP, 'GetTagVal', 'indexPlay'); end
% Reads from RP2 buffer and stores results in double float from 2 channels
tic 60
noise=invoke(RP, 'ReadTagVEX', 'dataout', 0, bufpts,'I16','F64',2); count = f write(mlsData,noise,'double');
toc
% checks to see if the data transfer rate is fast enough
curindexRec=invoke(RP, 'GetTagVal', 'indexRec') curindexPlay=invoke(RP, 'GetTagVal', 'indexPlay')
if (curindexRec<buf pts)
quit='Transfer rate too slow for Recording' 70
end
if (curindexPlay<buf pts)
quit='Transfer rate too slow for Playing' end
% Stop Playing
invoke(RP, 'SoftTrg', 2)
% Loop back to start of data capture routine. 80
end %Clear the RP2 invoke(RP, 'ClearCOF'); end f close('all'); nn=n;
L=size(nn,1); % length of waveform 90
f id = f open('mlsData.dat', 'r');
[r2, count] = fread(fid, [2,L], 'double'); r = r2(:, L/2+1:end);
rright = r(1,:); rlef t = r(2,:);
%Generate plots if the GEN FIGS == 1 100
if GEN FIGS f igure;
plot([1:length(rright)]/Fs,rright,'r',[1:length(rleft)]/Fs,rleft,'b'); xlabel('Time [ms]'); title('Sampled MLS Measurements');
f igure;
impr = xcorr(rright,morg); impl = xcorr(rlef t, morg);
plot([1:length(impr)]/Fs,impr,'r',[1:length(impl)]/Fs,impl,'b');
xlabel('Frequency [kHz]'); ylabel('Amplitude [dB]'); title('Impulse Response at -21
rlen = 320∗4;
f r=20∗log10(abs(fft(impr(1:rlen)))); f l=20∗log10(abs(fft(impl(1:rlen)))); f req = [0:rlen−1]/rlen∗Fs;
f igure;
semilogx(f req,f r,'r'); hold on; semilogx(f req,f l,'b');
xlabel('Frequency [kHz]'); ylabel('Amplitude [dB]'); title('Impulse Response on a Se
Bibliography
[1] Tara J. Brown. Characterization of acoustic head-related transfer functions for nearby sources. Master’s thesis, Massachusetts Institute of Technology, 2000.
[2] W. D. T. Davies. Generatio and properties of maximum-length sequences. Control, June 1966.
[3] S.W. Golomb. Shift register sequences. Aegean Park Press, Laguna Hills, Cali-fornia, February 1982.
[4] D. D. Rife and J. Vanderkooy. Transfer function measurement with maximum-length sequences. Journal Audio Engineering Society, 37(6), June 1989.
[5] L Vanderkooy. Aspects of maximum-length sequenc measuring systems. Journal