Designing a Tutorial for a Multiplatform and Multiplayer Virtual Reality Game
By Jing Fan
S.B., Massachusetts Institute of Technology (2014)
Submitted to the
Department of Electrical Engineering and Computer Science in Partial Fulfillment of the Requirements for the Degree of
Master of Engineering in Electrical Engineering and Computer Science at the
Massachusetts Institute of Technology February, 2019
© 2019 Jing Fan. All rights reserved.
The author hereby grants to M.I.T. permission to reproduce and to distribute publicly paper and electronic copies of this thesis document in whole and in part in any medium now known or
hereafter created.
Author: ____________________________________________________________________________ Department of Electrical Engineering and Computer Science
February 1, 2019
Certified by: ____________________________________________________________________________ Professor Eric Klopfer
Director, MIT Scheller Teacher Education Program Thesis Supervisor
Accepted by: ____________________________________________________________________________ Dr. Katrina LaCurts
3
Designing a Tutorial for a Multiplatform
and Multiplayer Virtual Reality Game
By Jing Fan
Submitted to the Department of Electrical Engineering and Computer Science On February 1, 2019, in partial fulfillment of
the requirements for the degree of
Master of Engineering in Electrical Engineering and Computer Science
Abstract
In order to explore the role of virtual reality (VR) in education, the Collaborative Learning Environment in Virtual Reality (CLEVR) team is building a multiplatform and multiplayer game, Cellverse, that targets high school biology students. The game familiarizes players with cellular organelles and processes as well as encourages them to collaborate to achieve a goal. Due to the novelty of VR and the intricacy of the game, a tutorial is useful to introduce the rules and objectives of the game, and to provide an even playing field to players with various gaming and VR experiences. This thesis presents the design, implementation, and user test procedures and results of the tutorial. Specifically, it discusses the considerations around key design decisions, the problems found in user tests, and the solutions used to resolve such problems. In addition to the implementation of a tutorial for the Cellverse game, this thesis contributed towards the exploration of creating a tutorial that first works with individual players and then brings them together to collaborate from both in and out of VR.
Thesis supervisor: Professor Eric Klopfer
5
Acknowledgements
I had a great experience at the STEP Lab. I would like to thank Professor Eric Klopfer for his guidance, as well as Rik Eberhardt, Dan Roy, Judy Perry, Philip Tan, Meredith Thompson, and Annie Wang for their continuous help and support! I could not have had such a fulfilling experience without these wonderful people.
In addition, I would like to thank Daniel Wendel and Chris Cheng, for connecting me to the lab. And I would like to thank the many other people in the lab, the fellow students and educators who participated in the user tests, and my friends for their help throughout the process.
I would also like to thank my parents, who have always been there for me. Their love, encouragement, and support have always kept me going.
7
Table of Contents
Introduction ... 11
1.2 Organization of the paper... 12
Background and Related Literature ... 14
2.1 VR ... 14
2.2 Educational Games ... 15
2.3 Current State of VR and Other Mediums of Mixed Reality in Education ... 15
2.4 Current State of Collaboration in Education ... 17
2.5 Studies on the Effects of Tutorials ... 20
2.6 Cellverse ... 22
2.6.1 What is Cellverse? ... 22
2.6.2 How do you play Cellverse? ... 23
2.7 Current Challenges... 30
2.7.1 Designing an Informative Tutorial ... 30
2.7.2 Designing a Tutorial that Promotes Collaboration ... 31
The Tutorial Design for Cellverse ... 32
3.1 Why is a tutorial needed? ... 32
3.2 Design of the tutorial ... 33
3.2.1 In what setting/format should the tutorial take place? ... 34
3.2.2 What features to present? ... 37
3.2.3 In what order should the features be presented? ... 39
3.3 The tutorial experience ... 42
User Testing ... 48
4.1 The Setup ... 48
4.2 The Test Users ... 50
4.3 Permission ... 52
4.4 Test Session ... 52
4.5 Designs Tested ... 54
Problems Discovered ... 56
5.1 Clarity of the Instructions ... 56
5.2 Clarity of the Game Objectives... 57
8
5.4 User Interface Design ... 58
Solutions ... 61
6.1 Clarity of the Instructions ... 61
6.2 Clarity of the Game Objectives... 62
6.3 User Engagement ... 63
6.4 User Interface Design ... 65
Conclusion and Future Work ... 69
Bibliography ... 72
Appendix ... 74
User testing information and consent form ... 88
Waiver or Alteration of Informed Consent Request ... 90
9
List of Figures
Figure 1: An Explorer test player going through the Cellverse tutorial. ... 24
Figure 2: A Navigator test player going through the Cellverse game. ... 25
Figure 3: Pictures of some of the organelles in the cell. ... 26
Figure 4: Pictures of clipboard (operated by the left controller) and laser beam (operated by the right controller) in VR ... 27
Figure 5: Pictures of left touch controller and right touch controller for the Explorer. ... 27
Figure 6: Picture of Navigator screen with all tools ... 28
Figure 7: Picture of Navigator Info mode ... 29
Figure 8: Picture of Navigator Beacon mode with 2 beacons intersecting ... 29
Figure 9: Picture of disease information on Navigator screen ... 30
Figure 10a: The Navigator's sequential tooltip style tutorial ... 35
Figure 11: The order in the tutorial in which each role learns about the features and tools in Cellverse ... 39
Figure 12: If the Explorer is still working on the individual features of the tutorial, the Navigator cannot go to the collaborative parts of the tutorial ... 41
Figure 13: If the Navigator is still working on the individual features of the tutorial, the Explorer is transitioned to the gameplay environment while waiting for the collaborative part of the tutorial. ... 41
Figure 14: A picture of the setup of the user test work space. ... 49
Figure 15: The progression of designs presented at each user test. ... 54
Figure 16: The iterative process the team followed when designing and developing the tutorial for Cellverse ... 55
10
List of Tables
Table 1: Table of all features classified by whether they are individual or collaborative. ... 39
Table 2: The staff roles and duties during a user test ... 50
Table 3: Test user demographics breakdown by occupations. ... 51
Table 4: List of issues found during user test sessions ... 60
Table 5: A summary table of problems and their solutions in the iterative process of design, implement, and test ... 68
11
Chapter 1
Introduction
For centuries, humans have been fascinated by the concept of teleportation. That is, to transport oneself from one place to another in an instant and without traveling through physical space. While we cannot realize teleportation today, virtual reality (VR) helps people to feel as if they are in another place. For example, a person can be watching a basketball game in their living room, but feel as if they are in the stadium with the help of a VR headset. Similarly, shoppers at an auto dealer can see cars with any features they desire using head-mounted displays (HMD), even if the cars or features are not on display in the showroom.
Other than in the consumer and retail fields, there are many more uses of virtual reality. Specifically, education is a large area in which we can find important uses of VR. For example, VR lets educators and students experience extreme environments as large as the galactic space or as small as a cell. In addition, it can provide practice environments for students to apply their skills and to collaborate with each other, making VR a useful learning tool.
The Collaborative Learning Environment in Virtual Reality (CLEVR) team is starting to explore the role of VR in education. CLEVR is building an application called Cellverse, which is an educational game that aims to explore the role of VR in high school classrooms. Cellverse brings its players into an unhealthy cell and tasks them with diagnosing and curing the cell. In the process, players learn about the organelles of the cell and the central dogma of biology. A unique characteristic of Cellverse is that it is a multi-player and multi-platform educational game. This means that more than one player participates in the game and the players may be on different
12 hardware platforms, such as inside a VR headset or operating on a tablet. Each player has an incomplete picture of the game, and they must collaborate in order to complete the game.
A tutorial is helpful to introduce players to VR and the rules of the game. However, there are many challenges with designing an effective tutorial, such as figuring out just the right amount of information to introduce, developing a setting that is consistent with the storyline of the game, and finding a way to promote collaboration among players.
My thesis project is to design and implement a tutorial for Cellverse, with the following goals: 1. To present the objectives of the game and to give high-level instructions
2. To teach movements using the touch controllers (for the in-VR role) and tablet (for the out-of-VR role), which allow the players to navigate in the game
3. To provide guidance and instruction and the freedom to explore in a limited environment 4. To introduce some collaborative aspects of the game
The design and implementation of the tutorial went through multiple iterations, from paper prototypes to separate disconnected VR and tablet prototypes, to VR and tablet tutorials that were networked with each other. Five user tests were also carried out to test the tutorial and the game at various points in time. The results from each test helped the group to make improvements for the next iteration. Through the iterations of tests, the group clarified the tutorial instructions and objectives as well as improved the user engagement and user interface design.
1.2 Organization of the paper
This thesis is organized such that Chapter 2 covers the background and related literature. Chapter 3 describes the design of the tutorial and some of the important decisions. Chapter 4 presents the methods used in the user tests while Chapter 5 discusses the problems found in the tests. The
13 solutions to resolve the problems are detailed in Chapter 6. Finally, Chapter 7 concludes and discusses the future work.
14
Chapter 2
Background and Related Literature
Here we introduce the many different facets of CLEVR and the Cellverse project. We briefly describe concepts such as VR and educational games, expand on the current state of VR and collaboration in education, and narrow in on tutorials and their effects on each player’s experience in a few research inquiries. Finally, we introduce Cellverse, the game of which the tutorial is a part.
2.1 VR
VR, along with augmented reality (AR) and mixed reality (MR), belongs to a family of technologies known collectively as extended reality (XR): “[extended] reality (xR) is a term referring to all real-and-virtual combined environments and human-machine interactions generated by computer technology and wearables” [1].
Unlike AR and MR, VR allows a user to experience a world completely separate from reality. Designers of VR applications use runtime engines to create the experience, which is visualized in the stereoscopic lenses of a head-mounted display (HMD) [2]. In addition, the HMD usually comes with a pair of headphones and touch controllers. The visual, audio, and touch components come together to create a virtual experience that lets the user feel as if they are physically in the generated environment.
15
2.2 Educational Games
Educational games are one of many types of games that fall in the realm of serious games, which aim to provide extra benefits in addition to entertainment [3]. These benefits can be for the purpose of training for a particular task (training games), to raise social awareness (social-awareness games), to advertise (advergames and anti-advergames), and many more. Specifically, “… educational games use the game’s natural ability to teach in order to present material in a way that promotes active learning” [3]. Often, its “design process … involves balancing the need to cover the subject matter with the desire to prioritize game play” [4].
In the case of Cellverse, it leverages the affordances of VR to teach students about size and scale of the cell. It also provides an opportunity for students to become hands-on with exploring cellular organelles and processes. While enjoying the immersive environment, students are actively seeking a way to solve the puzzle in the game, and to become more familiar with the biological concepts.
2.3 Current State of VR and Other Mediums of Mixed Reality in Education
As the usage of VR grows, many educators have started to experiment with adopting VR and other mediums of mixed reality in their classrooms. There is a wide range of attempts and adoption, in terms of grade level and subject matter. Classrooms in grade levels as low as kindergarten and as high as colleges have brought in MR to teach students about collaboration, ecology, and other subjects. Below are a few examples of applications of the current use of VR and other mediums of MR in education. To situate CLEVR in the realm of educational games, we explore some existing studies of games.
16 Campos et al., (2010) reported the use of an augmented reality game in kindergarten that maintained the students’ interest [5]. The game was used to teach the students about respect and collaboration. Students worked in groups of four or five and were tasked to place animals in the correct places on game boards. As a comparison, the authors performed a similar game in a PowerPoint-like format with the children. The authors noticed that some children had a difficult time concentrating in the PowerPoint-like format. However, the children did not lose focus in the AR game. In addition, when given the choice, the children did not go to the playground to play. Instead, they chose to continue playing the AR game, showing the effectiveness of the game in capturing the students' attention. "Finally, motivation levels were high because children never gave up the game. Even when feedback showed them they were very wrong, nobody quit the game until reaching the solution" [5]. This demonstrated that the augmented reality medium was captivating to the children, which promoted them to learn. Cellverse uses a novel technology as well, and aims to interest the players to learn biological processes in a similar way.
A study in North Taiwan shows how augmented reality was used in an elementary school to display difficult-to-observe details in order to teach students [6]. Specifically, two classes of thirty students each learned about the lifecycle of butterflies. One class, the control group, learned by breeding and feeding moths. The other class, the experimental group, learned by using tracking devices and mobile phones to capture and obtain information about virtual butterflies. "The results showed that … the teaching tool had a significant impact on the posttest score (p=0.04 < 0.05), indicating the learning effectiveness of the experimental group was significantly higher than that of the control group" [6]. Overall, this AR game raised the students' interests and acted as an effective learning tool by allowing the students to observe the details and habits of butterflies.
17 Similarly, Cellverse empowers students to see and interact with a cell as if they traveling inside it, which is not possible in any classroom or research lab.
Ren et al., (2015) used VR to prepare college students for a mechanical engineering lab [7]. The authors performed two experiments. First, they compared the performances of students who had prepared using one of three ways: lab manual, 3DTV, and Computer Automated Virtual Environment (CAVE). The study found that "Students from virtual module groups demonstrated better performance, as there were fewer mistakes made on the experiment, more collaboration and a higher level of involvement among group members, and shorter amount of time spent on the experiment in general" [7]. While the results of the other experiment did not meet the authors’ hypothesis that the students who prepared using the virtual methods (3DTV and CAVE) would achieve higher quiz scores, this experiment showed the potential of virtual modules and collaboration in increasing the students’ performance. Cellverse has a game setup that requires two players to work with each other. Because of this, the design team hopes to increase the students’ learning efficiency in a likewise fashion to the results of the first experiment.
2.4 Current State of Collaboration in Education
Collaboration is an important aspect of education. As stated by Laal, 2012, “CL [collaborative learning] is an instruction method in which individuals work with one another to achieve a common goal” [8]. However, the emergence of VR, AR, and MR poses new problems in the area of collaboration. For example, VR inherently challenges collaboration because of “the exclusion of all the people in the surrounding from the virtual environment of the immersed user.” [9]. Due to the nature of the headsets, only the player wearing the headset can see and experience the world created in virtual reality. To counterbalance that, many research groups have attempted to create
18 experiences that allow, or even require, people who are not wearing HMDs to collaborate with those who are. Some of the experiences that have led to positive results are ShareVR, EvoRoom, and Interactive Future Mathematics Classroom (IFMC). Because a focus of CLEVR is collaboration across platforms, it is useful to understand how these examples have integrated collaboration into their experiences.
ShareVR by Gugenheimer et al., (2017) uses floor projections and a tracking device to allow both VR and non-HMD players to participate in the same environment [10]. One of the games, Be My Light, is played such that the VR player is an explorer who kills monsters and the non-HMD player is the light that helps the explorer to see his/her environment. Consequently, the VR and non-HMD players must collaborate to accomplish the tasks of the game. One of the results of this study was that ShareVR had a positive impact on people’s “enjoyment, presence, and social interaction” [10]. This game is similar to Cellverse in that players both in and out of VR work together to achieve a common goal. The positive results from ShareVR help to confirm that this collaborative setup can be well received.
Collaborative experiences are also brought into the classrooms. EvoRoom uses projectors, interactive whiteboards, and a tablet application to create an immersive rainforest simulation to teach field biology concepts for students [11]. The students each had a different role and specialty and they worked in groups, where they shared and synthesized information. The authors evaluated 45 students over three sessions and found that there was a statistically significant increase in score between pre- and post-test questions on the topic of natural selection. The students’ responses also gained higher scores on the Knowledge Integration (KI) scale, though this was statistically not significant. This study showed that the collaborative experience was helpful to the students in learning about a topic. In Cellverse, players also have different roles and responsibilities. They
19 have to communicate and rely on each other’s information to complete the game. Cellverse aims to achieve a similar success as shown in the EvoRoom study.
In addition to biology, a math software called IFMC was used in the classroom to create a virtual world, where students worked in teams to study geometry [12]. The students were separated into two groups: with IFMC and without IFMC. Those who learned with it showed greater progress than those who learned geometry with the traditional method. Additionally, the study found that “Even irrelevant comments such as social discussions had positive correlations with the activity. The consequence implies that peer interaction is indeed the key to enabling students to mutually construct geometric concepts” [12]. These results show a positive impact of virtual worlds and collaboration on the students’ learning. Similarly, peer communication and interactions are an important part of Cellverse. The positive influence of the conversations may increase the students’ understanding of biology, as they did in the study of IFMC.
On a broader scale, computer supported collaborative learning in general has seen positive results. For example, Rau et al. (2017) stated in an International Conference on Computer Supported Collaborative Learning (CSCL) proceeding that students in a chemistry undergraduate class performed significantly better when they used an educational technology with a collaboration script [13]. While there are reports that oppose collaboration, such as the meta-analysis of instruction based on VR by Merchant et al., (2014), which stated “We found that students performed better when they worked individually rather than collaboratively when learning through games” [14], many studies have reported the positive impacts of collaborative learning. This may be a signal of the need for children to learn to collaborate as a 21st century skill.
20
2.5 Studies on the Effects of Tutorials
Before any player starts an educational game or a collaborative task, they need to understand what they are trying to achieve. A tutorial is often used in this case. It introduces such information as goals, rules, and constraints. Here we take a look at some common types of tutorials and their effects on VR and non-VR games to better inform us of our designs.
In order to develop effective tutorials, we first need to understand the ways in which people learn. There are three basic learning preferences: visual, audio, and kinetic. Given past experiences, people who are more comfortable with visual learning approaches obtain information the best when it is presented to them via text or graphics. Those who are prefer audio approaches obtain information the best when it is conveyed to them audibly, such as in a speech or information session. Finally, those who are more comfortable with kinetic approaches acquire the best while taking actions (not necessarily related to the content of their learning). In addition to learning styles, Ray argues that there are two acquisition styles: explorative and modeling [15]. People who have an explorative style like to learn by trying out everything and seeing what they do. On the contrary, people with a modeling style like to understand what each action does before trying it out. Ray further suggests that in order to appeal to both styles, a “Move to next step” option is needed in a tutorial.
With this information in mind, Green et al. [16] surveyed many game tutorials and found some common types of tutorials. They included teaching using instructions, teaching using examples, and teaching using a carefully designed experience. In the first case, the tutorial presents a set of instructions that explain the rules of the game. In the case of teaching using examples, the tutorial presents demonstrations that show the player what to do. Finally, in a carefully designed experience, the tutorial is designed such that a player can explore and try out actions in an
21 environment that is usually simpler than the game environment. In order to accommodate both explorative and modeling acquisition styles, the tutorial for the in-VR player in Cellverse uses a combination of instructions and an environment with a lighter cognitive load, while that for the out-of-VR tablet player uses instructions with the option “Continue” to the next step.
Tutorials are important tools that increase people’s sense of familiarity and confidence with a game. In an experiment carried out by Ho, players were set up to practice in either a real world or a virtual-world setting before playing a VR game [17]. The author was interested in finding out the effects of practice and its settings on the players’ confidence, familiarity, initial exploration time, and game performance [17]. The study found that “Even if the players have not played the VR game, practicing in a familiar reality makes them feel as confident and familiar as someone who has practiced in the VR” [17]. This showed that practicing in the real world had positive effects on the player by increasing their confidence and perceived familiarity. Furthermore, the study found that people who practiced in virtual reality had a higher sense of actual familiarity and game performance than those who practiced in the real world. This implied that giving players practice, in either the real or virtual world, had positive impacts on the players. Also, there were more positive effects when the practice was in the virtual world. Because a tutorial is similar to a practice session, this information was helpful to the Cellverse design team in deciding whether or not to create a tutorial for the game. In addition, it provided evidence that the tutorial should be created in VR to attain the best experience for the players.
For non-VR games, the influence of tutorials varied with the complexity of the game. Andersen et al. performed a study involving 45,000 players and 3 video games that differed in complexity [18]. The authors looked at time played, levels completed, and return rate for the video games. They found that “Tutorials were only justified in the most complex game” as the players who had
22 tutorials for the game played for longer durations and realized more levels than those who had no tutorials [18]. However, results of the experiment showed that the two less complex games had no significant difference in the time played and levels completed between the players with and without tutorials. Moreover, the return rate for one of the less complex games was higher without tutorials. Although the games used for the study did not involve any VR components, the results of this investigation informed the Cellverse design team of the possible adverse effects of a tutorial for a relatively simple game.
2.6 Cellverse
2.6.1 What is Cellverse?
Cellverse is a cross-platform and collaborative educational game developed by the CLEVR (Collaborative Learning Environment in Virtual Reality) team. It is targeted towards early high school students and specifically designed for the subject of biology. Cellverse aims to familiarize high school introductory biology students with cellular organelles and processes, eliminate some of the misconceptions introduced by conventional 2D static image representations, and help students learn and understand the central dogma of biology.
Cellverse is being developed using the Unity game engine along with C# scripts. The models used in the game have been developed on Maya and Blender, both of which are modeling and animation software. The CLEVR team behind Cellverse is composed of game designers, UI designers, research scientists, project managers, and software developers. Some of these roles are fulfilled by staff members while others by undergraduate and graduate students from MIT and Wellesley.
23
2.6.2 How do you play Cellverse?
Currently, two players must work together to play the game. One of the players is in the Explorer role. This player uses VR such as the Oculus Rift, as shown in Figure 1. The other player is in the Navigator role, as shown in Figure 2. This player uses a touchscreen tablet such as the Surface Pro. In addition to the different hardware devices the players use, they have access to different resources. For example, when the Explorer puts on the VR headset, they are stepping into a cell. They can see the structures of the cell in greater detail than the Navigator. They will also be able to view the cell at a different scale, which is a feature to be implemented in the future. The ability of the Explorer to see in greater detail helps both players to investigate the cell when certain organelles exhibit symptoms of a disease. The Navigator has a 3D map of the cell on a 2D tablet screen. They also have disease information and tools that may help them in the process of playing the game. The ultimate goal for the players is to diagnose the disease of the cell and to find a cure for it by effectively communicating with each other and leveraging their different resources.
24 Figure 1: An Explorer test player going through the Cellverse tutorial.
25 Figure 2: A Navigator test player going through the Cellverse game.
This player uses finger gestures to operate a touchscreen tablet.
To the Explorer, the cell is a large bounded space in which they can explore. They see various organelles and structures, including the nucleus, the endoplasmic reticulum (ER), the Golgi body, lysosomes, mitochondria, microtubules, actin, and many more. Some of these are pictured in Figure 3. Even though each of these organelles and cell structures was digitally created, their shapes, colors, and general appearances have been designed to resemble the structures and conventions used in research as closely as possible.
26 Figure 3: Pictures of some of the organelles in the cell.
From left to right, nucleus and rough endoplasmic reticulum (row 1), Golgi body and vacuole (row 2), and mitochondria and centrosome (row 3).
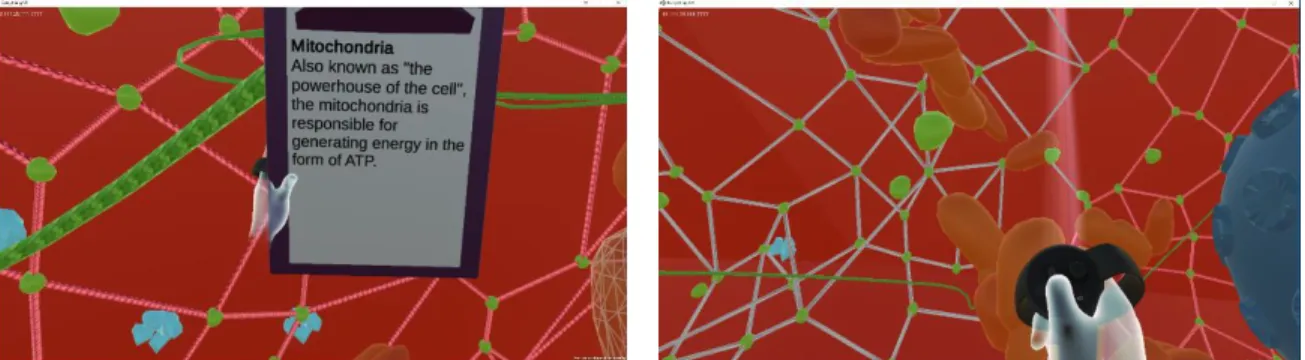
The Explorer is able to travel freely in the cell with the help of a laser beam (as shown on the right in Figure 4). The player uses it to pinpoint a location that they would like to move to and holds down the button A on the right touch controller (as shown on the right in Figure 5) to move towards that location. Similar operations of pinpointing and pressing A can be used to highlight and select an organelle. Then, by pressing button X on the left touch controller (as shown on the left in Figure 5), the player can open a clipboard that contains information on the selected organelle (as shown on the left in Figure 4). The underlying philosophy behind this design is that when a player sees something interesting, they can travel to it or select and read more about it. As a result, they learn more about the organelles in the cell.
27 Figure 4: Pictures of clipboard (operated by the left controller) and laser beam (operated by the right controller) in VR
Figure 5: Pictures of left touch controller and right touch controller for the Explorer. Buttons X and A are the ones that the Explorer uses to operate the clipboard and laser beam.
The operations and resources available to the Navigator are purposefully different than those available to the Explorer. Even though the Navigator does not have a visual experience that is 360 degrees, they have a cross-section map of the cell and a variety of tools. The Navigator can use single finger gestures to move the location of the cell on the screen as well as double finger gestures to zoom in and out. These gestures are similar to the ones used to manipulate pictures on a touchscreen cellphone or tablet. In addition, two sliders on the screen also help the Navigator to rotate the cell on horizontal and vertical axes. To restore the cell to its original location and size,
28 the player can press the Reset button. Figure 6 shows a screenshot of the tablet with the available tools.
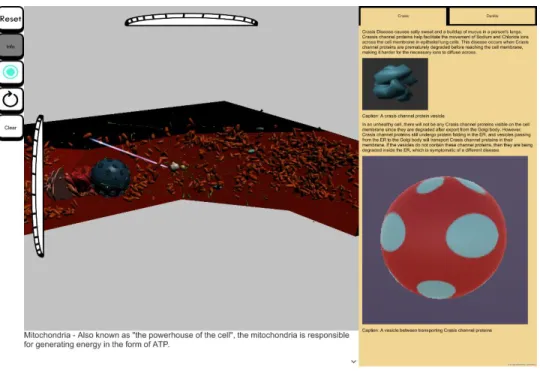
Figure 6: Picture of Navigator screen with all tools
There are two modes in the game. In Info mode, as shown in Figure 7, the player can touch any organelle or structure in the cell and read more about it. This is similar to the Explorer’s
clipboard. In Beacon mode, as shown in Figure 8, the Navigator can place markers, or beacons, onto the screen to help guide the Explorer to a particular location within the cell. Each beacon is a beam of light that penetrates from one end of the cell to the other. The Navigator can use two or more beacons to create an intersection to pinpoint a specific location. An undo button helps the Navigator to remove one beacon while the Clear button removes all beacons.
29 Figure 7: Picture of Navigator Info mode
Figure 8: Picture of Navigator Beacon mode with 2 beacons intersecting
An important asset the Navigator has is the disease information, presented in Figure 9. This contains the possible diseases that can be making the cell unhealthy and the details of each disease. Because this information is only available to the Navigator, the Navigator must verbally
30 communicate to inform the Explorer. The verbal communication as well as the combining of the textual information (Navigator) with the visual information (Explorer) is a crucial point of collaboration in the game.
Figure 9: Picture of disease information on Navigator screen
2.7 Current Challenges
When designing a tutorial for the Cellverse game, there are two main challenges with which we are faced:
1. How do we design a tutorial that is informative and engaging? 2. How do we design a tutorial that promotes collaboration?
2.7.1 Designing an Informative and Engaging Tutorial
There are lots of information to convey before the players start the gameplay. This includes the game context, objectives, and various operations of the game’s features and tools. For example, the game places the players on a molecular level, small enough to see the internal structures of a
31 cell. While this might not be a difficult setting for many people to imagine, it is not one in which people are usually placed. Therefore, we want to make the players aware of this context on which all further game is based. Additionally, we would like to introduce the objectives of the game so that the players understand what they are aiming to accomplish in order to complete the game. Of course, they must also figure out how to accomplish the goals. We would not tell them how, but we would present the resources and the ways to use them.
With this much information, we do not want to overwhelm the players or disengage them by presenting dry information. As a result, the design team explores ways to make the tutorial instructions as concise and informative as possible, and we record the reactions and responses from the test players for evaluation.
2.7.2 Designing a Tutorial that Promotes Collaboration
One of the complexities that makes this game unique is that it is multiplayer and cross-platform. The players involved are the Explorer on a HMD and the Navigator on a touchscreen tablet. We want to make each player comfortable on their platform, then promote collaboration between them. However, how do we do that between the players and across devices?
To answer this question, we explore two aspects:
The optimal time to give clear objectives of the game to each player so that they understand
their goals and the need for their partner
Whether or not to prompt verbal communication between the players. If so, when and how
to prompt such communication
32
Chapter 3
The Tutorial Design for Cellverse
3.1 Why is a tutorial needed?
VR is still a novel technology to which many people have not had prior exposure. Some guidance is needed to help them to familiarize with it. Furthermore, the type of environment for which Cellverse is targeted is a high school biology classroom with teachers and students. This environment has several challenges, such as time constraints, mixture of gaming and VR experiences, and potential peer pressure among students. These challenges contribute to a need of a tutorial.
First, timing is an important factor to consider when designing this game. A typical class in a high school is 45 minutes (1 class period) or 90 minutes (1 lab period) long. This poses a time constraint on the game. In addition, there are usually 20 – 30 students in a classroom and they have to rotate to play the game, because many schools do not have enough VR and tablet equipment for each pair of students. This means that students might not get a lot of time to play. Yet, before they start playing, there is a lot to understand about the game, such as how to interact with the environment, and what are the rules and goals, which cut away the already short playtime. Therefore, in order to maximize the usage of time, students need a way to efficiently understand the various aspects of the game without reading a manual or asking guidance from a teacher every time. In this case, a tutorial that introduces the objectives and rules of the game is a good way to bring the students up to speed.
In addition, students in a classroom represent a variety of gaming and VR experiences. Some students may have played a lot of games outside of school and are experts, while others may not
33 have played any. Similarly, some may have had exposure to VR before while it is the first time for the rest, who do not know what to expect. The level of expertise should not impact a player’s experience of playing Cellverse, especially not hinder that of a novice. In order to provide an even playing field, it would be useful to provide the directions in a tutorial so that anyone who starts the game has the same understanding and knowledge of the game and its operations.
Finally, as with any group of people, there are group dynamics at play. In this case, the students have peer pressure. Even though Cellverse is a game that is only part of the curriculum, students will likely not want to feel embarrassed in front of their classmates by making what they think is a silly mistake or failing to finish the game. Therefore, a tutorial that incrementally introduces all the aspects of the game and provides a response to each of the player’s actions helps the player to familiarize with the game with minimized risks of messing up.
3.2 Design of the tutorial
When designing the tutorial, several factors were considered. First, we needed to convey the game’s goals so that the players know what they are aiming to accomplish. Then, each role has their own operations with which the tutorial should help the player familiarize. Finally, the game intends to establish the need for collaboration between the Navigator and the Explorer. Therefore, the tutorial should start the two players on getting used to working together.
There were multiple challenges with meeting the above goals, including the tutorial setting, features presented, and the order of presentation in the tutorial. These goals are not limited to VR games. Nevertheless, the novelty of VR is an important consideration in constructing the tutorials. We provide additional details on each of these challenges below.
34
3.2.1 In what setting/format should the tutorial take place?
Much of the excitement of Cellverse is in the ability for the VR player to step into a cell and see its organelles and processes. While it might be practical to simply present the tutorial instructions without caring about the setting in which they are presented, it is more consistent and interesting to continue the storyline of a player traveling in the molecular level. In addition, we wanted to provide a safe learning space that is similar to, but not as complicated as, the environment in which the game takes place. As a result, one design decision was to place the Explorer’s individual tutorial in a microvesicle because it is a safe learning space that continues the storyline and provides a simplified and immersive learning environment. We discuss more about microvesicles below.
A microvesicle is a structure that carries contents to and from cells and it belongs to a group of membrane bound structures called extracellular vesicles (EV) [19], [20]. Its size varies from 50nm to 1000nm. Research has found that it is involved in communication among cells. It forms by budding from the membrane of the origin cell and releases the contents by fusing with the membrane of the target cell.
It is important to understand the functions and sizes of microvesicles because they act as a simplified environment in which the player learns the basic skills. A microvesicle contains only proteins and nucleic acids [19], [20], which is much fewer in variety than the actual cell. Hence, it is an environment with reduced cognitive load. In addition, it would eventually fuse with a cell, releasing its content as well as the player into the cell. This makes a scientifically reasonable way to transition the Explorer from the tutorial in the microvesicle to the gameplay in the cell.
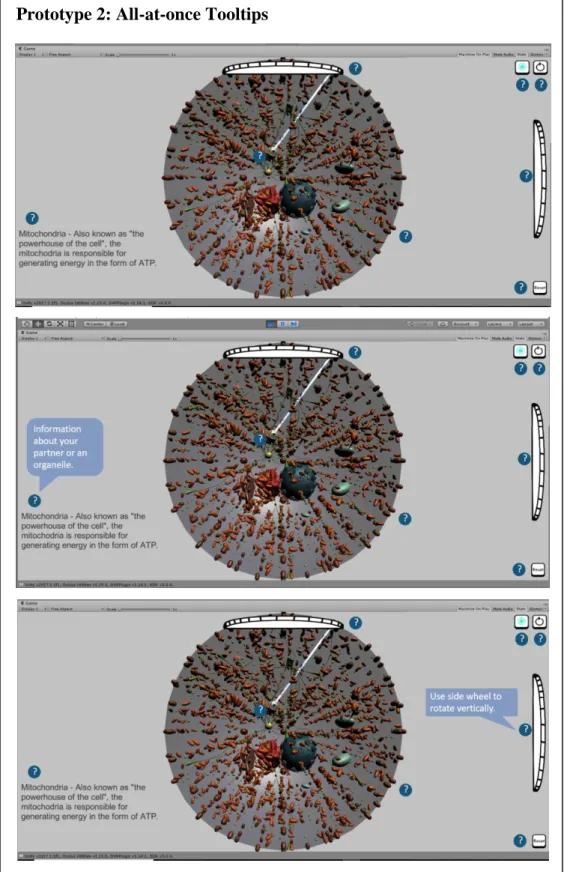
Unlike the Explorer, the focus of the Navigator tutorial is on the tablet interface. Specifically, a prototype with sequential tooltips appearing one at a time (shown in Figure 10a) and a prototype with all tooltips available upon click (shown in Figure 10b) were designed.
35 Prototype 1: Sequential tooltips
Each instruction appears one at a time in a speech bubble. The first screenshot is what the player would see upon entering the tutorial. The second is the introduction of the information panel while the third is the introduction of the side rotation wheel.
36 All of the instructions are shown on the screen as question marks. The player clicks to expand them. As before, the first screenshot is what the player would see upon entering the tutorial. The
Prototype 2: All-at-once Tooltips
37 second is the introduction of the information panel while the third is the introduction of the side rotation wheel. Due to the limited width of the page, the two prototypes are presented one after the other instead of side by side to allow the readers to see the screenshots in more detail.
There are pros and cons of both prototypes. The sequential tooltips prototype provides instructions one at a time without cluttering the screen. It gives the designers the ability to dictate the order in which the player learns the skills. For example, at any point in the tutorial, there would be one tooltip, and the player must click Continue to progress to the next one. Nevertheless, the player loses the freedom to choose the order in which they want to learn. On the other hand, the prototype with the all-at-once tooltips presents a question mark next to each feature. The player clicks on each question mark to read more about its corresponding feature. This design allows the player to explore the features in any order. However, it clutters the screen a bit and takes away the focus from the main features.
The design team decided to use the sequential tooltips style. It kept the screen clean and gave us control over the order in which to present the features. This ordering was especially important because the tutorial had an individual and a collaborative component. We did not want the Navigator to progress to the collaborative component before the Explorer. Therefore, we wanted to have some control over the timing in which certain features were presented.
3.2.2 What features to present?
Each of the Explorer and Navigator roles has a set of different features and tools at the player’s disposal. We decided that the tutorial would introduce all the tools available in the game and their functions instead of introducing some, and letting the players discover the rest. This is because the players should be aware of the existence and functions of all tools in order to play the game. For the Explorer, these include the A button for pointing and selection, X button for clipboard, and the ability to look 360 degrees around them (many first time VR users do not realize they can look
38 behind them). For the Navigator, these include the rotation sliders, pinch to zoom, reset to default, disease information, Info mode, Beacon mode, undo beacon, and clear all beacons.
It might seem that the tutorial is not leaving much for the players to explore. However, that is not quite the case. While the tutorial does introduce the tools and their functions, it would be up to the players to discover little tricks they could do with them. For example, for the Explorer, the tutorial would present the A button for pointing and traveling. The immediate reaction of a player is to point at somewhere in sight and hold A to travel forward to that location. However, a trick that they can discover is to point the touch controller backwards to travel away from the direction they are currently facing. These little tricks can be discovered while playing to add a bit of a surprise and fun. Meanwhile, the tutorial can still be a comprehensive introduction for the players. In reviewing all the tools and features available to each role, we made a distinction between features that required individual learning and those that required collaboration. For instance, learning how to enable and disable the clipboard is a skill only for the Explorer. This player can learn to perform this task on their own and it doesn’t affect the Navigator. In fact, the Navigator doesn’t even need to know the existence of the clipboard. Similarly, rotating the screen and zooming in are skills for the Navigator only. They have no effect on the Explorer. Skills that require only one player’s attention are called individual features. On the other hand, skills such as beacons require the collaboration of both players: the Navigator must place the beacons while the Explorer must recognize them and travel to them. These are called collaborative features. A list of individual and collaborative features is shown in Table 1.
39
Table of Individual and Collaborative Features Individual features Collaborative features
Press A to select (E) Enable Beacon mode and place beacons
Hold A to travel (E) Undo beacon
Press X to enable/disable clipboard (E) Clear all beacons Rotate using sliders (N)
Pinch to zoom (N) Reset to default (N)
View disease information (N) Enable Info mode (N)
Table 1: Table of all features classified by whether they are individual or collaborative.
Individual features require only the attention of one player. Collaborative features require both players’ attention and communication.
(E) denotes for Explorer only (N) denotes for Navigator only
3.2.3 In what order should the features be presented?
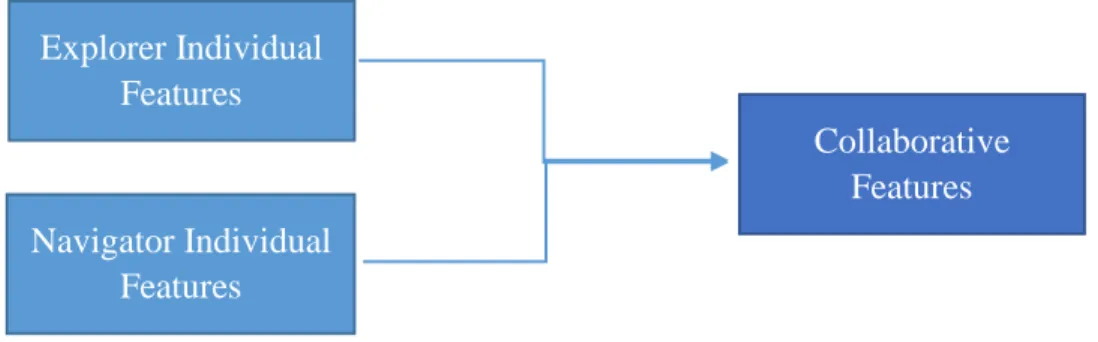
One major design decision we made was to present all the individual features first to each player. Once they have learned their own tools, then ask them to communicate with each other and start to work together. The following diagram (Figure 11) represents the big picture breakdown of the tutorial components.
The reasoning behind this decision was to provide an incremental effect. We did not want to introduce too many aspects of the game at once. Therefore, as the players were getting accustomed to the game, we presented the individual features. Then, we added the cognitive load and presented the collaborative features, which required the players to communicate with each other while being
Explorer Individual Features Navigator Individual Features Collaborative Features
Figure 11: The order in the tutorial in which each role learns about the features and tools in Cellverse
40 aware of the game mechanics. Because it was necessary for both players to interact in the actual game, the introduction of the collaborative features was also a good transition to gameplay. One problem with this ordering of tutorial components was that the Explorer and Navigator would most likely finish their individual parts out of sync. Several factors contributed to this, such as the fact that each role had a different number of individual features, each person learned at a different pace, and each role was performing their operations on a different platform (which would take different amounts of time even if they were the same operations).
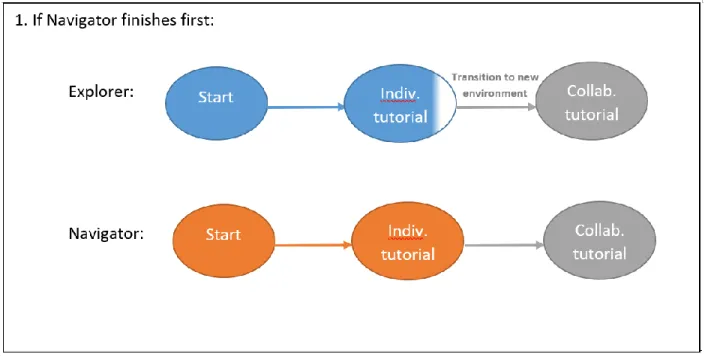
To deal with this problem, we developed a special ordering in which a player was not allowed to proceed to the collaborative features unless their partner had also finished their individual part of the tutorial. Specifically, if the Navigator finished the individual features first, they would be presented an instruction to explore around instead of proceeding to the next (collaborative) tutorial instruction. The tutorial would stay here until the Explorer finished their individual features. This prevented the scenario where the Navigator started to place beacons, thus adding the pair’s cognitive load, when the Explorer was still adjusting to the VR environment or learning about the individual features. Similarly, if the Explorer finished first, they could not embark on the collaborative features. However, they would be transitioned to the gameplay environment (the cell). This was because the Explorer had a bigger space and more cellular structures to explore in the gameplay environment. They would only be exploring the new environment while waiting for the Navigator to finish their individual tutorial. The order of the two scenarios – the Navigator finishes first and the Explorer finishes first – are shown in Figures 12 and 13.
41 Figure 12: If the Explorer is still working on the individual features of the tutorial, the Navigator cannot go to the collaborative parts of the tutorial
Figure 13: If the Navigator is still working on the individual features of the tutorial, the Explorer is transitioned to the gameplay environment while waiting for the collaborative part of the tutorial.
42
3.3 The tutorial experience
This section aims to provide a sense of the tutorial experience for the Explorer and Navigator. A few snippets from each role are provided while a full sequence of instructions can be found in the appendix. Due to the limitations of the print medium, the experiences presented in this thesis are not as good as those in the mediums for which they are meant.
The Explorer tutorial starts with a greeting: “Hey, there you are! We are in a vesicle. Look around. Don’t forget to look behind you!” We distinguish the setting of the tutorial, a vesicle, from that of the gameplay, which is the cell. The vesicle allows the player to experience the tutorial in a manner that is consistent with the storyline of the game. Also note that four panels of the same text are placed in VR. This enables the player to see the instruction in every direction.
43
Then the tutorial teaches the player about the selection mechanism: “Look at your right hand. Press A to select something you see.” For each action that the player performed correctly according to the instruction, the tutorial progresses.
44
This is what the clipboard looks like when the Explorer opens it.
The Navigator’s tutorial starts with a greeting and the objective: “Welcome to the cell! The cell is unhealthy. It is your goal to diagnose it.” At a given point in time, one instruction is displayed. A Continue button is there help the player progress.
45
Then the tutorial introduces finger gestures: “Try using 1 finger to drag the cell! and Try using 2 fingers to pinch and rotate the cell!” With each instruction, the player has the freedom to try the action for as many times as they want.
46
The section on the right is what the Disease Information looks like.
The tutorial tells the player about the different tabs: “You can switch between different
diseases by clicking the tabs on the upper right (with disease names). Feel free to scroll as well.”
47
The use of intersecting beacons is often undiscovered by players without an introduction. The tutorial also tries at every opportunity to encourage the players to communicate: “Add another beacon that intersects the previous one. The intersection of beams pinpoints a location for your partner. Does your partner see the intersection?”
48
Chapter 4
User Testing
Five user tests were done from January, 2018 to July, 2018 to gather data and to aid the design decisions. The procedures were similar for all user tests. However, the last two tests had the most comprehensive setup (with video footage) and included the most complete set of survey questions on tutorials.
4.1 The Setup
Before each test session, we set up the space such that the VR headset and monitor were placed on one table and the tablet was placed on a table next by (as in Figure 14). This way, the Explorer and the Navigator were within talking distance of each other. The monitor that was connected to VR displayed what the Explorer would see inside the headset. While the Explorer could not see the monitor, it allowed others, such as staff members, to check how they were doing. It was important to note that we try to angle the monitor such that the Navigator could not see what was on the display. This is because we would like each player to focus on their own resources and collaborate through communication, instead of through looking on at the Explorer’s display.
49 Figure 14: A picture of the setup of the user test work space.
The Navigator was seated within talking range of the Explorer. The Explorer stood in front of a computer monitor in a space that was free of obstacles to allow for their movements. The computer monitor displayed the visuals that the Explorer saw inside their headset. The setup was arranged such that the Navigator could not see the display on the monitor.
We had multiple staff members dedicated to running each test session. Every staff member had a set of duties. A list of different roles and duties are listed in Table 2. For example, one person was the Explorer facilitator. This person guided the player to the table with the VR equipment, helped them put on the headset, and provided assistance whenever the player was in desperate need. The Explorer notetaker was responsible for asking the Explorer a set of survey questions and recording their responses for evaluation. An analogous set of facilitator and notetaker existed for the Navigator. In addition, there were general notetakers who focused on the communication between the players as well as any aspects worth noting down but were not captured in the survey questions. When there were not enough staff members for a session, one staff member could act as both the facilitator and notetaker for the Explorer. The same is true for the Navigator.
50
Table of Staff Roles and Duties during User Testing Roles Duties
Explorer facilitator
Provides guidance to the VR player, including helping them with the VR headset and providing assistance whenever the player is in desperate need. Explorer
notetaker
Asks and records the VR player’s answers to survey questions. This role can be combined with the Explorer facilitator when the team is under-staffed. Navigator
facilitator
Provides guidance to the tablet player, including handing them the tablet and providing assistance whenever the player is in desperate need.
Navigator notetaker
Asks and records the tablet player’s answers to survey questions. This role can be combined with the Navigator facilitator when the team is under-staffed. General
notetaker(s)
Observe the communication and any highlights between the players. Table 2: The staff roles and duties during a user test
To keep the amount of distractions as low as possible, only the facilitators could speak at any time during the test sessions, the Explorer and Navigator notetakers spoke only when asking survey questions, and the general notetakers did not speak. All staff members were instructed to allow the test players to explore the game as much as possible and only provide help if they had been stuck for a while or were in desperate need. Because human subjects were involved in the test sessions, it is useful to mention that all staff members who assisted had taken the Social & Behavioral Research Investigators training from the Collaborative Institutional Training Initiative (CITI) and the Committee on the Use of Humans as Experimental Subjects (COUHES).
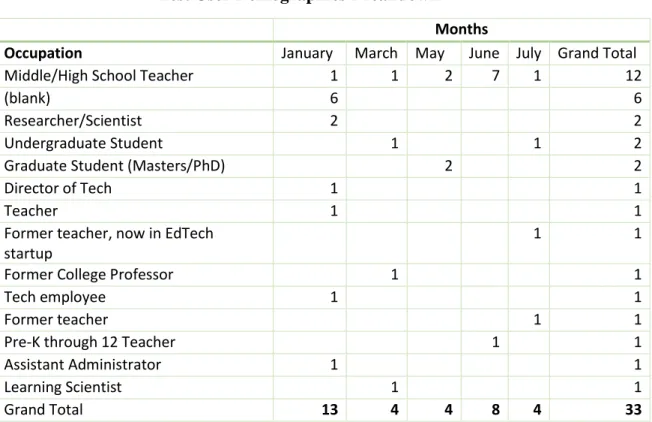
4.2 The Test Users
The people who tested Cellverse were mostly educators or students. Specifically, there were a total of 33 users, of which 14 were teachers (middle/high school, pre-K through 12, and no grade specification), 2 were former teachers, and 4 were students (undergraduate and graduate). A specific breakdown is shown in Table 3.
51
Test User Demographics Breakdown
Months
Occupation January March May June July Grand Total
Middle/High School Teacher 1 1 2 7 1 12
(blank) 6 6
Researcher/Scientist 2 2
Undergraduate Student 1 1 2
Graduate Student (Masters/PhD) 2 2
Director of Tech 1 1
Teacher 1 1
Former teacher, now in EdTech startup
1 1
Former College Professor 1 1
Tech employee 1 1
Former teacher 1 1
Pre-K through 12 Teacher 1 1
Assistant Administrator 1 1
Learning Scientist 1 1
Grand Total 13 4 4 8 4 33
Table 3: Test user demographics breakdown by occupations.
Note: The data from January were not as specific as those from the other months. As a result, there were a few that were blanks. In addition, January was the only month where the same people played in different roles in the user testing. Each role was counted as a user, amounting to a higher number of total users.
The testers were voluntary. They didn’t receive monetary compensation, but were given dinner before or after the test sessions.
Two users played together in a test session. One of the users plays in the Explorer role; the other in the Navigator role. Fourteen (about 42.4%) of the players didn’t know each other before the session, 10 (about 30.3%) knew each other somewhat (acquaintances), and for 9 (about 27.3%) of them we did not know the relationship.
To better understand the users’ backgrounds, we also asked whether or not they had had prior VR experience. Seventeen (about 51.5%) of the test players had VR experiences before, 9 (about 27.3%) had some experience, and 7 (about 21.2%) did not answer.
52
4.3 Permission
The results and video footage from the user test sessions would be used and published. Consequently, all players were asked to read and sign consent forms, which informed them of the purpose of the study, what data would be collected, and that their data may be used for research purposes.
User Testing Information and Consent Form was required to be signed in order to participate in the user tests. Waiver or Alteration of Informed Consent Request was given to the users to read but did not require signature. Both forms can be found in the Appendix.
4.4 Test Session
Each test session lasted about 45 to 60 minutes. This included the pre-test briefing, tutorial experience, gameplay, and answering survey questions. Usually, two test sessions were carried out in sequence in one day, with the exception of January. There was one day of testing in January, March, May, and July, and two days of testing in June.
During a test session, players were briefed on the background of the game and the audience to which it was targeted. Then, they were led to their respective facilitators and notetakers to answer a few demographic questions before getting accustomed to their devices. For the Explorer, this meant putting on the VR headset and touch controllers, and adjusting the lenses for clarity. For the Navigator, it simply meant getting the tablet. Both players then started on the tutorial experience. Due to the difference in devices, the Explorer usually took a longer time (a couple to a few minutes more) before they were ready for the tutorial. The Navigator could start immediately, but had more instructions that they needed to go through.
53 While the players were in the tutorial, the staff members were keeping a record of how long it took for each player to finish the tutorial as well as what they were doing in between tutorial instructions. In addition, the staff members noted down any signs of impatience or enjoyment, such as sighs, “this is so long,” or “wow”, “cool”, and “I know how to do X now.”
After the players finished the tutorial and gameplay, they sat with their respective notetakers and answered a series of survey questions that covered the tutorial, gameplay, and collaboration. The tutorial-specific questions are listed below, while the whole set of questions can be found in the Appendix.
Was the tutorial engaging? Why or why not?
Was the tutorial informative? Why or why not?
How do you feel about the tutorial instructions in general? What was confusing, if any?
What was clear, if any? (Please include whether you were a VR or tablet player.)
Did you understand how to move and operate the touch controllers or touchscreen from the
tutorial?
Did you understand what was the objective of the game from the tutorial? Any comments?
Did you understand that you had to work with your partner from the tutorial? Any
comments?
Did you feel that you had too short, enough time, or too long to learn how to navigate in
VR or on the tablet? (Please include whether you were a VR or tablet player.)
54
4.5 Designs Tested
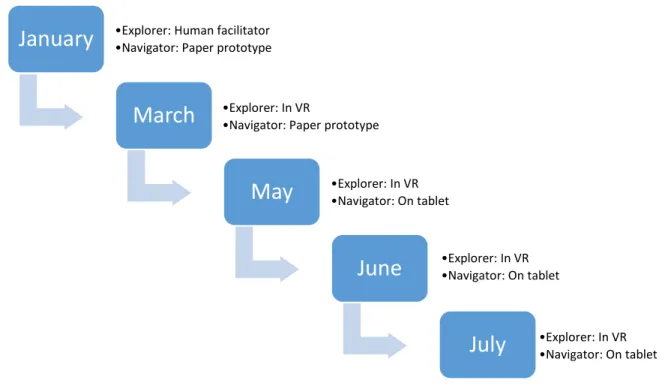
Test sessions were performed in January, March, May, June, and July of 2018. Each time, the designs of the tutorial were different. For example, the most basic prototypes were presented to the users in the January test. Here, a staff member acted as a tutorial for the Explorer, speaking each instruction aloud as the player traveled in the Cellverse environment. This was similar to the Wizard of Oz [21] style user testing, where the system to be implemented was played by a human facilitator. Likewise, the Navigator tutorial was in the form of a paper packet. On each page, there was a screenshot of the entire tablet interface and an instruction pointing to a specific feature. These low-fidelity prototypes provided the team the opportunity to test early and course-correct. Later in March, the first version of the Explorer tutorial had been implemented in VR while the Navigator tutorial was on paper. Then, in May, the Navigator tutorial was implemented on the tablet while the Explorer tutorial stayed in VR. The complete evolution of the designs is shown in Figure 15.
Figure 15: The progression of designs presented at each user test.
January
•Explorer: Human facilitator•Navigator: Paper prototypeMarch
•Explorer: In VR•Navigator: Paper prototypeMay
•Explorer: In VR•Navigator: On tabletJune
•Explorer: In VR•Navigator: On tablet55 The blue boxes represent the months in which user tests were carried out. The text specifies the way the designs were presented to the users in that month.
The team operated in an iterative process. After each user test, we debriefed on the results and observations. Improvements were then made to address the problems discovered. We tested the tutorial again in the next user test and repeated the process. An illustration of the process we followed is shown in Figure 16.
Figure 16: The iterative process the team followed when designing and developing the tutorial for Cellverse
The major problems that were discovered in the user tests are described in the next chapter, while the evolution of the design changes targeted at resolving these problems are described in the following chapter. Design and improve User test Debrief
56
Chapter 5
Problems Discovered
Through the multiple user tests, problems were discovered in four main categories: clarity of the instructions, clarity of the game objectives, user engagement, and user interface design. The details of the problems are stated in this chapter, while their solutions are described in the next chapter.
5.1 Clarity of the Instructions
Conveying the tutorial instructions clearly and concisely is a challenge. Many factors such as pace, terminology, and ordering of the instructions contribute to a user’s understanding of the game’s mechanics. For example, in the March version of the Explorer’s tutorial, the instructions progressed based on a timer. There was a fixed amount of time (e.g. 5 seconds) before advancing to the next instruction. This design was based on observations from the January user tests where a few seconds of interval was sufficient for the Explorer to understand and try out an operation. However, a problem was revealed in the March tests: users often missed the beginning instructions while making VR headset adjustments. This wasn’t revealed in the January tests because a human facilitator acted as the Explorer tutorial. The facilitator could recognize when a user was ready to start whereas a timer-based tutorial at this stage couldn’t. This was a significant problem that needed to be resolved through redesign.
In addition to pacing, the precision of the instruction terminology also impacted the tutorial. For example, in the earlier versions of the Explorer tutorial, we used the phrase “press the A button” to move to a location. As a result, we noticed many users would repeatedly press the button quickly
57 and release, with each press only allowing them to move a short distance. However, this was not the optimal way to move, especially for long distances in the tutorial or gameplay.
For the Navigator, there were also issues with the clarity of the instructions, specifically those related to the Disease Information. In both the January and March tests, because there were both the actual text of the Disease Information and the tutorial instructions that introduced it, some of the users were uncertain what to focus on. Instead of only reading the tutorial instructions, the users read the descriptions of the diseases as part of the tutorial. One of the problems was attributed to the fact that the Disease Information panel was defaulted to the “on” position, which became the largest section of text on screen and attracted many users’ attention. The other problem was that the Disease Information was introduced fairly early in the tutorial, which prevented the users from progressing.
5.2 Clarity of the Game Objectives
An issue that came up frequently in the January, March, and May tests was that the users didn’t know what was the ultimate objective of the game, even though they might have understood the mechanics.
In the beginning, the objective of the game was left out of the tutorial instructions on purpose because we would have liked it to be introduced in the narrative, which is a storyline behind this game. At the time, the narrative was not yet ready to be tested. The design was to have both players read the narrative first, progress to the tutorial, then reach the Cellverse game. However, it became increasingly clear that not having a clear goal in the players’ minds impacted their experiences. For instance, one of the facilitators had to prompt the users in the May test with “Do you know what the goal is” to start the discussion between them. Otherwise, many of the players