Design of a Liquid Embossing Machine
by
Eric J. Wilhelm
B.S., Mechanical Engineering (1999) Massachusetts Institute of Technology
Submitted to the Department of Mechanical Engineering in Partial Fulfillment of the Requirements for the Degree of
Master of Science
at the
Massachusetts Institute of Technology June 2001
@ 2001 Massachusetts Institute of Technology
All rights reserved SAI
MASSACHUSETTS INSTITUTE OF TECHNOLOGY
JUL 1 6 ?001
LIBRARIES
Author____________ F_______
Yepartment of Mechanical Engineering
May 11, 2001 Certified by
\4 'Ioseph M. Jacobson
Associate Professor of Media Arts and Sciences Thesis Supervisor Accepted by
Ain A. Sonin
Design of a Liquid Embossing Machine
by
Eric J. Wilhelm
Submitted to the Department of Mechanical Engineering On May 11, 2001 in partial fulfillment of the requirements for the Degree of Master of Science
ABSTRACT
A machine was designed to pattern thin films of liquid by liquid embossing. 10 designs
were prototyped and evaluated according to pattern transfer, alignment, and ability to emboss large area. The final design utilizes a PDMS stamp cast such that it seals an air cavity, which is then pressurized to slightly bow the stamp. The cavity is clear so
alignment can be accomplished by optical feedback using a camera and microscope objective.
The theory of liquid embossing is discussed. PDMS has a very high contact angle with most fluids and so it is able to clear liquid from channels approximately 5 pam wide. The wettability of the substrate is modified after being in contact with PDMS so the liquid does not reflow into the channels.
Sub-micron alignment between layers was achieved. Vector plots of runout between layers are given. Electrical yield was found to be 89% and was not negatively correlated
by stamp age up to 1000 dry stamps. The stamps were found to wear, but due to their
conformal nature this did not affect pattern transfer.
Structures created by the liquid embossing machine include electrostatic actuators, test patterns with 100 nm features, vias, under-etched metal layers, and released
cantilevers.
Thesis Supervisor: Joseph M. Jacobson
1 In tro d u c tio n ... 6
2 Theory of liquid embossing ... 9
2.1 Forming the stamp... 10
2.2 Fluid dynamics during the embossing process ... 15
2.3 Cleared channels... 19
2 .4 M a te ria l se t...2 7 3 Design of the liquid embossing machine... 30
3.1 Requirements... 31
3.1.1 Pattern transfer... 31
3.1.2 Large area ... 32
3.1.3 Alignment ... 32
3.2 Implementation... 32
3.2.1 Flat fixed stamp ... 33
3.2.2 Stiff bowed stamp ... 34
3.2.3 Bowed steel stamp ... 36
3.2.4 Pivoted stamp ... 37
3.2.5 Pivoted steel stamp ... 39
3.2.6 Actuated pivoted stamp ... 41
3.2.7 Hand roll... 42
3.2.8 Substrate on roller... 43
3.2.9 Stretched stamp and roller... 45
3.3 The liquid embossing machine ... 48
3.3.1 Positioning system... 48
3.3.2 Pneumatic stamping ... 49
3.3.3 Optical alignment... 53
3.3.4 Draw down bar ... 53
3.3.5 In situ laser curing ... 55
3.3.6 Using the liquid embossing machine ... 57
4 R e s u lts ... 6 2 4.1 Alignment and repeatability ... 62
4.2 Lifetime of stamp ... 65
4 .3 R u n o u t...6 9 4 .4 Y ie ld ... 7 1 4.5 Stamping pressure ... 74
5 D e v ic e s ... 7 8
5.1 Electrostatic actuators ... 78
5.2 High resolution ... 82
5.3 Inductors and vias ... 83
5.4 Deep channels ... 85
5.5 Aqueducts ... 90
5.6 Patterned, etched, and released... 90
6 Conclusions and future work ... 95
7 References ... 97
Acknowledgements
Thanks to my love, Christy, for giving me more than I am worth. A lot more.
Thanks to Joe, for inviting me to work in the lab and then not ever being satisfied until I got the best results.
Thanks to everyone in the lab for the favors and for putting up with, and sometimes even enjoying, NPR mixed with electronica.
Thanks especially to Colin, Saul, Brent, and Sawyer for ideas, a critical look at my work, and a stronger understanding of our research.
Thanks to Babak for urging both Joe and me that I should be a part of lab. Finally, thanks to my parents: you tried to raise a scientist, but got an engineer.
I
Introduction
Figure 1: Surface profiles of features in a stamp and a liquid embossed nanoparticle colloid.
Microfabrication is important to human society. The ability to make logic and electromechanical systems increasingly small has allowed for revolutions in
communication, information accessibility, and portability. It is beyond the scope of this work to weigh the relative merits and drawbacks, so suffice it to say that though current microfabrication is good, it could be greatly improved. This document discusses the design, creation, and performance analysis of a novel machine designed to improve upon the current methods of microfabrication.
The goal of the machine is to create the same sorts of structures and devices that are typically made in a microfabrication plant. These plants often cost billions of dollars to build and maintain, are run by highly trained personnel, generate large volumes of waste, and are extremely difficult to upgrade or change. Successful design is defined as creation of a machine capable of producing products functionally identical to those produced in a microfabrication facility. This machine should also cost less than one hundred thousand dollars, be simple enough that children could operate it, and should be able to operate in lab space converted from a basement.
The price point, long iteration time for design revision, and environmental impact associated with current microfabrication clearly demonstrate that a paradigm shift is
necessary. The machines required for microfabrication cost too much and are extremely complicated. The time between designing a structure and testing it is often measured in
weeks, if not months. Many microfabrication production facilities are limited in their production by the amount of waste they can legally generate and dispose of. Finally, construction of a microfabrication lab is impossible for someone with limited resources.
There are several efforts underway to address these problems. Nanoimprint lithography uses a rigid stamp to emboss a thin film of material using high pressure, at a
temperature above the glass transition temperature of the thin film1'2'3. The material is
cooled with the stamp in place and the film is then briefly etched to remove material in the imprinted regions. The film is then used as an etch mask to selectively remove underlying material.
Micro-contact printing is a technique that pioneered the use of elastomers for contact type patterning4'5'6. A soft stamp is cast on a master to create patterns in bas-relief. The
raised features are inked with a self-assembled molecular monolayer (SAM) that can then be transferred to a gold surface. The SAM acts as an etch resist, and underlying layers can be selectively removed.
Both of these techniques are limiting because they require an etch step. Etching is time consuming, costly, wasteful of functional material, and environmentally hazardous. It is possible to build multiple layers using either technique, though both require multiple steps to prepare. NIL requires a flat surface and application of an imprintable material. Microcontact printing does not require a flat surface, but does require a surface
amenable to SAMs.
An ideal technique would deposit patterned functional material directly. No etch would be required, and more functional material could be deposited directly on the previous layer without the need to planarize, treat, or otherwise prepare one layer for the next.
The machine described in this thesis uses a technique known as liquid embossing7.
Liquid embossing creates patterned layers of functional material, such as metal or insulator, by patterning thin layers of liquid. After patterning, the liquid is converted to a solid and another layer can be deposited. The machine described here is the first attempt to transition liquid embossing from a manual laboratory curiosity to a production method scalable to the point where it can have great impact.
This thesis is divided into several chapters. Chapter two describes the theory of liquid embossing as it is currently understood. Chapter three describes the design of the liquid embossing machine, and chapter four analyzes the machine by looking at some results. Chapter five showcases a selection of structures and devices made by liquid embossing, and finally chapter six discusses future work.
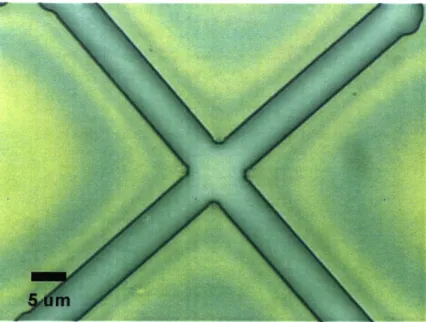
2 Theory of liquid embossing
a
b
c
Figure 2. Schematic of the liquid embossing process: (a) an elastomeric stamp is brought into intimate contact with a thin film of liquid, (b) the stamp contacts the underlying substrate and selectively patterns the liquid film, (c) the stamp is removed and the liquid film remains patterned.
Liquid embossing creates patterns by placing an elastomeric stamp in intimate contact with a thin film of liquid. The stamp through-embosses the liquid: raised features in the stamp push through the thin film until they are in contact with the substrate, clearing liquid from those areas of contact. The stamp is made from an elastomer and is thus conformal, so the stamp and the substrate need not be perfectly planar to achieve contact and good patterning of the film. The stamp is then removed, leaving a residue that prevents the liquid from re-flowing and filling the cleared channels. The patterned liquid film is finally converted to a solid film by heat, light, or other means, yielding isolated features.
Liquid embossing is fundamentally different from surface embossing techniques such as Nanoimprint lithography'. The channels are functionally clear of material, so there is no need for an etch step to clean out a thin layer. The thin film remains in liquid phase during the process and is still liquid when the stamp is removed. A phase change is not required to maintain patterns. In fact, after a thin film is patterned, the stamp can be brought back into contact with the substrate in a different position, and the film can be patterned again. This is not a particularly useful technique because the first pattern persists, but it does demonstrate that the fluid is still liquid.
This chapter is divided into four sections. The first three describe the aspects of the liquid embossing process: creation of the stamp, embossing the liquid, and the residue left in the cleared channels. The final section discusses the material set.
2.1 Forming the stamp
Figure 3: Schematic of stamp formation. PDMS pre-polymer is poured onto a master with surface features. The PDMS is cured and then removed from the
master.
The stamp is made from poly(dimethylsiloxane) (PDMS), either patterned in bas-relief by a master or cast on a flat surface and then cut by laser. Masters are made using
photolithography, focused ion beam (FIB), or similar methods that create surface topography. PDMS pre-polymer is poured onto the master and then cured. This work utilized Dow Corning Sylgard 184, which follows a linear curing time at temperatures ranging from 200C to 1500C. Typically the PDMS is cured for 3 hours at 600C, although
if shrinkage is a concern the PDMS should be cured at the same temperature it will be used. Once cured, the stamp is peeled off of the master.
100 uM
Figure 4: Optical image of laser-cut PDMS in profile. PDMS was cast on a glass slide, laser cut to form patterns, and cut by a razor into slices several millimeters
thick.
Laser-cut stamps are made by casting PMDS on a flat surface and then ablating material to form patterns (Figure 4). PDMS pre-polymer was cured on glass slides and
then cut at 2% power and 10% speed on a 100 watt C02 laser cutter8. Figure 6 shows a
computer-aided design (CAD) picture of a stamp and Figure 5 is an image of a laser-cut stamp.
Figure 5: Optical image of a laser-cut POMS stamp. PDMS was cast on a glass
slide and then cut at low power by CO2 laser. The patterns shown are test
structures.
IMM [I M
£rMM 3MM
Figure 6: CAD image of the test pattern used Figure 5.
to laser-cut the PDMS shown in
Figure 7: White light 3-D interferogram of a PDMS stamp.
The size of raised features in the PDMS can range from millimeters to tens of
nanometers9. In this work typical feature sizes were 1pm high, 1-5gm wide, and 1gm to several millimeters in length. Masters were typically features patterned in photoresist by photolithography on a silicon wafer (Figure 8). Stamps were also cast on silicon wafers etched by focused ion beam and optical gratings (Figure 9).
Figure 8: Optical image of a master used for stamp formation. The silicon wafer has a 1gm thick layer of photoresist that has been patterned by photolithography.
Box
Walls
[PDMS
Blaze
Angle
Coating Polished -.Epox
Al or Au Ssrale Lwyer
Figure 9: Schematic of an optical grating used as a master to cast a PDMS stamp. (Original image from Edmund Scientific)
Care must be taken in selection of a master. PDMS cured on bare silicon forms a bond and cannot be cleanly removed from the surface. Figure 10 shows an AFM image of a silicon master filled with PDMS. The stamp's raised features stuck to the silicon and ripped off, leaving PDMS in the FIB cut trenches. Treating the surface of the silicon
wafer, as discussed in Section 5.2, solves this problem. PDMS cured on silicon wafers coated in photoresist or glass, however, do not exhibit such problems.
Figure 10: Atomic force microscopy (AFM) image of a silicon master with features cut by FIB. The trenches are filled with PDMS that bonded to the silicon
and remained stuck as the stamp was removed from the master, removing the raised features.
2.2 Fluid dynamics during the embossing process
Liquid embossing takes advantage of a difference in contact angles. The raised features of a PDMS stamp are able to create cleared channels in a thin film of liquid due to the high contact angle between PDMS and most fluids, and low contact angle between the fluid and substrate. Figure 11 shows a schematic of a representative situation;
a1 > a2,
so the projection of the surface tension generates a net force towards clearing the channel.
PDMS
++ ± + 1hnf+ + + +
A- + +± ' + ' +
G
substrate
Figure 11: Contact angles of the thin fluid film with a raised feature in the PDMS
stamp (a1) and the substrate (M) in air. The surface tension (a) is a fluid
property and is the same at both interfaces.
The contact angles must fall into this range for liquid embossing to occur. If
C2 > 900,
the substrate is non-wetting and a thin film cannot be created on it. If a2 > aX - 90 ,
the net surface tension force will not clear the channel and a layer of fluid will remain between the substrate and the raised features of the stamp, a situation more akin to a surface emboss. Surface tension in the fluid tends to minimize exposed area and prevents the two interfaces from moving in opposite directions.
L
stamp
h
Figure 12: Hydrostatic bearing model of a raised feature of PDMS in contact with a thin film of fluid.
The maximum width that can be cleared depends on viscous flow while the raised features are still floating on the fluid. A first order model is that of a hydrostatic bearing, as shown in Figure 12. Assuming the fluid is Newtonian, and that viscous effects dominate inertial effects,
dh Ph'
dt gL2
where h is the gap height, P is the pressure applied to the stamp, [t is the viscosity of the liquid, and L is the length of the channel. Solving for gap height as a function of time yields:
h = 2ph_2t 2
ho _ %2L
where ho is the initial gap height and t is time. Note that
h
--> 0
ho
only asymptotically. This is a result of an assumption in the model that a fluid particle next to a wall must have the same velocity as the wall. So without the surface tension
force the channels could not be cleared. A stamp that was wetted by the liquid could not clear that liquid.
Using some typical process parameters (ho = 100 nm, p = 0.040 kg/ms, L = 5 [tm, and P
= 70 Pa), the time to reach a film thickness of 10 nm under a raised feature is 70
seconds. The time to reach 5 nm is 290 seconds. Watching the patterning of the fluid directly in the alignment camera (Section 3.3.3), there is usually no fluid movement after the first 30 seconds, indicating that the surface tension forces are significant compared to the forces from pressure between the stamp and the substrate.
4 +H + ±+
Figure 13: Schematic of a deformation in a raised PDMS feature that has trapped some liquid.
A perfectly planar, rigid stamp with proper contact angles could clear an arbitrarily long
channel on a perfectly planar substrate; however PDMS is not rigid. As the raised features clear the liquid they can also deform as shown in Figure 13, trapping liquid. Figure 14 shows an optical image of test structures used to determine the distance different liquids can be cleared. Lower viscosity liquids such as spin on glasses can be cleared much further than higher viscosity liquids such as nanoparticle colloids' .
Figure 14: Optical image of test patterns embossed in a thin film of colloidal nanoparticle silver. The colored areas are silver and the white areas are exposed substrate. Note that the silver is not entirely cleared in the thick bars on
the left.
2.3 Cleared channels
When the stamp is pulled away from the surface the thin film does not flow back into the
cleared channels as predicted by de Gennes13 with
iCR2 (t) t"Q'
where R is the radius of a droplet, n and p are constants determined empirically, and
Q = -hR2
2
This non-intuitive result is due to a change in wetting properties of the substrate after it has been in contact with the raised features of a PDMS stamp. The stamp leaves a very small amount of either PDMS or uncured pre-polymer, which maintains the high contact angle and hence non-wettability of PDMS in the channels. The amount of PDMS left after each stamp is very small, approximately a monolayer, and difficult to measure. As discussed in Section 4.2, lifetime tests were conducted, but an insufficient amount of PDMS was removed from the stamp to make accurate measurements.
V 1
Figure 15: Optical image of a film of silver nanoparticles drawn down on a glass slide that had been in intimate contact with a PDMS stamp.
Tests to investigate the residue left by a PDMS stamp were conducted by dry stamping. Dry stamping is the act of bringing a stamp into intimate contact with a substrate, without a thin film of liquid. The effects of dry stamping are visualized by drawing down a thin film of liquid on a dry-stamped substrate. As shown in Figure 15, the liquid will de-wet areas on the substrate, often de-wetting in the pattern of the stamp used to dry stamp. Good pattern transfer is rarely achieved because without the thin film of liquid to act as a lubrication layer and barrier, both the raised features and the base level of the stamp may come into contact with the substrate. In each of the four images shown in Figure 16 through Figure 19 the pattern of the stamp used was visible when the film was first drawn down. Unfortunately on the aluminum foil and the polyimide, the liquid tends to de-wet and flows fast enough that it is difficult to photograph the pattern.
Figure 16: Dry stamped glass with a thin film of silver
nanoparticles. Figure 17: Dry stamped
aluminum foil with a thin film of silver nanoparticles.
Figure 19: Dry stamped polyimide film with a thin film of
silver nanoparticles. Figure 18: Dry stamped silver
with another thin film of silver nanoparticles.
PDMS left residue on all substrates tested, while thin films of liquid did not de-wet the substrates if they were not dry stamped. Substrates tested include thin films of gold and silver from nanoparticle colloids, glass slides, silicon wafers with native oxide, polyimide films and laminated polyimide films, films of cured spin on glass (Filmtronics 21 F), and
aluminum foil. The residue persists and patterns are still visible in a thin film of liquid after rinsing with methanol and isopropanol, heating in air to 3000C, and bringing the substrate into contact with another clean substrate. In fact the residue can actually be transferred to another substrate as shown in Figure 20, by clamping a clean substrate to one that has been dry stamped.
Figure 20: Optical image of a glass slide, with a thin film of nanoparticle silver, brought into contact with another glass slide that had been dry stamped. The
PDMS residue is transferred to the clean glass slide by contact.
Other groups working with PDMS have observed residue14. Using micro-contact printing
to pattern cells, the Whitesides group noticed that their sensitive cells were shriveling and dying. They attributed this to uncured polymer in the raised features of their stamps, that was then transferred to the surface.
The residue is not from residual solvent in the PDMS. Stamps that have never been in contact with cleaning solvents leave residue, as do stamps held under vacuum for approximately 8 hours. Stamps with slight excesses of curing agent or pre-polymer also leave residue. Great excesses of either curing agent or pre-polymer were not tested because the PDMS did not fully cure under these conditions.
Figure 21: Optical image of a glass slide that has been dry stamped and then half of its surface cleaned by vigorous rubbing with a gloved finger under isopropanol
and methanol.
Figure 21 shows a slide that has been dry stamped, and then had the residue removed from half of the slide. The residue was removed through vigorous rubbing of the slide's
surface with a gloved finger and rinsing with isopropanol and methanol. Rinsing alone will not remove the residue. The liquid still tends to slightly de-wet the surface, but it is
not nearly as severe as the area of the stamp not cleaned.
The validity of dry stamping was checked by stamping into a thin film of a-terpineol on a
glass slide. The liquid was driven off by heating to 100 C, and then a film of gold
nanoparticle colloid was drawn down on top. Figure 22 shows that the film de-wetted in the area that had been in contact with the PDMS. A similar experiment utilizing a gold
nanoparticle colloid instead of a-terpineol was inconclusive because the liquid could not
Figure 22: Optical image of a thin film of a gold nanoparticle colloid drawn down on top of an embossed thin film of a-terpineol.
Good pattern transfer by dry stamping is difficult, but not impossible. Without the thin layer of fluid to support the stamp, the raised features will often deform and come into contact with the substrate. However with care, a substrate can be dry stamped and then dipped in the fluid of interest to yield patterns in that fluid. Figure 23 shows a pattern created by dry-stamping a substrate and then creating a thin film. The liquid has selectively de-wetted the areas that have been in contact with the PDMS stamp. It may be possible to use the techniques associated with microcontact printing" to do
patterning of this nature. This could be especially useful for liquids that either evaporate too quickly as a thin film or that have high contact angles and tend to bead up on the substrate.
Figure 23: Fluorescence micrograph of FITC-tagged poly-L-lysine patterned by dry stamping. A PDMS stamp was brought into intimate contact with a glass
slide, which then had FITC-tagged poly-L-lysine drawn down on it.
The ability of a thin film of liquid to re-flow after patterning by embossing was
investigated by spinning patterned and unpatterned films. A nanoparticle colloid of gold was drawn down on a glass slide containing a piece of scotch tape. The tape was removed leaving a "patterned" line of colloidal gold, which is shown before and after spinning on a spin coater at 2000 RPM for 90 seconds in Figure 24 through Figure 27.
After spinning, the liquid flows on two scales. In Figure 25 arms of liquid that have advanced tens of microns in length can be seen. These arms are also visible to the naked eye. The magnification of one of these arms is increased in Figure 27 showing that there are even smaller arms of liquid several microns in length. No arms of either size were visible in samples that were not spun, so the arms are not created by liquid wicking underneath the tape.
Patterns created by liquid embossing showed no signs of re-flowing after being spun (Figure 28). The cleared channels were optically identical before and after spinning. The residue on the surface of the glass slide prevented the liquid from flowing back into the channels. The major problem with this comparison was that the thickness of the
liquid film at the interface created by removing the tape was likely different from the thickness at the interface of the cleared channels in the embossed film. This change in thickness could lead to different flow characteristics during spinning, but since the flow was observed at two distinct size scales it is doubtful that a thinner or thicker film at an interface would completely prevent any flow as was the case in the embossed samples.
Figure 24: Optical image of a line in a nanoparticle colloid of gold patterned on a glass slide
by drawing down the liquid on
top of a piece of tape, and then removing the tape.
Figure 26: Optical image of the line at higher magnification
before spinning.
Figure 25: The same line shown in Figure 24, after spinning the glass slide at 2000 RPM for 90 seconds.
Figure 27: Optical image of the line after spinning.
Figure 28: Optical image of patterns created in a nanoparticle colloid of gold after being spun at 2000 RPM for 90 seconds.
Despite persisting at 3000C, the residue does not seem to prevent creating a thin film on top of a previously patterned thin film. For example, if a thin film of nanoparticle colloid is drawn down or spin-coated on a substrate, patterned by embossing, and then cured by heating, another thin film can be created directly on top of that cured film without de-wetting. It is unclear whether the residue is somehow absorbed or otherwise removed during the curing process or if the residue is much smaller then the surface topography and another film can simply bridge areas still containing residue.
The residue left by PDMS during stamping warrants more study. If the wetting
properties in the channels were not changed, would the thin film of liquid flow back into the channels? If there is residue in the channels how the is ability to make electrical connections between different layers (vias, discussed in Section 5.3) reconciled?
2.4 Material set
Liquid embossing depends upon a wide variety of useful materials that are liquid phase or start as a liquid and are converted to solid after patterning. For semiconductors, this set includes metals, insulators, and semiconductors. In micro-electromechanical
systems metals, insulators, and a sacrificial materials are required. Biological patterning requires two materials, one that cells have an affinity for and one for which they do not. Embossable liquids include, water, a-terpineol, nanoparticle colloids of gold and silver, spin on glasses of varying polymer content, polyimides, cadmium selenide nanocrystals dispersed in pyridine 16, and poly-L-lysine.
111111111ililil llhIIIII11111j
Figure 29: Optical image of Figure 30: Optical image of patterns created in polyimide. patterns created in spin on Polyimide can act either as an glass. Spin on glass can also insulator between conducting act either as an insulator or as layers, or as a sacrificial layer a sacrificial layer, etched by etched by light sonication hydrofluoric acid (HF). under 1 -methyl-2-pyrrolidinone
(NMP).
Even with a vast range of material, the parameters of liquid embossing are very similar for each material. Although the maximum cleared channel width is dependent on fluid
properties, the liquid embossing process itself is not very sensitive to changes in fluid viscosity or density and can work with a wide range of liquids. For example, a-terpineol
is a solvent used both to dilute high weight percentage nanoparticle colloids and to thicken thinner liquids such as spin on glasses to increase their drawn-down film
thickness. Its viscosity changes by a factor of 2 in a narrow temperature range, from 59 mPa seconds at 200C to 26 mPa seconds at 250C17. However the characteristics of
embossing do not show a similarly sharp dependence on temperature.
Figure 31: Optical image of a Figure 32: Optical image of a
pattern formed in a pattern formed in a
nanoparticle colloid of gold that nanoparticle colloid of silver
has been thermally cured. that has been thermally cured
(shown in transmission mode).
Nanoparticle colloids are of particular use to liquid embossing. Due to a vastly increased surface area to volume ratio when compared to the bulk material, nanoparticles exhibit
both a suppressed melting temperature and increased solubility. The nanoparticles can be dispersed in an organic solvent amenable to embossing and then converted to solid
films by thermal conversion at plastic compatible temperatures (approximately 3000C)
with characteristics very similar to the bulk material. The use of nanoparticle colloids
has allowed the fabrication of structures such as resistors18, which functionally
3 Design of the liquid embossing machine
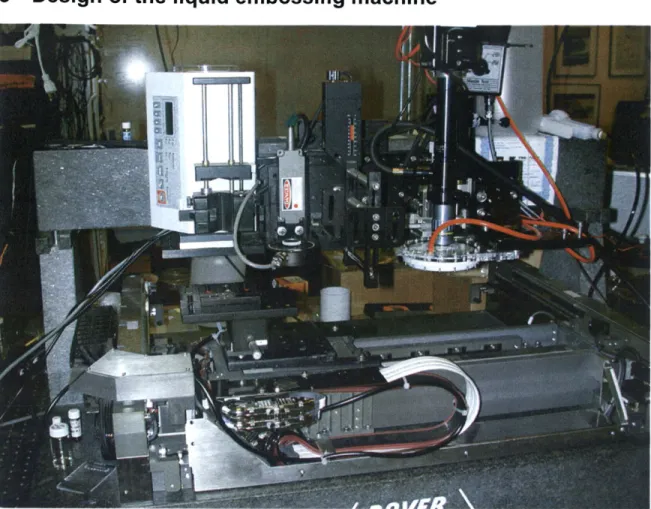
Figure 33: Optical image of the liquid embossing machine in its current configuration.
The liquid embossing machine was designed and built over a period of 2 years and is still evolving and being refined. This chapter discusses the requirements of the machine and how those requirements were met, and the different iterations of design leading to the current machine. It is divided into three sections: requirements of the machine,
implementation leading to the current design, and the current liquid embossing machine.
Until the liquid embossing machine was designed and set up, stamping was done by hand. The requirements of the machine are derived from the problems and limitations but also the advantages of hand stamping. With good technique and practice, as with any art form, one can achieve excellent pattern transfer from the entire area of stamp without any bubbles, though alignment much better than a few millimeters is nearly impossible.
3.1 Requirements
The requirements were to accurately emboss a large area with the ability to align to existing patterns or structures. This section discusses each of the requirements: good pattern transfer, large area, and alignment.
3.1.1 Pattern transfer
The pattern transfer into the thin film of liquid needs to be accurate. Bubbles, dust particles, and smudges must be minimized. These lead to several specific
requirements. The stamp must be placed in contact with the thin film such that air is not trapped between the PDMS and the substrate. The stamping area must be clean to avoid dust and the time that a wet film is exposed to open air must be minimized. The stamp must not move with respect to the substrate while in contact, and when removed should be lifted straight up.
Figure 34: Optical image of embossing by hand. The edge of the stamp is slowly lowered until the full contact is achieved.
When patterning by hand these criteria are met by rolling the stamp into place. One side of the stamp is placed in contact and the other end is slowly lowered, allowing the stamp to curve under its own weight and define a slight bow. This bow pushes the air ahead of
the interface between the PDMS and the thin film, preventing air bubbles. Once patterned, the stamp is quickly ripped off of the substrate.
Good pattern transfer is also dependent on low pressure between the stamp and
substrate while they are in contact. High pressure tends to deform the raised features of the stamp and bring the base level PDMS into contact with the substrate. Any pressure greater than the weight of the stamp should be avoided.
3.1.2 Large area
Masters are typically 4 inch diameter silicon wafers, and the patterns often cover the entire wafer. The liquid embossing machine should be able to utilize as much of the stamp as possible, or be immediately scalable to large area.
3.1.3 Alignment
To make multiple layer structures, each of the layers needs to be aligned to the others. Linear alignment and rotational alignment are important. Alignment can be achieved either by a stamp and substrate that once placed do not move relative to their mounting, so alignment is a function of the positioning stage (absolute alignment), or through optical feedback. Since PDMS is clear it is possible to align features in the stamp with fiduciary marks on the substrate. Optical alignment requires that there be a clear path through the stamp, and that the stamp and substrate be relatively close so that there are no parallax problems. Many of the configurations discussed fail to achieve optical
alignment because only an edge of the substrate and an edge of the stamp are close enough that both can be seen through a microscope. The stamp could be brought into contact with the substrate without a thin film of liquid, checked for proper alignment, removed, and repeated until alignment was completed (dry stamped), but as discussed in Section 2.3 residue is left on the surface. This prevents a thin film from properly wetting the substrate and would require that the substrate be de-mounted, washed, and then remounted, thus losing the carefully achieved alignment.
3.2 Implementation
Although the requirements to automate the liquid embossing process were clear, the actual implementation was developed partially by theoretical design and the rest by trial
and error. This section describes in detail the various approaches to the design of the liquid embossing machine.
3.2.1 Flat fixed stamp
stamp
y
z
substrate
X
Figure 35: Schematic of a flat fixed stamp and 3 degree of freedom substrate. The substrate is positioned beneath the stamp and then raised to emboss.
A PDMS stamp was cast around mounting hardware and secured in a fixed position over
the work volume of the substrate. The substrate was mounted on a single axis precision actuator19 that moved in the z axis shown in Figure 35. The single axis actuator was
mounted to the stage of a precision air-bearing positioning system20, which allowed
movement in the x and y axes. To emboss, the substrate was positioned beneath the stamp and then raised until it made contact.
Alignment with this system was excellent because the stamp was rigidly held in place and the substrate could be positioned to a known location. Pattern transfer, however, was awful. Since the substrate was brought flat against the stamp, air bubbles were invariably trapped, preventing the entire area of the stamp from coming into contact. The pressure between the stamp and the substrate was also difficult to control, which led to poor patterning in the areas not affected by air bubbles.
Figure 36: Optical image of a fixed stamp. PDMS was cast around a bolt within a plastic specimen box with raised features exposed.
3.2.2 Stiff bowed stamp
stamp
substrate
Figure 37: Schematic of the stiff bowed stamp. A stamp was held in a permanent bowed position, similar to the bow created during hand stamping. The substrate
was positioned beneath the stamp and then raised into contact.
The greatest problem with the flat fixed stamp was that of air bubbles. The stiff bowed stamp presented a solution by mimicking the bow created in the stamp during hand stamping, which would push the air ahead of the contact between the stamp and substrate. Stamps were cast around mounting hardware and then were fixed to a
position within the work volume of the substrate. The substrate was positioned beneath the stamp and raised into contact.
Air bubbles were pushed out near the center of the stamp, but as more of the stamp came into contact, it would bow upwards and large areas would not be in contact when the substrate was at its maximum height. In the areas without air bubbles, pattern transfer was compromised due to high pressure. Pattern transfer was not good enough to measure alignment.
Figure 38: Optical image of a stiff bowed stamp. PDMS was cast around a thin sheet of acrylic which had mounts glued on to it.
Figure 39: Optical image of a stiff bowed stamp. PDMS was cast around bent threaded rod, which was used as mounting.
3.2.3 Bowed steel stamp
an
actuator mount
stamp
'steel
substrate
Figure 40: Schematic image of a bowed stamp cast around spring steel. One side of the stamp is fixed and the other is attached to a single axis precision
actuator to allow changes to the radius of curvature.
The pressure during embossing was reduced by decreasing the thickness of the stamp, and actuating one of the edges. A thin stamp was cast around spring steel that was fixed on one edge and position controlled on the other edge by a single axis precision actuator. The substrate was positioned beneath the stamp and then raised until it first made contact with the fixed edge. The other edge was then lowered, making a moving line contact to push out air, until the stamp was in complete contact with the substrate.
This setup had trouble bringing the stamp into complete contact with the substrate. The spring steel would start flat, but over time would plastically deform because it was so thin. The deformation would manifest as wrinkles in the stamp that were impossible to flatten out during embossing. Embedding thicker steel in the stamp increased the length of time the stamp would remain flat, but also increased the stamping pressure, which led to poor pattern transfer.
Figure 41: Optical image of the bowed steel stamp. Holes were drilled in spring steel and PDMS cast around the steel and acrylic mounts. The patterning side
faces up.
stamp
substrate
Figure 42: Schematic of a stamp held rigidly at one end. As the substrate is raised, it contacts the stamp in a line-contact as the stamp bends upward.
A PDMS stamp was cast around mounting hardware on one edge, which was secured to
a fixed position in the substrate's work volume. The substrate was positioned beneath the stamp and slowly raised, bending the stamp as the two came together in a line-contact.
Air bubbles were reduced due to the moving line-contact, but pattern transfer was poor due to excessive pressure, and alignment was difficult. The stamp was cast fairly thick to maintain lateral stiffness, which also increased the bending stiffness and raised the pressure while patterning. The stamp was free, so alignment by absolute positioning did not work. Alignment by optical feedback was difficult because only the edge of the stamp furthest away from the mounting was close enough to the substrate to align before bringing the entire stamp into contact.
Figure 43: Optical image of a fixed pivot stamp. A piece of Lego with a bolt was cast into the stamp as a mount.
3.2.5 Pivoted steel stamp
steel
PDMS
substrate
Figure 44: Schematic of a pivoted steel stamp. PDMS was cast around a sheet of steel, which mounted to a fixed position.
The pivoted steel stamp improved upon the fixed pivot stamp by reducing the pressure between the stamp and substrate while keeping a similar motion to push out the air. The steel maintained lateral stiffness, allowing the PDMS to be cast much thinner, which reduced the stamping pressure. The substrate was positioned beneath the stamp and slowly raised as the stamp came into contact from the free edge to the mounted edge.
Much like the bowed steel stamp, the pivoted steel stamp plastically deformed. Due to the deformation, the stamp required remounting or re-fabrication to maintain proper orientation with respect to the substrate. Again, embedding thicker steel increased the stamping pressure and resulted in poor pattern transfer.
Figure 45: Optical image of the pivoted steel stamp. The steel was etched stainless steel and was mounted by bolts using the two cutouts.
3.2.6 Actuated pivoted stamp
~stamp
substrate
Figure 46: Schematic of the actuated pivoted stamp. A thin layer of PDMS with a polyester film embedded within it was allowed to come into contact with the
substrate by lowering the line shown on the free end of the stamp.
The actuated pivoted stamp improved upon the pivoted steel stamp in two ways: a polyester film was embedded in the stamp and the free edge was actuated. Using polyester instead of steel eliminated the problems of the stamp plastically deforming; the polyester film could be rolled up and would still spring back to its original position. The substrate was positioned beneath the stamp and then raised until the two edges were in contact as shown in Figure 46. A precision single axis actuator was used to let the stamp come into contact by lowering the free edge. The piece of polyester film cast into the PDMS stamp gave it some lateral stiffness without increasing the bending stiffness.
This configuration had good pattern transfer. Air bubbles were pushed ahead of the contact between the stamp and substrate and there was very little pressure on the stamp. Absolute alignment was fair (approximately ±50gm, occasionally as good as ±20gm) because the stamp could be brought back to the same position by its actuator. Alignment by optical feedback was very difficult because only the edge near the
mounting could be aligned, and the pattern transfer near the mount was not as good as near the opposite edge. Patterning large area was questionable because as the stamp got larger, it would tend to bow in the center and the first point of contact would not be near the mounting.
Figure 47: Optical image of the actuated pivoted stamp. PDMS was cast around a film of polyester and then the acrylic mount and wire were glued on. The wire
was attached to a precision single axis actuator that raised and lowered the stamp.
3.2.7 Hand roll
stamp
substrate
Figure 48: Schematic of the hand rolled stamp. A stamp is mounted to a roller and then rolled over the substrate by hand.
3 Design of the liquid embossing machine
A
The hand rolled stamp was designed to test how liquid embossing might be used in a roll to roll setting. A PDMS stamp was cast around a flexible backing and attached to a roller. A thin film of liquid was created on the substrate and the roller was rolled by hand over the liquid to emboss it.
The hand roll was not successful, but it did offer insight into the process. The roller tended to float on the thin film liquid and slide. If more pressure was applied to keep it in place, the liquid would simply squeeze out and the raised features in the stamp would deform.
Figure 49: Optical image of the hand rolled stamp. PDMS was cast around steel, which was then bolted to an acetal cylinder.
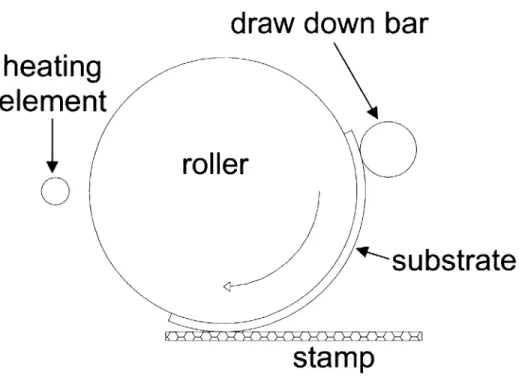
draw down bar
heating
element
IFroller
substrate
stamp
Figure 50: Schematic of the substrate on roller. A flexible substrate was attached to a roller and then rolled over the stamp.
It was thought that holding both the stamp and the substrate in place would help to correct the problems of the hand roller. The "substrate on roller" design built on the hand roller by fixing both the stamp and the substrate with respect to each other, and actuating both. The roller was controlled by a precision rotary actuator and the stamp by a precision linear actuator. A thin film of liquid was applied to the substate on the roller and was then rolled over the stamp.
There were two problems with this configuration: pressure between the stamp and substrate, and the line contact. The pressure was difficult to control, so either the stamp would not come into intimate contact with the substrate, or the pressure was so great that the stamp would deform. By ensuring that the stamp was concentric with the axis of rotation it was possible to get the correct pressure, but having only a line contact then prevented good pattern transfer. Only a small area of the stamp was in contact with the substrate at any time, so the liquid tended to flow out from underneath the stamp, either ahead of or behind the roller. A limited amount of success was achieved by slowing the process to a crawl, but the problems outweighed the benefits of this type of roll to roll embossing.
3.2.9 Stretched stamp and roller
padding
roller
spring
stamp
substrate
Figure 51: Schematic of a stretch stamp and roller. A stamp was cast around a film of polyimide and stretched in the work volume of the substrate. Once the
substrate was positioned just under the stamp a roller with a padded surface pushed the stamp into contact with the substrate.
The stretched stamp with roller built upon all of the previous stamping configurations. A thin stamp was cast around a film of material, such as polyimide or polyester, and then stretched with a spring over the work volume of the substrate. The substrate was
positioned beneath the stamp and raised until the edge of the stamp just came into contact. A roller, actuated by a single axis precision actuator, was then pushed in the direction shown in Figure 51. The soft padding on the roller served two purposes: to help control the contact pressure as the roller moved over the stamp, and to generate friction between the roller and stamp so the roller would not slide. The roller would move
along the stamp bringing it into full contact with the substrate, slightly streching the spring.
This configuration had excellent pattern transfer, could emboss a large area, and had fair absolute alignment. Air bubbles were pushed ahead of the contact between the stamp and substrate by the moving line contact. Stamping pressure was only that of the weight of the stamp; the raised features of the stamp were still floating on the thin film of liquid after the roller had passed over them. Although the tested system only embossed areas roughly 2 inches by 6 inches, it could easily be scaled up. Absolute alignment was approximately ±20gm, even as rubber bands in the system wore out and were replaced. Unfortunately optical alignment was difficult because, again, only the edges of the substrate and the stamp were in close proximity before they came into contact.
Figure 52: Optical image of a roller. This roller was made by several sheets of laser-cut acrylic stacked on top of each other. A sheet of soft foam packing
material was taped to the surface of the roller.
Figure 53: Optical image of a stamp used in the stretched stamp configuration. A film of polyester was laser cut and PDMS cast around it. The polyester was then
clamped by pieces of acrylic, which were mounted by rubber bands. Bolts secured the other edge.
Figure 54: Optical image of a stamp used in the stretched stamp configuration. This stamp is similar to the one shown in Figure 53, except that PDMS was cast
3.3 The liquid embossing machine
The liquid embossing machine shown in Figure 33 combines several features: the position system, pneumatic embossing, optical alignment, a draw down bar, and laser curing.
3.3.1 Positioning system
A precision air-bearing system was used to position the substrate. Performance
characteristics for both axes are given in Table 1 and Table 2.
Table 1: Positioning system X-axis performance data
Travel 330 mm Pitch 2.38 arc-sec Yaw 1.75 arc-sec Flatness 0.5 gm Straightness 4.14 gm Accuracy 0.62 gm Position repeatability 0.45 gm Homing repeatability 0.48 gm
Table 2: Positioning system Y-axis performance data
Travel 300 mm Pitch 3.07 arc-sec Yaw 0.94 arc-sec Flatness 0.48 gm Straightness 4.99 lam Accuracy 0.53 gm Position repeatability 0.41 pm Homing repeatability 1.22 gm
3.3.2 Pneumatic stamping
camera
objectiv
stamp mount
stamp
-
substrate
Figure 55: Schematic of pneumatic stamping. The substrate is positioned below the stamp. The stamp mount (shown in Figure 60) is pressurized, which bows
the stamp slightly outwards. The bowed stamp is moved to within a few millimeters of the stamp surface and the camera is used to optically align features in the stamp to those in the substrate, looking through the clear stamp
mount. The stamp mount is then slowly lowered so the stamp comes into contact with the substrate.
Pneumatic stamping builds upon all of the previous stamping configurations and
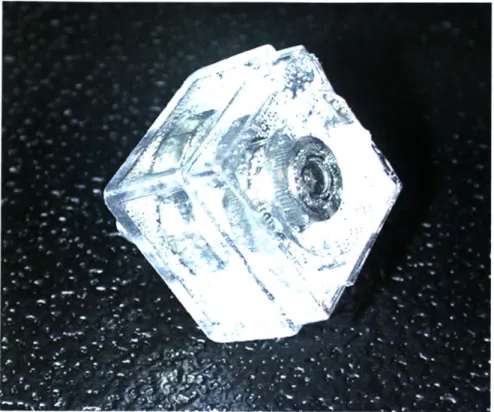
achieves good pattern transfer, large area, and excellent absolute and optical alignment. Air bubbles are pushed ahead of the contact by a moving line contact that is a circle of increasing radius as more of the stamp comes into contact. The stamping pressure is controlled directly by pressurizing the system with compressed air. Nearly all of the patterns on a stamp cast from a 4 in diameter wafer can be transferred. The stamp is held in place around all sides by a ring, so absolute alignment is very good.
Figure 56: CAD model of the ring part of the stamp mount. The flats are arranged such that a 4 inch silicon wafer master can be positioned in proper orientation. The series of small holes form a porous network that pre-polymer seeps into before curing to make an air-tight seal. The ring was 3D printed in
ABS plastic.
Figure 57: Optical image of the 3D printed ABS plastic ring with PDMS.
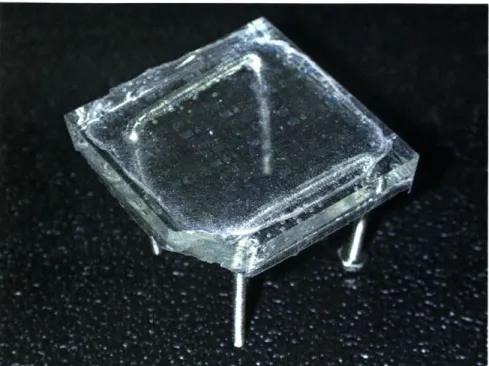
Figure 58: CAD model of the stamp holder. The stamp holder is laser cut from clear acrylic.
Figure 60: Optical image of the stamp assembly. The stamp, ring, and stamp
holder bolt together and are sealed by an o-ring. This creates a small air
chamber, which is pressurized slightly above atmospheric pressure to bow the stamp as shown. Some ink was left on the stamp to aid visualization.
The advantage of pneumatic stamping over the other techniques discussed in Section 3.2 is the ability to use optical alignment. Multiple layer structures rarely have the same pattern repeated directly on top of each other; instead they are built by different patterns which are located in different areas of the stamp as shown in Figure 61. Casting and mounting the stamp are not accurate processes; although rigid once fixed in place, it is difficult to know the exact positioning or rotation of the stamp with respect to the
coordinate axes of the positioning system. Hence, optical feedback is crucial for building multiple layer structures.
Stamp
Layer I Layer 2
Layer 3 Layer 4
Substrate
Figure 61: Schematic of the multiple layer stamping technique. Each of the patterns used to make a structure are included on the same stamp, but
separated spatially.
3.3.3 Optical alignment
Optical alignment is achieved using a microscope objective and camera. The stamp and substrate are brought close enough such that they are both in focus, and the substrate is
then moved so that it is in the proper position with respect to a previous pattern. A 1 Ox
objective is used which yields an approximate magnification on a 13-inch monitor of 3000x. The depth of focus of a 20x objective was too small and often resulted in accidentally contacting the stamp to the substrate during alignment.
3.3.4 Draw down bar
Sf>
-KK/ -- '--"7 / 7"- ~ IZs~Z' -. -,.A B
Figure 62: Schematic of the draw down process. A small amount of liquid is placed on a substrate and a cylindrical bar is dragged across. Similar to a doctor
blade or windshield wiper, if the liquid wets the substrate a thin film will be left behind.
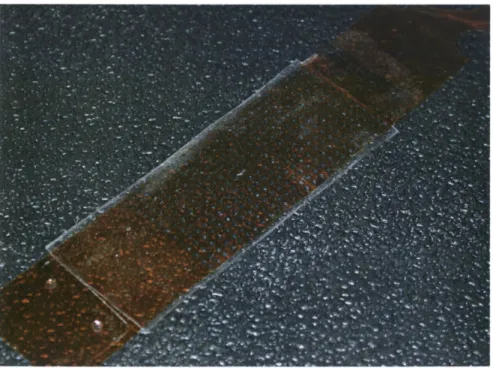
The draw down bar is used to create a thin film of liquid on the substrate. Draw down is used rather than spin coating because of the small volume of material required and the ability to cleanly integrate it into the liquid embossing machine. As shown in Figure 63, the draw down bar is simply a stainless steel bar held in the work volume of the
substrate. The bar sits in two slots that allow it to move linearly up and down, but do not allow rotation. The substrate is positioned beneath the bar and raised until the weight of the bar is supported on the substrate. It is then slowly dragged across the substrate. Films ranging from 100 nm to 500 nm were created using draw down speeds of approximately 4 mm per second.
The main limitation of draw down is film uniformity in the direction of bar movement. As the bar moves across the substrate the liquid is consumed and the film tends to get thinner until no film is left. Increasing the amount of starting material is possible up to a point. The desired film thickness is just under half the height of the raised features; thicker films are not able to be liquid embossed.
Figure 63: Optical image of the draw down bar. The draw down bar used in the liquid embossing machine is ground and lapped stainless steel. The bar is free
to move in the slots shown.
3.3.5 In situ laser curing
Figure 64: Optical image of the laser curing system.
The laser curing system uses an infrared (1064 nm wavelength) Ytterbium fiber lasere
to cure patterned thin films. The size of a cured spot on the substrate is 300 pam in
diameter, so the substrate is moved in raster fashion to cure a larger area.
To truly make liquid embossing an automated process some form of in situ curing is needed. Removing the substrate from the stage introduces positioning errors that are difficult to remove with only 2 axis positioning. The time and manual attention required to emboss a large number of layers is unreasonable with off-machine curing. Thermal curing on the positioning stage is very difficult due to the relatively high temperatures
positioning system. The infrared laser system is a step in the right direction but has some limitations.
n jul 02 10 00 D5 199
Numbe of sample scans 128
Nm bagund sans 12B Rewfut~r 8 DOC, Sample gair 8 C 9 Ve cTY 0 6229 C' &apeoM "1 7,22 Deteclor MCT.A Eamsputter, CaF2 C E Source. W e ligt 07 5-03 ,2 0 5 2C 3 3-w 4'a 4 Wavent'o ormewe
Figure 65: Absorption spectrum of a nanoparticle colloid of silver in the infrared range.
I It
4f
Figure 66: Absorption spectrum of a nanoparticle colloid of silver in the ultra-violet range.
The small spot size of the laser requires a fairly long curing time due to rastering. During this time the embossed material is still liquid and is very susceptible to contamination by dust. Since the materials typically used, such as nanoparticle colloids, do not readily absorb in the infrared spectrum, the energy from the laser tends to go into heating the substrate rather then curing the material. This very localized heating can thermally strain and crack glass substrates. The absorption spectrum shown in Figure 66 suggests curing by ultra violet would be more successful.
Figure 67: Optical image of an embossed film of nanoparticle silver. The stripes have been laser cured, and the glass in a section of the upper right stripe has
cracked and broken off.
3.3.6 Using the liquid embossing machine
Typical use of the liquid embossing machine is illustrated in Figure 68 through Figure 74.
A substrate is placed on the vacuum chuck, and if the embossed patterns are to be
aligned, care must be taken to seat the substrate firmly against the raised flats of the chuck. Next, the substrate is positioned beneath the stamp and the stamp is lowered until both the patterns on the substrate and the stamp are in focus. The substrate is then moved until alignment is achieved (Figure 70). The position is saved and the substrate is returned to its home position for application of the material to be embossed (Figure 71). The material is then drawn down forming the thin film (Figure 72), and the substrate is returned to the aligned position under the stamp. The stamp is slowly
lowered into contact with the substrate shown in Figure 73. Once embossed the stamp is lifted off of the substrate, and the stage is either returned to the home position or moved under the laser for laser curing (Figure 74). If laser curing is not used, the substrate is typically removed and placed on a hotplate or in an oven to thermally convert the thin film.
Figure 68: Optical image of a substrate on the vacuum chuck.
Figure 69: Optical image of alignment. The stamp is brought close to the substrate such that they are both in focus, but not in contact.
Figure 70: The substrate is moved until it is aligned with respect to the desired feature in the stamp.
Figure 71: A substrate is held to the positioning stage by the vacuum chuck and the liquid material to be embossed is applied. Shown is a glass substrate with a
gold nanoparticle colloid.
Figure 72: The liquid is drawn down, creating a thin film on the substrate.
Figure 73: The stamp is lowered into contact with the substrate.
Figure 74: Once embossed the substrate can be brought under the laser to be cured, or removed and cured by heat.
4 Results
This section discusses some performance metrics of the liquid embossing machine. Included are alignment and repeatability, lifetime of a PDMS stamp, runout, yield, and stamping pressure.
4.1 Alignment and repeatability
Figure 75: Optical image of the fiduciary mark used to align two layers of gold.
Figure 76: Optical image at lesser magnification of the same fiduciary marks shown in Figure 75 (transmission mode).
The greatest advantage of the liquid embossing machine is the ability to align multiple layers. This is important for both electrical and mechanical structures as discussed in Chapter 5. Due to the design of the liquid embossing machine, optical feedback allows layers to be aligned to the sub-micron level as shown in Figure 75.
Alignment repeatability was measured using 17 samples with the results shown as a scatter plot in Figure 77 and a histogram in Figure 78. Several outlying data points with misalignment ranging from 50 to several 100 microns were discarded as human errors
during the alignment procedure. The average misalignment length was 6.2 lam, and the
Alignment 15 -10 5---0- 0--mU -5 -- --10--- ---15 -10 -5 0 5 10 15 um
Figure 77: Scatter plot of alignment data.
From the scatter plot it is clear that misalignment is not simply a random occurance. Most of the misalignment appears to in one direction, along one axis of the positioning system. It is possible to watch the stamping process in the alignment camera, and this misalignment is often visible. The stamp comes into contact with the thin film in the same location that it was aligned, but before the raised features clear the material, the stamp slips slightly, usually in the same direction. Reducing the pressure in the stamp decreases the tendency to slip, but makes embossing large area more difficult because the surface of the stamp is closer to flush with the surface of the ring (Figure 57).
Alignment 4 3.5 3 2.5- 2- 1.- 0.5-0 0 2 4 6 8 10 12 um of misalignment
Figure 78: Histogram of alignment data.
4.2 Lifetime of stamp
Section 2.3 discusses a residue left in the cleared channels of the stamp. Whether the residue is PDMS or uncured polymer, it comes from the PDMS stamp. This implies that stamps degrade or wear down with use. Two lifetime tests were conducted to
investigate this phenomenon.
A stamp was cast on photoresist patterned by photolithography on a silicon wafer. The stamp was dry stamped against a glass slide 100 times and imaged by white light
interferometry22 after 1, 10, and 100 stamps. The stamps were periodically cleaned by
application and removal of scotch tape if dust or other particulates built up on the
surface. The same feature was imaged to see if and how much it wore as the stamp was used. Figure 79 shows the feature that was imaged, and Table 3 shows cross-sectional profiles of the raised feature.
There does not appear to be appreciable wear after 100 stamps. However, dry stamping onto the same substrate is not a truly realistic test. In a real embossing procedure there would be a thin film of liquid and the substrate would be free of PDMS.
Figure 79: Surface profile of a stamp generated by white light interferometry. The line shows the cross-section that was measured after dry stamping 1, 10,
and 100 times.
Table 3: Cross-sectional surface profiles generated by white light interferometry. Each profile is of the same feature.
Virgin stamp
Dry stamped 10 times
Dry stamped once
Dry stamped 100 times
In the second test the same feature was imaged by white light interferometry before and after it was dry stamped against glass 1000 times by the liquid embossing machine. The glass was changed every 50 dry stamps. The residue from the stamp would collect on the glass slide to the point where it was visible to the unaided eye. Again, dry stamping the same substrate more than once is a somewhat artificial test, but time constraints did not permit more realistic tests.
Figure 80: Surface profile of raised features in a previously unused PDMS stamp.