Debonding Failure of
CFRP Reinforced Concrete Beams and
In-Situ Monitoring Schemes
By
Ryan Sieber
Bachelor of Science, Civil and Environmental Engineering
Northeastern University, 2009
Submitted to the Department of Civil and Environmental Engineering
In Partial Fulfillment of the Requirements of the Degree of
. . MASSAC
Master of Engineering
OFIn Civil and Environmental Engineering
At the
LI
Massachusetts Institute of Technology
LI
June 2010
@
2010 Ryan Sieber. All rights reserved.
HUSETTS INSTfTUTE
TECHNOLOGY
L 15 2010
BRARIES
ARCHIVES
The author hereby grants to MIT permission to reproduce and distribute publicly paper and
electronic copies of this thesis document in whole or in part in any medium now known or
hereafter created.
Signature of Author:
Ryan Sieber
Department of Civil and Environmental Engineering
May 10, 2010
Certified by:
Accepted by:
Jerome J. Connor
Professor of Civil and Environmental Engineering
PJesis~iupervisor
Daniele Veneziano
Chairman, Departmental Committee for Graduate Students
Debonding Failure of
CFRP Reinforced Concrete Beams and
In-Situ Monitoring Schemes
By Ryan Sieber
Submitted to the Department of Civil and Environmental Engineering on May 10, 2010 In Partial Fulfillment of the Requirements for the Degree of
Master of Engineering
In Civil and Environmental Engineering
ABSTRACT
Fiber Reinforced Polymer (FRP) systems have gained much popularity as a method for reinforcing existing concrete structures. However a variety of sudden failure methods, such as debonding, delamination, and creep rupture have led to the development of code limitations on the strength that an FRP system can be considered to provide. The uncertainty brought on by the failure methods mentioned above has become the topic of much research. Researchers have proposed fracture and strength based methods to predict debonding. However, there are many environmental and durability issues that have not been considered in these prediction. These uncertainties make FRP strengthened concrete beams a good candidate for a health monitoring system. In this a paper a detailed look at current methods of predicting debonding is presented. Additionally, effects that the environment and durability have on debonding are presented. Finally, monitoring systems for FRP strengthened concrete beams are discussed. Two monitoring schemes are proposed.
Thesis Supervisor: Jerome J. Connor
Acknowledgments .
I would like to first acknowledge my parents, Deborah and Tony Sieber. Without their support I would never have reached MIT and thus never had the opportunity to write this thesis. Their constant support during this strenuous year was invaluable.
I would like to thank Professor Connor and Simon Laflamme for introducing to me a new way of looking at structures. An introduction to motion based design has increased my knowledge of and appreciate for how structures behave. I'm sure this will prove to be very valuable throughout my career.
Thanks to Chakrapan who helped me get through some stumbling blocks at the early stages of my research. Your knowledge of FRP helped me to be able to continue to move forward on my research.
Thanks to Rebecca and Chris for allowing me to use them as a way to distract myself from my work. Although sometimes it turned into procrastination, the distractions were necessary and much appreciated.
Thanks to the 2010 MEng class. It has been a fun ride and I couldn't have asked for a better group of people to spend this year with.
Table of Contents
1
Introduction ... 62 M echanics of Debonding Failure ... 9
2.1 Fracture M echanics Approach ... 10
2.1.1 Bond Slip Law ... 10
2.1.2 Global Energy Fracture M echanics ... 13
2.2 Strength Approach...16
2.2.1 Interfacial Stress M odels...16
2.2.2 Strength Based Equations for Design... 18
2.3 Crack Band M ethod ... 18
3 Durability & Debonding ... 20
3.1.1 Cyclic/Fatigue Loading ... 20
3.1.2 Sustained Load & Creep ... 23
3.1.3 Freeze-Thaw...24
3.1.4 High & Low Temperatures ... 26
3.1.5 M oisture & Salt ... 27
4 M onitoring of Debonding ... 31
4.1 M onitoring Instrum ents...31
4.1.1 Fiber Bragg Grating...31
4.1.2 OTD R Sensors ... 32
4.1.3 Introduction to Distributed Systems ... 33
4.2 Ideal M onitoring Schem e...34
4.3 In-Situ M onitoring Scheme ... 35
4.3.1 Accurate Bi-Linear M odel Available... 35
4.3.2 Abstract Approach W ithout Bi-Linear M odel... 36
5 Conclusions...40
References...42
List of Figures
Figure 1: FRP Debonding Types [2]... 9
Figure 2: Interfacial Stresses Along Cracked Beam [3]... 9
Figure 3: Bi-Linear Bond Slip Law [4]... 10
Figure 4: Bilinear Model vs. "Simplified" Model vs. "Precise" Model [2] ... 11
Figure 5: Schematic of FRP-Concrete Interface Showing the Cohesive Zone. ... 11
Figure 6: Theoretical Dual Crack M odel Analyzed [5]... 12
Figure 7: Results from Num erical Analysis of M odel [5]... 12
Figure 8: Theoretical Debonding Process Between Two Parallel Cracks [5]...12
Figure 9: Load vs. Deflection Plot Showing Energy Dissipation Due to Debonding [6]...14
Figure 10: Simply Supported, Uniformly Loaded Beam and Corresponding Moment Diagram...15
Figure 11: Internal Forces in FRP Strengthened RC Beam [7]... 16
Figure 12: (a) Discrete Crack Model vs. (b) Crack Band Model [9]... 18
Figure 13: Crack Band FEM Model Predicted Damage vs. Experimental Damage
[9]
...
19Figure 14: Load vs. Displacement for Fatigue Loading Double Shear Test [12]...21
Figure 15: Strain Curve of Monotonically Loaded T-Beam Bridge Girder [13]...22
Figure 16: FRP and Rebar Strain vs. Cycle Number (a) Wet Lay-Up (b) Plate [10]...23
Figure 17: Strain vs. Time for Four-Point Bending Sustained Load [16]... 24
Figure 18: Summary of Reviewed Freeze-Thaw Experiments...25
Figure 19: Schem atic of Direct Shear Test [2] ... 25
Figure 20: Load vs. Deflection (a) Room Temp. (b) +400C (c) -300C (d) -1000C [21]...27
Figure 21: Schem atic of Peeling (M ode 1) Test [22] ... 28
Figure 22: Num erical M ode 1 Fracture Energy vs. ... 28
Figure 23: Cohesive Zone M odel for Varying IRRH [22] ... 28
Figure 24: Load vs. Deflection for Varying No. of Wet-Dry Cycles for Plate [23]...29
Figure 25: Load vs. Deflection for Varying No. of Wet-Dry Cycles for Sheet (Wet Lay-Up) [23]...30
Figure 26: Schem atic of FBG Sensor [27] ... 32
Figure 27: Schem atic for OTDR Crack Detection [28]... 33
Figure 28: Power Loss vs. Crack Width for Varying Crack to Fiber Angles [28]... ... 33
Figure 29: Basic Strain Gage Schem atic ... 35
Figure 30: 3 Gage Monitoring Scheme for Known Slip Model ... 36
Figure 31: Schematic of Proposed Debonding Monitoring Scheme ... 37
Figure 32: Example Plot of Concrete and FRP strain vs. Time...38
1 Introduction
Fiber reinforced polymer (FRP) has drawn increasing interest from engineers as an acceptable method of performing civil structure remediations and upgrades. A majority of the applications currently used are for concrete structures. FRP can be used as containment for concrete columns or as shear and/or flexural reinforcement for concrete beams. As for FRP as flexural reinforcement, it takes on a role
identical to that of reinforcing steel. The addition of FRP increases the available tensile capacity of the cross-section which in turn leads to a larger and more efficiently used concrete compressive section. The combination of these two leads to an increased flexural capacity. With the larger flexural capacity
and corresponding larger stresses, additional possible methods of failure are introduced to the beam.
The introduction of FRP increases the number of possible materials to fail from two (concrete and steel) to four (concrete, steel, FRP, and the epoxy adhesive). Concrete beams are designed to perform in a ductile manner, meaning the ductile material, steel, is designed to yield prior to concrete crushing, a brittle failure. The possible failure modes for an FRP strengthened beam include [1]:
1. Crushing of the concrete in compression before yielding of the reinforcing steel 2. Yielding of the reinforcing steel in tension followed by rupture of the FRP laminate 3. Yielding of the steel in tension followed by concrete crushing
4. Shear/tension delamination of the concrete cover 5. Debonding of the FRP from the concrete substrate
Modes 1, 4, and 5 show no ductile behavior and thus fail in a brittle manner with little or no warning. Failure mode 1 can be avoided with a high level of certainty by considering it during the initial design. Similar to typical concrete design, where the amount of tensile reinforcement is limited in order to ensure the yielding of the steel prior to the failure of the concrete, the amount of FRP used can be controlled to ensure the compressive concrete does not reach a critical strain value, approximately 0.003 in/in, (in which is crushes) prior to another failure mode occurring. The concrete strain levels can be easily calculated using strain compatibility. The other two brittle failure methods, FRP debonding and delamination are less understood, more variable and therefore less predictable. Variability comes due to various initial conditions such as cracks or exposure to different environments and corresponding
material degradation. The American Concrete Institute (ACI) handles this variability and uncertainty by setting limits on certain stresses, strains, and by using reduction/safety factors. Equation 1 below is
from ACI 440 and is the general equation used for computing the moment capacity of a reinforced concrete beam strengthened by FRP.
Equation 1
QMn
=
0
[Asfs(d
)+
A1ffe
()
4= overall strength reduction factor (0.65
+
0.9)A= area of steel reinforcement
f= stress in steel reinforcement
d = dist. from extreme compression fiber to centroid of tension reinforcement
1= 0.85 for equivalent rectangular stress block
c = distance from extreme compression fiber to neutral axis
4f = FRP strength reduction factor (recommended 0.85) Af = area of FRP reinforcement
ffe = effective stress in the FRP
h = overall thickness or height of member
The overall strength reduction factor,
4),
is 0.9 for typical reinforced concrete beams. The factor is reduced as the FRP makes the failure less ductile and more brittle. A factor of 0.65 represents a section in which the reinforcing steel does not yield and thus has no ductility. 4f is simply an uncertainty factor. It represents the uncertainty of the data used to formulate the design equations for FRP and can expect to increase as the level of confidence in research goes up.Equation 2 ffe = EfEfe
Ef = tensile modulus of elasticity of FRP
Efe = effective strain level in FRP reinforcement attained at failure
Equation 3 Efe = (Ecu c bi Efd
Ecu = ultimate axial strain of unconfined concrete df= effective depth of FRP reinforcement
Ebi = strain level in concrete substrate at time of FRP installation
Efd = effective debonding strain of externally bonded FRP reinforcement
(typ. range of 0.6efu - 0.9Efu)
ACI limits the strain allowed in the FRP using Equation 3. This limit ensures that the stress at the FRP-concrete interface does not get above an allowable limit. At this limit either the FRP-FRP-concrete interface may get overstressed and begin to slip/fail (debonding) or the concrete will begin to crack under the combination of shear and tension (delamination).
Equation 4 Efd
= 0. 08
3Efg = design rupture strain of FRP reinforcement
Equation 5 Efu = CEEfu
CE = environmental exposure factor (ranges from 0.95 4 0.85 for carbon fiber FRP)
Equation 5 includes the final form of a reduction factor shown in the above equations. The
environmental exposure factor takes into consideration the degradation of the FRP and possible loss of strength or functionality.
The reduction factors highlighted above are ACI's attempt to design for the uncertainties that are associated with FRP flexural strengthening. This series of reduction factors has two effects on the use of FRP. Firstly, for certain situations the design may end up being extremely conservative. Secondly, the uncertainty that a list of reduction factors portrays may deter engineers from using FRP retrofits on higher importance structural members. There are two possible solutions to cut back on the uncertainty and thus the reduction factors. The most obvious one is continuing research. The Lf factor, a factor not found in front of the steel portion of the flexural strength equation, is solely a function of uncertainty within research data. Continuing research and growing confidence in data can lead to the elimination of such a factor. The second option, which is addressed in this paper, is the use of health monitoring. Proper health monitoring could be a reason to lower reduction factors. Limiting certain stress levels during design would still be necessary, however monitoring would give some warning of possible system failure and thus relieve some anxiety associated with FRP retrofits' brittle failures.
Health monitoring is a multi-step process that includes: i) a full understanding of the possible failure modes, ii) preliminary detailed inspection of the concrete member to be strengthened, iii) a balance of choosing the right combination of a monitoring scheme and analytical model to process the monitoring data, and iv) follow up maintenance. This paper focuses on the understanding of an individual possible failure mode, debonding and the implementation of monitoring schemes to recognize the initiation of debonding.
2 Mechanics of Debonding Failure
Debonding failures are the failures of most concern to the effectiveness of an FRP strengthened beam.
As explained above, debonding failures are brittle and hard to predict. These failures encompass the
fourth and fifth failure modes presented by ACI, namely shear/tension delamination of the concrete
cover and debonding of the FRP from the concrete substrate. Debonding can be further categorized
into four failure modes; intermediate crack (IC)
debonding, concrete cover separation, plate-end
interfacial debonding, and critical diagonal crack debonding [2]. See Figure 1 for sketches of these
failure modes.
lxural-A ehondino Debonding
Intermediate Crack Debonding
Plate-End Interfacial Debonding
DeDebonding Critical diagonal crack
Debonding
Concrete Cover Separation Debonding
Critical Diagonal Crack Debonding
Figure 1: FRP Debonding Types [2]
For all modes of debonding, the driver of the failure is high interfacial stresses. These stresses, normal
and shear, tend to be higher at concrete cracks and FRP plate ends which is where debonding initiates.
Figure 2 shows the increase of stresses at the bond interface at crack locations.
- Stress Analysis --- Section Analysis -- -Actual Stresses
Two different approaches to understanding and analyzing debonding are often recognized. These approaches are the strength based approach and the fracture based approach [3]. While the strength based approach was generally researched first, it only predicts a debonding load/stress and does not
recognize the process in which debonding happens. The fracture based approach also works to find a debonding load/stress, however it also focuses greatly on the steps prior, during and after debonding, in
particular crack propagation. Since the fracture based approach best considers debonding as a process, it will be presented first.
2.1 Fracture Mechanics Approach
Debonding is essentially a crack propagation promoted by local stress intensities [3]. A failure method involving crack propagation lends itself to be studied using a fracture mechanics based approach. The bond-slip law and a global fracture energy approach will be reviewed below. The bond-slip law, while being purely a fracture mechanics based law, is used in combination with a strength based approach to analyze the propagation of debonding over time of increasing load. The global fracture energy approach is a pure fracture mechanics approach which using global energy balance and dissipation to predict an ultimate load at which debonding causes failure.
2.1.1 Bond Slip Law
Along with the desire of finding an ultimate stress/load/strain that will cause debonding, it is also desired to understand and model the debonding process itself. Early simplified models considered the bond failure to act in a linear elastic manner throughout the complete debonding process. However it has been shown through experiments that failures actually act in a non-linear way [4] and a bi-linear model more appropriately represents the failure of the concrete/FRP interface, see Figure 3 and Figure 4. The slip, 5, is the relatively displacement between the top of the FRP and the top of the cohesive zone. Tf 0 for 6<-Sf --( 1f for - Sf ! 6 < -1 :Gff T = < r for - 61 5S < 5 1 Tf f or S1 S < 5f 0 for Sf 6
-- -Bilinear model
o Simplified model Precise model
, 5f
Figure 4: Bilinear Model vs. "Simplified" Model vs. "Precise" Model [2]
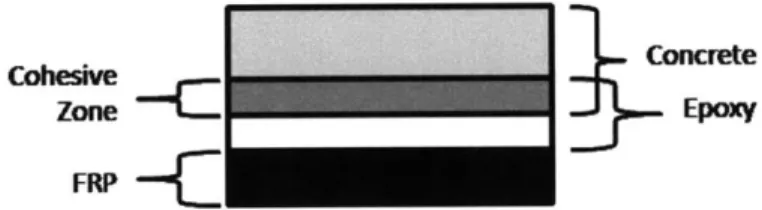
The bond-slip model is essentially a cohesive zone model (CZM). The cohesive zone refers to the
"fracture processing area" [4]. The bi-linear model best represents IC debonding, where the failure
most often takes place with-in the first few millimeters of the concrete layer, although occasionally in
the adhesive itself. It is in this zone of concrete in which the "fracture processing" occurs. In the case of
IC debonding, the initial formation of the flexural or shear/flexural crack at the FRP-concrete interface
causes an initial interface slip and therefore a concentration of stresses at the crack edges [4]. This
concentration of stresses introduces/increases the local shear stress t. As the applied load increases,
fractures continue to happen at the interface which results in a relative slip between the FRP and
concrete. During this initial stage the FRP-concrete interface acts as a spring with the value Kb. As the
fracturing process continues the interface continues to act as a spring Kb until the shear force reaches
the critical value of
Tfand the slips corresponding value of 61.
Tfis not a property of the concrete or the
adhesive, it instead is a property of the two acting together as a cohesive zone, see Figure 5. This is true
because there is microscopic interaction that occurs between the two layers that makes every different
combination of epoxy and concrete have a unique cohesive zone and corresponding unique value of
Tf.Concrete
one Epoxy
FRP
Figure 5: Schematic of FRP-Concrete Interface Showing the Cohesive Zone.
This is an important fact because it means that an appropriate value of
Tfhas to be found by testing and
can't be derived solely on material properties. At this value of t the point of the interface located
closest to the crack enters a softening stage. The softening stage is represented by the negative sloping
line as
5
continues to grow. Additional load can be applied, however the softening stage will propagate
away from the crack and the point at the crack will eventually enter the debonding stage. At this point
in time the point closest to the crack has debonded and throughout the process released a quantity of
energy equal to Gf (total area under the curve), the fracture energy. Additional load can continue to be
applied as the softening and debonding regions continue to migrate across the interface. This is true
until the full interface has no more elastic regions and consists only of softening and debonded regions.
A study done by Chen and Qiao [5] using the bi-linear bond slip law analyzed the debonding at two
intermediate cracks in a simply supported beam. Results from the study are shown in Figure 6,
Figure 7, and Figure 8 below and help illustrate the debonding process described above. Note the
reduction of the slope of load-slip curve as additional load is added. This beam model has no steel
reinforcement, so the change in slope is not a function of steel yielding, but rather solely a function of
more of the bond entering the softening and/or debonding stage.
cracks concrete
Z adhesive layer FRP plate
Si Lt L 5
LO
Figure 6: Theoretical Dual Crack Model Analyzed [5]
E
(A)
0.1 0.2 0.3 0.4 0.5 0.6 0.7 0.8 0.9 1 1.1 1.2 1.3
Bond slip at x-L (am)
Figure 7: Results from Numerical Analysis of Model [5]
T=TY
(B)
EE
(
(D) T (E) ES(C)
(=F(F)
E = Elastic State S=Softenina State D=DebondedBeam is not symmetrically loaded, thus debondinq propaaates from one crack and not from both
Figure 8: Theoretical Debonding Process Between Two Parallel Cracks [5]
Although this is a simplified model it does require a significant amount of inputs. Inputs for this model
include standard properties such as geometry, material properties and loading (magnitude and
location), but also includes inputs concerning the dimensions of the cracks. The dimensions of the crack are used to replace the remaining intact concrete with a rotational spring. This is used to accurately model the affect the crack will have on the flexibility of the beam and thus the stress that get applied at the interface. One interesting aspect of this is that the rotational spring, kr, used in this model is
calculated at the beginning of the modeling and not adjusted for the possibility of changing crack dimensions. Overall the blond-slip law proves useful as a simplified model for the understanding of the debonding process and the local stresses that occur during it.
2.1.2
Global Energy Fracture Mechanics
Another fracture mechanics approach to understanding and predicting debonding is a global energy approach. A global energy approach looks at the balance of external energy acting on a structure and stored "potential" energy within the structure. For an FRP strengthened beam or any structure, the external energy comes in the form of loads, while the potential energy is stored as strains. The structure is stable while these two energies are balanced. While the external energy can be limitlessly applied, the total possible potential energy is limited by the structure's geometry and material properties. In the case where the external loads exceed the possible potential energy the structure can still be in balance. This is dependent on a structure's ability to dissipate energy, remove it from the system. Energy is dissipated through materials failing or yielding. The structure as a whole will not fail until the difference in external energy and potential energy exceeds the structure's ability to dissipate energy. Gunes et. al. [6] studied the possibility of using this concept to predict debonding failure loads. As mentioned above, a structure has a certain quantifiable ability to dissipate energy. In the case of FRP there are three areas of possible energy dissipation; concrete cracking/crushing, steel yielding or pullout, and FRP debonding [6]. Gunes et. al. approached the global energy technique by concentrating on the energy dissipation during debonding, AID, represented in the equation below.
AD =
f
Ydfl +
f
adEPdf
+
f
Gf
dAf
>
0
Equation 6
JYdQ
represents the bulk energy dissipation (mostly concrete cracking),fjEcdQ
represents the plastic energy dissipation due to steel reinforcement yielding, andJGfdAf
represents the energy dissipation due to interface fracture/debonding. According to Gunes et. al. most of the concrete cracking happens prior to the debonding process, so the bulk energy dissipation is considered insignificant and dropped for further calculations.The model in this study is represented by a simply supported beam undergoing symmetrical four-point bending. The simplified bi-linear load vs. deflection figures below, Figure 9, are used to represent the beams response under load. The steeper portion represents the beam prior to steel yielding, while the less steep portion represents the beam after the steel yields.
dV=fTd[2+fGdA, d=f Td+fGdA,+ fa-de'dQ
.. stengthened f2d strengthened beam P beam oP2d 0 P ... ---- - - - - - - - - ----...- - --- -0 -y unstrengthened 0 unstrengthened beam K2 beam KI K2 /DKI
Beam deflection under load points, 5, Beam deflection under load points,
9,
Figure 9: Load vs. Deflection Plot Showing Energy Dissipation Due to Debonding [6]
Gunes et. al. explains that AI is approximately equal and opposite to the change in potential energy during debonding. A further assumption is made that the unloading "springs" Ki and K2 or equivalent to
the K, and K2 from the initial loading prior to yielding of the steel reinforcement. Given these
assumptions and the four-point loading scheme, the potential energy prior to debonding is PE2 and the
potential energy after debonding is PE1.
2 p2
PE2 = f2d 2K PE1 d All)=PE2 -PE,
2 '2K,
Equation 7 Equation 8 Equation 9
Given these Equations 7-9, AID from Equation 9 can be set equal to Ao from Equation 6 to solve for a failure load, P2- P2 is solved for by Gunes et. al. by making the following substitutions for the energy
dissipated by the steel and the energy dissipated by the FRP.
P2 2
M) = fa(dEPdfl+ fGfdAf 2- P
2K2 2K1 Equation 10
This equation becomes extremely simple to solve under this loading scheme and under some additional assumptions that are discussed below. The following substitutions can be made:
c'
fadEdfl
=
fyEc-
)Ac
Equation 11
f
Gf
dAf
=
Gfljbf
where c' and c are the depths of the compressive zone after and prior to debonding respectively and
le
is
the length of the "constant moment" area, the area between the two point loads. GfJI is the mode
11
fracture energy of concrete and If and bf are the length and width of the FRP reinforcement.
The first major assumption made in Equation 11 is that the steel yields prior to FRP debonding and
secondly that the curvature of the beam stays constant after FRP debonded. These assumptions can be
justified, however the Ie
term is troubling from design point of view. The thought behind the le term is
that under four-point bending the region between the point loads will have a constant moment equal to
the maximum moment. This means that all of the steel in this section will yield at the same time and
thus all contribute to the energy dissipation. A typical design load does not have a constant moment
region, this is only achieved in symmetrical point bending. Anything other than a symmetrical
four-point scheme will not have a constant moment region and thus according to this equation will have no
energy dissipation from the steel. Negating the dissipation due to steel yielding for a loading without a
constant moment region would be extremely conservative. Consider the uniformly loaded simply
supported beam and corresponding moment diagram in Figure 10.
Figure 10: Simply Supported, Uniformly Loaded Beam and Corresponding Moment Diagram
Assume that the uniform load, w, is the load at which the steel reinforcement yields. If it holds true that
debonding occurs after steel yielding then that means that additional load will be applied prior to the
FRP debonding. Given the above moment diagram, one can see that the slope of the curve is minimal
around the maximum moment location at the center. This means that as w increases to w+ that the
span of steel yielding will increase as the other portions of the moment diagram reach the moment that
causes yielding. Thus there will be a significant length of steel that will yield prior to debonding, not the
length of zero that is suggested by Equation 11. It was not the authors' intention to suggest that no
energy dissipation would occur without a constant moment region, however looking at such a situation
complicates the energy dissipation process as not all of the steel enters a yielded state at the same time.
The major assumptions concerning the FRP energy dissipation are that the debonding occurs in the
concrete and that it acts in a mode
11,
shear, failure mode. This is justified by past experiments that have
resulted in debonding occurring in the concrete and that the debonding process quickly turns from
mixed mode to solely mode
11.
Although the theory of a global fracture mechanics approach is applicable to the prediction of a
debonding load, it appears that many simplifications have to be made to create computational efficient
equations. Given complex modeling capabilities, a global energy approach should be able to predict a
debonding failure load.
2.2 Strength Approach
As mentioned earlier in the fracture mechanics section, debonding is essentially a propagation of cracks
caused by intense local stresses. The strength based approach essentially uses structural mechanics to
map the interfacial stresses. These stresses compare the materials ultimate strengths and an
approximate failure load can be found. Methods of finding detailed interfacial stresses as well as
empirical formulas for ultimate debonding strength are discussed below.
2.2.1 Interfacial Stress Models
Essentially there are two forces at the FRP-concrete interface, the normal force,
a(x),
and the shear
force, t(x). The differential beam element shown in Figure 11 shows these forces in addition to the
other internal forces that occur in a FRP strengthened concrete beam.
q M(x) M )+ dM1(x) N
~)
Nl(x)+dN,(x) V,(x: + dVI(x) t ti t t t t t t st t t t t t i t M,(,) +dug() Mi(x) V2(x) dx VIx) +dVzfx)Figure 11: Internal Forces in FRP Strengthened RC Beam [7]
The common assumption across all methods of finding interfacial stresses is that both the concrete beam and the FRP act in a linear elastic manner [3,5,7]. The methods of analysis can then be
dividing point in analyses is whether or not constant stresses are assumed throughout the depth of the adhesive. Realistically the adhesive has variant stresses through its depth and this is modeled in what researchers called a high-order analysis [3,5]. A high-order analysis requires a very intensive model which yields more accurate solutions. However, the only major increase in accuracy is only noticed at the very end of the FRP reinforcement [5]. That being said, the majority of models assume invariant stresses throughout the adhesive. Models that assume invariant stresses in the adhesive can further be broken into to two groups based on their approach to find interfacial stresses. These two methods are grossly broken into direct deformation compatibility approach and a staged analysis approach [7].
The direct deformation compatibility approach relates its interfacial stresses to the difference between the displacement of the top of the FRP reinforcement and that of the bottom of the concrete beam. Shear stresses are found by comparing the longitudinal displacements, while the normal stresses are found comparing the vertical displacements [7]. Multiple models have been formed around this approach and their differences come in the selection of which deformations to include in the displacement values. For example two models are addressed in [7], one model includes shear deformations of the beam while the other does not. Displacements that are considered in all the models include those from bending in the concrete beam and those from axial forces in the FRP.
A staged approach uses multiple steps to get the interfacial stresses. An example of this found in [7], uses the deformation compatibility approach to get initial shear stresses in stage one. In the second stage a bending moment and shear force equal to those found in the first stage are applied to the FRP
layer. The FRP is then treated as a beam on an elastic foundation to get the normal stresses and additional shear stresses. The stresses found in stage one are combined with stage two to get the final interfacial stresses.
A large variety of these types of approaches exist and each one makes unique assumptions to try to create a more accurate or simple model, ideally both. Whatever the approach taken, these models are used in combination with fracture mechanic concepts to understand interface crack propagation. This is seen in the example mentioned in the bond-slip law section. In that paper the beam and FRP
reinforcement are assumed to act linear elastically, however a bond-slip model is substituted in for the otherwise assumed linear elastic interface. Additionally rotational springs are used to represent cracks in order to more accurately model the beam stiffness and therefore the interface stresses. The addition of rotational springs and the bond-slip law are just examples of building on the more simple models mentioned above.
2.2.2
Strength Based Equations for Design
The methods above are useful for mapping interfacial stresses and being used in combination with
models such as the bi-linear slip model to understand the propagation of cracks, however in design the
main concern is not the path of cracks but preventing debonding from ever occurring. Prevention of
failure through initial design is the goal of every government's code and engineer and thus researchers
have focused on finding the most accurate and simple methods of generally avoiding debonding failures.
A summary of empirical design equations proposed by researchers was put together by Saxena et. al.
[8]. Different equations are proposed for the prevention of different debonding failures, intermediate
crack vs. plate end debonding. The variety of equations include producing limits on applied shear, V,
strain in the FRP, strain in the concrete, stress in the FRP, and some interaction equations which balance
the effects of shear and moment forces and their potential for causing debonding. The strain limitation
in these type of equations refer to the strains calculated using a linear stress-strain beam analysis, not
the local strains that may occur due to intensified forces at cracks. This makes sense for a design
approach in which the location of future cracks is not known. There is one stress limit approach
presented by [2] that limits local stresses in the FRP to prevent debonding.
2.3 Crack Band Method
So far no finite element modeling (FEM) approaches have been discussed, however FEM is a plausible
approach to predicting debonding failures. Two methods of FEM are discussed by Coronado and Lopez
[9], which include a discrete crack approach and a crack band approach. The difference between these
methods is how the FRP-concrete interface is modeled, see Figure 12.
"C beami 1 1 1 nd surface FRP laminate Interfacial elements(a)
P RC beamSFRP
laminate
Crack Band(b)
Figure 12: (a) Discrete Crack Model vs. (b) Crack Band Model [9]
In the discrete crack approach the debonding failure is modeled as a crack with zero thickness
propagating along the bond surface. The FRP is typical attached to the concrete by some sort of
linear spring to represent the interface stiffness. This can be numerically efficient if the crack path can
be accurately assumed, however it has been found that during debonding failure that occurs within the
concrete that the crack path continuously changes direction [9]. This means that in order to obtain
accurate crack propagation modeling the model would have to continuously be re-meshed. In the case
of the crack band approach a certain thickness of FRP-concrete interface is defined. It is assumed that
micro-cracking related to debonding will occur within the assigned crack band. Giving a depth to the
crack area allows for the crack to change direction while propagating. The crack band is defined by
giving it non-linear properties similar to the ones discussed in the bi-linear slip law. This does require
the input of an accurate bi-linear model, which requires preliminary testing to define the limiting values
associated with the bi-linear model. However, beyond the need for the bi-linear inputs the necessary
inputs for the model are relatively simple. Inputs consist of the basic material properties for each
element of the model (FRP, Concrete, and Epoxy), such as elastic moduli, limiting compressive stresses,
and tensile strains. The benefit of this model is the accuracy to which it models crack propagation and
debonding load. The crack band model allows for cracking to follow the path of least resistance. The
accuracy of the failure path can be seen in Figure 13. What's most intriguing about this example is the
transition the model makes from damage due to debonding to damage due to a shear crack. In a
discrete crack model this propagation upwards would not have been addressed. Overall the crack band
model is a formidable model for predicting debonding failure, however it does require preliminary
testing to get an accurate bi-linear model.
Load
Expermental damage
S1 FRP End D e
FRP End
Figure 13: Crack Band FEM Model Predicted Damage vs. Experimental Damage [9]
..... ... .... . .... ....
3 Durability & Debonding
Static loading is not the only possible cause of premature failure due to debonding. Other aspects such as fatigue and environmental exposure can also affect the load carrying capacity of an FRP strengthened concrete beam.
3.1.1 Cyclic/Fatigue Loading
One of the main reasons for the growing interest in FRP strengthening is the deteriorating infrastructure that society relies heavily on for transportation. This is particularly true with bridges, many of which have been labeled "structurally deficient". Furthermore a large portion of the bridges that make up the transportation system are concrete girder bridges. One of the main reasons for the deterioration is the cyclical nature of the loading that is applied to vehicular bridges. FRP has been proposed to help
reinforce these cyclically loaded structures, whether to help strengthen already fatigue damaged girders or strengthened girders for increased fatigue loads, thus preventing fatigue damage from ever
occurring.
For normal reinforced concrete beams it has been well documented that its fatigue behavior is controlled by the fatigue behavior of the reinforcing steel. In addition to the relatively high stresses in the steel, concrete is known to soften under fatigue loading and thus the FRP stress is increased even more [10]. This process leads to fracture of the steel reinforcement and thus the fatigue failure of the beam. It is for this reason that it is typical in reinforced concrete design to maintain steel stress well below the steels actual fatigue limit [10].
In theory, applying FRP to a fatigue damaged beam or any cyclically loaded reinforced concrete beam helps relieve some stress from the reinforcing steel and thus increases the number of loading cycles under the same load before failure. Additionally, applying FRP can increase the load capacity under fatigue loading. Tests have found that given the same steel stress for an un-retrofitted beam and an FRP
strengthened beam (additional load is applied to the strengthened the beam to reach equivalent un-retrofitted stresses) that the fatigue lives will be equivalent. This helps conclude the idea that steel stress/fatigue is still the controlling factor in the fatigue failure of FRP strengthened beams. The preceding information holds true assuming that there is no debonding failure at the FRP-concrete interface. However it will be seen that debonding can have an effect on the fatigue capacity of an FRP strengthened beam.
It has been found that the fatigue performance of FRP itself is a function of the matrix and not as much a function of the fiber [10, 12]. That being said, in general FRP is considered to have very good fatigue resistance. Additional studies have been done to study the effects cyclic loading has on the bond-slip properties. Figure 14 shows the load vs. displacement for the double shear test performed by [12] to study the bond-slip properties of fatigue loaded interfaces. Figure 14 shows plastic deformation upon unloading after each cycle in addition to lowering stiffness with each cycle. The lowering stiffness correlates with the softening stage of the bond-slip model. The interface fracture energy was also found to reduce slightly. 25- 5 10 - .... -. .. 10 5 15 -c CAL 0.0 0 0.5 1 1.5 2 2.5 3 0 0.5 1 1.5 2 2.5 3 lsplbcOment(mm) Dsplacement(mm)
Figure 14: Load vs. Displacement for Fatigue Loading Double Shear Test [12]
The reduction of fracture energy is small enough to be rather insignificant however debonding in general can have a significant effect on the fatigue performance of beam. When debonding occurs the stress that the FRP was helping to carry gets transferred back to the steel. This means that the beam is essentially working as an un-strengthened member at this point and will take on the fatigue properties of an un-strengthened beam. The strain relationship throughout the depth of the T-beam shown in Figure 15 should remain relatively linear with the maximum strain located at the bottom of the beam, the location of the FRP. However, it can be seen that from an early loading stage that the linear strain curve is not true. The only explanation for this digression from linearity is slip between FRP and concrete at the interface. It can be seen that the slip gradually gets worse as the difference between distance 0 and 2 gets greater. Eventually the FRP is fully debonded and a huge jump in the strain at the steel reinforcement is noticed. Since this is a fatigue load, lower than an ultimate load, the beam is not at risk of failing under a single cycle, however the earlier the debonding occurs the more cycles are applied to the steel at this higher stress level and the lower the fatigue life will be.
16 -400 T14 350 -s 1200 k3p4ch 0 0 -10ki4 250 e
~ ~
-e I as ip-imc A :10 410 -2000 0 2000 4000 6000 U000 10000 12000 MicrostraIf (at Midspea Seeden)Figure 15: Strain Curve of Monotonically Loaded T-Beam Bridge Girder [13]
Additional insight into debonding of FRP under fatigue loading can be found in Figure 16. With the same
linear theory in mind as above, the slopes of these curves can be analyzed to recognize slip and the
onset of debonding. Under ideal conditions, no-slip and no softening of the concrete, the slopes of
these curves should be zero. Consider a more realistic situation where softening of the concrete does
occur however no slip, in this case the curvature of the beam should slightly increase over the time of
the cyclical loading. The increase in curvature should lead to an increase in slope of the strain curves for
both the rebar and the FRP, furthermore with the FRP slope increasing faster than the rebar's due to its
location further from the neutral axis. It is apparent that in the case of this experiment that this was not
true. What is seen in both cases instead is a larger increase in slope of the rebar and not the FRP. This is
an indication of slip at the interface. In the case of the wet lay-up, the results are more drastic with the
rebar strain level eventually exceeding the FRP strain levels, a clear sign of debonding. More drastic
results are to be expected in the wet lay-up since the small thickness of the FRP makes the strains
naturally close even under ideal conditions. In the case of the plate, the rebar strain never exceeds the
FRP strain however it can be seen the slope of the rebar starts to increase at a higher rate than the FRP
at around
103
cycles, a sign of slip. The sudden increase in rebar strain and decrease FRP strain at the
end of plot b is representative of full debonding. Please note that although the gap between the FRP
and rebar strains is expected to be larger for the plate due to its larger thickness, the y-axes, strain, are
not the same scale. Despite the onset of debonding in the Figure
15Figure
16, experiments have shown
improved fatigue behavior in FRP strengthened beams when compared to un-strengthened beams. As
mentioned earlier, the mode of failure between the two are still noted as being the same, however the
FRP lowers the stress levels in the rebar for the cycles prior to debonding and thus increases the fatigue
life of the steel and the entire beam.
4000 (a) * 3500 rebar 3000-2500 .2000; -CFRP 1500 -1 10 10 - 10' 10' 10, 10' cycle number 1700 S(b) . 1600 1500- 1400-1300 - - -_ _ _ rebar 1200 1100 1000-1 10' 10 10V 10, 10V 10' 10V cycle number
Figure 16: FRP and Rebar Strain vs. Cycle Number (a) Wet Lay-Up (b) Plate [10]
3.1.2
Sustained Load & Creep
Another concern for concrete structures is the softening or loss of stiffness in the compressive concrete
over time under a sustained service load. The loss of stiffness leads to an increase in deflection, a
serviceability issue, but not typically failure. However, it is of interest to understand the behavior of the
FRP during sustained loads. Carbon FRP (CFRP), the most popular FRP for structural use, is also the FRP
with the best resistance to creep [1]. Creep-rupture tests have been performed on 0.25 inch diameter
FRP bars and it was found that a linear relationship exists between creep-rupture strength and the
logarithm of time [1]. It was found that after 50 years of sustained load that the ultimate strength of the
CFRP was reduced by approximately 10% [1]. Beyond the slight loss of strength in the FRP, the elastic
modulus is also affected. It was proposed that the elastic modulus of the FRP at time "t" after the
application of the sustained load follows the equation below [14, 15]:
Efrpt = Efr Equation 13
l+4Ofrp
where
Efrp isthe initial modulus and
frp isthe creep coefficient for a specific composite laminate.
Ofrp = tm - 1 Equation 14
where m is a coefficient determined experimentally from the relationship between
Efrp,tand t. Although
m seems difficult to get, the above equations show how the modulus will decrease over time. A
decreased modulus will have the same effect a softening concrete has and help lead to increasing
deflections over time. Additionally this leads to increased strains in the FRP, however not additional
stresses because the reduced modulus allows for increased strains without increased stresses. Figure 17
shows the strains versus time for a four-point bending experiment. U and L are used to denote two
different beams. Note the negative strains for compressive concrete and positive strains for FRP and
tension portion of concrete section. It can be seen that over time the strains in the FRP get larger.
Intuitively when the beam deflects more the curvature gets larger and both the FRP strain and "Bottom"
strain should get larger, with the FRP stain growing at a faster rate. Although the "Bottom" is not
showing an increase in strain, the FRP is showing an increase and one that is obviously larger than that
of the "Bottom". The above information leads to the conclusion that creep should not have a significant
effect on the ultimate strength of a beam, however the change in strain over time under the same load
is important to recognize when trying to differentiate between strains due to additional loads and
strains due to other reasons.
2000
-o .100 1o 200 250 300 3
2000 - - - Top-U -- Bom-U -- FRP-U --- Top-L -0-Boom-L -- FRP-L
.3 0 0 0-- - -- - - - - -- - - . . . -4000
.5000
Time (days)
Figure 17: Strain vs. Time for Four-Point Bending Sustained Load [16]
3.1.3
Freeze-Thaw
An initial review of literature concerning the effects of Freeze-Thaw on the bond strength of FRP
strengthened concrete beams revealed contradicting results. The first paper reviewed presented two
references to past experiments which concluded that freeze-thaw had negative effects on both the
ultimate load carrying capacity of beams, the bond shear strength, and the peak slip value (6f from
Figures 3 & 4) [17]. However the paper itself concluded after its experiment that there were no effects
of freeze-thaw cycles. This contradiction led to the review of a total of four experiments, summaries of
the experiments and conclusions from this review can be found below in Figure 18.
# of Exposure to Air- onclusion
Paper Type of Test FRP Type Freeze- Exosr toair- on
Freeze-Thaw Cycles Water Entramment Thaw Effect
CFRP: Plate & None
[10] Direct Shear* CFRP: Wet Lay-up 0, 100, 200 None Mentioned Mentioned Insignificant
Sprayed In Reduced
[11] Direct Shear* CFRP: Wet Lay-Up 0, 100, 300 Middle of None Capacity
I Thawing Process
[121 Direct Shear* & 0,50, Thawed in Water 6% Insignificant 4-Point Bending 150,300 (15 "C)
[13] 4-Point Bending CFRP: Wet Lay-Up GFRP: Wet Lay-Up 0,50,200 Thawed in Water 6% Insignificant
(15 *C)
*Schematic of direct shear test found below in Figure 19
Figure 18: Summary of Reviewed Freeze-Thaw Experiments
P
~~J~b.fz
Figure 19: Schematic of Direct Shear Test [2]
Each experiment has highly specific and unique test setups and material properties, however the
conclusions on the effect of freeze-thaw cycles are drawn from the differences found in the summary
above. The first paper read, "[17]", concluded that freeze-thaw has an insignificant effect, while the
second paper read, "[18]", concluded that freeze-thaw has a significant effect on the bond properties. A
comparison of these two papers revealed that while "[17]" used ASTM C666 for freeze-thaw testing,
there was no mention of interaction with water during the thawing, while "[18]" mentioned the
spraying of water on test specimens during thawing. The main driver in deterioration of concrete under
freeze-thaw cycles is the water inside the pores freezing, expanding and creating local stresses. This
made the absence of the mention of water in "[17]" significant. The third and fourth papers read were
"[19]" and "[20]". These experiments included soaking of the specimens in water during thawing,
however both concluded that freeze-thaw had insignificant effects on the bond properties. A
comparison of "[17]" with "[19]" and "[20]" found the only major difference to be the absence of air-entrainment in "[17]". It is noted that if appropriate are air-entrainment is provided in concrete, freeze-thaw deterioration of concrete can essentially be eliminated [20]. The conclusion is made that air-entrainment helps prevent micro-cracking from occurring in the concrete at the interface and thus allows the full fracture energy of the interface to be used to resist applied loads rather than some of this energy being used by fracturing during the freeze-thaw process.
Although air-entrainment appears to prevent reduction in bond strength due to freeze-thaw, it is still useful to look at the effects freeze-thaw has on non-air-entrained samples. The lower bond strength can be contributed to the fracture energy used up during the freeze-thaw process. The reduction in fracture energy however does not result in a lowered value of critical shear, Tf, according to [17]. The reduction
in fracture energy comes from the lower 5i value and critical slip value (when debonding starts), 6f. This is consistent with a more brittle failure which is commented on in [17, 18, 19]. It was also found that the decrease in fracture energy continued as the number of freeze-thaw cycles increased. However, not enough data is available to generate an equation for the rate at which this available fracture energy decreases with number of freeze-thaw cycles.
3.1.4 High & Low Temperatures
Freeze-thaw experiments typically perform the loading part of the experiment at room temperature. In this case the specimens are being tested to see what damage the freeze-thaw process has on them. In addition to the effects of freeze-thaw, extreme temperatures can play a role on the performance of an FRP strengthened beam during loading. It is well documented that FRP and its adhesives tend to behave in a more brittle manner at lower temperatures and tend to get softer at higher temperatures [21]. The effects of extreme temperatures can be seen in the figure below from the experiment performed by
[21]. It can be seen from these results of a three-point bending test that the colder temperature samples failed in a more brittle manner while the samples above room temperature failed in a more ductile manner. It should also be noted that all the samples at high temperatures failed through the epoxy, a manner of failure which is unconventional. This can be explained by the softening interface due to the temperature and its inability to transfer high loads, thus never transferring loads into the
concrete high enough to damage the concrete. Conversely the samples in the extreme cold environment all failed by debonding starting within concrete at the intermediate flexural crack and transitioning into epoxy. This also is an unusual failure pattern. It can be explained by the interface's
ability to take high loads initially and thus damage the concrete, but then the slip gets too large and the
brittle property of the cold epoxy takes over and the failure proceeds into the epoxy.
14 - F, kN 14 - F, kN 12 - 12 -b 10 - 10 -8 *8 - ... 6- 6 -4 4 -2 6, mm 2 - ,mm 0 0 0.20 0.70 1.20 1.70 2.20 2.70 0.20 0.70 1.20 1.70 2.20 2.70 14 - F,kN 14 - F, kN 12 - 12-10 - C 10
d
8 - 8 -6 - 6-4 -4 f 2~ -,mm 2 u,mm 0 I I I 0 0 0.20 0.70 1.20 1.70 2.20 2.70 0.20 0.70 1.20 1.70 2.20 2.70Figure 20: Load vs. Deflection (a) Room Temp. (b) +40"C (c) -30'C (d) -100*C [21] (-) for E=170 GPa (--) for E=300 GPa
It can be seen from Figure 20 that extreme temperatures can have a significant effect on the behavior of
FRP strengthened concrete beams.
3.1.5 Moisture & Salt
As mentioned earlier many applications of FRP strengthening are found in reinforced concrete bridge
girders. In addition to freeze-thaw and variant extreme temperatures these applications have to
withstand high levels of moisture and de-icing salts during winter months. The prevalence of this type
of application has led to many experiments on the effects of moisture and salt on the performance of
FRP retrofits.
As with most of the environmental effects mentioned above, experiments have been done on a global
level with bending tests and at a bond level with either shear or peeling tests. Peeling tests, see Figure
21, were done on CFRP-concrete bonded joints that were immersed in water for a varying amount of
time [22]. The objective of the test was to evaluate the effects of water on mode 1 fracture energy and
the cohesive zone model. Figure 22 shows the change in fracture energy for given water immersion
periods. The fracture energy was found by inputting the test data such as load and crack length into an
empirical formula presented in [22]. The loss of fracture energy is shown in a more specific manner in
Figure 23. This figure shows the variation of the cohesive zone model with interface region relative
humidity (IRRH) where
Hdis deterioration rate of the interfacial fracture energy,
@
is the retention
coefficient, and ko is the initial stiffness at the quasi-linear stage of the cohesive zone model and is
assumed to be unaffected by moisture [22]. Although all the specimens were immersed in water the
IRRH is a function of the diffusion rate of the water into the concrete and the time the samples are
immersed, thus the longer immersed specimens have a higher IRRH. It can be seen that the higher the
IRRH the lower the fracture energy as well as the critical stress and separation. It is important to stress
that this is mode 1 fracture energy and as mentioned earlier, debonding failure tends to converge to
mode 2 failure, however it is expected that comparable results would occur for mode 2 failure.
t
meds
I load sysan Side view
191 mn
Figure 21: Schematic of Peeling (Mode 1) Test [22]
500
400
300
200
100
0
0 2 3 4 5 6 7 8Water immersion time (weeks)
0.05 0.1 0.15 0.2 0.25 0.3 0.35
Normal interfacial separation (mm)
Figure 22: Numerical Mode 1 Fracture Energy vs. Figure 23: Cohesive Zone Model for Varying IRRH [22] Immersion Time [221
Many experiments have been done on the effects of wet-dry cycles with the inclusion of de-icing
chemicals. As mentioned earlier, this is popular because it represents the environmental conditions a
transportation structure might see over its lifetime. Three experiments were reviewed and all of them
recorded a decrease in load carrying capacity and ductility with the increase in the number of wet-dry
cycles in the de-icing chemicals [23, 24, 25]. It is noted that for a typical reinforced concrete beam the damage due to de-icing chemicals comes in the form of steel reinforcement deterioration [23]. The reinforcement deterioration was found to decrease in FRP strengthened beams compared to
unstrengthened ones [23]. This is believed to be a factor of the FRP acting as a line of protection against the infiltration of the chemicals into the concrete. This creates a two-fold benefit to applying the FRP, the strengthening of the cross-section as well as the barrier against steel corrosion. The FRP
strengthened beam however is still affected by the wet-dry cycles as can be seen in Figure 24 and Figure 25. In all of these cases besides the unstrengthened one, the method of failure was debonding. There are two possible explanations for the increased deflections with the number of cycles, either the deterioration of steel or that of the FRP-concrete interface. It was found that the steel reinforcement lost a mass equal to 0, 1, and 1.33% of its mass under 100, 200, and 300 cycles respectively for the beams strengthened with the FRP plate, while the change in the mass of the steel for the FRP sheet strengthened beams was found to be so low that it was unreadable. Additionally, strain at failure in the plate decreased from 1.057% at 0 cycles to 0.578% at 300 cycles (a 45% decrease), while the strain at failure in the sheet decreased from 0.917% at 0 cycles to 0.842% at 300 cycles (an 8% decrease). The difference in loss of steel mass and change in failure strain is very interesting. Looking at the cross-sections of the specimens it is clear that the plate exposes more of the concrete. Considering the experiment above it would be expected that the plated samples would have a higher IRRH due to the smaller amount concrete area covered by FRP, see Figure 24 and Figure 25. This leads to lower fracture energy in addition to the above mentioned steel mass reduction. Both beams exhibit more brittle failure and lower maximum loads with increase in the number of cycles, however the plated beam sees a greater change. Note that both beams use transverse FRP for longitudinal FRP anchorage, not just the "sheet" beams. 140 120-100- -10Cc. 1 80 r ... - --- 200 Cycles 20 -- 300 Cycls 0 10 20 30 40 50 0 80
CFRP
Dlctiononne PLATE140 -- 0 Cycles 120 ---100Cyles 50 --200Cycles -- 300 Cycles N -Lutmngiened 60-4 40 20 0 10 20 30 40 50 0 70 8
LONGITUDINAL
TRANSVERSEDeflectn (nw) CFRP SHEET CFRP SHEETS

![Figure 3: Bi-Linear Bond Slip Law [4]](https://thumb-eu.123doks.com/thumbv2/123doknet/14542850.535675/10.918.115.784.870.1058/figure-bi-linear-bond-slip-law.webp)
![Figure 7: Results from Numerical Analysis of Model [5]](https://thumb-eu.123doks.com/thumbv2/123doknet/14542850.535675/12.918.102.433.497.644/figure-results-numerical-analysis-model.webp)
![Figure 9: Load vs. Deflection Plot Showing Energy Dissipation Due to Debonding [6]](https://thumb-eu.123doks.com/thumbv2/123doknet/14542850.535675/14.918.163.767.232.450/figure-load-deflection-plot-showing-energy-dissipation-debonding.webp)

![Figure 11: Internal Forces in FRP Strengthened RC Beam [7]](https://thumb-eu.123doks.com/thumbv2/123doknet/14542850.535675/16.918.339.583.660.932/figure-internal-forces-frp-strengthened-rc-beam.webp)
![Figure 13: Crack Band FEM Model Predicted Damage vs. Experimental Damage [9]](https://thumb-eu.123doks.com/thumbv2/123doknet/14542850.535675/19.918.222.714.696.878/figure-crack-band-model-predicted-damage-experimental-damage.webp)
![Figure 14: Load vs. Displacement for Fatigue Loading Double Shear Test [12]](https://thumb-eu.123doks.com/thumbv2/123doknet/14542850.535675/21.918.210.690.363.519/figure-load-displacement-fatigue-loading-double-shear-test.webp)
![Figure 15: Strain Curve of Monotonically Loaded T-Beam Bridge Girder [13]](https://thumb-eu.123doks.com/thumbv2/123doknet/14542850.535675/22.918.290.628.122.319/figure-strain-curve-monotonically-loaded-beam-bridge-girder.webp)
