Development of Simple 3D-Printed Scaffolds for Liver Tissue
Engineering
by James Camp
B.S. Chemical Engineering The University of Texas at Austin, 1999
Submitted to the Division of Biological Engineering in partial fulfillment of the requirements for the degree of
Master of Science in Bioengineering at the
Massachusetts Institute of Technology September, 2002
Copyright © 2002 Massachusetts Institute of Technology. All rights reserved.
Signature of Author: _____________________________________________________________ Division of Biological Engineering
Certified by: ___________________________________________________________________ Linda Griffith Professor of Biological Engineering Thesis Supervisor Accepted by: ___________________________________________________________________ Douglas Lauffenburger Graduate Program Chair
Development of Simple 3D-Printed Scaffolds for Liver
Tissue Engineering
by James Camp
Submitted to the Division of Biological Engineering on August 7, 2002 in partial fulfillment of the requirements
for the degree of Master of Science in Bioengineering
Abstract
One solution to the increasing need for liver transplants is to grow implantable liver tissue in the lab. A tissue-engineered liver for transplantation will require complex structures to support cell differentiation and integration with surrounding vasculature. Recent developments in 3D-printing (3DP™) technology allow the construction of such geometrically complex scaffolds out of biodegradable polymers. These artificial tissues should maintain healthy, functional hepatocytes in proper contact with supporting cell types in the context of proper flow cues.
This project comprises three major efforts. First, the design and development of a 3D-printed scaffold, constructed of a porous biodegradable polymer matrix, for flow bioreactor culture. Second, the development of protocols for the production, preparation, and flow support of these scaffolds. And third, the employment of standard cell culture methodologies to test the ability of these scaffolds to support liver tissue cultures.
Initial cell culture experiments showed similar rates of albumin production in the polymer disk scaffolds compared to cells in silicon-chip scaffolds under appropriately scaled flow conditions, indicating that the polymer scaffolds maintain functioning liver tissue. Further, histology
sections of liver tissue grown on these polymer scaffolds show organization of cells into structures reminiscent of in vivo liver.
The results of this study show that 3D-printed porous polymer scaffolds have great potential for use as biodegradable tissue culture support devices. It is believed that, combined with printing technologies now under development, the technologies developed in this thesis will help facilitate the construction of an implantable tissue engineered liver.
Thesis Supervisor: Linda Griffith
Acknowledgements
I would like to thank my advisors, Linda Griffith and Harvey Lodish, for the thought-provoking conversations and professional criticism that have led to this Masters Project.
I would also like to acknowledge the support of many members of the Griffith lab who have made this project possible: Fred Gimenez, John Wright, Dan Bauer, Dena Janigian, Karel Domansky, the rest of the BPEC liver group, and the residents of office 56-379.
Thanks especially to Greg Nelson, who assisted with the pressure-flow experiments, and to Donna Stolz and her research group in Pittsburgh for the histology sections and electron micrographs that appear in Chapter 4 of this thesis.
Table of Contents
DEVELOPMENT OF SIMPLE 3D-PRINTED SCAFFOLDS FOR LIVER TISSUE ENGINEERING ...1
ABSTRACT...2
ACKNOWLEDGEMENTS...3
TABLE OF CONTENTS...4
LIST OF FIGURES...5
LIST OF TABLES...5
1 INTRODUCTION AND BACKGROUND ...6
1.1 OBJECTIVES...6
1.2 BUILDING A LIVER...6
1.2.1 Overview of Tissue Engineering ...6
1.2.2 The Structure and Function of Liver...7
1.2.3 The Macroreactor and the Silicon Scaffold...9
1.3 THREE-DIMENSIONAL PRINTING...10
1.3.1 The 3D-Printing Process...10
1.3.2 Adapting 3DP™ for Polymeric Materials...11
1.3.3 Technical Limitations on Polymer Device Geometries...12
1.4 THESIS OVERVIEW...13
2 SCAFFOLD DESIGN ...14
2.1 PROPOSED SCAFFOLD DESIGNS...14
2.1.1 Physiological Scaffold Design: Hex Array...14
2.1.2 Revised Design for DOD Printing: Hollow Box ...15
2.1.3 Simplified Scaffold Design: Striped Disc...16
2.1.4 Final Scaffold Design: Filter Disc...16
2.2 DESIGN CALCULATIONS...17
2.2.1 Hex Array Velocity Profile ...17
2.2.2 Oxygen Mass Balance in Disc Scaffold ...19
2.2.3 Model for Cell Distribution in Disc Scaffold...20
2.2.4 Estimated Flow Shear in Disc Scaffold ...22
2.2.5 Predicted Optimum Parameters...23
3 PROTOCOL DEVELOPMENT ...25
3.1 METHODS...25
3.1.1 Scaffold Materials...25
3.1.2 Printing and Processing...26
3.1.3 Scanning Electron Microscopy ...26
3.1.4 Void Fraction Measurement...27
3.1.5 Pressure-Flow Testing...27
3.1.6 Sterilization ...28
3.1.7 Collagen Coating Optimization ...29
3.1.8 Flow System Improvements...30
3.2 RESULTS...31
3.2.1 Scanning Electron Micrographs ...31
3.2.2 Void Fraction...35
3.2.3 Flow Testing...36
3.2.4 Collagen Coating Optimization ...37
3.2.5 Flow System Improvements...38
4 LIVER CULTURE TESTS ...39
4.1 METHODS...39
4.1.1 Bioreactor Culture...39
4.1.2 Long-term Culture Study ...40
4.1.3 Comparison of Single Cells and Spheroids ...41
4.1.4 Alternate Seeding Methods...42
4.2 RESULTS...43
4.2.2 Comparison of Single Cells and Spheroids ...47
4.2.3 Alternate Seeding Methods...48
5 CONCLUSIONS...49
5.1 DISCUSSION OF RESULTS...49
REFERENCES ...51
APPENDIX A: PARAMETER VALUES FOR DESIGN MODELING...53
APPENDIX B: MASK SET FOR CYLINDRICAL ARRAY SCAFFOLD...54
APPENDIX C: FINAL SCAFFOLD SYNTHESIS PROTOCOL ...55
APPENDIX D: MODIFICATIONS TO THE MACROREACTOR...56
APPENDIX E: CELL CULTURE MEDIA ...58
List of Figures
FIGURE 1.1—THE MULTIPLE LEVELS OF LIVER ORGANIZATION...8FIGURE 1.2—LIVER MICROARCHITECTURE AT THE CELLULAR LEVEL...8
FIGURE 1.3—THE MACROREACTOR...9
FIGURE 1.4—THE MOST COMMONLY USED SCAFFOLD IN MACROREACTORS, A SILICON-FILTER-STEEL SANDWICH. ...10
FIGURE 1.5—SCHEMATIC OF THE 3D-PRINTING PROCESS...11
FIGURE 1.6—SCHEMATIC OF CONTINUOUS JET 3D-PRINTING...12
FIGURE 1.7—PIXELATED VERSION DUE TO RASTER PRINTING. ...13
FIGURE 2.1—THE PROPOSED HEX ARRAY SCAFFOLD...14
FIGURE 2.2—PROPOSED HOLLOW BOX SCAFFOLD...15
FIGURE 2.3—THE STRIPED DISC SCAFFOLD...16
FIGURE 2.4—THE FILTER DISC SCAFFOLD...17
FIGURE 2.5—MODEL OF THE HEXAGONAL SUBUNIT AS A CYLINDRICAL ANNULUS...17
FIGURE 2.6—PREDICTED FLOW VELOCITY PROFILE FOR A HEXAGONAL SUBUNIT OF THE HEX ARRAY SCAFFOLD. ...18
FIGURE 2.7—LATTICE MODEL OF POROUS SCAFFOLD...20
FIGURE 2.8—IDEALIZED MODEL OF CELL STRUCTURES IN POLYMER SCAFFOLDS...21
FIGURE 3.1—CHEMICAL STRUCTURES OF THE TWO POLYMERS USED...25
FIGURE 3.2—PRESSURE-FLOW TESTING APPARATUS...28
FIGURE 3.3—THE ORIGINAL PASSIVE-CROSSFLOW SYSTEM VERSUS A FORCED-CROSSFLOW PUMP...30
FIGURE 3.4—SCANNING ELECTRON MICROGRAPHS OF PMMA STRIPED DISC SCAFFOLDS...32
FIGURE 3.5—SCANNING ELECTRON MICROGRAPHS OF SCAFFOLDS PRINTED TOP-DOWN...33
FIGURE 3.6—SCANNING ELECTRON MICROGRAPHS OF LATEST SCAFFOLDS, PRINTED BOTTOM-UP...35
FIGURE 3.7—RESULTS OF PRESSURE-FLOW STUDY OF FIVE MILLIMETER-THICK DISCS...36
FIGURE 3.8—D'ARCY PERMEABILITY AS A FUNCTION OF VOID FRACTION. ...37
FIGURE 3.9—COMPRESSION OF THE POROUS SECTIONS OF THE SCAFFOLD, INDICATING IMPROVED FLOW SEALING...38
FIGURE 4.1—MACROREACTOR WITH MEDIUM RESERVOIR...39
FIGURE 4.2—ALBUMIN PRODUCTION IN LONG-TERM CULTURES...44
FIGURE 4.3—UREA SYNTHESIS IN LONG-TERM CULTURES...44
FIGURE 4.4—P450 ACTIVITY IN LONG-TERM CULTURES...45
FIGURE 4.5—FLUORESCENT MICROGRAPH ILLUSTRATING P450 EXPRESSION...45
FIGURE 4.6—SCANNING ELECTRON MICROGRAPHS OF LONG-TERM CULTURES...46
FIGURE 4.7—TRANSMISSION ELECTRON MICROGRAPHSOF LONG-TERM CULTURES...46
FIGURE 4.8—TOLUIDINE BLUE STAINING OF LONG-TERM CULTURES...47
FIGURE 4.9—COMPARISON OF ALBUMIN PRODUCTION BY SINGLE-CELL AND SPHEROID SEEDED REACTORS...47
List of Tables
TABLE 2-1. NUMERICAL RESULTS OF DESIGN CALCULATIONS...24TABLE 3-1. VOID FRACTIONS OF FIVE SCAFFOLDS...35
1 Introduction and Background
This work represents the first step toward the goal of a scaffold that will reproduce all of the functional aspects of liver geometry in order to grow transplantable liver tissue in vitro. In order to understand the results presented in later chapters, the reader requires some understanding of the field of tissue engineering, especially as it pertains to liver, and a working knowledge of the Three-Dimensional Printing (3DP™) process used to build scaffolds for this project. This chapter gives an introduction to these topics and a brief overview of the remainder of the thesis.
1.1
Objectives
The primary goal of this project was to produce a physiologically motivated scaffold for liver tissue culture using state of the art polymer freeform fabrication technology. An initial design was conceived with a subunit structure based on the geometric structure of liver and a
macroscopic structure designed to fit and existing bioreactor system [Powers, 2002]. The particular technology used, which is described in detail in Section 1.3 of this work, limited the range of geometries that could be produced, leading to a series of simplified prototypes serving a set of secondary objectives:
• to demonstrate the feasibility of porous polymer scaffolds for liver culture;
• to develop a set of protocols for production, preparation, and use of these scaffolds; and • to identify issues that need optimization as 3D-printed scaffold technologies mature.
1.2
Building a Liver
1.2.1 Overview of Tissue Engineering
The term “Tissue Engineering” refers to a variety of efforts aiming to build tissues and organs using a mix of synthetic and natural components [Langer and Vacanti, 1993; Lysaght and Reyes, 2001; Yannas, 2001; Griffith and Naughton, 2002]. One major goal of tissue engineering is to produce off-the-shelf or custom-built devices that will reduce the need for transplants or replace them entirely. These efforts fall into two major categories: in vitro synthesis and in vivo
regeneration. The first category involves construction of tissues from defined components in vitro by adding specific cell types to a scaffold fashioned from biologically compatible materials [Griffith and Naughton, 2002]. Such a synthetic tissue can then be grown in a bioreactor using a defined culture medium formulated to supply the required nutrients, oxygen, and signaling molecules. The second approach, which will not be developed in detail in this thesis, involves implanting a scaffold or template into a wound site to encourage regeneration by cells in adjacent tissues [Yannas, 2001].
Synthetic polymer scaffolds can be produced in a variety of ways. One method for making simple scaffolds is to dip polyglycolide fabrics in a solution of polylactide in chloroform, shaping the wet fabric to match the macroscopic shape of the desired organ, and allowing the polylactide to dry and cement the scaffold in its new shape [Griffith and Naughton, 2002]. Alternately, scaffolds can be prepared by dissolving a polymer in an organic solvent and casting the polymer into a vessel containing a loosely packed bed of a water-soluble porogen such as sodium chloride [Ma and Langer, 1999]. This molding method can produce more complex structures than the dipping method, but does require a new mold for every permutation of the scaffold design. Finally, scaffolds can be produced from a mix of polymer and porogen powders [Zeltinger, 2001] by solid freeform fabrication methods such as the 3DP™ process described in Section 1.3, either to match an engineer’s design specification or to mimic a three-dimensional scan of a patient’s original organ.
1.2.2 The Structure and Function of Liver
From an engineering perspective, the liver is a complex and fascinating organ. It includes a complex flow manifold, a highly structured reactor bed, and a separation system that directs most metabolic products into the bloodstream but shunts bile salts into a retrograde duct. All of this function derives in one way or another from the liver’s unique structure. From a black-box point of view, the liver connects at its input to a structure called the portal triad (comprising the hepatic artery, the portal vein, and the retrograde bile duct), and at its output connects to the hepatic vein (Figure 1.2a). Adding a level of complexity, these inputs and outputs branch into interdigitating tree structures that supply and drain the entire liver (Figure 1.2b). Zooming in on a single branch of this tree reveals a hexagonal unit structure in which blood from three input branches flows radially toward a centrally placed output branch (Figure 1.2c). Isolating a single input-output pair reveals the fundamental unit of liver structure: a set of thin hepatocyte plates, called an acinus, strung between portal tract and hepatic venule (Figure 1.2d).
A
Portal Vein Hepatic Artery
Bile Duct Hepatic Vein
Digestive Tract Liver Circulation Detoxify blood Process nutrients Store/Release glucose B
C D
Figure 1.1—The multiple levels of liver organization. A: black-box connectivity; B: internal branch structure; C: hexagonal unit cell; D: perfusion path from portal tract to venule. [Images B, C, and D from Young, 2000]
In addition to macroscopic vascular structure, the liver has a high degree of organization on the cell scale that must be replicated for proper function. Each acinus is lined by endothelial cells that may serve a variety of physical and chemical shielding functions. Interspersed with the hepatocytes are supportive stellate cells and Kupffer cells, a specialized form of macrophage. While the bulk of fluid flow travels “down” the acinus from inlet to outlet, hepatocytes also form ducts called bile canaliculi that transport bile in a retrograde fashion to the bile duct in the portal triad. These ducts, like the apical surface of digestive tissues, are isolated from the remainder of the tissue by tight junctions between neighboring hepatocytes.
A B
Figure 1.2—Liver microarchitecture features string-like hepatocyte plates (A) lined with endothelial cells, E, and interspersed with Kupffer cells, K, and stellate cells (B). [Images from Young, 2000]
Functionally, the liver has been called the body’s chemical reactor. Hepatocytes are responsible for clearing toxins, drugs, and other foreign molecules from the circulation, and for maintaining homeostasis of nutrients and plasma proteins such as albumin. The success of a synthetic liver tissue, therefore, is often measured based on its ability to reconstitute these functions [Kurosawa, 2000; De Bartolo, 2000]. The rate of albumin production by bioreactors is a common measure of liver tissue function, as is the activity of various P450 enzymes, which take part in the first phase of foreign-compound oxidation. Finally, production of urea is commonly used as a measure of liver tissue function, since fixing nitrogen is another function delegated to hepatocytes. Of these three assays, only P450 measurement requires addition of a substrate to the reactor; albumin and urea synthesis take place constitutively in healthy liver tissue.
1.2.3 The Macroreactor and the Silicon Scaffold
Several bioreactor systems have been designed to replicate some portion of the liver’s
complexity. Many reactors use hollow-fiber or membrane systems to keep liver cells in contact with culture medium or blood, often for use as clinical extracorporeal liver assist devices [Rozga, 1993; Gerlach, 1994; De Bartolo, 2000]. Other reactors use polymer foams to provide a more free-form flow environment [Kurosawa, 2000; Torok, 2001]. Yet another design uses porous microbeads in a packed bed formation [Kawada, 1998]. None of these reactors, however, have succeeded in producing tissue structures that closely resemble those of in vivo liver. One hypothesis is that these reactors have not sufficiently replicated the flow environment of liver, leading to a lack of proper flow cues for liver tissue development.
In previously published work [Powers, 2002], the Griffith lab developed and characterized a flow chamber for perfused liver culture, known internally as the “macroreactor” (Figure 1.5). The key feature of this reactor is a flow pattern split between overhead flow across the top of the scaffold and perfusion flow (crossflow) through the cell bed. Scaffolds in the shape of half-inch-diameter disks are held in the cylindrical crossflow chamber, sealed by a gasket on the top side and by an o-ring on the bottom side to prevent fluid from flowing around the scaffold and bypassing the cell bed; visibility is provided by cover glasses on the top and bottom, also held in place by o-ring assemblies. See Appendix D for the initial assembly diagram.
A B
1 2
3 Figure 1.3—The Macroreactor, shown with polymer scaffold in place (A). The chamber divides a fixed inflow, 1, into rapid overhead flow, 2, and slower crossflow, 3 (B).
The crossflow chamber was designed to accept a silicon-filter-steel sandwich (Figure 1.6), which has proven very useful for simulating liver tissue in vitro [Powers, 2002]. Freshly isolated liver cells form ring or bridge structures in the 300µm-square channels, setting up microstructures that in many cases resemble in vivo liver. The clear top and bottom faces of the macroreactor allow not only microscopic observation of the liver tissue as it develops, but also spectroscopic and fluoroscopic quantification of liver function. This ability to yield quantitative results has made the macroreactor a system of choice for measuring the effect of toxins, viruses, and drugs on the health of liver tissue in vitro, potentially leading to a future use in the military, environmental, and medical industries.
A
B
Figure 1.4—The most commonly used scaffold in Macroreactors is a silicon-filter-steel sandwich (A) designed with etched square channels to provide perfused liver culture (B). The scaffold fits 100 channels, each 300 microns square, in a space smaller than a US dime.
1.3
Three-Dimensional Printing
1.3.1 The 3D-Printing Process
One potentially important new technology for tissue engineering is called the three-dimensional printing (3DP™) process (Figure 1.7). A type of solid freeform fabrication, the 3DP™ process was originally developed for rapid prototyping of ceramic parts, and has also been applied to the production of metal and polymer parts [Griffith, 1997]. Using technologies similar to modern inkjet printers, a 3DP™ machine fabricates complex structures as a sequence of thin layers. Each layer begins by rolling out a thin layer (50 to 200 µm in thickness) of fine powder particles. These particles are glued into a defined shape by placing drops of aqueous binder in precise locations; particles that are not exposed to binder are dusted away later in the process. The particular pattern of drops is defined by the controlling computer, which translates a three dimensional model of the desired structure into a stack of two-dimensional pixel patterns, and then directs the printer to draw each layer in sequence. The wetted area of each layer extends just
far enough below the current layer to glue it to the layer below, so that the complete set of these “inkjet drawings” form a solid three-dimensional structure of user-defined geometry. Resolution is limited by size of the powder, size of the droplets, and the tendency of droplets to wick out in various directions.
A
B
C
Figure 1.5—Schematic of the 3D-Printing process. Powder is spread in a thin layer (A), then a computer-controlled print head deposits binder where a solid area is desired (B). After a series of layers, a 3D solid is created (C).
1.3.2 Adapting 3DP™ for Polymeric Materials
Tissue engineers are often interested in materials for which nonpolar organic solvents such as chloroform must be used. Print heads designed to deliver aqueous materials are not compatible with these solvents, for reasons directly related to the droplet control technologies in use. Drop-on-demand (DOD) print heads use valves to control the release of binder droplets, and these valve structures have so far been constructed with plastic components that dissolve in high-strength organic solvents. Metal DOD print heads are under development, but the low surface tension of chloroform makes it difficult to generate discrete droplets [unpublished data]. Charge-and-deflect print heads generate a continuous stream of binder droplets, which pass through an
electric field as they exit the print head. Solvent droplets that should not fall on the powder bed are given an electric charge as they pass through the print head and are thereby deflected away from the powder bed. Uncharged droplets pass unhindered. Nonpolar solvents such as
chloroform, however, cannot be charged in this way.
Nonetheless, simple structures have been manufactured from poly(L-lactic acid) (PLLA) and poly(D,L-lactic-co-glycolic acid) (PLGA) powders using chloroform as a binder [Griffith, 1997; Park, 1998; Zeltinger, 2001]. These devices were generated using a printing mode known as continuous-jet (CJ) printing, in which a continuous stream of droplets is generated from a print head consisting of a metal tube ending in an aperture plate. The solvent stream traverses a powder bed shielded by a metal stencil, or mask, engraved with a negative image of each layer (Figure 1.8). Areas not covered by the mask are exposed to chloroform, which partially dissolves the substrate and then evaporates, linking the neighboring particles together. Continuous-jet technology natively provides two kinds of geometrical features: solid areas (printed so that each line slightly overlaps the last) and stripes (alternating printed and unprinted lines). Many intricate geometries can be produced given a set of sufficiently complicated masks, but the cost of
manufacturing masks discourages projects that require complex channel and island architectures.
Figure 1.6—Schematic of continuous jet 3D-Printing. The ink drops are controlled in this case by a stencil placed over the powder bed.
1.3.3 Technical Limitations on Polymer Device Geometries
The types of geometries possible in chloroform-printed polymer scaffolds are limited by three factors. First, the need to use masks in the printing process makes the production of complex scaffolds prohibitively expensive. Further, the customization of these devices requires the manufacture of additional masks for each permutation in the design. This limitation restricts biomimetic scaffold designs to lines [Park, 1998], square channels [Griffith, 1997], and porous discs [Zeltinger, 2001]. Piezoelectric DOD print heads are currently being developed for nonpolar solvent delivery, and the advent of polymer DOD printers will resolve this first limitation.
Second, the minimum feature size in a 3D-printed scaffold is defined by a handful of physical factors: size of the powder, size of the binder droplets, and tendency of the solvent to wick away from the impact site. Powder particles less than 25 µm in diameter seem empirically to spread
unevenly. Further, for the finished scaffold to have pores large enough to support cells, the device must be printed with 75-100 µm salt particles. Because of the random arrangement of powder particles, the effective minimum feature size is about twice the average particle size, or between 150 and 200 µm. Further, nozzles constructed to date produce drops around 100 µm in diameter, with enough spreading and wicking of the drop when it hits the powder to wet powder to a diameter twice that of the droplet. Minimum feature size horizontally is therefore
approximately twice the drop size, or about 200 µm, while feature size vertically depends on impact velocity of the droplet and the tendency of a given powder to wick solvent down. The effective minimum feature size is 150 µm in the “Z” direction (limited by powder size and drop penetration) and 200 µm in the “X” and “Y” directions (limited by powder size and droplet size). Third, the available geometries are limited to those shapes that a computer-controlled print head can produce. The print head can traverse the powder bed in a grid pattern (raster printing) or it can trace the actual lines specified in a computer drawing (vector printing). A standard drop-on-demand printing machine can only move the print head in two perpendicular directions (x and y) and therefore prints any shape as a set of points on a Cartesian grid. The control software
therefore converts a computer file consisting of lines and arcs (known as vectors) into a grid of squares known as pixels. This process, called rasterizing, produces jagged edges from circular or angular vectors. For scaffolds using angled lines with thicknesses on the order of the minimum feature size, raster printing would produce walls of inconsistent thickness (Figure 1.9), leading to uneven flow patterns or even leaks. Vector printing, in which the print head is capable of moving in a diagonal line or arc, would produce much more consistent angled walls. Prototype vector printers have been created for water-based binders, but the technology is not currently being applied to printing with organic binders.
A
Figure 1.7—Raster-printing would create a pixelated version of a design with curved or angled walls.
1.4
Thesis Overview
In this thesis I describe the design and characterization of porous 3D-printed polymer scaffolds, produced using the 3DP™ process, for use in liver tissue culture. Chapter 2 outlines the
evolution of the scaffold design used for experiments in this thesis, and gives some numerical predictions for optimal culture conditions. Chapter 3 describes the production and
characterization of the most simple of these scaffolds and the development of protocols for their use. Finally, Chapter 4 discusses the tissue culture methods employed for liver support
2 Scaffold Design
A significant portion of this project involved generating concepts for scaffolds to mimic the structure and flow pattern of in vivo liver. Liver tissue, as detailed in Section 1.2.2, is characterized by three main properties thought to help maintain functional hepatocytes:
• perfusion of blood from radially placed sources to a central sink,
• networked chains of hepatocytes alternating with sinusoidal flow spaces, and • three-dimensional interactions between hepatocytes and nonparenchymal cells.
The goal of the scaffold design portion of this project was to design a biomimetic scaffold that would support all three of these requirements, and then to simplify that scaffold to the point that it could be produced using current printing technologies.
2.1
Proposed Scaffold Designs
2.1.1 Physiological Scaffold Design: Hex Array
The first scaffold proposed in this project is designed to mimic the hexagonal subunit structure of liver, in an attempt to replicate the liver’s radial flow pattern. Figure 2.1 shows two views of the proposed physiologically-based scaffold design, referred to in this paper as the “Hex Scaffold.” Figure 2.1a shows the macroscopic arrangement of cells from a cross-sectional overhead view of the whole scaffold, while Figure 2.1b shows the flow pattern through a cross-sectional side view of a single cell. Hatched areas represent highly porous regions intended to promote self-assembly of liver tissue structures, including contact with non-parenchymal cell types, at the same time keeping hepatocyte structures in close contact with flow spaces. Solid black areas represent solid polymer layers on top and bottom designed to force flow through the tissue bed.
A B C
Figure 2.1—The proposed Hex Array scaffold called for hexagonal subunits arranged in hexagonal repeats (A: actual size, B: 5X enlargement) to provide a radial flow pattern (C)
Fluid from the top face of the scaffold flows to the outside of each hex subunit, radially in to the center of the subunit, and from there to the bottom face of the scaffold. The thickness of the hexagonal subunit walls, and hence the length of the oxygen-consuming flow path, is governed by oxygen supply concerns, as discussed in Section 2.2.2. Thus, each subunit has a fixed diameter. The whole scaffold diameter, however, can be scaled to fit the reactor chamber in use by adding or removing subunits. The scaffold pictured in Figure 2.1a is scaled to fit a half-inch-diameter reactor chamber. The height of the scaffold is theoretically limited by oxygen supply issues as well, but in this case the scaffold is limited to a height of 0.7 mm by the size of the flow chamber.
2.1.2 Revised Design for DOD Printing: Hollow Box
As mentioned in Section 1.3.3, current limits on the resolution available with 3D-printed devices would make the Hex Array scaffold impractical to build and use, even in the next year when DOD printing becomes available. In an effort to maintain some of the Hex Array features in a scaffold that can be printed with a 150 µm resolution printed, a squared-off design (Figure 2.2) was proposed. Dubbed the “Hollow Box” scaffold, this device would not produce the even radial flow pattern that would be produced by Hex Array scaffolds, but it would still feature a higher surface area on the outside face than on the inside face. The scaffold is made of the same porous polymer intended for the Hex Array scaffold, providing the same self-assembly advantages. Wall thickness (and hence flow path) could be chosen in increments of 150 µm. The scaffold shown in Figure 2.2 uses 300 µm thick walls in a scaffold that would fit the macroreactor chamber.
A B 0.5 inch dia. 150 µm 300 µm 300 µm 300 µm
Figure 2.2—Proposed Hollow Box scaffold, cross-sectional overhead view. Actual size (A) and dimensioned enlargement (B)
2.1.3 Simplified Scaffold Design: Striped Disc
Several issues fundamental to using polymer scaffolds in flow bioreactor liver cultures are better solved with simple scaffolds prior to complex scaffold construction:
• Methods for constructing, sterilizing, and preparing porous polymer 3DP™ scaffolds, • Necessary conditions for coating a highly porous hydrophobic device with collagen, • Methods for sealing porous polymer devices to ensure flow through the cell bed, • Necessary flow rates above and through the scaffold, and
• Methods for seeding cells evenly into a scaffold with high available surface area. A simple disk scaffold was therefore designed to serve in protocol development experiments. The “Striped Disc” scaffold (Figure 2.3) uses the solid and line primitives available with CJ printing to fashion a 300 µm thick porous polymer disk with simple features on the top and bottom faces. The top face features closely-spaced porous lines intended to trap and shelter hepatocyte aggregates , and the bottom face features thin solid support stripes to restrict output flow and to resist warping. The new design potentially maintains the three critical hepatocyte-scaffold elements: it allows for three-dimensional self-organized structures to form, promotes the formation of hepatocyte sheets surrounded by flow spaces, and provides greater area for flow at the inlet (top face) than at the outlet (bottom face). The 400 µm spaces between lines on the top face, analogs to the 300 µm channels of the silicon scaffolds currently in use, also serve as cell-trapping spaces that may serve as additional anchors for tissue-structure formation.
150 µm 300 µm 150 µm 300 µm bars, 700 um spacing Solid supports 50-100 um pores
Figure 2.3—The Striped Disc scaffold. The scaffold has a diameter of half an inch, and comprises three layers: a 150 µm thick layer of nonporous stripes, a 300 µm thick continuous porous layer, and a 150 µm thick layer of porous stripes.
2.1.4 Final Scaffold Design: Filter Disc
An alternative design to the Striped Disc was developed for three main reasons. First, in a cylindrical reactor chamber it proved impossible to properly align the stripes on the top face. Further, the top-face stripes were not needed to protect from shear flow after the addition of an o-ring between the upper chamber and the scaffold. The top stripes were therefore removed.
Second, single cells tended to pass through the Striped Disc scaffolds completely. A small-pore “filter layer” was added under the cell bed to better capture single cells during seeding. Ideally, the filter layer would use pores much smaller than the diameter of a hepatocyte, but salt particles
smaller than 25 µm showed extensive clumping and poor spreading. Third and finally, a thin film was forming on the top face due to the fact that the scaffolds were printed upside-down.
Changing the print order to build the scaffolds from the bottom up led to a better pore structure in the top section and also led to a higher degree of fusion in the lines on the bottom face (Figure 3.6b). The new design, pictured in Figure 2.4, was dubbed the “Filter Disc” scaffold.
300 µm
150 µm Solidsupports
25-50 um pores
300 µm 100-150 um pores
Figure 2.4—The Filter Disc scaffold. The new scaffold has two continuous layers, the first with 25-50 µm pores and the second with 100-150 µm pores. Note that the top layer of porous stripes has been removed.
2.2
Design Calculations
2.2.1 Hex Array Velocity Profile
This radial flow pattern is expected to produce results different from linear-flow systems because radial flow systems vary fluid velocity (and hence shear stress) inversely as a function of radius (Equation 2-3). Because of conservation of mass, volumetric flow rate of any constant-density fluid must be constant throughout any flow device. As the radius decreases, the same amount of liquid has to flow through a smaller area, and therefore flows at a higher velocity.
A
l Q
B
r v
An individual hexagonal subunit can be modeled as a cylindrical annulus of length l, exposed to a constant volumetric flow rate, Q, from the outer face to the inner face (Figure 2.2a). Flow velocity (Figure 2.2b) at a given radius, r, is given by the volumetric flow rate divided by the cylindrical surface area (2!rl) through which the fluid is flowing at that radius (Equation 2-1).
†
v = Q 2pl
1
r (2-1)
For a system where both the volumetric flow rate and the length of the cylinder are constant with respect to radius, Equation 2.2 shows that velocity must increase as the fluid progresses toward the center of the subunit (decreasing radius).
†
v µ1
r for constant Q,l (2-2)
Figure 2.6 shows the predicted velocity profile for a subunit with outer radius of 600 µm and inner radius of 150 µm. 0.0 0.1 0.2 0.3 0.4 0.5 0.6 0.7 0.8 0.9 0.00 0.15 0.30 0.45 0.60 Radius (mm) Flow velocity (mm/s)
Figure 2.6—Predicted flow velocity profile for a hexagonal subunit of the Hex Array scaffold. The subunit is modeled as a cylindrical annulus of outer radius 600 µm, inner radius 150 µm, with an average flow velocity of 0.4 (flow rate of 0.12 ml/min per subunit).
Because of the velocity gradient from input to output flow, cells growing in this system would experience a gradient of shear stress in addition to the gradients of oxygen and other diffusible molecules expected in flow bioreactors. It should be noted that the equations used here assume an even distribution of flow space at all points in the porous cylinder; the actual shear stress
gradient experienced by the cells would depend on distributions of cells and pore spaces in the scaffold wall. Still, the general effect should be one of increasing flow velocity as the space available for flow decreases in the inner portion of the hexagonal walls. This extra influence could potentially effect a higher degree of functional polarization than is seen in planar-flow systems and may also promote formation of specialized structures such as bile canaliculi.
2.2.2 Oxygen Mass Balance in Disc Scaffold
In addition to providing the proper physical and biochemical environment, a tissue support system must supply the tissue with adequate oxygen. For flow systems, dissolved oxygen is provided by the circulating culture medium, which is either equilibrated with air in the medium reservoir or passed through an oxygen-exchange device. The flow rate, Q, necessary for a given tissue culture can be estimated from a simple mass balance, with the simplifying assumption that each cell metabolizes oxygen at a uniform, constant, zero-order rate, RO2.
The amount of oxygen entering the scaffold is given by the volumetric flow rate multiplied by the concentration of oxygen at the inlet, CO2,i. The amount of oxygen leaving the scaffold is
given by the flow rate times the output concentration, CO2,o, and the difference is equal to the
amount of metabolized oxygen, given by the rate of oxygen uptake per cell multiplied by the estimated number of cells in the scaffold (Equation 2-3).
†
QCO 2,i- QCO 2,o= RO 2Ncells (2-3)
Designating the fraction of oxygen that is consumed “f” (Equation 2-4) and solving for flow rate as a function of cell number, Equation 2-3 reduces to the design Equation 2-5.
† f =CO 2,i- CO 2,o CO 2,i (2-4) † Q= RO 2Ncells f CO 2 (2-5)
An upper limit for the number of cells can be found by dividing the scaffold volume by the volume of a single cell. The scaffold is assumed to be a disc of diameter ddisc and height h.
Assuming that a cell is a sphere with diameter dcell gives the following relation:
† Ncells,max =p ( 1 2ddisk) 2h 4 3p ( 1 2dcell) 3 = 3 2 ddisc2h dcell3 (2-6)
No scaffold in a flow system can be uniformly full of cells, however. To account for flow spaces and any volume taken up by the scaffold itself, a cell volume fraction, xcell, can be multiplied by
†
Ncells= xcellNcells,max = 3 2xcell
ddisk2h
dcell3 (2-7)
Equations 2-5 and 2-7 combine to provide an estimate of the required flow rate for a scaffold of a given size (Equation 2-8) or the maximum flow path length, h, for a set flow rate (Equation 2-9).
† Q= 3 2 xcellRO 2 f CO 2 ddisk2h dcell3 (2-8) † h = 2 3 f QCO 2 xcellRO 2 dcell3 ddisc2 (2-9)
Oxygen concentration can be estimated from thermodynamic saturation values, assuming
equilibrium with an atmosphere of 21% O2 at 37°C and 1 atm. Consumption rate data and typical cell diameter values are available from the literature. The fraction of oxygen used is set by expectations of how well the cells perform in hypoxic conditions; calculations in this paper will set a value of f = 0.5.
Section 2.2.3 outlines a method for estimating xcell in porous polymer scaffolds, and Section 2.2.4
determines a predicted optimal flow velocity based on shear stress models of the existing silicon scaffold system. From these two additional parameters and Equation 2-9, a maximum flow path length (in this case, scaffold height) can be determined.
2.2.3 Model for Cell Distribution in Disc Scaffold
The question of how best to predict the number and distribution of cells in a porous scaffold is a nontrivial one. To begin with, the scaffold itself is irregular and randomly porous; in addition, the scaffold will be coated with cells in a non-uniform way that is likely to lead to alternating areas of high cell density and areas of low cell density that become flow channels. This section proposes a highly simplified model that attempts to represent some of this complexity while superimposing an artificial regularity on the system.
A
Print Leach
B
dp db
Figure 2.7—Lattice model of porous scaffold. Powder particles are fused around salt particles to form a lattice (A) that can be modeled as a Cartesian grid of bars (B)
Each lattice cell is surrounded by 12 bars of diameter db and length dp, but each bar is a member
of 4 adjacent lattice cells. The volume of polymer included in each cell is therefore given by:
† Vpoly = 12 4 1 4pdb 2 dp Ê Ë Á ˆ ¯ ˜ = 3 4pdb 2 dp (2-10)
Each lattice cell is a square with length dp + db. The volume fraction of polymer, xp, is given by
the volume of polymer divided by the volume of the total cell, and the void fraction (before adding cells), xV, is equal to one minus the polymer fraction:
† xp = 3 4 p db2dp db + dp
(
)
3 (2-11) † xV = 1- 3 4 p db2dp db + dp(
)
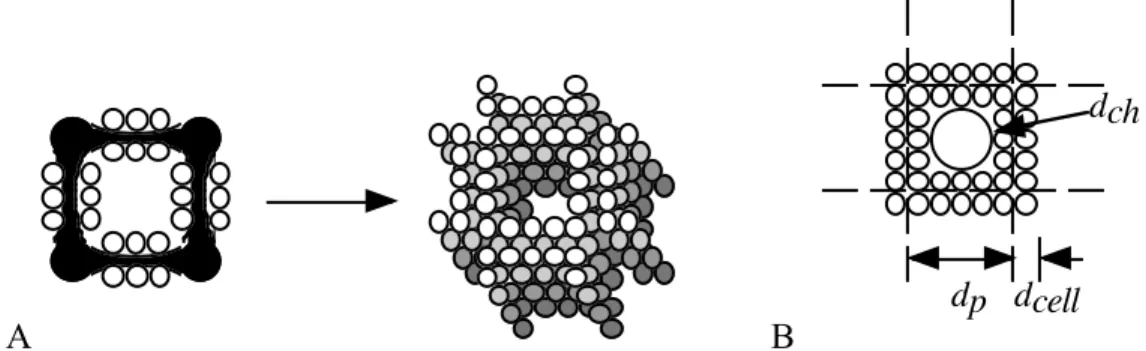
3 (2-12)With no data that adequately describes behavior of liver cells in these polymer scaffolds, a few assumptions had to be made about what structures they would form. This model assumes that liver cells will first evenly coat the polymer surface, and then begin to assemble into sheets parallel to the direction of perfusion flow (Figure 2.8a), leaving the intervening space as
unoccupied flow channels. This model chooses to examine the highly idealized case where flow channels are evenly spaced in the tissue by considering a repeating unit one pore diameter wide (dp) lined with a single sheet of cells (Figure 2.8b).
A B dp dcell
dch
Figure 2.8—Idealized model of cell structures in polymer scaffolds. Cells are assumed to assemble into vertical sheets (A) that can be modeled as a repeat unit consisting of a single flow channel surrounded by cells (B).
Cells are assumed to only occupy space from the void fraction calculated before (that is, no degradation of polymer will occur during the course of an experiment) and therefore the void fraction will now be broken up into a cell fraction, xcell, and a flow channel fraction, xch. The
equal to the pore diameter minus two cell diameters, and that the channel extends the full height of the scaffold, h: † Vch = 1 4pdch 2 h = 1 4p(dp - 2dcell) 2 h (2-13)
Assuming one flow channel per lattice unit, the volume fraction of flow channels is given by the Equation 2-13: † xch= 1 4p(dp- 2dcell) 2 h dp+ db
(
)
2h = p 4 (dp- 2dcell) 2 dp+ db(
)
2 (2-14)The volume fraction of cells is one minus the volume fraction of polymer and the volume fraction of flow channels:
† xcell = 1- 3 4 p db2dp db + dp
(
)
3 -p 4 (dp- 2dcell)2 dp+ db(
)
2 (2-15)The volume of the scaffold available for cell occupation, Vnet, depends on the scaffold height, h,
and the available flow diameter of the flow chamber, dflow (Equation 2-16). The volume of cells
is equal to the net volume times the cell volume fraction, and the number of cells can be estimated by assuming that each cell has a volume equivalent to a sphere of diameter dcell
(Equation 2-17). † Vnet =14pdflow 2 h (2-16) †
Ncells= xcellVnet
4
3p d /2
(
)
3 (2-16)
2.2.4 Estimated Flow Shear in Disc Scaffold
Perfusion cultures often have an optimal flow velocity determined by the response of cells in culture to shear flow. The optimal flow velocity through the scaffold, and hence the optimal volumetric flow rate, can be determined by analyzing the shear stress as a function of velocity. Well-known equations exist for predicting shear stress in cylindrical flow passages, so the model from Section 2.2.3—an array of cylindrical flow channels in an otherwise solid cell mass—was used to relate flow rate through a porous scaffold to the shear stress experienced by cells in that scaffold.
A flow rate, Q, imposed on a cylindrical channel with a fixed radius, R, produces a velocity distribution (Equation 2-17) whose average velocity, v (Equation 2-18), is equal to the flow rate divided by the cross-sectional area of the channel.
† v = 2v 1- r R Ê Ë Á ˆ ¯ ˜ 2 (2-17) † v = Q pR2 (2-18)
Newton’s law of shear stress (Equation 2-19), states that the stress experienced by cells forming the channel wall will be proportional to the gradient of velocity at that point multiplied by the viscosity of the flowing medium, µ.
†
twall = -m—vr= R (2-19)
Substituting Equation 2-10 into Equation 2-12 gives the result for shear stress at the wall in a cylindrical channel, both in terms of radius, R, and the more commonly given diameter, d:
†
twall = 4mv R= 8m
v
d (2-20)
Knowing the shear stress that a particular cell type “prefers”, the desired crossflow velocity can be calculated from Equations 2-21:
†
Q = pR
3
4m twall (2-21)
Finite element models of the silicon scaffold system have estimated an optimal shear stress of 0.067 Pa (Powers, 2002), which can be used to predict an optimal flow rate.
2.2.5 Predicted Optimum Parameters
The following parameters have been calculated by using the equations from this chapter with the values in Appendix A. The cell bed thickness calculation is given as a relationship between thickness and crossflow rate, since no optimum value for either has been determined experimentally as of yet.
Table 2-1. Numerical Results of Design Calculations
Quantity Symbol Value Units
Void Fraction xV 93 %
Channel Vol. Fraction xch 13 %
Cell Vol. Fraction xcell 80 %
Cell Capacity Ncells 2.3x10⁶ cells
Crossflow Velocity v 4.2x10⁻³ cm/s
Crossflow Rate (scaled by shear)
Qxf 0.025 ml/min
Cell Bed Thickness h 313 Qxf
155 for 0.5 ml/min crossflow
3 Protocol Development
3.1
Methods
3.1.1 Scaffold Materials
Two polymers were considered for use in the scaffolds (Figure 2.6): poly(methyl methacrylate) (PMMA) and polycaprolactone (PCL). Both are soluble enough in chloroform for 3D-printing and both are readily available from chemical supply outlets. PMMA is a glassy, brittle polymer that was relatively easy to mill and print, but produced brittle scaffolds that would be highly impractical for clinical use. Further, PMMA is not biodegradable and would therefore be a poor choice for an implant material. PCL is a pliant, plastic polymer that is long-term biodegradable due to its ester linkages. A glass transition temperature of –60°C makes PCL difficult to mill, however. Further, PCL is more hydrophobic than PMMA, leading to difficulties with collagen coating and cell seeding.
A B
Figure 3.1—Chemical structures of the two polymers used: PMMA (A) and PCL (B)
Initially, polymers were milled under cryogenic conditions using a high-speed mill [Pulva corp.] while running a continuous stream of liquid nitrogen through the milling chamber. Polymer beads were fed two to five at a time into the hopper, and the milled powder was collected in a plastic bag at the outlet. The powder was removed from the collection bag and immediately transferred to a lyophilizer to remove water that had condensed on the particles. During the last series of optimization experiments, a new microbead production process (Therics Corp, patent pending) was used to make PCL powder. In both cases, dried powder was sieved to remove particles larger than 75 µm in diameter and then stored in sealed vials at room temperature. Pores of the desired 100 µm diameter size were created by using a 4:1 weight ratio of NaCl to polymer powder in the printing process (Zeltinger, 2001). Salt was ground in a bench top milling unit, sieved to isolate large (100-150 µm diameter) and small (25-53 µm diameter) particles, and stored in sealed vials at room temperature. Salt particles of the desired size were mixed with polymer particles by stirring with a metal spatula followed by vigorous inversion mixing. In most cases the salt and polymer were mixed immediately prior to printing to prevent caking of the salt particles, which would lead to improper spreading of the final powder.
3.1.2 Printing and Processing
The polymer and polymer/salt powders were added to the 3DP™ machine (a modified version of the TheriForm machine from Therics Corp.), which would spread and print one layer at a time according to parameters entered by hand. An aluminum sheet with half-inch-diameter holes spaced on one-inch centers was used as the template. Delivery pressure was constant at 5 psig, print speed was set at 1500 mm/s, and layer thickness was 150 µm. Unused powder was removed from the printing palette between each layer to prevent cross-contamination between powders with differing salt contents; easily accessible powder was collected for recycling, and the remaining powder was dusted off with an airbrush.
Striped Disc scaffolds were printed in the following order (from bottom to top): • Porous stripes (1 layer): 0.700 mm spacing, large-diameter salt;
• Porous solid (2 layers): 0.175 mm spacing, large-diameter salt; • Nonporous stripes (1 layer): 1.400 mm spacing, no salt.
Filter Disc scaffolds were printed in the following order (from bottom to top): • Nonporous stripes (1 layer): 1.400 mm spacing, no salt;
• Small-Porous solid (2 layers): 0.175 mm spacing, small-diameter salt; • Porous solid (2 layers): 0.175 mm spacing, large-diameter salt.
Porous discs for void fraction and flow testing were printed as follows:
• Porous solid (5, 200 µm thick layers): 0.175 mm spacing, large-diameter salt
When finished, the palette (with scaffolds still attached) was removed from the printing machine, stood at room temperature for 15 to 30 minutes to dry, and then transferred to a –80°C freezer for half an hour to bring PCL scaffolds below their glass transition temperature. While still in the freezer, scaffolds were removed from the palette using a fresh razor blade to prevent marring or smearing of the surface touching the palette.
For nonsterile applications, scaffolds were then soaked overnight in a large bath of deionized, microfiltered water to remove the salt particles. Water was removed and replaced with fresh water approximately midway through the soaking process to prevent saturation of the water with salt. Scaffolds were then lyophilized overnight to remove water, and stored at room temperature in covered Petri dishes. Processing of scaffolds for sterile applications is detailed in Section 3.1.4.
3.1.3 Scanning Electron Microscopy
To examine the pore structure of the scaffolds, nonsterile scaffolds were printed as usual and then prepared for Scanning Electron Micrographs. In some cases, scaffolds were frozen in liquid
nitrogen and then, while remaining in the liquid nitrogen bath, were snapped in two with a “fault line” perpendicular to the direction of the solid lines on the bottom face. Scaffolds were then cut to fit the sample mounts, attached to the mounts, sputter coated with platinum, and inserted into the SEM sample chamber. Micrographs were taken with a computer-based imaging device that optimized the images for brightness and contrast.
3.1.4 Void Fraction Measurement
Uniform, porous PCL discs were printed to a thickness of 1 mm, then measured with calipers to determine dimensions to a tolerance of 0.1 mm. Scaffolds were then weighed to a tolerance of ± 0.1 mg. Total volume, Vtot, was calculated based on the diameter and height, and volume of
polymer, Vpoly, was calculated based on the density of the PCL powder,
†
rPCL, from which the
scaffolds were made.
† Vtot =1 4pd 2 h (3-1) † Vpoly= mscaff rPCL (3-2)
The density of PCL powder was, in turn, determined by Archimedes’ method: a known mass of powder was added to water in a volumetric flask, and the water that rose above the calibrated line was measured by quantitatively aspirating into a pipet. Void fraction, xV, was calculated as
the fraction of volume not occupied by polymer:
† xV =Vtot- Vpoly Vtot = 1-Vpoly Vtot (3-3) 3.1.5 Pressure-Flow Testing
It was desired to know how great the flow resistance of a porous scaffold was, prior to loading with cells. Preliminary studies showed that Striped Disc scaffolds did not offer sufficient flow resistance to yield measurable results, so the millimeter-thick discs from the void-fraction experiment in Section 3.1.4 were used to determine the D’Arcy permeability, k, of the large-pore segments of Striped Disc and Filter Disc scaffolds. The D’Arcy permeability is defined by D’Arcy’s Law (Equation 3-4), which relates pressure drop across a membrane to mean flow velocity through that membrane:
†
v = kDP (3-4)
Permeability can be determined by measuring the flow rate at a number of set pressure drops, or by measuring the pressure drop at a number of set flow rates. A peristaltic pump was used to produce a series of set flow rates, varied between 0.0 and 2.0 ml/min in approx. 0.25 ml/min increments, and the output from the pump was split between a U-tube manometer and a flow chamber that held the disc to be tested between two 1/16 inch-thick, 3/8 inch inner diameter
o-rings (Figure 3.2). The flow system was allowed to equilibrate for 5 min at each flow rate, after which the pressure difference was read from the manometer.
A B
Figure 3.2—Pressure-Flow Testing Apparatus. Water fed at a given flow rate by a
peristaltic pump was split between a U-tube manometer and a flow chamber containing the sample to be tested (A); the flow chamber sealed the millimeter-thick scaffold between two o-rings (B).
The manometer was filled with 70% ethanol in water, because its low density led to greater height differences than were seen with water in the manometer. The manometer measured pressure of the fluid entering the flow chamber relative to atmospheric pressure, with the
assumption that the output of the flow chamber was also at atmospheric pressure. The output line was less than an inch long, making the pressure drop in that line negligible.
The resulting data is plotted as ∆P values versus flow rate values, and a simple linear regression is performed to obtain a slope for the data. The permeability is the inverse of the slope, m, divided by the flow area (figured from the inner diameter of the o-ring, dO):
† m = DP Q = DP 1 4pdO 2
(
)
v (3-5) † k= 4 m(pdO2) (3-6) 3.1.6 SterilizationThe initial process for preparing cell-culture scaffolds involved soaking them in a large bath of nonsterile water overnight to remove salt, lyophilizing them to remove the water, and then sterilizing the dry scaffolds with a twelve-hour exposure to ethylene oxide (EtO) gas [Anderson Products]. Scaffolds were then rehydrated in a phosphate buffer (PBS), typically with collagen added as described in Section 3.1.7. The EtO-sterilized scaffolds produced no contaminated reactors during the course of this project, and this sterilization process was therefore assumed to be sufficient for cell culture work.
However, ethylene oxide gas sterilization is inconvenient and can leave trace amounts of the ethylene oxide in the scaffolds themselves if not vented for a sufficiently long time. Further, the hydrophobicity of PCL scaffolds made them very difficult to rehydrate. However, a simple UV
sterilization might be sufficient if performed prior to leaching, since both exposed surfaces were relatively flat and could be completely exposed to UV light. All subsequent processing steps could then take place in sterile conditions while maintaining the scaffolds in a hydrated state. To test this method, a set of Filter Disc scaffolds were sterilized by UV exposure, leached in sterile water, and incubated for up to a week in 10 ml baths of DAPS medium (Appendix E). No growth of any contaminant was observed.
The process used to sterilize scaffolds for the later optimization experiments therefore used the following protocol. Scaffolds were removed from the palette as described in Section 3.1.2 and then each scaffold was added to a 5 cm plastic cell culture dish. Scaffolds, in their uncovered dishes, were exposed to UV light in a sterile biosafety cabinet for 1 hour; scaffolds were then flipped to expose the nonsterile side and exposed for another hour. Each dish then received 10 ml of sterile microfiltered water; after 6 hours, the water was exchanged for fresh sterile
microfiltered water and left overnight. The water in each dish was changed once again and scaffolds were stored in this water bath until needed. Dishes were covered and sealed with Parafilm [American National Can] to preserve sterility.
3.1.7 Collagen Coating Optimization
Prior to initial cell culture studies, the proper collagen concentration for cell adhesion needed to be determined. Following lyophilization and sterilization, scaffolds were rehydrated in a solution of collagen monomers [Vitrogen] in sterile PBS. Collagen concentration was stepped up from a 0.03 mg/ml solution by factors of 5 (5X, 10X, 15X, 20X, and 25X with respect to original concentration). Cell adhesion was measured by flowing one million 3-day hepatocyte spheroids (see Section 4.1) over and through the scaffold. The measurement was purely qualitative, looking for a layer of yellow-colored tissue visible to the naked eye to form on top of the scaffold.
Cell adhesion on PCL Scaffolds was highly variable from scaffold to scaffold, which was hypothesized to be due to poor wetting. Surfactant-aided alkaline hydrolysis of PCL has been shown to reduce hydrophobicity without noticeably altering the surface’s appearance under atomic force microscopy, leading to an increase in collagen adsorption [Rouxhet, 1998]. It was hypothesized that pretreating scaffolds with a solution of 2.5N NaOH saturated with the high-strength surfactant dodecylbenzenesulfonic acid (DBA) would lead to enhanced collagen adsorption on these scaffolds.
To test for enhanced collagen adsorption, Filter Disc scaffolds were printed, sterilized by UV-sterilization and leached in sterile water. Scaffolds were the transferred to separate wells in a 24-well plate and incubated for 2 hours at 37°C in one of the following solutions: sterile water, 2.5N NaOH, water saturated with DBA, or 2.5N NaOH saturated with DBA. Scaffolds were then washed twice with sterile water and transferred to fresh wells. 2 ml of a solution of 0.6 mg/ml collagen in PBS was added for 1 hour at room temperature, and scaffolds were then washed twice with PBS.
Scaffolds were transferred to fresh wells and tested for collagen content using a Micro Lowry total protein determination kit [Sigma #690-A]. This kit uses a standard Lowry reagent to form a complex with peptide bonds (physically attaching the reagent to the collagen on each scaffold),
and then uses a second Phenol-based reagent that changes color when exposed to the Lowry-peptide complexes. The kit was calibrated using a series of dilutions of Vitrogen collagen in PBS, and returned a linear calibration curve.
3.1.8 Flow System Improvements
In the course of cell culture experiments with PCL scaffolds, it was noticed that flow would sometimes appear to leak around the edges of the scaffold, evidenced by a single large air bubble forming above the scaffold while fluid flowed around the scaffold perimeter. Considering
histology data that suggested poor crossflow through the cell bed (Figure 4.8), it was decided to improve the flow sealing between the macroreactor chamber and the polymer scaffolds.
To improve the flow sealing around the compressible scaffold, the top gasket was replaced by a second o-ring and retaining ring assembly (see assembly diagrams in Appendix D). The o-rings, however, left a yellow residue on the polymer scaffolds that could potentially harm the tissues cultured on those scaffolds. As a solution, the o-ring material was changed to NSF-approved EPDM, a material designed to reduce chemical contamination in potable water-handling applications. The new material eliminated the yellow-ring phenomenon.
Throughout the reactor-tuning process, the luer lock fittings on the macroreactor inlet and outlet ports were a persistent source of minor leaks and contamination. These fittings consisted of a screw-in steel female luer connector and a variety of male luer-to-barb adapters to hold the actual tubing. The luer lock succumbed to leaks with much greater frequency than either the screw-in or the barb junctions. The luer locks, therefore, were replaced by screw-in barb adapters that were sealed to the scaffold body using Loc-Tite instant silicone gasketing. The luer plug in the unused lower chamber port was replaced by a stainless steel set screw, also sealed with instant silicone gasketing. The full system was now virtually leak-free under normal operating conditions. Finally, to ensure that culture medium was flowing through the scaffold, a second pump was included in the flow path (Figure 3.5). Rather than allowing crossflow to be set by the pressure drop developed between the top and bottom chambers, this new system was designed to pull fluid down through the scaffold at a steady rate.
A B
Figure 3.3—The original passive-crossflow system (A) was updated to include a forced-crossflow pump (B)
3.2
Results
3.2.1 Scanning Electron Micrographs
PMMA Striped Disc Scaffolds: Top views of PMMA scaffolds show a rigid but porous
structure with an abundance of open surface area for cell adhesion. Bottom views show a much closer pore structure; they also show that the particles in the solid lines have not completely fused. This decrease in printing effectiveness is most likely due to the fact that the same solvent delivery pressure was used for the solid lines as for the porous region, while there is a lower concentration of polymer in the salt-laden powders used for the porous region.
B
Figure 3.4—Scanning Electron Micrographs of PMMA Striped Disc Scaffolds. Top view closeup (A), and Bottom view showing solid lines (B)
PCL Striped Disc Scaffolds: Electron micrographs (Figure 2.7a) showed that PCL discs tended
to have a solid film on the top face, which was thought to negatively affect cell penetration and crossflow rates. The new microbead production method, combined with the elimination of the porous top layer ridges, led to an even thicker film on the top surface of the scaffolds (Figure 2.7b) that all but eliminated crossflow.
A
B
Figure 3.5—Scanning electron micrographs of scaffolds printed top-down: milled powder with top-face ridges (a) and microbead powder with flat top face (b)
PCL Filter Disc Scaffolds: Having reversed the build order for the newer Filter Disc scaffolds,
the top views show a much improved pore structure with none of the smearing that marked the previous PCL scaffolds. Solid lines on the bottom no longer protrude beyond the small-pore layer surrounding them, but the lines themselves appear much more solid than the lines from the PMMA Striped Disc scaffolds. The increased saturation of binder that is often observed on the
first printed layer is thought to improve the fusion of polymer particles in these solid lines. The small-pore region looks very consistent and shows no evidence of the smearing.
A
C
Figure 3.6—Scanning electron micrographs of latest scaffolds, printed bottom-up: top face (a), bottom face (b), and cross-section (c)
3.2.2 Void Fraction
The results of the void fraction determination are summarized in Table 3-1. The mean value for void fraction is xV = 85.8%, which is within 10% of the value predicted in Section 2.2.5.
Table 3-1. Void Fractions of Five Scaffolds
disc # mass (mg) diameter
(mm) height (mm) total vol. (mm3) polymer vol. (mm3) void frac. (%) 1 26.0 13.8 1.0 150 21.4 85.7 2 24.7 13.7 1.0 147 20.4 86.1 3 25.1 13.5 1.0 143 20.7 85.5 4 25.4 13.6 1.0 145 21.0 85.5 5 25.6 13.8 1.0 150 21.2 85.8 mean 85.8%
3.2.3 Flow Testing
Figure 3.7 shows the pressure-versus-flow rate data collected for five millimeter-thick porous polymer discs. The Linear regression equations and the R2 values are shown next to each disc label, and the regression lines are plotted with the data. Four of five discs fall into a region of less than one Pascal pressure drop per ml/min of flow rate, while the fourth has a greatly increased flow resistance. It is tempting to label Disc #5 an outlier. However, considering the later problems with flow sealing in macroreactors, it is possible that the other four scaffolds did not seal properly and the 2 Pa per ml/min value is in fact the more accurate measurement.
y = 0.551x + 0.3811 R2 = 0.9716 y = 0.2794x + 0.4057 R2 = 0.9158 y = 1.0198x - 0.2257 R2 = 0.976 y = 0.5783x - 0.0131 R2 = 0.866 y = 2.204x - 0.0362 R2 = 0.9826 -0.5 0.0 0.5 1.0 1.5 2.0 2.5 3.0 3.5 4.0 4.5 0.00 0.25 0.50 0.75 1.00 1.25 1.50 1.75 2.00 Flow (ml/min) ∆ P (Pa) Disk #5 Disk #1 Disk #4 Disk #3 Disk #2 Linear (Disk #4) Linear (Disk #2) Linear (Disk #1) Linear (Disk #3) Linear (Disk #5)
Figure 3.7—Results of pressure-flow study of five millimeter-thick discs.
In an attempt to find some trend in these permeability values, a plot (Figure 3.8) was made of the permeability versus the void fraction for each disc, calculated earlier and shown in Table 3-1.
0.00 0.02 0.04 0.06 0.08 0.10 85.0% 85.5% 86.0% 86.5% Void Fraction D'Arcy Permeability [(cm/sec)/Pa]
Figure 3.8—D'Arcy Permeability as a function of void fraction.
Unfortunately, the only trend that appears is an inverse of what would be expected—a finding that more-porous discs have increased resistance to flow, with the exception of the most-porous disc, #2, which is almost certainly an outlier. One possible explanation for this phenomenon is that more-porous discs are easier to seal using o-rings, thereby increasing their resistance to flow around the disc. It is, however, rather unlikely that a half-percent difference in void fraction would have such an effect on scaffold compressibility.
3.2.4 Collagen Coating Optimization
Collagen Concentration: For PMMA, a transition occurred very sharply from no cell bed to a
clear yellow coating when the collagen concentration reached 0.6 mg/ml collagen (20X). PCL scaffolds attracted patchy cell beds when exposed to 0.6 mg/ml collagen and began to resemble the PMMA cultures at 0.75 mg/ml (25X).
Alkaline Pretreatment: Results showed a more than tenfold increase in collagen on the
scaffolds treated with NaOH and DBA, compared to untreated controls (Table 2-1). Only minor improvements were seen in scaffolds treated with only one of NaOH or DBA. A full
optimization was planned with multiple repeats, different collagen concentrations, and different exposure times, but the protein assay kit seemed to have partially decomposed by the time this set of experiments was finished, since it no longer returned a linear calibration curve.
Table 3-2. Effect of pretreatment on protein adsorption on PCL scaffolds
Treatment Adsorbed Protein
Water only 18 µg
2.5M NaOH 33 µg
Saturated dodecylbenzenesulfonic acid (DBS) 59 µg
3.2.5 Flow System Improvements
New O-Ring Assembly: The new assembly compresses the scaffold on both sides, forming an
impermeable ring around the scaffold perimeter (Figure 3.9) whose flow resistance is expected to be much higher than that of the scaffold, even with cells. Informal flow-visualization
experiments showed this new configuration to be much more effective. Another positive result is shown in Figure 3.9B: the solid lines in the newer Filter Disc scaffolds do not protrude beyond the porous region surrounding them and also compress evenly with the surrounding porous region, showing no breaks in the solid line.
A B
Figure 3.9—Scanning Electron Micrographs show significant compression of the porous sections of the scaffold, indicating improved flow sealing.
Crossflow Pump: The crossflow pump did pull fluid down through the scaffold; however, in
many cases the crossflow rate was lower than the pumping rate. In these cases, bubbles would form in the crossflow line, a phenomenon known as cavitation. The air bubbles appeared to be coming through the gas-permeable tubing itself, rather than from reactor leakage, since when the reactor was immersed in a bath of colored water, no coloring seeped into the reactor.
The cavitation problem was mainly observed with a set of scaffolds (see section 3.2.1) in which a thin film of solid polymer had formed on top of the scaffolds, dramatically increasing resistance to flow. This problem was addressed by reversing the print order; however, as in the silicon-chip scaffold [Sivaraman, unpublished data], the addition of cells often reintroduced the cavitation effect, probably due to clogging of the filter layer pores. In an attempt to address this problem, the crossflow pump was reversed to deliver fluid up through the scaffold. Reverse-crossflow reactors showed the opposite problem: leakage from the bottom chamber through the cover glass/o-ring junction. Both problems indicate an unusually high pressure drop across the scaffold, suggesting that the reactor needs higher pressure tolerances or that thinner scaffolds may be needed to allow forced crossflow without leaks.