Conceptual Phase Structural Design Tool for Microsatellites
Texte intégral
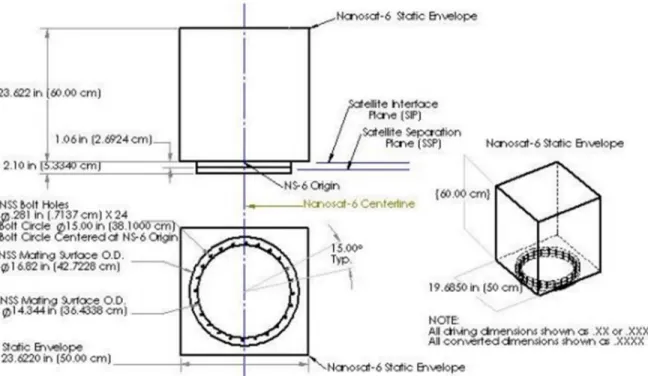
Figure


Documents relatifs
The objective of this study is to explore how global sensitivity analysis can help for the parameterization of FSPM, by quantifying the driving forces during plant growth and
L’archive ouverte pluridisciplinaire HAL, est destinée au dépôt et à la diffusion de documents scientifiques de niveau recherche, publiés ou non, émanant des
The absence of mutation in 19/33 patients (58%) prompted us to compare the clinical and radiological features of the two groups of GD patients (Table 2), namely group 1, patients
The methods of analysis for both aerodynamic and structural investigations are presented, giving particular focus on the chosen model (fluid and structure models), pre
investigate glass transitions or similar processes. It is necessary to check, if for the rotator phase this range can also be applied or an adjustment of the pulse
KEYWORDS: Geometrical requirement; Life Cycle; Metric tensor; Gram matrices; coordinate free
We con- sider the case of Norway maple (Acer platanoides) which was intentionally in- troduced to North America as an ornamental street shade tree, but now has been viewed as a
In the following, the structure of cyanoadamantane in its glassy phase will be solved with a Frenkel and a cylindrical description.. In both cases, the whole
