Dynamic Response of 3D Printed Beams with Damping Layers
by
Maryse Vachon
BEng Civil Engineering Universite Laval, 2013
ARCHIVES
MASSACHU3E TT INSTITUTE OF TECHNOLOLGYJUL 02 2015
LIBRARIES
SUBMITTED TO THE DEPARTMENT OF CIVIL AND ENVIRONMENTAL ENGINEERING IN PARTIAL OF THE REQUIREMENTS FOR THE DEGREE OF
FULFILLMENT
MASTER OF ENGINEERING IN CIVIL AND ENVIRONMENTAL ENGINEERING AT THE
MASSACHUSETTS INSTITUTE OF TECHNOLOGY JUNE 2015
@2015 Maryse Vachon. All rights reserved.
The author hereby grants to MIT permission to reproduce and to distribute publicly paper and electronic copies of this thesis document in whole or in part in any medium now
known or hereafter created.
Signature of Author:
Signature redacted
//" BD4artment of Civil and Environmental Engineering May 19, 2015
Signature redacted
Certified by:
Markus J. Buehler Professor of Civil and Environmental Engineering Thesis Supervisor
Signature redacted
Accepted by:
VHeid( Nepf Donald and Martha Harleman Professor of Civil and Environmental Engineering
Dynamic Response of 3D Printed Beams with Damping Layers
by Maryse Vachon
Submitted to the Department of Civil and Environmental Engineering on May 19, 2015 in Partial Fulfillment of the Requirements for the Degree of Master of Engineering in Civil
and Environmental Engineering
ABSTRACT
3D printers are a relatively new technology and they could be used in the future to 3D print structural components in buildings or bridges. The main advantages of using 3D printing would be the optimization of the structures. Effectively, with 3D printers, it is possible to generate polymers with different strengths and stiffnesses in the same structure. It is also possible to print very complex shapes and forms.
This thesis will focuses on the dynamic response of 3D printed beams with damping layers. More precisely, natural frequency and damping ratio will be analysed in order to find the optimal location of the damping layers. For this experiment, three methods are used, one with an accelerometer, one with a high speed camera and one with a piezoelectric actuator.
Characterization of the 3D printed material has been made to predict results.
For the results, it is possible to conclude that using softer material as damping layer reduces the beam frequencies but increases the damping ratio. Also, in order to get the most efficient beam in terms of damping properties, the damping layers need to be close to the top and bottom surfaces as strains are larger. Finally, it can be say that a high speed camera is the best device to investigate the dynamic response of 3D printed materials.
Thesis Supervisor: Markus J. Buehler
Acknowledgements
I would personally like to thank Professor Markus Buehler, Professor Jerome Connor and Dr. Zhao Qin for their guidance and support for this thesis. I would also like to thank the Fonds de
recherche du Qu6bec - Nature et technologies for their generous funding.
As some might know, the MEng program is a very intensive program and I would like to thank my family for their constant support and help during the past nine months. This amazing opportunity would not have been possible without them.
I would like to express my gratitude to the MEng group of 2015 for their help and friendship, especially Isabelle Su. This year would not have been the same without you.
Table of Contents
ABSTRACT ... 3
Acknow ledgem ents... 5
Chapter 1 - Introduction ... 15
1.1 M otivation... 15
1.2 Sco pe of W ork ... 15
Chapter 2 - Literature Review ... 17
2.1 Structural Dynam ics ... 17
2.1.1 Dynam ic Response for a Single Degree of Freedom System ... 17
2.1.3 Dam ping in Structures ... 18
2.1.4 Existing Dam ping System s ... 19
2.1.4.1 Tuned M ass Dam per and Tuned Liquid Dam per ... 19
2.1.4.2 Viscous Dam pers and Friction Dam pers ... 20
2.1.5 How to Evaluate Dam ping ... 20
2.1.5.1 Half-Power Bandw idth M ethods ... 20
2.1.5.2 Logarithm ic Decrem ent M ethod ... 21
2.1.5.3 Viscoelastic Dam per... 22
2.2 3D Printing ... 23
2.2.1 Background and Process... 23
2.2.2 M aterials Available at M IT... 23
Chapter 3 - M ethodology ... 25
3.1 Characterization of 3D Printed M aterials ... 25
3.1.1 Young's M odulus ... 25
3.2 Determination of the Frequency and Damping Ratio of a 3D Printed Beam ... 29
3.2.1 Prediction by hand calculation ... 31
3.2.1.1 Beam Theory ... 31
3.2.1.2 Correction Factor for Shear ... 32
3.2.2 Experim ental study ... 32
3.2.2.1 Accelerom eter ... 32
3.2.2.2 High Speed Cam era... 33
3.2.2.3 Piezoelectric Actuator... 33
Chapter 4 - Results and Discussions... 35
4.1 Characterization of 3D printed m aterials ... 35
4.1.1 Young's M odulus ... 35
4.1.2 Viscoelastic Properties... 36
4.2 Determination of the frequency and damping ratio of a 3D printed beam... 37
4.2.1 Prediction by hand calculation ... 37
4.2.2 Experim ental study... 37
4.2.2.1 Accelerom eter ... 37
4.2.2.2 High Speed Cam era... 39
4.2.2.2.1 First Set ... 39
4.2.2.2.1 Second Set... 40
4.2.2.3 Piezoelectric Actuator... 41
Chapter 5 - Conclusion ... 43
AppendixC C ... 55
List of Figures
Figure 1: Free Vibration ... 17
Figure 2: Tuned M ass Damper for the Taipei 101 Building in Taiwan ... 19
Figure 3: Determination of Equivalent Viscous Damping ... 21
Figure 4: Logarithmic Decrement Method ... 22
Figure 5: Viscous Dam per ... 22
Figure 6: Specimen Dimensions - ASTM ... 26
Figure 7: Tensile Test of Plastics ... 26
Figure 8: Experimental Setup - Creep Test ... 29
Figure 9: Beam Configurations ... 30
Figure 10: Beam Dimensions ... 31
Figure 11: Experimental Setup - Accelerometer ... 32
Figure 12: Experimental Setup - High Speed Camera ... 33
Figure 13: Piezoelectric Actuator ... 34
Figure 14: Experimental Setup - Piezoelectric Actuator ... 34
Figure 15: VeroM agenta Stress-Strain Curve ... 35
Figure 16: Stress-Strain Curve for Other Mixtures ... 35
List of Tables
Table 1: Damping Ratio for Different Type of Structures ... 18
Tab le 2 : M ate rial Pro perties ... 24
Table 3: 3D Printed M aterials ... 25
Table 4: Specim en Dim ensions- Narrow Areas... 27
Table 5: Creep Test - Load, Length, Cross Section ... 28
Table 6: Young's Modulus for 3D Printed Materials ... 36
Table 7: V iscoelastic Properties ... 36
Table 8: First Natural Frequency - Hand Calculations ... 37
Table 9: Average Damping Ratio- Accelerometer ... 39
Table 10: Experimental Results - High Speed Camera - First Set... 40
Table 11: Experimental Results - High Speed Camera - Second Set... 40
Chapter 1
-
Introduction
1.1 Motivation
The phenomenon of resonance happens when the frequency of an external force is equal to the natural frequency of a structure. Under resonance, structures experience large amplitude oscillations as they store kinetic energy. This phenomenon needs to be avoided as it can compromise people's comfort and lead to the collapse of civil engineering infrastructures. Thus, engineers need to be careful when designing structures; high-rise buildings and bridges need to
be damped to avoid resonance under lateral loadings, such as wind or earthquake.
Nowadays, concrete and steel are the most common materials used to build civil engineering structures. However, as engineers and architects want to build more efficient and creative structures, other materials are making their way into construction fields. For example, fiber-reinforced plastic can be used as rebar in concrete and aluminum can be seen on pedestrian bridges. Other materials that could be seen in the future could be polymers. Actually, with 3D printers, polymers with different strengths and stiffnesses can be generated in the same structure. It is also possible to create an infinite number of forms and shapes with this technology. In brief, almost any architectural design would be possible with polymers. It could even be possible to remove space-consuming damping devices in high-rise buildings by including damping material layers directly in the structures.
1.2 Scope of Work
As 3D printers and polymers are still far from being found on construction sites, this thesis will primarily investigate the impact of adding damping material layers in 3D printed beams on the dynamic response of the beams. For this project, two layers of damping material are added inside a beam made of a stiffer material. Furthermore, different damping materials and layer
locations are experimented with in order to find the most optimal configuration.
To get satisfying results, many steps need to be followed. First of all, a literature review on structural dynamic and 3D printing is necessary to have a better understanding of the experimental project. Also, materials available to perform 3D printing need to be selected
carefully and tested for their properties. It is important that relatively stiff materials are chosen
r mig mLhe beams need tU Lreain riiu. MIfe ei i litLidl exper irrimenitLd tests,
simple configurations of 3D printed beams with and without damping layers are produced and tested in the laboratory to determine their damping ratio and dynamic response under external loading. For this test, beams are clamped to a table to simulate cantilever beams. They are then struck and different devices are used to investigate the dynamic response. The dynamic response of 3D printed beams will be analyzed with an accelerometer, a high speed camera and a piezoelectric actuator.
Chapter 2
-
Literature Review
2.1 Structural Dynamics
2.1.1 Dynamic Response for a Single Degree of Freedom System
The differential equation governing the response of a viscous damped system is given by:
mu+cn+k =p,
(1)
where m, c, k , u, p0 are respectively the mass, damping parameter, relative displacement to ground and external excitation. Depending on the situation, the external excitation can be arbitrary, step, periodic or pulse.
The natural frequency and the damping ratio of a structure are the following:
k
(2)c (3)
2m
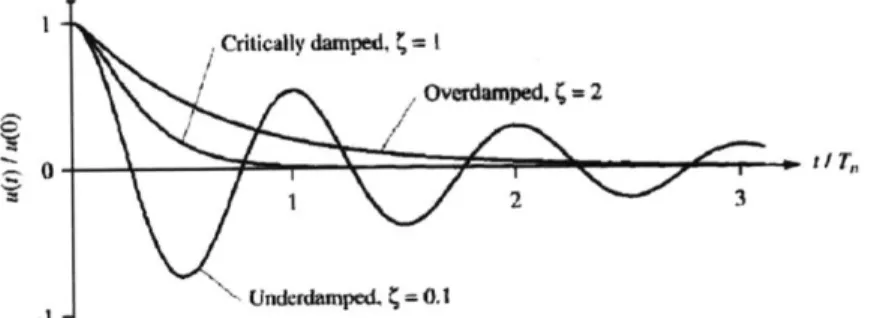
Three different situations can be observed. When k=1, the structure experiences critical damping and returns to its equilibrium state without any oscillations. When k>1, the structure is overdamped and does not oscillate. Finally, when
O<k<1,
the structure oscillates until it reaches its equilibrium position. The last case is the most common case in structural engineering and it is called an underdamped system. Figure 1 represents free vibrations of the three cases presented (Chopra, 1995). Note that when k=O, the structure is not damped and should oscillate forever..Criticlly damped, C=t
Undctdamped.=0.1
Other important parameters related to the dynamic response of a structure are the period (T), the duration of one full cycle of oscillation, nA frriu ency (f). 12 rmk tr r pr3esnted in the following equations:
2117 T= - r. Is 1
S=
-
H
7
(4) (5)2.1.3 Damping in Structures
In civil engineering, common structures have a damping ratio between 5% and 20%. Almost no structures have a damping ratio over 20% as it becomes too expensive. The following table, from N.M. Newmark and W.J. Hall, presents the desired damping ratio for different types of structures depending on the stress level.
Table 1: Damping Ratio for Different Type of Structures
Stress Level
Working stress, no more than about 0.5 yield point
At or just below yield point
Type and Condition of Structure Damping Rati( Recommended (%)
Welded steel prestressed concrete, well
reinforeed concrete (only slight cracking) Reinforced Concrete with considerable
3-5
cracking
Bolted and/or riveted steel, wood structures with nailed or bolted joints
Wclded s:eel, prestressed concrete (without complete loss in prestress)
Prestrcssed concrete with no prestress left Renoforced concrete
Bolted and/or riveted steel,wood structures with bolted joints
Wood structures with nailed joints
5-7
7-10
7-10
10-15
2.1.4 Existing Damping Systems
This section presents different damping devices that are currently used in high-rise buildings.
2.1.4.1 Tuned Mass Damper and Tuned Liquid Damper
The tuned mass damper was invented in the early 1900s. It is composed of a mass on a roller, a spring and a damper that is attached to the main structure. It absorbs vibration and controls displacements of the building. Tuned mass dampers are primarily used to mitigate motion, due to wind load, to avoid uncomfortable motion for occupancy. As tuned mass damper can only be tuned for one of the building's natural frequencies, it is tuned for the frequency that is the most likely to happen. This frequency is often the first fundamental frequency of the building as it is the lowest one. Thus, when the external excitation is close to the natural frequency, the response amplitude is considerably reduced. However, this system does not work when the external frequencies get further from the frequency tuned. An alternative damping system needs to be added when a building is likely to experience two resonance frequencies. Another disadvantage of tuned mass dampers is that they are space consuming as the mass needs to move (Connor & Laflamme, 2014). Figure 2 shows the tuned mass damper system that is used for the Taipei 101 building.
Tuned liquid dampers are more recent. They were invented in the late 1990s. The most popular type is the U-shape tuned liquid column damper. It uses water flowX from one column to the other to dissipate vibration energy. This system plays exactly the same role as a tuned mass damper. However, it requires less maintenance and uses less valuable space. Effectively, tuned
liquid dampers can use pre-existing tanks in buildings.
2.1.4.2 Viscous Dampers and Friction Dampers
Viscous dampers can be used in buildings and bridges. To dissipate vibration energy, this system uses a resisting force that is created when a fluid is forced through the piston head orifices. The resisting force is controlled by the velocity of the rod.
2.1.5 How to Evaluate Damping
Different ways can be used to estimate the damping ratio of structures or materials in the laboratory. The half-power bandwidth method and the logarithmic decrement method can both be used to determinate the damping ratio of beams. However, another method has to be used to determine the damping properties of viscoelastic materials.
2.1.5.1 Half-Power Bandwidth Methods
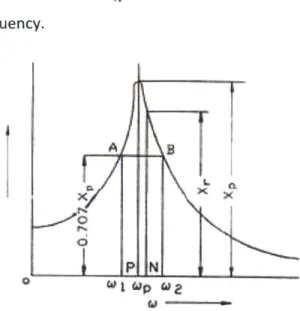
The half-power bandwidth method uses the first natural frequency to determine the damping ratio of the structure. In order to determine the damping ratio in the laboratory, the beam needs to be clamped to a table to simulate a cantilever beam. An external source of excitation is attached to the free end of the beam forcing the beam to experience different known frequencies. Also, an accelerometer is used to measure and record the free end displacement of the beam (Sawant, 2014). A peak in amplitude is observed for each natural frequency as the beam goes into resonance. The first natural frequency corresponds to the largest amplitude oscillation and is the lowest resonance frequency. Figure 3 shows an example of the oscillation amplitude under resonance. The damping ratio can be found with the following formula:
12-WI) (6)
2 0
where w, is the natural frequency.
A B
I.
NI
Figure 3: Determination of Equivalent Viscous Damping
2.1.5.2 Logarithmic Decrement Method
The logarithmic decrement method uses almost the same laboratory experiment. However,
instead of forcing the beam to experience different frequencies, the beam is struck and goes
into free vibration. A function, like the one presented in Figure 4, is recorded. In this Figure, ux
is the maximal oscillation displacement (Chopra, 1995). In order to find the damping ratio of the
structure, the following relation between successive peaks can be used:
Ui 2xk (7)
=i+ exp =1+ =k2
Since k is very small and V17+ (2 1, 17 = U 27rk
(8)
ii
Vt
Figure 4: Logarithmic Decrement Method
2.1.5.3 Viscoelastic Damper
For viscoelastic materials another method is used to calculate their damping properties as those materials are too soft to make a beam. To do the experiment, a viscoelastic damper is fabricated by bonding thin sheets of damping material to steel plates. Figure 5 shows a setting that can be made in the laboratory. The grey shaded areas represent the damping material and the black shaded areas are steel plates. Also, an external force, F, is applied on the system and the displacement, u, is measured (Connor & Laflamme, 2014).
td
S;Jt
nelop
viewFigure 5: Viscous Damper
In this system, all motion is due to the shear deformation of the viscoelastic material as the shear modulus of the damping material is remarkably smaller than the elastic modulus of steel. Damping properties of the material can be estimated as the loss factor (n), a measurement of intrinsic damping. 6 is the phase shift between stress and strain and its value varies from 0, for an elastic material, to n/2, for a viscous material. The loss factor can also be calculated by the ratio of the storage modulus (GS) over the loss modulus (GI).
2.2 3D Printing
2.2.1 Background and Process
3D printing is a new technology and was first introduced in the late 1980s. One of the earliest developments was made at the Massachusetts Institute of Technology by 3D Systems. The most recent 3D printer at MIT uses the triple-jetting technology, the most recent technology. 3D printers using the triple-jetting technology jet layers of curable liquid photopolymer onto a build tray (Stratasys, 2015). It has many advantages over the previous technology, inkjet printing. It produces more complex shapes, smoother surfaces and more intricate details. It is also faster, for tooling and 3D print, is more precise and permits the inclusion of different material's properties or colors in the same model in order to create composite structures.
2.2.2 Materials Available at MIT
Three main materials are available at MIT. VeroMagenta and VeroCyan are rigid opaque materials and TangoBlackPlus is a rubber-like material. Their material properties are shown in Table 2 and are provided by Stratasys, the manufacturer.
Table 2: Material Properties ASTM Tensile sength D438-03 Elon n at break D-638-05 Maddus of elasticity D63804 -1lo-25 1% 1 2000-3000 7250-9450 10-25 290.000-435.000
Fexural StrnM D-790-03 MPa 75-110 psi 11000-16000 Flexural ModuLus D-790-04
MWa
2200-3200 psi 320,000-465,000 HTff*C g ASM5W D-648-06 2C 45-50 TF 113-122HDT OC 4M 1.82LPa D-648-07 aC 45-50 TF 113-122
zod Ntched IMPac D-256-06 J/m 20-30 ft Iblnch 0.3754.562
WalerAbsorptn D-570-98 24hr % 1.1-1.5 % 1.1-1.5 TO
DMA,
E* 0C 52J54 *F 126-129Shore Hardness (D) Scale D Scale D 83-86 Scale D 83-86 Rockwell Hardness Scale M Scale M 73-76 Scale M 73-76 Polymerized density ASTM D792 gAcm3 1.17-1.18
Ash wntet VeroGray, USP281 % 023-0.26 % 0.23-0,26 VeroWhtePlus
Ash content VeroBlackPlus USP281 % 0.01-0.02 % 0.01-0.02
ASTW (Jaft Meft Unft Iffpwdal
Tensile strengh D-412 MPa 0.8-1.5 psi 115-220
Elongation at break D-412 % 170-220 % 170-220
Compressive set D-395 % 4-5 % 4-5
Shore Hardness (A) D-2240 Scale A 26-28 Scale A 26-28 Tensile Tear resstance D-624 Kg/cm 2-4. Lb/in 18-22 Polymenzed density ASTM D792 g/cm3 1 12-1-13
K01119" s" DSi
I
psi a
Chapter 3
-
Methodology
3.1 Characterization of 3D Printed Materials
3.1.1 Young's Modulus
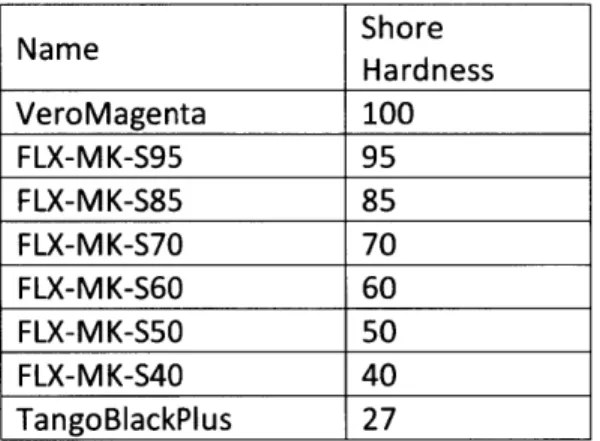
Characterization tests need to be performed on the available 3D printed materials in order to determine the Young's modulus, as this modulus is needed to calculate the natural frequencies of the beams. Thus, a tensile test was performed on every mixture of VeroMagenta and TangoBlackPlus. Table 3 shows every material tested with their name according to the manufacturer and shore hardness. For example, FLX-MK-S95 is composed of a greater ratio of stiff over rubber-like material than FLX-MK-S85.
Table 3: 3D Printed Materials
Name Shore Hardness VeroMagenta 100 FLX-MK-S95 95 FLX-MK-S85 85 FLX-MK-S70 70 FLX-MK-S60 60 FLX-MK-S50 50 FLX-MK-S40 40 TangoBlackPlus 27
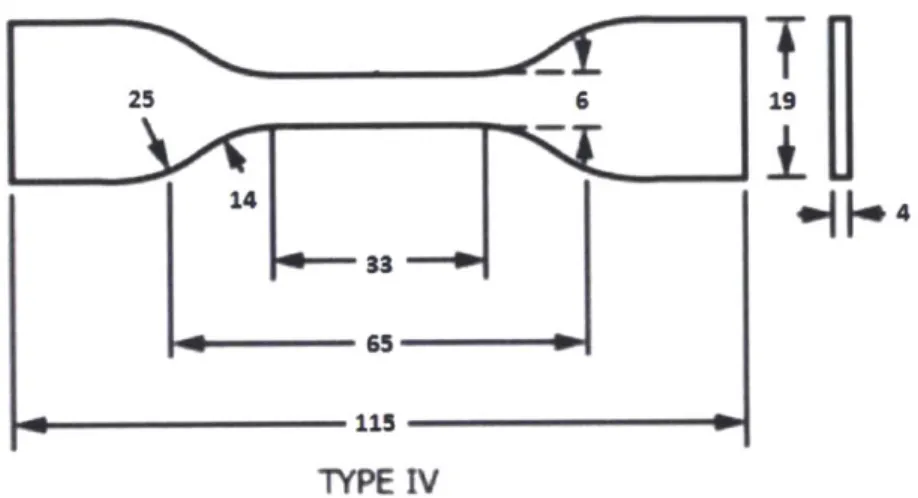
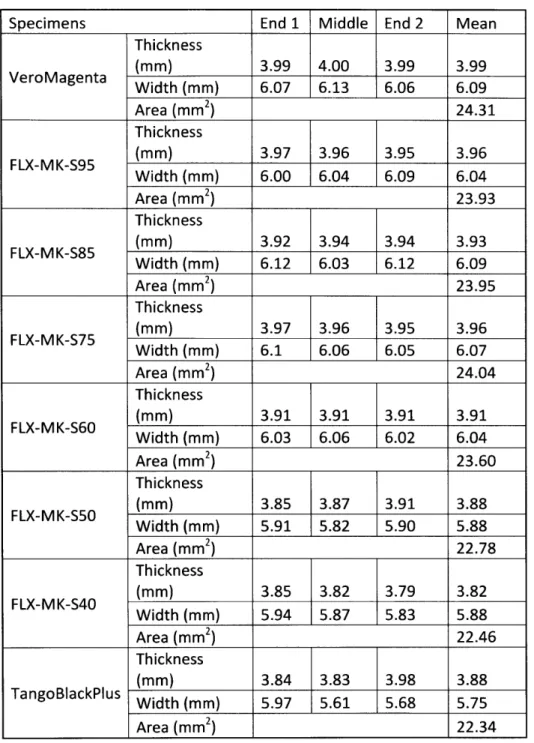
Tensile tests were performed at the civil engineering laboratory. Figure 6 shows the required dimensions for a dog bone of category IV according to the ASTM D638-10. This category has been chosen as it can be used for rigid, semi-rigid and non-rigid plastics. It is also the specimen to use to compare rigidity of materials. A gage of 12.5 mm was used and a displacement rate of 5mm/min was chosen. However, the gage had to be removed for FLX-MK-S60 and softer materials. The gage produced too much initial displacement on specimens as the material has more rubber-like properties. Furthermore, only one specimen of each type of material has been tested instead of the five prescribed by the ASTM D638-10 for time constraint. Figure 7
represents the experimental setup for the tensile test and Table 4 presents the dimensions of each specimen narrow area.
25 6 19
144
65
N 115
TYPE
IV
Figure 6: Specimen Dimensions - ASTM
Table 4: Specimen Dimensions- Narrow Areas
Specimens End 1 Middle End 2 Mean
Thickness _________(mm) 3.99 4.00 3.99 3.99 Width (mm) 6.07 6.13 6.06 6.09 Area (mm2 ) 24.31 Thickness _________(mm) 3.97 3.96 3.95 3.96 FLX-MK-595 (m)_______ Width (mm) 6.00 6.04 6.09 6.04 Area (mm2 ) 23.93 Thickness (mm) 3.92 3.94 3.94 3.93 Width (mm) 6.12 6.03 6.12 6.09 Area (mm2 ) 23.95 Thickness __________(mm) 3.97 3.96 3.95 3.96 FLX-MK-575 (m)_______ Width (mm) 6.1 6.06 6.05 6.07 Area (mm2 ) 24.04 Thickness (mm) 3.91 3.91 3.91 3.91 Width (mm) 6.03 6.06 6.02 6.04 Area (mm2) 23.60 Thickness (mm) 3.85 3.87 3.91 3.88 FLX-MK-550 (m)____________Width (mm) 5.91 5.82 5.90 5.88 Area (mm2 ) 22.78 Thickness (mm) 3.85 3.82 3.79 3.82 FLX-MK-540 (m ___________ Width (mm) 5.94 5.87 5.83 5.88 Area (mm2 ) 22.46 Thickness (mm) 3.84 3.83 3.98 3.88 Width (mm) 5.97 5.61 5.68 5.75 _Area (mm2) _F 22.34
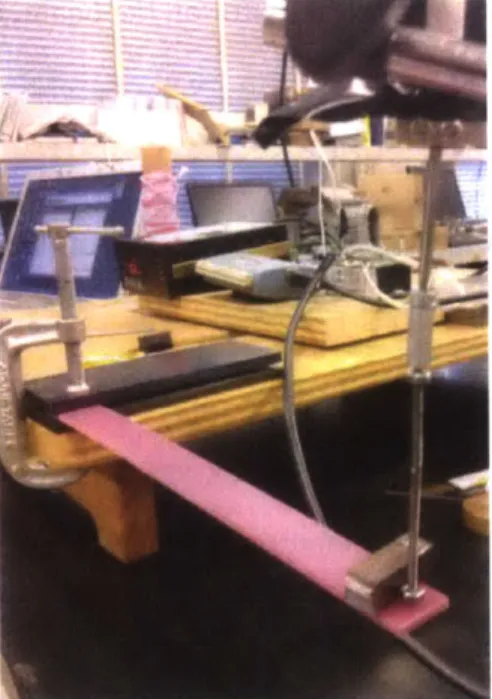
3.1.2 Viscoelastic Properties
I o calculate the vIscoelastic properties 1 I tle 3D printed materials, a creep test was performed
on them. A creep test consists of applying a constant load on a beam and measuring its
deflexion over time. The creep function and viscosity can be determinated by the following
equations:
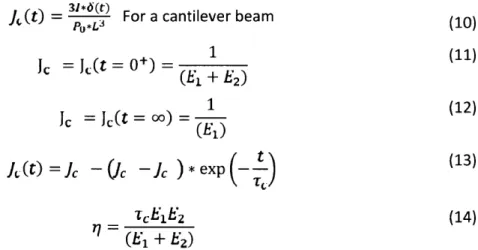
it) = 310 For a cantilever beam (10)
J = J(t = 0+)= (11)
1
(12)
Jc
=
c(t =o0)
=(1
(ED) jc (t) = Jc - Uc -- c *exp (13) TciT 2 (14) (El + E2)where Jo Jcg., Jce, Th and
ri
are respectively the creep function, the glassy compliance, theequilibrium compliance, the creep retardation time and the viscosity.
Table 5 presents information on the beams used and Figure 8 shows the experimental setup of
the creep test. Note that no test was performed for FLX-MK-S70 or softer materials as the
beams would be not rigid enough for a creep test.
Table 5: Creep Test - Load, Length, Cross Section
Specimens P (N) L (mm) Cross Section (mm x mm)
VeroMagenta 0.0981 51 20 x 3
FLX-MK-S95 0.0981 71 20 x 3
Figure 8: Experimental Setup - Creep Test
3.2 Determination of the Frequency and Damping Ratio of a 3D Printed
Beam
All beams have a rectangular cross section to simplify the experiment. The beam lengths are 210 mm in order to get a free span of 200 mm as a cantilever beam. This dimension was chosen to fit the maximal build size of the 3D printer, the Object260 Connex3. The beam widths are 20 mm as typical beam widths are 1/10 of the span. In addition, the depth of the beam is chosen in order to get a precise frequency, as natural frequencies of a beam depend on their cross sections. For the first set of beams, each beam has exactly the same cross section but is using different materials as the damping layer. This set is composed of the following beams, Pink (VeroMagenta only), Pink95 (VeroMagenta/ S95) and Pink85 (VeroMagenta/ FLX-MK-S85). For the second set of beams, the location of the damping layers is variable but the ratio of stiff over damping material remains constant. This set is composed of Pink85V1 and Pink85V2 and the reference beam is Pink85. An extra specimen has been built to investigate the dynamic response with a piezoelectric actuator. This specimen is the same as Pink95 but it is 300 mm
long and 45 mm wide to be able to fit the actuator on the beam. Figure 9 presents the different beam cross sections in millimeters.
20 VeroMagenta
VeroMagenta, FLX-MK-S95 or FLX-MK-S85
a) First Set of Beams - Pink, Pink96 and Pink85
N
) o
~-
20VeroMagenta
FLX-MK-S85
b) Second Set of Beams - Pink85V1
N
Co 20
0
0
VeroMagenta
FLX-MK-S85
b) Second Set of Beam - Pink85V2 Figure 9: Beam Configurations
3.2.1 Prediction by hand calculation
3.2.1.1 Beam Theory
The natural frequency, f, of a cantilever beam is given by the following equation, where Kn is
3.52 for the first natural frequency:
Kn
El
f r (15)
Consequently, an equivalent stiffness can be found by fixing the natural frequency. The total
height of the beam can be calculated using equations (16) to (19). Every parameter is
represented in Figure 10. For this experiment, the total height of the beam was fixed to 2 mm
in order to get frequencies around 10 Hz. Note that the mass of the 3D printed material is
1g/cm3. E
e
= Es
(11+ 13) + ES, (12)(16)
11 = 2
(1)
+ bhj
Ht,
h
)Ht/(17)
122(18)2
Sb(h2)b
2 (Ht,-h-
h2 Ht)2(18)
6=2
12
+
2-
21
2
13
S12
b(h)3
(19) Htot '-4b
Material 1 Material 23.2.1.2 Correction Factor for Shear
As the ratio of Estif and Esoft is relatively high, hand calculations might be more accurate if the effect of shear is taken into account. The following equation can be used to calculate a correction factor to the frequency of a cantilever beam:
[
K
*r
2f-t T.*[1 2L2 + )
where r is the radius of gyration of the section and k' can be approximated to 0.5. (20)
However as the ratio r2 over L2 is very small, the correction factor is =1. Thus, shear should not have an effect on the frequency of the beam.
3.2.2 Experimental study
3.2.2.1 Accelerometer
The first set of beams (Pink, Pink95 and Pink85) has been used for this experiment. Figure 11 shows the experimental setup to investigate the dynamic response. Note that the logarithmic decrement method was chosen for this project. The accelerometer and software used are called "Slam Stick."
3.2.2.2 High Speed Camera
Both sets of beams are used for this experiment. The setup and MatLab code to analyse the
beam were made by Justin Chen, a PhD candidate at MIT. The setup is shown in Figure 12.
Beams are clamped to simulate a cantilever column and are excited by a small pressure close to
the support. While beams go into free vibration, the high speed camera records theirs
movement. Data are then analysed with a MatLab code that was created to generate the
displacement of multiple points along the column and calculate frequencies.
Figure 12: Experimental Setup - High Speed Camera
3.2.2.3 Piezoelectric Actuator
A piezoelectric actuator can be used to determine the frequency of a beam. The ceramic
actuators used are those represented in Figure 13. Those types of actuators contract and
expand as a response to a small imposed strain. When a direct current is applied, the cantilever
beam will deflect and the deflection will depend on the intensity of the current. When an
alternative current is applied, the cantilever beam will go into vibration. The natural frequency of the beam is found when the amplitude is maximal. For this experiment the actuators are bond with epoxy on each side of the beam at the support. Figure 14 shows the experimental setup and the wide beam is used.
Figure 13: Piezoelectric Actuator
Chapter 4 - Results and Discussions
4.1 Characterization of 3D printed materials
4.1.1 Young's Modulus
In order to determine the Young's modulus, the stress-strain curve of each material has been
generated, as presented in Figure 15 and Figure 16. VeroMagenta is on a separate graph as its
maximal stress value is more than 10 times the maximal stress value of other mixtures.
60 50 ' 40 0. S30 20 10 0 0 - VeroMagenta 0.01 0.02 0.03 0.04 0.05 0.06
Strain
Figure 15: VeroMagenta Stress-Strain Curve
0.07 0.08 FLX- .00.FLX--- FLX--- -FLX-- -FLX-- FLX-..-... -0FL .-- ' ...-- - FLX .- * -- *Tan 0.1 0.15 0.2 0.25 0.3 0.35 Strain
Figure 16: Stress-Strain Curve for Other Mixtures
MK-S95 MK-S85 MK-S75 MK-S60 MK-S50 -MK-S40 goBlackPlus 0.4 0.45 6-5' . 4 a-2 1 0 0 0.05 i
As one can observe, the maximal stress decreases significantly between VeroMagenta and FLX-MK-S75. Note that failure was reached only for the four stiffer materials. However, the maximal stress and stress at failure are not required in order to calculate the Young's modulus. The initial slope of the stress-strain curve represents the Young's Modulus and those values are
presented in Table 6.
Table 6: Young's Modulus for 3D Printed Materials
Specimens E (MPa) VeroMagenta 2469 FLX-MK-S95 228 FLX-MK-S85 47 FLX-MK-S75 18 FLX-MK-S60 15 FLX-MK-S50 7 FLX-MK-S40 2 TangoBlackPlus 1
4.1.2 Viscoelastic Properties
The following table presents the viscous properties obtained from the creep test. It is possible to see that the viscous properties decrease when a softer material is used. To verify the current results, a similar creep test has been performed on simply supported beams made of the same materials and equivalent results were obtained. The creep functions are detailed in Appendix A. Table 7: Viscoelastic Properties
Specimens r (GPa*s) VeroMagenta 202.6
4.2 Determination of the frequency and damping ratio of a 3D printed
beam
4.2.1 Prediction by hand calculation
The following table presents the predicated natural frequencies of the beams. Table 8: First Natural Frequency - Hand Calculations
Set
1
Set 2As one can observe, frequencies become lower when a softer material is used, as E2 decreases.
Also, higher frequencies are observed when the top (external) layers are thicker as it increases the equivalent stiffness of the beam.
4.2.2 Experimental study
4.2.2.1 Accelerometer
Four tests were performed on each beam. The accelerometer was placed at the free end of the beam (200 mm for the support) for the first two tests and the accelerometer was placed at 150 mm from the support for the last two tests. Detailed results of the behavior of the beams can be found in Appendix B. Figure 17 shows the first natural frequency and Table 9 shows the damping ratio measured.
Specimens Frequency (Hz) Pink 11.80 Pink95 10.69 Pink85 10.58 Specimens Frequency (Hz) Pink85V1 11.13 Pink85 10.58 Pink85V2 8.92
1 , 0.9 0.8 0.7 o 0.6 0.5 E 0.4 0.3 0.2 0.1 -0 0 2 4 6 8 Frequency (Hz) -Test 1 - 200 mm .Test2-200mm Test I - 150 mm --- Test 2 -150 mm 10 12 14 a) Pink 0.8 - Test 1 -200 mm 0.7 - --- Test 2 -200 mm 0.6 Test 1 - 150 mm . ... .- Test2-150mm 0.4 E S0.3 0.2 0.1. 0 0 2 4 6 8 10 12 14 Frequency (Hz)
b) Pink95
Test 1 - 200 mm ---- Test 2 -200 mm .8-Test 1 - 150 mm ---. Test 2 - 150 mm .6- -.4 .2 - --- . 0 A 0 2 4 6 8 Frequency (Hz) 10 12 14 c) Pink85Figure 17: First Natural Frequency - Accelerometer 1
0.
0
E 0 0
Table 9: Average Damping Ratio- Accelerometer
Specimens Damping Ratio Pink -200 mm 2.0% Pink - 150 mm 2.4% Pink95 - 200 mm 3.4% Pink95 - 150 mm 3.3% Pink85 - 200 mm 4.4% Pink85 - 150 mm 4.7%
As one can see, the damping ratio increases when a softer material is used as the damping layer. However, the obtained frequencies do not match with the hand calculations, even for the homogeneous material. This difference, for Pink when the accelerometer is placed at the free end, is 6 Hz and gives a relative error over 100%. Another inaccuracy is that the frequency measured changes depending on the location of the accelerometer. When the accelerometer is closer to the support, the frequency is higher. This difference is significant; the relative error between Pink-200 mm and Pink-150 mm is 47%. However, the frequency should be the same as it does not depend on the location of the accelerometer (see equation (15)). Thus, the mass of the accelerometer is too heavy compared to the mass of the beams. Effectively, with this experiment, the frequency obtained is more similar to a SDOF system instead of a continuous cantilever beam. Another method is then required to verify the previous conclusion.
4.2.2.2 High Speed Camera
4.2.2.2.1 First Set
Table 10 shows the measured frequency and damping ratio obtained with the high speed camera.
Table 10: Experimental Results - High Speed Camera - First Set
Frequency Damping Ratio
Specimens (Hz)
Pink 11.95 2.3%
Pink95 11.30 4.0%
Pink85 11.14 6.1%
As it can be seen, the measured frequencies are very similar to the predicated frequencies. The largest relative error is for Pink95 with 6%. The relative error for Pink and Pink85 are 1% and 6% respectively. Thus, the weight of the accelerometer played an important role on the previous experiment. Also, as seen with the accelerometer, the damping ratio increases when a softer material is used as the damping layer. An increase of 4% can be seen between the reference specimen and Pink85. Additional data are provided in Appendix C.
4.2.2.2.1 Second Set
Table 11 shows the measured frequencies and damping ratio obtained for the second set of beams.
Table 11: Experimental Results - High Speed Camera - Second Set Frequency Damping
Specimens (Hz) Ratio
P85V1 10.26 6.0%
Pink85 11.14 6.1%
P85V2 9.00 6.4%
As it can be seen, the optimal position for the damping layers is close to the top and bottom surfaces as displacements are maximal. The increase is 0.36% between P85V1 and P85V2.
relative errors are 8%, 5% and 2% for P85V1, Pink85 and P85V2 respectively. More details are available in Appendix D.
4.2.2.3 Piezoelectric Actuator
Results were compared with hand calculations. Table 12 shows the results obtained for the wide beam.
Table 12: First Natural Frequency - Actuator and Hand Calculations Frequency (Hz) Length (mm) Actuator Hand Cal.
200 7.90 10.10
250 17.00 15.79
As one can see, the relative error between hand calculations and the piezoelectric actuator is around 28% and 7% for the first and second test respectively. No equipment was added at the free end of the beam to measure its displacement because the mass of the device would have influenced the results. Therefore, it was harder to get natural frequency as the maximal amplitude of the beam had to be estimated.
Chapter
5
-
Conclusion
Many conclusions can be drawn from this thesis. First, it was possible to characterize 3D printed materials. The Young's modulus of the stiffer 3D printed material is 2 500 MPa and it decreases rapidly when more rubber-like material are added. In addition, the viscosity of the stiffer material is higher and this property also decreases when the stiffness decreases. As expected according to hand calculations and theory, using softer material as damping layer reduces the beam frequencies but increases the damping ratio. Also, in order to get the most efficient beam in terms of damping properties, the damping layers need to be close to the top and bottom surfaces. Damping layers are more efficient where strains are higher. However, using softer materials for the damping layers or place the damping layers closer to the surface decreases the natural frequencies of the beams. Another conclusion is that the best way to analyse the dynamic response of 3D printed material is the high speed camera, as no equipment has to be installed on the beams. 3D printed beams are so light that the weight of a simple accelerometer has a big influence on the results.
To push forward this study, finite element models should be made to determine even more efficient beams in terms of damping. It would be also interesting to use finite element to not only look at damping and frequencies but to look also into tensile and compressive strengths and deflection.
In summary, the use of polymer could be an interesting avenue for the future. As this thesis showed, it was possible to create different beams with different strengths and stiffnesses using mixtures of two polymers. It was also possible to vary natural frequencies and damping ratio while keeping dimensions and stiff over soft material ratio constant. Thus, structural components could be optimized with the use of 3D printed materials. However, for now, 3D printed materials are not strong enough. Their highest modulus of elasticity is 2500 MPa, which is 80 times lower than steel, and their maximal tensile strength is about 55 MPa compare to 400 MPa for steel. Therefore, major improvements have to be made before seeing 3D printed
References
Ahm, Sung-Hoon, 2002. Anisotropic material properties offused deposition modeling ABS. Rapid Prototyping, Vol.8, N 4.
Arora, S., 2012. Study of Vibration Characteristics of Cantilever Beams of Different Materials. Master of Engineering's Thesis, Mechanical Engineering Department, Thapar University, Patiala, India.
ASTM D638. Standard Test Method for Tensile Properties of Plastics. ASTM International, 100 Barr Harbor Drive, PO Box C700, West Conshohocken, PA 19428-2959, United States.
Bagsik, A., 2010. FDM Part Quality Manufactured with Ultem*9085. Polymeric Materials 2010, Halle (Saale).
Buehler, M. J., 2008. Atomistic Modeling of Materials Failure. Springer, 488 p. Chopra, A. K., 1995. Dynamics of Structures: Theory and Applications to Earthquake
Engineering. Prentice-Hall International Series in Civil Engineering and Engineering Mechanics. Upper Saddle River, N.J.
Connor, J. J. and Laflamme, S., 2014. Structural Motion Engineering. Springer, 619 p.
Orban, F., 2011. Damping of materials and members in structures. 5th International Workshop on Multi-Rate Processes and Hysteresis, Journal of Physics: Conference Series 268.
Rodriguez, M. M., 2006. Analysis of Stuctural Damping. Master's Thesis, Department of Applied Physics and Mechanical Engineering, Lulea University of Technology, Sweden.
Sawant, S., 2014. Experimental Verification of Damping Coefficient by Half Power Band Width Method. INTERNATIONAL JOURNAL OF RESEARCH IN AERONAUTICAL AND MECHANICAL ENGINEERING, Vol. 2, p.8-13.
Appendix A
Creep functions for the creep tests:
1 1 0.9 0.8 0.7 0.6 0.5 - VeroMagenta 0 200 400 600 Time (s) 50 45 40 35 30 25 20 15 10 5 0 -0 - FLX-MK-S95 500 1000 1500 Time (s) 100 90 80 70 0 60 50
I
40 30 20 10t 0 0 FLX-MK-S85 200 400 600 800 1000 1200 1i400 Time (s) (U 800 1000 1200 2000 2500 0.4 0.3 0.2 0.1 dAppendix B
Data for the experiment with the accelerometer (Pink):
-- Test 1 -200 mm
I
v-1 3 4 5 Time (s) -- Test 2 - 200 mm I Time (s) 6 5 4 3 2 1 0 -1 -2 -3 5 4 3i 24 0 M. E 4. EA
0
---1 -2 -1 A -- - - - -89 10 1120 - Test 1 - 150 mm 3 4 5 Time (s) - Test 2 - 150 mm 3 4 5 Time (s) @3 0 4-a E 15 10 5 0 -5 -10
~IAAAAAALWYVA
llV v
v
.15 20 15 10 5 @3 4-a E U1~
yV V vI
-5 10 -15 -20- - -
- - - -
-Data for the experiment with the accelerometer (Pink95): 12 _
1
-- Test 1 - 200 mmI
_________________________V
V
2
3 4 Time (s)15
- Test 2-200mm Time (s) 10 4aE
8 6 4 2 0 -2 -4 10 -) E 50
-5 -LU 3 4A A A
- Test 1 - 150 mm
AA AAA\
12 10 8 6 4 2 0 2 -Time (s) - Test 2 - 150 mmIA AAA
/
I
Vv\
2 Time (s) 14 I w 4-a -i. E -4 -6 -8 20 15 -10 -w -o 4' E 5 n -5 -10 , vVv
W,'
v 2Vv
I
-.LData for the experiment with the accelerometer (Pink85): in -- Test 1 - 200 mm
~AAA
A/V V
LVVvvw%~
3 4 Time (s) -- Test 2 -200 mmAAAAAIVVVE
3 4 Time (s) 8 6 E 4 2N
0 -2 -4 -6 10 8 6 4 2 --E Km~~i0
-2 -4 -6 W-- Test 1 -150 mm
AAP
15 10 IP 5 -5 -10 Time (s) 20 -Test 2 - 150 mmVAi
v
v
Vv
-15 15 1 E 10 50
-5 -10 --15I
r
?nAA
Appendix C
First natural frequency: 0.12 0.1 0.08 A0 A. E 0 2 4 6 8 10 Frequency (Hz) 12 14 16 18 20 Displacement: 0.3 -- -Pink 0.2 1 0.1 w -V- --VW -o 2 -0.1 E -0.2 -0.3 -0.4 -0.5 Time (5) .----.-- Pink -- Pink95 Pink85 0 0.04-0.02 --....
0.15 E 0.1 0.05 0 -0.05 -0.1 Time (s) 6.OOE-01 Pink85 4.OOE-01 2.OOE-01 .
0.OOE+00
,z- - --E < -2.OOE-01 -4.OOE-01 -6.OOE-01 -8.OOE-01 Time (s) -- Pink95Appendix D
First natural frequency: 0.12 0.1 0.08 0.06 E 0.04 0.02 0 ... P85V1 --_ _ -Pink85 P85V2 ... ....----. 0 2 4 6 8 10 12 14 16 18 2 Frequency (Hz) Displacement: 3.OOE+00 2.OOE+00 1.OOE+00 0.OOE+00 -1.OOE+00 E -2.OOE+00 -3.OOE+00 -4.OOE+00 -5.OOE+00 -6.OOE+00 -P85V1 0.5 1.5 2 2.5 Time (s) 0 I
6.OOE-01 Pink85 4.OOE-01 2.OOE-01 0.OOE+00 -2 E -2.OOE-01 -4.OOE-01 -6.QOE-01 -8.OOE-01 Time (s) 4 -- P85V2 2 0. $0.5 v 1.5 2 2.5 -2 -0 -. E -6 -8 -10 -12 Time (s)