Design of a Bead Holder for Thermal Atherosclerosis Sensor
by
Christopher Savage
SUBMITTED TO THE DEPARTMENT OF MECHANICAL ENGINEERING IN PARTIAL FULFILLMENT OF THE REQUIREMENTS FOR THE DEGREE OF
BACHELOR OF SCIENCE AT THE
MASSACHUSETTS INSTITUTE OF TECHNOLOGY
JUNE 2007
©2007 Christopher Savage. All rights reserved. The author hereby grants to MIT permission to reproduce
and to distribute publicly paper and electronic copies of this thesis document in whole or in part
in any medium now known or hereafter created.
MASSACHUSETTS INSTITUTE OF TECHNOLOGY
JUN
2 12007
LIBRARIES
ARCHIvES
Signature of Author:'-.--eepartment olMchanical Engineering JIV2IU I
Certified by:
H Frederick Bowman r Academic Administrator, IHST
"--"4hak Qono-ViSor
Accepted by:
John H. Lienhard V ofessor of Mechanical Engineering Chairman, Undergraduate Thesis Committee
I
Design of a Bead Holder for Thermal Atherosclerosis Sensor by
Christopher Savage
Submitted to the Department of Mechanical Engineering on May 20, 2007 in partial fulfillment of the
requirements for the Degree of Bachelor of Science in Engineering as recommended by the Department of Mechanical Engineering
ABSTRACT
Atherosclerosis is a systemic disease that causes plaque accumulation in arteries and diminished endothelial function. Because it is rarely identified until serious symptoms appear, there is value in a noninvasive technique for detecting atherosclerosis using characterization of endothelial dysfunction. Dr. Bowman devised a thermal sensing device to measure the temperature reflex of the hand subsequent to induced hyperemia. We created an interface that would securely and reproducibly place the thermal sensor in contact with skin. Our interface (the bead holder) was designed and redesigned until we reached a successful and viable product.
The bead holder iterative design process involved creating solid models, rapid-prototyping, and finally testing the effectiveness of the interface. After our first production run of ten acrylic bead holders, we installed a thermistor in each holder and achieved a satisfactory fit. Moreover, the thermistor was easily oriented into the holder and fit snugly.
We must continue the design optimization process to determine the best distance for the thermistor bead to extend beyond the holder housing to optimize fluid transport in capillary collapse. We will also consider fabrication alternatives to 3-D printing such as injection molding.
Thesis Supervisor: H. Frederick Bowman Title: Senior Academic Administrator, HST
Acknowledgements
This project could not have been completed without the support of the Laboratory for Manufacturing and Productivity and the advice of Gerry Wentworth, shop manager.
I'd like to thank MIT Media Lab masters student Amon Millner for his timely support in the fabrication process. I could not have accomplished the 3-D printing and design improvements without your assistance with rapid prototyping.
Specials thanks to Doctor Fred Bowman for his continued support and patience with this project. I sincerely appreciate your encouragement throughout the term and your support of my fact-finding mission to Switzerland. That research and the work I've done this term have taught me a lot about biomedical applications and engineering design.
Table of Contents
Abstract
2
Acknowledgements
3
Table of Contents
4
List of Tables and Figures
5
1. Introduction
6
2. Background
6
3. Device Design
8
3.1. Bead holder ... 83.1.1. Geometry...
8
3.1.2. Materials...
... 11
3.2. Adhesive Patch ... ... 12 3.2.1. Geometry... 12 3.2.2. Materials... 14 4. Fabrication 14 4.1. Injection Molding... ... ... 14 4.2. Composite 3-D Printing... ... 16 4.3. Acrylic 3-D Printing ... 174.4. Thermal Sensor Calibration... 19
5. Results 20 5.1. Overview of Results ... 20
5.2. Conclusions... ... 21
List of Tables and Figures
Figure 1. Thermal sensor with wire leads, thermistor at tip...
7
Figure 2. Bead holder with insulating buffers and wire canal...
9
Figure 3. External device for orienting bead...
10
Figure 4. Bead holder with cradle to control extension length...
11
Figure 5. Bead holder designed with flange
...
13
Figure 6. Wire path from bead holder to exit through electrode ...
14
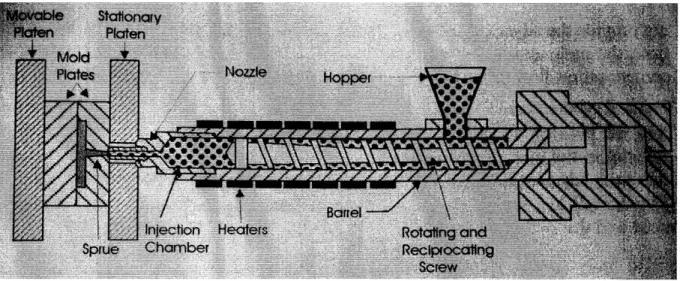
Figure 7. Diagram of standard injection molding setup...
15
Figure 8a. Bead holder prototype to scale...
17
Figure 8b. Bead holder scaled by factor of 125...
17
Figure 9. From inVision finished wax product (right) to exposed acrylic (left)... 18
Figure 10. 3-D Systems inVision printer...
19
Figure
1
a. 3-D printed acrylic bead holder...
... 20
Figure
1 lb.
Bead protruding from holder...
20
1. Introduction
Atherosclerosis is a category of heart disease characterized by plaque formation in the arteries, leading to occlusion and blood clots. The plaque formation develops from the
accumulation of cholesterol (LDL) in certain vulnerable parts of the artery. The most
atherosclerotic-prone regions are those near bifurcations and significant curves in the artery. Past approaches have been relatively rudimentary with atherosclerosis determined by serious
symptoms or invasive techniques.
This topic piqued my interest; however, I wanted to find a way to incorporate my knowledge in Mechanical Engineering into the project. Dr. Bowman's work in Health Sciences and Technology (HST) does just that - he's devised a non-invasive thermal approach to measure the vaso-reactive health of small arteries. My goals are to finish a functional prototype of and calibrate his thermal sensor.
2. Background
My thesis work began in a cardiovascular research lab in Switzerland last summer, where I conducted experiments that shed light on the precursors to atherosclerosis in blood vessels. This work was part of an information exchange between the lab in Switzerland and my advisor at MIT. I'm continuing work in this field of atherosclerotic detection by first realizing the model designed by Dr. Bowman.
Dr. Bowman's system involves using the thermal sensor placed on the hand to detect its temperature while inducing a rush of blood to the hand. The hyperemia is created using a standard arm cuff used for blood pressure measurements. Ideally, measuring temperature
changes while restricting blood flow to the arm and then suddenly releasing the occlusion allows for an accurate indication of vasculature response, and thus vascular health. This is potentially a very efficient, low cost, and noninvasive approach to atherosclerotic detection. It would require only a few minutes and could serve as a surrogate for the state of arteries all throughout the body. It remains to be seen how accurate this technique is.
Because this technique relies solely upon the measurement of temperature, it is essential that the thermal sensor gives an accurate indication of skin temperature. In our design, we employed a negative temperature coefficient (NTC) thermistor, a sintered mixed metal oxide between parallel electrodes that senses temperature through changes in resistance. Its function is
governed by the simple relationship:
1
AT=- .AR (1)
k
where k is the thermal coefficient of resistivity and AR is our measured value. Some thermistors exhibit lower resistance in response to increased temperature, thus a negative thermal coefficient, and some exhibit higher resistance indicating a positive coefficient. The thermal sensor is composed of two metal electrodes separated by the thermistor, a material of known thermal coefficient, and encased in glass. The glass encasement is nearly rectangular, with filleted edges in the axial direction.
Figure 1. Thermal sensor with wire leads, thermistor at tip
The tip of the glass bead is a necessary point of contact, but its diminutive size (mm scale) makes the skin-glass interface a challenge to maintain. Not only do we want to maintain contact during measurements, but we want the wire coming from the thermistor to be thermally isolated - heating or cooling of the wires themselves alters our measured resistance and yields faulty results. We took these design specifications into account as we designed the thermal interface.
There are other non-invasive techniques that address atherosclerosis detection similar to the thermistor. At MGH, Professor Lees uses ultrasound to observe carotid arteries in vivo and measure their wall thicknesses and flow velocity to develop a more complete picture of arterial health. This is a fairly successful technique with accurate results. Ultrasound is a relatively expensive process that takes a trained technician and probes small areas. It doesn't provide the
systemic view such as angiography that is often the defining diagnosis for atherosclerosis. On the other hand, it is particularly useful for a close up view of problem areas such as the carotids. Potentially, a combination of this approach and the thermal sensor could yield better results, and the aim of my project is to determine the viability of the thermal sensor device. Since this is a macroscopic solution and the ultrasound provides more microscopic atherosclerosis detection, eventually this device might serve as an initial test for Endothelial Dysfunction (ED), a precursor to atherosclerosis, and using ultrasound as a post-diagnosis analysis tool.
3. Device Design
Given our design parameters, we engineered an interface with the materials and geometry to meet those requirements. Because the thermistor is a small, sensitive instrument requiring proper orientation, we could not simply adhere the thermistor to the skin. Instead, we developed
a supporting 'bead holder' that satisfied the functional requirements of the thermistor - thermal insulation from anything other than skin, orientation of the thermistor tip of the sensor as the primary point of contact with skin, and protection of the wire leads connected to the thermistor.
3.1. Bead Holder
3.1.1. Geometry
The bead holder is of similar scale to the thermistor and provides an angled cradle for the bead of the thermistor to rest. Thin buffers provide separation between the glass bead and the surface of the holder, thus thermally insulating the thermistor with air. The buffers also serve to secure the bead in place, preventing slippage due to application forces.
The wires emanating from the thermistor are wrapped around the bead holder in a canal extruded from the side of the holder. This keeps a segment of wire close to the skin to thermally anchor the lead wire to skin temperature and prevents heat leakage from the sensor through the wire introducing a temperature artifact. The orientation of the glass bead within the bead holder is extremely important, especially the angle at which the bead protrudes from holder to contact skin. While the buffers securely hold the bead in place, we needed a method for accurately and repeatedly positioning the bead.
In our first iteration of design, we conceived of parallel supports that used the near rectangular geometry of the bead to offset the bead slightly from the level of the supports,
creating a slight protrusion. This did not account for the nonuniformity in bead shape over the length of the bead and it required accuracy in the placement of the bead which is a difficult task.
The second iteration incorporated nipple-like buffers to hold the bead stationary, insulate the bead, and allow a variety of "engagement angles"--the angle in which the bead tip contacts the skin. This engagement angle could be decided by an external setting device that interfaces with the bead holder, accurately orienting the bead. This provides simplicity in bead holder design and repeatability that expedites mass assembly.
Figure 2. Bead holder with insulating buffers and wire canal
y
..i .~·.
Figure 3. External device for orienting bead
The inevitable drawback of this approach is that two mating pieces create tolerance issues that are magnified in small applications like this one. The internal dimensions of the bead holder are already pushing the limits of machining resolution; therefore further reliance on tight
tolerances will inevitably cause problems. In light of this realization, we reconsidered the method of bead orientation.
Our next iteration of design incorporated an angled plane within the bead holder to properly position the bead to make contact with skin. We fabricated prototypes with different planes that gave a variety of protrusion lengths, but maintained the same engagement angle. In this iteration, we included two supports for the back of the bead to provide relatively uniform support throughout the length of the bead. We also designed the holder with and without perimeter wire wrapping in order to evaluate the importance of this feature.
(
Figure 4. Bead holder with cradle to control extension length
3.1.2. Materials
In terms of materiality, we chose to make the bead holder out of plastic because of its low thermal conductivity, durability and slight elasticity. Within the realm of thermoplastics, there are over 100,000 varieties, therefore we needed to identify our most important functional and engineering requirements and match those requirements to a type of plastic. Our engineering constraints were:
1. Thermally insulates bead to prevent heat loss
2. Allows glass bead to fit snugly with reproducible orientation 3. Can be machined and molded at very high precision
4. Commercially available and inexpensive
Based on these specifications, we produced a list of potentially viable plastics, with their advantages, disadvantages, and typical applications.
Table 1: Comparison of commercially available thermoplastics [1]
Thermoplastic Advantages Disadvantages Common Applications
High Temperature -dimensional stability -low elongation -air bag sensor housings
Nylon (HTN) -widely available -temperature and speed
sensors
Liquid Crystal Polymer -tight tolerances -poor impact -electrical components
-(LCP) -low mold shrinkage resistance miniaturization
Polycarbonate (PC) -wear resistance -soft, scratchable -sports helmets
- dimensional stability surface -mugs, pitchers
- impact strength - appliances
Polytetrafluoroethylene -good mech. strength -can not injection -vascular grafts
(PTFE) -low mold shrinkage mold -hoses, tubing
-widely available -nonstick cookware
Polymethyl -immediately available -no flexible -packaging, decoration
Metacrylate (Acrylic) -dimensional stability grades -catheters
- good impact strength
Unfortunately, Acrylic was the only plastic immediately available to us, by means of the Media Lab's 3-D printer. While it makes an extremely durable plastic that can be machined to tight tolerances and serves prototyping well, Acrylic doesn't have the thermal or mechanical characterstics we are looking for in a final product. The thermoplastics listed in the table generally met our criteria; however HTN and LCP offered the most enticing advantages with very minor disadvantages.
3.2. Adhesive patch
3.2.1. Geometry
While the bead holder effectively puts the thermistor bead in contact with skin, the holder needs to be secured to the skin so that the thermistor does not simply rest on the skin. A sticky patch similar to an electrocardiogram (ECG) electrode would accomplish this task without applying excessive force. Too much pressure applied to the skin causes a condition called capillary collapse, which results in inaccurate temperature measurements due to altered blood perfusion. Ideally, the patch could be applied on the variety of contours presented by the hand, therefore it should not be too large. It should also act as a secure conduit, transferring the thermistor wire from bead holder to an appropriate external cable.
plane, with the patch fusing around the holder. Because the sides of the holder are much thinner than the top and bottom, it is difficult to make this connection without a flange extending from the holder.
Figure 5. Bead holder designed with flange
While this was a viable option, the interface introduced further machining precision; therefore we contrived a simpler approach - simply attaching the bead holder to the underside of the patch. The diminutive size of the holder makes this connection possible. Additionally, the interface utilizes the largest face of the holder, ensuring a firm adherence.
To further enhance this connection, we designed a punch and die system that stamped an impression of the holder into the center of the patch. With this punch, the holder no longer protrudes from patch. We also wanted to have an isothermal length of wire kept in contact with (or near to) the skin to prevent lead wire thermal gradients and thus heat leakage to and from the sensor with the associated temperature artifacts. The punch and die technique allows us to create a channel in the patch for the wire to lie in and stay in contact with skin until it exits through the foam of the patch.
Figure 6. Wire path from bead holder to exit through electrode
3.2.2. Materials
Like a common electrode, the patch should be made of two materials - an insulating foam substrate and a thin, sticky underlayer for adhesion. The foam acts as a durable material that provides the bulk of the patch. Dr. Bowman has a supply of sticky foam that should be perfect for this application. The adhesive is moderately sticky and can be reusable.
4. Fabrication
4.1. Injection Molding
In order to evaluate the feasibility of our design at various stages, we wanted to produce working prototypes. Our first inclination was to machine molds at each stage and injection mold bead holders that were high-fidelity, operational parts. Having taken 2.008, a design and
manufacturing course that gives hands-on instruction in injection molding, I was familiar with both the mold production and injection molding processes. Injection molding is the process of passing melted plastic at high pressure through runners into a mold usually made of aluminum. The pressure and heating are necessary to ensure a full shot - complete filling of the mold channels. The mold is made of two aluminum blocks that interface to create a "negative" or empty space replicating the geometry of the part. Ideally, a mold should also match the finish requirements of the part.
Figure 7. Diagram of standard injection molding setup2
A machinist can supply the injection molder (the hopper) with a variety of thermoplastics depending on the application. The most common plastics used are acrylonnitrile-butadiene-styrene (ABS), polysterene (very cheap, good for one time use parts), nylon, and polyvinyl chloride (PVC). Injection molding is a cost effective technique to manufacture big and small plastic parts in mass. The process does not lend itself to customization, as each iteration would require re-machining a mold.
Naturally, the more complex the part, the more difficult it is to machine the
corresponding mold. Complexities in part design include intricate contours, internal geometries, and small features. When the limits of these complexities are reached, it is mostly because of limitations in the milling of the corresponding mold. Small features also introduce problems with supplying adequate pressure - small channels can require inordinate amounts of pressure to fully fill. Engineers must also consider the incorporation of parting lines and ejector pins, which further complicate small part molds. Thankfully, engineers do not design without considering the feasibility of their mold. Software modeling tools can simulate the entire injection molding process and are invaluable to part designers. These programs model melt front progression, mold stress patterns and part shrinkage.
To begin the process of mold fabrication, I met with Gerry Wentworth, head machinist at the Laboratory for Machining and Productivity (LMP). Though I was aware of the challenges presented by our design, I was surprised to find out that the machines in LMP could not machine
a mold with adequate precision. Particularly, the nipples of the internal geometry which require sub-millimeter accuracy wouldn't likely show in the mold. He also warned that the injection molder probably could not produce adequate pressure to fill such a small mold. These were both concerns of ours as we approached the fabrication process; however, we were still disappointed to receive this information. Gerry suggested that other labs might be able to machine a mold with the precision we needed, but that there were not more robust injection molders on campus.
4.2. Plaster-Resin Composite 3-D Printing
Because we did not necessarily need high-fidelity prototypes, we considered quicker means of part production. Currently, one of the best techniques of rapid-prototyping is the 3-D printer. We had access to a ZCorporation Spectrum 510 system, a high-definition, full color prototyping machine. ZCorporation claims a large part of the 3-D printing market with their
inkjet technologies. This printer receives a solid model file as an input (STL format) and builds the model layer-by-layer usually using fine composite powder (plastin and resin mix) and a water based adhesive. The Spectrum 510 prints two layers per minute (a layer is .1mm thick), so
fabricating a part of a few millimeters thickness takes about ten minutes [4]. The cross sectional area of these layers does not affect fabrication time. You must allow ten more minutes for the adhesive to set and then apply a coat of epoxy or wax to fix the delicate exterior. While this powder-adhesive composite does not possess the correct thermal or material properties, it does give an accurate indication of geometry, the most important characteristic of our prototypes. This process also allows the production of tens and hundreds of parts in one batch and different designs within the batch.
We utilized this process in the second iteration of design. By printing a batch of our design, we immediately realized that the buffers needed to be greatly enhanced, the wire routing canal was insufficient, and the outer dimensions of the bead holder needed to be augmented. Thankfully, this rapid-prototyping process allows for quick design adjustments and testing. We were able to vary bead holder dimensions and empirically reach an optimal design. As seen in picture A, the plaster prototypes capture the general geometry and scale, but can not resolve the smaller internal geometries. In order to better visualize these internal features, we machined a bead holder prototype scaled up by a factor of five (linearly, factor of 125 volumetrically), seen in picture B. While this took a longer time to print and cure, the larger model was valuable for
photographing and hands-on visualization. The marked difference in appearance demonstrates the limits of this rapid-prototyping machine.
Figure 8. Bead holder prototype to scale - 4mm x 8mm x 1.5mm (A), bead holder scaled
by 125 - 20mm x 40mm x 7.5mm (B)
Our third iteration of design with the angled internal cradle and ribs introduced further internal geometries that our powder prototypes were even less capable of replicating. We again printed large scale models of our revised bead holder. Satisfied with our prototyping results, we were ready to consider more advanced printing techniques.
4.3. Acrylic 3-D Printing
We wanted the fidelity necessary to test the glass bead-bead holder interface and this could only be accomplished using a more sophisticated 3-D printer that uses plastic. Specifically, we used the inVision si2 3-D modeler made by 3D Systems. This 3-D printer builds from the
steel base plate upwards, using jets that thermally deposit cross sections of acrylic plastic layer by layer. It also deposits wax-like supports that almost entirely encase the acrylic-it's necessary to melt off the wax after printing with a heat gun to reveal the acrylic model. The heat gun removes the majority of the wax; however, it does not effectively clean small crevices. 3-D systems sells a companion machine to the modeler that finishes the products by completely removing the wax. Unfortunately, we do not have this technology at our disposal, leading us to consider alternate approaches like ultrasonic cleaning or a hot liquid bath.
Figure 9. From inVision acrylic and wax product (right) to exposed acrylic (left)
Unlike the ZCorp machine, this printer prints with a vertical (z-axis) resolution of 800 dots per inch (dpi) and 656 dpi in the x and y axes [3]. Given this resolution, it's conceivable that the inVision si2 could produce a part with dimensions on the order of 50
-100 microns. Clearly, the resolution was more than sufficient to include all our structural elements. Because of this precision, we were able to test a variety of glass tip extensions from .01" - .015". Like the Spectrum 510, the inVision si2 has a relatively intuitive user interface and thus an easy learning curve. Job setup involves placing a clean plate in the loading bay, loading the proper STL file in the inVision printing software, and sending the job. For a part of our size, the printer takes approximately an hour to complete the job. The inVision si2 is capable of printing a single object
Figure 10. 3-D Systems inVision printer
We made improvements in the design of the bead holder based on some challenges this 3-D printing process presented. For example, it was extremely difficult to remove wax from small crevices like the wire well in the back of the holder, so we widened the orifice in subsequent production runs. We also made slight adjustments in the cradle width in order to accommodate a snug fitting.
4.4. Thermal Sensor Calibration
Once we have a working set of bead holders, we can calibrate the thermal sensor under different conditions to determine environmental effects and the sensor's effectiveness. First, we'll evaluate the thermal effects of the bead holder. Measuring temperature in air with and without the holder will indicate the quality of thermal insulation the holder was designed to provide.
We will then gather temperature data from the thermal sensor in a variety of media at known temperatures. Because the temperature varies linearly with the change in resistance, we can use a calibrated and accurate thermometer to find the coefficient.
5. Results
5.1. Overview of Results
We began the design process with drawings, refined our ideas through the use of prototypes, and finalized the design using the acrylic 3-D printer. While we could install the thermistor into our plaster prototypes, it was the fit of the thermistor in the acrylic bead holder that was our sole indication of success.
The dimensional adjustments we made between design iterations two and three were sufficient to produce a good fit between the thermistor and the acrylic bead holder. Ten bead holders were fabricated in the first trial with an intended extension length of .01 inches and all ten successfully interfaced with the thermistor-the thermistor was seated in the proper fashion with similar extension lengths, as seen in the figure 1 lb.
Figure 11. 3-D printed acrylic bead holder (A), thermistor bead protruding from holder (B
As mentioned, the only modification was to the wire well in the back of the holder, which was widened in subsequent production runs. In the next trials, we will evaluate the fit of the thermistor with greater extension lengths of .015" and .020".
5.2. Conclusion
We have a functioning prototype and a tested method for part production-3-D printing. The next steps are to find the optimal extension length of the thermistor from the bead holder, calibrate the thermal sensor, and integrate the sensor into our electrode patch. We will then have a viable prototype of an atherosclerosis-sensing device for evaluation.
We may decide to transition to injection molding fabrication, as it is a very efficient and precise plastic forming technique. We would then have to more carefully consider our selection of a thermoplastic, as there are many more options when injection molding. At this point, however, our optimal solution would be to find a 3-D printer or stereo lithograph available to us on campus that prints in a more suitable plastic. Considering that we may still modify our design and will go through many iterations of thermal testing, we are not ready for a mass production
References
[1] A.E. Campo. The Complete Part Design Handbook. Hanser Gardner Publications, Inc., Cincinnati, OH., 2006.
[2] J.P. Beaumont, R. Nagel, and R. Sherman. Successful Injection Molding: Process, Design,
and Simulation. Hanser Gardner Publications, Inc., Cincinnati, OH., 2002.
[3] 3-D Systems. "InVision HR 3-D Printer." June 23, 2006. http://www.3dsystems.com/ products/datafiles/invisionHR/DS-InVisionHR_3-D printer.pdf (May 19, 2007).
[4] Z Corp. "Spectrum Z510 System: Next-Generation High-Definition Color 3-D Printing System". http://www.zcorp.com/products/printersdetail.asp?ID=2 (May 19, 2007)


![Table 1: Comparison of commercially available thermoplastics [1]](https://thumb-eu.123doks.com/thumbv2/123doknet/14683631.559738/12.918.120.814.165.483/table-comparison-commercially-available-thermoplastics.webp)