3D ARCHITECTURE FORM SYNTHESIZER
by
Yufei Wang
Bachelor of Architecture, Tsinghua University, July 1996
Bachelor of Science in Computer Science, Tsinghua University, July 1996
Submitted to the Department of Architecture in partial fulfillment of the requirements of the degree of
Master of Science in Architecture Studies at the
Massachusetts Institute of Technology June 1998
@ 1998 Yufei Wang All rights reserved
The author hereby grants to MIT permission to reproduce and to distribute publicly paper and electronic copies of this thesis document in whole or in part.
Signature of Author
Yufei Wang, Department of Arc * ure May 8, 1998
Certified by
Terry Knight Associate Professor of Architecture
Thesis Supervisor
Roy Strickland Chairman, Department Committee on Graduate Students Accepted by
JUN 7104-8
, s,V , ,
Thesis Reader: Title:
Thesis Reader: Title:
William Mitchell
Professor of Architecture and Media Arts and Sciences
George Stiny
3D ARCHITECTURE FORM SYNTHESIZER
by Yufei Wang
Submitted to the Department of Architecture on May 8, 1998 in partial fulfillment of the requirements of the degree of
Master of Science in Architecture Studies
Abstract
The synthesis of forms is an interesting problem which has faced designers for years. So far, the only solution to this problem is to use the imagination of designers. Even though computers have been used in representing designs, they play only a very passive role in the process of design. Computers are regarded as non-creative and lacking imagination. However, with the theory of Shape Grammar, a rule system that can be used to generate a large number of varied and complex designs using only a small number of simple rules, computers can now have imagination. The problem is addressed here mainly in the domain of architecture. By formulating Shape Grammar in the framework of Iterated Function System (IFS) theory, various architectural massing designs, most of which could not be imagined by even the best architects, can be created
by applying grammars to simple geometric forms recursively. The software package
developed here uses Java, Open Inventor and cutting-edge 3D graphics technology. Architects will be able to work in a virtual 3D environment, generating designs with the aid of a creative computer.
Thesis Advisor: Terry Knight
Acknowledgments:
I would first like to thank my advisor, Terry Knight for her guidance and valuable
suggestions throughout this project. I would like to thank my readers, Professor William Mitchell and Professor George Stiny for their deep insight and theoretical foundation for the project. I would like to thank Coach Wei for providing me with the IFS theory. I would also like to thank my husband, Pengfei Xie, for his patience and support while I am working on my thesis. I would especially like to thank my parents, my brother, Dr. Shubo Xu and Bruce Dexter for their generous support of my study at MIT.
Table of Contents
A b stract... . .. 3
Acknowledgments... 4
T able of C ontents... 5
1. Introduction...6
1.1. Shape and Shape Grammar... 6
1.2. Shape Grammar Interpreters... 6
1.3. Defining Shape Grammars... ... 7
1.3.1 A Vocabulary of Shapes... 7
1.3.2 Spatial R elations... 8
1.3.3 Shape R ules... 8
1.3.4 Labels and Design Space... 9
1.4. C olor G ram m ar... 10
1.5. Objectives of Present Research... 10
2. The Choice of Languages... 11
2.1. Object-Oriented Design... 11
2.2. Java and Java AWT ... 12
2.2.1 Java vs. C ++ ... 12
2.2.2 Java A W T ... 13
2.3. OpenInventor and Utility Programs... 14
2.3.1 OpenInventor... 14
2.3.2 U tility Program s... 14
3. Software Design...16
3.1. The Design of Blocks...16
3.2. The Design of Spatial Relation and Rules... 17
3.3. The Realization of Iterations... 20
3.4. The Design of Labels... 21
3.5. Surface Style and Color Grammar... 25
4. The User Interface Design... 27
4.1. How to Start the Program... 27
4.2. Introduction of the Interface... 28
4.3. The Running of the Program... 33
4.4. Restrictions of the Settings and Limitations of the Program... 36
4.5. Sam ple R esults... 37
5. Conclusions...40 Appendix A: Box1.java...42 Appendix B: Shaper.java...46 Appendix C: iv-generator.java... 54 Appendix D: new.iv... 64 B ibliography ... 70
Chapter 1 Introduction
1.1 Shape and Shape Grammar
What is shape? In the dictionary (The American Heritage Dictionary, 1994), shape is defined as the characteristic surface configuration of an object. It is a definite, distinctive form. Architects use shapes as their basic design elements, put specific
meanings and relations between the elements and generate designs. Shapes to an
architect are just like words to a writer.
The shape language has been used by architects and other kinds of designers for years. However, most of the rules for creating beautiful forms taught in design studios are based on years of experience. In 1972, Stiny and Gips first presented the idea of shape grammars. Three years later, Stiny formally gave the definitions and algorithms for a shape grammar system (Stiny, 1975). A shape grammar is a rule based system, in which a large number of varied and complex designs can be generated or computed with only a small number of simple rules. Since their advent, shape grammars have been used widely and successfully in analyzing and understanding designs in virtually every area of visual and spatial design. Recently, shape grammars have begun to be used to create new and original designs. This approach was first outlined by Stiny in his 1980 paper "Kindergarten grammars: designing with Froebel's building gifts", and was later reworked, expanded, and applied extensively by Knight (1994) in a number of architectural and other design projects.
1.2 Shape Grammar Interpreters
Computer implementations of shape grammars began in the early 1980s. Some shape grammar interpreters focused on implementing any shape grammar in two-dimensional space (Krishnamurti, 1980, 1981, 1982; Krishnamurti and Giraud, 1986;
Chase, 1989; Tapia, 1996), or three-dimensional space (Earl, 1986; Krishnamurti and
Earl, 1992). Other work focused on restricted types of shape grammars - set grammars
(Stiny, 1982). A set grammar is different from a shape grammar in that each design decomposes into a unique set of shapes, instead of unlimited sets of shapes. Work in set grammars includes a Queen Anne style house grammar (Flemming, 1987; Heisserman and Woodbury, 1994), boundary solid grammars (Heisserman, 1991; Heisserman and Woodbury, 1994), structure grammars (Carlson, Woodbury, and McKelvey, 1991; Carlson, 1993), and most recently, an ACIS Scheme shape grammar interpreter (Piazzalunga and Fitzhorn, 1998). However, because of their complicated and imperfect interfaces, most of these interpreters are just theoretical models and could not be put into general use by designers.
1.3 Defining Shape Grammars
A shape grammar defines a language of designs. The shape grammars implemented in this program are a restricted type of shape grammars called basic grammars (Knight, 1997). This type of shape grammar is defined by:
(1) a vocabulary of shapes.
(2) spatial relations between shapes in the vocabularies.
(3) shape rules in terms of the spatial relations.
(4) rule labelings.
1.3.1 A Vocabulary of Shapes
The vocabulary of shapes provides the basic building elements for a design. Figure 1.3.1.1 shows the vocabulary of shapes for the Froebel building gifts. They are the oblong, pillar, square, cube, half-cube, and quarter-cube. An oblong is a block with its width, length, and height not equal to each other. A pillar or a square is a block with either its width equal to its length, or its length equal to its height, or its height equal to its width. A cube is a block with its width, length, and height equal to one other.
square (16) cube (48) half-cube (4) quarter-cube (4)
Figure 1.3.1.1 The vocabulary of shapes for the Froebel building gifts
(Stiny, 1980, pp 434)
1.3.2 Spatial Relations
A spatial relation is a spatial arrangement of any two shapes in the vocabulary. It
specifies the spatial transformation of shapes. Figure 1.3.2.1 shows a spatial relation between an oblong and a pillar. There are infinitely many other possible spatial relations between oblongs, pillars, and squares.
Figure 1.3.2.1 A spatial relation between an oblong and a pillar
(Stiny, 1980, pp 420)
1.3.3 Shape Rules
Shape rules are defined in terms of the spatial relations. For any given spatial relation between shape A and shape B, two additive rules can be derived:
rule 1: rule 2:
If the shape A
applied recursively to both rules are applied
A ->A + B
B ->A + B
and B are geometrically similar, then only one rule (either rule) is generate designs. If A and B are not geometrically similar, then alternately to generate designs.
pillar (16) oblong (8)
1.3.4 Labels and Design Space
In order to eliminate the ambiguity of shape rule applications, labels are associated with shapes. As shown in Figure 1.3.4.1, when a pillar is added to an oblong, it has eight different positions which will formulate the same spatial relation. That is to say, we can formulate eight different rules.
(b)
2
4 70
(
Figure 1.3.4.1 Add a pillar to an oblong
(Stiny, 1980, pp 433)
The number of rules we can derive from a spatial relation is determined by the order of symmetry of the shapes in the spatial relation. The order of symmetry of a shape is the maximum number of transformations that can apply to the shape leaving the appearance and position of the shape the same. The transformations include identity, reflection, rotation, and their combinations.
As shown in Figure 1.3.1.1, the order of symmetry of an oblong is eight. The order of symmetry of a pillar or a square is sixteen. And the order of symmetry of a cube is forty-eight.
The size of design space, which is the number of different designs that can be derived from applying the rules, can now be determined. For an oblong (order 8) and a pillar (order 16) in a non-symmetric spatial relation (shown in Figure 1.3.2.1), the design
space is 8*16 = 128. That is to say, 128 different designs can be derived from the spatial
relation. For non-symmetric spatial relations between cubes, the design space is even
larger, as large as 48*48 = 2304 different designs. For a more complete discussion of
the grammars described here, and the design spaces they define, see Knight (1994,
1997).
1.4 Color Grammar
Color grammars are an extension of the shape grammar formalism. With a color grammar, designs may be created and described in multidimensional ways: in terms of different spatial entities such as lines, planes, or volumes, and different properties such as color, texture, material, and function. A complete explanation of color grammar is presented in Knight (1989, 1994).
1.5 Objectives of Present Research
The purpose of the present research in shape grammars is to develop a three-dimensional shape generation system which can be used by designers, one which can play an active role in the process of design.
Instead of creating a complete shape grammar interpreter, the current work is focused on basic grammars, a type of set grammar, in three-dimensional space, since the full power of shape grammars (emergence) is not always needed in many design
Chapter 2 The Choice of Languages
In this program, I have chosen Java and Open Inventor as the programming languages. The interface is generated using Java. The Java program is to generate a number of Open Inventor files, which can be seen using Open Inventor viewers such as SceneViewer or ivview. Here I would like to briefly introduce the characteristics of these two languages, so we can see why they are good for solving this kind of problem.
2.1 Object-Oriented Design
Java and Open Inventor are object-oriented languages. Object-oriented design is a technique that attends first and foremost to objects or data in the design of a system. Unlike the traditional structured design, which emphasizes operations or functions, object-oriented design emphasizes objects and classes (Johnsonbaugh and Kalin, 1995,
pp 2-4), and thus has many advantages for dealing with sophisticated projects.
The concept of a class is somewhat like what we call type in architecture. It captures the common characteristics of a group of objects, and abstracts them in one class. An object is an instance of a class. This is neat because everything now becomes an independent component. Modifying a function inside a class will not have any ripple effect to other classes. When programming, we can begin with the very simple design of the classes, since no one actually knows all that is needed at the very beginning. As time
goes on, the classes can be constantly modified, until finally they are full-fledged.
In this program, I have created several classes, like Point and Box. Because they are created as classes, any data or methods encapsulated inside one class will not trouble the rest of the classes. For example, in class Box, I can constantly add methods,
whenever I find out a new characteristic of the Box, making it more and more complete (See Appendix A: Boxl.java).
2.2 Java and Java AWT
2.2.1 Java vs. C++
Java is fully object oriented. Everything in Java, except for a few basic types like numbers, is an object (Cornell and Horstmann, 1996, pp.4). C++ is also an object-oriented language. Why have I chosen Java as the main programming language instead of C++? This is because Java has many advantages over C++ for solving this kind of problem.
First, from the language itself, it is far easier to get bug-free code using Java than using C++. Java eliminates manual memory allocation and deallocation. Memory in Java is automatically garbage collected, so we never have to worry about memory leaks. Java eliminates multiple inheritance, replacing it with a new notion of interface. Also, Java introduces true arrays and eliminates pointer arithmetic, so we never have to worry about off-by-one errors when working with a pointer (Cornell and Horstmann, 1996,
pp.4). In addition, Java itself has a String class, which greatly facilitates the use of
strings.
Second, Java is portable on any platform. C++ is dependent upon platforms. We do not need to recompile Java because of different platforms like PC, Sun, or SGI. Also, Java can run through the Internet as an Applet, providing a bright future for wider use of the program. Even now the result of the program can only be seen on a SGI. It is possible in the future that the program could be run through the Internet, and many more people can share and enjoy playing with it.
Third, from the point of view of speed, Java is an interpreted language, and C++ is a compiled language. So generally speaking, C++ runs faster than Java. However, since this program is not a huge project, speed does not make much difference with these two languages.
2.2.2 Java AWT
AWT stands for Abstract Window Toolkit. It is extremely useful when designing
a user interface. AWT is composed of a package of classes named
java.awt,
and itsupports everything from creating buttons, menus, and dialog boxes, to complete GUI applications. The AWT classes are platform independent and are primarily used to build
graphical user interfaces (Geary and McClellan, 1997, pp.3).
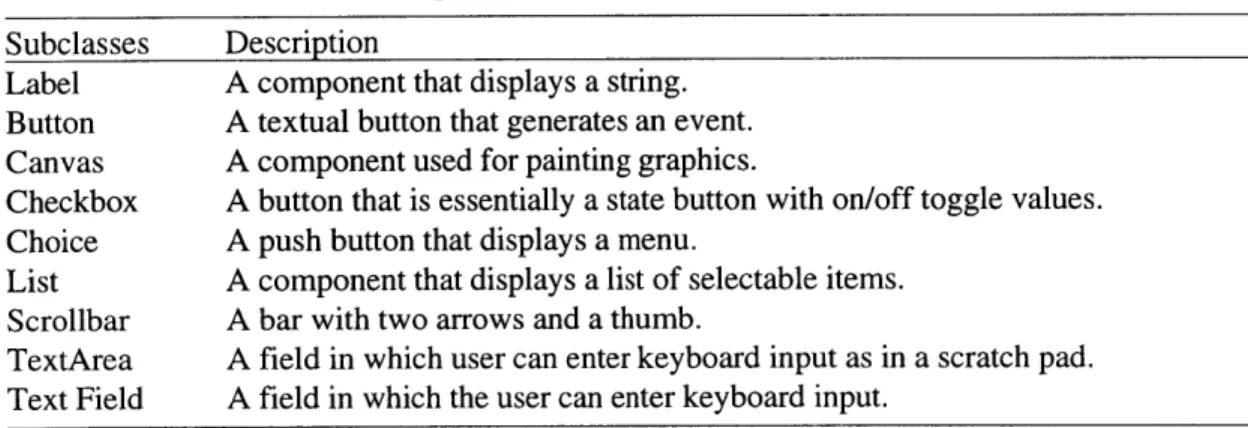
Components are the foundation of AWT. In Java parlance, user interface
controls, such as panels, scrollbars, labels, text fields, buttons, and so on are generically referred to as components because they all extend the java.awt. Component class. Table 2-1 lists the Java components derived from the Component class (Geary and McClellan,
1997, pp.7). Subclasses Label Button Canvas Checkbox Choice List Scrollbar TextArea Text Field
Table 2-1 Component Subclasses
Description
A component that displays a string. A textual button that generates an event. A component used for painting graphics.
A button that is essentially a state button with on/off toggle values. A push button that displays a menu.
A component that displays a list of selectable items. A bar with two arrows and a thumb.
A field in which user can enter keyboard input as in a scratch pad. A field in which the user can enter keyboard input.
In this Shaper.java). Design.
program, the user interface is designed with AWT (See Appendix B: For detailed information, please refer to Chapter 4, The User Interface
2.3 Open Inventor and Utility Programs 2.3.1 Open Inventor
Open Inventor is a collection of software developed by Silicon Graphics to support easier use of the high-quality, high-performance 3D graphics (OpenGL) on their workstations (SGI) that otherwise would require substantial programming experience. The Open Inventor file format is ".iv" ( See Appendix D: new.iv).
The purpose of an Open Inventor file or program is to describe what is referred to as a scene graph. A scene graph is a diagram that has a number of lines connecting a number of points. The points are the objects and transformations (called nodes in Open Inventor), like a cube, a cone, or transformations. The lines are an indication of the relationship between the points. For example, collections of simple objects can be grouped together to form a more complex object, in which case the node for the complex object would be referred to as the parent node and the simple objects would be referred to as child nodes (Wernecke, 1994). Once we have a scene graph, we can use a type of program that is referred to as a viewer to render the scene so that we can see
what it looks like.
2.3.2 Utility Programs
The utility programs are the viewers of Open Inventor files. There are several programs we can use, like SceneViewer, ivview, insight, and gview. Here I would like to briefly introduce the use of SceneViewer, since it is needed for viewing our designs. The program will only run on an athena SGI work station. To start the program, type:
athena% SceneViewer &
This will bring up an empty scene, or we can type:
A new window appears with a 3D chair appears in the scene. To the right of the
window is a line of icons. Below is a wheel. If the wheel is rotated, the scene is zoomed in/out. There are two other wheels at the bottom of the window. They function to rotate the scene. The functions of these three wheels can also be achieved by clicking the mouse buttons. If the left mouse button is clicked, the scene is rotated according to the movement. If the left and middle mouse button are clicked together and moved, the scene is zoomed in/out. If the middle mouse button is clicked, the little hand on the screen is changed to another direction with a square on the top, and now it functions to pan (move the scene). In addition, if the right mouse button is clicked, a pop-up menu will appear, letting us select the drawing style of the objects. We can choose to view our designs in wireframe, hidden line, or rendered objects.
Above is the introduction of the language tools and utility programs I am using in developing this program. In the next chapter, I will talk about the internal issues of the program: how blocks, labels, spatial relations, and rules are represented using these languages.
Chapter 3 Software Design
The internal issues of the problem concern the representation of the blocks, labels, spatial relations, rules, and designs within the computer. How can these 3D visual
elements be realized on a 2D computer screen? We have the tools - Java and Open
Inventor. They are the languages a computer can understand. With these tools, we can communicate with a computer, defining our own language representing these visual
elements in computers.
3.1 The Design of Blocks
A physical block has width, length, and height. In Open Inventor, there is already
an object Cube which has these properties. However, Java does not have a Cube class.
Also, our block has more properties than just a simple Cube - we need to know whether
it is an oblong, a square, a pillar, or a cube. We are also going to put labels on it. It is best that we define our own Box class.
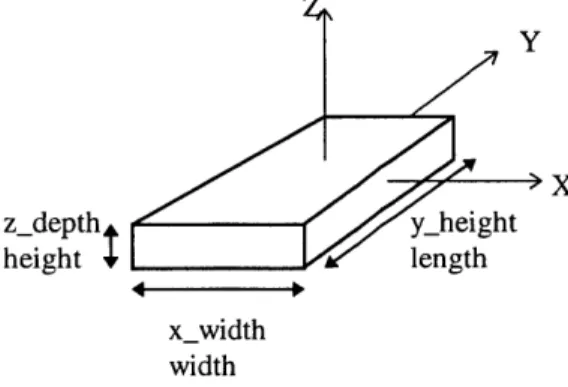
There are many data members in the Box class. xwidth, yjheight, and z-depth represent the width, length, and height of the block respectively (Figure 3.1.1).
Y >X z-depth y-height height + length x width width
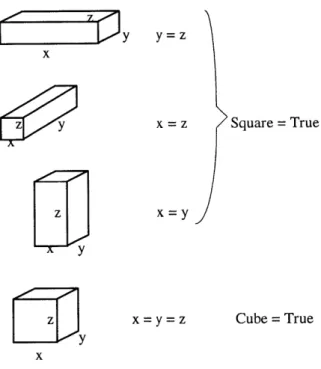
In order to represent different blocks, such as oblongs, squares, or cubes, the program uses two other data members: Square and Cube inside the Box class. If the block is neither a square or a cube, then it must be an oblong (Figure 3.1.2).
y = z x = z Square = True x = y
z
y
z
z- YTy
x
Cube = True x = y = zFigure 3.1.2 Square and Cube of the Box
3.2 The Design of Spatial Relation and Rules
A spatial relation shows the spatial arrangement of geometric forms. When
designers are working with physical blocks in real space, they do not really care where they put the blocks in the real space. They can easily move their bodies and rotate their heads to see the blocks from anywhere. So they can just focus on the relationship
between the blocks. However, the computer space - virtual space - is different. A
computer can only work with numbers. Everything must be changed into numbers, so as to make a computer "understand". In addition, a computer screen is two dimensional and finite. The only way we can see the screen is from its front, which means
three-dimensional information must be transformed into two-three-dimensional representation to show on the screen.
In a computer, three-dimensional real space is represented using a Cartesian
coordinate system, with an origin point and three axes - X, Y, and Z. In this system,
each spatial point has its unique Cartesian coordinate (x, y, z). With the Cartesian coordinate system, all visual elements (lines, faces, volumes) can be transformed into numbers, so that a computer can understand and work with them.
In this program, the two blocks are originally located at the origin point of the Cartesian coordinate system (Figure 3.2.1).
Z, Y Z, Y
X
X
A
Figure 3.2.1 Two blocks
The desired spatial relation is:
... .. B
A
Figure 3.2.2 Spatial relation of the two blocks
In order to produce this spatial relation (Figure 3.2.2), we must transform
-rotate and translate - one of the blocks to a new position in the Cartesian coordinate
system.
Two rules can be derived from this spatial relation. Rule 1 is A -> A+B: Figure 3.2.3 Rule 1 Rule 2 is B -> A+B: B B Figure 3.2.4 Rule 2
In Figure 3.2.3, the center of Block A is at the origin point of the Cartesian coordinate system. We transform Block B, so that the center of Block B is at (mx], my],
mzl). In it:
mx] = (B.y-height -A.xwidth) /2.0; my] = (A.y.height -B.x-width) /2.0;
mz1 = (A.zdepth + B.zjdepth) /2.0;
Also, Block B will rotate around its own center by angleX, angleY, and
angleZ.
In Figure 3.2.4, the center of Block B is at the origin point of the Cartesian coordinate system. We transform Block A, so that the center of Block A is at (mx2,
my2, mz2). We can calculate mx2, my2, mz2 according to mx1, my], mzl, angleX, angle_Y, and angleZ, and get:
mx2 = -r*sin(alfa-angleZ)*cos(angleY)-mzl *sin(angleY); my2 = r*cos(alfa-angleZ)*cos(angleX)-mzl *sin(angleX);
mz2 = mzl *cos(angleY) *cos(angleX) +mzl *sin(angleY) *sin(angleX) +mxl *sin(angleX) *cos(angleY)+myl *sin(angleY) *cos(angleX);
angle2_X = -angleY; angle2_Y = -angleX; angle2_Z = angleZ; In it: alfa = arctan(mxl/myl); r = mx]*mx] + myl * myl;
The calculation of (mx2, my2, mz2) still has some discrepancies, when Block B is rotated around two or three axes at the same time. But this calculation can get perfect results in most cases.
3.3 The Realization of Iterations
The iterations of the rules (Rule 1, Rule 2, Rule 1, Rule 2 repeatedly) is realized using the Iterated Function System (IFS) theory.
If in Rule 1, the transformation is TI, and in Rule 2 the transformation is T2, then
the rules can be written as:
Rule 1: A ->A + T]B
Rule 2: B -> B + T2A
A
A + TIB
A + TJB + T]T2A
A + TJB + T1T2A +TlT2T]B
A + TJB + TJT2A +T]T2T]B + T1T2TJT2A
A + TiB + TT2A +T]T2T]B + T1T2TJT2A + T]T2T1T2T]B
For the code, see Appendix C: iv-generator.java.
3.4 The Design of Labels
Labels represent the symmetry of the block. An oblong has eight labels, a square (pillar) has sixteen labels, and a cube has forty-eight labels. That is to say, when we put a pillar (symmetry 16) on an oblong (symmetry 8), we will have eight different positions on the oblong to put the pillar, while keeping the same spatial relation (Figure 1.3.4.1). And when we put an oblong on a pillar, we will have sixteen different positions on the pillar to put the oblong, while keeping the same spatial relation.
How does the program know where to put the pillar on the oblong?
In the definition of the Box class, I mark the eight corners of the Box as position one to eight. The one position is the upper-right corner of the Box, the two position is the upper-left corner of the Box, the three position is the lower-left corner of the Box, and so on. As shown in Figure 3.4.1, we can see that these eight different labels actually mark the eight different directions we can put the added block.
2(-111) (1,1,1)
... (-1,1,1) .. (1,1,-i)
3 .. ' 4(- ,1 1 .--- , )
7 8 (-1,-1,-1) (1,-1,-1)
However, after moving the second block to the correct position on top of the first one, we must specify where the label on the second block is, so we can continue this process recursively.
The label position on the second block is actually determined by two factors. One is its previous block, and the other is its own label number. Suppose we have two
blocks -block(A) and block(B). We want to add block(B) to block(A), so they form the
spatial relation shown in Figure 3.4.2.
A B Spatial Relation
Figure 3.4.2 Block A and block B
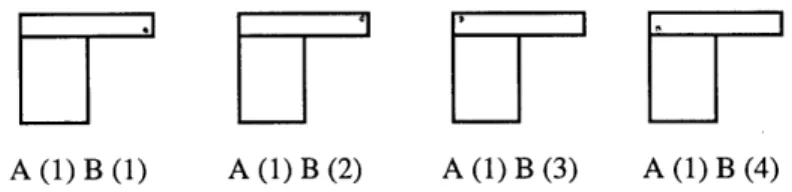
Figure 3.4.3 shows that if block A has label one, and the added block B has a
different labeling - one, two, three, or four, then in the four cases, block B will have
different label positions for its label one, two, three, or four.
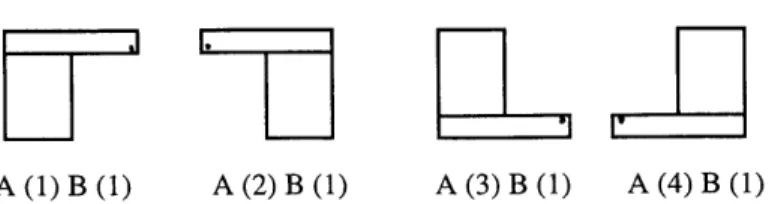
A (1) B (1) A (1) B (2) A (1) B (3) A (1) B (4) Figure 3.4.3 Add block B (labels 1-4) to block A (label 1)
Figure 3.4.4 shows that if the added block -block B, has the same labeling - label
one, but the previous block A has a different labeling -one, two, three, or four, then the
A (1) B (1) A (2) B (1) A (3) B (1) A (4) B (1) Figure 3.4.4 Add block B (labels 1) to block A (labels 1-4)
So, each time a new block is added, its new label position is determined
according to both the previous block and its own label number. In this program, I
defined two moveLabel ( ) methods inside the Box class for fulfilling this task.
B.moveLabel (A);
B.moveLabel (labelib);
The first moveLabel ( ) function lets block B has the same label as block A, and
the second moveLabel ( ) function moves the label position on block B according to its
current label position (which is block A's label position).
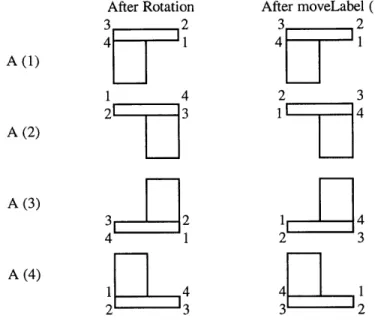
Another concern is that when block B is added to block A, it needs to be rotated first. Should it be rotated clockwise or counter-clockwise? Figure 3.4.5 shows that if the previous block has labels 1, 3, 5, or 7, the second block should be rotated clockwise.
If the previous block has labels 2, 4, 6, or 8, the second block should be rotated
counter-clockwise, so as to keep the same spatial relation.
A (1,5) A (2,6) A (3,7) A (4,8) Figure 3.4.5 Rotation directions of block B
With the rotation and moveLabel () can be derived (Figure 3.4.6).
After Rotation
3 2
1 4
4 1
2 3
function, the right label position for block B
After moveLabel () 3 2 4 -2 3 1 4 2 3 3- 2
Figure 3.4.6 Add block B (label 1) to block A (labels 1-4)
The above shows how the one to eight labels are represented in this program. However, this only solves the problem of an oblong (which has eight labels on it). What if the block is a square or a cube? There should be more labels on it.
Let us first look at the case of the square. When a Box is a square, its length is
equal to its height (y = z), or its width is equals to its height (x = z), or its width is equal
to its length (x = y). When its length is equal to its height (y = z), we can rotate the Box
around the X axis and get the same Box. And this is how the eight labels become sixteen
labels - by just adding a rotation transformation to the Box. Similarly, when its width is
equal to its height (x = z), we can rotate the Box around the Y axis, and get eight more
labels. When its width is equal to its length (x = y), we can rotate the Box around the Z
axis and get eight more labels. One additional concern is that, for the same reason
A (1)
A (2)
A (3)
shown in Figure 3.4.5, when we rotate the box around the X axis, labels 1, 2, 7, 8 should rotate clockwise, and labels 3, 4, 5, 6 should rotate counter-clockwise. When we rotate the box around the Y axis, labels 1, 4, 6, 7 should rotate clockwise, and labels 2, 3, 5, 8 should rotate counter-clockwise. And when we rotate the box around the Z axis, labels
1, 3, 5, 7 should rotate clockwise, and labels 2, 4, 6, 8 should rotate counter-clockwise.
The case of a cube is a bit more complicated, since a cube has forty-eight labels
with eight labels on each face. The program realizes this also by the rotation
transformation. Rotation around the X axis will get the 9 to 16 labels. Rotation around the Y axis will get the 17 to 24 labels. Rotation around the Z axis will get the 25 to 32 labels. Rotation around both the Z and X axes will get the 33 to 40 labels. Rotation around both the Z and Y axes will get the 41 to 48 labels. Thus, labels of any orthogonal shapes can be represented now in computers.
3.5 Surface Style and Color Grammar
Surface style is the color and material of an object. In Open Inventor, the
Material
(]
node defines the surface style of an object. Inside computers, color is represented with RGB (red, blue, green) values. The RGB values for ambientColor,diffuseColor, specularColor, and emissiveColor can be defmed in the Material
[
node.Shininess and transparency of an object can also be defmed in it. Because Open Inventor viewer has a very nice rendering effect, with a good definition of the material,
designs in the virtual space (computer screen) can look almost real.
In this program, I defmed three basic surface styles -Red Color, Blue Color, and
Color Cube. The first two will show the design in solid color on all surfaces. Color Cube shows the six surfaces of the block in six different colors. It is using a file called colorcube.iv. If you know the syntax of Inventor files, you can even design your own
color cube by changing the color of each face. And this provides an expedient way for doing research in color grammars.
Below shows the Material
[}
node of the Red Color block: Material { ambientColor diffuseColor specularColor emissiveColor shininess transparency 0.234043 0.113685 0.089257 0.914894 0.444404 0.348914 0.345745 0.143066 0 0 0 0 0.12766 0Chapter 4 The User Interface Design
The program is called Shaper. It can run on any athena SGI work station. This kind of machine is found throughout MIT. Even though the program itself is written in Java, a language running on any platform, the resulting viewable files (*.iv), can only be seen on a SGI work station with an Inventor viewer such as SceneViewer, ivvew, or gview.
4.1 How to Start the Program
First, we need to get to the directory where the program located. In the class, we have put all the files in a class locker called archfileO3. Here are the instructions:
athena% attach archfile03
athena% cd /mit/archfile03/shape
Now we are ready to run the program. Before that, we may want to have a look at what the program includes. By using the ls command on athena, we can see a list of files already there. There are some *.class files, which are the runnable compiled Java files. There are also some *.iv files, which are the default Inventor files useful to the proper running of the program. To run the program, type:
athena% add java athena% java Shaper &
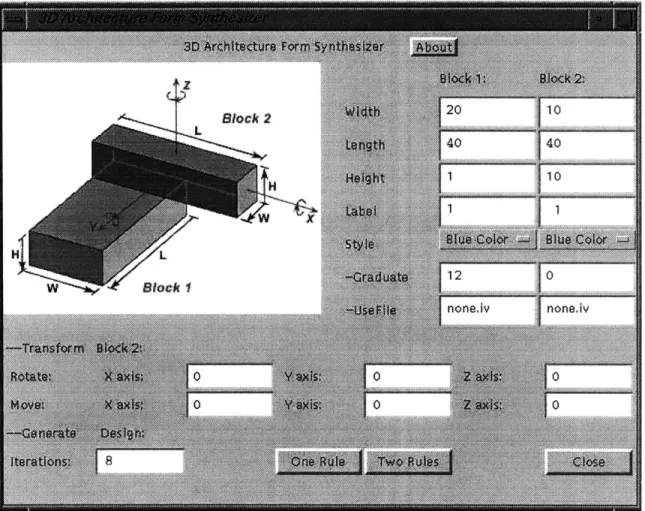
Figure 4.1.1 The Interface of the program
4.2 Introduction of the Interface
The layout of the window is composed of five parts: the title bar, the picture, the definition of blocks, the transformation of Block 2, and the generation of a design.
On the top is the title - 3D Architecture Form Synthesizer. We can easily get a
sense of what the program does by reading its title. To the right of the title, there is an
About button. By clicking on it, a dialogue box will pop up, a brief introduction to the
In the main window is a picture illustrating the use of the program (Figure 4.2.1).
A blue block (Block 2) is attached to the top face of a red block (Block 1), with two side
faces aligned. This shows the default spatial relation of an oblong (20*40*10) and a pillar (10*40*10) pre-defined in the program.
Bl1ock 2
HL
W Block 1
Figure 4.2.1 Default spatial relation of the two blocks
To the right of the picture is the definition of the two blocks (Figure 4.2.2). They are the Width, Length, Height, Label, and Style parameters. In Style, there are also
Graduate and UseFile parameters. Width, Length, and Height define the geometric
dimensions of the two blocks, as shown in Figure 4.2.1 with W, L, and H. The arrow directions indicate the directions in which width, length, or height may be increased. Because the two blocks keep their default spatial relation, increasing the height of Block 2 will make it grow upwards, instead of downwards, and intersect with Block 1. For the same reason, increasing the length of Block 2 will make it grow longer to the right, while keeping its left face aligned with Block 1. Block 1 follows the same rules. Increasing its height will make it growing downwards, and increasing its length will make it grow longer, while keeping its back face aligned with the back face of Block 2.
Notice that the default spatial relation follows Stiny's criteria for defining a spatial relation in his paper "Kindergarten grammars: designing with Froebel's building gifts" (Stiny, 1980, pp 420-424). Changes in values for the Width, Length, and Height parameters produce all of the spatial relations enumerated in the paper, except for those between half-cubes and quarter-cubes.
20 1
40 40
1 10
nonehi none.iv
Figure 4.2.2 The definition of blocks
Following Width, Length, and Height is the Label parameter. The picture does not show where the label is, since it is showing the spatial relation, not the rules. However, the labels can be seen later when the SceneViewer is invoked to actually look at the rules. The default label position is 1 on both blocks, which is the upper right corner of the block. And since Block 2 is rotated 90 degrees, it looks like Label 1 position is on its lower right corner. We will have a better idea of how each label is located when we see it later with the rules.
Below Label is the Style parameter. Style defines the surface property of each block. What will it look like? What color? There is a pop-up menu for each block. The default is Red Color. By clicking on it, we can see that there are four choices for each
block, which are Red Color, Blue Color, Color Cube, and File. Two sub-choices are
below - Graduate and UseFile. By combining the pop-up menu with the sub-choices,
we can get many interesting surface styles for the blocks.
The Graduate parameter is coupled with the Red Color and Blue Color in Style.
Graduated colors are useful because they show the order in which blocks are added in the generation of designs. This feature is especially helpful in understanding complex designs. Default for Graduate is 0, which means no graduation, so all the blocks in a resulting design will be the same red or blue color. If we choose Red Color and a
Graduate number greater than 0 for Block 1, the blocks (only Block 1) will be from the
reddest, on the first block added to the design, to less and less red until the last block added becomes white. If we choose Blue Color and a Graduate number greater than 0 for Block 2, the blocks (only Block 2) will be from the bluest, on the first block added to the design, to less and less blue until the last block added becomes totally white.
Graduate can be any positive integer number. The bigger the number is, the slower the
graduation is. When the iteration is 8, Graduate 10 gives a good range of color
graduation.
The UseFile parameter is coupled with the File parameter in the pop-up menu of Style. Typically, blocks are represented using cubes. UseFile means use an Inventor
file, instead of a simple cube in the representation of the block. It can be any .iv file. Since there are many tools for generating complicated .iv files, we can basically define any irregular shape with the file. With UseFile, the simple cube can be replaced by any shape in the .iv file to generate complicated designs. Default for UseFile is none. iv. It is an empty Inventor scene. However, this adds a very interesting and nice feature to the program. We can actually make one block disappear and just see the other one. It shows clearly how one block is formatted by the rules.
The Color Cube is a special case of using files. If we choose it, the program will
six different colors on each face. This feature is especially useful when doing research on color grammars. It also shows clearly how the blocks are transformed in the design.
Above is the definition of dimensions and surface styles of the two blocks. Now we are going to show how to modify the spatial relation of the two blocks. This is done
by transforming Block 2 (Figure 4.2.3).
00
0 0
Figure 4.2.3 Transform Block 2
The default spatial relation is shown in the picture (Figure 4.2.1). Varying the dimensions of the blocks in this spatial relation can produce a great diversity of designs; however, the design possibilities are still very limited. Blocks must align on two side faces, and touch on bottom and top faces. What if we want them to intersect? What if we want them to be at non-orthogonal angles? By transforming Block 2, we can get any
spatial relation between the two blocks.
Under the picture are the Transform Block 2 settings (Figure 4.2.3). The
transformation of Block 2 is relative to the default Block 2 position shown in the picture.
The defaults are all zero. There are two kinds of transformations - Rotate and Move.
The rotation and moving axes - X, Y, and Z, are shown in the picture. The direction of
the arrow shows the positive direction of the movement and rotation. If we want to rotate or move to the opposite direction, just make the number negative. The rotation number is in degrees. One circle is 360. We can rotate around any axes; however, if we rotate around all three axes at the same time, there may be some minor discrepancies in the final results.
After getting the desired blocks and spatial relation, labels and rules (which we will see later in detail), we are ready to generate a design. The Generate Design part is just below the Transform Block 2 (Figure 4.2.4). It contains the Iterations parameter,
One Rule button, and Two Rules button. Also, there is the Close button which will let us
quit from the program. The default number of Iterations is 8. It means that the program will apply the rules eight times. If it is two rules alternatively, it will apply Rule 1 four times and Rule 2 four times. So the final design will contain four of Block 1 and four of Block 2. We can increase or decrease the number of Iterations. However, the larger the number is, the longer it takes the program to run. For quick results, the number should be less than 20. Iterations in the 30s and 40s will also work fine. However, if the number is more than 50, the SGI machine may sometimes crash suddenly.
Figure 4.2.4 Generate Design
One Rule button is different from Two Rules button, in that it will only run one
rule, instead of two rules alternately. The spatial relation here is between two block 1s. The default rule is to rotate one block 1 90 degree around Y axis, use this as the added block to put on top of the other block 1. If the iteration is 8, the final design will contain eight block Is. Another feature of the One Rule button is that it can run two different labelings alternately (which make it two rules).
4.3 The Running of the Program
Now we can just click the Two Rules button, and the program will automatically run and generate two files according to our settings. One is called rule. iv, and the other
Iterations. Normally, after clicking the button, if we see the black frame around the
button disappear, it means that the program has finished running.
In order to view the rules and designs, which are the files rule. iv and new. iv, we need to invoke the Inventor viewer program we have introduced in Chapter Two (See
2.3.2).
athena% SceneViewer rule.iv & athena% SceneViewer new.iv &
Figure 4.3.1 rule. iv in SceneViewer
The rule.iv file (Figure 4.3.1) shows the rules that have been used in the design. For the two rules, the first one is to add Block 2 to Block 1, and the second is to add Block 1 to Block 2. Labels are shown on the added blocks with red letters. On an
sixteen labels (1 - 16). On a cube, there will be forty-eight labels (1 - 48). The current label position is shown with a red dot and its label number beside it. The label position
on the block indicates where the added block will be put according to this one.
Figure 4.3.2 new.iv in SceneViewer
The new.iv file (Figure 4.3.2) shows the design generated by the rules. The program will always begin with Block 1 with its initial label on the upper right corner. There we will put Block 2. If the label on Block 2 is two, the next Block 1 will be put at Block 2's label two position. This new Block 1 (no longer the initial Block 1) will have its defined label, for example label three. The next added Block 2 will be put on the label three position of this Block 1. Also, the new Block 2 has its label two. The program will continue this process recursively, until it reaches the desired iteration times.
Each time Two Rules or One Rule button is clicked, the old new. iv will be overwritten by a new one. To save the result, use the athena command:
athena% mv new. iv /yourjdirectory/filename. iv
We can specify any name we want for the file, as long as they are easy to remember. And if later on, we would like to check how this design is defined, we can use emacs to view the .iv file in text format.
athena% emacsfilename.iv &
At the top of the file is the description we have set for this design. The Block 1 and Block 2 definitions, rotation angles, and moving distances (See Appendix D: new.iv).
In SceneViewer, we can also go to the menu bar, click File! Save as, input the
file name and directory ( be sure it is *.iv) to save the file in a new name. However,
since SceneViewer will rewrite the file, all the information about the blocks in the original file will be lost.
4.4 Restrictions of the Settings and Limitations of the Program
First, the program requires all the input numbers to be integers.
One may ask then what to do to move the block one and a half inches? The answer is to increase all the numbers. For example, if initially the blocks are defined 2*4*1 and 1*4*1, and we would like to move Block 2 by 0.1, then increase all the dimensions to 20*40* 10 and 10*40*10, and move Block 2 by 1.
Second, oblongs should have labels 1 to 8, squares and pillars should have labels
1 to 16, and cubes should have labels 1 to 48. Any numbers out of these ranges will
Third, when Block 2 are rotated around two or three axes at the same time, some
discrepancies might happen in the final design. The spatial relation is not exactly
identical in the two rules and in the design generated. A bit of offset might occur between the two blocks.
Fourth, the Iterations parameter should be set to less than 50; otherwise, the machine may crash.
a) Two Rules Block 1 Block 2 Width 40 5 Length 40 40 Height 5 5 Transform Block 2: Rotate: X: 0 Y: 45 Z: 0 Move: X: 0 Y: 0 Z: 0 Figur a) Labels: 1, 12 b) Lab d) Lab c) Labels: 2, 13
Figure 4.5.2 Two-rule designs
e 4.5.1 Two rules
els: 15, 12
b) One Rule
Block 1
Width 20
Length 40
Height 3
Transform Block 2: Figur
Rotate: X: 0 Y: 0 Z: 0
Move: X: 0 Y: 0 Z: 0
a) Labels: 1, 1 b) Lab
c) Labels: 1, 5 d) Lal
Figure 4.5.4 One-rule designs
e 4.5.3 One rule
els: 1, 4
Chapter
5
Conclusions
Ever since the advent of shape grammars, all kinds of disputes have arisen concerning them. People don't believe that computation can do creative work as a human designer does, or that beauty can come from a non-human mind. But if we look
about in the world, many beautiful forms come out of the nature. Often, human
designers learn from nature, find the rules of beauty, follow the rules, and create beautiful and harmonious artifacts.
In my understanding, shape grammars dig into the essence of the form language, find the rules, follow the rules, and create beauty. Shape grammars do not mean to replace the creative mind of human designers, but to combine, abstract and extend the
knowledge designers have.
My work here is focused on the computer implementation of shape grammars. A
computer is a fast and never-tired computational machine, and shape grammars require intensive computational jobs to be done in a very short time. This is just what a computer is good at.
So far, I have focused on a three-dimensional basic grammar implementation. More work is needed to allow for more than one spatial relation and two rules, and for varying sequences of rule applications.
Another important aspect of the program I would like to mention here is its potential to run through the Internet. The main language used in the program is Java,
and the other one - Open Inventor, has a very similar counterpart Internet language
-VRML. It is possible for the program to be put on the web, get wider attention and be enjoyed by a larger community of people.
Now, the program has been put into use here in the Department of Architecture at MIT. Even with its limited power of creating designs, people find it a great tool, and have a lot of fun playing with it.
Toward the goal of pursuing the relationships between computation, beauty and creativity, the program is a small step forward, but it is an important step. I am sure that the full power of shape grammars will be unleashed in the near future.
Appendix A: Box1.java
* 3D Architecture Form Generator -this file defines basic geometric object: Box
* Wang, Yufei [email protected]
*/
public class Boxi
{
public double xwidth=1.0; public double y-height=1.0; public double z-depth=1.0; public double halfWidth; public double halfHeight; public double halfDepth; public boolean Rx=false; public boolean Ry=false; public boolean Rz=false; public boolean Square=false; public boolean Cube=false;
public int label;
public Point center=new Point(0.0, 0.0, 0.0); public Point[] p= new Point[8];
public Box1 (double x, double y, double z,Point cen)
{ x_width=x; y-height=y; z_depth=z; center=cen; label = 1; halfWidth=x/2; halfHeight=y/2; halfDepth=z/2; if (z-depth==yheight) Rx=true; if (x-width==z depth) Ry=true; if (x-width==yheight) Rz=true; if(Rx &&Ry &&Rz) Cube = true; else if(Rx IIRy lIRz) Square = true;
p[]=new Point(cen.x-halfWidth, cen.y-halfHeight, cen.z+halfDepth); p[l]=new Point(cen.x+halfWidth, cen.y-halfHeight, cen.z+halfDepth); p[2]=new Point(cen.x+halfWidth, cen.y+halfHeight, cen.z+halfDepth); p[3]=new Point(cen.x-halfWidth, cen.y+halfHeight, cen.z+halfDepth);
p[4]=new Point(cen.x-halfWidth, cen.y-halfHeight, cen.z-halfDepth); p[5]=new Point(cen.x+halfWidth, cen.y-halfHeight, cen.z-halfDepth); p[6]=new Point(cen.x+halfWidth, cen.y+halfHeight, cen.z-halfDepth); p[7]=new Point(cen.x-halfWidth, cen.y+halfHeight, cen.z-halfDepth);
}
public void setLabel(int la){ label=la;
return;
I
public Point getLabel ( {
if (label==1) return (new Point (1., 1., 1.)); if (label==2) return (new Point (-1., 1., 1.)); if (label==3) return (new Point (-1., -1., 1.)); if (label==4) return (new Point (1., -1., 1.)); if (label==5) return (new Point (1., 1., -1.));
if (label==6) return (new Point (-1., 1., -1.)); if (label==7) return (new Point (-1., -1., -1.)); if (label==8) return (new Point (1., -1., -1.)); return (new Point(0,0,0));
}
public void moveLabel (Box 1 a) { label= a.label;
}
public void moveLabel(int im) { switch (1m) {
case 1: break; case 2:
{ if (label==1) label=2; else if (label==2) label=1; else if (label==3) label=4; else if (label==4) label=3; else if (label==5) label=6; else if (label==6) label=5; else if (label==7) label=8; else if (label==8) label=7;
break;
}
case 3:
{ if (label==1) label=3; else if (label==2) label=4;
else if (label==3) label=l; else if (label==4) label=2; else if (label==5) label=7; else if (label==6) label=8;
else if (label==7) label=5; else if (label==8) label=6;
break; case 4:
{ if (label==1) label=4; else if (label==2) label=3; else if (label==3) label=2; else if (label==4) label=1; else if (label==5) label=8; else if (label==6) label=7; else if (label==7) label=6; else if (label==8) label=5;
break;
}
case 5:
{ if (label==1) label=5; else if (label==2) label=6; else if (label==3) label=7; else if (label==4) label=8; else if (label==5) label=1; else if (label==6) label=2; else if (label==7) label=3; else if (label==8) label=4; break;
I
case 6:
{ if (label==1) label=6; else if (label==2) label=5; else if (label==3) label=8; else if (label==4) label=7; else if (label==5) label=2; else if (label==6) label=1; else if (label==7) label=4; else if (label==8) label=3;
break;
I
case 7:
{ if (label==1) label=7; else if (label==2) label=8; else if (label==3) label=5; else if (label==4) label=6; else if (label==5) label=3; else if (label==6) label=4; else if (label==7) label=1; else if (label==8) label=2;
break;
I
{ if (label==1) label=8; else if (label==2) label=7; else if (label==3) label=6; else if (label==4) label=5; else if (label==5) label=4; else if (label==6) label=3; else if (label==7) label=2; else if (label==8) label=1; break; I default: break; } } }
Appendix B: Shaper.java
* 3D Architecture Form Generator -Interface
* Wang, Yufei [email protected]
*/
import java.awt.*; import java.awt.image.*; import java.util.*; import java.io.*;
public class Shaper extends Frame
{
public Shaper()
{
mBackgroundImage = Toolkit.getDefaultToolkito.getImage("picture.jpg"); canvas = new myCanvas(mBackgroundlmage);
setTitle("3D Architecture Form Synthesizer"); setLayout(new BorderLayouto);
Panel p2 = new Panel();
p2.add(new Label("3D Architecture Form Synthesizer "));
p2.add(new Button("About")); add("North", p2);
add("Center", canvas); Panel p = new Panel(); Panel pl = new Panel();
p.setLayout(new GridLayout(8,3)); pl.setLayout(new GridLayout(6,6)); style1=new Choiceo;
style 1.addItem("Red Color"); style 1.addItem("Blue Color"); style 1.addltem("Color Cube"); style 1.addItem("File"); style2=new Choiceo; style2.addltem("Red Color"); style2.addItem("Blue Color"); style2.addItem("Color Cube"); style2.addItem("File"); pl.add(new Label("--Transform")); pl.add(new Label("Block 2:")); pl.add(new Label(" "));
pl.add(new Label(" ")); pl.add(new Label(" "));
pl.add(new Label(" "));
pl.add(new Label(" "));
pl.add(new Label(" Rotate:")); pl.add(new Label(" X axis:")); AngleX_Field=new TextField("O",4); pl.add(AngleXField);
pl.add(new Label(" Y axis:")); AngleY_Field=new TextField("O",4); pl.add(AngleYField);
pl.add(new Label(" Z axis:")); AngleZ_Field=new TextField("O",4); p l.add(AngleZField);
pl.add(new Label(" Move:")); pl.add(new Label(" X axis:")); Move_X_Field=new TextField("O",4);
pl.add(Move_X_Field); pl.add(new Label(" Y axis:")); Move_Y_Field=new TextField("O",4); pl.add(MoveYField);
pl.add(new Label(" Z axis:")); Move_Z_Field=new TextField("O",4); p l.add(MoveZField);
pl.add(new Label("--Generate")); pl.add(new Label(" Design:")); pl.add(new Label(" "));
pl.add(new Label(" "));
pl.add(new Label(" "));
pl.add(new Label(" "));
pl.add(new Label(" "));
pl.add(new Label(" Iterations:")); IterationsField=new TextField("8",3); p l.add(IterationsField);
pl.add(new Label(" ")); pl.add(new Button("One Rule")); pl.add(new Button("Two Rules")); pl.add(new Label(" ")); pl.add(new Button("Close")); pl.add(new Label(" ")); pl.add(new Label(" ")); pl.add(new Label(" ")); pl.add(new Label(" ")); pl.add(new Label(" ")); pl.add(new Label(" ")); pl.add(new Label(" ")); p.add(new Label(" "));
p.add(new Label("Block 1: "));
p.add(new Label("Block 2: "));
p.add(new Label(" Width")); Boxlx_Field=new TextField("20",3);
p.add(BoxlxField);
Box2xField=new TextField("10",3); p.add(Box2xField);
p.add(new Label(" Length")); Boxly_Field=new TextField("40",3);
p.add(BoxlyField);
Box2y_Field=new TextField("40",3); p.add(Box2yField);
p.add(new Label(" Height")); BoxlzField=new TextField("10",3); p.add(Boxlz Field);
Box2zField=new TextField("10",3); p.add(Box2z Field);
p.add(new Label(" Label")); labellField=new TextField("1",3); p.add(label 1_Field);
label2_Field=new TextField(" 1",3); p.add(label2_Field);
p.add(new Label(" Style")); p.add(stylel);
p.add(style2);
p.add(new Label(" -Graduate")); GralField=new TextField("O",3); p.add(GralField);
Gra2_Field=new TextField("O",3); p.add(Gra2_Field);
p.add(new Label(" -UseFile"));
FilelField=new TextField("none.iv",8); p.add(FilelField); File2_Field=new TextField("none.iv",8); p.add(File2_Field); add("South", pl); add("East",p);
public boolean handleEvent(Event evt)
{ if (evt.id == Event.WINDOWDESTROY) System.exit(O); return super.handleEvent(evt);
public boolean action(Event evt, Object arg) if (evt.target.equals(style 1))
I
else if (evt.target.equals(style2)) s2=(String)arg;
else if (arg.equals("One Rule")Ilarg.equals("Two Rules"))
{
readLabel();
Box1 al= new Boxl(Boxlx,Boxly,Boxlz,cen); BoxI b1= new Box 1(Box2x,Box2y,Box2z,cen);
if (testLabel(al,labell) && testLabel(b l,label2)) {
if (arg.equals("One Rule")) {
ivrule.theMain(al,bl ,label l,label2,2,AngleZ,AngleY,AngleX,Move_X, MoveY,MoveZ,s 1,s2,fl,f2,"onerule");
iv-generator.theMain(al,bl ,abell,label2,Gral,Gra2,Iterations,AngleZ,Angl e_Y,AngleX,Move_X, Move_YMove_Z,s1,s2,fl,f2,"onerule");
I
else if (arg.equals("Two Rules")) {
ivrule.theMain(al,bl ,label l,label2,2,AngleZ,AngleY,AngleX,Move_X, MoveY,Move_Z,s1,s2,fl,f2,"generate");
iv-generator.theMain(al,b 1,labell,label2,Gral,Gra2,Iterations,AngleZ,Angl e_Y,AngleX,MoveX, MoveY,MoveZ,s 1,s2,fl,f2,"generate");
} }
else {
WrongDialog wr=new WrongDialog(this); wr.showo;
} }
else if (arg.equals("About"))
{ AboutDialog ab=new AboutDialog(this); ab.showo;
I
else if (arg.equals("Close")) System.exit(O);
else return super.action(evt, arg); return true;
}
public boolean testLabel(Boxl a, int 1)
{
if (1<=0) return false; if (a.Cube)
{ if (1>48) return false; else return true;
I
else if (a.Square) { if (1>16) return false; else return true;
else if (1>8) return false; return true;
I
public void readLabel()
Box x = Integer.parselnt(BoxIxjield.getTexto.trimo); Boxly = Integer.parselnt(Boxy_Field.getTexto.trimo); Boxiz = Integer.parselnt(BoxlzField.getTexto.trimo); Box2x = Integer.parselnt(Box2xField.getTexto.trimo); Box2y = Integer.parseInt(Box2yField.getTexto.trimo); Box2z = Integer.parselnt(Box2zField.getTexto.trimo);
labell = Integer.parseInt(label Field.getTexto.trimo); label2 = Integer.parselnt(label2Field.getTexto.trimo); Gral = Integer.parseInt(Gral_Field.getTexto.trimo); Gra2 = Integer.parseInt(Gra2Field.getTexto.trimo); fG = FilepnField.ggetTexto; f2 = File2Field.getTextO; Angle 2 _ Integer.parselnt(AngleZField.getTexto.trimo); AngleY = Integer.parseInt(AngleXField.getTexto.trimo); AngleX = Integer.parselnt(AngleYField.getText.trimo); MoveZ = Integer.parseInt(MoveZ_Field.getTexto.trimo); MoveY = -1 *Integer.parseInt(MoveYField.getText(.trim(); Move_X = Integer.parselnt(MoveX_Field.getTexto.trimo); Iterations = Integer.parseInt(IterationsField.getTexto.trimo); }
public static void main(String[] args)
{
Frame f = new Shaper(); f.resize(650, 515);
f.setBackground(Color.lightGray); f.showo;
private TextField labellField; private TextField label2_Field; private TextField Gral_Field; private TextField Gra2_Field; private TextField Box Ix_Field; private TextField Box ly_Field; private TextField Boxlz_Field; private TextField Box2xField; private TextField Box2yField; private TextField Box2zField;
private TextField Angle_ZField; private TextField AngleYField; private TextField AngleX_Field; private TextField Move_Z_Field; private TextField Move_Y_Field; private TextField Move_X_Field; private TextField IterationsField; private TextField FilelField; private TextField File2_Field; private Choice style1;
private Choice style2;
private String sl="Red Color"; private String s2="Red Color"; private String fl="none.iv"; private String f2="none.iv"; public int labell=1, label2=1;
public int Gral=O, Gra2=0;
public double Boxlx=2.0, Boxly=4.0, Boxlz=1.0; public double Box2x=1.0, Box2y=4.0, Box2z=1.0;
public int AngleZ= 90; public int AngleY= 0; public int AngleX= 0; public int MoveZ= 0; public int MoveY= 0; public int MoveX= 0; public int Iterations=8;
private static final Point cen= new Point(0.,0.,0.); Graphics mOffScreenGraphics;
private Image mBackgroundImage; private myCanvas canvas;
}
class myCanvas extends Canvas
{
public Image backgroundImage; public myCanvas(Image backlmage)
{
backgroundlmage=backImage;
I
public void paint(Graphics g)
{
g.drawlmage(backgroundlmage,0,0,this);
} }