DESIGN AND EVALUATION OF A 2-D PLANAR THERAPEUTIC
ULTRASOUND PHASED ARRAY
by
Danish Suleiman Khatri
Submitted to the Department of Electrical Engineering and Computer Science in Partial
Fulfillment of the Requirements for the Degree of Master of Engineering in Electrical
Engineering and Computer Science at the Massachusetts Institute of Technology
-October 14, 2005
C Massachusetts Institute of Technology. All rights reserved
Signature of
Author / '
Danish S. Khatri
Department of Electrical Engineering and Computer Science
October 14, 2005
Certified
by 1
Kullervo Hynynen, PhD
Professor of Radiology, Harvard Medical School, Brigham and Women's Hospital
C eer
-,
Thesis Advisor
by
,Roger
G. Mark, MD, PhD
Distinguished Professor in Health Sci & Technology,
Harvard-MIT Division of Health Sciences & Technology
Pro...
fssor of Electricaal"Engineering and Computer Science
M.I.T. Thesis AdvisorAccepted
by. ,
y krthur C. Smith, PhD
Chairman, Committee on Graduate Students
Department of Electrical Engineering and Computer Science
MASSACHUSM'r I06 lJE,
OF TECHNOLOGY
AUG 14 2006
LIBRARIES
ARCHIVES
Design and Evaluation of a 2-D Planar Therapeutic Ultrasound Phased
Array
by
Danish Suleiman Khatri
Submitted to the Department of Electrical Engineering and Computer Science in Partial Fulfillment of the Requirements for the Degree of Master of Engineering in Electrical
Engineering and Computer Science at the Massachusetts Institute of Technology
ABSTRACT
Focused ultrasound continues to be investigated as an exciting technique for several medical therapy applications including tissue ablation. Phased array transducers serve as important devices for delivering the high intensity focused ultrasound to the targeted tissue. These arrays often produce undesired secondary foci called grating lobes that can result in heating of non-targeted healthy tissue. Grating lobes can be eliminated by setting the element-spacing between adjacent elements to V/2 or less.
The aim of this research is to construct and evaluate a 2-D planar phased array with close to X/2 element-spacing. A 7x7 element array with element-spacing of 0.762mm was constructed using 1,3-piezocomposite material. Acoustic field measurements of the array focused at three different locations were taken to demonstrate its ability to scan the focus in a volume. In addition, a maximum average intensity of 5.54W/cm2 was measured for the unfocused array using radiation force measurements.
Thesis Advisor: Kullervo Hynynen, PhD
ACKNOWLEDGEMENTS
I would like to thank my advisor, Professor Kullervo Hynynen, for the opportunity to work in such an exciting research field and for his guidance, mentorship and availability throughout my time at the Focused Ultrasound Laboratory. His achievements and immense contributions to the therapeutic ultrasound field are inspiring and I am deeply honored to have been one of his students.
In addition, I also thank Professor Roger Mark for his role as my on-campus advisor. I am grateful for the friendship, advice and mentorship of everyone at the FUL. I would like to thank Jose Juste for his advice, mentorship and lessons on the ins-and-outs of the VUDS system, Phillip Jason White and (Professor) Greg Clement for their advice in matters of ultrasound and experiment setups. It was a great joy discussing circuits with Sai-Chun Tang, a passionate and friendly circuits engineer and enthusiast. I thank Xiang-Tao Yin for his comprehensive Matlab software to simulate the acoustic fields from phased arrays and Russell Erich Caulfield for his advice and motivating discussions. I am grateful to Susan (Sue) Agabian for teaching me to use the mill and sharing her tremendous knowledge in machining and adhesives. I thank Keiko Fujiwara for her help with all the formalities of being a graduate student. I also thank Thomas Gauthier, Sonali Palchaudri, Anne Yu, Lisa (LT) Treat, Manabu Kinoshita, Anthony (Mr. T) Ross, Janne
Heikkila, Hao-Li Liu, Nickolai Sheikov, Vince Colucci, Nathan McDannold, Yong-Zhi Zhang, Karen Tam and Natalia Vykhodtseva for making the lab enjoyable to work in. They have all been as good friends as they have been research colleagues.
Finally, I would like to thank my family: my sister Sameera, my brother Fayaz, Nizam, Lindsey and my adorable nephews Naheel, Saajid and niece Nailah. Most importantly, I am deeply grateful to my parents, Munira and Suleiman Khatri, for their tremendous support and guidance without which I would never have made it to M.I.T. This thesis is dedicated to them.
TABLE OF CONTENTS
LIST OF FIGURES ... 6
LIST OF TABLES ... 9
1 INTRODUCTION... 10
1.1 M OTIVATION ... .... ... 10
1.2 ARRAY THEORY/ BACKGROUND ... ... 12
1.2.1 History... ... ... ... 12
1.2.2 G rating L obes... ... ... 13
1.2.3 1,3-Piezocomposites ... ... 15
1.2.4 Focusing of a Phased Array ... ... .... ... 16
2 2-D ARRAY DESIGN ... 19
2 .1 IN TRO D U C TIO N ... 19
2.2 ELEMENT IMPEDANCE... ... 19
2.3 AMPLIFIER SPECIFICATIONS ... ... 21
2.4 CIRCUIT M ODELS ... 21
2.5 POWER TRANSFER AND CABLE SELECTION... ... 26
3 2-D ARRAY CONSTRUCTION ... .... ... 39
4 2-D ARRAY EVALUATION ... 44
4.1 IMPEDANCE MEASUREMENTS... ... 44
4.2 ACOUSTIC FIELD MEASUREMENTS... ... 45
4.2.1 Focus at (2.7, 2.7, -4.9) mm : ... .. ... ... 47
4.2.2 Focus at (4, 4, -9) mm: ... 50
4.2.3 Focus at (4, 4, -2)mm ... ... 52
4.3.1 Maximum Power Out:... ... ... 57
4.3.2 Array Efficiency ... ... ... ... 58
4.4 D ISCUSSION ... 59
5 CONCLUSIONS AND RECOMMENDATIONS FOR FUTURE WORK... 61
5.1 C ON CLU SIONS ... ... 6 1 5.2 RECOMMENDATIONS FOR FUTURE WORK ... 62
LIST OF FIGURES
Figure 1.1: (a) annular array, (b) sector-vortex array, (c) spherically curved array with
square elements, and (d) linear array. Figures adopted from respective papers... 12
Figure 1.2: Simulated acoustic field pressure-squared plot from a 15x 15 element array with diagonal inter-element spacing of ... ... 14
Figure 1.3: Structure of a 1,3-piezocomposite: piezoelectric rods distributed in a polymer m atrix ... ... 15
Figure 1.4: Generating a focus at 11 from the element E1 ... 17
Figure 1.5: Software to generate phases for each element in an arbitrarily-sized planar array .... ... ... 18
Figure 2.1: Impedance magnitude versus frequency for four randomly selected array elem ents ... ... ... 20
Figure 2.2: Phase versus frequency for four randomly selected array elements ... 20
Figure 2.3: Lumped electrical model for a coax cable... ... 22
Figure 2.4: Simple model of transducer element used in circuit simulations... 23
Figure 2.5: Circuit model of 0.30m coax cable terminated with an array element at 1.2M H z ... ... 23
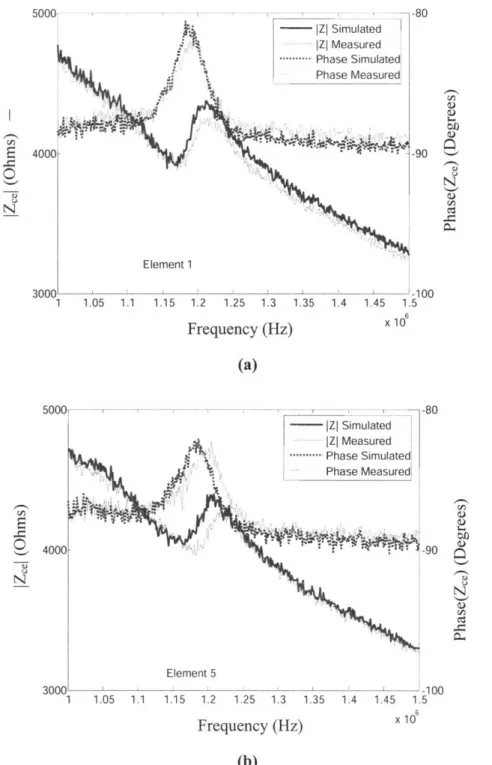
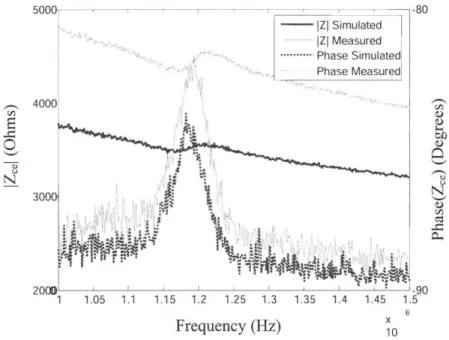
Figure 2.6: (a) Plot of the simulated and measured impedances of one of the three elements whose impedances matched well and (b) of one of the two elements whose impedances were slightly shifted in frequency ... 24
Figure 2.7: Circuit model of cable terminated with an array element at 1.2MHz with parameters derived from Z, and Z, measurements... ... 25
Figure 2.8: Plot comparing the measured impedances and impedances simulated using cable model parameters derived from Z, and Z, measurements. ... 26
Figure 2.9: Amount of power delivered to an array element connected to (a) 4 different lengths of coax cable (b) 4 different diameters of 0.91m coax cable ... 28
Figure 2.10: Model for a non-ideal inductor... 30
Figure 2.11: Schematic showing matching network added between amplifier and cable input ... ... ... ... 31
Figure 2.12: Matching network derived from a Smith chart. (a) Impedances plotted on the chart and (b) Schematic of matching circuit ... 34 Figure 2.13: (a) Power transferred to the array element and (b) total power output from
the amplifier versus amplifier peak output voltage using the two matching networks
... ... . . . ... 3 6
Figure 2.14: (a) Power transferred to 4 different array elements and (b) total output from corresponding amplifiers versus peak output voltage using the same matching n etw ork ... ... ... .. ... 3 6 Figure 2.15: (a) Power transfer to the element and (b) total power output from the
amplifier versus peak output voltage for a matching network with component values at the nominal values, 5% larger and 5% smaller than the nominal values ... 37 Figure 3.1: Photograph of 1,3-piezocomposite transducer showing dimensions of the
elem ents ... ... 39 Figure 3.2: Images showing method to connect coax cables to array elements. (a)
Schematic showing layered method and dimensions. (b) Photograph showing brass pins inserted into the PCB. (c) Photograph of milled acrylic housing... 41 Figure 3.3: (a) Photograph of the complete 2-D array including the matching networks.
(b) photograph of the array face with the 1,3-piezocomposite and ground wire
v isib le ... ... 4 3 Figure 4.1 : Impedance plots for elements 1,7 and 43 over a frequency range of
500kHz-2M H z ... ... 4 5 Figure 4.2: Apparatus for measuring acoustic field generated by the 2D-Array... 46 Figure 4.3: Focus positions relative to 2D-array. Elements 1, 7 and 8 are numbered in the
left plot ... 47 Figure 4.4: XY (a) and YZ (b) acoustic field scans with the focus at (2.7, 2.7, -4.9)mm.48 Figure 4.5: XY (a) and YZ (b) acoustic field scans after amplitude correction for a focus
at (2.7, 2.7, -4.9)m m . ... 49 Figure 4.6: XY (a) and YZ (b) acoustic field scans with no correction for a focus at (4, 4,
-9)m m ... ... ... .. ... 50
Figure 4.7: XY (a) and YZ (b) acoustic field scans with amplitude correction for a focus at (4, 4, -9)m m . ... .... ... ... 51 Figure 4.8: XY (a) and XZ (b) acoustic field scans with no correction for a focus at (4, 4,
Figure 4.9: XY (a) and XZ (b) acoustic field scans with amplitude and phase correction
for a focus at (4, 4, -2)m m ... ... 54
Figure 4.10: XY (a) and XZ (b) acoustic field scans with amplitude correction at the
focus and phase correction for a focus at (4, 4, -2)mm...
55
Figure 4.11: (a) XY and (b) XZ plane scans for the matched 2-D array focused at (2.7,
2 .7, -4 .9)m m ... 56
Figure 4.12: Radiation force measurements setup ... 57
Figure 4.13: Plot of total power output versus amplifier output peak-to-peak amplitude.
The series marked with the dots were measurements taken after the maximum power
output was observed. For each point five measurements were taken and averaged;
only two measurements could be taken for the maximum (circled) ... 58
Figure 4.14: Plot of measured acoustic power versus estimated electrical power. The
circled point indicates the efficiency for which the maximum acoustic power output
w as recorded. ... 59
LIST OF TABLES
Table 2.1: Comparison of currents in a cable-element pair using 50n and 752 coax cab les ... ... .... ... ... .... ... 2 9
1
INTRODUCTION
1.1
Motivation
Focused ultrasound has been investigated as a tool for numerous medical therapy applications. These include tumor ablation (Adams et al. 1996, Fry et. al 1970, Fry et. al 1986, Stewart et. al 2003), drug delivery (Unger et. al 1998, Yuh et. al 2005), gene therapy (Greenleaf et. al 1998, Huber & Pfisterer 2000, Silcox et. al 2005) and opening of the blood brain barrier (Hynynen et al 2001, Vykhodtseva, Hynynen & Damianou 1994). Therapeutic ultrasound proves to be suitable for all these applications for a number of reasons. First, at frequencies of 500kHz-10MHz, commonly used in therapeutic applications, significant penetration depth in soft tissue (10cm at IMHz) is possible (Hynynen & Lulu 1990). Next, its ability to be focused to a small spot size on the order of its wavelength (1.5mm at 1MHz) makes it suitable for targeting specific tissue regions. Third, ultrasound can produce two known effects in tissue: localized heating and cavitation which involves the formation, oscillation and possible collapse of bubbles (Apfel 1981, Eller & Flynn 1969, Hynynen 1991, Lele 1977, Fry et. al 1970). Phased arrays have been an important tool in delivering the ultrasound for some of these therapeutic applications and hence a significant amount of research has been dedicated to advancing the devices. Some of this research is highlighted later in this introduction. Phased arrays enable precise deposition of the acoustic energy onto targeted regions by electrically steering the focal beam produced by the array. This thesis focuses on the development and evaluation of a planar 2-D phased array for therapeutic purposes with an unprecedented inter-element spacing of the order of X/2 i.e. half the ultrasound wavelength. An element-spacing of W2 eliminates grating lobes in the array's acoustic field resulting in an unambiguous focus. This is significant in the therapeutic applications because grating lobes can result in undesirable heating of healthy tissue. Furthermore, planar 2-D arrays are predicted to have important applications such as the trans-esophageal ablation of cardiac tissue responsible for arrhythmias.
Focused ultrasound has been investigated as a feasible method for inducing necrosis in cardiac tissue (Zimmer et. al 1995, Hynynen et. al 1997). It has thus been identified as a potential modality for the treatment of cardiac arrhythmias which occur in tissues that have irregular electric conduction resulting in abnormal contraction rhythms. Arrhythmias can be eliminated by irreversibly ablating or damaging the responsible cardiac tissue regions. Currently, catheter-based ablation systems are widely used to target abnormally-conducting tissue regions (Haines & Nath 1995, Calkins 2001). In the catheter-based ablation systems, RF energy (350 kHz-700 kHz) is delivered through the tip of a catheter which may be guided to the targeted tissue by fluoroscopy. However, these systems suffer from several problems. It is difficult to monitor the lesion development when delivering RF energy. Visualization of lesion development is important because catheter-based ablation results in inflammation of healthy tissue peripheral to the target and this could progress to necrosis. Next, as RF energy causes lesion formation, coagulum and desiccated tissue form an insulating barrier to further delivery of RF energy. Furthermore, catheter placement and manipulation may result in damage to valvular apparatus. Finally, patients are exposed to harmful radiation when fluoroscopy is used to guide the catheter to the target tissue.
The motivation for this research into planar 2-D phased arrays comes in part from wanting to investigate the use of focused ultrasound, delivered via a high-power intracavitary ultrasound array, as an alternative to catheter-based ablation systems. By delivering the energy for ablation via a source placed away from the heart, we will avoid the catheter placement and guidance complications that may arise in catheter-based ablation systems. Lesion development from the focused ultrasound can be accurately guided and monitored by magnetic resonance imaging (MRI) thermometry which has been investigated extensively for focused ultrasound surgery (McDannold et. al 1998, McDannold et. al 2002). The ultrasound array can deliver acoustic energy to the cardiac tissue from within the esophagus which provides a convenient acoustic window to the heart. The 2-D phased-array transducer will be capable of producing a focus that can be freely moved in all three dimensions in front of the array with the array stationary in place. Initial simulations of this application have been carried out by Yin, Epstein &
Hynynen where a 2280-element 2-D array arranged in a 114x20 configuration was used to generate multiple lesions in the cardiac tissue (Yin, Epstein & Hynynen 2004).
1.2
Array Theory/ Background
1.2.1 History
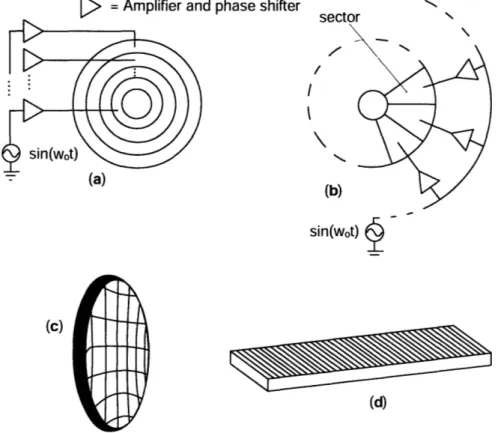
Several types of phased arrays for therapeutic applications have been investigated. One of the earliest implementations of a therapeutic phased array was the annular array by Do-Huu and Hartemann for the purpose of deep localized hyperthermia (Do-Huu & Hartemann 1981). They created an array of 14 concentric annular elements and were able to move the focus along the central axis normal to the array by varying the phase and magnitude of each element (figure 1.1 a).
>
= Amplifier and phase shiftersin(wot)
Figure 1.1: (a) annular array, (b) sector-vortex array, (c) spherically curved array with
Cain and Umemura proposed using the annular ring phased array to generate annular foci that can be scanned in diameter and focal length. The annular ring arrays produced a significant secondary focus along the central axis and they further proposed a sector-vortex configuration to remedy the secondary focus problem (Cain & Umemura 1986). The sector-vortex array, illustrated in figure 1.1b, consisted of a transducer disc divided into sectors of equal size. Umemura and Cain soon after combined the sector-vortex and annular configurations into a single phased array (Umemura & Cain 1989).
Research into the combination of the two configurations was further carried out by Fjield and Hynynen who constructed a 13-ring, 4-sector array to demonstrate the ability to vary the focus size and scan the focus along the central axis (Fjield & Hynynen 1997). Research has also been carried out on spherically curved phased arrays with square elements in which parameters such as the number of elements and multiple foci-spacing were varied to investigate the largest necrosed tissue volumes possible with these arrays (Fan & Hynynen 1996). An illustration of this type of array is shown in figure 1.1c. Such an array with 256 6.5x6.5mm elements was later constructed out of 1,3-piezocomposite transducer material (Daum & Hynynen 1999). More recently a 500-element hemispherical array was developed for trans-skull ultrasound surgery. The array was also constructed of 1,3-piezocomposite material (Clement et. al 2005). Linear (I-D) phased arrays for intracavitary use have also been researched extensively. The focus from a linear phased array can be electrically scanned both radially and axially. Linear phased arrays for transrectal prostatic ablation have been investigated (Sokka & Hynynen 2000, Hutchinson, Buchanan & Hynynen 1996). Sokka's array used an ultrasonic motor to rotate the linear array to allow focusing in all three-dimensions.
1.2.2 Grating Lobes
A common problem with phased arrays is the generation of grating lobes. Grating
lobes are secondary foci generated when the spacing between adjacent elements in the array is greater than V/2. Such element-spacing results in spatial aliasing and the subsequent generation of multiple foci. Figure 1.2 shows the simulated pressure-squared contour plot of the acoustic field from a 15x 15 element array with diagonal inter-element
spacing of X focused off-center at the edge of the array. The grating lobe is indicated on the plot. In therapeutic ultrasound applications, grating lobes are highly undesirable since they could result in heating of healthy tissue that surrounds the targeted tissue.
_40+ 30 E 20 E N 10 0 -20 -10 0 10 20 30 40 50 y (mm)
Figure 1.2: Simulated acoustic field pressure-squared plot from a 15x15 element array
with diagonal inter-element spacing of X.
A variety of methods have been employed to reduce the grating lobe levels. For example, using optimized random distribution of elements of two different widths in linear arrays resulted in 30-45% smaller grating lobes than from using uniform width elements (Hutchinson, Buchanan & Hynynen 1996). In ultrasound imaging where grating lobes are generated when the field is undersampled by an array with element-spacing greater than k/2, sparse arrays of randomly distributed elements of width V/2 have been used to reduce the grating lobe levels (Turnbull & Lum 1991). Grating lobes are eliminated when the element-spacing is reduced to V/2 or less. Therapeutic ultrasound phased arrays with such small element spacing have not been constructed in the past for a number of reasons. First, at frequencies used in therapeutic applications (-0.5-10OMHz), the array elements' widths would be very small (-0.075-1.5mm). To treat tissue at large depths, arrays with large apertures and hundreds to thousands of elements will be required. Next, constructing such arrays would have been extremely challenging using monolithic blocks of piezoelectric material such as lead zirconate
titanate (PZT). Finally, economically-viable driving systems with hundreds to thousands of amplifiers to drive these arrays were not available.
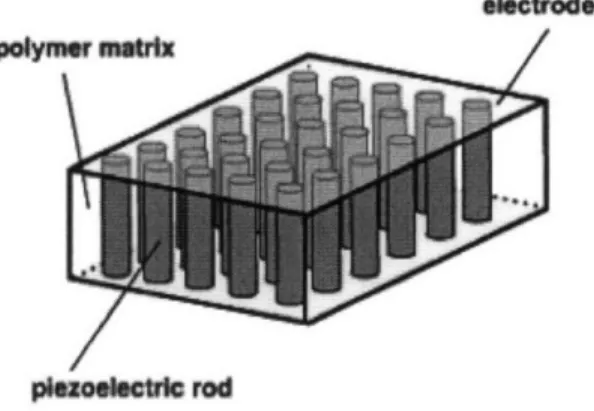
1.2.3 1,3-Piezocomposites
The limitations of constructing an array with such a large number of elements have been overcome by using novel composite transducer material. One such composite is the 1,3-piezocomposite that was developed at Penn State University (Gururaja et al. 1980, Gururaja et al. 1984, Gururaja et al. 1985a, Gururaja et al. 1985b, Gururaja et al. 1985c, Shrout, Bowen, & Schulze 1980). The 1,3-piezocomposite is a network of tiny piezoelectric rods aligned parallel to each other and distributed in a polymer matrix. The composite structure is illustrated in figure 1.3.
£bctrvde
pe..0cchic rod
Figure 1.3: Structure of a 1,3-piezocomposite: piezoelectric rods distributed in a
polymer matrix
These composites offer several advantages over monolithic blocks of piezoelectric material. First, only the electrode surface of the 1,3-piezocomposite needs to be etched out in order to create an array. In contrast, to construct an array out of a PZT block, the block would have to be diced up and then glued together with an adhesive that is also an acoustic and electric insulator. Thus a lower cost in terms of time, labor and machinery is incurred in producing an array using the 1,3-piezocomposite. Next, for high-density arrays in which the element widths approach the thickness of the transducer, the 1,3-piezocomposite material offers better efficiency than a block of PZT. In a high
density array with homogeneous cuboid elements the applied electrical energy goes into exciting both the longitudinal and lateral modes thereby decreasing the efficiency of the longitudinal excitation (Desilets, Fraser, & Kino 1978). Since the piezoelectric material in the composites takes the form of thin "one-dimensional" rods, the longitudinal mode is always dominant even when the element widths approach the thickness of the transducer. The 1,3-piezocomposites can also be manufactured with good electrical properties (low impedance and low loss) as well as good mechanical properties (low loss and acoustic impedance) (Smith 1992). Low acoustic impedances that match water or tissue help in the transfer of acoustic energy from the transducer to the coupled medium. Finally, the
1,3-piezocomposites can be molded into custom shapes and sizes by gentle heating. The absence of cost-effective large-scale amplifier systems also hampered the development of phased arrays with large number of elements. However, recently our lab developed a system capable of driving thousands of elements independently (Sokka & Hynynen 2003). The system called the Versatile Ultrasound Driving System (VUDS) is capable of delivering -1.1W per element. Such a system makes driving high-density phased arrays with V2 spacing feasible.
The benefits of 2-D phased arrays over the linear phased arrays are straightforward. As mentioned earlier, the focus from a 2-D phased array can be scanned in all 3-dimensions making it possible to generate lesions that span whole volumes of tissue without having to move the array. Linear arrays would have to be rotated to generate the same effect. In addition, 2-D arrays are capable of generating a larger variety of focal patterns thus enabling better targeting of tissue. High-density 2-D arrays are also capable of high focal scanning resolution. Finally high-density arrays would enable multiple foci generation to speed up treatment time for large volume of target tissue.
1.2.4 Focusing of a Phased Array
The ultrasound beam focus, or region of maximum acoustic power deposition, occurs at the point where waves emitted by each element undergo constructive interference. The location of the focus can thus be varied by altering the phase of the electrical signal to each element of the phased array. As an example, consider a linear
array with two elements E, and Ez (Figure 1.4). E emits a wave
4
=
sin(kz) and E2
emits A
=
sin(kz+ 0) . To generate a focus at a distance 11 normal to El, the two waves
must constructively interfere at the focus. The phase 0 can thus be obtained as follows:
4() = 4 (1
2)=1
kl + 0 =
2
2
A
2
2where 12=
2+d
2E2
T
d
12
El
...
~.
F o c
us...
F
11
,*1
Figure
1.4:
Generating a focus at 11 from the element EF
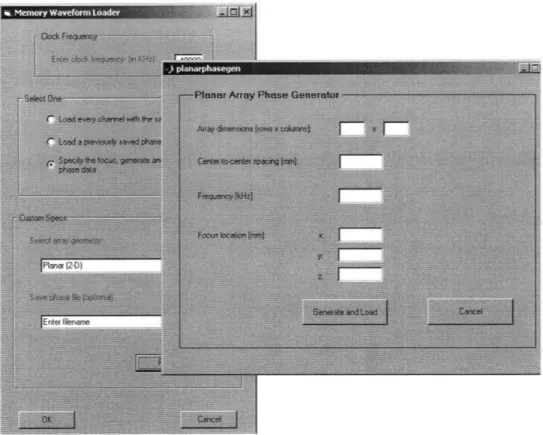
This can be extended to a larger number of elements and to 2 dimensions. A stand-alone Matlab application was written to generate the phases for every element in an arbitrarily-sized planar array. This application was integrated into the existing VUDS software. The user-interface is shown in figure 1.5. The main software application to control VUDS was developed by our lab and written in Visual Basic.
Figure 1.5: Software to generate phases for each element in an arbitrarily-sized planar
array.
2
2-D ARRAY DESIGN
2.1
Introduction
In designing a focused ultrasound therapeutic array, several criteria must be considered. To begin, there are three basic requirements that an ultrasound array must satisfy. First, the array as a whole must be capable of delivering sufficient amount of acoustic power to ablate the targeted tissue. Next, the array must be MRI-compatible if MRI is used to monitor the thermal effects of the ultrasound. Third, the array must be water-proof. For 2-D arrays with V2 spacing between elements, the element dimensions move into the sub-millimeter range and finding suitable methods to connect electrical cables to these becomes a challenge. In addition, there are tradeoffs to selecting different types of cables and these tradeoffs should be understood. Circuit models for the cables provide good insight into these tradeoffs. For a given transducer, it is also worthwhile to
examine its impedance spectrum to determine the driving frequency which will result in most efficient electrical power to acoustic power transformation. Impedance matching circuits may also be required to increase the amount of electrical power delivered to the array elements. It may not be practical to use bulky hand-wound inductors for arrays in which the power per element is not large. Finally, the specifications such as the maximum current output of the system driving the array must be considered.
2.2 Element Impedance
The electrical characteristics of the elements provide good insight into the design of the array. The impedance spectra of the elements show the optimum frequency at which the elements can be driven. Impedance measurements are also used in simulations that help optimize the electrical power transferred to the array elements.
Impedance measurements of four randomly-selected elements of the 2-D array were taken using an impedance analyzer (Hewlett-Packard HP4195A). The impedance was measured with the ground side of the array dipped in water. Figure 2.1 is a plot of the impedance magnitude of the four elements versus frequency while figure 2.2 is a plot
4
Al
0 1 2 3 4 5 6 7
Frequency
(Hz)
x1o6
Figure 2.1: Impedance magnitude versus frequency for four randomly selected array elements U) a) a)(D) -C a.-0 1 2 3 4 5 6 7 Frequency x 10 (Hz)
The two plots show clearly the resonance frequency of about 1.2MHz. As discussed earlier, because of the composite structure of the transducer (thin piezoelectric rods distributed within an acoustically non-conductive polymer), only one resonance frequency is observed corresponding to the longitudinal excitation mode of the piezoelectric rods. The peaks in the phase plots at approximately 3.7MHz and 6MHz represent the third and fifth harmonic frequencies respectively. The resonance frequency is the most efficient frequency to drive the array elements. At this frequency, the forward stress wave and wave reflected off the air-backed side of the array element are in phase and a larger effective stress wave is generated at the face of the element (Hynynen 1990).
The relatively high impedance of the order of 104f is expected since the capacitance of the array element, C decreases as its electrode area becomes smaller. Thus its impedance, which is inversely proportional to C, increases. The array element can be modeled as a parallel plate capacitor.
eA t
where 6 is the permittivity of the composite material, A is the area of the electrode surface and t is the thickness of the composite.
2.3 Amplifier Specifications
A multi-channel broadband amplifier system was developed at our lab to drive transducer arrays (Sokka 2003). Each channel is capable of sourcing up to 150mA RMS of current at a peak voltage of 11V. The maximum power deliverable per channel, Pmax, is thus:
mx =
asPk =
1.17W2.4 Circuit Models
Transducers used in conjunction with MRI are usually connected to the amplifier system via coax cables of several meters in length. The lengthy coax cables allow the amplifier system to be placed in a separate room from the magnet for MRI guided applications.
The electrical characteristics of such transducers are significantly affected by the electrical properties of the coax cables. Therefore, to properly analyze the power transfer to the array elements, the transmission line effects of the coax cable must be included in the circuit analysis. The coaxial cable can be represented by a lumped or distributed model. A distributed model includes both spatial dimensions and time. The lumped model, in which variables only depend on time, is sufficient for frequencies small enough such that the length of the cable is much shorter than the wavelength of the AC signal (Clayton 1994). At a frequency of 1MHz, the wavelength of the AC signal is 300m, much longer than typical coax cable lengths of 3-4m.
R L
Figure 2.3: Lumped electrical model for a coax cable
In the lumped model (figure 2.3), R is the DC resistance plus the resistance due to the skin effect while G is the shunt resistance. L is the inductance and C the capacitance of the coaxial cable respectively; L and C depend on the radii of the outer and inner conductors and the properties of the dielectric insulator between the two conductors (Alexander et. al 2000).
In order to carry out circuit simulations of the power transfer to the array elements, an element was represented by a simple equivalent model of a resistor and capacitor in parallel (figure 2.4). While this simple model does not give any information about the efficiency of the element (amount of electrical power converted to acoustic power), it does help optimize the amount of electrical power delivered to the array elements. Other researchers have described elaborate electrical models for transducers that take into account mechanical and electrical losses (Prokic 2004). However, it is easier to determine the power efficiency of the 2-D array experimentally via radiation force measurements (Stewart 1982).
Figure 2.4: Simple model of transducer element used in circuit simulations
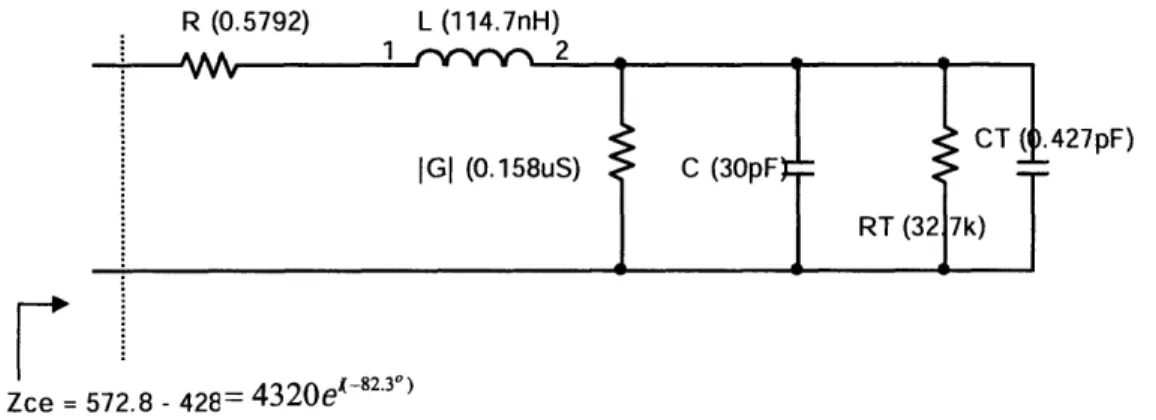
The R, L, C and G parameters for the coax cable model can usually be obtained from the manufacturer. To check on the accuracy of the model, measured and simulated impedances of 0.30m-long 34AWG coax cables (Precision Interconnect, OR) connected to five different array elements were compared. Figure 2.5 shows the model of the cable terminated with one of the array elements. The values of the cable parameters shown are for a frequency of 1.2MHz. Zce is the impedance looking into the cable
R (0.5792) L (114.7nH) 1 • 2 CT (0.427pF) IGI (0.158uS) C (30pF (7 RT (32 7k) Zce = 572.8 - 428= 4320e-82.3)
Figure 2.5: Circuit model of 0.30m coax cable terminated with an array element at 1.2MHz
The simulated and measured impedances for three of the five elements matched well. Figure 2.6a is a plot of the impedances for one of the three elements. The simulated and measured impedances for the other two elements were slightly shifted in frequency. Figure 6b is a plot of the impedances of one of these two elements.
tiement I S- i 100 1.05 1.1 1.15 1.2 1.25 1.3 1.35 1.4 1.45 1.5 x6 Frequency (Hz) x 10
(a)
-80 -90 rA 1 1.05 1.1 1.15 1.2 1.25 1.3 1.35 1.4 1.45 Frequency (Hz) 1.5 x 10⁶ -100Figure 2.6: (a) Plot of the simulated and measured impedances of one of the three elements whose impedances matched well and (b) of one of the two elements whose impedances were slightly shifted in frequency.
When the cable parameters are not readily available from the manufacturer, parameters can be estimated from impedance measurements of a known length of the
5000,
4000
1
;:: :
cable. While it is not possible to measure the parameters individually, they can be derived from two cable impedances: the impedances of the cable with its ends shorted
(Zs) and open (Zo) respectively (Cheng 1989, Griffith et. al 2000).
Zc= ZYZ0 Zc is the cable characteristic impedance
Y = tanh-'
I R zo
Zc R+ jcoLZc---
~
(0y is the propagation constant; 1 is the length of the cable
is the frequency in rad/sec
7
ZC=GC
G + jcoC
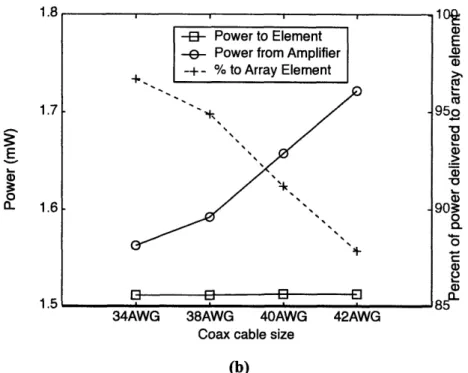
To test the cable model using R, L, C and G parameters derived from the equations above, Zs and Zo were measured for the 0.30m 34AWG coax cable and the parameters calculated over the 1MHz-1.5MHz frequency range. Figure 2.7 shows the model for a frequency of 1.2MHz. The capacitance, C, obtained is about 20pF higher than that quoted by the manufacturer.
R (0.6141) L (178.3nH)
T (0.427pF)
Zce = 212 - 2568i
Figure 2.7: Circuit model of cable terminated with an array element at 1.2MHz with parameters derived from Zs and Zo measurements
Figure 2.8 shows a plot of the measured impedances and impedances simulated using the derived parameters for one of the elements over a frequency range of IMHz-1.5MHz. The simulated impedance does not match the measured value as well and has a lower magnitude because of the higher derived cable capacitance.
Frequency (Hz) x
Figure 2.8: Plot comparing the measured impedances and impedances simulated using
cable model parameters derived from Zs and Zo measurements.
2.5 Power Transfer and Cable Selection
The maximum amount of power delivered to an array element connected to 0.30m of the 34AWG coax cable can be determined simply from the impedance of the cable and element (Zce). The power, Pout output from the amplifier is given by:
Given Z, = 4030e'(- 842o,
11 11
Po,, = cos(-84.20)
,2 40302
Pout =1.51mW
The power delivered to the array element is less than Pout since some of the power delivered by the amplifier is dissipated in the cable resistance R. R increases as the length of the cable increases and as the diameter of the inner-conductor decreases; therefore, as R increases the fraction of power delivered from the amplifier to the array element decreases. Figure 2.9a shows the results of a simulation to determine the maximum amount of power delivered to an array element connected to increasing lengths (0.30m, 0.91m, 1.52m and 3.04m) of 34AWG coax cable. Figure 2.9b shows a similar simulation using 0.91m of coax cable with decreasing inner-conductor diameters (34AWG, 38AWG, 40AWG and 42AWG) (Precision Interconnect, OR).
A 4 001 3 E a. 2 0.30m 0.91m 1.52m 3.04m
Length of coax cable
(a)
E a, a, 80 $ 0 (D a-60 0 C-40)-E- Power to Element
-e- Power from Amplifier
-+- % to Array Element
40 1.0 I .O 1.7 E 0) n- 1.6 1.5 -8- Power to Element
-e- Power from Amplifier
-+- % to Array Element
E ,
O O] O
I I I+
34AWG 38AWG 40AWG 42AWG Coax cable size
(b)
Figure 2.9: Amount of power delivered to an array element connected to (a) 4
different lengths of coax cable (b) 4 different diameters of 0.91 m coax cable
It is estimated that each element can handle approximately 19mW of electrical power. However, in all the above cases, the maximum amount of power delivered to the array element is only about 1.5mW. This is very small and not sufficient for therapeutic applications. Only a small amount of power is delivered to the element because the impedance of the cable-element pair is large and very capacitive. This in turn is because the array element impedance is much higher than that of the cable capacitance that appears in parallel to the element. Thus, most of the current from the amplifier is shunted through the cable capacitance instead of the array element. For the 0.91m cable at 1.2MHz, the impedance magnitude of the cable capacitance is 14739 while the impedance magnitude of the element is 30.92kM. Thus, only about 5% of the current from the amplifier is delivered to the element.
The current delivered to the array element can be increased by using a lower capacitance cable and by increasing the total output current from the amplifier. If a lower capacitance cable is used, a larger portion of the total current flows to the element. Since the lower capacitance results in a higher impedance (Zce) seen at the input of the cable,
"-E a0 E 95o -o 903o 1. 0 ci C., "
the total current sourced from the amplifier must also be increased to increase the total current delivered to the array element. Table 2.1 compares the current in a cable-element pair using 0.91m of 50n and 7592 42AWG coax cables. The cable capacitances are 90.6pF and 49.5pF respectively. If the 502 and 75K2 cable-element pairs were driven with the same total current, we would expect to have a larger amount of power delivered to the element with the 75n2 cable attached.
Table 2.1: Comparison of currents in a cable-element pair using 50•2 and 75K2 coax cables
To increase the total current output by the amplifier, the impedance seen by the amplifier output must be decreased by adding an impedance matching network of inductors and capacitors between the amplifier output and cable. Traditionally, the matching inductors have been constructed by winding a length of wire around a toroid core. These inductors offer several benefits. Precise inductance values can be achieved by varying the number of turns and the turn-spacing. Furthermore, these inductors have low resistive loss and are able to handle large currents, making them suitable for high-power applications. However, winding each inductor manually proves to be a time-consuming and arduous task. In addition, the inductors tend to be very bulky. A four-channel matching card for our older amplifier system containing four of the inductors measures approximately 6.5" x 4.5" x 1"; the matching cards require almost the same amount of rack-space as the amplifiers' analog and digital hardware. These drawbacks make the inductors unsuitable for matching 2-D phased arrays which will have hundreds to thousands of elements. As an alternative, we propose using surface-mount chip inductors for matching of the phased array. The biggest benefits of using these inductors are smaller matching networks and faster matching time. A 100uH chip inductor is available in a package as small as 2.5mmx3.2mm (Murata LQH32M). The properties of these chip-inductors are less ideal than the toroid inductors. The chip inductors suffer
from a lower Q, which is the ratio of the power stored to energy dissipated in an inductor. The Q-value depends on the inductance, frequency and resistance of the inductor.
co L
Q= , R, is the series resistance
The Q-value of an inductor is usually quoted at a particular frequency hence the equivalent series resistance, Rs at a particular frequency is proportional to the inductance and inversely proportional to the Q-value. In addition, the chip-inductors have low self-resonance frequencies (SRF). Beyond the self-self-resonance frequency, inductor devices behave more like capacitors and their reactance drops with increasing frequency. Finally, chip inductors have a lower current rating. As an example, at 0.796MHz the Q-value for the 100uH chip inductor is 40. Thus its series resistance, Rs , 12.51. The SRF for this inductor is about 8MHz and its current rating is 80mA. The lower current rating for the chip inductors is acceptable since the power delivered to each element in a high density array is small.
To take these non-ideal characteristics into account in simulations, the inductor can be modeled with three ideal elements (figure 2.10).
C
L R
1 yV- 2
Figure 2.10: Model for a non-ideal inductor.
By using the chip-inductors in the matching networks, we trade off increased power dissipation in the inductors for smaller size and faster matching time.
Several different configurations of matching networks can be employed to reduce the impedance between the amplifier and the cable-element pair. Two configurations to match elements connected to 0.91m of 34AWG cable are described here. The first, schematized in figure 2.11, uses an inductor, Lmi, to cancel the large negative reactance from the cable capacitance.
Figure 2.11: Schematic showing matching network added between amplifier and cable
input
L,
=
imag{Zce}
0)
The resistive loss in the inductor Lm, is given by:
RLml =
QLml
,
QLm, is the inductor QAn impedance transformer (L,,2, Cm) is then used to step up the resistance Rcez to a larger
value Rin (Lee 2003). The derivation of the values for Lm2 and Cm proceeds as follows:
R,
=
Rce
2LM2
2
+1)Lm
2OQ
=
Lm+ 0Lm2
(1), where Rc2= real{Zc,+ RLml and Q is the imp. transformer
Q
(2)
substituting (2) in (1):
R
=
Rce
+
2
+1Rearranging gives us a quadratic function of Lm2:
(~
22 ___0+2 2 Lm2
QLm2
2
(
2RceO R,,
.o
Qm2
QLm2
Lm
2( +R
_,RnRe)
=0
L P= ( Ln2) , where Lp is the equivalent inductance parallel to C,,
1
co2I
The calculations above ignore the parasitic capacitance in the inductors due to their finite SRF. In figure 2.11, RLml, C6, RLm2 and C5 are calculated assuming inductor
LmI has a Q of 65 and a SRF of 7MHz while Lm2 has a Q of 50 and a SRF of 12MHz.
Matching networks can also be derived from the Smith chart. To obtain a matching network, the two impedances Zce and Ri, are normalized and plotted on the Smith chart. A path is then traced between the two normalized impedances. The path consists of arcs, each one of which results from adding a reactive element to the matching network. In the second network, matching was achieved using three reactive components. The smith chart with the paths traced out is shown in figure 2.12a* while the corresponding circuit is shown in figure 2.12b. The impedance transformation from
Zce to Z2 is achieved by adding the series inductor Lml. Lm2 is then added in parallel to
obtain Z3 and finally the capacitor Cm is placed in series to cancel the positive reactance
in Z3.
* Plot using Microsoft Excel tool from RF Cafr:
(b)
Figure 2.12: Matching network derived from a Smith chart. (a) Impedances plotted on
the chart and (b) Schematic of matching circuit
In both matching configurations, the impedances Rin, Re, Z2, and Z3 are labeled as
the ideal values i.e. obtained if ideal reactive components were used to match the impedances. In practice, these values will depart from the ideal due to the finite SRF and resistive losses in the inductors. In simulating the above two matching configurations, Rin
of 59492 and 755M are obtained respectively. Also, the Ri,'s are not real and have phases of 25.30 and 6.70 respectively.
The resulting matching inductor and capacitor values can be varied slightly so that they correspond to readily-available standard values. Using standard inductor values (27uH, 180uH in the first matching network and 47uH, 120uH in the second network) and capacitor values (680pF for the first and 150pF for the second matching network), Rin of 482.7L2 and 51792 result respectively. In addition, the Rin have phases of 210 and -18.720 respectively. Figure 2.13 is a plot of the simulated power delivered to the array element versus the input voltage swept from 0 to 1 lV-peak for both of the matching configurations using these standard-valued matching components. Also shown is the total power output from the amplifier.
Since the elements' impedances differ and the same matching network is applied to every element, the power delivered to each element is expected to differ as is the total power output from each corresponding amplifier. Power transfer simulations were carried out for 4 different elements with the same matching configuration applied to each one. The results are shown in figure 2.14.
a
E
a)
0~
Amplifier Peak Output V (V) Amplifier Peak Output V (V)
(a)
(b)
Figure 2.13: (a) Power transferred to the array element and (b) total power output from
the amplifier versus amplifier peak output voltage using the two matching networks
Amplifier Peak Output V (V) Amplifier Peak Output V (V)
(a)
(b)
Figure 2.14: (a) Power transferred to 4 different array elements and (b) total output
from corresponding amplifiers versus peak output voltage using the same matching
network
In practice, the inductor and capacitor values with a quoted nominal value may
depart from this value by up to a quoted tolerance. Therefore, the power delivered to an
element can also vary because of this variation in matching components' values. To
investigate the effect of the variation in inductor and capacitor values from their nominal
values, a power transfer simulation was carried out using component values at their
nominal values,
5%
larger and
5%
smaller than the nominal. The results are shown in
figure 2.15. The variation in component values results in a larger variation in power
transfer and thus using components with the lowest tolerances is important.
E E a) i:ii0 a) 0 CL 2OU 240 220 200 180 160 140 120 100 80 60 40 20 0
Amplifier Peak Output V (V) Amplifier Peak Output V (V)
(a)
(b)
Figure 2.15: (a) Power transfer to the element and (b) total power output from the
amplifier versus peak output voltage for a matching network with component values at
the nominal values, 5% larger and
5%
smaller than the nominal values.
From the simulations, it is evident that the amount of power delivered to the
elements will differ from one element to another due to the differences in element
impedances and the deviation in matching component values from their nominal values.
Thus, we expect the acoustic power delivered by each element will differ even when the
elements are driven by the same signal. The effects of the varying element impedances
and matching component values can be mitigated by calibrating the array in a scan tank
so that all the elements deliver the same acoustic power. The calibrating procedure
involves using a needle hydrophone to measure the acoustic pressure emitted by each
element and bringing the pressures to uniformity by correcting the corresponding
amplifier's output amplitude and phase. The calibrating procedure is explored further in
chapter 4.
3
2-D ARRAY CONSTRUCTION
A prototype 7x7 element array was constructed to demonstrate the capabilities of 2-D phased arrays. One side of a 20.4mm x 20.4mm x 1.57mm 1,3-piezocomposite transducer piece was etched into a 25x25 element grid. A K&S 780 dicing saw (Kulicke
& Soffa, Willow Grove, PA) fitted with a 3 mils (0.0762mm) diamond blade (Thermocarbon Inc, Casselberry, FL) was used to etch the transducer in-house. The center-to-center spacing between adjacent elements is 30mils (0.762mm) while the kerf size is 3mils (0.0762mm). V/2 at 1MHz is approximately 0.75mm. Figure 3.1, a photograph of a small region of the etched transducer, shows these dimensions.
Figure 3.1: Photograph of 1,3-piezocomposite transducer showing dimensions of the
elements
A significant part of the design effort required finding a suitable method to connect coax cables to the sub-millimeter elements. Soldering the cables to the elements proved to be futile since the high temperatures required for the solder peeled off the gold electrode and damaged the composite material. It also proved difficult to apply solder uniformly without shorting out elements. An approach using layers of printed circuit
boards (PCB) and small pins was devised to connect 0.91m lengths of 34AWG coax cables to 49 of the array elements. The layered approach allowed soldering of the coax cables to a PCB first without exposing the array to the high solder temperature. A schematic of this design is shown in figure 3.2a. Small gold-plated brass pins (Mill-Max, Oyster Bay, NY) were inserted into another PCB (PCBI) and aligned over the array. Pins were used to make the electrical contact area on the elements as small as possible and to ensure that the elements have some air-backing. Small contact area is assured since the cylindrical stem of each pin is 12mils (0.3048mm) in diameter and the pin tip is rounded. Each pin is 50mils (1.27mm) long while the PCB is 31mils (0.787mm) thick. A photograph of a magnified region of the PCB with the pins inserted is shown in figure 3.2b. Next, the two PCB layers were aligned and held together in an acrylic housing (figure 3.2c) milled in-house. To ensure good electrical contact between the pins and array elements, globules of an electrically conductive silver-epoxy adhesive (Mereco, West Warwick, RI) were placed on the pin tips before connecting these to the array elements. The adhesive was also applied onto the pin-heads to establish good electrical contact between the pin heads and PCB2. The adhesive was cured over 24 hours at room-temperature. Finally, the coax cables' ground shields were soldered onto a ground-plane PCB; copper tape was used to connect the array ground electrode to the ground-plane
PCB.
34AWG To Amplifiers - _-2ml
,----ass
pin
•2mils
I I
I
---. ---.---.---.---. ---.---.---. a
=
0.203mm
{d
b =
0.787mm
yiiu tIdLcLIouU C=l.L2mm
gnd wire
etched electrode
I
d
d = 057mm
=0.57mm
e
-28mm
(a)
coax
gnd
PCB
PCB2-PCBI"
(b)
Figure 3.2: Images showing method to connect coax cables to array elements. (a)
Schematic showing layered method and dimensions. (b) Photograph showing brass pins inserted into the PCB. (c) Photograph of milled acrylic housing.
The thickness of the first two PCB layers, pins and array is only -3.6mm. The 34AWG coax center conductor was just narrow enough to fit through the ground PCB vias. The ground PCB could not be moved closer than approximately 25.4mm from PCB2 because the center conductors could not be squeezed through the vias without snapping off of PCB2. With narrower coax cables, the overall thickness of the layered design can be decreased from the current thickness of 28.7mm to about 5mm.
To make the array water-proof, the transducer was affixed onto the acrylic housing using VI-SIL V-1022 silicone adhesive (Rhodia, Cedex, France). The 0.91m coax cables were housed in silicone rubber tubing (Ipotec, Exeter, NH) and the tubing was sealed onto the acrylic housing using an adhesive-lined heat-shrink tubing (3M, Austin, TX), VI-SIL adhesive and RTV silicone sealant (GE Silicones, Wilton, CT).
Finally, a rubber tube with 1.5mm I.D. was positioned in the acrylic housing in order to
circulate air in the transducer via an external aquarium pump. The air pump helps push
any moisture out of the transducer. If left to build-up in the transducer, the moisture may
condense when the transducer is placed in cold water resulting in electrical shorts.
Acoustic field scans were taken with the complete 2-D array before the matching network
was added.
The matching network used readily available through-hole inductors with nominal
values of 180p.H (7MHz SRF and
Q
of 65) and
2 7p.H (12MHz SRF and
Q
of 50) (J.W.
Miller Magnetics, Gardena, CA). The matching capacitors were ceramic and 680pF
nominal value. The inductors and capacitors had a tolerance of
5%.
All the matching
components for the 49 elements were soldered onto a generic prototype board of size
3.5"x3".
A photograph of the complete phased array system with the matching network is
shown in figure 3.3a. Figure 3.3b shows the array face in more detail with the
1,3-piezocomposite, PCB, and grounding wire visible.
(b)
Figure 3.3: (a) Photograph of the complete 2-D array including the matching networks.
4
2-D ARRAY EVALUATION
Several measurements were made on the completed 2-D array to characterize it
and demonstrate its focusing and 3-D beam-steering abilities. Impedance measurements
were taken for all the elements of the array to evaluate the integrity of the electrical
connections and determine the best frequency to drive the array. Next, acoustic field
measurements were taken in a scan tank to demonstrate the focusing ability of the array.
Finally, radiation-force measurements were taken with the matched 2-D array to
determine the power efficiency of the array and demonstrate the improvement in power
output from the array.
4.1
Impedance Measurements
Impedance measurements were taken for all the elements in the unmatched array.
The impedance measurements provided information about the presence of electrical
shorts between elements and the best frequency to drive the array for acoustic field
measurements. Electrical shorts between elements were indicated by impedances which
were a common fraction of the predicted impedance of one cable-element pair. Electrical
shorts were found for 3 pairs of elements (elements 23-24, 32-39 and 37-38). To avoid
shorting out the amplifiers connected to these elements, only one amplifier was
connected to each pair of the shorted elements. The impedance measurements over
frequency differed from those predicted in the simulations. The measured impedances
were more capacitive and hence had more negative phase. Figure 4.1 is a plot of the
measured impedances of array elements 1, 7 and 43. All elements had phase greater than
4000 I - impedance -88 Element r d, p1 hase 2000 -90 0 -92 0.5 0.75 1 1.25 1.5 1.75 2 4UUU E S2000 10 2000 0 -908 SQ • -00 -90 2.) 0.5 0.75 1 1.25 1.5 1.75 2 frequency x 10e
Figure 4.1: Impedance plots for elements 1,7 and 43 over a frequency range of
500kHz-2MHz
From the impedance plots, the maximum phase occurred at about 1.1MHz. The unmatched array was thus driven at this frequency to obtain the best acoustic output for the acoustic field measurements.
4.2 Acoustic Field Measurements
Acoustic field measurements, carried out in a scan tank, are useful for evaluating the 2-D array's ability to generate a focus at various positions in the sonicated volume in front of the array. In the scan tank setup, depicted in figure 4.2, the array is locked in position in a tank filled with degassed water. A 0.2mm needle hydrophone (Precision Acoustics, Dorcet, UK) is used to measure the relative acoustic pressure at points in the sonicated volume; the hydrophone generates an electrical signal whose amplitude is proportional to the acoustic pressure. The AC signal is amplified and read using an oscilloscope (Tektronix TDS 3012, Beaverton, OR). The hydrophone is attached to a
Element7 .I I v IIe 0.5 0.75 1 1.25 1.5 1.75 2 Element'43 A 'W' 'i II lr I I, Y -L
positioning system (Velmex, Bloomfield, NY) and can be moved in all three dimensions with a spatial resolution of 3 tm. A PC with software written in-lab is used to control the positioning system via the serial port and capture data from the oscilloscope via the GPIB port. Finally, the VUDS 100-channel amplifier system is used to drive each of the 2D-array elements independently. The software, written in BASIC captures the time waveform and amplitude data from the oscilloscope and stores these on the hard-disk. A C program utilizing the GrWin* graphics library was written to interface with the original BASIC software to generate contour plots of the acoustic field at the end of each scan. With this apparatus, we are thus able to generate acoustic field scans in any plane perpendicular or parallel to the 2D-array surface.
n 2mm Nea•nrla
hydrophone
system
Issed
ter
... .... PC 2 aQp ,,.,iIuN .FIJCu
Ampliifier System
Figure 4.2: Apparatus for measuring acoustic field generated by the 2D-Array
To demonstrate the ability to focus the 2-D array in all 3 dimensions, acoustic field scans were taken at three focus positions: a) at the center of the array and displaced at -4.9mm in the radial direction i.e. at (2.7, 2.7, -4.9)mm in the Cartesian coordinates, b) displaced
*http://spdg1.sci.shizuoka.ac.jp/grwinlib/english/
1
by 1.3mm from the center of the array and at 9mm in the radial direction i.e. at (4, 4,
-9)mm, and c) displaced by 1.3mm from the center of the array and at 2mm in the radial direction i.e. at (4, 4, -2)mm. These focus points are shown relative to the array in the two plots in figure 4.3.
x (mm) -0-10 0 1 2 3 4 5 E E N y I n Focusa
I
I c,,,,, ,, I X I IkI) I ^ ""~I O Focus cFigure 4.3: Focus positions relative to 2D-array. Elements 1, 7 and 8 are numbered in the left plot
For each focus, scans were taken for the three orthogonal planes centered at the focus. The plots presented here are normalized pressure squared plots showing the field in two of the planes.
4.2.1 Focus at (2.7, 2.7, -4.9) mm:
Figure 4.4a shows the normalized pressure squared plots for the XY plane at the focus while figure 4.4b shows the normalized pressure squared plots for the YZ plane at the focus. 3-D and contour plots are shown for both planes. The scans were 10x10mm with a step size of 0.5mm. In all the contour plots presented, contours represent 10%-100% of the maximum intensity with increments of 10%.
0 1 2 E E 3 4 5 r II.II
-2 0 2 4 6 x (mm)
(a)
611 0 -1 -2 -3 -4 -5 -6 -7 -8 -9-10-11 z (mm) (b)Figure 4.4: XY (a) and YZ (b) acoustic field scans with the focus at (2.7, 2.7, -4.9)mm.
A slightly smaller focus was achieved when amplitude correction was carried out. As discussed earlier, amplitude and phase correction may be necessary because of the variation in power emitted by different elements due to the differences in the elements' impedances and variations in the matching components values in the case of the matched array. To perform amplitude correction, the hydrophone was placed at the focus and each of the 49 elements was driven with the others turned off with a constant amplitude signal.
48
0o
0.1. --2 0 2 4 6 x (mm) - - - ---' ' ' ' ' " ' ' ,rThe amplitude of the AC signal from the hydrophone was recorded for each of the elements. The resulting amplitudes were inverted and normalized to 1. Each element was then driven with its corresponding corrected amplitude. Figures 4.5a and 4.5b show
the XY and YZ plane scans after amplitude correction was carried out.
I I.. 0 2 4 x (mm)
0l
0 -1 -2 -3 -4 -5 -6 -7 -8 -9-10-11 z (mm)(b)
Figure 4.5: XY (a) and YZ (b) acoustic field scans after amplitude correction for a focus at (2.7, 2.7, -4.9)mm. ,1'
(;;~)
--; -;---;--··-·--·-: :--r ~C3~ " __I _:p~..~... ;;· '·- ;- ; ;·;; - · -;'-- ----· · · · · · · ·4.2.2
Focus at (4, 4, -9) mm:
Figures 4.6a and 4.6b show the normalized pressure squared plots for the XY and YZ planes with no amplitude or phase correction applied. As expected, the focus appears larger and longer because it occurs further away from the 2-D array. Also, the focal beam appears tilted.
0 2 4 6 8
x (mm)
0 -1 -2 -3 -4 -5 -6 -7 -8 -9-10-11 z (mm)
Figure 4.6: XY (a) and YZ (b) acoustic field scans with no correction for a focus at (4,
4, -9)mm. - I \ I I