Design of a Flapping Mechanism for
Reproducing the Motions at the Base of a Dragonfly Wing
by
Teresa Liu
Submitted to the Department of Mechanical Engineering in Partial Fulfillment of the Requirements for the Degree of
Bachelor of Science at the
Massachusetts Institute of Technology
June 2007
@2007 Teresa Liu. All Rights Reserved
The author hereby grants to MIT permission to reproduce and to distribute publicly paper and electronic copies of this thesis document in whole or in part
in any medium now known or hereafter created.
Signature of Author ~ /".T" •• ~...•.•.••••••••••••••••••••.
Department of Mechanical Engineering May 11,2007
Certified by .
I
Lynette A. JonesPrincipal Research Scientist, MIT BioInstrumentation Lab Thesis Co-supervisor Certified by " f'oo
.r.-
j ••r.-.•...
ll •••••••••••••••••••••••••••••••••••••••••••••••••••••••••••••James Louis Tangorra P6SLdeetota1 Associate, MIT BioInstrumentation Lab
Thesis Co-supervisor
ARCHtVE8
Accepted by .. ~
~~I
"~._
.._ _._
.._"
---
.
John H. Lienhard V Professor of Mechanical Engineering Chairman, Undergraduate Thesis Committee
MASSACHUSETTS INSTITUTE
or:T::C:-i1'.'OLOGY
~~--2
1 2007
Design of a Flapping Mechanisn1 for
Reproducing the Motions at the Base of a Dragonfly Wing
by
Teresa Liu
Subn1itted to the Departlnent of Mechanical Engineering on May 11, 2007 in Partial Fulfillment of the Requirements for the Degree of Bachelor of Science in
Mechanical Engineering
ABSTRACT
Insect flight is being studied to aid in the developn1ent of n1icro-air vehicles that use the flapping wing model in an attempt to achieve the high levels of Inaneuverability that insects have. The flight of the dragonfly has been chosen to be l110deled because of its exceptional flight capabilities. This thesis addresses the flapping n1cchanisn1 designed for the root of each wing. Thc prototype of the n1echanisn1, built at a scale of four times the size of a dragonfly having a wingspan of 150 mm, is able to create motions in the wing of flapping and feathering, and can vary the stroke plane. The coning angle can be set between tests. The design process began with considcring two methods of actuation, a four-bar transmission Inechanisn1 used in the Micromechanical Flying Insect developed in the UC Berkeley Biomimetic Millisysten1 Lab, and by pivoting the wing support directly with cables or rigid links. The second design was chosen to be developed further. A functional prototype was built fron1 acrylic and parts made using stereol ithograph y.
Thesis Co-supervisor: Jamcs Louis Tangorra Title: Postdoctoral Associate
Thesis Co-supervisor: Lynette A. Joncs Title: Principal Rcsearch Scientist
Table of contents ABSTRACT 2 ACKNOWLEDGEMENTS 3 TABLE OF CONTENTS 4 1. INTRODUCTION 5 2. BACKGROUND 5
2.1WING OVERVIEW AND KINEMATICS 5
2.2UNSTEADY AERODYNAMICS AND FLIGHT MECHANISMS 8
2.3EXISTING PROJECTS 9
3. DESIGN REQillREMENTS 10
3.1PERFORMANCE CRITERIA 10
3.2DESIGN CONSTRAINTS 16
4. DESIGN PROCESS 17
4.1 CONSIDERATION OF TWO METHODS OF ACTUA nON 18
4.1.1 Linkage 18
4.1.2 Direct drive 23
4.1.3 Evaluation and decision 31
4.2DEVELOPMENT OF DIRECT DRIVE DESIGN 31
4.2.1 Changing the stroke plane 31
4.2.2 Flapping actuation 35
4.2.3 Cable guides 37
4.2.4 Motor and lever assembly 40
4.2.5 Prototype dimensions and manufacturing 41
4.2.6 Mounting and setting the coning angle 42
5. EVALUATION OF THE PROTOTYPE AND FURTHER IMPROVEMENTS 43
Acknowledgements
I would like to thank Dr. James Tangorra and Dr. Lynette Jones for giving me the
opportunity to work on this project and for their guidance throughout the semester. I would also like to thank members of the BioInstrumentation Lab who assisted me with various tasks around the lab, and fellow mechanical engineering students who have offered their time in aiding me throughout the semester. Finally, I would like to thank my family, friends, and sisters for their support this semester and during my time at MIT.
structure and strength to the wings, and likely contribute to the flexibility of the wing depending
on how much blood is contained in the veins. Each wing has a leading edge, which is stiff, and a
trailing edge that is more flexible (Combes and Daniel, 2003). The wing is connected to the body
at a joint which is driven by several muscles. There are posterior and anterior wing elevators and
depressors, as well as muscles to pronate the wing and restore the shape of the notum, the dorsal
part of the thorax, which deforms with wing movement (Clark, 1940).
WiJ gba () r
/
,I Leading edge:1
/ ,t 1" / i l..andmnrk (Q) I ... FOl'cwin Hindwing ,I !Figure 1: Forewing and hindwing of a dragonfly. (From Wang et al., 2003)
Insect wingstroke varies depending on the insect and the flight mode. Insects often trace a
figure eight shape with the tip of their wings, especially in hover (Wang, 2005). Stroke plane
may be horizontal or inclined in hover, and in moving forward often the stroke plane becomes
more inclined (Sane, 2003). The inclined stroke plane is shown in Figure 2. In the dragonfly,
different studies give different shapes traced by the wingtips (Azuma, 1985), possibly due to the
1. Introduction
Insect flight is being studied to assist in the development of micro air vehicles (MA V s).
Micro air vehicles are small aircraft less than 150 mm long, that are being developed primarily
for use in hazardous environments such as in military applications and in collapsed buildings.
Three common types of MA V are the fixed wing model (e.g. plane), the rotating wing model
(e.g. helicopter), and the omithopter model. The ornithopter uses flapping wings in imitation of
birds and insects since flapping motion can often achieve higher maneuverability than a fixed
wing. Birds and insects both have significant flight capabilities that would be desirable in a
micro air vehicle; however, insects are simpler than birds in many ways in the movement of their
wings and thus are easier to model. Wing motions in insects are actuated only at the base, with
no muscles extending into the wing itself.
The goal of this project is to build a mechanism replicating the motions at the base of the
wing that allows the study of the fluid flow and forces created by different flapping motions.
This information will be useful for the incorporation of various motions into wings of MA V s to
provide more efficient flight. The dragonfly has been chosen as the focus of study for this study.
The dragonfly in particular exhibits ideal flight capabilities for an MA V; it can hover and has
high maneuverability: it can glide, fly sideways, turn quickly, and fly in windy environments.
2. Background
2. 1
Wing Overview and KinematicsInsects have flexible wings that grow out of the thorax and are actuated by muscles at the
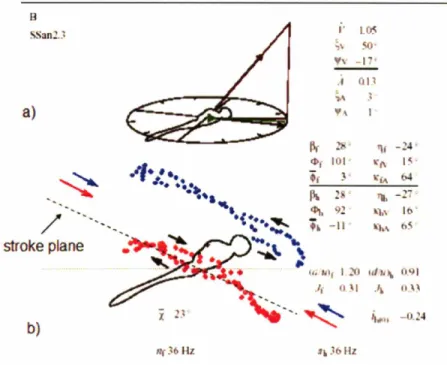
flight accurately. The shape traced by the wingtip is generally a narrow figure eight in the
dragonfly (Wakeling and Ellington, 1997). An example of the wingtip path for the dragonfly
Sympetrum sanguineum is shown in Figure 2. The stroke plane is roughly perpendicular to the
direction of travel; a dragonfly hovers with an inclined stroke plane (Wang, 2005), and as it
climbs the stroke plane becomes flatter relative to the horizontal (Wake ling and Ellington, 1997).
The dragonfly's fore and hindwings typically counterstroke, or beat out of phase. During take-off
and hovering, when greater lift forces are needed, the wings beat in phase (Alexander 1986). In
turning, the dragonfly has high maneuverability due to the four wings' ability to flap
independently. In just a few wingbeats a dragonfly can make a quick turn by varying, for
example, the stroke angle and phase relationships of its wings (Alexander 1986).
B San2.J a) ~
;
.
stroke plane b) i v r36 Hz ." L. .;\ ;0' \' -I . .i QD .l ¥\ I ~"'.. - .24 ,,~.l6HzFigure 2: An example of a wingtip path for dragonfly Sympetrum sanguineum. The short arrow in (a) originating from the body is the acceleration vector, and the two long arrows indicate velocity. The inclined stroke plane is shown in (b). (From Wakeling and Ellington, 1997).
2.2 Unsteady aerodynamics and flight mechanisms
The understanding of insect flight has gone through significant development in the past few
decades. Research has shown that by using steady aerodynamics the lift coefficient required for
insects to fly was unrealistically high, around 3.5 to 6.1, and so further research took unsteady
effects into account (Sane, 2003). Previously it was assumed that the air flow over a flapping
wing was the same as the air flow over a non-flapping wing with the same angle of attack;
however, aerodynamic forces change magnitude and direction through each wingbeat
(Zbikowski et aI., 2005). This study of unsteady aerodynamics has been the focus of most current
research in insect flight.
In the study of unsteady aerodynamics, proposed flight mechanisms in insects include
delayed stall, rotational circulation, and wake capture (Sane, 2003). In delayed stall, the wing has
a large angle of attack. In a non-flapping model of a wing, vortices form on the leading and
trailing edges and shed as it continues to translate, which causes the wing to lose its lift. In a
flapping wing, however, a vortex at the leading edge remains as the wing translates, providing
lift to the wing. In rotational circulation, lift is produced from the rotation of the wing at the end
of a stroke. Rotating about the trailing edge produces a leading edge vortex, and the timing of the
rotation is essential to the forces produced. Wake capture takes advantage of the previous
stroke's vortices, creating additional lift. Reversing the wing stroke sheds the leading and trailing
edge vortices, creating a stronger velocity field, which the wing then encounters. None of these
2.3 Existing Projects
Due to the difficulty of studying complex insect aerodynamics in nature, researchers have
developed flapping mechanisms that model either the wings and the thorax together, or just the
wings by themselves. The models allow for easier measurement and analysis of various aspects
of flight such as the forces on the wing, forces due to wing motion, and the flows created by the
flapping wings.
Ellington et aI. (1996) and Dickinson et aI. (1999) developed models of the hawkmoth and
fruit fly respectively. Ellington created a scaled up flapping device that modeled a hovering
hawkmoth's wing motions, called 'the flapper,' which he used to look at vortices created by the
wing stroke (Van Den Berg and Ellington, 1997). From their experiments they determined that
the leading edge vortex created on the downstroke was the primary provider of lift force. The
model itself was ten times the size of the hawkmoth, flapped at one hundredth of the hawkmoth's
wingbeat frequency in order to maintain the Reynolds number, and used servo motors to drive
the gears that moved the wings. Dickinson et aI. (1999) also developed a scaled up model of the
fruit fly in order to study the effects of the timing of stroke reversal on lift generation over the
course of a wing stroke. They also measured the aerodynamic forces and recorded the flow
around the wing using digital particle velocimetry. This enabled them to characterize the motions
of the generated vortices (Birch and Dickinson, 2001).
Both Ellington et aI. (1996) and Dickinson et aI. (1999) used scaled up models of insects,
modifying wingbeat frequency to stay within the correct Reynolds number range. However, in a
scaled up model the correct Strouhal number, the dimensionless number characterizing
not be accurate. The model developed in this project will be on the same scale as a dragonfly,
keeping both the same ReYnolds number and Strouhal number.
Fearing has been working on the Micromechanical Flying Insect (MFI) since 1998, which is
manufactured at a smaller scale, with a wingspan of 25 mm. It is modeled after the blowfly,
Calliphora, which has a wingspan of 11 mm and a wing beat frequency of 150 Hz. Like insects
such as blowflies and fruitflies, the MFI drives the wings at mechanical resonance in order to
avoid losses in energy. The wing apparatus was also designed to provide adequate wing rotation
in recognition of the importance of wing rotation, particularly at the end of the stroke, in
generating lift (Yan et aI., 2001). They mapped lift and thrust forces of a 2 DOF wing, using a
precision balance to record data during flapping (Yan and Fearing, 2003).
This research gives valuable insight into the flight aerodYnamics of insects. The project to be
undertaken by the MIT BioInstrumentation Lab will incorporate the use of advanced software for
computational fluid dYnamics, which will enable researchers to better characterize fluid flow
around the wing. Past models and algorithms have attempted to use computational methods to
calculate forces generated by wings, but need more improvement for theoretical values to better
match experimental results CYan and Fearing, 2003). This project will make use of an advanced
model of a flexible wing structure that deforms with flow, something that has not yet been
encountered in literature.
3. Design Requirements
3. 1
Performance Criteriaand so perfonnance criteria were chosen by looking at several sources and sometimes
extrapolating to detennine infonnation that was missing.
• The prototype wings should have a flapping amplitude range of 120-180 degrees
which is sYmmetrical about the horizontal. Ideally each wing should have a range of
motion of 160 degrees, 80 degrees above and below the horizontal. If necessary, the
range of motion can be reduced to 120 degrees. Typical flight in dragonflies requires
up to 100 degrees (Ruppell, 1989), with greater amplitudes in high lift situations
such as during vertical take-off and carrying a female during mating (Ruppell, 1989).
However, because the neutral axis may be below the horizontal (Figure 3), greater
amplitude below the horizontal is needed to achieve the appropriate range of motion.
No specific angle for the neutral axis has been found in literature; an estimate of 10
degrees below the horizontal has been obtained from Azuma (2006). A flapping
amplitude of 180 degrees about the horizontal should be adequate for reaching
nonnal flight conditions while allowing for some flexibility in changing the neutral
b)
neutral axis
Figure 3: The device should have a flapping amplitude of 160 degrees, 80 degrees above and below the horizontal (left). The neutral axis of flapping may be below the horizontal (right).
• Each wing should be able to feather 60 degrees above and below the horizontal about
its long axis, defined as the line passing through the quarter-chord of any cross
section of the wing. This axis lies roughly halfway between the two wing joints,
which operate independently of each other, enabling the wing to rotate about its
leading or trailing edge. The phase difference between the two joints creates the
feathering angle of the wing; the greater the phase difference, the greater the angle.
a)
b)
For '"G
Hind wing
Figure 4(a): The wing is sliced along a chord length, with the circle indicating the leading edge. 4(b) shows the path of a slice of the dragonfly wing as it feathers in a tilted stroke plane. (From Wang, 2005)
chord length
•
trailingedge
Figure 5: The wing should rotate 60 degrees above and below the horizontal about its long axis (or feathering axis)
• Wings beat in a stroke plane of 40-70 degrees above the horizontal (Azuma, 2006).
wing stroke extends from behind and above the joint to before and below the joint.
The angle of the stroke plane increases with greater forward velocity and decreases
with greater vertical velocity. At zero feathering angle, the wing is assumed to be
angled 20-50 degrees from the horizontal since the plane of the wing is perpendicular
to the stroke plane (Figure 6)
wing orientation ~
.
1
..---
stroke plane
\
Figure 6: The stroke plane varies from 40 to 70 degrees from the horizontal, and the corresponding plane of the wing varies from 20 to 50 degrees from the horizontal
• Wings should beat at a frequency of about 40 Hz, with one cycle defined as an
upstroke and a downstroke. Studies have recorded various frequencies for the
beating of dragonfly wings such as about 30 Hz in Azuma (2006) and 44 Hz in
Ruppell (1989).
• Dragonfly wing velocity varies throughout the stroke, and the maximum velocity
frequency and amplitude. The prototype should be able to create velocity profiles for
the wing other than a simple sinusoid.
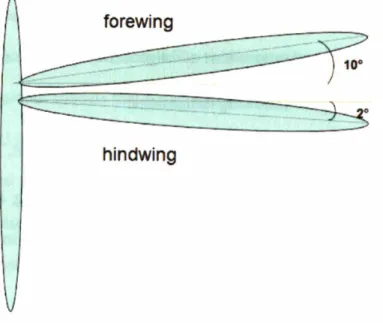
• The wings of dragonflies are not perfectly perpendicular to the body. The coning
angle, or the angle of the wing to the body in the yaw direction should be adjustable.
The forewing is generally angled about 10 degrees fOlWard, and the hindwing about
2 degrees back (Azuma, 2006).
forewing
hindwing
Figure 7: The forewing is angled about 10 degrees forward, and the hindwing is angled about 2 degrees back
• The flapping mechanism should be able to operate for at least ten minutes without
failing, an estimate of how long is necessary for adequate testing and data collection.
In choosing these performance criteria, more range of motion has been specified than the
dragonfly may have. Since many specific criteria are unknown, it was considered desirable to
allow more degrees of freedom to enable exploration of the effects of various motions.
Dragonfly anatomy was used for insight into how a dragonfly wing is actuated (Neville, 1960;
3.2 Design Constraints
The goal in designing the flapping device is to test the aerodynamics of flapping motions, so
the device should be encased in a housing that is similar to body of a dragonfly. The housing
should be close in size to a dragonfly thorax, and should not impede air flow past the wings.
The flapping mechanism is for a robotic dragonfly with a wingspan of 150 mID. A rough
estimate of the body's dimensions was obtained by looking at photographs of dragonflies and
scaling the bodies and wings up to 150 mm wingspan. There is some freedom here to vary the
dimensions since the sizes and proportions of dragonflies vary across species.
The body should have the following dimensions:
• The distance between two joints of one wing is 2.5-3 mID.
• The distance between the hind joint of the forewing and the fore joint of the
hindwing ranges from approximately 3 mID estimated from photos to 8.2 mID from
one particular paper by Azuma et al. (1985).
• The width of the thorax casing is about 10mID.
Because of manufacturing limitations in the time available for building the prototype, the
actual dimensions of the prototype are four times the dimensions specified.
The housing containing the flapping mechanism can be tall as long as it remains stable. The
housing can be broader at the base as long as it does not interfere with the air flow created by the
wings. The minimum distance the base can be from the wing attachment point is 66 mm in order
to clear the wing, assuming a length of 70 mID, but there should be additional space in the final
The torque required to flap a dragonfly wing was estimated by adding the peak torque due to
drag and the peak torque due to rotational inertia, using maximum stroke velocities obtained by
Ruppell (1989) for various species of dragonflies. The maximum stroke velocity may be
different from a velocity calculated from a simple sine wave representing the vertical position of
the wing. The maximum torque calculated was about 6.2x10⁻³ Nm (see Appendix A).
4. Design Process
A literature review was first conducted in order to see what models had previously been
developed. Many of the previous models that have been developed were scaled to a size much
larger than that of the actual insect (Zbikowski et aI., 2005), enabling the model to employ more
complicated mechanisms to move the wing. One model that was scaled accurately was the
Micromechanical Flying Insect (MFI) , developed in the Biomimetic Millisystem Lab at DC
Berkeley, which had a wingspan of 25 mm and was capable of flight (Zbikowski et aI., 2005).
Each wing flapped using a four-bar linkage mechanism. Because the MFI was one of the few
devices that was on the same scale as an insect, it was examined more closely in order to
determine what could be learned from it. Other designs used gears and transmissions that were
difficult to miniaturize.
In determining the final mechanism used to flap the wing, I considered the four-bar linkage
inspired by the MFI design as well as a mechanism using cables or rigid links to drive the
flapping motion directly. Models of both methods revealed the capabilities of and issues
associated with each. After examining each method, one approach was chosen to be developed
4. 1
Consideration of two methods of actuation4.1.1 Linkage
The linkage in the MFI served as the starting point for developing one method of flapping the
wing. Goals in developing models were to analyze the benefits of using a linkage and to
determine if a linkage was appropriate for this project's purposes.
4.1.1.1 MFI design
In the MFI, each wing is flapped using a four-bar linkage as shown in Figure 8. There are
three bars 6 mm long, and a short bar 0.5 mm long. The wing is connected to a spar which lies on
the shortest bar. Points C and F are fixed, and Point B is actuated by the PZT actuator at A. An
approximately linear horizontal motion at point B translates to a maximum of 180 degrees of
rotation for the spar.
,..
,..
JE--+-=-=-~
8l
Spar
PZT
Figure 8: Linkage used to drive the wings of the Micromechanical Flying Insect. A PZT actuator drives the rotation of the spar (From Van et aI, 2001).
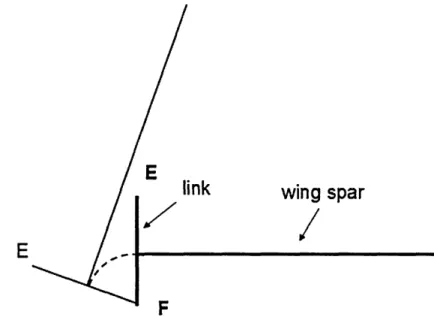
There are a few aspects of the linkage in the MFI that are not ideal for this project and would
need to be modified. The wing has an arcing pivot point since the wing spar is attached to the
midpoint of a bar (EF) that rotates about an endpoint (F), shown in Figure 9. This arc is small,
but is not desirable in reproducing the motions of a dragonfly wing, which probably has a
stationary pivot point. The exact linkage in the MFI also does not meet the design constraints for
this project since it extends too far into the body to fit a pair in a 10 mm wide thorax.
E
E
link
/
F
wing spar
I
Figure 9: Due to the attachment of the wing spar to the midpoint of the link, the end of the wing spar travels through an arc instead of remaining stationary.
4.1.1.2 New Linkage
In examining the four-bar linkage design as a possible path, I first focused on how to
achieve flapping and feathering since changing the stroke plane and setting the coning angle
would be fairly independent from flapping and feathering. If no alternative was found, the stroke
plane could be changed by rotating the platform on which the motors rested, and the coning
To be appropriate for this project, the wing support should have a stationary pivot point, and
the linkage should fit the design constraints. The attachment point of the wing spar was first
moved from the middle to the secured end of the shortest bar where rotation occurs so that the
wing spar rotates about a stationary pivot point (Figure 10). Since the linkage is slightly larger
than what is appropriate for the dragonfly body, the linkage lengths need to change in order to fit
within a smaller footprint while giving a flapping amplitude of 160 degrees. Given a thorax
width of about 10 mm, each flapping unit should not extend more than half the width, or 5 mm,
into the body. In the MFI, half the linkage also extends above the wing joint. Since in a
dragonfly the top of the wing appears to be flush with the top of the thorax, the flapping
mechanism for this project would ideally be contained below the wing joint, keeping the air
above the joint undisturbed.
link"",
wing spar
I
'\
pivot point
Figure 10: Attaching the wing spar to the endpoint of the link gives the wing a stationary pivot point.
To determine a linkage that would meet these space constraints and manufacturing
limitations, and still achieve appropriate flapping amplitude, I experimented with different
necessary in the driving bar to move the wing through its full range of flapping while staying
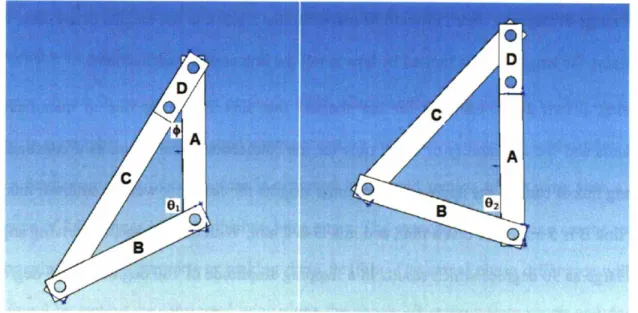
within space constraints. In Figure 11, A is fixed, B is actuated, and the wing support is
connected to the end of D that attaches to A. The configurations of the links at the two extremes
of the flapping range are shown. When the wing is at its highest point, links C and D are
collinear. When the wing is at its lowest point, links A and D are collinear. It is possible to move
the wing higher by continuing to rotate link D counterclockwise, where C and D create a
concave angle, but there is no way to control which direction D rotates by controlling link B.
Thus, the point at which C and D are collinear is at the extreme. It is also possible to rotate D
clockwise past the configuration shown to achieve a greater angle below the horizontal, but it is
preferable not to extend into the space above the wing.
Figure 11: Orientations of four bar linkage at two extremes.
Calculations were done using the law of cosines. In the first configuration, where C and D
are collinear, the angle fjJ is the supplementary angle to the full flapping amplitude. The angle (}l
to drive the wing spar through an angle of (180- rjJ) degrees. rjJ and B are calculated using Equations 1-3. (C+D)2 +A2 _B2 cosrjJ
=
2A(C+
D) (A2 +B2)-(C+D)2 cos B] = -=---=---=---=.-2AB (A+D)2 +B2 _C2 cosB
= -=---=---2 2B2(A+D) (1) (2) (3)To minimize the number of variables, links A and B were set to have the same lengths in
initial calculations. These calculations showed that the longer link C is relative to the lengths of
links A and B, the greater the flapping amplitude. To reduce the rotation of B needed to obtain
the full range of flapping, link D should be made shorter relative to the lengths of the other links.
Minimizing the length of D is limited by how small the link can be manufactured.
Using 2 mm as an estimate for the shortest that link D can be due to manufacturing
constraints and the availability of small pins for the connections, and 5 mm as a constraint for
how long link B can be, the approximate optimal lengths for each link were as follows: link A is
5 mm, link B is 5 mm, link C is 8 mm, and link D is 2 mm. With this linkage, the driving angle is
still as large as 90 degrees which results in a flapping amplitude of 160 degrees, or 75 degrees if
the maximum flapping amplitude is reduced to 140 degrees. At a distance of 1 mm away from
the pivot point of link B, the side to side linear displacement needed is 1.4 mm. Piezoelectric
actuators typically displace less than 1 mm, so using a piezoelectric actuator is not a viable
option.
required, but includes gearing in two steps which may not be necessary. Link B can also be
driven by a linear actuator that will push and pull from one side. Because the motion at anyone
point on link B is not linear but is actually an arc, the driving arm will need to either rotate with
respect to the actuator and link B, or be slotted so that the interface with the link can slide. Using
this method, the translation of linear motion into rotary motion will need to be accounted for in
the mathematics for actuating the arm.
4.1.1.3 Interface with wing
If two joints per wing are used with stiff spars moving out of phase, the distances between
the two wing supports changes. One option to address this issue is changing the distance between
the two joints so that the joints flex inward as the phase difference increases and back out when
the two joints flap more closely in phase. Another option is to have an elastic wing material that
will stretch with greater feathering.
Since objects in nature are not perfectly rigid, allowing the wing or joint to flex by a small
amount is acceptable. Assuming rigid spars extending from the joint to the mid section of the
wing, a feathering angle of 60 degrees is achieved at the mid section of the wing with a phase
difference of 8.5 degrees between the two wing spars. The stretching of the wing can be reduced
by shortening the wing supports or making them flexible. The actual phase difference will need
to be found by testing the fabricated wing since the above estimate is very rough and does not
account for the flexing of the wing. With each wing of different flexibility, a different phase
difference will be associated with the feathering angle.
4.1.2 Direct drive
Several designs uSIng cables or rigid links were considered and prototyped in the
wing supports rigidly connected so that they remained in the same plane. Feathering could be
induced by angling the two joints at the base of the wing. Each wing needed to pivot about a
point that could rotate in three directions.
4.1.2.1 Cables
The first design used a set of cables to flap the wing and used one motor to drive the
flapping of the wing. As the wing is pulled down, the bar on the other side of the pivot pulls the
cable up, and vice versa. This reduces the need for two motors to pull the wing support on
opposite sides of the pivot point to one motor that pulls both sides of the wing. Figure 12 shows a
side view of the pulley and wing system.
pivot point
~-cable
~pUlley
\
wing
Figure 12: Diagram of cables actuating the wing support. The pulley rotates around a fixed point, and the cable pulls on the wing support on either side of the pivot. Rotating the pulley will shorten the cable on one side and lengthen the cable on the other.
The pulley also pivots about its midpoint to create a feathering motion. Figure 13 shows the
wing and pulley system from the rear. As the pulley rotates, the cables cause the wing to rotate to
wing
fixed point
cable
pUlley
Figure 13: View from the back of the wing, looking out across the wing. The pulley rotates about a fixed point to change the feathering angle of the wing.
One issue with this design is that the cables are connected to the pulley at an angle, causing
it to spool across the pulley instead of remaining on one circumference (shown in Figure 14).
The pulley can be grooved, or the pulleys can be separated so that they remain horizontal and
perpendicular to the cable (Figure 15). If there are two separate pulleys, two separate motors will
be required to drive each one.
cable
pulley
Figure 15: Instead of a single pulley for both joints of the wing, the pulleys are separated in order to keep the cables perpendicular to the pulleys.
In using cables to pull on the wing support, one should consider the distance between the
attachment of the cable and the pivot point. The further out the cable extends into the wing, the
more likely it is to disrupt the air flow created by the flapping motion, making rigid links on the
inside half of the wing support a better option. However, this may not be an issue at all, since the
wing's rotation translates into a small linear distance close to the root of the wing, and the air
flow where movements are small is probably not essential to the total forces created by the wing.
4.1.2.2 Rigid links
The second design for a rigid wing involves rigid links instead of cables. Two links push and
pull on the two supports. After making a mock-up of this design, it could be seen that there was a
lot of movement needed at the point of actuation, assuming vertical links. There is an arcing
motion due to the rotation of the wing support (Figure 16). There is also a movement in towards
the feathering axis due to feathering motion. The arcing motion can be addressed by attaching
the links to something that also travels in an arc of the same radius, such as a wheel. The distance
ends of the lin1e However, this would also introduce an additional factor to consider In
calculations in controlling the actuators.
wing joints rigid links wing support ~.""~ path of wing support
..
Figure 16: The wing support traces an arc as it flaps, requiring the same motion from the rigid link driving it (left). As the feathering angle increases, the links will need to move closer together (right)
4.1.2.3 Ball joint designs
In mocking up scaled up models of the designs, I used several different materials to make
the joint. Since there were no ball joints small enough or with a large enough range of motion
that Icould obtain within the time constraints, other materials were used.
The first material I experimented with was Smooth-On urethane rubber, (ReoFlex and
Evergreen Series, Smooth-On, In~., Easton, PA), used as molding material that can flex and
allow rotation in three directions. Figure 17 shows different designs using the urethane rubber. In
working with the material, it was difficult to make intricate shapes on a small scale. Another
issue with designs a-c was that the center of the wing pivots around a point outside the joint due
to its arcing motion.
Figure 17(a-d): Back view of various joints using a combination of rods, a plate, and urethane rubber. Figures 17c and 17d show a cross sectional view. The wing supports lie on the ends of the horizontal rods and the sides of the plates (not shown)
One simple option for a flexible joint involved a cylinder through a hole in a plate holding
the wing supports. Since all the glues used on the urethane rubber could be peeled off, the only
way to secure the cylinder to the plate was to pour excess material around the hole. (Figure 17d)
was applied. The hole in the plate would also need to be fairly large in order to accommodate the
range of motion necessary for flapping (Figure 18), making the joint less stable.
hole diameter
rod
Figure 18: Side view of wing. The wing flaps 80 degrees above and below the horizontal, so a hole that allows a rod to pass through would need to be wide.
Since a ball joint could not be manufactured easily, a joint was made by applying epoxy to
nuts and bolts which allowed rotation in three directions. This served the purposes of the
mock-up, but is not ideal since the rotations do not occur at the same point. Miniaturization would also
Figure 19: A joint with three degrees of freedom made from nuts and bolts
The ball joint included in the design for a wing presents several issues. The first is
manufacturability. There may be options that have not been explored, but the design options
explored in this project have been difficult to miniaturize, not very robust, and/or reproduce the
kinematics inaccurately due an arcing pivot point. The second issue is the constraint in degrees
of freedom. If the wing joint is rigid and fixed at one point, and each wing support is constrained
to travel parallel to the stroke plane, then the movements of the two wing supports are coupled.
With a single ball joint in the middle of the wing joint, the wing always feathers about a chord
containing the ball joint. The wing cannot hold one joint still while moving the other. However,
it is ideal for the wing joints to move independently. Each joint is actuated by separate muscles,
so it is logical that they move independently from each other with some degree of coupling due
to the attachment to the same wing. Further iterations of the direct drive method of actuation
should drive each joint independently.
4.1.2.4 Interface with wing
The original intent of having a rigid wing for the direct drive was to avoid the need to stretch
wings do at the base. Further designs using the direct drive method of actuation will use the same
interface as the linkage design.
4.1.3 Evaluation and decision
The decision was made to pull directly on the wing supports and not to use linkages to drive
the flapping of the wing. Both methods would produce the appropriate kinematics given no space
limitations, and so the decision was based on space constraints, simplicity of design, and
manufacturability. A linkage would occupy more space since it would need to be connected to
another mechanism that would drive the movement of one link. Having two mechanisms instead
of one is also not ideal when one mechanism alone would suffice.
Benefits to the linkage include the ability to achieve resonance to flap at higher frequencies
using less power, and the possibility of having a smaller flapping unit. This was necessary for the
MFI since it needed to fly. These characteristics are not necessary for this project, since the unit
will not fly and can use actuators that are much larger and provide more power. The frequencies
of flapping required are also much lower-40 Hz for this project compared to 139 Hz for the
MFI (Yan et
aI.,
2001).4.2 Development of direct drive design
4.2.1 Changing the stroke plane
The original method of changing the stroke plane was to swing the platform holding the
flapping device, including the actuators. However, this was cumbersome and required a lot of
allow for the wing to flap down, the connections of the flapping mechanism to the motors below
would need to be even larger to give room for the motors to swing up.
distance required between wing
attachment and base
additional distance to allow for swinging of platform
I
"
lowest point reached by motorswing attachment point
-
---::;~I
path of swinging platform of motors highest point .reached by motorsFigure 20: Diagram of swinging motors system to change the stroke plane. Swinging the motors requires more height in order to accommodate the path of the motors while maintaining free space around the wing.
A method of changing the stroke plane that does not require rotating a lot of equipment
through a large arc would be preferred. The two joints should rotate about a middle point to
produce a rotating stroke plane without the connection moving with the wing. One way to do this
is to change the relative heights of the joints, keeping the pivot point stationary. A four bar
linkage constrained to remain vertical can accomplish this. As the joints slide up or down relative
to each other, they move closer together, and the vertical supporting bars move closer as well.
The connection to the motors should not change, so the motors should also move with the joints
___ wing joints
\
Figure 21: Diagram of changing the stroke plane by changing the heights of the wing joints. A four bar linkage keeps the vertical bars upright while the joints rotate about a fixed point.
Figure 22 shows the Solidworks model of the prototype. A middle bar constrained to remain
vertical keeps the vertical supports vertical as the stroke plane changes. Cables form two bars of
a four bar linkage with the two joints and a lever arm that controls the angle of the stroke plane.
As the horizontal distance between the joints shortens, the horizontal distance between the cables
also shortens, so that there is no need to account for changing vertical cable lengths due to angled
cables.
The first design included only a hollow cylinder surrounding the two ends of the wing rods
that caused the wing rod to rotate with the changing heights of the joints. However, the cylinder
overlapped with only a short section of the rod, creating a situation where the rod could catch on
the cylinder as it rotated. An additional bar was added to cause rotation in the joints rather than
the rods (Figure 23). The cylinder is no longer necessary, but has been retained to provide
additional stability.
Figure 23: (Back view of wing joint assembly) The joint end forms a half circle which fits into a hole of the same shape in the bar. The bar causes the two joints to rotate together.
Since the heights of the joints change with the changing stroke plane, the cables need to be
adjusted as the stroke plane changes. In order to maintain the same relation between the point of
cable actuation and the joints, and also between the motors and the cables, the heights of the
motors must also change. If the cables run straight down from the joint to the point of actuation,
on another four bar linkage that would create the same relative vertical and horizontal motions as
those in the joints (Figure 24).
Figure 24: As the motor cases move up and down, the stroke plane of the wing also changes, keeping the relationship between the motor and wing joint the same throughout changing stroke planes. Both the motor units and the wing joints use a four bar linkage to change height
4.2.2 Flapping actuation
Inthe previous cable design for the direct drive, the cables pulled on either side of the pivot
point of each wing support. A minor concern here was how far from the pivot point the cable
could be attached. Inorder to address this concern and also use less space, the wing support
could be rotated instead of pulled. One cable rotates the rod in one direction, and the second
cable rotates the rod in the opposite direction. The angular displacement of the wing support is
controlled by the length of string pulled, which is inturn detennined by the vertical displacement
of the lever arm pulling on the cables. As one side of the lever arm lowers, pulling the cable to
rotate the wing rod in one direction, the opposite side of the lever ann rises, feeding an equal
Since the cables are now being pulled directly below the joint, the cable will not be tangent
to the cross section of the wing rod. The length of cable wrapped around the rod will change
slightly with changing stroke plane. In order to prevent this, the cable can be directed
horizontally through a guide before being directed down to the actuating lever. The initial design,
shown in Figure 25 labeled '1', used a pulley on the vertical support to guide the cable from the
wing rod down below the joint. However, new angles are introduced as the stroke plane changes.
In the second design, labeled '2', the guides rotate with the joint to maintain the same angle with
the wing rod.
Figure 25(a): Solidworks model showing the cable attachment points on the wing rod. One cable goes through each attachment point to rotate the wing rod in each direction. (b) Solidworks model showing the first and second methods for guiding the cable down (cable attachment points hidden, please refer to figure a). In the first method, labeled 1, the pulley is on the vertical support, and as the stroke angle changes, the relationship between the wing rod and the pulley changes. In the second method, labeled 2, the guides for the cable are on the joint, which rotate along with the wing rod.
The vertical displacement of the lever arm-cable connection point should equal the length of
string wrapping around the wing rod. In order to achieve this, the section of cable connecting to
the lever arm must run in the same direction as the displacement of the lever arm, and the cable
4.2.3 Cable guides
Since the motor diameter is larger than the footprint of the thorax, the cables need to be
guided away from underneath the thorax where the wing structures are. The layout of the motor
casings is shown in Figure 26. The cables should run down close to the body of the wing
structure stand. About 70 rom underneath the wing rods, the cables turn to run horizontally to the
motors. Since the 70 rom is approximately equal to the length of the wing and the wing is angled
forward, there is more than enough clearance for the wing to flap. For the final design, there
should be consideration of how much of the air surrounding the wing should remain undisturbed,
and the height, or the distance between the wing rod and the widening of the base, should be
increased accordingly. motor I
/
wing structureI
Figure 26: Overhead view of the layout of the four flapping mechanisms for each of the four wings, and the eight motors required to drive the mechanisms (two motors per wing)
The first design for guiding the cables included grooved 'pulleys' at the bottom of the wing
structure stand. However, it is much simpler to have holes with an additional curved bearing
the stand to above the motors. Another pulley turns the cable to run vertically down to the
connection to the lever arm. The schematic is shown in Figure 27. The Solidworks model of the
guides that turn the cables out to the motors is shown in Figure 28. The actual bearings of the
prototype are shown
in
Figures 29 and 30.wing joint wing joint
j
\
\c.bIe guld•• -- _
1
1
Figure 27: Schematic of cable system. The cables run vertically down from the wing joint, through a guide that turns the cables to run horizontally to another guide that turns the cables to attach vertically to the lever on the motor.
cables
•
to mctors
cables
to motors
Figure 28: Cables that actuate the flapping motion run down from the joint through the four circular holes in the front (left). Cables that change the stroke plane run from the vertical supporting bar down through the slots (right).
Figure 30: Rounded bearing surfaces guide the cables through the last turn downward to the actuating lever arm
4.2.4 Motor and lever assembly
The lever anns driving the cables attached to the wing rods sit in the base several hundred
millimeters below the wing joints. Each lever has one cable attached to each end to drive the
back and forth rotating motion of the wing rod. One end of the lever is driven by a linear actuator
that will push and pull on the ann. Since the actuator travels in a linear path and the lever travels
in an arcing path, the interface must account for the different types of motion. Either the actuator
connection can pivot, or the lever ann can be slotted. This prototype uses a slot as the interface
a)
Figure 31(a): The lever arm contains slots for the cables and actuator. The cable attaches to the slot labeled 1.
The actuator will be connected with the slot labeled 2. (b): The lever arm sits on top of the motor casing. The actuator will push on the block shown in light gray lines, which will transfer the force to the lever arm.
The BioInstrumentation Lab has custom-built Lorentz force linear actuators available that
can give displacements of 2-4 mm at 40 Hz with an output of a few Newtons. Each motor is
roughly 40 mm in diameter and 100 mm tall. Each motor sits in a separate case, with the lever
unit and cable guide on top.
4.2.5 Prototype dimensions and manufacturing
The prototype was designed for a wing and thorax that were scaled by a factor of four.
Specifically, the wing supports are 12 mm apart rather than 3 mm, and the distance between two
wings is 32 mm, rather than 8 mm. Each wing joint assembly has a footprint of about 25 by 14
mm. Each dimension in the prototype is not necessarily four times as large as a mechanism that
is to scale, since many of the dimensions were chosen based on the limitations of manufacturing
with the tools available for use. Stereolithography and laser cutting were used in addition to a
4.2.5.1 Stereo lithography
The joints and wing supports were built using stereolithography. The limitations in the design
included hole size and thickness of material. The loads on the parts are low, but the material used
in stereo lithography is brittle and can be fragile if the part is small. Holes were made to be at
least 1 mm in diameter since smaller holes may close up during manufacturing. Holes are
surrounded by at least 1 mm of material or more if the thickness is small. Parts are generally at
least 2 mm thick to prevent failure.
4.2.5.2 Laser Cutting
The laser cutter was used to cut acrylic to make the supporting structures and linkages, which
were generally rectangular. One issue in using the laser cutter is the taper of the cut. With the 2
mm and 3 mm acrylic, the taper was not as obvious and the parts fit easily with little
modification. With the 6 mm acrylic, small holes needed to be remachined using a drill press. To
create more accurate fits, smaller pilot holes were made with the laser cutter, and then bigger
holes were drilled. Because of the taper, very small holes cannot be made with the laser cutter
with great precision.
4.2.6 Mounting and setting the coning angle
In setting the coning angle, all components of the flapping mechanism must rotate together in
order to keep the relationships of the cables constant. In this prototype, MK positioning bars
were used to hold the components up. The pivot point lies directly below the midpoint between
the two wing joints. There is some space remaining between the fore and hind wing setups to
allow for the coning angle to change. Future designs can place the two setups closer together if
5. Evaluation of the prototype and further improvements
The prototype built (shown in Figure 32) demonstrates the prescribed motions at the base of
a dragonfly wing. It can cause a wing to flap with an amplitude of 180 degrees and feather 60
degrees in both directions, and can change its stroke plane from 40-70 degrees inclined above the
horizontal. Each wing support operates independently, enabling feathering of the wing about
both the leading and trailing edges. The coning angle can be set to 10 degrees for the forewing
and 2 degrees for the hindwing. Actual ranges of motion are larger but have only been confirmed
for the ranges specified in the performance criteria.
The prototype is scaled to four times the size of the final device and cannot be operated at 40
Hz as it is meant only to illustrate the kinematics of the wing. Further iterations should use
different methods of manufacturing and fit within a roughly 10 mm wide thorax casing. This
prototype only contains two wings-a forewing and a hindwing on the same side of the body.
Mounting methods result in dimensions that are much larger than the design constraints specify.
In changing the stroke plane, cables that pull on the vertical supporting bars do not remain
vertical as the stroke plane changes. There are slight angle changes as the stroke plane varies, so
the change in stroke plane produced at the base does not translate perfectly at the wing unit.
It was at first difficult to flap the wing supports in the prototype. Since the joints and wing
rods were made with stereo lithography, there was a significant amount of friction due to a tight
fit and rough surfaces. The bearing surface for the rods was not long enough-the cylinder in the
center was not stable enough to act as a bearing as it was not fixed to either joint. There was also
a lot of friction between the cable and the cable guide in the joint as the joint was too small to
add a bearing surface to. To address these issues, lubricant was added to the wing rod-joint
wing rods, creating a long bearing surface for both wing rods. A bearing surface for the cables
below the joint was also added and attached to the four-bar linkage (Figure 32). However, this
bearing extends past where the thorax casing should end. In future iterations, the cables should
be directed towards the inside of the thorax rather than away from it since there is more space to
add a bearing surface on the inside of the wing pivot point (Figure 33). Lengthening the joint in
which the wing rod rotates will also provide a better bearing surface and may eliminate the need
for a pin through the wing rods.
Figure 32: A thin rod was inserted through both wing rods, acting as a bearing for the rotation of the wing rods. A bearing surface was also added for the cables extending from the joint.
Figure 33: In the new design, cables attach to the wing rod and are directed away from the wing towards the thorax. A bearing surface is added to the back of the bar (not shown).
The cables go through a few right angle turns from the wing rod to the lever arm. For each
turn, there should be a bearing surface to reduce friction between the cable and guide. The
resulting velocity of the cables is about 100-200
mmlsdepending on the diameter of the wing
rod. If the material that the cable runs through is soft, even minimal wear can cause a significant
change in the part. More importantly, if there is high friction between the cable and the cable
guides, the amount of force required to pull the same load is increased. With three approximately
right angle turns, the force required would increase dramatically without bearing surfaces,
making it difficult to actuate the wing supports. The prototype uses curved acrylic pieces to act
as bearing surfaces since they were easy to attach to the existing acrylic pieces. For the final
design, a smoother surface should be used.
In
the existing prototype, the two cables for each wing joint were placed too close together.
Since the thin rod was placed through the wing rod, the second attachment point could no longer
be used since the hole was filled by the rod. Figure 34 shows the original attachment points for
the two cables. The second cable was then attached to the same point as the first cable, causing
the exit points to be close together. As seen in Figure 35, the cables interfere with each other as a
result of the two cables exiting the joint on the same side. In the final design, the cables should
be placed on opposite sides of each joint, or there should be additional guides to separate the
cables.
wing support
Figure 35: Since the two cables are close together, the cables sometimes interfere with each other.
In the higher joint, the cables also interfere with the wing support due to the added
bearing surface. By directing the cables behind the wing joint assembly, this issue will no longer
be a problem.
Fasteners were not accounted for in the design of the flapping mechanism. In the actual
mechanism, the bolts protrude further than is ideal, interfering with the path of the cables. New
fasteners can be chosen that do not extend as far.
In future iterations of the flapping mechanism, special attention should be paid to the
bearing surfaces in order to reduce friction and minimize the forces required to actuate the wing.
The wing will be flapping at 40 Hz, so it is important that all rotating parts can slide smoothly
against their respective surfaces. Some additional design work needs to be done in order to fit all
four wing units into the specified thorax size constraint. Adjustments to the angles of the cables
and more precise tensioners are needed in order to keep the tension consistent as the stroke plane
References
Alexander, D. E. Wind tunnel studies of turns by flying dragonflies. Journal of Experimental Biology. Vol 122, issue 1, pages 81-98, 1986.
Azuma, A., Azuma, S., Watanabe, 1., and Furuta, T. Flight mechanics of a dragonfly ..
Journal of Experimental Biology. Vol 116, pages 79-107, 1985.
Azuma, A. (2006). The Biokinetics of Flying and Swimming, 2nd Ed. AIAA Inc.
Birch, J. M. and Dickinson, M. H. Spanwise flow and the attachment of the leading-edge vortex on insect wings. Nature. Vol 412, pages 729 -733, 2001.
Clark, H. W. The adult musculature of the anisopterous dragonfly thorax (Odonata, Anisoptera). Journal of Experimental Biology. Vol 67, pages 523-526, 1940.
Combes, S. A. and Daniel, T. L. Into thin air: contributions of aerodynamic and inertial-elastic forces to wing bending in the hawkmoth Manduca sexta. Journal of Experimental Biology. Vol 206, pages 2999-3006, 2003.
Dickinson, M. H., Lehmann, F-O., and Sane, S. P. Wing rotation and the aerodynamic basis of insect flight. Science Vol 284, pages 1954 -1960, 1999.
Ellington, C. P ., Van den Berg, C., Willmott, A. P., and Thomas, A. L. R. Leading-edge vortices in insect flight. Nature Vol 384, pages 626-630, 1996.
Neville, A. C. Aspects of flight mechanics in Anisopterous dragonflies. Journal of Experimental Biology. Vol 37, 631-656, 1960.
Rupp ell , G. Kinematic Analysis of symmetrical flight manoeuvres of Odonata. Journal of
Experimental Biology. Vol 144, pages 13-42, 1989.
Sane, S. P. The aerodynamics of insect flight. Journal of Experimental Biology. Vol 206, pages 4191-4208, 2003.
Simmons, P. J. The neural control of dragonfly flight. 1. Anatomy. Journal of Experimental
Biology. Vol 71, pages 123-140, 1977.
VanDen Berg, C.. and Ellington, C. P. The vortex wake of a 'hovering' model hawkmoth.
Philosophical Transactions of the Royal Society of London, series B. Vol 352, no. 1351, pages
317-328, 1997.
Wakeling, J. M. and Ellington, C. P. Dragonfly flight (2). Velocities, accelerations and kinematics of flapping flight. Journal of Experim ental Biology. Vol 200, pages 583 -600, 1997.
Wang, H., Zeng, L. J., Liu, H. and Yin, C. Y. Measuring wing kinematics, flight trajectory and body attitude during forward flight and turning maneuvers in dragonflies. Journal of Experimental Biology. Vol 206, pages 745 -757,2003 .
.
Wang, Z. J. Dissecting insect flight. Annual Review of Fluid Mechanics. Vol 37, pages 183-210,2005.
Wootton, R. J. Functional morphology of insect wings. Annual Review of Entomology, Vol 37, pages 113-140, 1992.
Van, J, Wood, R. J., Avadhanula, S. , Sitti, M., and Fearing, R. S. Towards flapping wing control for a Micromechanical Flying Insect. Robotics and Automation, Vol 4, pages 3901-3908, 2001.
Van, J. and R.S. Fearing. Wing Forces Map Characterization and Simulation for the MicroMechanical Flying Robotic Insect, IEEE Int. Conf. on Intelligent Robots and Systems, Oct 28-30, 2003, Las Vegas NY.
Zbikowski, R., Galinski, C., and Pederson, C. A four-bar linkage mechanism for insect-like flapping wings in hover: Concept and an outline of its realization. Journal of Mechanical Design, Vol 127, Issue 4, pages 817-824, 2005.
Appendix A
Calculation of torque required of wing
Total torque =torque due to drag
+
torque due to inertia (small)Torque due to drag:
where p
=
1.293kg / m3,
Cd
=
1.17 , W=
15mm, L=
70mmOJwas estimated from linear stroke velocities of wings documented by Ruppell (1989)
max max
wing stroke angular
length wingbeat velocity velocity torque insect (mm) frequency (Hz) (mm/s) (rad/s) (Nm)
A.c. 45.1 36 2920 129.490 5.430E-03
An.i.
(hindwing) 47.5 37 2070 87.158 2.874E-03
An.j.
(male) 51 36 2940 115.294 6.224E-03
Abbreviations used for Anisoptera Aeshnidae: A.c.: Aeshna cyanea
An.i.: Anax imperator An.j.: Anaxjunius
Notes:
Calculations are only estimates since the data are not necessarily correlated across the table,
as the data are taken from separate tables.
Linear stroke velocity is reported for half the wing length.