Design and Characterization of Artificial
Transcriptional Terminators
by
r
MASSAQt1USE!fS INE,TiTUl E i,'I Of-TECHN('LOi_~y' I
, ---""----"1 . ;
NOV 1
3 2008
Haiyao Huang
LIBRARIES
----,,--,"----'
Submitted to the Department of Electrical Engineering and Computer
Science
in partial fulfillment of the requirements for the degree of
Master of Engineering in Electrical Engineering and Computer Science
at the
MASSACHUSETTS INSTITUTE OF TECHNOLOGY
August 2007
©
Haiyao Huang, MMVII. All rights reserved.
The author hereby grants to MIT permission to reproduce and
distribute publicly paper and electronic copies of this thesis document
in whole or in part.
Certified by ..
':7
'r ._ . . . -.... No • 1/ • •~!
..
:'Phdrnas
F. Knight
Jr.
Accepted by .. /
~.' ~~,''.
Senior Research Scientist
Thesis Supervisor
Arthur C. Smith
Chairman, Department Committee on Graduate Students
Design and Characterization of Artificial Transcriptional
Terminators
by
Haiyao Huang
Submitted to the Department of Electrical Engineering and Computer Science on August 21, 2007, in partial fulfillment of the
requirements for the degree of
Master of Engineering in Electrical Engineering and Computer Science
Abstract
Design and characterization of artificial transcriptional terminators. Ten new minators were designed based on previous research of terminator structure and ter-miantion efficiency. The terminators were built by PCR extension, ligated into a BioBrick plasmid backbone, and transformed into TOP10 cells. Characterization de-vices were built to test the terminators. Input and output of the terminator were measured by expression of RFP and GFP. Charaterization devices were then placed into the E. coli strain CW2553/pJAT18, which hijacks the arabinose transport system to provide controlled input to the terminator. Of the ten terminators designed and tested, BBa_B1002, BBaB1004, BBaB1006 and BBaB1010 proved to be strong ter-minators with termination efficiencies above 90%. These terter-minators may be obtained from the Registry of Standarized Parts at parts.mit.edu.
Thesis Supervisor: Thomas F. Knight Jr. Title: Senior Research Scientist
Contents
1 Introduction 2 Background
2.1 Advances in Synthetic Biology . . . . 2.1.1 The abstraction barrier and its use . . . . 2.1.2 The advance of BioBricks . . . . 2.1.3 Evolution of the genetic inverter . . . . 2.2 Rho-independent Transcriptional Terminators . . . . 2.2.1 Finding rho-independent terminators in prokaryote genomes . 2.2.2 Effects of structure on termination efficiency . . . .
2.2.3 Predicted termination efficiency given structure . . . .
19 21 21 21 22 24 25 26 27 27
3 Design and Construction of Artificial Transcriptional Terminators 31
3.1 D esign . . . . 31 3.1.1 H airpin . . . . 32 3.1.2 Length of tail . . . . 32 3.1.3 Predicted efficiency . . . . 33 3.2 Construction . . . . 34 3.2.1 Primer design . . . . 34 3.2.2 DNA purification . . . . 36
3.2.3 Insertion into BioBrick backbone . . . . 37
3.2.4 Transformation into TOPlO competent cells . . . . 39
3.2.6 Errors and Troubleshooting . . . .4
4 Design and Construction of Characterization Devices 43 4.1 Design of terminator characterization devices . . . . 43
4.1.1 PoPS input generator . . . . 45
4.1.2 Device under test . . . . 46
4.1.3 Dual Fluorescent system . . . . 46
4.1.4 C ontrols . . . . 48
4.2 Construction of Characterization Devices . . . . 48
4.2.1 Triple antibiotic assembly assembly . . . . 52
4.2.2 Robotic assembly . . . . 53
4.2.3 Verification . . . . 53
4.3 Transforming into an ideal strain . . . . 53
4.3.1 E. coli strain CW2553 . . . . 54
4.3.2 Making competent cells . . . . 54
4.3.3 Transformation of characterization devices into CW2553 . . . 55
5 Using Characterization Devices to Measure Termination Efficiency 57 5.1 M aterials . . . . 57 5.1.1 M edia . . . . 58 5.1.2 Characterization Devices . . . . 59 5.1.3 Controls . . . . 59 5.2 P rotocols . . . . 59 6 Results 61 6.1 C ontrols . . . . 61
6.1.1 Constitutive expression of RFP and GFP . . . . 61
6.1.2 Expression of RFP and GFP from empty characterization plas-m ids . . . . 63
6.2 Term inators . . . . 64
6.2.1 Results of characterization plasmid 1 . . . . 75
6.2.2 Results of characterization plasmid 2 . . . . 76 6.3 Termination Efficiency . . . . 87
7 Discussion 95
7.1 Effects of mRNA stability . . . . 95 7.2 Accuracy of predicted termination efficiencies . . . . 97 7.3 Future works . . . . 98
List of Figures
2-1 Abstraction barriers, shown in red, control the access of information across abstraction levels. A sample exchange is shown in green. This image was taken from http://parts.mit.edu. . . . . 22 2-2 Two BioBrick parts, blue and green, are combined to form one part.
This image was taken from http://parts.mit.edu. . . . . 23 2-3 On left is a classic inverter, which uses Lac and cI as signals. A
high concentration of Lac inhibits the expression of the downstream cI gene while a low concentration of Lac allows more transcription and expression of cI. On the right is a PoPS based inverter, which takes PoPS as both inputs and outputs. When the input is high, cI is produced and acts to the keep the output PoPS low. This image was taken from http://parts.mit.edu. . . . . 25
2-4 This image, taken from the d'Aubenton-Carafa paper, illustrates the correlation between the calulated d score and the measured efficiency of a terminator. Termination efficiency increases linearly as the d score increases, and plateaus after the d score is higher that 40. . . . . 29
4-1 Characterization plasmid version 1: controlled by ParaBAD, with inputs
measured by GFP expression and outputs measured by RFP expression. 43 4-2 Characterization plasmid version 2: controlled by ParaBAD, with inputs
measured by RFP expression and outputs measured by GFP expression. 44 4-3 Characterzation plasmid version 1 constructed using composite
4-4 Characterzation plasmid version 2 constructed using composite
Bio-Brick parts aviable in the Standard Registry. . . . . 45
4-5 113514: calibrates GFP input to RPF output . . . . 46
4-6 113515: calibrates RFP input to GFP output. . . . . 47
4-7 113521: measures maximum RFP expression . . . . 48
4-8 113522: measures maximum GFP expression. . . . . 48
4-9 Triple antibiotic assembly is the method by which two BioBrick parts are combined into a new part with a differnt antibiotic marker which can then be used in futher constuctions. The image was taken from http://openwetware.mit.edu . . . . 52
6-1 This figure shows the measured GFP and RFP of controls 113521 and 113522 as compared to the negative control CW2553/pJAT18. Controls 113521 and 113522 respectively express RFP and GFP constitutively. As expected, 113521 has negligible GFP expression and 113522 has negligible RFP expression. The sample 113521 contained a population of cells that produced neither GFP nor RFP, and those cells were ignored when calculating the mean RFP expression. The mean RFP of 113521 was 83.92, compared to the negative control of 2.17. The mean GFP of 113522 was 15.12, compared to a negative control of 2.86. It is not know why constitutive GFP expression was much lower than constitutive RFP expression. . . . . 62
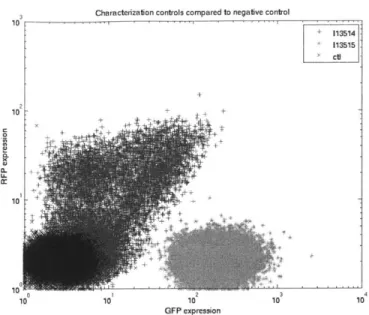
6-2 This figure shows the measured GFP and RFP of controls 113514 and 113515 as compared to the negative control CW2553/pJAT18.
Ide-ally, 113514 and 113515 should have the same levels of GFP and RFP. The majority of cells with the plasmid 113514 produced no significant amounts of GFP or RFP. Of the cells producing significant fluorescence, the mean GFP expression was 20.73, and the mean RFP expression was
17.2. As the majority of cells produced neither GFP nor RFP, 113514
cannot be used to accurately calibrate the ratio of input to output of a terminator under test in version 1 of the characterization plasmid. Due the possible presence of an RNAse cut site in the RFP coding region, the control 113515 produced negligible RFP. The mean GFP
expression for 113515 was 210.3. . . . .
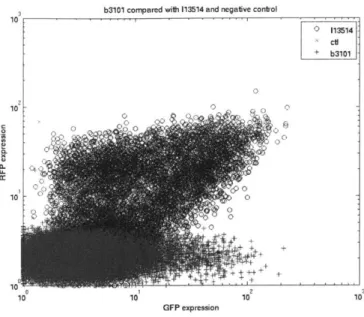
6-3 Measurements of characterization device B3101
6-4 Measurements of characterization device B3102
6-5 Measurements of characterization device B3103 6-6 Measurements of characterization device B3104 6-7 Measurements of characterization device B3105 6-8 Measurements of characterization device B3106 6-9 Measurements of characterization device B3107 6-10 Measurements of characterization device B3108 6-11 Measurements of characterization device B3109 6-12 Measurements of characterization device B3110 6-13 Measurements of characterization device B3201
6-14 Measurements of characterization device B3202
6-15 Measurements of characterization device B3203 6-16 Measurements of characterization device B3204 6-17 Measurements of characterization device B3205 6-18 Measurements of characterization device B3206 6-19 Measurements of characterization device B3207 6-20 Measurements of characterization device B3208
. . . . 6 3 . . . . 6 5 . . . . 6 6 . . . . 6 7 . . . . 6 8 . . . . 6 9 . . . . 7 0 . . . . 7 1 . . . . 7 2 . . . . 7 3 . . . . 7 4 . . . . 7 7 . . . . 7 8 . . . . 7 9 . . . . 8 0 . . . . 8 1 . . . . 8 2 . . . . 8 3 . . . . 8 4
6-21 Measurements of characterization device B3209 . . . . 85 6-22 Measurements of characterization device B3210 . . . . 86 6-23 The figure shows a histogram of the termination efficiency of the
ter-minator B1001, calculated using the data from B3201. The average
termination efficiency is 0.81. . . . . 88
6-24 The figure shows a histogram of the termination efficiency of the ter-minator B1002, calculated using the data from B3202. The average
termination efficiency is 0.99. . . . . 88
6-25 The figure shows a histogram of the termination efficiency of the
ter-minator B1003, calculated using the data from B3203. The average
termination efficiency is 0.83. . . . . 89
6-26 The figure shows a histogram of the termination efficiency of the
ter-minator B1004, calculated using the data from B3204. The average
termination efficiency is 0.94. . . . . 89
6-27 The figure shows a histogram of the termination efficiency of the
ter-minator B1005, calculated using the data from B3205. The average
termination efficiency is 0.86. . . . . 90
6-28 The figure shows a histogram of the termination efficiency of the
ter-minator B1006, calculated using the data from B3206. The average
termination efficiency is 0.98. . . . . 90
6-29 The figure shows a histogram of the termination efficiency of the
ter-minator B1007, calculated using the data from B3207. The average
termination efficiency is 0.83. . . . . 91
6-30 The figure shows a histogram of the termination efficiency of the
minator BlO, calculated using the data from B3208. The average
ter-m ination efficiency is 0.95. . . . . 91
6-31 The figure shows a histogram of the termination efficiency of the
ter-minator B1009, calculated using the data from B3209. The average
6-32 The figure shows a histogram of the termination efficiency of the
ter-minator B1010, calculated using the data from B3210. The average termination efficiency is 0.96. . . . . 92
List of Tables
3.1 This table shows the structure and sequence of the designed terminators. 32
3.2 This table shows the calculated d scores and the predicted termination efficiency for BioBrick terminators BIOOI-BI010. . . . . 34
3.3 This tables show the forward primers used to synthesize BioBrick ter-minators B1001-BIOIO. . . . . 35
3.4 This tables shows the reverse primers used to synthesize BioBrick ter-minators BlOOl-B1010. . . . . 35
4.1 A list of the BioBrick parts needed to construct the terminator
char-acterization plasmids and a short description of the function of those parts. Data for these parts were found on the Standard Registry at http://parts.m it.edu. . . . . 44 4.2 This table shows composite BioBrick parts availible from the registry
(http://parts.mit.edu). These composite parts were used in the con-struction of the terminator characterization devices. . . . . 45 4.3 This table shows the function and component parts of the control
plas-mids. All controls are availible from parts.mit.edu . . . . 47 4.4 This table shows the parts used to constuct the terminator
character-ization devices. . . . . 49 4.5 This table shows the first construction step and the intermediate parts
4.6 This table shows the second construction used to create the termi-nator characterization devices. The intermediate part from the first
construction is used as the right part in this construction . . . . . 51
6.1 This table shows the average GFP and RFP expression of the negative
control, 113514, 113515, 113521 and 113522. 113521 and 113522
con-stitutively express RFP and GFP respectively. 113514 and 113515 are used to calibrate input and output measurements of the characteriza-tion devices. In cases of 113514 and 113521, which have two distinct populations of cells, the cells which do not express sufficient
fluores-cence are discounted from the mean. . . . . 62
6.2 This table shows the mean GFP and RFP expression of
characteriza-tion plasmids B3101 through B3110. The mean GFP and RFP expres-sion of the negative control CW2553/pJAT18 and 113514 are shown
for com parison. . . . . 75
6.3 This table shows the mean GFP and mean RFP expression of
charac-terization plasmids B3201 through B3210. The mean GFP and RFP
expression of the negative control CW2553/pJAT18 and 113515 are
shown also for comparison. . . . . 76
6.4 This table shows the termination efficiencies of the new BioBrick
ter-minators B1001 through B1010. The strongest terter-minators are B1002
7.1 This table shows the termination efficiencies of the new BioBrick termi-nators BlOOl through BlOlO as well as the mRNA stabilization ability. mRNA stabilization is based on much GFP was produced a terminator was tested with version 1 of the characterization plasmid as compared to control 113514. Strong terminators should also be able to stabilize mRNA better than weak terminators. B1008 and B1009 have high %
TE, but are unable to stabilize mRNA. As the data from the two
dif-ferent characterization plasmids conflict for these two terminators, no conclusions can be made about them. The best terminators are B1002, B1004, B1006 and BlOlO. . . . . 96 7.2 This table shows sequences, predicted % TE, measured % TE, and the
error in the prediction. The strongest terminators are B1002, B1006, B1010, and B1004. The formula used to predict termination efficiency was most accurate when the terminator had approximately 6 thymine residues in the tail. The most accurately predicted terminators were
Chapter 1
Introduction
Synthetic biology creates biological systems using engineering design principles. The goal of synthetic biology is to create and maintain a library of standardized and fully characterized biological parts for the construction of artificial biological systems. Currently, a library of biological parts used in synthetic biology can be found at http://parts.mit.edu. The goal of this project was to design and characterize artificial transcriptional terminators to further the advances of synthetic biology.
The registry possesses a collection of transcriptional terminators, but only have detailed information regarding the performance of a few. Of the forty plus terminators available before this project commenced, only five terminators in the collection were both available for use, and were classified as working. The most efficient and thus most commonly used terminator is B0015, which would appear a multitude of times in a large biological device. The presence of repeats of DNA segments has been known to cause unintended translocation of genetic elements, and may disrupt the carefully designed genetic machines. It would be most beneficial to design a group of terminators with high termination efficiency to lessen the likelihood of multiple repeats.
A collection of transcriptional terminators with variable termination efficiency may
be used to control inputs to other genetic systems for purposes of characterizing other genetic parts. Currently, controlled inputs may be generated by hijacking transport
control input instead of inherent metabolic systems allows separation of cell processes from the introduced genetic system under test.
Ten artificial transcriptional terminators were designed and characterized. The terminators were designed to achieve a range of termination efficiencies, and con-formed to BioBrick standards for easy assembly with other genetic parts. The ter-minators were built by PCR extension, ligated into BioBrick backbones, and trans-formed into competent cells. Characterization devices testing the performance of the terminators utilized fluorescent proteins to measure input and output and altered the arabinose transport system to control inputs. The fluorescence produced by the characterization devices were then measured using flow cytometry to calculate the termination efficiency of the terminators.
Chapter 2
Background
2.1
Advances in Synthetic Biology
To simplify the task of engineering biological systems, the construction framework BioBricks and its associated abstraction hierarchy were developed. The abstraction hierarchy allows engineers working on one abstraction level to obscure everything in the abstraction levels below it. The BioBrick construction framework allows simple, easily repeatable assembly methods for creation of genetic machines [1].
2.1.1
The abstraction barrier and its use
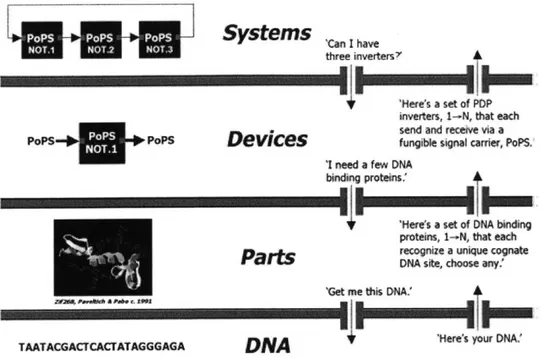
The abstraction hierarchy defines abstraction levels and the interactions allowed be-tween those levels [1]. The abstraction hierarchy and an ideal exchange of information between levels is shown in Figure 2-1. Complexity at each level is reduced because information not relevant to that level is obscured. For example, an engineer designing genetic devices would need to know how the devices are used in systems, and what parts are needed to construct the device, but would not need to know about DNA synthesis.
I
Systems
tan I have-
- -three
inverters?'I Here's a set of PDP
inverters, 1--N, that each send and receve via a
popS,* POSi--,epPS
D vces
fungible sigaal carrier, P*P!S'I need a few DNA
binding proteins.
Here s a set of DNA bnding protens, I-N, that each
a tsrecognize
par&
a unique cognateDNA sie, chwise any. tme thi DNA
TAATACGACCACTATAGGGAGA
DNA
'Heres your DNAFigure 2-1: Abstraction barriers, shown in red, across abstraction levels. A sample exchange is taken from http://parts.mit.edu.
control the access of information shown in green. This image was
2.1.2
The advance of BioBricks
The goal of BioBricks is to standardize the form of genetic components to allow idempotent reactions where the key structural elements of a component are unchanged
by the reactions. The outputs of such reactions can be used as the starting point in
subsequent reactions. BioBricks provide a standard method of assembling genetic components using specified prefixes and suffixes.
BioBrick prefixes and suffixes
Each BioBrick part contains the component of interest flanked upstream by EcoRI and XbaI restriction sites and downstream by Spel and PstI restriction sites
[21.
The component should not contain any of the restriction sites. When creating a new BioBrick part, PCR primers containing the BioBrick prefix and suffix are used to turn the component in question into a BioBrick. The resulting PCR product can then be cut with EcoRI and PstI, and ligated into the plasmid of choice. The primersBlue Part Gween Part
E X S P E X S P
Cut with Cut with
EcoRI and Spel EcoRI and XbaI
EX S
Mix and Ligate (Blue-Green Part)
EX M S P
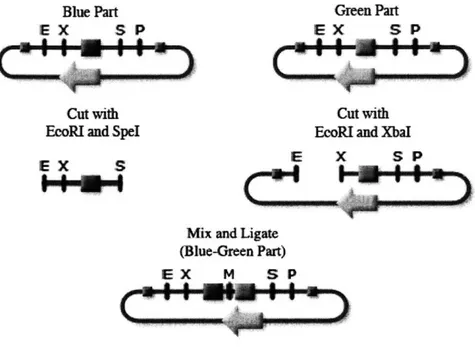
Figure 2-2: Two BioBrick parts, blue and green, are combined to form one part. This
image was taken from http://parts.mit.edu.
contain extra bases beyond the restriction sites to allowed restriction enzymes to bind
to the EcoRI and PstI sites.
BioBrick Prefix:
GAATTCGCGGCCGCTTCTAG
for parts that start with AGT...
GAATTCGCGGCCGCTTCTAGAG
for all other parts
BioBrick Suffix Primer:
TACTAGTAGCGGCCGCTGCAG
for all parts
Assembly Methods
To combine two BioBrick parts A and B, part A is cut with EcoRI and Spel while
part B is cut with EcoRI and XbaI. The insert cut from part A and the insert from
part B are ligated together to a new backbone. The Spel and XbaI cut sites have
comparable overhangs, and can be ligated together to create a mixed site that is not
recognized by either restriction enzyme and cannot be cut. The resulting vector will
still be flanked by the appropriate restriction sites, but will contain the parts A and
B. This construction process is shown in Figure 2-2.
There are two ways to create a construct containing N BioBrick parts. The
first involves first joining two parts and then adding the subsequent parts in order.
This process will take a total N - 1 constructions, and weeks of time that might
not be able to be spared. The second method involves parallel assembly, shown in Figure x. By performing multiple pairwise constructions in parallel, the number of
constructions can be reduced to log2(N) from N. If error occurs in one construction
in parallel assembly, the failed part is ignored, and further construction continues with successful constructs. However, such errors in the standard assembly would require an additional stage to compensate for the failure. For these reasons, it is more convenient to use parallel assembly when making large constructs.
2.1.3
Evolution of the genetic inverter
The common signal used by BioBrick for gene expression is PoPS (polymerase per second) instead of a relying on a chemical signal. The PoPS level is set by the number of RNA polymerase molecules that move across a particular section of DNA
[1]. Having a common signal means that any PoPS based device may be connected
to any other PoPS device. An example of a PoPS based device is a genetic inverter, which takes a high input and returns a low output.
A PoPS based inverter fixes the main problem of a classic inverter: using proteins
as signals. A classic genetic inverter receives as input the concentration of protein A, and through gene regulation, sends as output the concentration of the repressor B. The problem with a classic inverter is that any device upstream of it must output a concentration of protein A, and any device downstream from it must take as input repressor B. Therefore, inversion of signal using a classic inverter requires two proteins.
A PoPS based inverter both takes PoPS as input and outputs PoPS and requires only
one protein, the repressor, for an inverter. Unlike the classic inverter, the specific molecular interactions in a PoPS inverter are internal and can be hidden to reduce complexity [1]. A comparison of a classic inverter and a PoPS based inverter is shown
Figure 2-3: On left is a classic inverter, which uses LacI and cI as signals. A high concentration of Lac inhibits the expression of the downstream cI gene while a low concentration of LacI allows more transcription and expression of cI. On the right is a PoPS based inverter, which takes PoPS as both inputs and outputs. When the input is high, cI is produced and acts to the keep the output PoPS low. This image was taken from http://parts.mit.edu.
2.2
Rho-independent Transcriptional Terminators
Transcriptional termination in prokaryotes is a complex process that involves RNA polymerase and possible other protein factors. Terminators that can function in vitro with only the DNA substrate and RNA polymerase are called intrinsic or rho-independent terminators. This section will discuss the structure of rho-rho-independent terminators, the effects of structure on termination efficiency, and early attempts to characterize BioBrick terminators. Unlike rho-dependent terminators, the charac-teristics of rho-independent terminators are well understood, making it possible to design new rho-independent terminators.
The majority of transcriptional terminators studied in the d'Aubenton Carafa [3] paper have a G+C rich stem of 7(+/-1)bp and a loop of 4(+/-1) nucleotides followed
by a poly(T) tail. The most common loop size found was 4nt, with 55% of the
terminators studied having a loop of that size. Of the tetra-nucleotide loops found, the most commonly repeated sequences were TTCG and GAAA, both of which are known to increase RNA hairpin stability.
2.2.1
Finding rho-independent terminators in prokaryote genomes
To identify rho-independent terminators in prokaryote genomes, one must find the sequences that have high likelihood for hairpin formation that also have a T-tail of an appropriate length. Calculations of hairpin predictions differ depending on the study, but usually involve minimizing free energy of the stem loop structure. To calculate the likelihood that a T-tail is present, several recent papers [4, 5] use a modified version of the algorithm presented in the d'Aubenton Carafa paper. The algorithm favors thymine residues closer to the stem loop, and penalizes presence of other nucleotides in a 15 nt sequence. The original algorithm is as follows.
The parameter nT evaluates the importance of T residues going from 5' to 3'. To calculate nT, a number x, is calculated for the nucleotide at position n as follows:
0.9
*
Xn_1if the nth nucleotide is a T
Xn
-0.6 * xn_- if the nth nucleotide is not a T The value of xO, the first T residue is set to be 0.9.
To calculate nT:
n =
EXn for all T residues in 15 residue segmentIn the original paper, the authors considered a tail score of 2.895 to be the mini-mum score for a real terminator.
The modified algorithm used by Ermolaeva in 2000 and Kingsford in 2007 calcu-lates the tail score as follows to have a low score represent a T-rich tail.
15 n= -
S
x n=1 where 0.9 * Xn- 1 if the nth nucleotide is a TXn-0.6 * Xn- 1 if the nth nucleotide is not a T
2.2.2
Effects of structure on termination efficiency
The termination efficiency of a terminators depends on its particular stem loop struc-ture and the length of the poly(T) tail. In general, disruption of stem loop strucstruc-ture lowers termination efficiency more than disruption of the poly(T) tail [6]. Destroying the G+C dyad symmetry of the stem by either creating mismatches or by replacing all G+C pairs with A+T pairs will greatly reduce the termination efficiency by up to 90% [6]. Decreasing the free energy of the stem does not guarantee an increase in termination efficiency [7, 8]. In some cases [7], replacing the loop of a terminator with the sequence TTCG will stabilize the RNA hairpin, and slightly increase termination efficiency.
The effects of disruption of the poly(T) tail is much more straight forward. The termination efficiency increases linearly with the number of thymine residues present up to around 7 residues. The addition of more residues does not further increase the termination efficiency [9].
2.2.3
Predicted termination efficiency given structure
The structure of a terminator can be used to predict its efficiency using a formula developed by d'Aubenton-Carafa. The formula was used to calculate a factor d, which described the likelihood of a given sequence being a terminator, but could also be used to predict termination efficiency.
d =
nT *18.16 + Y
*96.59
-116.87
where nT is the tail score calculated as follows:
0.9 Xn 0.9 * X"-1
0.6
*x,_1
if n = 1
if the nth nucleotide is a T if the nth nucleotide is not a T
and
Y =-AG LH
where -AG is the free energy of hairpin formation and LH is the number of
nucleotides in the entire stem loop
In general, the higher the d score, the higher the termination efficiency. Shown in Figure 2-4 is a figure taken from the d'Aubenton-Carafa paper that relates the d score of a variety of terminators to their measured termination efficiencies.
100 00 E a so - a a
.60-*&
/
40 -20 0 20 40 60 Score dFigure 7. Diagram showing the correlation between the
score d of some rho-independent terminators and their
efficiency in vitro. We name the terminators by the name
of the preceding gene or operon: (]) rrnB TI (Schmidt &
Chamberlin, 1987), bacteriophage T7 Te (Chamberlin et
at, 1979); (A) ampL attenuator and ampL35A mutant
(Jaurin et at, 1981); (0) in40 (Sacerdot et at, 1982;
ref. (13) in Table 2A), pheS attenuator (Fayat et at, 1983;
ref. (65) in Table 2A), his attenuator (Frunzio et at, 1981;
ref. (68) in Table 2A), trpt and trpCJ01 and 1rpC302 mutants (Christie et al., 1981), bacteriophage T3 Te (Neff
& Chamberlin, 1980); (A) tonB (both directions) (Postle &
Good, 1985; ref. (122) in Table 2A), rpLT (Fayat et at,
1983; ref. (65) in Table 2A); (0) trp attenuator, rp a1419
and frp a135 mutants (Christie et at, 1981), trpL77,
trpL78, trpL80, frpLl53 mutants (Stauffer et al, 1978);
(U) thr attenuator and T2, T3, T4, 75, T6, T mutants in
the poly(U) stretch (Lynn et at, 1988); ([E) thr attenuator stem mutants t135U, L138U, L139A, L140A, L151A,
L151U, L153A, L153U, L153+0, L153-G, L156U
(Lynn et al, 1988); (x) rnpB (Sakamoto it at, 1983); (+)
intracistronic signals in eca (this work).
Figure 2-4: This image, taken from the d'Aubenton-Carafa paper, illustrates the correlation between the calulated d score and the measured efficiency of a terminator. Termination efficiency increases linearly as the d score increases, and plateaus after the d score is higher that 40.
Chapter 3
Design and Construction of
Artificial Transcriptional
Terminators
This chapter describes the design and construction of ten artificial transcriptional ter-minations with a theoretical range of termination efficiencies from 10% to 90%. These ten terminators are in the registry of standard parts as BBaB1001 to BBa_B1010.
3.1
Design
The ten terminators are split into two series based on their stem-loop sequence. Series A contains terminators BBaB1001 through BBaB1005, while series B con-tains BBaB1006 through BBa_1010. Each series has five terminators with varying thymines in their poly(T) tails. As previous studies show it is easier to predict ter-mination efficiency by truncating the poly(T) tail, I have chosen that method to vary the termination efficiency of these terminators. The stem loop and tail sequences of these terminators are shown in Table 3.1.
Table 3.1: This table shows the structure and sequence of the designed terminators. Part Name Stem-Loop Sequnce Loop Tail
BBaB1001 CCCCGCTTCGGCGGGG TTCG TTTTTTTTT BBaB1002 CCCCGCTTCGGCGGGG TTCG TTTTTT
BBaB1003
CCCCGCTTCGGCGGGG
TTCG
TTTTT
BBaB1004
CCCCGCTTCGGCGGGG
TTCG
TTTT
BBa_1B1005
CCCCGCTTCGGCGGGG
TTCG
TTT
BBaB1006
CCCCGCCCCTGACAGGGCGGGG CTGACA TTTTTTTTT
BBaB1007
CCCCGCCCCTGACAGGGCGGGG CTGACA TTTTTT
BBa-B1008
CCCCGCCCCTGACAGGGCGGGG CTGACA TTTTT
BBa-B1009
CCCCGCCCCTGACAGGGCGGGG CTGACA TTTT
BBaB1O1O
CCCCGCCCCTGACAGGGCGGGG CTGACA TTT
3.1.1
Hairpin
All terminators in Series A have a stem of 6nt and a loop of 4nt. The stem seqence, GGGGCG, is the consensus sequence found for terminators with 4nt loops in the
d'Aubenton-Carafa paper. The loop, TTCG, is one of two loop sequences known to stabilize the mRNA hairpin. Series B terminators are a variation of the thr termina-tor. All A-T pairs in the stem of the thr terminator were replaced by G-C pairs, and the first G-C pair was changed into a C-G pair. Removal of the A-T pairs should increase the stability of the stem-loop structure. Series B terminators have a stem of
8bp, and a loop of 6nt.
3.1.2
Length of tail
The lengths of the poly(T) tail in each series goes from a minimum of 3nt to a maximum of 9nt. In theory, additional T residues beyond 6nt would not further increase termination efficiency. Additionally, termination efficiency increases linearly as the poly(T) tail increases from 3nt to 6nt. Only one terminator in each series has a poly(T) tail greater than 6nt at 9nt. The other terminators have poly(T) tails ranging from 3nt to 6nt.
3.1.3
Predicted efficiency
The paper by d'Aubenton-Carafa suggests that the same algorithm used to predict the presence of a terminator can also be used to estimate termination efficiency of a given terminator. The termination efficiency can be predicted as a function of the total length of the terminator, the free energy of the stem loop structure, and number of thymine residues in the stretch of 15 nt after the stem loop:
d =
nr * 18.16+ Y *
96.59 - 116.87where nT is the tail score calculated as follows:
nr = EX for all T residues in 15 residue segment
0.9
Xn 0.9 * Xn_1
0.6
*n_1
if n = 1
if the nth nucleotide is a T if the nth nucleotide is not a T
and
Y-=
AG
LH
where -AG is the free energy nucleotides in the entire stem loop
of hairpin formation and LH is the number of
structure.
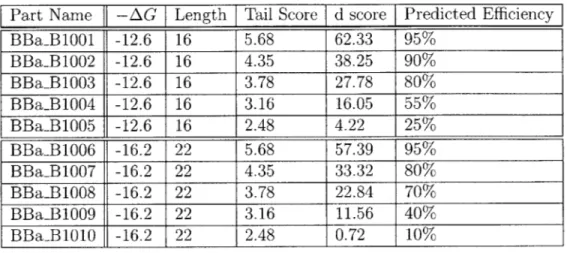
Python scripts were written to calculate both d and nT. The energy of hairpin formation for a given sequence was calculated using UNAFold [10]. A summary of the d scores and predicted efficiencies of terminators BBa-B1001 through BBaB1010 is shown in Table 3.2.
Table 3.2: This table shows the calculated d scores and efficiency for BioBrick terminators B1001-B1010.
the predicted termination
Part Name -AG Length Tail Score d score Predicted Efficiency BBa-B1001 -12.6 16 5.68 62.33 95% BBaB1002 -12.6 16 4.35 38.25 90% BBaB1003 -12.6 16 3.78 27.78 80%
BBaB1004
-12.6
16
3.16
16.05
55%
BBaB1005 -12.6 16 2.48 4.22 25%BBaB1006
-16.2
22
5.68
57.39
95%
BBaB1007 -16.2 22 4.35 33.32 80% BBaB1008 -16.2 22 3.78 22.84 70% BBaB1009 -16.2 22 3.16 11.56 40%BBa-B1010
-16.2
22
2.48
0.72
10%
3.2
Construction
Five rounds of construction were needed to create these terminators. This count does not include rounds of construction that yielded no successful construct. The first round yielded BBaB1004. BBa_1007, BBa-1005, and BBa1001 were completed in rounds 2, 3, and 4 respectively. All other terminators were completed in round 5.
The terminators were made by overlapping primers and extending them by PCR. The PCR products were then purified, and cut with EcoRI and PstI. The BioBrick plasmid backbone was also made by PCR and cut with the same restriction enzymes. The insert and backbone were the ligated together and transformed into TOP10 cells.
3.2.1
Primer design
The process of making BioBrick parts from the designed sequences begins with cre-ating PCR primers to turn the sequence from text on paper to a stretch of DNA . The forward and reverse primers overlap from 2nt before the loop to 2nt after the loop. This creates a 8bp overlap for series A terminators and a 10bp overlap for series B terminators. Ideally, the forward and reverse primers would only overlap at the loop, but a 4bp or 6bp overlap is not sufficient for binding. Extending the overlap 2nt
Table 3.3: This tables show the forward primers used to synthesize BioBrick termi-nators B1001-B1010.
Part Name Forward Primer
BBaB1001 GTTTCTTCGAATTCGCGGCCGCTTCTAGAGAAAAAAAAACCCCGCTTCGGC BBaB1002 GTTTCTTCGAATTCGCGGCCGCTTCTAGAGCGCAAAAAACCCCGCTTCGGC BBa-B1003 GTTTCTTCGAATTCGCGGCCGCTTCTAGAGCGCCAAAAACCCCGCTTCGGC BBa_B1004 GTTTCTTCGAATTCGCGGCCGCTTCTAGAGGCCGAAAACCCCGCTTCGGC BBaB1005 GTTTCTTCGAATTCGCGGCCGCTTCTAGAGCGCCGCAAACCCCGCTTCGGC BBaB1006 GTTTCTTCGAATTCGCGGCCGCTTCTAGAGAAAAAAAAACCCCGCCCCTGACAGG BBa-B1007 GTTTCTTCGAATTCGCGGCCGCTTCTAGAGCGCAAAAAACCCCGCCCCTGACAGG BBa_B1008 GTTTCTTCGAATTCGCGGCCGCTTCTAGAGCGCCAAAAACCCCGCCCCTGACAGG BBaB1009 GTTTCTTCGAATTCGCGGCCGCTTCTAGAGCGCCGAAAACCCCGCCCCTGACAGG BBaB1O1O GTTTCTTCGAATTCGCGGCCGCTTCTAGAGCGCCGCAAACCCCGCCCCTGACAGG
Table 3.4: This tables shows the reverse primers used to synthesize BioBrick termi-nators B1001-BlOlO.
Part Name Reverse Primer
BBaB1001 GTTTCTTCCTGCAGCGGCCGCTACTAGTAAAAAAAAACCCCGCCGAAGC BBaB1002 GTTTCTTCCTGCAGCGGCCGCTACTAGTAGCGAAAAAACCCCGCCGAAGC BBa_B1003 GTTTCTTCCTGCAGCGGCCGCTACTAGTAGCGGAAAAACCCCGCCGAAGC BBa-B1004 GTTTCTTCCTGCAGCGGCCGCTACTAGTACGGCAAAACCCCGCCGAAGC BBa-B1005 GTTTCTTCCTGCAGCGGCCGCTACTAGTAGCGGCGAAACCCCGCCGAAGC BBaB1006 GTTTCTTCCTGCAGCGGCCGCTACTAGTAAAAAAAAACCCCGCCCTGTCAGGG BBa_BI007 GTTTCTTCCTGCAGCGGCCGCTACTAGTAGCGAAAAAACCCCGCCCTGTCAGGG BBaB1008 GTTTCTTCCTGCAGCGGCCGCTACTAGTAGCGGAAAAACCCCGCCCTGTCAGGG BBa_B1009 GTTTCTTCCTGCAGCGGCCGCTACTAGTAGCGGCAAAACCCCGCCCTGTCAGGG BBa_B1010 GTTTCTTCCTGCAGCGGCCGCTACTAGTAGCGGCGAAACCCCGCCCTGTCAGGG
each way beyond the loop should provide adequate strength for binding, but should not cause the primers to form a hairpin with themselves. Both forward and reverse primers have extra bases beyond the EcoRI and PstJ cut sites to ensure the restric-tion enzyme can bind to the site effectively. The forward and reverse primers used to construct terminators BBaB1001 through BBa..B1O1O are shown in Tables 3.3 and
3.4.
3ul of each of the primers were added to 40ul of Fidelity PCR supermix. The primers would overlap and form the template, so no additional template DNA was required. The samples were placed in the thermocycler for 20 extension cycles. PCR products were then run on Metaphor 3.5% agarose gels to check for length. It took some experimentation to determine what percentage gel to use to separate the product from primers because the DNA fragments were only twice the size of the primers, and typical 1-1.5% agarose gels don't have the definition to separate 100bp products from
50bp primers.
3.2.2
DNA purification
The PCR product must be purified to remove all remaining primers and unused nucleotides. Purification was complicated by the relatively short length of the PCR
product (9Obp). Two methods of PCR used were gel purification and a modified
version of the Qiagen PCR purification protocol.
Gel purification
The first attempts to purify the PCR were done with the Qiagen gel purification kit. The PCR products were run on Metaphor 3.5% gels, and the appropriate bands were cut and placed into 2ml tubes. The tubes were weighed, and QX1 buffer equal to
6 times the weight of the gel was added to each tube. Ten microliters of QIAEX II
beads were added, and the tubes were incubated for 10 minutes at 50 degrees C. The tubes were vortexed every two minutes to keep the QIAEX II beads in suspension. After incubation, the tubes were centrifuged for 30 seconds, and the supernatant
removed. The remaining pellets were then washed with 500 ul of QXI buffer once, and 500 ul of PE twice. The pellets were then left to air dry for 15 minutes until they turned white. To elute the DNA from the QIAEX II beads, 50ul of Qiagen elution buffer was added to each tube, and the pellets were resuspended. After 5 minutes of incubation on the bench, the tubes were centrifuged, and the supernatant containing the DNA stored at -20 C.
For reasons yet unknown, not all uses of the kit yielded any DNA but this mistake was not noticed until the fourth round of construction. An alternative method was found for purifying PCR products in the fourth round of terminator construction.
Alternate protocol for PCR purification
This protocol used Qiagen solutions PB, PE, and EB as well as Qiagen miniprep columns. The sample and 5 times as much PB were applied to the miniprep column, and the column was spun for 1 minute at 3000G. The flowthrough was then applied to the column, and this procedure was repeated twice. After the third spin, the flowthrough was discarded, and 750 ul of PE was added to the column. The column was then spun for 1 minute at 3000G; the flow through was discarded, and the column spun again for 3 minutes at 17900G to remove all residual PE, which might hamper later reactions. After spinning, the column was transferred to a new tube, and 30 ul of EB was added. The column was incubated on the bench at room temperature for
5 minutes, and then spun for one minute at 6800G. Another 30 ul of EB was added,
and the column was incubated for another 5 minutes. The column was spun for a final time for 5 minutes at 6800G to recover the PCR products.
3.2.3
Insertion into BioBrick backbone
After the PCR product is purified, it must be ligated into an approved BioBrick backbone to form a BioBrick part. BioBrick backbones carry one of kanamycin , chloramphenicol, or tetracycline resistance markers in addition to ampicillin resis-tance. Backbones can be created by miniprepping cultures carrying the backbone
plasmid or by building the backbone using a template and PCR primers. Both the backbone and the insert are cut with appropriate restriction enzymes, and ligated together.
Creation of backbone
I chose to use the backbone with the kanamycin resistance marker for the terminator BioBrick. I used PCR to build the backbone as this method generally yielded higher concentrations of backbone DNA than miniprepping cultures with the appropriate plasmid. The backbone was then purified using the protocol described earlier.
Digestion and ligation
Both the backbone and the insert were cut with EcoRI and PstI. Each digest was set up with 20 ul DNA, 1 ul of each of the enzymes, 5 ul of NEB buffer 2 at 10x concentration, 0.5 ul of BSA at 100x concentration and 22.5 ul of distilled water. These digests were then incubated at 37 degrees C for 2 hours for the enzymes to cut the DNA, and then heated to 80 degrees C to heat kill the enzymes. Cut DNA should
be stored in TE buffer at -20 degrees C to reduce chances of cut ends degrading. Once both inserts and backbones have been cut with the correct enzymes, they should be ligated to form a BioBrick part. A rough ratio of 3:1 insert to backbone should be present in the ligation reactions. Adding too much insert causes the inserts to ligate to each other, forming final products with repeats of three to five inserts in one backbone. It is also possible for the backbones to ligate to each other, but these constructs never form viable colonies, and thus is not a problem. The formula to calculate the amount of insert to add to a reaction is given by the following formula:
ng insert = 3 * fracng vector * kb insertkb vector
The ligation mixtures contained lul 10x T4 DNA ligase buffer, 1 ul plasmid back-bone, the amount of insert needed as calculated by the formula above, 0.3 ul T4 DNA ligase, and enough water to make a final volume of 10ul. The water is added first, and
the ligase added last. The final mixture should have equimolar amounts of plasmid backbone and insert DNA. The ligations are incubated at room temperature for 15 minutes, and then used immediately to transform competent cells.
3.2.4
Transformation into TOP10 competent cells
The finished ligation products are transformed into TOP10 competent cells, and the cultures with the correct BioBrick part are store for future use. The competent cells are thawed on ice, and 10 ul of cells are aliquoted for each transformation. The cells are then diluted with 40ul CMB800 to increase transformation efficiency. 1 ul of the appropriate ligation product is added to each aliquot, and the cells are kept on ice for thirty minutes. The cells are then heat shocked for 50 seconds at 42 degrees C, and put on ice again for two minutes. SOC media is added to the cultures, and the cells are incubated at 37 degrees C to recover antibiotic resistance before being plated out and grown overnight at 37 degrees C. Generally, one hour of incubation is enough to recover resistance to kanamycin or ampicillin, but two hours is preferable when using tetracycline or chloramphenicol as resistance markers.
At first, I added 1 ml of SOC to each culture, and plated out two plates per culture, one with 200ul and the other with 20ul. I found that these plates rarely yielded enough colonies, particularly the plates spread with 20ul. I switched to adding 250ul of SOC to each culture, and plating out the entire culture. This approach tended to yield at least one colony per transformation.
3.2.5
Plasmid recovery, verification, and storage
DNA was recovered from the transformants by minipreps, and was then verified for
the presence of the correct BioBrick part. If the part was correct, then the cells would be prepared for storage.
Minipreps to recover plasmid DNA
The following day, one colony was picked from each plate of transformants and grown up for minipreps in LB broth. I used the Qiagen miniprep kit to perform these minipreps. First, 1.7 ml of culture were spun down to obtain a pellet of cells. The pellet was resuspended in 250 ul of P1 buffer, and vortexed for 30 seconds to lyse the cells. 250 ul of P2 buffer was then added, and the tube was gently inverted 6 to 10 times. The tube was not vortexed at this time as it would result in shearing of the genomic DNA. After the solution has turned an even shade of blue, 350 ul of
N3 buffer was added to stop the reaction. Once the solution turned colorless and
cloudy after inverting the tube 6-10 times, the tube was centrifuged at 17900G for 10 minutes.
The supernatant was then transferred to a miniprep spin column, and the column spun for 1 minute. The flowthrough was discarded, and 500ul of PB buffer was applied to the column. The column was spun again for 1 minute, and 750 ul of PE was added. The column was then spun twice to remove all PE, which could hamper future reactions. Afterwards, the column was transferred to a clean tube. 50 ul of EB was applied, and the column was incubated on the bench at room temperature for 5 minutes. The tube was then spun for 3 minutes at 6800G to recover the plasmid
DNA. The DNA obtained from these minipreps is then used to verify the existence
of the correct BioBrick part.
Verification of BioBrick part
The plasmid DNA recovered from the minipreps were first cut with one restriction enzyme and run on a 1.5% agarose gel to check for its presence. The concentration of the plasmid DNA was then measured with the NanoDrop spectrometer and recorded. PCR primers VF2 and VR were then used to measure the length of the insert using the plasmid DNA as the template. VF2 binds to the template before the BioBrick prefix, and VR binds to the template after the BioBrick suffix. The resulting PCR product was then run on an 1% agarose gel to measure its length. If the length was
correct, the plasmid DNA was then sent out for sequencing at the MIT Sequencing Center. Each sample contained 200ng plasmid DNA, 0.3 ul of either VF2 or VR, and enough water to make a final volume of 12 ul.
Storage of cultures
If the culture contains the correct BioBrick part, it will be prepared to be stored
at -80 degrees C for future use. A solution of 85% cell culture and 15% glycerol is vortexed for 30 seconds to mix it well, and then incubated on the bench at room temperature for 30 minutes. The solution is then stored in the -80C freezer until it is needed. From past experience, incubation for periods longer than 30 minutes does not seem harm the cells. I use an 80% glycerol solution to make these frozen cultures since it is easier to accurately pipette than 100% glycerol.
3.2.6
Errors and Troubleshooting
A number of problems occurred during the construction phase including but not
limited to: setting the thermocycler to the wrong temperatures for PCR extension when creating the parts, not being able to recover DNA with the gel extraction kit, and degraded cut ends on the backbone which caused the backbone to ligate shut. Perhaps the most perplexing instance was that of transformants which grew on antibiotic plates but lacked the plasmid and insert when miniprepped. In addition, when streaked out from prepared glycerols, the transformants again grew on antibiotic plates, but would not grow in liquid media. After trying in vain to recover plasmid
DNA from these transformants for two weeks, these transformants were scrapped,
and a new set of construction started.
A common problem faced with these constructions was the insertion of genomic DNA into the plasmid during the transformations. This was noticed when the
Bio-Brick site was amplified with PCR and run on gels. For these terminators, the
approximate size should be around 350 bp. When genomic DNA was inserted instead of the BioBrick part, the size of the insert ranged from 350bp to 750bp. If the length
was around 300, it meant that nothing had been inserted, and the backbone was
Chapter 4
Design and Construction of
Characterization Devices
The next goal after creating the terminators was to develop devices that would allow characterization of the new BioBrick terminators. The characterization devices for the artificial terminators use a GFP/RFP dual fluorescent system with the inputs to the system controlled by the promoter. The characterization devices were constructed using 3A assembly, described in 4.2.1, either performed by hand or by robot. The finished constructs were then transformed into E. coli strain CW2553.
4.1
Design of terminator characterization devices
The input to the characterization devices is controlled by the ParaBAD system. The
terminator to be characterized is flanked by two fluorescent proteins, GFP and RFP,
RBS G FP T erminator RBS RFP T erminator
c
t D under test
Figure 4-1: Characterization plasmid version 1: controlled by ParaBAD, with inputs
P rLBADRBS RFP Terminator RBS G FP T erm inator 77Dunder test
Figure 4-2: Characterization plasmid version 2: controlled by ParaBAD, with inputs measured by RFP expression and outputs measured by GFP expression.
Table 4.1: A list of the BioBrick parts needed to construct the terminator characteri-zation plasmids and a short description of the function of those parts. Data for these parts were found on the Standard Registry at http://parts.mit.edu.
Part Name Part Type Description
BBaI0500 promoter inducible ParaBAD BBa-E0034 RBS strong RBS
BBa.EO040 reporter generates GFP BBa_E1O1O reporter generates RFP
BBaB0015 terminator terminator with high TE
which are used to measure the termination efficiency of the terminator. The charac-terization devices are made entirely from BioBrick parts found in the registry. Parts used to construct these devices are shown in Table 4.1. Figure 4-1 shows the ver-sion of the characterization device using GFP expresver-sion to measure input and RFP expression to measure output. Figure 4-2 shows a characterization device using the opposite measuring scheme.
Some of the parts used to construct the characterization devices are available in composite parts. Using the composite parts instead of the individual parts speed up
BBa I-13 506 T erm inat or B BaI I13 507
under test7
D
Figure 4-3: Characterzation plasmid version 1 constructed using composite BioBrick parts aviable in the Standard Registry.
.
... ... B B aI113 5 04 T erm inator B Ba I13516
under test
Figure 4-4: Characterzation plasmid version 2 constructed using composite BioBrick parts aviable in the Standard Registry.
Table 4.2: This table shows composite BioBrick parts availible from the registry (http://parts.mit.edu). These composite parts were used in the construction of the terminator characterization devices.
Part Name Components
BBaI13506 10500, E0034, E0040
BBaI13507 E0034, E1010, B0015
BBaI13516 10500, E0034, E1010 BBaI13504 E0034, E0040, B0015
the construction process by reducing the number of assemblies needed. The composite parts used to construct the characterization devices are described in Table 4.2. The final constructs are shown in Figures 4-3 and 4-4.
4.1.1
PoPS input generator
The PoPS generator must be able to vary the input signal to produce a wide range of outputs for device characterization. One possible way to produce a wide range of PoPS inputs is to use an inducible promoter such as the arabinose promoter, ParaBAD. However, inducing the araBAD operon at subsaturation concentrations results a population of cells which exhibit linear behavior in response to chances in inducer concentration but individual cells with either be fully induced or not induced. Decoupling the arabinose transport gene araE from the ParaBAD promoter and putting it under the control of an arabinose independent promoter will remove the all-or-none effects and produce a population of cells that will exhibit linear behavior in ParaBAD expression as a function of arabinose concentration at an individual level with all cells in the population having a similar level of expression as shown in the paper by
Pms RBS RBS F RFP T erminator
Figure 4-5: 113514: calibrates GFP input to RPF output
Khlebnikov et al [11].
4.1.2
Device under test
The new BioBrick terminators will be the devices under test for these measurement devices. A list of terminators tested is shown earlier in Table 3.1.
4.1.3
Dual Fluorescent system
The DUT is flanked by two fluorescent proteins, GFP and RFP. The fluorescent protein preceding the DUT measure inputs to the DUT while the fluorescent protein following the DUT measures the output.
The termination efficiency will by measured by the ratio of the first fluorescent protein produced to the second protein produced. If the terminator has a high termi-nation efficiency, very little fo the second protein will be produced. If the terminator has low termination efficiency, there should be no difference in the levels of the first and second proteins. In the off chance that one of the terminators acts as a promoter, more the second protein will be produced than the first protein.
Two sets of the characterization devices were constructed. The first set has GFP flanking on the left of the DUT and RFP flanking on the right. The second set is reversed with RFP on the left, and GFP on the right. This allows calibration of the input and output measurements.
Table 4.3: This table shows the function and component parts of the control plasmids.
All controls are availible from parts.mit.edu.
Part Name
Description
Componenets
BBaI13514
Calibration of GFP input to RFP output 10500,
E0034,
E0040,
E0034, E1010, B0015
BBaI13515
Calibration of RFP input to GFP output 10500,
E0034,
E1010,
E0034, E0040, B0015
BBaJI13521
Maximum RFP output
R0040,
E0034,
E0040,
B0015
BBaI13522
Maximum GFP output
R0040,
E0034,
E1010,
11_ 1 B0015
FarBAD
R B1
RFP
iBS
GFP
ountt.
PT et RB
7
RFPT erminatorD
Figure 4-7: 113521: measures maximum RFP expression
P Tet R BS G FP T erm inator
Figure 4-8: 113522: measures maximum GFP expression.
4.1.4
Controls
Controls were needed to calibrate the levels of GFP and RFP expression in the char-acterization constructs. A list of controls used is shown in Table 4.3, and all controls are available from the Standard Registry. The controls 113514 and 113515 have the same components as the characterization devices, but lack a DUT. These are used to calibrate the input and output between the two sets of characterization devices by showing normal GFP and RFP expression without interference from the DUT, and are shown in Figures 4-5 and 4-6.
Constructs 113521 and 113522 each have a fluorescent protein, RFP and GFP respectively, under the control of a constitutive promoter, TetR. These controls test the maximum levels of GFP and RFP expression and are shown in Figures 4-7 and 4-8.
4.2
Construction of Characterization Devices
The characterization devices were constructed using the triple antibiotic rolling as-sembly method performed either by hand or by robot. Finished constructs were sent out for sequencing to verify the existence of the correct construct. The complete list