Publisher’s version / Version de l'éditeur:
Vous avez des questions? Nous pouvons vous aider. Pour communiquer directement avec un auteur, consultez la première page de la revue dans laquelle son article a été publié afin de trouver ses coordonnées. Si vous n’arrivez pas à les repérer, communiquez avec nous à [email protected].
Questions? Contact the NRC Publications Archive team at
[email protected]. If you wish to email the authors directly, please see the first page of the publication for their contact information.
https://publications-cnrc.canada.ca/fra/droits
L’accès à ce site Web et l’utilisation de son contenu sont assujettis aux conditions présentées dans le site LISEZ CES CONDITIONS ATTENTIVEMENT AVANT D’UTILISER CE SITE WEB.
Research Report (National Research Council of Canada. Institute for Research in
Construction), 2007-01-01
READ THESE TERMS AND CONDITIONS CAREFULLY BEFORE USING THIS WEBSITE.
https://nrc-publications.canada.ca/eng/copyright
NRC Publications Archive Record / Notice des Archives des publications du CNRC : https://nrc-publications.canada.ca/eng/view/object/?id=fec10c25-4060-4b0f-9ac2-c6d10938c4b0 https://publications-cnrc.canada.ca/fra/voir/objet/?id=fec10c25-4060-4b0f-9ac2-c6d10938c4b0
NRC Publications Archive
Archives des publications du CNRC
For the publisher’s version, please access the DOI link below./ Pour consulter la version de l’éditeur, utilisez le lien DOI ci-dessous.
https://doi.org/10.4224/20377963
Access and use of this website and the material on it are subject to the Terms and Conditions set forth at
Key considerations for repointing mortars for the conservation of older
masonry
Maurenbrecher, August H (Paul); Trischuk, Kenneth J (Ken); Rousseau, M.
Z.; Subercaseaux, M. I.
http://irc.nrc-cnrc.gc.ca
Ke y Conside rat ions for Re point ing
M or t a rs for t he Conse r vat ion of Olde r
M a sonr y
I R C - R R - 2 2 5
M a u r e n b r e c h e r , A . H . P . ; T r i s c h u k , K . ;
R o u s s e a u , M . Z . ; S u b e r c a s e a u x , M . I .
J a n u a r y 2 0 0 7
Table of content
Abstract
Acknowledgements
Part 1 Design considerations
1. Context for older masonry conservation
2. What is repointing mortar?
3. Potential damage associated with poor repointing practices
4. Pre-design
assessments
5. The design intent
6. Key properties of an effective repointing mortar
7. Design of a mortar mix
8. Testing
Part 2 Site considerations
9. Pre-construction
considerations
10. Joint preparation
11. Mortar mixing
12. Mortar application
13. Mortar curing and protection
14. Quality control
15. Maintenance
16. Summary
17. References
Abstract
The properties of repointing mortars for older masonry assemblies as well as their on-site installation practices are somewhat different than those typically used in modern masonry construction. Inappropriate repointing materials and execution practices can result in permanent damage to older masonry assemblies, affecting their aesthetics qualities, heritage value, performance and service life. This paper provides architects, engineers, masons, contractors, property owners and managers with a better appreciation of key considerations for durable repointing mortars that contribute to the preservation of Canada’s older
masonry buildings.
Acknowledgements
The authors wish to thank John Cooke at John G. Cooke & Associates for his review and insightful comments on the document. The authors also enjoyed and benefited from lively discussions and debates among the members of the NRC Working Group on Repointing Mortars whose semi annual “meetings of the minds” have contributed to the advancement of our collective understanding of the performance of repointing mortars for Canadian climates.
Figure 1The Dominion Observatory building in Ottawa was built in 1902 and is a classified heritage building. The observatory was constructed to be Canada’s primary longitudinal reference as well as providing Canada’s national time service (a function it served from 1905 until 1970). The observatory is clad with Nepean and Credit Valley sandstone and was most recently repointed in 2003 – 04.
Figure 2 Bedding and repointing mortars
Part 1 Design considerations
1. Context for older masonry conservation
Rehabilitation of buildings accounts for an increasing proportion of design and construction activities. Older buildings are repaired, upgraded or converted to new uses, with the expectations that the service life of the building components will be extended to another half century or more. While the building is put to good use to fulfill current contemporary needs, the Canadian architectural heritage is being preserved. Masonry buildings built in the 19th century to about 1940 make up a significant portion of this inventory with unique features quite different from modern
construction. Churches, hospitals, museums, courthouses, university campuses, large government offices, industrial warehouses as well as houses are common examples of such construction (Fig. 1). Preserving such buildings requires somewhat different knowledge and skills than what is needed for new
building construction because the materials and techniques used were different when originally
constructed. For instance older masonry assemblies often rely on the mass of the masonry for the control of water intrusion to the interior and such assemblies rarely include a drained cavity to evacuate water (Brown et al., 19971). Mortar in older masonry walls was often much softer than modern mortars thus allowing the wall to absorb more movement without cracking. Cracks in the mortar would greatly increase water ingress. The mortars were also more breathable (porous), which promoted faster drying of the wall through the mortar joints. Repair of the mortar joints therefore requires special considerations.
Regular maintenance or a rehabilitation program on an older masonry building can include repointing the mortar (Fig. 2) to restore the ability of the masonry
assembly to control external water ingress and to improve appearance or historic authenticity of the masonry. For the uninformed, it may appear like a standard masonry job but on the contrary,
everything about the repointing mortar, from selecting the mix to the curing conditions, can have a lasting effect on the visual and functional
integrity of older masonry. Improperly done, it can detract from the appearance of the masonry and lead to premature deterioration of the mortar and the masonry units.
2. What is repointing mortar?
Mortar basically consists of sand and a binder made up of cement and /or lime. Several types can be used. Water is added for hydration of hydraulic binders and initial plasticity, and additives can improve
performance.
Mortar laid between the masonry units fulfills a structural function of distributing vertical and lateral loading and is referred to as “bedding mortar.” The “pointing” mortar is placed at the external face of the joint where it manages climate loads including water resistance, water shedding and drying ability. The pointing mortar also has significant impact on the aesthetic value of the masonry assembly. Repointing is the process of removing the outer damaged (e.g., cracked, loose and disintegrating) layer of mortar from the joints in existing masonry work and replacing it with new mortar (Fig. 2).
Repointing just to improve the appearance is not recommended. Selective repointing of deteriorated areas is the best approach, unless due to cost, timing and the difficulty of access, it is more effective to repoint the whole structure. Selective repointing may also be the best choice for thin mortar joints where removal of the existing mortar is difficult and is very likely to damage the masonry units.
3. Potential damage associated with poor repointing practices
Inadequate repointing practices carry a risk of permanent damage to older masonry. The most critical risk consists of some form of permanent damage to the masonry units (e.g., erosion of unit edge and spalling), considering that the masonry units constitute the historic fabric to preserve. Damage to masonry units can occur during the raking out of the mortar joint prior to repointing, particularly when power tools are used. Damage can also develop during the service life, when a hard (high compressive strength) modern mortar is used to join softer masonry units. Frost action on water-saturated joints will likely cause the erosion of the weakest and more permeable element of the assembly.
Because masonry units are more difficult to repair or replace than mortar, repointing mortar should be the “sacrificial” element of the system. It should be as durable as possible but should not be the cause of damage to the existing bedding mortar and masonry units. Poor selection of mortar for a given assembly and severity of exposure may also lead to a very short service life of the mortar itself (Fig 3).
Understanding that the repointing mortar has a function of ensuring a level of water resistance for the assembly, a deteriorating repointing mortar can lead to shortened service life for the total assembly as well (Fig. 4).
Because repointing work can be expensive, time consuming and disruptive to the building occupants, it is hoped that the repointing work will last for decades and will not “sacrifice” itself too quickly. In Canadian climates, premature failures of softer repointing mortars tend to result from poor freeze-thaw resistance of the mortar installed, which can in turn be due to inappropriate mortar mix selection, poor execution and curing as well as poor water management on building façades.
Figure 4 Dense and hard repointing mortar was pushed out by frost damage to the bedding mortar. The dense pointing mortar greatly reduced the drying capacity of the wall allowing a build up of moisture within the wall. Cracking at the
mortar/stone interface greatly increased the water ingress. The aesthetics of the joint is also poor.
Figure 3 Frost action and possibly inappropriate curing led to premature deterioration of this mortar joint.
4. Pre-design assessments
A building condition assessment will yield valuable information for prioritizing the extent and nature of maintenance, repair and needed alterations. It should include a thorough survey of the composition of the existing masonry assemblies and their condition, as well as the other systems interacting with the masonry (e.g., roof, heating, ventilation and air conditioning /HVAC systems, windows, structure). The design team should also develop a historical perspective for the changes the building has experienced over its lifetime, for the elements that failed and why, as well as details of any previous remedial work. The designer should determine the cause of material deterioration (e.g., efflorescence may have started after the installation of humidification equipment onto the HVAC systems) and needed repair work should be addressed prior to repointing masonry work.
An evaluation of the type and severity of climate exposure for each element of each building elevation will assist the design team with the selection of different mortar mixes for different applications, as well as to remedial work to minimize moisture loads on the masonry (Maurenbrecher, 19982). For instance, chimney stacks tend to be exposed to more extreme loads of wind-driven rain than exterior walls sheltered under a large overhang; window sills and horizontal projections are subjected to concentrated wetting due to melting snow. Minimizing moisture loads on the masonry can be effective for extending the service life of a masonry assembly. For example, limited field monitoring of a church’s protruding buttresses plagued with deteriorating mortar joints indicated that satisfactory performance could be achieved with a larger range of mortar mixes once measures (i.e., capping the masonry buttresses with a metal flashing) were taken to develop a moisture management strategy thus reducing water and snow melt accumulation on the buttresses from the steep sloped roof.
The design team should assess the advantages for seeking the services of an experienced masonry conservation specialist. It can prove beneficial considering restoration of “older” masonry buildings is a relatively recent area of expertise in Canada and not all design professionals possess an understanding of conservation principles and the knowledge of the particularities of the construction of older masonry buildings. Such a conservation specialist can assist the design team with the following issues.
• Historic authenticity: How close should the repointing mortar match the original? Should only traditional binders be used? What are the properties and composition of the existing mortar?
• Specifications for mortar selection, mason selection, mortar applications, quality control and curing: Many materials and techniques for producing and applying traditional mortars have been lost and
substitutes may have to be found and techniques learned again. Experience gained on similar projects can bring valuable insight considering successes/failures of repointing works in Canada have not been much reported in the public domain.
• Appropriate laboratory and site test procedures: There is currently no general agreement for test methods used to assess masonry repair materials used for restoration of masonry structures.
5. The design intent
The design intent for an intervention involving a repointing mortar should aim for the durability of the masonry assembly and the maintenance of historic authenticity. It should embrace the following objectives:
• Ensure the mortar exhibits a lower compressive strength than the masonry units and where possible similar to or lower than the existing bedding mortar (the pointing mortar should be the “sacrificial” element).
• Minimize the formation of cracks at the interface between the pointing mortar and the masonry units and bedding mortar.
• Promote the drying of the assembly.
• Match colour and texture with the existing or original mortar.
• Strike a balance between obtaining a sacrificial repointing mortar (relative to a given assembly) while still achieving acceptable service life for the repointing work.
6. Key properties of an effective repointing mortar
The field of masonry restoration is relatively young in Canada; therefore, current recommendations on mortar properties for older masonry structures can only be of a qualitative nature. The guidelines in this report are subject to modification as more research data and field experience become available.
• Ensure the compressive strength is lower than that of the existing masonry units, and where possible similar to or lower than the existing bedding mortar. If the pointing mortar is too strong, stress
concentrations could cause spalling of the masonry units.
The mortar strength should be no higher than needed for the structural and durability requirements of the masonry. The intuitive typical appreciation that “the stronger the better” can lead to damage to the masonry or shortened mortar service life. For example, if the pointing mortar is too strong, stress
concentrations could cause spalling of the masonry units. Specifications for compressive strength should include an upper as well as a lower limit. A lower strength mortar will also tend to be “soft” or more flexible, a property that permits the mortar to respond to small differential movement without cracking. Cracks allow water ingress into the assembly which can lead to freeze-thaw damage in cold weather. In the spirit of sustainability and reversibility, low strength mortars will also be easier to remove in future maintenance and repairs. Current CSA standard A179-04 “Mortar and Grout for Unit Masonry Mortar” focuses on modern masonry mortars but Annex A briefly discusses mortars for older masonry (CSA 20043).
The repointing mortar rather than the other masonry elements should absorb stresses experienced by the masonry (e.g., due to thermal expansion, differential settlement, wind loading, etc.) and in the event of excessive strain, the repointing mortar will experience the damage. This is why it is referred to as a “sacrificial mortar.”
• Aim for water absorption and vapour transmission rates similar to or greater than those of the bedding mortar and masonry units. In general, lime-based mortars are more vapour permeable than cement-based mortars.
A more permeable mortar will promote drying through the mortar, a mechanism quite useful to avoid moisture accumulation in the masonry (especially in masonry with dense masonry units). As well, any salts in the masonry will then tend to migrate out through the mortar instead of the masonry units.Vapour permeance in mortars decreases as the hydraulicity of the binder increases. Pure lime mortars are the most permeable and pure cement mortars the most impermeable. High vapour permeance of the repointing mortar will assist in providing a path of least resistance for moisture evaporation to the exterior. • Minimize the formation of cracks to control water ingress.
Minimal shrinkage of repointing mortars (a maximum of 1 mm/m was recommended by Knöfel and Huesmann, 19934) will reduce the risk of fine cracks at the interface with the masonry units that provide capillary passages for water ingress thereby increasing the risk of freeze-thaw damage. Use well-graded, washed sand, with no clay fines (conform to CSA A179 standard), a low water-to-binder ratio for the mortar mix and curing conditions that minimize evaporation in the first days after the mortar is placed. Sharper sand particles also contribute to control of shrinkage, as these provides more interlocking between particles than rounded sand; however, these also make the mix less workable for the masons.
The proportion of cement and lime in the mortar mix also has an effect: mortar mixes with a high proportion of cement (modern mortars) tend to shrink more. Mortars with higher lime content are softer and more flexible, thus exhibiting an ability to flex rather than crack when the masonry experiences differential movement during service life. Lime also has what is referred to as a “self-healing” property, as the lime can dissolve in rainwater and “reseal” fine cracks.
• Promote full contact between mortar and masonry units and existing bedding mortar (good bond, not necessarily strong)
Clean removal of the deteriorated mortar when cutting out, good compaction of the fresh mortar and proper curing all contribute to obtaining full bond between the mortar and its substrates. Full bond and low shrinkage reduce the risk of fine cracks forming at the interface between the masonry units and mortar. Most water infiltration through a masonry assembly occurs at this interface and at poorly filled joints. Examples of minimum recommended flexural bond strengths are 0.2 MPa (CSA 2004) and 0.3 MPa (with Nepean sandstone; Suter et al, 19985).
• Provide resistance to frost action where needed. An air-entraining agent added to the mortar will improve frost resistance.
Most regions in Canada are subjected to significant freeze-thaw action (temperature fluctuations about the freezing point). Designers must pay particular attention to resistance to frost action to extend the service life of the repointing mortars. Otherwise premature crumbling, erosion or cracking of the mortar may occur. Typically, chimneys, parapets, freestanding walls, window sills, exterior steps and pavement, and masonry below or at ground level are the architectural elements most exposed to extreme wetting. A design approach which combines improved freeze-thaw resistance of the mortars with effective detailing to avoid water saturation of these masonry elements can improve the service life of the mortars as well as that of the masonry units. Factors that influence freeze-thaw resistance include air entrainment agents, sand grading and shape as well as the curing conditions to minimize cracking at the repointing
mortar/masonry units. Laboratory testing of freeze-thaw resistance of mortar using small masonry specimens can provide useful comparative data (see section 7).
• Provide resistance to salts where needed (e.g., sulphates). Use of sulphate-resistant Portland cement reduces this risk.
Mortars for use in masonry containing high levels of salts, such as sulphates or chlorides, should be assessed beforehand. One common problem is the migration of de-icing salts into masonry adjacent to roads and pavements. More maintenance will be required if salt use is an issue.
• Ensure compatibility of the thermal and moisture expansion properties of the repointing mortar to existing masonry.
This compatibility will result in lower differential movement between the two materials and, as a result, lower concentrated stress and lower potential for crack formation.
• Match texture and colour to the existing mortar, or as required for historic authenticity and aesthetics. Sand, the largest mortar ingredient, contributes most to colour and texture. If a particular colour match for a mortar cannot be achieved, pigments are sometimes added. They should be inorganic oxides, and not exceed 10 percent by weight of the dry binder so as not to alter the properties of the mortar significantly.
• Mortars should be practical in application to encourage good workmanship.
Lower strength mortars are less forgiving of poor construction practices than mortars used in modern masonry. Repointing mortars have a lower water content than bedding mortars. This reduces the risk of staining the masonry adjacent to the mortar joint, a factor playing a role in maintaining the aesthetics of the assembly as well. Use of contractors and masons experienced in the repair of older masonry is recommended.
7. Design of a mortar mix
The selection of a repointing mortar mix should be based on the severity of climate exposure, the strength of the masonry units, the compatibility with the bedding mortar and the masonry units, the expected conditions of mortar application and curing, and the principles for historic conservation. A single mortar mix for all types of masonry assemblies and all Canadian climates does not exist. More than one mortar mix may actually be used on a single project in response to different masonry and environmental loading characteristics. For instance, three mixes are typically used: one for the base (up to 1 m), one for the walls (above 1 m) and one for exposed areas (sills, horizontal projections etc.).
A mortar mix is normally expressed in terms of volume of main ingredients. For instance, a 1:2:9 mix will contain one unit of volume of cement, 2 units of lime and 9 units of sand. The types of mortar mixes are defined by the binder in the mix in the following manner: (non-hydraulic) lime mortars, hydraulic lime mortars and cement/lime mortars.
On the basis of the needs and constraints of the project at hand, the design team will select a type of mortar mix, establish the proportion of binder(s) and sand, the characteristics of the materials to use (e.g., type of sand, type of lime and cement) and additives (e.g., air
entraining agent). The design team also decides whether
the mortar used will be a premixed formulation (if available) to which only water needs to be added, or will it need to be batched on site.
Information on the different types of mortar mixes with their uses and limitations follows.
Non-hydraulic lime mortars
This type of mortar mix is a lime:sand mortar, usually a 1:2-3 mix (by volume). Up until late in the 19th century, lime putty (a lime paste made from quicklime) was the most common binder in mortars. Today
Types of binders
• Air hardening binders (e.g. lime putty and hydrated lime) gain strength by reaction with carbonic acid derived from carbon dioxide and moisture in the air -a very slow process called carbonation.
• Air and hydraulic hardening binders (e.g. hydraulic lime and lime with pozzolan additives) gain strength by reaction with carbon dioxide as well as directly with water.
• Hydraulic binders (e.g., Portland cement) gain nearly all their strength by reaction with water.
lime is also available in a powder form called hydrated lime. Type S (special) or SA (with an air entraining agent) are recommended for repointing work. For maximum workability of the mortar, lime putty is usually preferred for repair mortars in older masonry (either made directly from quicklime, or from hydrated lime mixed with water).
Lime mortars are appropriate for repointing older thicker masonry where an existing lime mortar has provided satisfactory performance and service life in the past,
and in sheltered areas where risks of water saturation of the masonry units combined with frost action are low. Lime is an air-hardening binder and as such, gains strength very slowly. Initial controlled curing, protected from rain or snow melt, is essential to good performance. Its initial frost resistance is very low and for this reason, repointing with lime mortars should be carried out well before the onset of cold weather. Although, in principle, simple to use, only experienced conservation specialists should specify lime mortar in exterior applications until more guidance and field experience in the Canadian climate is available.
One way to speed up the strength gain of lime mortars has been to include additives called pozzolans (one traditional pozzolan is volcanic ash) that give the binding paste some hydraulic properties. These mortar mixes are not recommended for repointing mortars, as it is difficult to ensure that the slow hydraulic reactions between the lime and pozzolan can occur before carbonation of the lime (drying of the mortar joint will stop the hydraulic reaction).
Hydraulic lime mortars
As the name indicates, this type of lime has hydraulic properties, because of the clay impurities in the particular limestone used to produce the lime. Hydraulic limes can be feebly, moderately or eminently hydraulic (the new European standard EN4596 classifies them by strength, e.g., NHL2, 3.5 or 5).
Hydraulic lime mortars gain strength at a faster rate than lime-sand mortars but, in general, still are much slower than mortars using Portland cement.
Very little documentation on the performance of hydraulic lime mortars in Canadian climates has been published. In Canada, experience gained with a few historic buildings repointed with hydraulic lime mortars as well as laboratory testing at the NRC have indicated that hydraulic lime mortars can perform well and exhibit adequate frost resistance when every step of the process is well controlled. However, comparative
testing also showed that the properties of similarly classified hydraulic limes from different manufacturers can vary significantly. The use of hydraulic lime mortars has a relatively short construction window during the year (due to slow strength gain) and will require more care during a longer curing period and tight quality control to ensure a good result. These extra considerations can add to the construction expenses. When contemplating the use of hydraulic lime mortars, consulting a masonry conservation specialist with experience with the products is recommended so critical factors of performance are well taken care of in the design, application and curing of the product.
Cement/lime mortars
Portland and other modern cements are hydraulic binders. These cements contain hydraulic components, which react at a faster rate than those in hydraulic limes therefore providing faster strength development resulting in faster construction. Portland cement also contains a small amount of gypsum to retard initial
Hydrated lime and lime putty
Lime is obtained from limestone, CaCO3, when it is heated to 900°C driving off carbon dioxide resulting in quicklime, CaO. In Canada and the United States, most lime used in mortar is obtained from dolomitic limestone containing calcium and
magnesium carbonate. Water is added to the quicklime to produce a slaked lime for use in mortar, Ca(OH)2. An excess of water produces lime putty and just enough water produces hydrated lime, a dry powder.
Hydraulic lime
In the late 1700s it was recognized that binders with hydraulic properties could be obtained by burning limestone containing clay impurities. This required increased firing temperatures (up to 1200°C). These binders, known as hydraulic limes, have a range of hydraulic properties.
set. Today many repointing mortars use normal grey or white Portland cement together with an equal or higher volume of lime (e.g., 1:1:6 to 1:3:12 mortars). The lime contributes mainly to the mortar’s
workability while the Portland cement provides most of the mortar strength and rapid set. Properties of the Portland cement/lime mortars will depend on the proportion of ingredients. A mix richer in Portland cement will exhibit higher compressive strength, more shrinkage and lower vapour permeance than a mix rich in lime. Careful consideration must be given to ensure a cement/lime mortar will not result in too high a compressive strength for the masonry of the project. In repointing work, a cement/lime mortar rich in lime) is more compatible with older masonry assemblies(e.g., type O mortar - CSA standard A179-04 Annex A).
The minimum compressive strengths expected for typical bedding mortar mixes (CSA standard A179-04) represent an underestimation for repointing work, because repointing mortars have a lower initial water content than bedding mortars. As a result of this lower initial water content, they will develop a higher final compressive strength.
Portland cement and/or other modern cements are also contained in masonry and mortar cements, which are pre-blended binders containing air entraining agents and other proprietary additives to improve workability, setting time, water retention and durability. The upper limit on the
compressive strength of mortars with these cements should be assessed beforehand to make sure it is not excessive. Conservation practitioners have often preferred to specify Portland cement/lime mortar mixes, because the ingredients are known and their proportion can be adjusted to control the compressive strength.
Premix mortars
Packaged premix mortars are available to which only water needs to be added. These mixes can be a proprietary mix or can be made based on the specifications for a specific project. In Canada, most of them contain an integral air entraining agent for improving freeze-thaw resistance. Premixes give the greatest control over mortar consistency on site. Manufacturers of premix mortars usually state the minimum compressive strength their mortars will achieve and they may add more binder to ensure achieving that strength. As a result, the actual strength can be much higher than the minimum stated. The designer should make sure the strength is not excessive.
Table 1 provides a compilation of typical mortar mix proportions, and the corresponding range of compressive strengths to expect. See section 8 on laboratory methods to characterize compressive strength.
Portland cement is made from a blend of clay materials and limestone fired at a temperature of around 1450°C. The high temperature leads to sintering and fusing of materials, which are ground after firing. A small amount of gypsum is then added to prevent flash setting of the cement. It was patented in Britain in 1824, but not until 1845 was the forerunner of modern Portland cement first manufactured in Britain. In the United States
manufacturing started in the 1870s and in Canada in the 1890s.
Additives
Any type of mortar mix can be designed to include additives for the purpose of enhancing an aspect of performance, for example, bond, workability, frost resistance, or to change mortar colour. The effect of additives on the mortar should be assessed beforehand. In conservation, mortar additives are usually discouraged. Although they may improve one property, they can degrade others. There is also a quality control problem if they are added to the mortar mix on site (small changes in dosage can have a large effect). If possible, additives should be premixed into one of the mortar ingredients to avoid errors on site. For example, air entraining agents can be obtained premixed in many binders and mortar premixes. If added on site, the air entraining agent is in liquid form and added to part of the mixing water. Air
entrainment improves frost resistance, and mortar workability. Air entraining agents do not work well with very dry pointing mortar mixes. A recommended range for air entrainment is 10 to 16 percent.
Table 1 Pointing mortar mixes (proportions by volume)
Binder Type of mix Portland cement Mortar or masonry cement Hydraulic lime (NHL 2, 3.5 & 5) Hydrated lime or lime putty* Sand** Cube Strength*** (MPa) Type N 1 1 5-6 7-15 Type O 1 2 8-9 3-9 Portland cement-lime Type K 1 3 10-12 2-8 Proprietary cement Type N 1 2-3 7-15 Hydraulic lime 1 2-3 1-10 Lime-based Lime 1 2-3 0.5-2 Notes:
* Hydrated lime powder from different manufacturers may have different bulk densities, and lime putty contains significantly more lime than the same volume of hydrated lime. The volume of lime used may have to be adjusted to take this into account.
** The Canadian mortar standard (CSA A179) assumes that mortars mixed according to the proportion specification will use sand in a damp state. This may in some cases produce mortars which are too strong (if the sand is measured damp, there is less sand in the mix because it occupies more volume than dry or wet sand). It is best to determine the strength before the project starts for any chosen mortar mix.
The optimum ratio of sand to binder paste is usually in the range 2 to 3 (CSA A179 recommends 2¼ to 3 for cement based mortars). The sand to binder ratio mainly depends on the grading and particle shape of the sand which affects the void volume of the sand. For a well graded sand the void volume is around 30% which explains the commonly used binder to sand ratio of 3. The binder paste should fill the voids.
*** Until more data is available, the values for compressive strength in this table only give a very rough guide of the range in strength of 50 mm mortar cubes made with mortar of pointing mortar consistency (consistency can be assessed using a Vicat cone; see section 11). The age at test for type N & O mortars is 28 days (tested wet), and 60 to 90 days for the other mortar mixes listed (tested air dry). The mortar cube test is a quality control test. The cube strength does not directly represent the strength of the mortar in a masonry mortar joint.
8. Testing
For more extensive and complex conservation projects, pre-construction testing can assist the designer in determining a suitable mortar mix. More extensive testing projects take time and planning to get the most out of the information collected. The use of experienced masonry conservation specialists is generally recommended before engaging in such projects.
Analysis of existing mortar samples can provide useful information regarding binders, aggregates type and gradation; however, exact mix recipes of existing materials are difficult to determine accurately.
Characterization of physical properties can be carried out for large enough samples of existing mortar. Results from testing for compressive strength, water absorption and/or the vapour transmission rate will provide the designer with a benchmark for the selection of a compatible repair mortar with similar properties as the original. Also, gradation of the original aggregate will allow for a more compatible selection of sand to be used in the repair mortar.
The following tests are most commonly used to characterize mortars:
Petrographic analysis provides the details of sand type, size and characteristics as well as details about the binder.
Sand grading and mortar compressive strength should be determined in accordance with the new edition of the Canadian mortar standard (CSA A179-04). Lime-based mortars can be cured in a similar way to type K mortar (see Table A3 in the standard). Both type K mortar and lime-based mortars should be tested at 60 or 90 days instead of 28 days because of their slower strength development (the strength may increase significantly for up to two years or more until the lime is fully carbonated).
Flexural bond testing may be used to establish bonding ability between a given masonry unit type and a mortar mix (CSA A179, ASTM C13577).
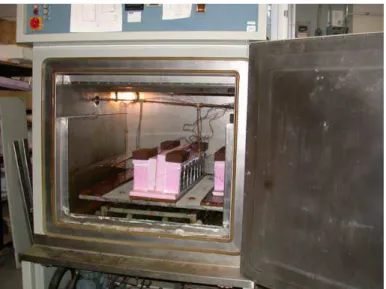
Frost durability testing can provide comparative frost resistance between several mortars. The NRC-IRC’s freeze-thaw cabinet, using a uni-directional freeze-thaw test procedurei, has been used for this purpose to test mortars as part of small masonry specimens (Fig. 5).
If there is a concern of hazardous materials contained in the mortar, use of a scanning electron microscope or X-ray diffraction can assist in identifying the presence of these materials in the existing mortar.
Figure 5 The NRC/IRC freeze-thaw test cabinet testing masonry prisms. The cabinet utilizes a
uni-directional test procedure adapted for Canadian conditionsi.
i
For further information on the test procedure see RILEM draft recommendation MS.A.3 Unidirectional freeze-thaw test for masonry units and wallettes. Materials and Structures. Vol 31, Oct 98, pp 513-521
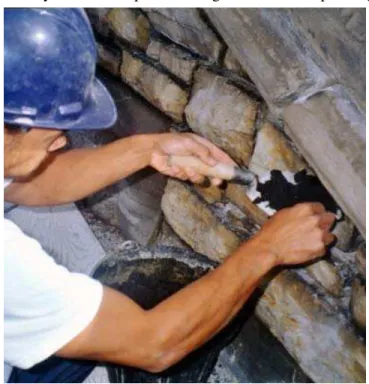
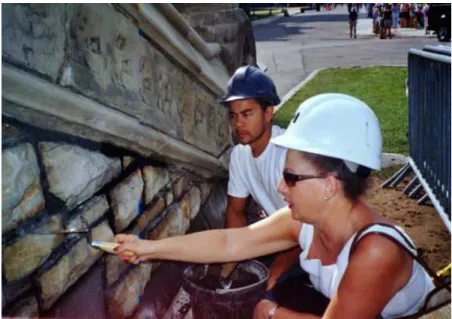
Figure 7 The mason at work should be
experienced in the conservation of older masonry.
Figure 6 Scaffolding to protect fresh repointing mortar from direct sunlight.
Part 2 Site considerations
Low strength mortars recommended for old masonry can extend the service life of the masonry unit compared to stronger modern mortars. To be successful however, more attention must be given to the application of the mortar than with modern mortars. This includes scheduling the work, the qualifications of the workers, the preparation of the mortar joint, and the mixing, installation and curing of the mortar. The specifications should describe in detail what is expected in each of these areas.
9. Pre-construction considerations
Scheduling. Seasonal conditions can be a constraint on the project as low strength mortars are sensitive to extreme climate conditions during installation and curing (e.g., freezing
conditions and hot temperature lead to rapid drying which will have a detrimental effect on the durability of the mortar). In northern climates, the window of opportunity for repointing can be quite short.
Scaffolding may need to be in place for extended periods (Fig. 6), and joint preparation can be noisy and generate a large quantity of dust. These conditions can affect the operation of the building and need to be taken into account in the scheduling of the work.
Selection of qualified contractors. Selection of contractors experienced in the conservation of older masonry is a vital step in ensuring a successful repointing job. Accreditation of the masonry contractor
helps ensure that the workers executing the work have received training by a recognized organization. For work on historic structures, it is suggested that the mason have over five years of experience following accreditation, or work under the supervision of a mason with such experience (Fig. 7). Training courses on restoration masonry work are available ii. Manufacturers of restoration mortars also offer hands-on training courses for their products. Test panels. Representative test panels should be prepared by the contractor in a less visible location of the building. It will form the benchmark for an acceptable standard of work and for evaluating subsequent work on the building. These test panels can be used to assess the mason’s skill as well as assessing the mortar colour, texture and joint finishes which have
been selected for the job.
ii
10. Joint preparation
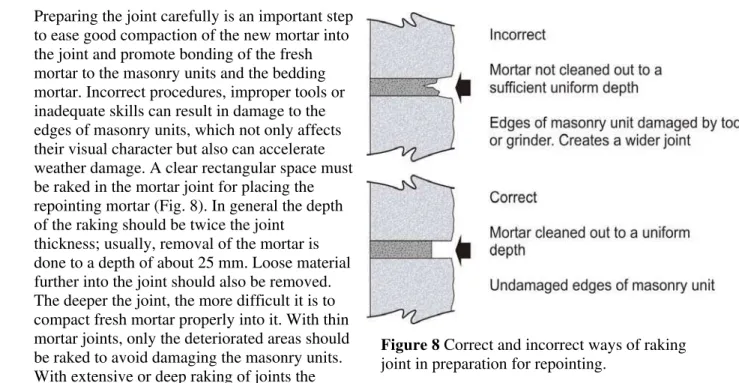
Preparing the joint carefully is an important step to ease good compaction of the new mortar into the joint and promote bonding of the fresh mortar to the masonry units and the bedding mortar. Incorrect procedures, improper tools or inadequate skills can result in damage to the edges of masonry units, which not only affects their visual character but also can accelerate weather damage. A clear rectangular space must be raked in the mortar joint for placing the repointing mortar (Fig. 8). In general the depth of the raking should be twice the joint
thickness; usually, removal of the mortar is done to a depth of about 25 mm. Loose material further into the joint should also be removed. The deeper the joint, the more difficult it is to compact fresh mortar properly into it. With thin mortar joints, only the deteriorated areas should be raked to avoid damaging the masonry units. With extensive or deep raking of joints the
stability and stresses in the wall should be evaluated before deciding on the area of wall to be repointed at one time. Older buildings may occasionally have contaminants in the mortar, such as lead. In this case extra measures must be taken to deal with the removal of these contaminants.
Manual tools, such as hand chisels or small pneumatic chisels, are traditional methods of removing old mortar, which reduce the risk of damage to the masonry units (Fig. 9). Power saws and grinders on masonry with thin joints, or on vertical joints should not be used as there is a higher risk of damage to the edges of masonry units. However, on wide and uniform horizontal joints, careful use of a power grinder or saw in the middle of the joint can assist in breaking down hard mortar; then the raking of the joint is
completed with a hammer and chisel. With softer stones laid in a harder existing mortar it may also be necessary to use the grinder to cut the center of the joint to facilitate removal of the mortar. Before using power tools, a sample area should be tried to ensure it works correctly and the operator is experienced. After raking, the joints should be brushed or vacuumed out and then washed out with a water jet from the top of the masonry area down to remove loose material and dust.
11. Mortar mixing
Mortar binders should be stored in dry areas. Sand should be protected from contamination from ground materials and from rain. Batching (measuring) mortar ingredients by weight gives much better uniformity between batches than the common practice of batching by volume. Volume batching introduces larger variations, because the level of compaction in measuring containers varies with the individual doing it. That said, the standard practice on site is to use
Figure 8 Correct and incorrect ways of raking joint in preparation for repointing.
Figure 9 Chipping out of old mortar using a mallet and chisel.
volume batching of ingredients. Uniform containers are set out at the beginning of the job with the necessary volumes of each ingredient marked on them. Often the same person will be responsible for mixing, offering consistency in mixing (e.g., compaction of ingredients will be more consistent from mix to mix). Bagged premix mortars which only require the addition of water, offer one solution to the variability of on-site batching.
A given weight of damp sand can occupy up to 30 percent more volume than when it is dry (called
bulking of the sand). Therefore, batching by volume could result in different mortar compressive strengths due to variations in moisture content of the sand over the duration of a project. To account for that
variable, it is good practice for the mortar mix designer/specifier to review and possibly adjust the mortar mix recipe the first day of mortar mixing (as well as regularly afterward depending on the weather conditions, e.g., heavy rain, heat spells), by checking on the bulking of the sand. If the sand is batched by weight, then the variation in moisture content should be checked.
Mortar ingredients should be mixed into a homogeneous state. Mechanical mixing is preferred, using a standard paddle mortar mixer or a mortar mill (the mill is normally used for mortars with lime putty as the main binder). Small amounts of mortar can also be mixed with a hand drill with a whisk attachment used for plaster, or vigourously by hand, mixing no more than needed at one time. Mix procedures should be specified before work begins. A thorough blending of the ingredients is required. The procedures differ depending on the binders used (see manufacturers specifications
for guidance). Lime putty (lime blended with water) in the mix is sometimes preblended with the sand. This lime/sand mix can be kept indefinitely provided it is kept damp. Portland cement can then be added to the lime putty/sand mix just before application. Mortars with lime putty only as a binder may not need additional water after the sand is added but they need to be well worked to obtain good plasticity. Plasticity improves with mixing time, although care must be taken if an air entraining agent has been added as too much mixing may introduce excessive air into the mix. Usually a maximum of five minutes wet mixing is recommended. Sometimes, the mortar is allowed to stand for a short while after mixing to allow good wetting of the ingredients. This can be especially important if dry sand has been used (e.g., premix mortars). A brief re-mixing and addition of any extra water occurs after this period. In most cases having one person assigned to the mortar mixing will help bring consistency to the mixing process.
The total volume of water necessary for a mortar mix will vary depending on the weather conditions. Often, this is left to the judgement of the mason on site; however, there are some points to consider. The amount of water added to mix a repointing mortar is less than the amount added for mixing a bedding mortar. A drier mortar is cleaner to work with (it doesn’t stain the units around the repointed joints), can be compacted into the joint better and will be less prone to shrinkage during curing.
Figure 10 The Vicat cone is dropped
into a cylinder of mortar and the depth of penetration into the mortar provides an indication of the consistency of the mortar.
Figure 11 Different types of joint tooling Equally, a repointing mortar can be too dry. An excessively dry mortar may not activate air entraining additives in the mix, which are added to improve frost resistance. The end result will be a poorly performing mortar. A Vicat cone test can be used quite quickly on site to help ensure consistent workability for a particular mix (Fig. 10) (ASTM C7808). Repointing mortars usually have a Vicat cone reading in the range of 15 to 30 mm depending on the type of mortar, the type of masonry unit and site conditions.
In warm weather, the mortar container should be covered with a damp cloth to prevent drying. The Vicat cone can be used to assess any reduction in workability. When air temperatures are likely to exceed 27°C, pointing should be postponed.
12. Mortar application
The repointing work should take place from the top of the façade down. The application should be done in the shade, away from strong sunlight. Shade can be provided by modifications to scaffolding equipment. Before applying the mortar, the joints should be wetted to minimize the loss of water in the fresh mortar by capillary action into the masonry. Pre-wetting also keeps the mortar joint damp longer allowing better curing of the mortar and also reduces the risk of staining during mortar application. The extent of pre-wetting will vary depending on the water absorption capacity of the masonry and the temperature. When applying the repointing mortar, the joint should be damp but not “surface wet.”
The quality of compaction of the fresh mortar into the joint will affect its bond with the substrates (as well as its freeze-thaw resistance). A short pointing iron allows more pressure to be exerted. Lime-sand mortars are usually compacted once more as they stiffen up. Vertical joints are normally done before horizontal joints. For joints less than 25 mm deep repoint layers successively without interruption. For deep repointing (backpointing) point the first layer leaving a rough surface texture then wait a day. Rewet the joint and continue with the pointing. Care should be taken not to smear mortar onto the surface of the masonry units. Thin joints may require protective tape
adjacent to the joints to avoid staining the masonry units.
Portland cement-lime mortar mixes should be used within two hours of adding water to the mix when the air temperature is less than 25°C (1½ hours for higher temperatures). Mixes with hydraulic lime can be used over longer periods (up to 24 hours depending on hydraulicity), and lime-sand mortars can be kept indefinitely provided they are kept damp. Re-tempering (remixing with a small addition of water) may be required if the mortar becomes too dry within its useful life. Portland cement-lime mortar mixes should only be retempered once. Mortars that contain a colouring additive should not be retempered; it may affect the colour of the mortar.
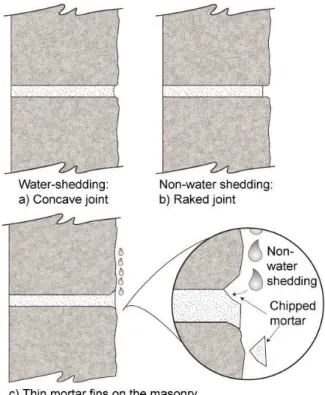
The final finish (tooling) of the mortar joint surface affects its water shedding ability (Fig. 11). The mortar should not extend onto the surface of the masonry units. Thin fins of mortar extending onto the face of the masonry unit easily spall and collect water; they also make the mortar joint look thicker than it actually is (see Fig. 11c). Standard finishes range from a concave finish (11a - best compaction and weather tightness) to a
raked joint (11b - worst). If the masonry units have worn rounded edges, it is best to recess slightly the mortar away from the face. Texture can also be adjusted by using a stiff bristle brush to tap the mortar after its initial set (thumb print hard). For historic masonry and for aesthetic effect, alternative finishes have been used and special tools may be needed.
Natural bristle or nylon brushes can be used to remove small pieces of mortar at the edge of the repointed joint after the mortar has become thumb print hard. If the work was carefully executed, there is no need for any other cleaning of the masonry. Washing the masonry can lead to leaching of the lime out of the mortar and staining the masonry.
13. Mortar curing and protection
Fresh mortar joints should be protected from rain, wind and sun and kept damp for periods of three to seven days depending on the type of mortar. Rapid drying out of the mortar should be avoided, because it can lead to shrinkage cracks. Mixes with slower hardening hydraulic binders, such as hydraulic lime, should preferably be damp-cured for a minimum of seven days while three to four days can be sufficient for type N and O Portland cement/lime mixes. Damp-curing can be achieved by installing a wet burlap fabric covered by a plastic sheeting onto the masonry with regular re-wetting of the burlap before it dries. Keep it a short distance away from the masonry to avoid mortar staining. Regular misting of the masonry alone is an unreliable method as evaporation from the masonry surface can occur quite quickly in warm, dry and windy weather. Water should not run off the mortar joints while doing this, otherwise staining may result from lime leaching out of the joint.
Pointing should be done well before or after freezing weather. In cases where work has been unavoidably delayed to the cold season, the mortar should be protected from freezing conditions. The mortar must be protected for a minimum of three to four days for 1:2:8 (PC:lime:sand) mortars or stronger mortars, and at least seven days for weaker mortars. An air-entrained mortar is also recommended (Maurenbrecher et al., 20059). To achieve this protection, an enclosure should be built on the exterior of the masonry and a temperature above 10°C and high relative humidity should be maintained within. When cold outside air is heated in this enclosure, it can get very dry; special humidification measures must be taken to ensure that the rapid drying of the mortar is avoided. After the initial recommended damp curing period, the mortar should be protected from frost and precipitation for a further three to four days to allow the mortar to dry partially before exposure to frost. For very low strength mortars, such as a lime based mortar, a longer protection from precipitation may be needed to avoid high moisture levels. It is advisable to keep a record of temperature and humidity inside the enclosure.
14. Quality control
The conservation consultant in charge of site supervision and quality control should visit the site more regularly than necessary for modern masonry projects. Quality workmanship is much more important with low strength mortars to ensure good performance. Inspections after the joints have been raked out, cleaned and squared off, after any deep (>25 mm) backpointing has been done and after the joints have been repointed will help ensure a better quality job (Fig. 12).
Quality control (QC) tests include compressive strength of mortar cubes (minimum 3 cubes per mix or more if unacceptable results have been
achieved), bulking of sand, air content of the fresh mortar, binder/sand ratio and mortar consistency. The Vicat cone test provides QC personnel with a tool to check immediately on site the consistency of the mortar mix and to monitor water loss during hot weather. The mortar cube tests cannot be used for immediate checks because they require 7 or 28 days (mortar containing Portland cement) to 60 days or more (lime and hydraulic lime mortars) curing before testing. Mortar cubes are mainly useful for pre-construction tests. For large projects, site cubes can nevertheless be used as an additional quality control check for future reference. One should document locations of the wall where mortar has been placed corresponding to each set of mortar cubes to know where to return if problems arise from the cube results.
15. Maintenance
After completion of the work, the design professional should provide the building owner with a maintenance manual documenting the evaluation of the masonry before the work started, the materials used for the work and the installation practices. Recommendations on regular visual inspection for signs of deterioration should be provided (Fig. 13), ideally in a checklist format, as well as a schedule and mortar recipes for future maintenance. Space should also be left for recording the subsequent maintenance. If the use of salt as a means of clearing ice and snow cannot be avoided around the building, then more frequent inspections should be
undertaken.
Figure 12 Inspection and discussion of joint finishing techniques during the mock up work.
Figure 13 A mobile stage can be used
to conduct periodic inspection of the condition of masonry.
16. Summary
The following are important points to remember:
• Older masonry often behaves differently than modern masonry.
• Evaluate and correct the existing problems with the masonry and the connected sub-systems of the building/structure particularly in relation to the effectiveness of the moisture management strategies.
• Repointing mortars should be designed to be sacrificial to the masonry units (lower compressive strength) and existing bedding mortar, have higher vapour permeance and good bond.
• No single repointing mortar mix fits all needs. The mortar should be adapted to the masonry on the particular building and the severity of the climatic exposure.
• Traditional mortars (e.g., lime-based) are experiencing a revival in conservation work. Care must be taken to evaluate their suitability for the climate, particularly their freeze-thaw resistance.
• For large projects or projects of historic significance, the assistance of a masonry conservation specialist will be beneficial.
• Only contractors, masons and professionals experienced in conservation work should undertake historical conservation projects.
• Special considerations must be given to site conditions such as scheduling the work, the qualifications of the workers, the preparation of the joint, the mixing as well as the curing of the mortar.
• Ensure quality control on site. Low strength mortars are less forgiving of mistakes.
• Regular maintenance should be undertaken to extend the service life of the structure.
Repointing masonry joints, when needed and done properly, contributes toward conserving the visual integrity and weather resistance of older and historic masonry. Following the guidelines presented here from pre-design assessments, design considerations, on-site practices and maintenance during service life can go a long way toward ensuring satisfactory performance for decades to come.
17. References
1. W C Brown, G A Chown, G F Poirier, M Rousseau.1997. “Evolution of Wall Design for Controlling Rain Penetration. Construction Technology Update No 9.” Institute for Research in Construction, National Research Council Canada.
2. A.H P Maurenbrecher. 1998. “Water-Shedding Details Improve Masonry Performance. Construction Technology Update No. 23”. Institute for Research in Construction, National Research Council Canada.
3. CSA (Canadian Standards Association). 2004. “Mortar and Grout for Unit Masonry.” CSA A179-04 4. Knöfel D & Huesmann M . 1993. “Mörtel zur Fugeninstandsetzung an Historischen Bauwerken”
(Mortar for pointing maintenance in historic structures). Bautenschutz + Bausanierung 16. pp 30-34 5. G T Suter, M L Thomson & L Fontaine. 1998. “Mortar Study of Mechanical Properties for the
Repointing of the Canadian Parliament Building”. Association of Preservation Technology Bulletin, Vol 29(2), p 51-58.
6. EN459-2001. Building Lime. Part 1: Definitions, specifications and conformity criteria. Part 2: Test methods. European standard available from the British Standards Institution.
7. ASTM (American Society for Testing and Materials). 2002. “Standard Test Methods for Evaluating Masonry Bond Strength.” ASTM C1357-02
8. ASTM (American Society for Testing and Materials). 2000. “Standard Test Method for
Preconstruction and Construction Evaluation of Mortars for Plain and Reinforced Unit Masonry.” ASTM C780-00
9. AHP Maurenbrecher, K. Trischuk, M. Subercaseaux and G. Suter. 2005. “Cold Weather Protection Requirements for a Low Strength Repointing Mortar”, Proceedings 10th Canadian Masonry
Symposium, Banff.
18. Complementary reading
Note:
All URLs were confirmed at the time of publication.The Institute for Research in Construction at the National Research Council (NRC) provides further information about repointing mortars and links to other Web sites at
http://irc.nrc-cnrc.gc.ca/bes/hmpe/masonry/index_e.html. Below is a selection of practice-oriented documents expanding on the issues of mortars for older masonry buildings.
• de Vekey, Bob. 2005. “Building Masonry with Lime-Based Bedding Mortars”, BRE GBG 66, Building Research Establishment, UK, November, 8 p.
• Hughes, J.J. and J. Valek. 2003. “Literature Review – Mortars in Historic Buildings”. Historic Scotland.
• Jeffs,P., PJ Materials Consultants Limited. Nd. “Repointing Masonry Walls – Matching the Techniques for Success of Failure.” Technical Workshop Restoration, Reconstruction and Maintenance of Masonry Structures, Dalhousie University Continuing Technical Education. • Mack, Robert C. and John P. Speweik. 1998. “Repointing Mortar Joints in Historic Masonry
Buildings”. Preservation Brief No. 2. Washington DC: National Park Service, October . http://www2.cr.nps.gov/tps/briefs/brief02.htm
• Maurenbrecher, A.H.P. 2004. “Mortars for Repair of Traditional Masonry", Practice Periodical on Structural Design and Construction, ASCE May 2004.
• The Society for the Protection of Ancient Buildings. 2002. “Repointing Stone and Brick Walling”. Technical Pamphlet 5. United Kingdom. 17 p http://www.spab.org.uk
• Suter, G. T, C.P. Borgal and K. Blades. 2001. “Overview of Mortars for Canadian Historic Structures”. Proceeding of the 9th Canadian Masonry Symposium. Fredericton: University of New Brunswick, http://irc.nrc-cnrc.gc.ca/fulltext/mortar/paper9.pdf