HAL Id: hal-00273488
https://hal.archives-ouvertes.fr/hal-00273488
Submitted on 15 Apr 2008HAL is a multi-disciplinary open access
archive for the deposit and dissemination of sci-entific research documents, whether they are pub-lished or not. The documents may come from teaching and research institutions in France or abroad, or from public or private research centers.
L’archive ouverte pluridisciplinaire HAL, est destinée au dépôt et à la diffusion de documents scientifiques de niveau recherche, publiés ou non, émanant des établissements d’enseignement et de recherche français ou étrangers, des laboratoires publics ou privés.
Interferometry Basics in Practice: Exercises
Florentin Millour, Damien Ségransan, G. Duvert, Fabien Malbet,
Jean-Philippe Berger
To cite this version:
Florentin Millour, Damien Ségransan, G. Duvert, Fabien Malbet, Jean-Philippe Berger. Interferome-try Basics in Practice: Exercises. Circumstellar Disks and Planets at Very High Angular Resolution, 2008, �10.1016/j.newar.2008.04.015�. �hal-00273488�
hal-00273488, version 1 - 15 Apr 2008
Interferometry Basics in Practice: Exercises
Florentin Millour
a, Damien S´egransan
b, Jean-Philippe Berger
c,
Gilles Duvert
cand Fabien Malbet
caMax-Planck-Institut f¨ur Radio-astronomie, Auf dem H¨ugel 69, 53121 Bonn,
Germany
bObservatoire Astronomique de l’Universit´e de Gen`eve, 51, chemin des Maillettes,
CH-1290 Sauverny, Switzerland
cLaboratoire d’Astrophysique, Observatoire de Grenoble, 414, Rue de la Piscine,
Domaine Universitaire, 38400 Saint-Martin d’H`eres
Abstract
The following exercises aim to learn the link between the object intensity distribu-tion and the corresponding visibility curves of a long-baseline ptical interferometer. They are also intended to show the additional constraints on observability that an interferometer has.
This practical session is meant to be carried out with the ASPRO software, from the Jean-Marie Mariotti Center, but can also be done using other observation prepara-tion software, such as viscalc from ESO.
There are two main parts with series of exercises and the exercises corrections. The first one aims at understanding the visibility and its properties by practicing with simple examples, and the second one is about U V coverage.
Key words: Optical long baseline interferometry, visibility, phase, U V coverage, VLTI, ASPRO
1 From model to visibility (exercises)
This first series of exercises is made for training your practical comprehen-sion of the link between the image space (where you usually work) and the Fourier space (where an interferometer produces its measurements). Opti-cal long-baseline interferometry experts constantly switches between Fourier space and image space. This training will help one get used to this continuous switching.
What you will need for this particular practice session
All exercises of this practice session will be done assuming a simple yet unre-alistic UV coverage. Synthetic UV tables simulating such UV coverages are provided for use:
strip-[J,H,K,N]-[000,..,170].uvt, where the number xxx is the projected baseline angle in degrees.
ASPROis able to do many things, but this session will focus on the MODEL/FIT -UV plots and source modeling part.
You will probably also need tables 1 and 2. Table 1
All integrated ASPRO models one can use during this practice session and their useful parameters.
ASPROname Source shape useful parameters POINT Unresolved (Point source) None
C GAUSS Circular Gaussian FWHM Axis
E GAUSS Elliptic Gaussian FWHM Axis (Major and Minor), Pos Ang
C DISK Circular Disk Diameter
E DISK Elliptical Disk Axis (Major and Minor), Pos Ang RING Thick Ring Inner Ring Diameter, Outer ring diam U RING Thin Ring Diameter (1 value: unresolved!) EXPO Exponential brightness FWHM Axis
POWER-2 B = 1/r2 FWHM Axis
POWER-3 B = 1/r3 FWHM Axis
LD DISK Limb-Darkened Disk Diameter, ’cu’ and ’cv’
BINARY Binary Flux ratio, rho, theta
Exercise 1: The diameter of a star.
The aim of this exercise is to have first contact with uniform disks, which are very often used to perform photospheric diameters fits or first-order interpre-tations of the data.
Table 2
Description of the parameters of the ASPRO model software module. Be sure to regard the parameter units.
name / parameter 1st 2nd 3rd 4th 5th 6th
(”) (”) (no unit) (unit) (unit) (unit)
POINT R.A. Dec Flux 0 0 0
C GAUSS R.A. Dec Flux Diameter (”) 0 0
E GAUSS R.A. Dec Flux Maj. diam. (”) Min. diam. (”) Pos. Ang. (◦)
C DISK R.A. Dec Flux Diameter (”) 0 0
E DISK R.A. Dec Flux Maj. diam. (”) Min. diam. (”) Pos. Ang. (◦)
RING R.A. Dec Flux In diam. (”) Out diam. (”) 0
U RING R.A. Dec Flux Diameter (”) 0 0
EXPO R.A. Dec Flux Diameter (”) 0 0
POWER-2 R.A. Dec Flux Diameter (”) 0 0
POWER-3 R.A. Dec Flux Diameter (”) 0 0
LD DISK R.A. Dec Flux Diameter (”) cu cv
BINARY R.A. Dec Flux Flux Ratio Rho (”) Theta (◦)
Notes: - for the binary model, the Flux Ratio is Fsecondary / Fprimary, and
Rho& Theta are the angular separation (”) and position angle (degrees) of the binary.
- R.A. and Dec are usually set to zero while Flux is set to one.
- “0” means you have to fill the parameter value a with zero. Be careful to put a 0 instead of leaving it blank, otherwise the software will crash !
Plotting a uniform disk visibility curve: Given a star with a 2 milli-arc-second (mas) photospheric radius, use the model function to plot the visibility versus the projected baseline length (baseline radius). For this purpose, you can use the MODEL/FIT.UV Plots & Source Modeling menu.
Zero visibility: At what baseline does the visibility become equal to zero (you can refer to Berger & Segransan, 2007, for example)? Use this number to evaluate the disk diameter.
Diameter uniqueness: Can you measure a unique diameter if your vis-ibility is non-zero but you know the star looks like a uniform disk? If yes, how?
Exercise 2: Binary star.
When the amount of data you get is a low number of visibilities, the object’s complexity for your interpretation cannot be too high. Therefore, binary mod-els are often used to understand the data when asymmetries happen to be proved by means of interferometry (by a non-zero closure phase) or by indi-rect clues (a polarization of the target, for example). Therefore, one has to understand the behavior of such a model.
Plotting a binary star visibility curve: Display the visibility and phase as a function of projected baseline (using the file strip-K-60) of a binary with unresolved components with 4 mas separation, a flux ratio of 1, and a position angle of 30 degrees. Do the same thing with different separations. Comment on the result.
Varying the flux ratio: Using the previous model, now vary the flux ratio from 1 to 1e-6. Comment on how the dynamic range requirement to detect the companion translates into visibility and phase constraints?
Phase versus visibility: Would the phase alone be sufficient to constrain the binary parameters?
Exercise 3: Circumstellar disk.
The last model we will see in this practice session is a Gaussian disk that can, in a first approximation, simulate a circumstellar disk, or an optically thick stellar wind. The idea here is to understand how visibilities change with source elongation.
Plotting a Gaussian disk visibility curve: Display the visibility curve of a disk which is assumed to have an elliptical Gaussian shape (model E GAUSS). Use the minor and major axes (parameters 4 & 5) to simulate an inclination. The display should be done for several PAs (strip-*-(0,30,45,60,90)).
Aspherity and visibility variations: Comment on how the aspherity in-duced by the inclination changes the visibility function at a given projected angle.
Exercise 4: Model confusion and accuracy.
If the baseline you have chosen is too long or too small relative to the typical size of your source, this may cause problems when you try to interpret your data. Here you will see why.
Plotting several model visibilities: Use the model function to compute the visibility of a star with a uniform disk brightness distribution (2 mas ra-dius), circular Gaussian disk (1.2 mas rara-dius), and binary (flux ratio 1, 1 mas separation, 45◦ PA) with the baseline stripe strip-K-60. No
superpo-sition of the plot is possible, so use the show plot in browser option, save it as a postscript file, and compare the different files afterwards. Compare their visibilities at 100 m in the K band.
Model confusion at small baselines: How can we distinguish between these various models? What about measurements at 200 m? What do you conclude?
The role of measurement accuracy: Does the measurement accuracy play a role in such model discrimination?
Which baseline for which purpose: Construct a 2-component model in which a central, unresolved star (POINT) is surrounded by an inclined, extended structure. You can use an elliptical Gaussian distribution (E GAUSS) for this purpose (minor and major axes in the range 0.5 to 15 mas).
Try two scenarios:
• an extended source easily resolvable but with a flux contribution much smaller than the star;
• a smaller extended source but with a larger flux contribution.
What are the best baseline lengths for estimating the size and relative flux contributions with an interferometer?
Exercise 5: Choosing the right baselines.
Given a specific object’s shape, one can determine how a baseline constrains a given model parameter. We will see this aspect here. In order to determine
the parts of the UV plane which constrain the model most, one can make use of the first derivative of the visibility with respect to a given parameter (e.g. derivative of visibility versus diameter).
Uniform disk: Choose a uniform disk model. What is the most constraining part in the UV plane?
For this exercise, in the UV EXPLORE panel, use V versus U, check the under-plot model imageoption, and choose the appropriate derivative in the plot what... line.
Gaussian disk: Do the same exercise using a Gaussian disk.
Exercise 6: An unknown astrophysical object.
The wavelength at which an object is observed is also important. This exercise attempts to illustrate this point.
Loading and displaying a home-made model: Load the fits table fudisk-N.fits corresponding to the simulation of a certain type of astrophysical object (here,
a disk around an FU Orionis object) using OTHER/Display a GDF or FITS image menu. If the color scale is not appropriate, check the Optional param-eters button and select another color scale. Notice what the contrast of the object (angular units in radians) is.
Computing the visibilities of a home-made model: Compute the vis-ibility of the model in the N-Band with MODEL/ FIT.UV Plots & Source Modeling/USE HOMEMADE MODEL. To do so, select the appropriate grid strip-N-60 in the Input Information menu. Use UV EXPLORE to plot the vis-ibility amplitude versus the spatial frequency radius.
Comparing visibilities for different wavelengths: Repeat these opera-tions in the K band, then the H and J ones. Compare the visibility profiles. Conclude on the optimal wavelength to observe the object with the VLTI (maximum baseline is 130 m today).
Exercise 7: Play with spectral variations, closure phases, etc.
Bonus exercise: Try to guess what this model shows just by looking at the visibilities (please do not cheat!).
Plotting visibilities and closure phase versus wavelength: Using a given model of a binary star (γ2 Vel, file gammaVelModelForAspro.fits), try to
plot visibility and closure phases as a function of wavelength (see the OTHER ... Export UV table as OI fits and OTHER ... OI fits file explorer menus).
Qualitative understanding: Compare the obtained visibilities with what you would get with an ASPRO model of one Gaussian and one uniform disk of diameters 0.5 mas, a separation of 3.65 mas, and an angle of 75 degrees. What do you conclude?
Looking at the solution: After your conclusions, you can look at the model by opening it with a fits viewer (for example, fv1).
2 From model to visibility (Correction)
The author of this paper carried out the previous exercises using ASPRO (and an image processing software for superposition of the graphs: GIMP) to give an idea of what one should get with ASPRO when following the previous ex-ercises. Please try to do the exercises yourself before reading these corrections.
Exercise 1: The diameter of a star.
Plotting a uniform disk visibility curve: The figure produced by ASPRO should look like Fig. 1, left.
Fig. 1. Left: The uniform disk visibility function cut from exercise 1. Right: The place where one can infer a unique diameter from a single visibility measurement for a uniform disk is where the measured contrast is above 0.15. Indeed, below 0.15, several diameters can be inferred from this single visibility measurement (as shown by the red line).
Zero visibility: The visibility for a uniform disk of diameter a is given by the following expression:
V (ρ) = 2J1(πaρ)
πaρ (1)
ρ = B/λ (B and λ in meters) being the spatial frequency, a being the star diameter (in radians), and J1 the 1
st
order Bessel function. Therefore, the value for which the visibility becomes zero is B = 1.22λ/a.
Here, the visibility zeroes around the 280 m baseline. This gives an approxi-mately 1.89 mas diameter for the star, close to the 2 mas input.
Diameter uniqueness: The right plot in Fig. 1 gives a hint of the answer: There are parts of the visibility function which are monotonic (above the red line). In these parts, one visibility gives a unique solution to the diameter of the star. In the parts below the red line, a given visibility corresponds to many different solutions (as the line crosses several points of the curve). Therefore, there is a lower limit on the visibility value (V & 0.15) where one can infer a unique diameter from a unique measurement.
Exercise 2: Binary.
Plotting a binary star visibility curve: The visibility and phase func-tions of a binary star are periodic since the image is made of Dirac funcfunc-tions. One can see what can be expected for a 4 mas-separation binary star in Fig. 2. One can see that the visibility does not have a cosine shape, but has sharp changes at visibility 0 for a 1 to 1 binary (black line).
Varying the flux ratio : For other flux ratios (0.8 in red, 0.5 in blue, and 0.1 in green), both the phase and visibility get smoother, and the contrast of the variations gets dimmer. Please note that these are visibility plots made with “AMP” and not “AMPˆ2” in ASPRO.
Fig. 2. Left: The visibility amplitude for a separation of 4 mas and different flux ratios (from the lower to the upper curves: 1 to 1 in black, 0.8 to 1 in red, 0.5 to 1 in blue, and 0.1 to 1 in green). Right: The visibility phase for the same separation and flux ratios.
Fig. 3. Top: U V map showing the previous binary star visibility modulus. This visibility shows characteristic modulation stripes perpendicular to the binary ori-entation. Bottom-Left: Visibility modulus as a function of base length for the different projected stripes, in different colors (the number of sine arches increases with the different orientations): red is 90◦ relative to the binary orientation, green
is 60◦, blue is 30◦ and black is 0◦. Bottom-right: Visibility phase as a function of
base length for the same stripes as before.
Phase versus visibility: To see how visibility or phase can constrain a binary star model, one can just try to change the baseline orientation and see how visibility and phase vary. In Fig. 3, bottom-right, one can see the result of such exercise. One has seen that the phase is sensitive to the contrast of the binary (Fig. 2), as is the visibility, but it is also sensitive to the position angle (both of the binary star and of the baseline) and the binary separation. Therefore, the phase can be used instead of the visibility to constrain the binary parameters!
Fig. 4. Left: U V map showing the visibility amplitude for a 2x4 mas elongated Gaussian disk. The black and blue lines correspond to the right part of the figure. Right: Visibility versus base length for the minor (black, upper curve) and major (blue, lower curve) axes of the Gaussian disk. Please note that the visibility is lower in the direction of the major axis and greater in the minor axis direction.
Exercise 3: Circumstellar disk.
Plotting a Gaussian disk visibility curve: The example of this exercise is a disk of 2x4 mas and a position angle of 60 degrees. The resulting UV map and cuts in the UV plane are shown in Fig. 4.
Aspherity and visibility variations: As one can see, for a given baseline and a varying position angle, the visibility goes up and down, the minimum corresponding to the major axis and the maximum corresponding to the minor axis. One has to note (and can check) that the phase function for such a model is zero.
Exercise 4: Model confusion and accuracy.
Plotting several model visibilities: In Fig. 5 different plots are superim-posed using the GIMP software. The uniform disk is in black, the Gaussian in blue, and the binary in red.
Model confusion at small baselines: Two green lines represent the 100 m and 200 m baselines. One can see the importance of multi-measurements at different baselines to be able to disentangle the different objects’ shapes. With only one visibility measurement, one will never be able to distinguish between
Fig. 5. Illustration of model confusion for different baselines and models: blue (top curve) is a Gaussian disk, red (bottom curve) is a binary star, and black (middle curve) is a uniform disk. The first green vertical line represents a 100 m baseline. If the accuracy is not better than about 0.01, then no distinction can be made between the different models. For the 200 m baseline (second green vertical line), an accuracy of 0.1 or better is sufficient to discriminate between the different models. Note, however, that one needs more than 1 point to be able to really distinguish between the models.
these different models. With the two visibility measurements, one can see that it will be possible to disentangle the different models if both very different baselines AND a sufficient accuracy can be reached.
The role of measurement accuracy: Here, if one has visibility error bars of 0.05, one can distinguish between the sources using the 100 and 200 m baselines, but not with an accuracy of 0.3. This importance of accuracy in model confusion is illustrated by Fig. 6. The 1st plot (on the left) is a central point with 90% of the total flux contribution and a large (15mas) Gaussian disk around, accounting for 10% of the flux. Errors bars of 0.1 would prevent one from finding the Gaussian component, and the measured visibility (0.9 ± 0.1) would be compatible with a completely unresolved star. The right graph shows the same but with the flux ratio inverted (90% of the flux to the disk and 10% to the central star). In this case, the visibilities would be compatible with a fully resolved, extended component, given an accuracy of 0.1 on the visibility, and the point source (the central star) would not be detected. So, not only the number of baselines but also the accuracy of the measurement is of high importance to distinguish between different models.
Which baseline for which purpose: Here, one can see that since there is an unresolved source in the object image (a central source), measuring the
visibility at long baseline directly provides the unresolvedflux/resolvedflux flux
ratio.
If one wants to get information on the disk itself (size, shape, etc.), the shorter baselines are more appropriate, since the visibility will vary according to the source shape.
Fig. 6. Left: Visibility cut for a point star accounting for 90% of the total flux and a 15 mas Gaussian disk accounting for 10% of the flux. Right: Visibility cut for a point star accounting for 10% of the total flux and a 15 mas Gaussian disk accounting for 90% of the flux.
Exercise 5: Choosing the right baselines.
The idea here is to use the nice feature of ASPRO that is able to plot the derivatives of visibility versus the different parameters of the input model. To do so, one has to go to the UV explore panel, select U as X data and V as Y data, and finally select d(AMP )/d(4) in the Plot what... part. This will plot the derivative of the visibility amplitude versus the 4th
parameter (radius, as shown in table 2).
Fig. 7 shows the model visibility and its derivative, relative to the model size, for a Gaussian disk and a uniform disk.
Uniform disk: The size used is 2 mas. The derivative peaks where the visi-bility slope versus baseline is the largest. This means that for a small baseline change, a large visibility change will be observed; i.e., the biggest constraint will be applied to the corresponding model in the model fitting process. One can see that the optimal baseline is 100 m for the uniform disk. One should know that the optimal baseline to constrain a given model corresponds
to a visibility of about 50%. Very important to know: baselines that are too short or too long will not reveal much information about the source size or shape.
Gaussian disk: The size used is the same as before: 2 mas. The optimal baseline is about 50 m for the Gaussian disk. Therefore, using different base-lines, one will be able to both disentangle the model shape (Sharp - UD - or smooth - Gauss - edges?) and constrain the typical size (as seen before).
Fig. 7. Top-left:Gaussian disk visibility map, as a function of U V coordinates. Top-right:Visibility derivative versus the model size (FWHM), showing where the visibility varies more with U V coordinates. Bottom-left: Visibility map, but using a uniform disk. Bottom-right: Visibility derivative versus model size (FWHM) for a uniform disk model.
Exercise 6: An unknown astrophysical object.
Loading and displaying a home-made model: Fig. 8 (top) shows the model of a young stellar disk produced by F. Malbet. The star-to-disk contrast here is 1 to 10.
Please note that, as for the previous disk model (Exercise 3), the disk is elongated, and therefore, the large visibilities will correspond to the minor axis of the model, whereas the low visibilities will correspond to the major axis.
Computing the visibilities of a home-made model: The lower-left part of Fig. 8 displays a UV map of the model shown in the upper part. This map is very similar to the one shown in Fig. 4, which indicates that the disk mostly looks like a Gaussian disk.
Comparing visibilities for different wavelengths: The lower-right part of Fig. 8 shows the visibility for the minor axis with different wavelengths: J (black, lower curve), K (blue, middle curve), and N (red, upper curve). This shows which wavelength to use to observe the object: the K-band allows both high visibilities for the extended component and low visibilities for the detailed structure of the disk, in the range of the VLTI offered baselines (16-130 m).
Exercise 7: Play with spectral variations, closure phases, etc.
This is a bonus exercise. To manage it, one will need the newest local version of ASPRO to cope with closure phases (at the time of writing this correction, the web version of ASPRO did not have all functionalities necessary to do this exercise). Therefore, one is not obliged to reach this point.
Plotting visibilities and closure phase versus wavelength: In Fig. 9, one can see the visibilities for a given observational setup (A0-D0-H0) and the closure phase. The author has used, on purpose, an array with aligned baselines to illustrate this exercise.
Qualitative understanding: There are a number of indicative clues to qualitatively understand the shape of the observed object:
Fig. 8. Top: Image of the disk model used in exercise 6 (shown using the fv tool) Bottom-Left:Visibility map showing the main elongation of the disk, perpendic-ular to the main elongation of the visibility function. Bottom-Right: Visibility of the disk for different wavelength regimes: red (top curve) is N-band, blue (middle curve) is K-band, and black (bottom curve) is J-band.
Fig. 9. Left: Visibility plot as a function of wavelength for different baselines (in red, green and blue). The global geometry of the model does not change, only the flux ratios between the 3 components. Right: Closure phase plot as a function of wavelength.
• The different visibilities are decreasing with baseline. Therefore, the object is barely resolved by the interferometer. One cannot qualitatively distinguish between a uniform disk, a Gaussian disk, or a binary star, but one can say the object is resolved at the largest baseline (≈130m) and therefore has a size of about 2mas.
• The non-zero closure phase gives information about the asymmetry of the object. Here, one has a non-zero but very small closure phase. The only simple model known from this practice session which gives a non-zero closure phase is a binary star model. The fact that the closure phase is not 180 degrees gives the additional information that the flux ratio is not 1/1. Therefore, only qualitatively looking at these data one can say:
• The object is likely to be a binary star, • the separation is about 2mas,
• the flux ratio is not 1/1,
• so far, one cannot say if each component has been resolved or if there is a third component.
Looking at the solution: Fig. 10 shows the image of the model used in this exercise. As one can see, the components are somewhat resolved, but probably not enough to be detected, and a third component is present. Therefore, the qualitative analysis is not enough, and one has to perform a quantitative analysis to characterize all of these components.
3 Observability and UV coverage
What you will need for this particular practice session:
You will need to use ASPRO and the catalogs named sampleSources1.sou and sampleSources2.sou provided with this practice session (you can copy this information into text files, see below). To set up ASPRO, please refer to the 1st part of this practice session about visibilities and model fitting.
!---! sampleSources1.sou !---ACHERNAR EQ 2000.000 01:37:42.8466 -57:14:12.327 NGC_1068 EQ 2000.000 02:42:40.8300 -00:00:48.400 BETELGEUSE EQ 2000.000 05:55:10.3053 +07:24:25.426 HD_68273 EQ 2000.000 08:09:31.9503 -47:20:11.716 HD_81720 EQ 2000.000 09:25:19.2802 -54:27:49.559 !---! sampleSources2.sou !---STAR_40 EQ 2000.000 16:00:0.0 40:00:0.0 STAR_30 EQ 2000.000 16:00:0.0 30:00:0.0 STAR_20 EQ 2000.000 16:00:0.0 20:00:0.0 STAR_10 EQ 2000.000 16:00:0.0 10:00:0.0 STAR_0 EQ 2000.000 16:00:0.0 0:00:0.0 STAR_-20 EQ 2000.000 16:00:0.0 -20:00:0.0 STAR_-40 EQ 2000.000 16:00:0.0 -40:00:0.0 STAR_-60 EQ 2000.000 16:00:0.0 -60:00:0.0 STAR_-80 EQ 2000.000 16:00:0.0 -80:00:0.0
Exercise 1: Setting up an observation
Set the date: In the WHEN menu, Date & Time Setup, put the date 28-AUG-2007 and time 14:00:00.
Set the place: In the WHERE menu, select VLT, 2 Telescopes.
Set the target: In the WHAT menu, choose Use Object catalog and select the file sampleSources1.sou. If you use the web version of ASPRO, you need
to have an account on the JMMC server and to copy your files beforehand using the File Management panel.
Check the settings: Check with the WHAT menu View Object catalog and look at the result in the xterm window. Note: you can do this step only with a local version of ASPRO as the web version has no access to a terminal.
Exercise 2: Observability of sources at different declinations and delay line constraints
First, we will check the observability of the sources with OBSERVABIL-ITY/COVERAGE, Observability of Source. Set the minimum elevation to 30◦,
check the Plot the twilight zones button, and use UT1 and UT2. When every-thing is done, press the GO button.
Which stars are observable? Is the chosen date appropriate for observing all stars together?
Delay lines limitation: Now, go to OBSERVABILITY/COVERAGE, Ob-servability limits due to delay lines. How does it change the obOb-servability? Compare the observability with UT1-UT4 and G1-J6. What do you conclude?
Sampling the UV plane with the VLTI
This goal of this section is to see how the UV coverage changes with baseline orientation and source declination.
You should first load the catalog named sampleSources2.sou. It contains 7 stars of R.A. 5:00:00 and of different declinations. In this section, you will make intensive use of the OBSERVABILITY/UV COVERAGE menu of ASPRO.
Exercise 3: UV tracks for a North-South baseline
We will now study the UV coverage of the sources with OBSERVABIL-ITY/COVERAGE, UV coverage & PSF.
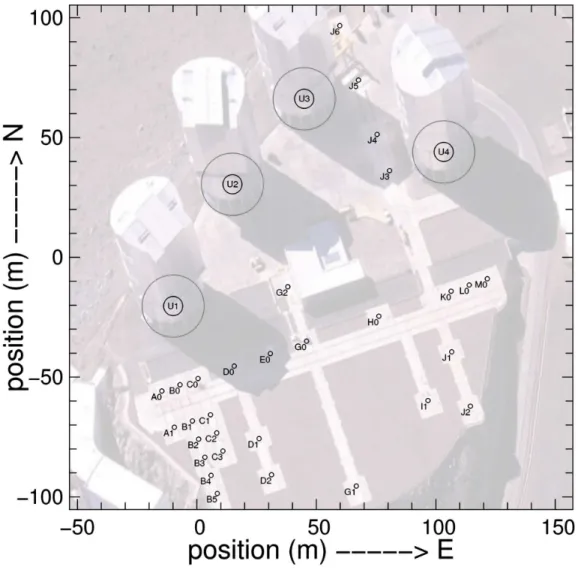
Fig. 11. The VLTI stations. Photo: Gerhard H¨udepohl
• Select the star at declination -20 and set the wavelength to 2 microns. In the Telescopes & Stations panel, select a 2-telescope baseline oriented N-S (cf. Fig. 11 ) and have a look to the shape of UV coverage you get.
• Change stars, going from positive to negative declination and see what hap-pens (you can over-plot the graphs by unchecking the RESET FRAME button in the Telescopes & Stations).
Hint: Look at the orientation of the Earth in Fig.12.
Exercise 4: UV tracks for an East-West baseline
Select a large 2-telescope baseline oriented E-W. Visualize the observability of the targets and check the delay line constraints. Plot the UV coverage for several stars.
2
Fig. 12. The Earth, as seen from a -25◦ declination (left) and a
+25◦declination (right). These images were generated using the free software
xplanet, http://xplanet.sourceforge.net.
UV tracks shape: Why are the UV -tracks elliptical (you can refer to the interferometry introduction articles)?
UV tracks and target declination: Have a look at the UV -tracks of a star above the equator and below the equator. What do you notice?
Hint : Look at the figure of the Earth in Fig.12 again.
Importance of the baseline orientation: Compare the N-S baseline and the EW baseline in terms of UV coverage and observability (how much UV -track do you cover with the same fixed delay?) Play with the star and the end of hour angle range.
Exercise 5: UV tracks for a 3-telescope-array
Observability:
• Select a large 3-telescope array configuration (in the WHERE menu). • Visualize the observability of the targets (including constraints on delay
lines). Look at the OBSERVABILITY/COVERAGE, Observability limits due to delay lines panel to see why the observability range is smaller with 3 telescopes than with 2 telescopes.
UV tracks for different configurations: In the UV coverage panel, try to add several 3-telescope configuration. For that you need to un-check the reset frame button. As an example, you can select 4 configurations i.e. A0-G1-J6, G2-J1-D2 and A1-B2-C1.
Beam shape: You can then display the “dirty beam” (the same as in radio-astronomy !) by using the Display PSF panel.
Exercise 6: Radius measurement of a star (uniform disk)
Here you will play with configurations and “real” observations. You will have a set of stars you want to observe. You must figure out if they are observable and choose the best observing setup to accurately measure the diameters. In this part, you should load the catalog named sampleSources1.sou. Select an instrument and the K band (2.1µm). You should also select an observing period and an optimal array configuration to determine the radius of the targets with the highest accessible accuracy. In this section you will make intensive use of the WHAT & Object Model menu (or UV Model/FIT, Source modeling menu) and OBSERVABILITY/COVERAGE menu of ASPRO. Table 3
Star main characteristics of catalog sampleSources2.sou
Object Spectral Type Ra Dec Diameter
from simbad [mas]
Betelgeuse M2Iab 05:55:10.31 +07:24:25.4 44.20 Achernar B3Ve 01:37:42.85 -57:14:12.3 2.53 HD 81720 K2III 09:25:19.28 -54:27:49.6 0.93 HD 68273 K2III 08:09:31.95 -47:20:11.7 0.5
NGC 1068 AGN 02:42:40.83 -00:00:48.4 3
Use the appropriate uniform disk model to either display the amplitude, the phase of the visibility, or the derivatives with respect to the diameter to visu-alize which part of the UV plane really constrains the model.
Optimizing the observability of a series of sources: Can you find a setup which fits well all the stars together? For that purpose, you must find a night and configuration which fits well all the stars characteristics for observ-ability, visibility level, delay lines constraints, and UV tracks.
Radius measurement: Can one determine the radius of these stars?
More details about the object: Can one determine phenomena that oc-cur at higher spatial frequencies, like limb darkening?
Knowing the limitations: What accuracy do you need to fulfill your ob-jectives?
3.1 Exercise 7: Binary parameter determination
In fact a “mistake” was introduced in the previous list: the star HD 68273 is a binary star (real name γ2 Velorum). First load/re-load the catalog named
sampleSources1.sou and then select star HD 68273. Let us consider it as a binary system with the properties summarized in Table 4.
Table 4
Binary system characteristics
Ra Dec ρ P.A. ∆mag
[mas] [◦.]
08:09:31.9503 -47:20:11.716 3.65 75 0 • Select the baseline G2-G1
• Visualize the UV coverage and the amplitude. Does this baseline constrain the parameters of the binary? Plot the visibility as a function of time. • Select the baselines A0-M0. Visualize the amplitude, the phase, and their
derivatives.
• Does this baseline constrain the parameters of the binary? • Plot the visibility as a function of time.
• What do you notice about the baseline orientation / the binary system position angle?
4 Observability and UV coverage (Correction)
The same procedure as before was used to produce these corrections: ASPRO was used for getting the figures and GIMP to over-plot the graphs together for illustration. As in the previous section, please try the exercises first before reading these corrections.
Exercise 1: Setting up an observation
After having set the date, time, place, and target (Fig. 13), you can start using ASPROand its many features to check and prepare observations. Fig. 14 is what you should get in your shell when setting View Object Catalog correctly.
Fig. 13. How to set the date, place, and object. Top: the date setup window appearing when pressing the WHEN menu. After changing the date and time, just press GO. Middle: the WHERE menu, where one can choose between all the supported interferometers. Bottom: the WHAT menu. The Get CDS Object... is very convenient for quickly finding a target.
Exercise 2: Observability of sources at different declinations and delay line constraints
Which stars are observable? Fig. 15 shows the observability for the sec-ond catalog of sources (sampleSources2.sou). The gray area correspsec-onds to the night, and the black lines correspond to the observability of sources by their height above the horizon (here 30◦). First, you can see that a source at
Aspro> !---! sampleSources1.sou !---ACHERNAR EQ 2000.000 01:37:42.8466 -57:14:12.327 NGC_1068 EQ 2000.000 02:42:40.8300 -00:00:48.400 BETELGEUSE EQ 2000.000 05:55:10.3053 +07:24:25.426 HD_68273 EQ 2000.000 08:09:31.9503 -47:20:11.716 HD_81720 EQ 2000.000 09:25:19.2802 -54:27:49.559 Fig. 14. Display of the catalog in the terminal window.
declination +40 is not observable at all, due to the latitude of Paranal: about 30◦.
Delay lines limitation: The additional constraints coming from the inter-ferometer are displayed in red just above the usual observability plot: the left graph is for stations UT1-UT4 and the right one is for G1-J6. You can see the difference for 2 extreme cases: a (roughly) East-West baseline (UT1-UT4) and a North-South baseline (G1-J6). The North-South baseline restricts the access to northern sources, whereas the East-West baseline restricts the observability during the night.
Fig. 15. Left: Observability of sources at different declinations for the UT1-UT4 baseline (roughly East-West baseline). Right: Observability of sources for the G1-J6 baseline (North-South).
Exercise 3: UV tracks for a North-South baseline
The UV tracks for the targets of the 2nd catalog (sampleSources2.sou) are shown in Fig. 16. The North-South baseline gives roughly North-South UV tracks, but the limitations due to the delay line limits are quite severe here since a very long baseline (G1-J6) was used. This can be seen in the very short
accessible UV tracks for the 20 and 30◦ declination targets. One can see here
that the 0◦ declination target gives a line in the UV plane.
Fig. 16. U V plane tracks due to the Earth rotation for a N-S baseline (G1-J6) and for different declinations: cyan for -20◦, blue for 0◦, green for 10◦, red for 20◦ and
black for 30◦.
Exercise 4: UV tracks for an East-West baseline
UV tracks shape: For the answer to this question, please refer to Millour (2008). The UV tracks correspond to the projection of a circle (due to the Earth rotation) on an inclined plane (the plane of sky) and are therefore arcs of ellipses.
UV tracks and target declination: Fig. 17 now shows the East-West baseline. As one can see, East-West baselines will never give a North-South UV projection on the sky. Also, the total range of UV plane projected angles is maximum for high declination targets (either positive or negative). As for the previous case, a 0◦ target gives a straight line in the UV plane and, therefore,
provides less coverage than a high declination target.
Exercise 5: UV tracks for a 3-telescope-array
Observability: First, one needs to check the observability when taking a big triangle (B5-J6-M0, Fig. 18, left panel). As one can see, the observability constraints are much more stringent than before, using a lower number of telescopes. The Observability limits due to delay lines panel (right side) now
Fig. 17. U V plane tracks due to the Earth rotation for an E-W baseline (A1-J2). The color-coding for the different declinations is the following: black for -80◦, cyan
for -40◦, blue for -20◦, green for 0◦, red for 20◦ and yellow for 40◦.
gives meaningful information; i.e., splitting the constraint by delay line. Here, one can see that the most constraining baselines are the B5-J6 and M0-B5, and the M0-J6 baseline does not too much constrain the observability.
Fig. 18. Left: Observability of sources for a big triangle of baselines (B5-J6-M0). The constraints due to the delay lines (red lines) are now larger than for 2 telescopes. Right: Detail of the delay line constraints: the B5-J6 and M0-B5 are the most constraining baselines.
UV tracks for different configurations: In Fig. 19, the UV tracks for the different triangles and different object declinations (0◦, -20◦ and -40◦ from
top to bottom) are shown. One can see that many aspects will affect the UV coverage:
• delay lines constraints - which prevent one from observing with large base-lines (bottom graph).
• available baselines - which limits the available stations due to the interfer-ometer possibilities.
Beam shape: One can see that the many aspects raised before will affect the UV coverage and, therefore, the quality of the PSF (plotted using the show dirty beam option):
• declination affects the quality of different position angles and gives irregular secondary lobes to the PSF.
• The delay line constraints prevent one from observing with large baselines (bottom graph) and widen the PSF (loss of angular resolution).
• The available baselines give an elongated PSF in the E-W direction for the VLTI, since the longest baseline is in the N-S direction.
Exercise 6: Radius measurement of a star (uniform disk)
Optimizing the observability of a series of sources: The first step is to set up an observation date in order to be able to observe all targets together in one night. The optimal date of observation would be the 15th
of December, but the moon is full on the 20th
. However, one can choose this date (Fig. 20) since interferometry is insensitive to the moon phase. I also chose the UT1-UT3-UT4 triplet since there is a faint target in my sample (NGC 1068) and checked that it does not put too many additional constraints on the observability of the source due to delay lines.
Radius measurement: First of all, you need to look at the standard accu-racy of the instrument you will use to be able to know what you can expect from your observations. The ESO Call for Proposal3 gives you information
about AMBER and MIDI (the two offered instruments) accuracy you can ex-pect. For AMBER in P81, the accuracy is 3% for an uncalibrated visibility point; i.e., about 5% for a calibrated one. If you look at the different targets here (I have taken a diameter of 3 mas for NGC 1068, see Fig. A.2), you can see that with this accuracy, both the star Betelgeuse and HD 68273 (γ2 Vel)
are unreachable for diameter measurement. The star HD 81720 will be mea-surable but with a poor accuracy on the diameter. Therefore the targets you will really be able to observe using these baselines are Achernar, NGC 1068, and partially HD 81720. For the two other stars (HD 68273 and Betelgeuse),
Fig. 19. Top: Sketch of the stations used in this example. Middle-Left: U V tracks for a 3-telescope observation on a 0◦declination object and several telescopes
configurations: A1-B2-C1, A0-G1-J6 and G2-J1-D2, corresponding roughly to 3 ob-serving nights using AMBER and with complete freedom in the stations selection. Bottom-Left: The corresponding “dirty beam”, or what would look like the PSF if one would observe a point-source with a telescope having an aperture similar to the previous U V track. Middle: Same as 1st
plot, but for a -20◦ declination target.
Bottom-Middle:The corresponding dirty beam. Middle-Right: Same as before but for a -40◦ declination target. Note that the biggest triangle does not appear
in this plot, as the constraints due to the delay lines prevents from observing with these telescopes. Bottom-Right: The corresponding dirty beam.
you will need other configurations (a short baseline triplet for Betelgeuse and the longest available baselines for HD 68273) to reach your goal of measuring a diameter.
More details about the object: You should also notice that limb-darkening measurements, which need at least one point in the second lobe of visibility, are not achievable, except for Betelgeuse. Finally, one baseline setup is not sufficient to measure all the star diameters: you will need at least a 3-baseline setup to reach your proposal goal (one short baseline setup for Betelgeuse and
Fig. 20. Observability of the 1st
catalog.
one very long baselines needed for HD 68273 and HD 81720 to reach a better accuracy).
Knowing the limitations: By browsing the ESO call for proposals4, you
can find that the current AMBER accuracy is 0.03 on the raw visibilities. This means 0.05 on calibrated measurements. Therefore, as seen in Fig. A.2, only Achernar and NGC1068 will allow one to “easily” measure a non-zero or non-1 visibility. HD68273 and Betelgeuse will make the measurement very difficult, as the expected visibility is very close to 0 or 1. Then, HD81720, whose visibility at maximum baseline is 0.85, will be marginally resolved and only an upper limit to the diameter will be measurable.
Exercise 7: Binary parameter determination
If the reader has reached this point carried out all of the exercises without any problems, he is now an expert in long-baseline stellar interferometry and can do this exercise without any difficulty ;-)
Fig. 21. Top-Left: Achernar visibilities for the largest baselines, given a radius of 2.53 mas. Top-Right: Same for NGC 1068 and a diameter 3 mas. Middle-Left: Same for Betelgeuse, diameter of 44 mas. Middle-Right: Same for HD68273, di-ameter of 0.5 mas. Bottom-Left: same for HD81720, didi-ameter of 0.93 mas.
APPENDIX
A Practical considerations
A.1 ASPRO rules of thumb
ASPRO is an optical long-baseline stellar interferometry tool intended to help the observations preparation. One can find it on the website http://www.jmmc.fr. Note that all exercises can be done at home with an internet connection, given that ASPRO can be launched via a java web interface.
Launching ASPRO on the web: The ASPRO launch is set up in five simple steps:
(1) go to http://www.jmmc.fr
(2) Select ASPRO applet. A pop-up window should appear (if not, please allow pop-up windows from http://www.jmmc.fr in your web browser). (3) If you have a user account on the JMMC website, then just log in; oth-erwise, uncheck the start application using my account information and proceed to the next step.
(4) in the Start... menu, select ASPRO. 2 new windows should appear. (5) The last step is to select the ASPRO version you want to use in the menu
Choose.... Here we will use the Full ASPRO interface version.
Fig. A.1. The different steps to launch the web version of ASPRO. One only needs an internet connexion and a java-enabled web browser.
Launching ASPRO on a local computer: If your computer is one of the rare ones to have ASPRO locally installed, then the launch is even simpler:
(1) In a command line, type aspro @oipt
(2) In the menu Choose..., select the ASPRO version you want to use. Here, we will use the Full ASPRO interface version.
Fig. A.2. The steps to launch ASPRO on a local computer: even simpler, but one needs a local version of the software installed!
When ASPRO gets stuck: You will sometimes experience strange behavior such as non-responding buttons or a different response to what you expect. If you are in doubt, do not hesitate to quit ASPRO by clicking the EXIT button. If this button does not work either, you can still write exit in the command line, which will kill the Gildas session (and the ASPRO one at the same time). Do not worry, restarting ASPRO and entering the different parameters again does not take very long!
References
Berger, J. P. & Segransan, D. An introduction to visibility modeling, New Astronomy Review, 2007, 51, 576-582
Millour, F., All you ever wanted to know about optical long baseline stellar in-terferometry, but were too shy to ask your adviser, New Astronomy Review, this issue.