Characterization of a Pre-curved Stylet Distal Tip Manipulation Mechanism for use in Volume Targeting
by
Hao Ding
SUBMITTED TO THE DEPARTMENT OF MECHANICAL ENGINEERING IN PARTIAL FULFILLMENT OF THE REQUIREMENTS FOR THE DEGREE OF
BACHELOR OF SCIENCE IN ENGINEERING
AS RECOMMENDED BY THE DEPARTMENT OF MECHANICAL ENGINEERING AT THE
MASSACHUSETTS INSTITUTE OF TECHNOLOGY
ARCHIVES
MASSACHUSETTS
INST17UE
OF TECHNOLOGYJUN 3
0
2010
LIBRARIES
JUNE 2010C2010 Hao Ding. All rights reserved.
The author hereby grants to MIT permission to reproduce and to distribute publicly paper and electronic copies of this thesis document in whole or in part
in any medium now known or hereafter created.
Signature of Author:
-- ~ ~~a~bepartment of Mechanical Engineering May 18, 2010
Certified by: ( )
Accepted by: (
Alexander H. Slocum sor of Mechanical Engineering Thesis Supervisor
John H. Lienhard V
ei '. ,unus rruiessor of Mechanical Engineering
Characterization of a Pre-curved Stylet based Distal Tip
Manipulation Mechanism for use in Volume Targeting
by Hao Ding
Submitted to the Department of Mechanical Engineering on May 18, 2010 in partial fulfillment of the
requirements for the Degree of Bachelor of Science in Engineering as Recommended by the Department of
Mechanical Engineering ABSTRACT
The characterization of the volume targeting capabilities of a telerobotic device capable of needle distal tip manipulation with a pre-curved needle is the focus of this thesis. The concept of deploying a pre-curved stylet from a concentric stiff cannula that is capable of both translational and rotational motions allows the device to achieve targeting of volumes through a single needle insertion into a soft medium. Each mechanism component was analyzed for its motion, and separate functional requirements were determined for experiments to characterize its accuracy and repeatability.
Three main areas of mechanical studies were selected for experimentation: (1) accuracy and repeatability of the robot drive mechanisms; (2) 3D experiments measured the positional accuracies of the device in being able to command the cannula or stylet tips to travel to the desired location input into the control box; (3) 2D experiments in body tissue simulating ballistics gelatin analyzed the accuracy and repeatability of the device in being able to target a small volume inside simulated surgical environments in one plane, as well as the potential effects the gelatin may have had on the stylets' travel paths. Each set of experimental protocols and setup were specifically designed to target the characterization of that mechanism or component of the device. A kinematic model was used as a basis of comparison for the two latter experiments.
The robot drive mechanism has a fundamental driving repeatability of 0.209mm in cannula axial translation, 0.034mm in stylet axial translation and 0.2200 in cannula rotation. For the 0.838mm diameter 30mm radius of curvature stylet, the stylet has an actual radius of curvature of 31.72mm as determined through a scan measurement. The tip positions experiments in the CMM and gel yielded radii of curvature changes of -1.461mm or -4.606% between the CMM data and the actual measured stylet, and +1.202mm or +3.789% between the gel data and the stylet. 2D volume targeting experiments yielded an average distance of 1.8822mm + 0.2628mm between the measured stylet tip positions and the model based calculated positions. The stylet with the highest targeting accuracy and repeatability was the 0.838mm diameter 20mm radius of curvature stylet with a targeting accuracy of 1.2760mm ± 0.7256mm, making it the ideal stylet for use in volume targeting procedures.
Thesis Supervisor: Alexander H Slocum
Acknowledgements
I would like to thank Professor Slocum for providing me with the opportunity to do research with such supportive graduate students during the final year of my undergraduate education. The design processes I learned researching in PERG will help me immensely in the years to come.
I would like to thank Conor Walsh for his guidance, support and mentoring during the research and writing of this thesis. Also, thanks to Nevan Hanumara for generously volunteering advice throughout the experiments.
Table of Contents
A cknow ledgem ents... 5
Table of Contents... 7
List of Figures... 7
List of Tables ...--- 9
Chapter 1: Introduction and Background ... I1 Chapter 2: Actuation Mechanism Repeatability... 16
Chapter 3: Distal Tip Positioning in Air... 20
Chapter 4: Distal Tip Positioning in Gelatin ... 33
Chapter 5: Conclusions and Future Work ... 50
R eferen ces... 52
Appendix A: HTM Model for Tip Position Calculations... 53
List of Figures
Figure 1.1: Section view Steedle showing the cannula and stylet actuating mechanisms...13Figure 1.2: Coordinate system and position variables for cannula and stylet. In order to position the distal tip of the stylet in a volume, three degrees of freedom have to be controlled; zeg, the axial position of the cannula with respect to ground (i.e. the casing); Oc/g, the angle of rotation between the cannula and the casing and z,, the axial position of the stylet with respect to the cannula... ... 14
Figure 2.1: Experimental rig for evaluating Steedle mechanism...17
Figure 2.2: Digital calipers with tail end fitted into slot of cannula spline-screw for measurements of axial translation. Measurement setup for the stylet screw would look the same except with a sm aller screw ... ... . 18
Figure 2.3: Steedle mechanism and a rotary potentiometer mounted in testing rig...19 Figure 3.1: CMM test bed shown with the positive axes. The measurement probe is the sharp vertical
Figure 3.2: Zero point at the end of the access cannula, the reference point for all m easurem ents... . 2 1 Figure 3.3: Measuring probe tip pushed against a stylet tip for taking a position measurement...22 Figure 3.4: Probe taking measurement when 30mm stylet is fully deployed to 50mm...26 Figure 3.5: 2D plot showing measured (o) x and z coordinates of stylet deployment 0mm -> 50mm
against calculated positions (*). The zero position is near (0,0)... 26 Figure 3.6: Cannula axial translation 2D graph showing the cannula tip axial translation in X. The zero position is near (-2.5,0.5)... ... 28
Figure 3.7: Cannula rotation graph showing the 00 and 3600 positions at the top, the 900 position near 0 on the Z axis, and the 1800 position at the bottom. This graph shows the view as seen from device, or the -X domain in the CMM coordinate system...30 Figure 3.8: Measured stylet tip positions in 5mm increments vs. calculated positions...31 Figure 3.9: The leftmost 8 data points represent the measured and calculated stylet tip positions when
the stylet is only deployed 25mm, compared to the rightmost 8 points at 50mm...32 Figure 4.1: Experimental setup showing a needle deployed and a camera on a tripod...35 Figure 4.2: 4.2a and 4.2b show a 0.838mm diameter 20mm radius of curvature stylet being deployed
in air and gel. The tip positions do not seem to be too different in the two photos, whereas 4.2c and 4.2d clearly show very different stylet tip positions of a 0.635mm diameter 40mm radius of curvature stylet... . 36 Figure 4.3: Percent change in radii of curvature of different stylets in gel versus air...37 Figure 4.4: Plate shown with gel box rig mounting holes on the left and camera mounting holes on
the right... . ... 39 Figure 4.5: Camera and gel box rig are both mounted to the camera test rig, ready for taking pictures. Note the camera sits on two spacer blocks to raise the camera lens to approximately the same level as the absolute center of the grid... 40 Figure 4.6: Alternate view of the setup showing the screw underneath the camera acting as a
positioning stop to align the camera parallel to the gel box rig...41 Figure 4.7: Grid calibration plate shown in gel aligned with the cannulus. Measurements of the
aluminum grids are compared to the paper grid seen behind the gel box...42 Figure 4.8: Stylet is fully deposited 50mm into the gel. Note that the cannula is deposited 20mm and
the tip of the cannula is inside the gel...43 Figure 4.9: Stylet path for volume targeting in gel...44
Figure 4.10: Plots showing the measured 0* and 1800 stylet deposition data (+) vs. the calculated positions (*). Based on the data shown, it appears that at times, the stylet is deployed in slightly
less than 5m m increm ents ... . ... ... 45
Figure 4.11: Stylet 5mm incremental deployment data of the CMM (o) vs. gel (+)...46
Figure 4.12: Measured vs. calculated stylet tip positions. "o"s represent the measured data and "*"s represent the calculated positions... ... 48
List of Tables
Table 2.1: Functional requirements and design parameters for Steedle evaluation fixture...16Table 2.2: Stylet screw axial translation data... ... 18
Table 2.3: Cannula spline-screw axial translation data... ... ... 18
Table 2.4: Commanded vs. actual angular displacements of cannula spline-screw...19
Table 3.1: Commanded rotations, average measured rotations and corresponding mean error calculated from 36 measurements...29
Table 4.1: Improved experiment functional requirements and design parameters...38
Chapter 1: Introduction and Background
In recent years, noninvasive percutaneous procedures have replaced many of the traditional surgical procedures, but the procedures have been primarily operated manually [1]. Though the accuracy of these procedures has greatly improved over time with the introduction of the use of high resolution imaging technologies, there are still many improvements to be explored. Standard methods require the long needle (10-20 cm) to be fixed in a specific orientation on the skin, and inserted into the body along a preselected path determined based on the information derived from some form of imaging technology such as Computed Tomography (CT), Ultrasound, and Fluoroscopy [2]. These procedures require multiple imaging scans during the procedure, and are subject to misalignments which can prolong the procedure and may cause unnecessary tissue damage, leading to longer patient recovery time [3].
Body structure often proves to be difficult problems for doctors to work around when performing percutaneous procedures. Often, bones and other tough tissues get in the way of the needle when targeting a volume deep inside the body. Standard needles can only target one point at a time, and multiple targets require multiple needle insertions, increasing the overall tissue damage.
Distal tip manipulation is a concept that provides a solution to the issues present in many current percutaneous procedure methods and devices. Distal tip manipulation easily bypasses body structures that are in the way of the needle, and multiple adjacent points may be targetable with the same needle, removing the need for multiple insertions and the resulting excessive tissue damage.
Pre-curved Stylet
One possible method of distal tip manipulation uses the control of a pre-curved stylet as the percutaneous tool. In order to achieve all the desired motions, an access cannula must be used in conjunction with the pre-curved stylet. The cannula fits on the outside of the stylet and keeps the stylet straight during axial translations. The cannula can also be rotated to allow the pre-curved needle to target volumes in 3600, allowing for a greater working volume in which the pre-curved stylet is effective [4].
The combined stylet and cannula allow 3 degrees of freedoms to be actuated, 2 in cannula axial translation and rotation, and 1 in stylet axial translation. Together, these 3 degrees of freedoms allow a cylindrical volume to be targeted. Even though the last degree of freedom is not a purely translational motion as the stylet is pre-curved, thus giving it a rotational nature of up to 900, it is carefully actuated thus making it a
controllable degree of freedom.
Several factors that may influence the accuracy of using a pre-curved stylet to target a volume in a medium must be carefully considered. The stylet would ideally be pre-curved such that the arc of the stylet follows a quarter circle as closely as possible to make modeling simple and targeting inputs easy to calculate. Another important factor that must be examined is the interactions between the pre-curved stylet and the medium it must travel through. When the stylet is deployed into the medium similar in stiffness and consistency to body tissue, in this case, ballistics gelatin, the stylet tip would experience a force that would cause it to deflect away from its original shape [5]. This deflection could cause the targeting accuracy to decrease.
Steedle
An automated device called Steedle was previously developed with a pre-curved stylet as the distal tip manipulation mechanism [6]. The Steedle was designed to enable the positioning of the distal tip of a pre-curved stylet within a working volume in the body. A CAD presentation of the device is shown in figure 1.1. The device has a protruding access cannula with a pre-curved stylet pre-assembled inside. The cannula is attached to a hollow spline-screw with the pre-curved stylet attached to a screw fixed inside the spline-screw. Two motors engage the cannula spline-screw through nuts to give it translational and rotational motion. This moves the entire spline-screw which effectively moves the stylet in the same motions. The stylet screw is attached to a motor through a nut to give it axial translational motion.
Stylet Screw Cannula Screw-spline Spline Nut Screw Nut
Figure 1.1: Section view Steedle showing the cannula and stylet actuating mechanisms.
Tip positioning accuracy and volume targeting accuracy measurements typically yielded data in the form of 2D or 3D coordinates. Inputs for control box, however, are in the form of axial translations in millimetres and rotations in degrees. In order to provide a basis of comparison for the measured data, stylet tip positions must be calculated. Trigonometry was used to calculate where the stylet tip positions should be based on the inputs to the control box. A system of cylindrical coordinates was defined based on the geometries of Steedle, as shown in figure 1.2.
Simple trigonometry and Cartesian-Cylindrical coordinate conversions were used to define the kinematic equations necessary to convert the measured data back to cylindrical coordinate system. Alternatively, by reversing the kinematic equations, the Cartesian coordinates could also be derived for where the inputs should command the stylet tip to travel to.
stylet tip position
stylet radius (X,y,Z)
of curvature ( p ,Z) R/ Zs/c Zc/g Z ground (telerobot casing) x P
Figure 1.2: Coordinate system and position variables for cannula and stylet. In order to position the distal tip of the stylet in a volume, three degrees of freedom have to be controlled; zc/g, the axial position of the cannula with respect to ground (i.e. the casing);
0
,g, the angle of rotation between the cannula and the casing and zc, the axial position of the stylet with respect to the cannula. [7]
According to figure 1.2, the Cartesian coordinates from the measured data would simply be represented by p and z, with p encompassing both x and y, and z encompassing both Z, and Zc. The stylet tip position in the p-z plane is simply a function of Z, stylet axial translation, Z, cannula axial translation and R the stylet bend radius. Simple trigonometry dictates that:
p=R(1-cosI (1)
z=zC +Rsin zsRj) (2)
The angle between the x axis and the p-z plane is simply the cannula rotational angle, in this case, <p. By reversing these equations and solving for Zs and Ze respectively, cylindrical coordinates may be obtained:
z, =z-Rsin( zsj (4)
Ge= (5)
Equations (1) and (2) were used to analyze the positional accuracy of the cannula rotational motion studies, whereas (3), (4), and (5) were converted into Cartesian coordinates and compared to the data of the cannula and stylet axial translational motion studies.
The accuracy to which the distal tip of the stylet can be positioned within a desired working volume will determine how the device is used clinically. Before the Steedle can be put into clinical trials and studied for use as a percutaneous device, its accuracy and repeatability must be characterized. This thesis focuses on characterizing the accuracy and repeatability of Steedle and its ability to target a volume using distal tip manipulation with a pre-curved needle. This thesis begins by characterizing the motional accuracies of the steering and driving mechanisms in chapter 2. 3D experiments to determine tip positioning accuracy and repeatability in air without the interaction of a medium, and 2D experiments to analyze the volume targeting accuracy and repeatability of Steedle inside body tissue simulating ballistics gelatin are examined in chapters 3 and 4 respectively. In the process of performing these experiments and analyzing the data, the effects of gelatin on the Steedle tip positioning accuracy and repeatability can be quantified, and the model used to describe the motions and estimate the tip positions of Steedle can be verified and improved to more accurately predict the motions of Steedle.
Chapter 2: Actuation Mechanism Repeatability
The translational and rotational motions of Steedle were found to have a fundamental movement error of 0.243 mm and 0.2200 respectively. System backlash was found to be 1.984' ± 0.208' in cannula rotation. These results act as benchmarks against which all other error measurements would be compared, and show the lowest possible error the system can exhibit when positioning the stylet tip as they measure the most fundamental errors found in the separate components of the driving and steering mechanisms of Steedle. To make these measurements, a test rig was designed and built to allow accurate measurements to be performed on the work bench on a rigid experimental setup that eliminated most human error contributions.
Design of the Test Rig
To begin motions characterization, confirmation that the mechanism was in proper working order was crucial. For this purpose, an experimental rig was designed and built with the specific functional requirements listed in table 2.1 to provide a solid mounting platform for the mechanism so that it could be evaluated on the work bench.
Table 2.1: Functional requirements and design parameters for Steedle evaluation fixture.
Functional requirements Design parameters
Concentricity When mounted, Steedle spline-screw and tapped hole must be concentric for accurate force measurements
Rigidity Rig must be rigid as to not deform during Steedle
benchmarking or force experiments
Adjustable Length must be adjustable to allow room for different
equipment and cannula/stylet axial translational motions Experiment flexibility Can be used to run multiple experiments that test every
component of the Steedle
Mountable to other setups Can be attached to the camera gel box fixture for experimentation - provides rigid structure for testing
A picture of the rig is shown in Figure 2.1. The rig consisted of a "boxed" % inch thick aluminum frame where the walls could be positioned at various points along the base. One of the walls provided a mounting region for the plastic part of the mechanism that supported the screw spline nuts and bearings. The other wall provided a tapped hole for mounting measuring instruments such as load cells and potentiometers.
The front mounting plate is a U-shaped piece containing mounting holes that keep the device centered and concentric with the load cell or potentiometer. The mounting holes were machined into the piece with dimensions from the plastic piece through which the spline-screw is centered from the original Steedle CAD files. This piece is concentric with the spline-screw, making it the ideal piece for centering the mounting piece.
Figure 2.1: Experimental rig for evaluating Steedle mechanism.
Initial experiments performed by Conor Walsh included measurements of the translational and rotational accuracy of the spline-screw and as well as the translational accuracy of the stylet screw when a specific command was input into the control box. For the translational experiments, the drive mechanisms were attached to the U-shaped mounting plate with the zero position defined at the face between the mounting plate and the Steedle. The tail end of the digital caliper used to make the translation measurements fitted into the slots of both the stylet screw and cannula spline-screw, and so was able to be repeatably positioned for each measurement. This setup is shown in figure 2.2. Using the digital caliper with a resolution of 0.001mm, measurements of the axial translations
of the cannula spline-screw and stylet screw were taken and the data is listed in tables 2.2 and 2.3.
Figure 2.2: Digital calipers with tail end fitted measurements of axial translation. Measurement the same except with a smaller screw.
into slot of cannula spline-screw for setup for the stylet screw would look
Table 2.2: Stylet screw axial translation data.
Commanded Position Actual Position [mm] Standard Deviation
5 4.975 0.057
20 20.018 0.056
25 24.969 0.082
Table 2.3: Cannula spline-screw axial translation data. Commanded Actual [mm] Relative [mm]
0 0 5 5.167 5.167 10 10.006 4.839 15 15.24 5.234 20 20.017 4.777 15 15.225 4.792 10 9.985 5.24 5 5.177 4.808 0 -0.011 5.188 -5 -5.057 5.046
The stylet screw had an axial translation repeatability of 4.9962mm L 0.039mm. The mean relative axial translation of the cannula spline-screw was measured to be 5.01 1mm ± 0.204mm. The axial error of the two components combined is much less than 1mm under the ideal conditions.
Rotational motion was measured through the use of a rotary potentiometer mounted on the back plate and attached to the spline-screw. This setup is shown in figure 2.3.
Figure 2.3: Steedle mechanism and a rotary potentiometer mounted in testing rig.
The cannula spline-screw was commanded to rotate in 50, 100 and 200 increments and the
resultant data was collated for mean rotation and repeatability error calculations. The results show that on average, the largest mean error is seen in the 50 commanded angle where the actual measured rotation was 4.97* ± 0.22*.
Table 2.4: Commanded vs. actual angular displacements of cannula spline-screw. Commanded Angle 10 Actual Angle [0]
5 4.97 0.22
10 10.15 0.36
20 19.84 0.47
The rotational backlash in the screw-spline was evaluated by applying gentle positive and negative moments by hand while measuring the angular displacement. This backlash was measured to be 1.9840 E 0.2080. All these errors ultimately trace back to the backlash caused by clearances in between the teeth of mating gears from imperfections in gear material and manufacturing, and from imperfect center distance mounting of the gears
[8].
These initial experiments show promising repeatability, though more robust experiments must be performed to analyze the actual tip positioning accuracy of the entire device as well as the volume targeting capabilities of the system in gel.
Chapter 3: Distal Tip Positioning in Air
The purpose of these measurements was to analyze the accuracy and repeatability of the different motions of Steedle in air without the interaction of a tissue-like medium. Specifically, the motions that were commanded were cannula axial translation, cannula rotation and stylet axial translation. The positioning accuracy errors for each of the three motions were found to be: ±0.2560mm in cannula axial translation, ±3.990' in cannula rotation, and ±1.2316mm in stylet axial translation. For these measurements, the CMM
measurement repeatability error was found to be ±0.1450mm when the stylet was retracted and ±0.2006mm when the stylet was deployed.
Functional Requirements of Experimental Setup
Several functional requirements were taken into consideration for these experiments. The Steedle must be able to control each motion with no movement in the main body itself to minimize errors. The act of taking the measurement must not change the position of the tip of the stylet or cannula being measured. Only one standard frame of reference must be used to make all measurements to ensure statistical consistency. Measurement must be made in 3 dimensions by the same measuring device. Finally, each motional error must be characterized individually to eliminate other potential sources of errors. Description of CMM Experimental Setup
A coordinate measuring machine, or CMM was chosen to be the measurement device. The machine itself satisfies 3 of the 5 functional requirements regarding the act of taking the measurements. A vice attached to the CMM test bed was used to grip the Steedle, thus satisfying the 4th functional requirement.
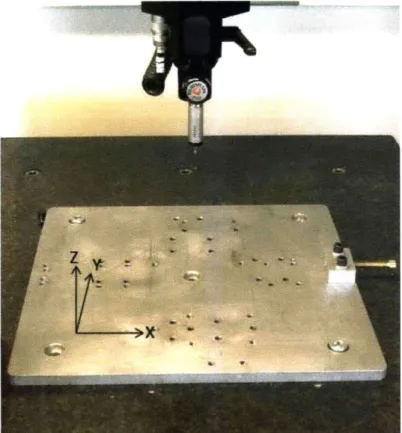
The CMM consists of a 2 axes (X and Y axes) motion carriage carrying a position measurement probe at the bottom tip of the vertical axis (Z axis) arm. In figure 3.1, the different axes as recognized by the CMM are shown in their respective positive orientations. Due to the nature of the machine, the zero position is preset such that one cannot reset the zero freely. All measurements were taken with a point on the Steedle as the zero reference point in the CMM preset axes coordinates, and the reference point was
set at the end of the access cannula from where the stylet is extend out, which can be seen in figure 3.2.
Figure 3.1: CMM test bed shown with the positive axes. The measurement probe is the sharp vertical protrusion.
Figure 3.2: Zero point at the end of the access cannula, the reference point for all measurements.
The measurement probe takes position readings in Cartesian coordinates when the probe tip touches a surface and is deflected, see figure 3.3. When this occurs, the CMM restricts further movement in that direction until either the probe is backed up or the object is removed. The machine automatically accounts for the radius of the probe tip and subtracts that from the position where the measurement is taken, to obtain the exact position of the edge of the object that it is measuring.
Figure 3.3: Measuring probe tip pushed against a stylet tip for taking a position measurement.
This means that for measuring a tip of a stylet, assuming that the stylet tip is sufficiently small, it makes no difference which direction the probe approaches the tip from, the differences in positions measured are so sufficiently small that the error is below the resolution of the CMM. To be consistent, all measurements were taken with the probe approaching the stylet tip from the right, or positive X direction moving towards the left or the negative X direction as seen in figure 3.3. This guaranteed that neither the axial translation motions nor the rotational motion of the cannula had any influence on the way the probe took measurements.
To determine the repeatability of taking measurements using the CMM, two different sets of data were taken. One characterized the repeatability of measuring the zero position of the cannula and stylet where the deflection of the stylet tip, which is fully supported by the cannula, is smallest. The other characterized measuring the stylet tip position when it was fully deployed, where the interaction with the probe tip would cause the greatest amount of deflection in the stylet tip. Doing these two experiments allowed the characterization of the smallest and largest repeatability errors found in taking position measurements with the CMM when being controlled manually.
The repeatability of taking measurements on the CMM was found to be ±0.1450mm at the Omm position, and ±0.2006mm when the stylet was deployed 50mm out. For targeting purposes using the 30mm stylet, this error is between 0.343% and 0.475% the distance traveled by the tip of the stylet.
Homogeneous Transformation Matrix Model
In order to provide a basis for the measured data to be compared against, stylet tip positions must be accurately calculated using the different experimental settings. A homogeneous transformation matrix (HTM) model was used to calculate the stylet tip positions. This model takes into consideration several factors that could affect the final stylet tip positions. Two primary factors taken into account were factors that could be observed during CMM and initial gel experiments. The cannula deflected radially in the direction of the pre-curved stylet when the stylet was retracted into the cannula, giving the stylet tip an initial radial displacement. This positively affects the final position of the tip because the gel does prevent the cannula from spring back to the zero position when the stylet is deployed, giving the stylet tip a larger radial position.
The second factor is that the stylet does not exit the cannula completely tangentially. Instead it exits at an angle, giving the stylet an even larger radial displacement compared to the axial displacement. The HTM model accounts for these by adding a new reference frame and a new coordinate system at each cannula/motor, stylet/motor or cannula/stylet interaction location. This allows the model to have different starting positions for each separate component of the Steedle, so the cannula can have a starting position that is
non-zero, and the stylet can have a starting angle that is also non-zero. See Appendix A for a figure and equations of the HTM model.
Stylet Deployment Measurements
The stylet deployment experiments measured the positional accuracy of deploying the stylet from 0mm to 50mm. This was done in two experiments. The first only measured how accurately the device could deploy the stylet to 50mm starting at 0mm. The second did the same positional translation, but deployed the stylet from 0mm to 50mm in 5mm increments to analyze the behavior of the stylet tip as it was deployed.
The stylet insertion repeatability was measured with the cannula fully retracted to ensure all errors were due to the movements of the stylet and the stylet motor. In order to do this, the stylet was initially retracted such that only the very tip of the stylet was outside the cannula for the probe to interact with. The stylet was then translated 50mm, allowing it to reach full deployment, thus no curved part of the stylet was still inside the cannula. Once, the stylet was fully deployed, the tip position was recorded with the CMM machine as depicted in figure 3.4. A measurement was taken here, and then the stylet was retracted back into the cannula. This procedure was repeated a total of 10 times.
The second stylet deployment experiment was performed to analyze the behavior of the stylet tip as it was being deployed. In order to see how the tip position of the stylet changes as the stylet moves out of the cannula for targeting purposes, the stylet was deployed from Omm - 50mm in 5mm increments. 5 measurements were taken at each 5mm increment to find the average position and to decrease the statistical significance of each data point to avoid outlying measurement errors due to external factors such as potential human interactions and errors. These stylet deployments were done with
Figure 3.4: Probe taking measurement when 30mm stylet is fully deployed to 50mm.
The measured data is plotted in 2D in figure 3.5 against the calculated positions of the stylet. This plot only shows the x and z axes as the y axis was aligned vertically. The Omm measured position had the stylet slightly outside the cannula for easier measurement. An average accuracy error of ±1.2316mm was measured in the tip positions with a CMM measurement repeatability of +0.2006mm.
Stylet Axial 0-50mm
0 5 10 15
X Axis (mm)
20 25 30
Figure 3.5: 2D plot showing measured (o) x and z coordinates of stylet deployment 0mm
-> 50mm against calculated positions (*). The zero position is near (0,0).
... .... ... ... . . .. .. . .. .. .. .. . .. .. . ...... ... ... ... ... ... ... ... ... ... ... ... ... ... I ...... ... ... ... ... ... ... ... ... PO ... ... ... ... ... An
Cannula Translational Measurements
Cannula translational measurements measured the positional accuracy of translating the cannula by 10mm increments at a time. Error was calculated to determine for a
10mm translation in command input, how far the device actually moved the cannula. The average translated distance for a 10mm commanded axial translation was measured to be 9.9889mm ± 0.2560mm.
The axial measurements were taken with the stylet fully retracted. This made for easier measurements as the cannula has a much larger area for the probe to interact with. Since Y and Z deflections cause very little change in position in the X direction, as long as the probe interacted with the far end of the cannula, measurements were easy to take. The stylet cannula was initially extended a few millimeters to ensure that the measurement of the starting position was that of the stylet cannula and not the cannula attached to the Steedle housing. This was considered as the zero position for the cannula axial measurements. A command of 10mm axial translation was input into the control box and a second reading was taken. The sequence of inputs and position readings were as follows:
Omm -> 10mm -> 20mm -> 30mm -> 20mm -> 10mm -> 0mm
This was repeated a second time for extra data, and a total of 12 translational motion measurements were recorded. Since the cannula moved 10mm each time, errors due to backlash or inconsistencies in the code would have likely been captured in the measurements.
Cannulus Axial 0-10-20-30mm 2 0 Position 0o . ... ... ... ... ... ... -5 0 5 10 15 20 25 30 X Axis (mm)
Figure 3.6: Cannula axial translation 2D graph showing the cannula tip axial translation in X. The zero position is near (-2.5,0.5).
Axial translation was the Steedle commanded motion with the smallest average error. The small angular backlash from the motor gearheads and nuts is passed down to an even smaller translational backlash through the screw-spline. For a commanded cannula axial translation of 10mm, the actual translated distance was found to be 9.9889mm ± 0.2560mm, and the CMM measurement repeatability error for this experiment is ±0.1450mm. The 2D graphical representation of the cannula axial translation as seen in the x-z plane is shown in figure 3.6. For this graph, the zero position is situated near (-2.5,0.5).
Cannula Rotational Measurements
Cannula rotational measurements measured the actual rotations of the cannula when specific commands of 90', 180' and 360' rotations were input into the control box. Having the stylet fully deployed and rotating the cannula allows the characterization of the rotational positioning accuracy of the stylet tip. The largest absolute error, found in the command of 180' cannula rotation motions, was measured to be 181.612' ± 5.728'.
The rotation measurements were taken with the stylet deployed 50mm. This allows the angles turned by the cannula to be amplified by the tip of the stylet for easier measurements and analysis. The starting position was at 00. The first set of tests had the cannula turn 900 for a position reading, then back to 00 for another. This was done 3 times for backlash measurements. Similar readings were done with 1800 and 3600 rotations. The entire set of data included the following rotation inputs and position readings: 00 -> 90 ->00 -> 900 -> 00 -> 900 00 ->90 ->180 -> 900 -> 00 (x2) 0 ->1800 ->00 -> 1800 >00 -> 1800 00 ->1800 -> 3600 -> 1800 ->00 (x2) 00 ->3600 -> 00 -> 3600 -> 00 -> 3600
A position reading was taken at each angle input and backlash can be measured at each change in direction of rotation. 00 -> 360' -> 7200 ->3600 -> 00 measurements were not taken, because in theory, the Steedle should be able to reach any volume within the work volume by turning up to 3600 in either direction.
Table 3.1: Commanded rotations, average measured rotations and corresponding mean error calculated from 36 measurements.
X Y Z Measured Rotation Mean Error
Cannula Rotation 900 133.63 166.4118 -182.4693 93.9170 ±3.9900
Cannula Rotation 1800 132.5592 128.7598 -220.2905 181.6120 ±5.7280
Cannula Rotation 3600 130.026 129.807 -145.5147 359.980 ±3.8780
For these measurements, the CMM measurement error is ±0.2006mm, or approximately +0.3620, which is an order of magnitude smaller than the mean error measured in the device rotation motions. The largest error by percent rotated, was measured in the 900 rotation, where the actual measured rotation was off by 3.917 0 and the error was ±3.9900. This is within reason as compared to the initial device repeatability
which showed the fundamental machine repeatability error in chapter 2 as being 0.2080 for 50 rotations.
Figure 3.7 shows that the cannula rotation was not in perfect 900, though looking through the X axis, it seems very close. By percent rotation, there was a rather large
standard deviation in the tip position at 90' which was not propagated to the same extent in the 1800 and 3600 positions, showing that backlash may have contributed more to the overall error in the 900 rotations as compared to the 1800 and 360' rotations.
Cannutus Rotation 0-90-1W-360
0*->90L
! :Z7 1800->3600 90C-> 80C I I I 1 1 35 30 25 20 15 Y Axis (mm)Figure 3.7: Cannula rotation graph showing the 00 and 3600 positions at the top, the 900
position near 0 on the Z axis, and the 1800 position at the bottom. This graph shows the view as seen from device, or the -X domain in the CMM coordinate system.
Stylet Tip Deployment Behavior Characterization
The behavior of the stylet tip as it is deployed from the cannula can have an effect on the path the stylet follows inside a medium. An experiment was performed to analyze the stylet tip positions by deploying the stylet from 0mm to 50mm in 5mm increments, and tip positions were measured at each increment. This data was then plotted against the
calculated tip positions of the stylet using the HTM model. 40 --T' 10-4 -10- -201- -30-I I I 10 5 XAr4(mm)
The graph below shows the measured stylet tip positions plotted against the calculated tip positions.
Stylet Axial CMM Measured (o) vs. Calculated ( 5 E -2*0 -25 0 0 0 0 -30 p 0 5 10 15 20 25 30 35 40 X Axis (mm)
Figure 3.8: Measured stylet tip positions in 5mm increments vs. calculated positions.
The actual tip of the stylet does have a portion that is relatively straight, thus naturally changing the nature of the fit curve. A circle was fitted onto the measured data in Matlab, and the circle traced out by the stylet tips was found to have a radius of 30.259mm, which is quite close to the 31.72mm radius of curvature that was measured for this stylet. The two circles have a difference of 1.461mm or 4.606% in radii. This data will become more useful when compared to the results from an experiment detailed later in the gel experiments aimed to measure the same data but in gel instead of air. Simulating Stylet Tip Positioning in 3D
An experiment was performed to simulate positioning the stylet tip to a set of desired locations in 3D. The cannula axial position was kept constant at 10mm while the stylet was deployed to 25mm and 50mm at 0* cannula rotation, and at every 90* rotation thereafter. Since the error in each individual motion is known from the other experiments, this combines the two motions that are controlled by all three motors. By
performing this experiment, representative stylet tip positioning capabilities of Steedle could be evaluated. This cannot officially be considered volume or position targeting because Steedle was designed to target volumes inside tissue-like medium.
Figure 3.9 shows the data points from the CMM. The measured data had an average distance of 0.2373mm from the calculated positions, and the tip positioning accuracy had a variability of ±0.8155mm. The HTM model predicts stylet tip positions reasonably well for the 25mm deployment, but not quite as accurately for the 50mm deployment. This is due to the fact that the error propagates along a longer distance for the 50mm deployment. The largest measured error is still within the errors found in the individual motions errors found previously.
Cannula Rotational, Stylet Axial Measured (o) vs. Calculated (*)
-150 -160 -170 -180 E -190 E -200 -210 .220.... -230... -240 160 140 -- 8 120 - 127 100 -011 2 123 124 12 Y Axis (mm) X Axis (mm)
Figure 3.9: The leftmost 8 data points represent the measured and calculated stylet tip positions when the stylet is only deployed 25mm, compared to the rightmost 8 points at 50mm.
Conclusions
Of the three different motions in the cannula and stylet, the cannula rotation exhibits the greatest amount of backlash and motional accuracy error. The cannula rotation motion had an error of ±3.990' for a 900 commanded rotation. The largest contributor to this error could be the fact that the rotational motion of the cannula is controlled by two motors through two nuts both attached to the same spline-screw. Backlash in either the motors or gearheads could positively affect the overall accuracy as the two motors spin in the same direction to rotate the cannula. Also, unlike the translational motions where backlash in the rotational directions of the motors and gearheads leads to very small motion backlash in the axial translations, the backlash in motors and gearheads is directly related to the rotational accuracy of the cannula.
Stylet axial translational motions also has a relatively large error at ±1.2316mm, however the interactions between the measurement probe and the stylet tip may be an influencing factor in this case due to the flexibility of the stylet when it is fully extended. That deflection does not exist in cannula axial translational measurements as the stylet tip is supported by the cannula which is much stiffer. The cannula axial translation motion had on average, the smallest measured error of ±0.2560mm. The motor and gear backlash inherently contribute less to the translational motion of the cannula than the rotational because it is no longer a direct relationship. At the same time, only one motor would spin to command the translational motion, thus decreasing the overall number of potential sources of backlash and error.
Chapter 4: Distal Tip Positioning in Gelatin
The purpose of these experiments was to analyze the effects of gel on the device volume targeting capabilities using stylets of two different diameters, 0.635mm and 0.838mm, ranging in radii of curvature from 10mm to 30mm. To do so, first the tip positions of the 30mm radius stylet must be measured as it is deployed into the gel, and compared to the stylet deployment data taken on the CMM in air. Once the effect of the gel on the 30mm stylet is estimated, the targeting accuracies can also be analyzed by deploying all the stylets in a systematic manner and comparing the calculated input positions to the measured positions. This would be done with 6 different stylets varying in both radius of curvature (10mm, 20mm and 30mm) and stylet diameters (0.635mm and 0.838mm), to determine the different stylet targeting accuracies. These experiments ultimately help to determine the ideal stylet to be used in volume targeting using the Steedle.
Initial Experimental Setup
Initial experiments were performed to examine the viability of using a camera setup to test stylet insertions in air and gel using stylets with diameters of 0.508mm, 0.635mm, 0.838mm and 0.990mm. The experimental setup is shown in figure 5.1. The stylet was clamped into the force sensor which was attached to the stylet insertion machine. The cannula in which the stylet was inserted was mounted in the center of the top plate of the aluminum test fixture which also housed the gel box. To ensure that the frame of reference of the camera was the same in every picture, and thus allowed for taking pictures with the same viewing field every time, the camera was placed on a tripod placed directly in front of the gel box, and the tripod was positioned such that no zoom was used on the camera to take the pictures.
To enable measurements of the stylet radii of curvature using the same standard rule, a 160mm x 80mm scaled grid paper was taped onto the back of the clear gel box. Pictures were taken when the stylets were retracted inside the cannulus, and then again when the stylets were fully deployed inside the gel. By doing so, the effects of the stiffness of the prebent stylet on the cannulus could be seen, and the path the stylet would take during deployment could be estimated. These pictures were then imported into
Matlab for extraction of the stylet positions relative to the coordinate system defined based on the grid paper. Finally, a set of circle-fitting algorithms were applied in Matlab to these stylet position data points to determine the radius of curvature of the stylet from the pictures they were extrapolated. Stylet radius of curvature were examined because this directly affects the final position of the stylet tip, and no change in radius of curvature would mean no change in final stylet tip position.
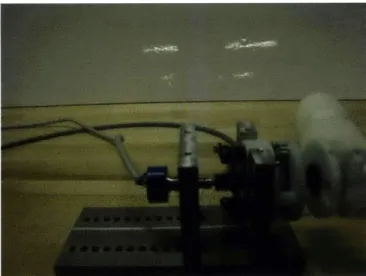
Figure 4.1: Experimental setup showing a needle deployed and a camera on a tripod.
Figure 4.1 shows the experimental setup, which includes the use of a needle or stylet insertion machine, a gel box testing fixture, cannula and stylet, and a camera mounted onto a tripod for picture taking stability and consistency. Many potential sources of error ...I ".. '--'---- ... .
were accounted for through this setup such as stylet axial translational accuracy, grid normalization and human errors during picture taking. Figure 4.2 shows a comparison of different stylets deployed in gel, and one can tell immediately that certain experimental design parameters need improvements.
Figure 4.2: 4.2a and 4.2b show a 0.838mm diameter 20mm radius of curvature stylet being deployed in air and gel. The tip positions do not seem to be too different in the two photos, whereas 4.2c and 4.2d clearly show very different stylet tip positions of a 0.635mm diameter 40mm radius of curvature stylet.
The edges and corners of the grid paper in figure 4.2a are clearly rounded due to the focusing capabilities of the lens of the point and shoot digital camera. Alignment differences can be observed between 4.2c and 4.2d, making choosing the same reference frame for the two pictures difficult. Distortion due to the gel can be observed by comparing the air photos to the gel photos. There is a huge change in radius of curvature, and consequently the final stylet tip positions between the air and gel photos. These were just a few issues that could be clearly seen from the photos in figure 4.2. Certain deterministic conclusions could be seen from these experiments. 0.5mm diameter stylets
are generally not ideal stylets for targeting purposes because they are very susceptible to deflections due to the gel. 0.838mm and 0.990mm diameter stylets visually deflected very little. Within each diameter, radius of curvature of the stylets also played a role in targeting accuracy. The larger radius of curvature stylets had a much larger working volume, thus allowing them to reach more volumes in one insertion. However, they also displayed the greatest deflections, making them less accurate. Some variability in radius of curvature comes from the effects of gel on the stylets. Especially for larger stylets, the radii of curvature of the stylets are not constant along the length of the stylets because the stylets are less supported the farther out they are deployed. This is difficult to model, however it does provide a metric for how stylets deflect in gel.
Percent Change in Gel vs. Air Values based on 7.5% Gel
Distortion Effects
15 ( 10 -U 5 '4-0 U: c 10mm 20mm 30mm 40mm a0.990mI (U -10Designed Needle Radius of Curvature
Figure 4.3: Percent change in radii of curvature of different stylets in gel versus air.
Figure 4.3 shows the percent change in differences in stylet radii of curvature of the different stylets when inserted into air and gel. Some issues can be observed through these results. Changes in radii do not exhibit any consistent trends that can be observed throughout the 10mm radius of curvature stylets. Though the changes in radii of curvature seem slightly more consistent in the other three stylets, no clear conclusions can be drawn from this data. Also, the 0.990mm stylet exhibited a negative change in radius of curvature in gel than air, which is opposite the normal seen in all the other 15
stylets, suggesting something might not have worked as desired or planned. This motivates the need to improve the experimental setup.
Pictures taken with the point and shoot digital camera and the small lens at such a close distance distorted the view of the gel box, making the edges of the gel rounded. This may have skewed the data as data points extracted from the photos were not where they were in reality. Guaranteeing the parallelism of the camera lens and the stylet was difficult because there was no standard method of camera alignment, and the act of clamping in the stylet using the chuck often rotated the stylet itself out of plane. Some data in the initial experiments were performed with multiple stylets inserted through the same access hole in the gel, and some error was associated with the stylets' natural tendency to travel down the path created by an earlier stylet.
One problem that was unforeseen and unavoidable by the experimental setup was the fact that the gel greatly distorted the view of the camera as seen in figure 4.2. Light travelling through different depths of the gel was refracted more, thus the distortion effect was different for the grid paper compared to the stylet as seen by the camera. An attempt to correct for this effect can be seen in figure 4.3, where the 7.5% distortion effect correction made up some of the diffraction difference between the stylet and grid. All these issues prompted for an improved set of experimental setup and protocols in preparation for the 2D targeting experiments detailed below.
Design of Improved 2D Camera Experimental Setup
The following functional requirements and design parameters were used in the design of the improved 2D targeting experiment.
Table 4.1: Improved experiment functional requirements and design parameters.
Functional Requirements Design Parameters
Picture taking consistency Components (camera, test fixture, gel box, etc.) must be fixed relatively to each other
Simulate tissue Material properties must be able to simulate body tissue to validate device effectiveness
Table 4.1 continued: Improved experiment functional requirements and design parameters.
Functional Requirements Design Parameters
Accurate measurement No portion of the images to be used for data collection can be distorted by the camera
Gel magnification correction A normalizing procedure must be able to account for the magnification caused by the gel on the stylet and grid Stylet alignment Stylets must be aligned before deploying into gel
With these functional requirements in mind, the following experimental protocols and equipment were developed.
The Camera Test Rig and Setup
The rig included a long plate specifically designed for the dimensions of the gel box rig and the Nikon D80 DSLR camera. Tapped holes were designed into the plate to allow the gel box rig to be screwed into the plate. On the other end, mounting holes for the camera were placed at 16in - 19in at lin increments to allow for multiple camera positions and room for focus length adjustments. The camera was fixed to the plate using the same %-20 screw hole that would normally be used to mount the camera to a tripod. A different set of screw holes were made to the right to accommodate screws to be attached that could act as stops for the camera. The screws act to align the camera such that pictures are taken with the lens parallel to the gel box to ensure minimal distortion from the camera being skewed.
Figure 4.4: Plate shown with gel box rig mounting holes on the left and camera mounting holes on the right.
Experimental Setup
Figure 4.5: Camera and gel box rig are both mounted to the camera test rig, ready for taking pictures. Note the camera sits on two spacer blocks to raise the camera lens to approximately the same level as the absolute center of the grid.
Figure 4.5 shows the test setup. The lens is zoomed in slightly to ensure the lens is focused on the stylet and the grid behind instead of the front of the gel box rig itself. The Steedle was mounted to the gel box rig, and positioned such that the 0* cannula position corresponded to the stylet curving to the right as seen from the camera. This is made such that under ideal conditions, deposition of the stylet resulted in the stylet curving in a plane parallel the camera's viewing plane. A grid paper is attached to the back of the gel box rig to provide a stationary point of reference for each of the pictures taken, and to act as a rule to measure the stylet against. Figure 4.6 shows the side view of the setup. Note that the zoom of the lens and the stop screw are both visible in this picture.
Figure 4.6: Alternate view of the setup showing the screw underneath the camera acting as a positioning stop to align the camera parallel to the gel box rig.
Grid Distortion Calibration
The grid as seen through the gel is distorted such that even though the original square grids are 5mm per side, what the camera sees through the gel is not the same as what it would normally see. By the same concept, the distortion amount is also different looking through different depths of the gel, thus the stylet at the middle of the gel would be distorted a different amount from the grid behind the gel. Because of this, the stylet distortion must be calibrated according to the grid.
Figure 4.7: Grid calibration plate shown in gel aligned with the cannulus. Measurements of the aluminum grids are compared to the paper grid seen behind the gel box.
To do this calibration, a separate calibration plate was made such that 10mm per side square grids were cut out of a 1/16in thick aluminum plate. This plate is then inserted into the gel at the same plane in which the stylet would be inserted to provide a second frame of reference. This grid is then measured against the grids in the back and a calibration factor was found to relate the size of the aluminum grids to the paper grid. The calibration factor was found to be 1.17, so by dividing the radius of curvature and positions of the stylet measured against the paper grid by 1.17, the actual radius of curvature and positions can be found.
Tip Position Characterization
The stylet was deposited in two different positions, at 0* and 180' cannula rotations. This allowed pictures to be taken in the same plane in opposite directions. The stylet was deposited at 5mm increments from 0mm to 50mm and back again in each cannula angular position, and a picture was taken at each increment to obtain tip positions of the stylet as it was deposited.
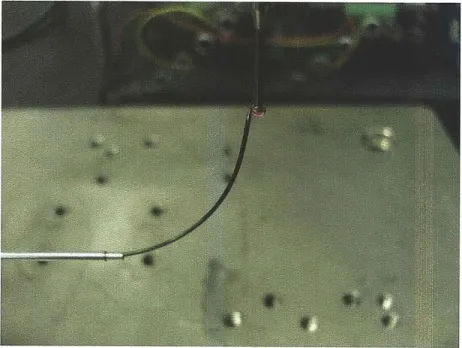
Figure 4.8: Stylet is fully deposited 50mm into the gel. Note that the cannula is deposited 20mm and the tip of the cannula is inside the gel.
The cannula was also deposited 20mm from the 0 position so that the tip of the cannula is inside the gel when the stylet is deposited. The 0 position of the cannula corresponds to the position at which the first length marking on the cannula is just outside the green capped Steedle cannula. Even though this produces a slight curve at the tip of the cannula due to the prebent stylet pushing on the cannula wall, this will be corrected in the analysis of the data collected.
Different Stylet Measurements
To compare all the different stylets and their corresponding targeting accuracies, each stylet is attached to the device and mounted to the test rig. They are aligned such that the stylet initially deployed to the right in the plane parallel to the camera lens. The gel is placed into the rig, and the cannula is axially translated 15mm such that the tip of the cannula is about 5mm inside the gel. The stylets are then fully deployed, and a data point is taken at this position. The stylets are then retracted, the cannula translated to 25mm and 35mm positions, and the same stylet motions were repeated at each cannula position. These steps are then repeated with the cannula rotated 180' to obtain the same data on the other side of the device. This path is shown in figure 4.9.
Figure 4.9: Stylet path for volume targeting in gel.
Data Analysis
The pictures are imported into Matlab and analyzed for the stylet tip positions of each deposition increment. The tip positions are defined based on a coordinate system set by the grid paper in the program, which effectively normalizes all the pictures in the same reference. The tip positions are then combined into one graph that represents the overall profile of the tip positions as the stylet is deposited in 5mm increments. This graph is then compared to an HTM model aimed at modeling the expected stylet tip positions.
The stylets targeting accuracies data are normalized using the metal grid and graphed into Matlab against the tip calculation model outlined in the previous section. The differences in tip positions are found by plotting both the data and the calculations in the same graph and finding the Cartesian coordinates between the two sets of points.
Results
Figure 4.10 show the coordinate positions of the measured and the calculated stylet tip positions at 5mm deposition increments. The "+" points show all the measured data
takes into account potential effects of stylet exit angle and cannula curvature prior to stylet deployment.
Stylet Axial 0 Degrees Measured (+) vs. Calculated (*)
0 5 10 15 20 25 30
0 5 10 15 20 25 30
X Axis (mm)
Stylet Axial 180 Degrees Measured (+) vs. Calculated (*) 0 Position + + t+ + -40 -35 -30 -25 -20 X Axis (mm) 35 40 -15 -10 -5 0
Figure 4.10: Plots showing the measured 00 and 1800 stylet deposition data (+) vs. the calculated positions (*). Based on the data shown, it appears that at times, the stylet is deployed in slightly less than 5mm increments.
0 Position - --. ---. - --+ ... ... +.. .. .. ... .. .... -- -- + --101 -251 -10
-015--25
--E ... ... I ... -. . .. . . -. --. --.-.-. -. ---..There may be other factors that contribute to the fact that the HTM model overshoots the estimation of the stylet tip positions. The HTM model cannot accurately take into account backlash which may have decreased the distance the stylet should have traveled. Between certain data points in the measured data set, the distances seem to be less than the full 5mm the stylet was instructed to travel, which may have skewed the data and altered the tip positions. The cause of the errors is consistent in both direction of stylet deposition, which makes these errors systematic. Potential causes for errors could arise from data collection and analysis through the use of the Matlab code, model assumptions errors, gel-stylet interactions, or Steedle systemic backlash and inaccuracies.
Position data from the stylet 5mm incremental deployment normalized to the zero position defined at the tip of the access cannula is presented in figure 4.11. This data is compared to the data collected on the CMM.
Stylet Deposition in 5mm Increments CMM (+) vs. Gel (o)
5 10 1 2 54
19...
Fiur 4. 1 hows 0 the . data... .... rotated.... 90.... clck ie.o.es.o.om arsn. g intote
E +0 -20 . ... . ... + 0. .0 0 0 0 5 10 15 20 25 3) 35 40 X Axis (mm)
Figure 4.11: Stylet 5mm incremental deployment data of the CMM (o) vs. gel ()
Figure 4.11 shows the data rotated 900 clockwise for ease of comparison against other figures in this thesis. As can be seen in the graph, the two sets of data initially have a very similar radius of curvature, but the farther the stylet tip is deployed, the more leveled out the CMM tip positions are while the stylet tip positions in gel are axially displaced