Design of Test Bench Apparatus for Piezoelectric Energy Harvesters
by MSCUM NYTE
OF TECHNOLOGY
You C. Yoon
I
JUN
0
7 2013
LIBRARIES
I
Submitted to the
Department of Mechanical Engineering
in Partial Fulfillment of the Requirements for the Degree of Bachelor of Science in Engineering as Recommended by the
Department of Mechanical Engineering at the
Massachusetts Institute of Technology
June 2012
C 2012 You C. Yoon. All rights reserved.
The author hereby grants to MIT permission to reproduce and to distribute publicly paper and electronic copies of this thesis document in whole
or in part in any medium now known or hereafter created.
Signature of Author:
Department of Mechanical Engineering May 09, 2012 Certified by:
Sang-Gook Kim Prgfes .4 Mechanical Engineering
Accepted by:
~''' tTrl hhad V
SamuelC. Colsso Mehanical Engineering
Samuel C. ColUdegrztei
Design of Test Bench Apparatus for Piezoelectric Energy Harvesters
by You C. Yoon
Submitted to the Department of Mechanical Engineering on May 09, 2012 in Partial Fulfillment of the
Requirements for the Degree of
Bachelor of Science in Engineering as Recommended by the Department of Mechanical Engineering
ABSTRACT
This thesis presents the design and analysis of an experimental test bench for the characterization of piezoelectric microelectromechanical system (MEMS) energy harvester being developed by the Micro & Nano Systems Laboratory research group at MIT. Piezoelectric MEMS energy harvesters are micro-devices that are able to harvest energy from their ambient vibrations using piezoelectric material property, and many different designs are being researched by the Micro & Nano Systems Laboratory. In order to analyze the different designs, it is crucial to have a flexible test bench, and the test bench created in this thesis allows data to be gathered easily from different energy harvesters. After the test bench is designed and created, it is used to excite a linear cantilever beam energy harvester system at different frequencies and values for open circuit voltage, resonance frequency, and maximum power are calculated from the collected experimental data. In addition, theory behind linear and nonlinear energy harvester systems is investigated and important definitions, characteristics, and equations are summarized in this thesis.
Thesis Supervisor: Sang-Gook Kim
Acknowledgements
I would like to thank Professor Sang-Gook Kim and the rest of the Micro & Nano Systems group at MIT Pappalardo Laboratory for giving me the opportunity to work with and learn from them. My research experience at the Micro & Nano Systems group strengthened my understanding of mechanical engineering principles and further enhanced my research abilities. I would also like to give a special thank you to my direct supervisor, Ray Xu, for taking me under his wing. In addition to mentoring my research, he also provided countless hours of guidance for my work in this thesis.
I would also like to thank Stephen Bathurst and Arman Hajati for their supervision and guidance which helped develop my research skills and understanding of mechanical engineering concepts. Finally, I would like to thank my family for their continual support throughout my education process and beyond.
Table of Contents
A b stract ... . ... 2 Acknowledgements... 3 Table of Contents ... 4 L ist of Figures ... 5 L ist of T ables... 6 1. Introduction ... 71.1 General Idea of MEMS Energy Harvester... 7
1.1.1 Electrostatic Energy Harvester... 7
1.1.2 Electromagnetic Energy Harvesting... 8
1.1.3 Piezoelectric Energy Harvesting... 9
1.2 Important Factors Regarding Power Measurement and MEMS Design... 9
1.2.1 Linear MEMS System... 10
1.2.2 Nonlinear MEMS System... 12
1.3 Overview of the Thesis... 15
2. Design of the Test System... 16
2.1 Overall Layout of the Test System... 16
2.2 Details Regarding the Shaker... 18
2.3 Details Regarding the Charge Amplifier... 18
2.4 Details Regarding the DAQ Board... 20
3. Experimental Evaluation... 21
3.1 Specification of Energy Harvester Device... 21
3.2 Open Circuit Measurements for the Energy Harvester... 23
3.3 Theoretical Calculation of Power... 28
3.4 Experimental Calculation of Power... 30
4. Summary and Conclusion... 32
5. A p p en d ices... 33
Appendix A LabView Setup... 33
Appendix B ET-126 Shaker Specifications... 39
Appendix C Charge Amplifier Specifications... 41
Appendix D NI USB-6120 DAQ Board Specifications... 43
Appendix E V21BL Specifications... 47
List of Figures
Figure 1-1: Figure 1-2: Figure 1-3: Figure 1-4: Figure 1-5: Figure 1-6: Figure 2-1: Figure 2-2: Figure 2-3: Figure 2-4: Figure 2-5: Figure 2-6: Figure 3-1: Figure 3-2: Figure 3-3: Figure 3-4: Figure 3-5: Figure 3-6: Figure 3-7: Figure 3-8: Figure 3-9: Figure 3-10: Figure 3-11: Figure 3-12:possible topologies for MEMS-scale electrostatic energy harvester ... mechanical schematic of a typical electromagnetic energy harvester ...
A diagram of a cantilever beam harvester with a proof mass ...
Graph of transmissibility... ...
Bending and stretching of a double clamped beam... Deflection vs. frequency for a nonlinear system ... Diagram of the overall layout of the test bench ... Test bench layout with labeled machinery ... Test bench layout with labeled machinery ... Energy harvester mounted on the shaker ... Input and output chord of the charge amplifier ... 500GB-IOA charge amplifier with a gain of gain of lOOmV/pC ... Diagram of V21BL energy harvester; measurements are in inches ...
L ayers of V 21B L . ... .
Graph that shows the relationship between natural frequency and proof mass... Positive and negative nodes of the energy harvester connected to clamps ... Green wire inserted in Input 1 and black wire inserted in Ground of the DAQ board Diagram of overall layout of the test bench without charge amplifier... Open circuit voltage measured at 67Hz... Plot of open circuit voltage vs. frequency for a V21BL... Series circuit with voltage source and internal and external impedance ...
Pattern seen from plotting Pext (Zext) function ...
Resistor connecting the positive and negative nodes of energy harvester ... Graph that plots power vs. resistance data from table 3-2...
List of Tables
TABLE 3-1: TABLE 3-2:
Open circuit voltage created by the energy harvester for given excitation frequency ... 26
1. Introduction
1.1 General Idea of MEMS Energy Harvester
Many technologies have been developed to collect energy from our ambient
surroundings, such as wind turbines, solar panels, and wave turbines. One of the more recent energy harvesting technologies is the idea of MEMS Energy Harvester from passive
environmental vibrations. Vibrational MEMS energy harvesting is a fairly new technology that can be categorized into three main methods: electrostatic, electromagnetism, and piezoelectric. Although this thesis focuses on piezoelectric energy harvesters, different types of harvesting method will be briefly discussed for general information.
1.1.1 Electrostatic Energy Harvesting
The main idea behind electrostatic energy harvester comes from the relationship between the capacitance of a capacitor and the distance between the capacitors. As distance between the
capacitors increase, the capacitance decreases, which decreases charge; as distance between the capacitors decrease, the capacitance increases, which increases charge. By using this
characteristic of a capacitor, charge created from mechanical energy can be used to create electrical energy [1].
The main disadvantage of this energy harvesting method is that the harvester needs a separate voltage source for the capacitors and there also has to be a mechanical motion-limiting mechanism so the electrodes of the capacitors don't create a short circuit. Lack of reliability and complexity of the electrostatic energy harvesting method makes piezoelectric energy harvesting method preferable over the electrostatic method.
(a) 1 al l 0 1 ~TI1IIIIl
I
(b)I
(c)Figure 1-1: Three possible topologies for MEMS-scale electrostatic energy harvester: (a) in-plane overlap type, (b) in-in-plane gap closing type, (c) out-of-in-plane gap closing type [2].
1.1.2 Electromagnetic Energy Harvesting
Electromagnetic energy harvester uses a similar mechanism used in large-scale generators. Using a magnet and a coil, Faraday's law of induction is applied by changing the magnetic flux felt by the coil; a permanent magnet is held in place while the coil moves up and down changing the magnetic flux and creating an electric current [3].
Although this method is simple there are three main problems to this energy harvesting method. Firstly, the current density is high but the induced voltage is limited to hundreds of millivolts. Secondly, The EM generator requires a structure that allows big range of movements and it needs a bulky magnetic structure. Thirdly, single fabricating process for induction coils and magnet are not compatible with standard MEMS procedures; they need to be precision machined and assembled, which is very costly. Therefore, the production cost is very high and may not be commercially viable.
----
spring, k
Cmass, m
+-_wire
coil, I
permanent
magnet, B
Figure 1-2: The mechanical schematic of a typical electromagnetic energy harvester [3].
1.1.3 Piezoelectric Energy Harvesting
Piezoelectric material's unique property allows energy to be harvested from the
material's mechanical strain. When strain is exerted on a piezoelectric material, the molecules of piezoelectric material interact to create electrical charge, and this charge can be harvested to create energy. To exert physical strain on the piezoelectric material, the material can be vibrated, such as vibrating a piezoelectric cantilever beam, and energy can be harvested from the
piezoelectric material. MEMS-piezoelectric energy harvesters can have power density up to 3.6W/cm3 and voltage up to IV. Piezoelectric energy harvesters' efficient energy generation and simple design structures make them favorable compared to the other two energy-harvesting methods.
1.2 Important Factors Regarding Power Measurement and MEMS Design
The power measurements for the MEMS energy harvester have to be made for low frequencies because the MEMS devices are to be used for practical usage and will be powered by ambient vibrations, which are mostly in low frequencies. Also, since the MEMS device will be operated in low frequency, it is important that the resonance frequency of the device is in the range of ambient vibration. This is important because the charge created by piezoelectric material is directly proportional to the strain put on the material and at resonance frequency the strain exerted on the material is at max. In addition, the frequency range around the resonancefrequency gives high strains, and it's important to have the operating frequency to be around the range of the resonance frequency so energy can be created efficiently. In order to achieve these traits many different designs of MEMS device are being researched and two systems of MEMS systems that will be discussed below are linear and non-linear systems
1.2.1 Linear MEMS System
A simple example of a linear MEMS system is a cantilever beam harvester with a proof mass on the edge of the beam.
Electrical Load
Figure 1-3: A diagram of a cantilever beam harvester with a proof mass; linear system [2].
For this linear system, equation relating force, deflection, and properties of the beam can be derived to calculate the deflection of the beam for a given proof mass and force. Using variable F as the force exerted on the system, which is proof mass multiplied by the acceleration exerted on the system by the vibration, 8 as the deflection of the beam, E as the young's
modulus, and W as the width, H as the thickness, and L as the length of the beam, the equation derived is [4]:
EW H2 (1-1)
F =
4LZ6
In addition, given linear stiffness, KL, and mass of proof mass, m.,, an equation that calculates the natural frequency is given by the following equation [5]:
1 KL (1-2)
For a MEMS energy harvester, we can plot a transmissibility vs. frequency graph, which is proportional to gain voltage vs. frequency graph, and imply that transmissibility is directly proportional to the deflection, energy, power, and current created by the harvester. For linear MEMS system, such as a cantilever beam, following plots for given damping coefficients display its characteristic.
0.5 1 1.5 2 2.5
W/ro
3 3.5 4 4.5 5
Figure 1-4: Graph of transmissibility, also known as linear gain, vs. normalized frequency for a linear system for given damping values [2].
Damping for MEMS device is a combination of mechanical and electrical damping. Some mechanical damping sources are squeeze film damping, suspension/anchor losses, and thermo-elastic dissipation, while a main electrical damping source is electrical loss from external electrical load. Mechanical damping can't be controlled too much, but electrical damping may be altered in small amount by changing the external electrical load [6].
From looking at the graph above, it can be seen that when there is less damping in the system, there is higher linear gain. One of the most important characteristic for an energy
0.02 .05 c0.1O 0.25 25 201 151 "I E 5 0 C
harvester is the quality factor
Q,
which tells how much energy a system conserves. Equation forQ
is given by [2]:(1-3)
Bandwidth, AW, is the frequency range at half max gain. It's interesting to note that to maximize quality factor, less damping is preferred, which maximizes the gain and lowers bandwidth range. However we also need a wide bandwidth range so our device can function and create energy efficiently in a wide frequency range, and more damping is preferred in this case. So it is crucial to create a design that has high enough
Q
factor and gain, but also a wide bandwidth. This shows that damping and bandwidth are inversely proportional to gain. However, large bandwidth range and high gain are both preferred, and this is the "Gain-Bandwidth Dilemma" [7].In addition, as it can be seen from the graph above, some traits of linear systems are narrow bandwidth and sensitivity of transmissibility, voltage, current, and power to the change in frequency. This limits linear systems to a small frequency range in which they can operate efficiently, and this makes linear systems not very viable for real world applications. Another reason why linear systems are not preferred is because the maximum output power of linear systems is limited by the internal impedance of the energy harvester (this idea will be explained in section 3.3). Due to these drawbacks in linear systems, non-linear systems are being researched to develop viable energy harvesters.
1.2.2 Non-linear MEMS System
As seen from section 1.2.1, the bandwidth of a linear system is very narrow, the power created by the system is limited by internal impedance, and power, voltage, current, and transmissibility are very sensitive to the change in frequency. This causes the system to have a very narrow frequency range that it can function efficiently. In order to improve this design, a non-linear system can be introduced. An example of a non-linear device is a double clamped cantilever beam with a proof mass in the middle.
Pioof
Mass
,D,
bend StretchSdeti Bend
Figure 1-5: Bending and stretching of a double clamped beam; nonlinear system [2].
When the deflection is low the double clamped cantilever beam still behaves like a linear system since there isn't a stretching displacement and a simple equation can be used to calculate its deflection. Using variable F as the force exerted on the system, which is proof mass
multiplied by the acceleration exerted on the system by the vibration, 8 as the deflection of the beam, E as the young's modulus of the beam, and W as the width, H as the thickness, and L as the length of the beam, the equation derived is [4]:
F
=
16LWH (1-4)When the deflection is high, the double clamped cantilever beam behaves nonlinearly and goes through stretching as well as the vertical displacement. Under this condition, given that aO is residual axial stress and v is Poisson's ratio, following equation of displacement and force and be derived [8]. F 2) (oWt + 4 EWt(+ E t
l
6 (1-5) F- 2 + - S+ 1NI M 2 L !6 (1v)a9 1vLIn addition, given linear stiffness, KL, mass of proof mass, nM,, nonlinear stiffness due to stretching, KS, and maximum displacement ,8, natural frequency can be found using the following equation [2]:
(1-6)
f F! a
nMeq 21r mpmM
To study the characteristics and the relationship between frequency and deflection of a nonlinear system, a deflection vs. frequency graph for a nonlinear MEMS system can be plotted as seen below. It is important and interesting to note the different zones of the plot: unstable root, unique root, high-energy stable root, and low-energy stable root, and how previous events are important, as if the nonlinear system has a memory. For example, when frequency is increased from 0 Hz to the frequency value at the dotted light blue line, about 1080Hz, the deflection drops rapidly and will follow the green line when frequency is decreased. At this region, even though the system is excited at the same frequency as before, such as 700 Hz, deflection will not be the same as the value on the solid light blue lines.
45
---*Unsltae Root 4
High-Enrg~ty Slable Rool I
35 Lckw-Energy Stabee Root
Exc~amton Frequency 01z
Figure 1-6: Deflection vs. frequency for a nonlinear system. The system has a memory once frequency passes 1080Hz [2].
From looking at the graph above, it can be seen that the nonlinear system has a greater bandwidth range than the linear system. Also, the nonlinear system is less sensitive to frequency change, and change in power, current, and energy due to change in frequency won't be as extreme as that of a linear system. In the plot above, as long as frequency is above 350Hz and under 1080Hz, the system will function in high-energy stable root. This makes non-linear system more favorable over linear system. In addition to this advantage, nonlinear systems are more efficient in power production than the linear systems. This will be further discussed in
section 3.
1.3 Overview of the Thesis
A flexible and accurate test bench to measure power and voltage is needed because many designs for MEMS energy harvester are being researched and it is crucial that the test bench is able to test the device and also collect accurate power and voltage data. Graphs such as power vs. resistance and voltage vs. frequency are very important to analyze the performance of the MEMS device, and accurate plots are needed to develop an efficient and practical MEMS device. Having a flexible and accurate test bench will allow different designs of MEMS device to be tested and analyzed accurately and help researchers characterize the system built and create the most optimal MEMS energy harvester.
The main role of this thesis is to serves as a step by step manual that helps users
characterize and analyze energy harvesters. The thesis will start out by explaining the test bench design, and after the overall setup is explained, some of the key devices will be discussed. Afterwards, experiment steps to characterize energy harvesters will be explained and properties of linear and nonlinear systems will be further discussed. In the end, experiment results of MIDE V2IBL cantilever piezoelectric energy harvester will be analyzed and used to describe the accuracy of our test bench.
2
Design of the Test System:
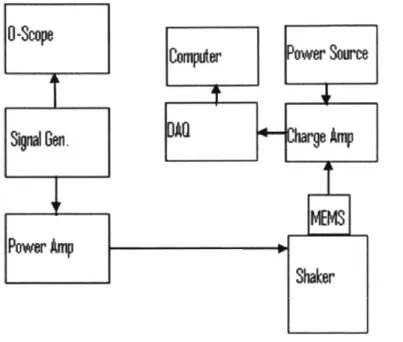
2.1 Overall Layout of the Test System
o-sop
MES
kGen.W
r
T~s
Figure 2-1: A diagram of the overall layout of the test bench. The arrows represent the direction of the signals. Note that MEMS is the energy harvester and is mounted on the shaker.
ET-126-4 electrodynamic shaker was used to simulate vibration and signal was sent to the shaker by a signal generator amplified by a power amplifier. Also, the signal created by the signal generator was connected to an oscilloscope so the signal being sent could be visualized and seen on a screen.
The energy harvester was mounted on top of the shaker and connected to a charge amplifier, and the charge amplifier was connected to a DAQ board. The DAQ board was connected to a computer using USB and was used to read the values from the charge amplifier. Also, power source was used to power the charge amplifier.
Figure 2-2: Test bench layout with labeled machinery.
Figure 2-4: Energy harvester mounted on the shaker.
2.2 Details Regarding Shaker
ET-126-4 electrodynamic shaker is a small permanent magnet shaker that has a 2.125 inch diameter table with multiple attachment points. The shaker has a 0.75 inch stroke, frequency range of up to 8,500 Hz, and peak force of 13 lb-f, which is about 57.83 N. Further specifications of ET-126-4 can be seen on Appendix B. This shaker was used because it uses a permanent magnet and this allows the shaker to be more accurate than electric power source magnet and prevents the shaker from overheating.
To setup the shaker, the shaker was bolted down to the test bench and positive and negative nodes of the power amplifier were connected to the shaker's input source.
2.3
Details Regarding Charge Amplifier
The charge amplifier used in this setup was a 5000B-IOOA charge amplifier with a gain of 1 OOmV/pC. To setup the amplifier, a coaxial cable with positive and negative nodes was connected to the 10-32 input connector coaxial on the charge amplifier, and these positive and negative input nodes were connected to the positive and negative nodes of the energy harvester.
The power and output side of the amplifier was assembled by connecting Vout to the Analog InputI of DAQ board's input, Ground to the negative node of the power source and ground of the DAQ board's input, +Vcc to the positive node of the power source, and NC to nothing. The wires of Vout, Ground, +Vcc, and NC ports are color coded and they are green, blue, red, and white respectively; a detailed specification sheet for model 5000B is on appendix C.
Model 5000 Connector Diagrams
+VCC Vout
0 0
Input Connector -Vcc Ground
Coaxial 10-32
Power/Output Connector Figure 2-5: Input and output chord of the charge amplifier[9].
The power source for the charge amplifier ranges from 12 to 30 Vdc and the output voltage swing is 70% of the source voltage, which means that the max output from the charge amplifier is 21V. Due to this property, when our energy harvester was tested with the charge amplifier, the output voltage from the charge amplifier was capped because the charge created by the energy harvester was too high and the converted voltage value exceeded the charge
amplifier's voltage output limit. Therefore, charge amplifier was not used and open circuit
voltage was measured by connecting our energy harvester straight to the DAQ board (this will be discussed further in section 3).
Figure 2-6: 500B-100A charge amplifier with a gain of gain of IOOmV/pC [9].
2.4 Details Regarding DAQ Board
To collect data from the energy harvester and analyze it using LabView on a computer, a DAQ board was used to collect data from the energy harvester. The DAQ board receives analog input signals from the energy harvester, and then transfers these signals into data that can be
displayed and analyzed on LabView. The DAQ board used for this experiment was NI USB-6210, a 16-Bit, 250 Kilo samples per second Multifunction DAQ board. This DAQ board also has two analog input modes one being -1OV to 1OV and the other being -200mV to 200mV. The
voltage range accuracy and range sensitivity is 2.69mV and 91.6pV, and .088mV and 4.8pV respectively. A detailed specification sheet for NI USB-6120 is on appendix D. This DAQ board was chosen since it will be sensitive enough for our piezoelectric energy harvester and will take enough number of samples to get an accurate measurement.
3. Experimental Evaluation
3.1 Specification of Energy Harvester Device
The energy harvester device used for this experiment setup is a V21BL piezoelectric vibration energy harvester by MIDE technology. The device is a linear system and is a simple cantilever beam with 1 gram tungsten proof mass attached on its tip using epoxy.
3.560
3.310 *
o- 1.085 m,30
i( .600 .660 V21BL
Figure 3-1: Diagram of V2lBL energy harvester; measurements are in inches [10].
V21BL is a bimorph with a thickness of .031in and has two layers of piezoelectric material that are each connected to two prongs, one positive and one negative. Counting from the bottom, the first and third prongs in the diagram above are positive nodes and the second and fourth prongs are negative nodes. The max deflection of V21 BL is .1 8in, and further specifications are in appendix E.
---Product Layers
FR4 PIEZO -7 P (J x ' --a ESPANEX -EPCXYi. PIEZO -P -Px x FRA1 FR4 PIEZO .-- "...-- E PCXY - ESPANEX useaames EPOXY PIEZO FPCR YFigure 3-2: Layers of V21BL. The two piezoelectric materials on both sides of the cantilever beam make V2lBL bimorph [10].
As the weight of proof mass increases, the resonant frequency for this system decreases, and this pattern can be seen in the plot published by the manufacturer. From this plot it can also be seen that the resonant frequency for our system with 1 gram of proof mass is around 76Hz.
0 130 120 110 100 90 s0 70 60 50 40-0 2 3
Tip Mass (grams)
4 5
Figure 3-3: Graph that shows the relationship between natural frequency and proof mass. As mass increases, natural frequency decreases [10].
- - - -.- . ... .. .. .... ...... .... . ... ... ... ... --- --- I ... ... ... ... ... ... ... --- * ... ... ... ... ... ... ... I .... . . .. . . . ... ... ... ... ... ... ... ... ... ... ... ... ... ... ... 1
3.2 Open Circuit Measurements for the Energy Harvester
As mentioned in section 2.3, although we planned on measuring the charge created by the energy harvester by using the charge amplifier, the charge amplifier was not used because the charge created by the energy harvester was too high and the converted voltage value exceeded the charge amplifier's voltage output limit. Instead, open circuit voltage of the energy harvester was measured by connecting the energy harvester directly to the DAQ board. To measure the open circuit voltage, the positive and negative nodes of the energy harvester were clamped and connected directly into Input 1 and Ground of the DAQ board.
Figure 3-4: Positive and negative nodes of the energy harvester connected to clamps that are connected to Input 1 and Ground of the DAQ board.
M Pd4 ~4 ~ M~ A~
Figure 3-5: Green wire inserted in Inputi and black wire inserted in Ground of the DAQ board.
Oscilloscope
t
Signal Generator Operated from 42~200 Hz "I Power Amplifier Amplification kept constantComputerI
AQ Board For p ampi vibrat reson resist chan drop used Energy HarvesterShaker Energy harvester
mounted on the shaker
Figure 3-6: A diagram of overall layout of test bench without charge amplifier. Explanations for
ower measurement tude and frequency of ion was kept constant at ant frequency, and ance, external load, was ;ed from 5 -45 kW. Voltage between the resistor was to calculate power.
In order to record the voltage measurements using LabView, a simple waveform graph and block diagram that graphs and measures the voltage input were created; steps on how the waveform graph and block diagram were made and LabView is set up are shown in Appendix A.
Since two variables that affect piezoelectric energy harvester are frequency and amplitude of vibration, the open circuit voltage was measured by sweeping the frequency from 42Hz to 200Hz while the amplitude was kept constant by keeping the power amplifier at a constant level. To be more specific, the power amplifier was set to a level such that the max voltage amplitude at 67Hz was 8.6V. One of the open circuit voltage measured on LabView is shown below.
The frequency sweep was made for 21 different frequency points, and the data gathered are shown in the in Table 3-1.
TABLE 3-1: Open circuit voltage created by the energy harvester for given frequency.
Hz Volts Hz Volts Hz Volts
42 0.6 69 7.75 90 0.95 55 1.25 71 5.65 95 0.8 62 2.1 72 4.85 100 0.7 65 3.6 75 3.3 115 0.45 66 4.35 77 2.2 120 0.35 67 8.6 80 1.8 160 0.25 68 8.35 86 1.2 200 0.1
From looking at the table it can is at 67Hz. To further analyze the data,
frequency and open circuit voltage.
be seen that the energy harvester's resonance frequency a plot can be made to visualize the relationship between
Open Circuit Voltage vs. Frequency of
Shaker
10 9-8 I> tw 7 _ _ _ _ _ __ _ _ _ 4.. 0 2 -0 -0 50 100 150 200 250 Frequency of Shaker (Hz)Figure 3-8: Plot of open circuit voltage vs. frequency for a V21BL with resonance frequency of 67Hz and bandwidth of 8Hz. The graph shows narrow bandwidth and sensitivity of open circuit voltage to the change in frequency. The shape of the graph is similar to that of Figure 1-4.
From looking at the graph above, bandwidth can be found by finding the difference between two frequency values at half of max open circuit voltage value. In the plot above, it can be analyzed that V21BL has a small bandwidth range of about 8Hz, quality factor, which is resonance frequency divided by the bandwidth, of about 8.375, and the outputs near resonant frequency are very sensitive to the change in frequency. The graph above is similar to Figure 1-5 discussed in section 1.2.1. This was expected since V21BL is a linear system, and small bandwidth and strong sensitivity to frequency are traits that belong to linear systems. This result
3.3 Theoretical Calculation of Power
Maximum power that can be created by the energy harvester is one of the most important values of the harvester. After doing the frequency swap to gather voltage vs. frequency data, resonant frequency can be found, and using this resonant frequency, max power can be found experimentally or using theoretical calculation.
In theory, maximum power is achieved when the external impedance is equal to internal impedance. This can be shown by analyzing a simple circuit diagram as shown below.
Internal Impedance
External Impedance
Figure 3-9: Series circuit with voltage source and internal and external impedance.
The voltage source, internal impedance, and external impedance in the circuit diagram above represent: voltage created by the energy harvester without considering the internal resistance of the energy harvester, internal resistance that exists in the energy harvester itself, and resistance from external load exerted on the energy harvester respectively. Given that power can be expressed by the following equation:
P
=1R
2 = (3-1)R
Power exerted on the external load can be expressed by the following:
ext = in)r2 t zeXt (3-2)
Pex _ ze t~z _v2
Zext (Zext+Znt)2
If constant values C1 and C2 are assigned to Zj,., and V respectively, the following pattern can be seen for a P., vs. Z,, plot:
0.006
0.004
-0.00
50 100 150 200 250 300 350 400
Figure 3-10: Pattern seen from plotting Pext (Z.xt) function such as equation 3-2.
When equation for P., is differentiated by Z*,,, it can be seen that P," is at maximum when Z.,, is equal to Z,.
8Pext Zint2_ZeXt2 (33)
azext (Zint+ZCjj'
This shows that for a linear system, the max power created by the energy harvester is limited by the internal impedance of the energy harvester. Unlike the linear system, nonlinear
system's max power is not limited by the internal impedance and this is another advantage that a nonlinear system has over the linear system.
3.4 Experimental Measurement of Power
Maximum power output by this energy harvester can also be calculated experimentally by doing a resistance sweep. With the shaker set at resonance frequency of 67 Hz and power amplifier set at a constant level, resistors can be connected between the positive and negative nodes of the energy harvester as shown below and the voltage on different external loads can be measured.
Figure 3-11: Resistor connecting the positive and negative nodes of energy harvester, and DAQ board measuring the voltage drop between the resistors by connecting to the ends of the resistor.
For our resistance swap the frequency was set at the resonant frequency, 67Hz, and power amplifier was set at a level such that open circuit voltage at 67Hz was 10.3 V. In addition, a resistor connected in series to a potentiometer was used as the external load so resistance could be set easily for different values.
For different external loads, the voltage drop was measured and using equation 3-1, power created at each load was measured. Data gathered from the resistance swap is shown in
Table 3-2.
TABLE 3-2: Power values calculated from the resistance swap
Voltage(V) Resistance(f2) Power(Watt)
2.2 5000 9.68E-04 4.1 10000 1.68E-03 5.6 15020 2.09E-03 6.3 17000 2.33E-03 6.55 18000 2.38E-03 6.7 19000 2.36E-03 7.3 22000 2.42E-03 7.8 25000 2.43E-03 8.2 28000 2.40E-03 9 35000 2.31E-03 9.65 45000 2.07E-03
Power vs. Resistance
3 2.5 2 E. 1.5 C-0.5 0 0 10 20 30 40 50 Resistance(kM)Figure 3-12: Graph that plots power vs. resistance data from table 3-2.
From the resistance sweep plot, it can be seen that the maximum power of 2.43mWatts is at the external load of around 25 kO. As shown in equation 3-3, max power is obtained when internal load is equal to external load. Using this fact, the internal impedance of the energy harvester at 67Hz is about 25kQ.
4. Summary and Conclusion
To facilitate the development of piezoelectric MEMS energy harvesters, a test bench was developed to test and analyze the different designs of piezoelectric MEMS energy harvester. The test bench created is able to accurately collect data and measure open circuit voltage, resonance frequency, max power output, and current, and will be helpful in testing many different types of energy harvester designs. For the V21BL energy harvester tested, open circuit voltages, max power output, and resonance frequency could be measured. However, charge was not measured because the charge created by the energy harvester was too high for the charged amplifier to convert it to its output voltage range. The charge amplifier, however, will work for a MEMS energy harvester since the charge created by a MEMS energy harvester is many magnitudes
smaller than the charge created by V21 BL.
In our test bench, the power amplifier was kept at a constant value so the amplitude of a frequency could be kept constant. However, the amplitude of a frequency is another important factor that affects piezoelectric energy harvesters' output values, and accelerometer should be used to analyze how force exerted affects the values of open circuit voltage, max power output, and charge. Although we did not include an accelerometer in our test bench, accelerometer can be easily attached to the shaker and connected to the DAQ board to further improve the test bench.
Appendix A -
LabView Setup
Chst 40
w f
J-Step 1: Open LabView and create a blank form
gzk J u
Too, iTli-.
vwo: "
0
w
a
a
Step 2: Right click on the screen and press modern, graphs, and wavefirm graph. 33
Step 3: Following Graph will be shown on the panel. Fq .20,-* A4 - , .
I
-,~ c.~ ~ *Mft In UftIE
Aa* 400 %i.7 If" CV-49 5-,,,e Fi1Step 4: Open up a block diagram platform and right click and click on Measurement I/O, DAQ max, and then click on DAQ Assist
.. ... ... ... . ... ... . .... ... -- .. - -- I . . . .. ... .. . ... Ii.* F.'.0 Q-0. I. "of Am --~ I-, A i. LtLt v-, "%mv ? L:"
ow
V400*0w MOWLP"NW1446 IV__k1 t4
~~i. ~ i Now~u .-- U
Step 5: After clicking on the DAQ Assist block diagram, Mblowing box will show. Click on the type of input the DAQ board will be receiving, which is voltage for our experiment.
PO Q- I-A- ALP -- 4. U44 of4 - O44-4 4 . 14 944 I4 K s4. *.4%4*4 *44.It *
Step 6: Choose which ports it will be taking the input from and press finish, ail fbr our experiment. edmil ~ ~w.44lw.iwt4 4444~~44444~h9 44444*44*4 * ~, 444494 449 444 Add * 0~ 4.' .~ 4 444~4 * 44Y4*4~4 A ~ * ~*i~ * ~4494444 * 4~44I * #4444449 ... ....... _ _ ., , , " . ... '' " - - - 1- 1 . . ....... .. .. ... ... - - ---- --- --- - --- -- --- - ,_.." . ... ..
ble Ldst Y-<e Projepra e J-i Arindow &ip
Waveform Graph
sna I MI
Step 7, Connect the waveform graph to the data source of DAQ Assistant. Block diagram is now finished.
Before nasuring the voltage, measurement settings have to be set for the DAQ
Assistant Double click on the DAQ Assistant in the block diagram and set the following values: Max and Min of Signal Input Range tolO and -10 respectively, Scaled Units to Volts, Terminal Configuration to RSE, Acquisition Mode to Continuous Saniples, Samples to Read to 5K, and Rate to 5K.
---*DAQ Assistant
I+
Und P ~Run Add Channels Remove Channehs
{(jExpress T
askT Connection Di!gam
Show Help
0-
.500M-0 0 26 3; A0 50 6 76 80 96 100 11 120 A30 140 V50 160 1;0 1iO 140 200I
Graph w Daspisy Type AUto&al Y4xis 9)i
configuration Tr ow
Channe Settngs
&.a* Vokage Inpu
s ettings
Max!
Mn[
aci #ie A&as O bun%" (+) to addmore do A to
the ts;(
Timng Settbns
Acuisition mode Samples ti ContinuousSamples t Setup *.car;on R 0! 10 -10 volts Termina configuaton custo Read RSE mScalng <No Scale> Rate (Hz) 5k Io OK
Step 8: Setting the correct measurement setting for the DAQ measurement system.
Sk i
... ... - .. -.... ... - . ... . .... --- - --
f$DAQ Assistant Connecon Diagram hanels Task e Lst Point 1Point 2 _ eCH+ US8421X/17 vUtagXH- g21x2e ___ SM to0 HTW WCH+ -
-Step 9: The DAQ assistant has a Connection Diagram tab that shows how the wires should be connected to the DAQ board. Look at this diagram to double check the wires are connected correctly.
... .... ... ... ... .... .. .. .. ...
Use the Connection
Diagram tool to View the
required signal
connections between your sensor and
connector block. To use
the tool, you must first
specify an accessary for j your device. Rlght-click
your device under
Devices and Interfaces and saleot Propeties to
Specify an accessory The tool currently
supports analog input
mnasuremant types and
mnost MIO and SCXI screw terrnlal blocks .
To sane a connection diagram, click Save to
Hi1L.. and enter a
narm* for thc. rI Li fil,
Select .. 0 of a
asaea-a ia Taak toi
connectlons for th*
Appendix B
-
ET-126 Shaker Specifications
> Home
ET-126-1,-4
ET-126HF-
1,-4
-25 pounds pk sine force
-. 75 inch stroke
- 2.125 inch diameter table
- Low stray magnetic field
- Frequency range DC - 8.5 KHz DC - 14 KHz (HF)
-Trunnion mounting base
The Labworks ET-1 26 Electrodynamic Transducer is a rugged, full featured, small permanent magnet shaker. It is ideally suited for the production screening of small components, engineering design verification/evaluation, or for larger transducer calibration systems. The shaker features a 2.125 inch diameter table with multiple attachment points, and an extraordinary 0.75 inch stroke. The ET-1 26 has a linearly compliant armature suspension that is also suitable for modal testing with a current source amplifier. The ET-126HF (High Frequency) with its slightly heaAer armature has an extended full force frequency range of up to 14 KHz with operation to 20 KHz at 7 lbf pk sine, and a dual thread center mounting hole with #10-32 threads for mounting accelerometers and other vibration transducers. Available in two different impedance ranges, the ET-126 series are easily matched to most amplifiers yielding the maximum system performace.
39
3W00 VM'W
General Specifications
Performance ET-126-1,4
Sine force
Natural cooling 13 lbf pk
With cooling vacuum* 25 lbf pk Random force
Natural cooling 8 lbf rms With cooling vacuum* 17.5 lbf rms Shock force 53 lbf pk Frequency Range Max displacement Continuous pk-pk Between stops Maximum velocity Physical Armature weight Suspension stiffness Dimensions Shaker weight Impedance Nominal E/I cc ET-126HF-1,4 13 lbf pk 25 lbf pk DC-8,500Hz .75 in .75 in 120 ips pk 0.20 lbs 15 lb/in 6.5"H x 4.8"W x 4.25"D 11 lbs ET-126-1, ET-126HF-1 1.3 Ohm 8 lbf rms 17.5 lbf rms 53 lbf pk DC-14 KHz(-20 KHz, 71bf) .50 in .50 in 100 ips pk 0.35 lbs 15 lb/in 6.5"H x 4.8"W x 4.25"D 11 lbs ET-126-4, ET-126HF-4 2.9 Ohm
#&-32 mtg hole, thru (-HF modlels-Dual Thread. 281 DIA 910-32x.30 dp, #8-32 lhru)
CI
325" TYP 2.125-#6-32 mtg holesrmial 1800" hole cir (4) holes, thruCooling air 32O 5"
outlet (if reqd)
7 00"
3.25"
- 5.60" Options
SI-1 26 Vibration Isolation Mounts MS-129 Modal Stinger Kit
Appendix C
-
Charge Amplifier Specifications
viN
D PESRSVIBRATION IMPACT AND PRESSURE
Quafy Innovarions Cusronw Sarsaclon
Charge Amplifier Module
MODEL
5000
" Small Size, Rugged Construction
* High Gain * Wide Bandwidth * Fixed Low Pass Filter
" Adjustable Sensor Sensitivity " Output Short Circuit Protection
The VIP Sensors charge Amplifer Model 5000 accepts signals from piezoelectric type of transducers and converts the high irpedance charge input into a low impedance voltage output signal. The signal is processed through a gain stage and a 2-pole low pass filter stage. The value for gain and the comer frequency for the low pass filter are set at the factory.
The Model 5000A requires a ± voltage source from 6 to 15 Vdc and its output voltage swing is about 70% of the source voltage. The Model 5000B operates from a single positive voltage source from 12 to 30 Vdc; an intemal voltage divider halves the source voltage to bias its circuitry and its output voltage signal.
Model 5000 Charge Amplifier Functional Diagram
Vout
-P Filter
ZPE
Factory Set Gain
Model 5000 Connector Diagrams
Input Connector Coaxial 10-32 +VOc cWA 0 0 -VPoace0p0 CGnxnd PowerlOulput Connector Page I of 2 VIP Sensors California, USA Ph (949) 429 3568 Fx (949) 528 0126 info@vpsensors.com
www.vipensors.com VIP hse Sensors speiAions witho* noioe. resem s tbright tom niyMI
vripseSORS
VIBRATION IMPACT AND PRESSURE Quality Innovarions Cusiomea SatisfactionCharge Amplifier Module
SPECIFICATIONS
The "l W ase WiWenrpe*uton ama,+75 (4+C.U wnS e'rmenoW. UNITS INPUT Type Capacitance Resistance Piezoelectric, single-ended pC 1000 Maximum M( 20 OUTPUT Type Voltage (peak) Current TRANSFER CHARACTERISTICS Gain Accuracy Low Pass Filter Noise
Harvnoic Disk~tion
Broadband Frequency Response Low Cutoff Frequency Upper Cutoff Frequency
ENVIRONMENTAL Temperature Humidity POWER SUPPLY Power Sources PHYSICAL CHARACTERISTICS Dimensions Weight Connections ACCESSORIES mA Single-ended
70 of the maximum supply voage for model 5000A 70 of % the maximum supply voltage for model 50008
10 maximum
mV/pC 10to 100 Setatfactory;defautvaue 100
% ± 1 maximum for I Kz to 100 kHz at 24*C
% + 2 maximum for I lz to 100 kHz over Operating Temp Range
Hz F (-3±1dB ): 1 to 100,000 set at factory
2 poles, -12d8/octave roN off
sV rms 10 RTI
% < 1 at 10 kHz with 10 nF capacitive load and full-amplitude output
Hz F (-3 ±1dB): 1 Attenuation Rate: 6dBIOct
Hz F (-3 IdB): 100,000 Attenuation Rate: 12dB/Oct
-F (-C) Operating temperature: +32 to +104 (0 to +40)
Storage temperature: -67 to +185 (-55 to 85)
% 95 maximum relative humidity Vdc 6 to ± 15 for Model 5000A
+12 to +30 for Model 5000B
inches (nm) 2.0W x 1.3H x 3.9L (50 x 32 x 100)
oz (grams) 8.8 (250)
4-pin Power/Output connector
10-32 Transducer Input receptacle 4-pin Power/Output Cable ORDERING INFORMATION
Model 5000X -yyy X = A (± 6 to ± I5 Vdc supply) or 8 (+12 to +30 Vdc supply)
yyy = Gain (010 to 100) Page of 2 VIP Sensors California, USA Ph (949) 429 3568 Fx (949) 528 0126 info@viensors.com
www.vipsensors.com VIP seiSrs these specieatois msenes te uigt to modilyWAitho* noe. Vol
MODEL
5000
Appendix D
-
NI USB-6210 DAQ Board Specifications
NI USB-6210
16-Bit, 250 kS/s M Series Multifunction DAQ, Bus-Powered
- 16 analog inputs (16-bit, 250 kS/s)
- 4 digital inputs; 4 digital outputs; two 32-bit counters
- Bus-powered USB for high robility; built-in signal connectivity
- NI signal streaming for sustained high-speed data streams over USB
- Compatibiity w ith LabVEW, LabWindowsTm/CV1, and Measurement Studio for Visual Studio .ET
- NI-DA~im driver software and LabVIEW SignalExpress LE interactive data-logging software
Overview
The NI USB-6210 Is a bus-powered M Series nultifunction data acquisition (DAQ) nodule for USB that is optimized for superior accuracy at fast sampling rates. It offers 16 analog inputs; a 250 kS/s single-channel sampling rate; four digital input lines; four digital output lines; four prograrmmble input ranges (*0.2 lo*10 V) per channel; digital triggering; and two counter/timers.
The USB-6210 is designed speclicaly for mobile or space-constrained applications. Plug-and-play instalation minimizes corfiguration and setup time, w hile direct screw-terninal connectivity keeps costs down and sirplifies signal connections. This product dbes nd
require external power.
This module also features the new NI signal streaming technology, which gives you DMA -like bidirectional high-speed streaming of
data across USB. For more inforrration about Ni signal streaming, view the Resources tab.
Bus-powered M Series devices for USB are available in OEM versions. Check the Resources tab or use the left navigation to get
pricing and technical information. Driver Software
NI-DAQm driver and measurement services sdtware provides easy-to-use corfiguration and programming interfaces with features
such as the DAQ Assistant to help reduce development time. Browse the infornation in the Resources tab to learn more about driver sdtware or download a driver. M Series devices are not compatible w ith the Traditional N-DAQ (Legacy) driver.
Application Software
Every M Series DAQ device includes a copy d NI LabVIEW SignalExpress LE data-logging software, so you can quickly acquirA
analyze, and present data without programming. In addition to LabVIEN SignalExpress, M Series DAQ devices are compatlble wih
the folow ing versions (or later) f NI application software: LabVEW 7.1, LabWindows/CVI 7x, or Measurement Studio 7.x. M Series
DAQ devices are also compatiblew ith Visual Studio .NEr, C/C++, and Visual Basic 6.0.
The mark LabWindows is used under a license from Microsoft Corporation. Windows is a registered trademark of Microscit Corporation in the United States and other countries.
Specifications
Specifications Documents - Specifiations (2) * Data Sheet Specifications Summary General Product Name Product Family Form Factor Part Number Operating SystemTargetDAQ Product Fanmily Measuement Type RoHS Compliant Analog input Channels Single-Ended Channels Differential Channels Resolution Sample Rate Max Voltage
Maxinum Votage Range
Maxium Voltage Range Accuracy Maxnum Votage Range Sensitivity
Minimum Voltage Range
Mnknum Voltage Range Accwacy Mikinum Voltage Range Sensitivity Number of Ranges
Simultaneous Sampling
On-Board Memory
USB-6210
Miltifunction Data Acquisition
USB
779675-01
Unux , Mac OS , Wlndows M Series Voltage Yes 16,8 16 8 16 bits 250 kS/s 10 V -10V, 10V 2.69 MV 91.6 pV -200 nW , 200 nW 0.088 nW 4.8 pV 4 No 4095 sanples .. .... ...
Analog Output Channel 0 Digital Y/O Bidirectional Channeb 0 Input-Only Channel 4 Output-Only Channel 4 Number of Channel 4,0 Timing Software Logic Lew TTL
Input Current Flow Sinking
Output Current Flow Sourcing
Programmable kIput Filters No
Supports Programmable Power-Up States? Yes
Current Div Single 16 rrA
Current Div All 50 rrA
Watchdog Tkner No
Supports Handshakkig 110? No
Supports Pattern I1O? No
Maxmnum Input Range 0V , 5.25V
Maxinum Output Range 0 V , 3.8V
Counterfliners
Counters 2
Butfered Opertions Yes
Debouncing/Glkch Removal Yes
GPS Synchronization No
Maxinum Range 0V , 5.25V
Max Source Frequency 80 N-1z
Pulse Generation Yes
Tnebase Stability Logic Lewis Physical Specifications Length Width Height I/O Connector Tinigfrriggering/Synchronization Triggerig 50 ppm TTL 16.9 cm 9.4 cm 3.1 cm Screw teminals Digital .... .. .. ...
Appendix E -V21BL Specifications
4ijturi'
V21BL TYPICAL PERFORMANCE POWER CHARACTERIST ICS
Tum So 11 b 0 gram Tp Mass
1 2 3 4 5 6 7 a 9
Ct, p
Tuned to 50Hz 2.4 gram Tip Man
Is 20 25 ~S 0 5 to Ms 0,4 0
i
Z
tsTaan to 65 tz 1 gam Ti Mass
0 .. ftAa . a f
--- am ftrAm..Q tia r"w
--.--- OW 4M f trw-4 St-3 nW
Tuned to 48H 4.1 gram ltp Mas
A] 0 5 t t 3 2
V21BL RELATION BETWEEN TIP MASS & NA TURAL FREQUENCY
2 S 4
rT, &L txA Yln
To mm F A0004 Og MGM 0 110 0275 535 0 110 05 fi 0 110 1 121 6 5 025 1 6 0375 99 1 65 1 2721 24 50 025 98 24 50 0375 117 2.4 50 0S iai 2.4 50 1275 41 40 025 132 41 40 0375 192 4A 40 0.5 259 41 4 40 1 44A 1 caimecad 1(1501 REVISON DATE: 06-3-2010 - a niaa -aea ' ' ' - a 75 a ftr -. 0% nW - a M i t.-A2O aw - I 0W ft 0-&;2 a* aa s 12 _ 0
I
06 0 4 02 0g 133 no nO too Uk *0 93 REMSNONO .001 47 11 e2W a ftrm-0 15? nW -a -Im a Fma-.4 = aw Um 4 mm-4 Sm aw I 4"mw - 4 M a "Tuft-4-143 ffw 41A 4 ftrdw-4S4 ffw - a sa a ftraw-4 M aw - I am Aw OW a 3)is 2 25 a 5Bibliography
[1] Chau K, Sulouff R et al. 1998 Microelectronics Journal 29 579-586
[2] Hajati A 2011 Ultra Wide-Bandwidth Micro Energy Harvester Doctor of Philosophy thesis Massachusetts Institute of Technology
[3] Amirtharajah R and Ch A P 1998 IEEE Journal of Solid-State Circuits 33 687-695 [4] C. Livermore, "Structures," 6.777J Lecture Notes, MIT, Spring, 2011 (unpublished)
[5] Brotz J 2004 Damping in CMOS-MEMS resonators Master's thesis Carnegie Mellon
University
[6] D. Weinstein, "Damping," 6.777J Lecture Notes, MIT, Spring, 2011 (unpublished) [7] Jeon Y.R, Sood R, Kim S.G., "Piezoelectric Micro Power Generator for Energy
Harvesting," Sensors and Actuators A: Physical, 122, pp. 16-22, 2005.
[8] Timoshenko S P and Goodier J 1970 Theory of Elasticity 3rd ed (McGraw Hill Higher
Education)
[9] Vip Sensors, premier supplier of sensors and sensor systems http://www.vipsensors.com/electronics/electronics.html

![Figure 1-1: Three possible topologies for MEMS-scale electrostatic energy harvester: (a) in- in-plane overlap type, (b) in-in-plane gap closing type, (c) out-of-in-plane gap closing type [2].](https://thumb-eu.123doks.com/thumbv2/123doknet/14688437.560714/8.918.156.752.104.489/figure-possible-topologies-electrostatic-harvester-overlap-closing-closing.webp)
![Figure 1-2: The mechanical schematic of a typical electromagnetic energy harvester [3].](https://thumb-eu.123doks.com/thumbv2/123doknet/14688437.560714/9.918.254.657.143.407/figure-mechanical-schematic-typical-electromagnetic-energy-harvester.webp)
![Figure 1-3: A diagram of a cantilever beam harvester with a proof mass; linear system [2].](https://thumb-eu.123doks.com/thumbv2/123doknet/14688437.560714/10.918.232.698.390.558/figure-diagram-cantilever-beam-harvester-proof-mass-linear.webp)
![Figure 1-4: Graph of transmissibility, also known as linear gain, vs. normalized frequency for a linear system for given damping values [2].](https://thumb-eu.123doks.com/thumbv2/123doknet/14688437.560714/11.918.219.736.323.707/figure-graph-transmissibility-linear-normalized-frequency-linear-damping.webp)
![Figure 1-5: Bending and stretching of a double clamped beam; nonlinear system [2].](https://thumb-eu.123doks.com/thumbv2/123doknet/14688437.560714/13.918.305.694.190.499/figure-bending-stretching-double-clamped-beam-nonlinear.webp)
![Figure 1-6: Deflection vs. frequency for a nonlinear system. The system has a memory once frequency passes 1080Hz [2].](https://thumb-eu.123doks.com/thumbv2/123doknet/14688437.560714/14.918.193.677.753.1007/figure-deflection-frequency-nonlinear-memory-frequency-passes-hz.webp)