Design of Autonomous Robot Device for Accurate Pacing of Track
Athletes
by
Qinyuan (Chen) Liu and
Albert Hernandez
SUBMITTED TO THE DEPARTMENT OF MECHANICAL ENGINEERING IN PARTIAL FULFILLMENT OF THE REQUIREMENTS FOR THE DEGREE OF
BACHELOR OF SCIENCE IN MECHANICAL ENGINEERING AT THE
MASSACHUSETTS INSTITUTE OF TECHNOLOGY
JUNE 2008
©2008 Qinyuan Liu, Albert Hernandez. All rights reserved.
The author hereby grants to MIT permission to reproduce and to distribute publicly paper and electronic copies of this thesis document in whole or in part
in any medium now known or hereafter created.
Signature of Author:
nt of Me'?hanical Engineering
6th, 2008
Signature of Author:
Dbp~menft o e ical Engineering
May 1t6
8
Certified by:
S/ v "-avid R. Wallace
Associate Professor of Mechanical Engineering Thesis Supervisor
Accepted by: '
Jonn H. Llenhara V
ssor of Mechanical Engineering ndergraduate Thesis Committee
Design of Autonomous Robot Device for Accurate Pacing of Track Athletes
by
QINYUAN LIU ALBERT HERNANDEZ
Submitted to the Department of Mechanical Engineering On May 16th, 2008 in partial fulfillment of the
Requirements for the Degree of Bachelor of Science in Mechanical Engineering
ABSTRACT
Given the health and weight gain concerns plaguing the country, there is currently a great need for products that encourage athletic activity. A robotic pacing device that facilitates running along a track was developed to help fulfill this requirement. The need for this device, determined from interviews and a survey of experienced running athletes and coaches, was found to be substantial for a number of age groups and experience levels of runners.
An experimental robot prototype was designed and manufactured to aid in pacing runners around a track. The robot was designed to accurately follow the lines of the track using IR sensors that detect reflectivity of the track's surface.
The prototype was tested and optimized to determine a successful control logic that reduced error and the amount of overshoot the robot experiences as it adjusts to follow the lines at high speeds. Large overshoots lead to robot malfunction and breakdown in the logic as the robot reaches curves in the track. The optimized prototype currently has the capability of running full lengths around various shaped tracks that incorporate white lines dividing dark colored lanes at speeds of up to eight miles per hour. In this form, the robot might be useful for beginner runners, runners that are doing distance training, and physical education classes that have access to running tracks.
Future versions of the robot pacing device will need to incorporate additional features in order to be useful for the full range of people that want to use this product, including a flexible user interface that allows users to program the robot to their needs, a more sophisticated robot control
system that allows for accurate control based on the dynamics of the robot, and a more durable cover that is easily spotted by runners looking straight ahead.
Thesis Supervisor: David R. Wallace
Table of Contents
Chapter 1: Introduction
4
1.1 Initial Brainstorming 4
1.2 Chosen Idea 6
Chapter 2: Background
7
2.1 Field Research: Track Coach Input 7
2.2 Field Research: Track Runner Input 8
2.3 User Survey 9
Chapter 3: Chassis Design
11
3.1 Prior Art 11
3.2 Material Selection 13
3.3 Steering Mechanism 16
3.4 Sensor Placement 16
3.5 Assembly 17
Chapter 4: Electronics and Control
18
4.1 Robot Control System 18
4.2 Steering Control 19
4.2.1 Dead Reckoning 20
4.2.2 Feedback Control 23
4.2.3 Sensory Feedback Control Logic 26
4.3 Motor Control 30
Chapter 5: Additional Improvements
32
5.1 Mechanical Adjustments 32
5.2 Control Logic Adjustments 33
5.3 User Input 37
Chapter 6: Conclusions
40
Chapter 1: Introduction
To solve the problem of inactivity among the American population concerning physical activity, several problems needed to first be discussed as to what deters today's population for a daily need for physical activity. Several deterrents include: lack of time and space, affordability, lack of results, low enjoyability, bad weather, and lack of confidence . The list does not stop here as there are many other deterrents, and they are all specific to each person within the population. It is clear that all of these deterrents cannot be addressed with one single solution and/or product. However, if there was some product that could increase the ease of overcoming even one of these obstacles, the possibility for a more active population could be possible. A major deterrent is mainly ease of living. If running was easier and faster than driving a car, many more people would be running for two main reasons: it is 1) faster and 2) cheaper. The fact that there is an added benefit in running is not important to many people, but if running was as it was stated before i.e. easier, the easier something is, the better it is.
To begin, motivation is overall one of the most important aspects of physical activity. If there is no motivation by the individual who wishes to exercise, that individual will more than likely stop exercising. If the thought of exercising could be seen as an enjoyable past time, the percentage of individuals who would want to exercise could increase. Also, the issue of lack of confidence within the individual can also be a large deterrent of motivation. If the individual does not feel comfortable and/or confident while exercising around other people, having a product that encourages exercising but does judge the individual is ideal. Although there are exercise machines in gyms and ones that can be purchased for in-home use, there are still other individuals within the gym that could judge the individual with a lack of confidence and the machines that one can purchase may be out of a certain price range. As stated earlier, there is no one product that can solve all of these issues. However, certain ones can be targeted to study in more depth and a decision can be made on whether a new product could possibly begin to or completely remove a deterrent from the individual.
1.1 Initial
Brainstorming
Several ideas were discussed as to what could be preventing people from engaging in physical activity. When each was discussed, potential products to help increase the amount of physical activity within an individual were proposed. When the brainstorming process began, all
ideas were accepted as possible prototypes that could potentially go into production. It is important to follow this type of mentality as close as possible because this could provide new ideas which can then become the final prototype. Ideas that were discussed included: a bike rain shield, webbed feet for swimming, and a running robot. All of these ideas will be discussed.
The bike rain shield was an idea that arose from an MIT student who rides their bike across the bridge, but cannot ride their bike on a rainy day, but would still prefer to ride their bike rather than have to take public transportation or walk. The bike rain shield was to be a fully retractable bubble-like shield that would start from either wheel, and create an arc around the rider that would protect them from the rain, and then would attach to the other wheel. An issue that arose with this idea was that it would be very difficult to create an arc that could fully encompass varying heights of potential riders. Also, when the shield was to be retracted, there would need to be a way to store the actual shield. Although the shield itself was to be made of a durable flexible plastic, there would be a lot of material that would need to be easily stored. This would cause a problem if the material was not self retractable in some way, which would save a lot of time. Lastly, this would only benefit riders on rainy days and depending on how cheap this could be made could determine whether or not potential customers would buy it.
The webbed feet for swimming are very different from just ordinary flippers. The thought was to have a single flipper with a propeller in the middle to push the swimmer forward. Although this device would be used for more open waters, it could potentially help bring people into a different field of activity that they are normally not used to. After discussing the idea for
some amount of time, some inherent problems arose as the design was taken into more careful consideration. Firstly, one flipper on both feet is rather hard to obtain a continuous forward motion from swaying back and forth, i.e. the motion of a fish. Also, the idea of having
something push you rather than pull you through water seemed rather odd. A fear that arose was that the propeller, when turned on, would move about uncontrollably without the ability to correct the direction of which the swimmer desires. Lastly, when a propeller is added to the flippers, dead weight has been added to the system that could potentially be fatal if something tragic with the electronics were to occur.
The last idea that was mentioned is the pacing robot. This would be used for runners of all ages to have something to run along with rather than another person. This would allow them to run at their desired pace without having to worry about being too fast or slow for their running
partner. The original idea consisted of a robot that would be able to go with you along any path and stop when you stopped and begin at the same pace when you began. This is ideal for cities, where crossing a street is often an obstacle. The robot however would have to remote controlled, which could be quite cumbersome while the individual is running. The other option is to
somehow make it distance dependent, allowing the robot to only travel a certain proximity away from the individual. This would work however it could be very troublesome if the wireless connection between the robot and say a tracking device on the person could potentially drop and the robot would immediately stop working, which could be aggravating for the runner if it happened multiple times.
1.2 Chosen Idea
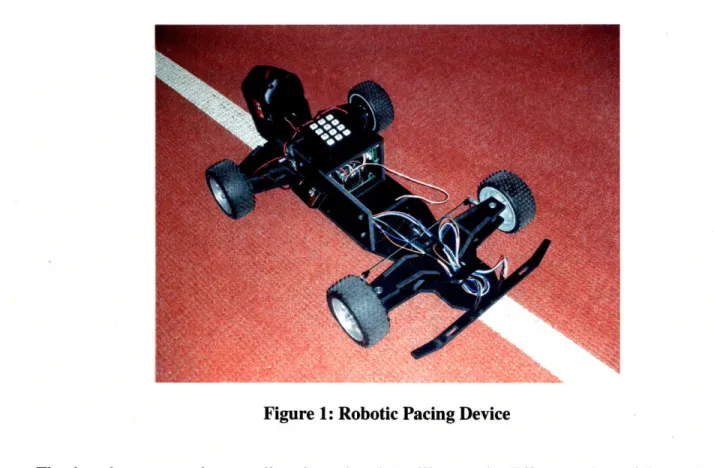
The idea that was chosen was the pacing robot however with some minor modifications. The robot will solely be used for a track and would follow the lines on the track to perform the correct number of laps as desired by the user. Figure 1 shows a prototype of the pacing robot.
Figure 1: Robotic Pacing Device
The thought was to make a small pacing robot that will sense the different colors of the track and follow a pre-determined color for the line. The robot would then be programmed to complete a certain distance within a certain time and the user would then begin running after it.
Chapter 2: Background
2.1
Field Research: Track Coach
Input
An important initial phase of the robot pacing design was conducting field research to find out basic needs and applications for the device. A wide number and variety of track coaches were contacted and interviewed. They were asked mainly about potential applications for the robot and about the features that would make it a useful product. Their feedback in both areas was very informative and helpful in the design of our robot.
While the initial intention of the device was for it to be used by high school and varsity track runners, a number of the coaches suggested that it could also be useful in other areas. A Michigan Track Coach Association [2] exec member as well as an MIT track coach mentioned that the device would be beneficial to female runners, who tend to run too hard at the beginning of runs and slow down by the end. The MIT Track coach [8] also suggested that physical education classes in primary schools would be able to use them. The device would be useful for helping students that are not familiar with running set a decent pace without hurting themselves. Most of the track coaches agreed that adult and post collegiate running clubs would be by far the most willing to use a device such as a pacing robot. According to one adult club coach, many adults are very reluctant to listen to another adult's coaching, and will do anything they can to train on their own. Personal training devices such as this robot would be very popular among this group.
The requirements of the pacing device according to the coaches will need to vary based on what group they are being marketed to. High school and college varsity runners, as well as adult track runners, will need the robot to be accurate in both distance and speed. According to a coach from Clarkson University [1], these professional runners have a fairly good sense of how to pace themselves, but a robot that was precise would eliminate all possibility of error in pacing. Furthermore, for this group, the robot would have to be easily programmable to run various distances in various times. For good runners a couple of seconds can make a huge difference. On the other hand, physical education classes and lower skill level running organizations would not need such an accurate device. Finally, for all potential users, the coaches suggest that the robot include a visual cue that reached eye level, such as a flag or an antenna, that would allow runners to still follow the robot but look at it from eye level.
These comments made by the various track coaches that were interviewed were carefully considered, and an effort was made to include some of the suggestions into the design of the robot pacing device.
2.2
Field
Research: Track Runner Input
Student athletes were also consulted to gauge the usefulness of the pacing robot, as well as to gather input on their needs and requirements the robot must have to be effective. A number of varsity level college track runners were interviewed in depth in the preliminary stages of the project to understand the functional requirements the robot needed to meet. Then a survey was given to a larger group of track athletes to get feedback on a more developed concept of the pacing robot.
Feedback from the initial interviews was very helpful in determining useful information about running habits that the usefulness of our robot. According to a varsity level track athlete who participated in track in both high school and college, the idea of pacing is not new to track teams. Currently the most widely used method is the use of a human pacer, typically a more experienced runner that other runners follow. The main benefit of using a human runner is the ability to have very dynamic running speeds that suits the needs of a runner. This includes acceleration at the beginning of a run and the variable speeds over the course of the run. Furthermore, a runner that you can just follow provides a visual cue that requires very small amount of mental effort to follow.
Other methods are employed by track coaches, such as indicator lights around the track and wristwatches, but the interviewed track runners say they rarely see those devices used. According to them, the wristwatches are difficult to use because it forces the runner to look
down to check their pacing. The few seconds used to check the wristwatch prevents the runner from running at full capacity, and does not allow the runner to get his best time. Also, the wristwatch does not provide constant pacing, as the runner must be looking at the watch to get feedback on his run. Some wristwatches will give aural cues by beeping differently based in how on pace you are running, but it is difficult to adjust your running speed according to this type of feedback. Similar complaints were made about the light pacing system. Since the lights run around the inside of the track, it is difficult to constantly keep track of where you are in relation to the indicator lights.
The interviews with experienced track athletes provided useful information on the most important requirements of pacing. In order for a pacing device to be effective, it should provide constant feedback to the runner. Visual feedback is more effective than other sensory feedback, as demonstrated by the runner's preference for the runner pacer over beeps from a watch. The robot pacer meets both of these requirements, but can be improved with an attached symbol that rises from the robot body to the eye level of the runner. According to the varsity athletes, runners typically look forward as they run, and a visual cue at eye level would provide pacing feedback with minimal effort from the runner. Finally, if the robot could be easily programmed for varying speeds, it would combine the positive aspects of the human pacer with the accuracy in speed, distance, and timing of a programmed robot.
2.3 User Survey
Based on the initial responses from the interviews with the varsity track athletes, a survey was developed to get input from a larger number of potential users of the pacing device. The survey gathered information on the background of 20 college age track athletes, including their running experience and experience with pacing devices. They were then asked about their training habits and how they learned to run. Finally, they were asked for their opinion on pacing devices, various methods of pacing, and how access to pacing devices would affect their training.
A number of interesting findings were discovered from the results of the survey. When asked about the way they learned to run or started off their training for track events, nine said they learned by listening to their coach, five just learned through trial and error and experience, and four developed a mental strategy that they would follow. Interestingly, none of the
participants chose a pacing device as their answer, even though that was an option on the question. Clearly pacing devices are not currently used to initially train runners, and may be something coaches generally use once a runner has become more developed. The participants' current training methods varied widely, ranging from using stopwatches to time their runs in specific intervals, to running with partners going for a similar time, to simply going by feel. Many of the participants mentioned using timed intervals as a way of preparing to run a certain time for their event.
Pacing devices seemed to be popular among those surveyed, and the robot pacer concept was also well received. Twelve of the twenty runners/ex-runners have used a pacing device of some sort at one point in their running careers. Most of the twelve used a stopwatch or other
form of pacing watch. Many of them said their coaches were the ones that calculated their time at each interval. In addition to these twelve, sixteen of the twenty participants said they believed using a pacing device earlier on in their track running would have helped them develop into better runners.
In addition, the survey allowed the participants to rank four ideas for pacing devices: a set of lights around the inside of a track that flashed based on where the runner should be, a physical object that moved at a pace you could follow, a wrist-watch that displayed time over distance intervals, and a wrist-watch that gave sound cues to whether or not the runner was going too fast or too slow. Figure 2 shows the responses of the runners.
14 12 10 8 6 4 2
-Indicator Lights Physical Object Wearable Beeping/Sound Other Stopwatch Pacer
Types of Pacing Devices
Figure 2: Popularity of Types of Pacing Devices
Fourteen runners ranked the physical object choice as their top pick, and the watch that gave sound cues was a distant second with five votes for top choice. More tellingly, of the twelve runners who have experience with track pacing devices, nine ranked the physical object pacer
option first.
To answer the question of whether the pacing robot would facilitate individual training and running, the survey also asked the runners to mention when they trained, and if they would train additionally given the option of using the pacing device of their choosing. Of the nine that
i~:~s-:l:_: ::::::--- pl-:l: -:--::;:1-:-, -: :::~a:::r: : : -· :, :: .::: :; · ·-:-: ;_ : ; · : : ~ ...- :::i:i;-': -- :: : :!~ : II·::: :: :;::::-:: : - : ...-. L:_~-i.i -- --:: -, 10 -- I--~---·~;:· --- I
-V
I
---· ~ -- --- - ----cl---did not say they trained all year round, two mentioned that they would be more willing to train during the off-season individually if they could use the robot. Furthermore, one of the
participants who does not train all year round said she would not train more if given the pacing device, but only because she feels her normal runs would be more effective with the device, and that additional training would not be necessary. Finally, most of the participants that do train all yea round said that they would be willing to incorporate the pacing robot into their workouts.
In addition to answering the survey questions, participants of the survey were given the
option to give general feedback on the idea. A number of curious ideas came from that, including someone's notion that introducing pacing to a training routine takes all the fun out of running.
The results of the survey seem to suggest that there is a good amount of interest among college level track athletes in using the robot pacing device, and that the device may even allow these athletes to expand their training ability. The notion of using a physical object that you can follow to achieve a good pace is a popular idea, even among runners who have had experience with other types of pacing devices. It seems likely that the robot will benefit runners that are just beginning to run competitively. Furthermore, if the cost is low enough, it is possible that the robot will allow college athletes to train on an individual basis either during the season or even in the off season. Finally, the ability to follow something to pace yourself as opposed to constantly checking times on a watch requires much less mental thought, and can be a much less tedious and painful method of pacing.
Chapter 3: Chassis Design
3.1
Prior Art
The basis of which the body was based off of was a typical remote controlled car as shown in Figure 3.
Figure 3: RC Car Example [5]
The car was dismantled and the inside of the car was examined. The entire car is made of several injection-molded parts that are screwed together. Also, the wheels are press fit onto the axles which made disassembling very difficult. After removing the wheels, the gearing and motors were revealed. The motors were small and appeared to not have enough power to run at high speeds with a sufficient amount of torque for what was needed for the pacing robot. Since we were unable to run the sample car, we were unable to determine the exact speed of the motors, however, due to prior experience, it was apparent that this motor was not powerful enough. Also, the front steering axle was exposed and the front steering axle for the pacing robot was based off of this design, however adjusted for specific dimensions for the pacing robot.
Also, the remote controlled car had a pair of shock absorbers on the front wheels. The original design was to include shocks, however, after examining the indoor and outdoor tracks, it was determined that shocks were unnecessary because the wheels can absorb the vibrations from the track.
The servo that was used in the pacing robot is different from the one in the remote controlled car; however the system for turning is very similar. The design pivots about a single point but is spring loaded to bring the servo joint back to a central, which was not incorporated in the final design. The rods that are connected the servo joint are connected to the steering wheel axis in a similar manner to the remote controlled car. Something that is very difficult about this design is the actual servo joint which moves from left to right to control the direction of the car.
This needed to be able to move from left to right at approximately +/- 60' from center, therefore a rounded bend around either side of the servo to fill the servo rod that moves the joint side to side.
The body for the robot pacer is a simple design in which space for electronics and the ability to be user friendly in case of a malfunction needed to be incorporated within the design, while still accomplishing the goal of accomplishing its task of providing a specific pace for a runner. The design of the body components without the control box is shown in Figure 4.
Figure 4: Design of Robot Body
3.2
Material Selection
The chassis of the robot pacer needed to be lightweight and the more simple and robust the chassis could be the easier the manufacturing and assembly process could be completed. At first, aluminum was considered for the base plate of the robot pacer. Although aluminum is a durable material and ideal for the body, the base plate would have become far more complicated. Due to sheer weight of a quarter-inch thick aluminum, the chassis would have to be cut into a truss-like shape. Also, the truss-like shape would have made placing and attaching the motor mounts, bearing blocks, and servo motor more difficult. Each of the parts would need to be placed in very exact positions and there would be very little room for error or movement of parts.
Figure 5: Aluminum Chassis Design for Robot Pacer
A simpler design for the chassis of the robot pacer involved using ABS plastic. By using a quarter-inch thick ABS sheet, the base had enough strength for the purpose of which it
required. The ABS sheet is also lighter than the aluminum, if both bases were manufactured the same way. Due to the fact that the ABS is lighter, a truss-like base in unnecessary and allows for the ability for the movement of components that appear atop the base of the robot pacer. Also, the ABS plastic is easily machine-able, therefore reducing the amount of time it takes to make each individual part. However, since ABS is still a very flexible material compared to aluminum at a quarter-inch thick, attaching the components on the top of the ABS while aligning them properly can prove to be difficult due to bending and eventually other components being attached to the surface, providing an uneven surface to machine on.
Figure 6: ABS Base for Pacing Robot
In addition to the use of ABS for the base of the robot pacer, it was also used to produce the remainder of the parts excluding the steering mechanism and rear axle. These parts are shown in Figure 7.
These parts, as shown in Figure 6, were produced from the outline of the perimeter of the base and designed appropriately so that a quarter/inch of support could be attached to them so that the
steering mechanism and bearing blocks could be held in place. Also, the parts were designed with as much symmetry as possible so as to reduce the amount of design time needed to create the parts in a solid model program to prepare for production.
3.3 Steering Mechanism
The steering that was used for the robot pacer consisted of three parts made of aluminum that were welded together, which are displayed in the following photograph.
Figure 8: Front of Robot Pacing Device Prototype
These three parts consisted of the cylindrical piece which would allow the wheels to rotate from left to right, an axle for the wheels to spin on, and a joint which connected to the servo
mechanism which applied a forced to the axle to turn left or right.
3.4 Sensor Placement
Lastly the sensors needed to be placed in the front of the car. The challenge with arranging the sensors is that they need to fill two requirements. The first is that they needed to be close enough to the ground, approximately 0.150 inches as stated previously, and the second is that they need to fully be sensing the line. If the sensors are partially off the track lines, the
pacing robot is unable to recognize the change in colors. Therefore, having the sensors the correct distance from both the floor and apart from each other is very important.
3.5
Assembly
The assembly of the robot pacer is done with two Allen key wrenches sizes 3/32 and 1/16 inch. Since most of the bolts being used are 3/32, this would reduce cost of assembly due to the fact that there will be little tool change. The assembly is simple and repetitive however, when the bearing blocks need to be aligned, there is a chance that the rear axle will not spin freely. This is due to three things: 1) the bearing blocks were tightened improperly, i.e. one might have been tightened too much and another too loose or 2) the shaft may be bent so that wedging occurs within the hole about which the axle to spin about or 3) the ABS sheet is bent after some machining and can cause the plates to become misaligned during assembly. The rear axle must spin freely due to the high velocities of which the pacing robot must achieve.
Also, the connectors from the servo to the front wheel steering axle should be done after the wheels are placed on the robot. This will ensure that the wheels are aligned and in the appropriate direction according to the servo motor. Having the wheels misaligned, although it may not seem to be a critical issue, it can become a problem one testing begins. If the wheels are misaligned, or in either direction, the robot will start to drift that direction as soon as the robot begins to run. In addition to a varying trajectory, it will suffer from a smaller turning radius due to the extent of which the servo motor can move the steering axles.
Last, the electronics are to be located in the center of the robot along with the battery. This central location places the electronics away from any dangerous or super sensitive parts. Also, it balances the weight of the vehicle and allows for a more stable ride. The battery that is used must be above 12 volts, but must also be lightweight for the vehicle. The purpose for the
12 volt battery is so that it can provide enough power to the controller and the motor. However, the battery cannot produce a current higher than 3 amps to the motor for the electronics of the robot. The program for the robot is preloaded into the electronics and the reset button (start button), which is easily accessible, is triggered to begin running the program.
Figure 9: Assembled Robot Pacer Prototype
Figure 9 shows the assembled robot prototype with all of its components.
Chapter 4: Electronics and Control
4.1
Robot Control System
For the purposes of constructing the prototype for the robot pacing device, an OOPic-R board was used as the controller for the various robot functions [4]. The OOPic is a PICmicro operating system that uses object oriented programming to control hardware. The wide variety of hardware objects the OOPic is capable of controlling and its ability to be programmed in Java, C, and Basic makes it a versatile operating system that is ideal for this application.
Figure 10: OOPic-R Control Board [4]
The OOPic-R board contains 16 digital 1/O lines that have power and ground connectors arranged for servo motor connection. Four of these I/O lines can also receive analog signal inputs, and are therefore ideal use for sensors. In addition, the board contains two I/O lines that are configured for PWM output, which can be used to drive DC motors. Finally, there is a serial port that makes for convenient downloading of programs to the micro processor.
These characteristics of the OOPic-R board account for all the necessary hardware that the pacing robot requires. Furthermore, the object oriented control of the hardware makes programming the logic of the robot fairly straightforward.
In addition to the OOPic-R board, the robot control system requires a specific controller for the DC motor. This controller takes an input from the PWM I/O line from the OOPic
controller, and outputs the signal to a DC Motor. The controller also provides power to the motor from an external power source, with a 3 Amp limit on the amount of current drawn by the motor. The motor controller uses a LMD 18200 chip as processors for the motor control. This chip can control the direction and trigger the motor to brake in addition to driving it at variable speeds.
4.2 Steering Control
One of the most crucial aspects of the robot pacer is its ability to accurately follow the lanes of a track. Since the main appeal of the robot as a pacing device is the minimal effort required to run after the robot, accuracy is very important. Users will become immediately disillusioned with the product if it continuously drives off the track, or if it swerves around between the lanes. It is also a potential health hazard for the robot to suddenly malfunction as it
moves along the track, as runners that are coming along behind it, or runners that are in adjacent lanes, have the potential to injure themselves by tripping over the robot.
There are a number of ways to control the motion of the robot pacer, including remote control by the coach or another runner, defining a specific path for the robot to follow and hard-coding the path into the robot's programming, and creating a feedback system that allows the robot to somehow sense whether it is on track at all times. Remote control is not a viable method, as it would be extremely tedious to control the robot as it goes all the way around the track. Most people, especially the coaches, would have better things to do with that time than focus on driving the robot. In addition, most remote control cars lack the precision required to follow the lanes accurately, as adjustments in direction would have to be constantly made.
Hard-coding a pathway into the programming of the robot and creating a feedback system that allows the robot to sense where it is on the track, on the other hand, are both viable options that require little or no effort from the user or coach. The following sections describe the findings from attempts to implement both systems into the robotic pacing device.
4.2.1 Dead Reckoning
The first approach to guiding the pacing robot around the track is by controlling the position of the robot and to traverse a fixed trajectory that is in the shape of the track lane. Ideally, this would be a feasible method of controlling the robot because track sizes are standard; indoor tracks are typically 200 meters long and outdoor tracks are 400 meters long. Track shapes are also standardized; the distances are split into four, such that the two straight lengths and the two arcs are all equal in length, and the two arcs at either end of the track should form a perfect circle. Using this information, the dead reckoning approach on an indoor track would involve having the robot move 50 meters straight, 50 meters around a semicircle, 50 meters straight again, and another 50 meters around a semicircle.
To implement this approach in the robot pacing device is fairly simple, and all that would be required is an encoder to accurately gauge distance traveled. The robot would first drive
straight forward until the encoder signaled a count that is the equivalent of 50 meters. Then the robot will reach the first curve in the track.
Turning the radius of the track can be determined from the geometry of the robot and the known geometry of the track. The steering mechanism on the robot turns both wheels at an angle, which generates an instantaneous center of rotation (ICR) about which the robot turns. In
order to turn around the semicircles on the tracks, the robot would need to have an instantaneous rotation radius that was equal to the radius of the track. Given the 50 meter semi-circumference
on a typical indoor track, the radii of the semicircular sections of the track are approximately 15.9 meters. Figure 11 shows the diagram of the system and its parameters.
A-I\
0
-
I-R-r
---Figure 11: Instantaneous Radius of Rotation
As shown in the figure, the instantaneous rotation radius can be approximated as the distance to the left rear wheel from the intersection of the perpendicular bisectors of the two left wheels. In actuality, the ICR exists at the point of all the perpendicular bisectors of the wheels. Therefore, this robot as shown has no ICR, as both front wheels are turning at the same angle. However, since the width of the robot is insignificant compared to the 15.9 meter turning radius, the left wheels will be used to find an approximate ICR. Based on this approximation, geometry will show that the two angles alpha and theta are equivalent. Then, simple trigonometry will show
L
Rir = (1)
tan(a)
= a=tan-(
)
(2)
Rir
So for an indoor track, the wheels must rotate by an angle of 1.05 degrees to make the turn for the semicircle. Once the wheels are adjusted, the encoder will count until 50 meters is
reached, then tell the controller to return the wheels to 0 degrees from the vertical. By doing this and driving the robot based on calculated position and the known trajectory, the robot should
ideally be able to make it around the track.
Implementation of this dead reckoning approach involved a number of very precise calibration measurements and many tests before the robot was able to complete a lap around the
indoor MIT track.
The first step was calibrating the steering mechanism such that the robot would move perfectly straight if the steering mechanism were set to the center position. This information is extremely valuable since the robot must move perfectly straight along the lane during the straight
sections of the track. Otherwise there is nothing that will prevent it from driving straight off the track. The steering servo motor was set to a number of different angles and driven for a long
stretch to determine which angle would result in perfectly straight movement of the robot. Then, using Equations (1) and (2), the necessary angle for turning the robot about a 15.9 meter radius of the indoor track turns was calculated, and the steering servo motor was once
again calibrated and tested such that the exact angle required for turning could be obtained. Finally, since the prototype of the pacing device did not leave room for an encoder for the motor, the speed of the robot needed to be determined as well. This was done by driving the robot straight along the track for a known distance and timing it, using various motor outputs. A calibration curve was obtained from this data and used to determine speed.
Once these tests and measurements were made, a simple program was written to control the robot motion. The program was split into four sequential steps corresponding to the two straight and two semicircular sections of the track. Each step controlled the motor to drive for enough time to cover the distance of the section and set the servo motor to turn the wheels to a certain angle.
While this method was imperfect, the robot was able to drive fully around the lap of the track. The robot did not stay perfectly in lane, particularly around the turns. Allowing the robot to stay in lane on the straight sections of the track involves setting the initial position of the robot well and aligning it exactly with the lanes of the track. The error in lane following in the curved sections of the track is more difficult to get rid of, as the errors are mainly due to the imperfect semicircle of the track.
While dead reckoning control did manage to work for at least one lap, there are a number of downsides to this method of controlling the robot. The first is that dead reckoning allows for no correction of error. Therefore, the error in the robot's position will add up as the robot drives around the track. At some point, when the actual position of the device is far enough from the assumed position, the control method will break down and the robot will drive off the track. Due to the accumulation of error with dead reckoning, it will be impossible to use this control method to drive the robot for many laps around the track.
Another issue is that not all tracks are designed to fit the geometric description above. Many, including the MIT indoor track, must fit the constraints of the building, and therefore modify the shape by making the corners tighter or lengthening the straight sections. This renders the dead reckoning approach less effective as this system is not adaptable for different shaped trajectories.
Also, the ability of the robot to drive straight when the steering angle is set to zero is not superb. Again, this makes the path following difficult as the robot will move slanted instead of straight, and actually run off the track before it begins to turn.
The issues relating to the standardization of the track trajectories as well as the robot's ability to move according to the planned trajectory is questionable. Therefore, other methods of robot control must be explored.
4.2.2 Feedback Control
The most appropriate method of controlling the robot's trajectory as it circles the track would be to have it receive and react to feedback about its surroundings. There are a wide variety of types of sensors, many of which could be used for this application. However, the most suitable choice would be infrared sensors that can detect light that has been reflected off a surface. This type of sensor takes advantage of the fact that every track, regardless of shape, size, or
indoor/outdoor, will have lines that divide the track into different lanes. Typically there is a lighter color that is used to draw the lines, and the darker color is used for the rest of the track. Since light colors reflect more than dark colors do, the IR sensors will be able to tell whether it is pointed toward a lane or the line next to the lanes.
Figure 12: QRB1134 Phototransistor Reflective Object Sensors
The QRB 1134 Phototransistor Reflective Object Sensors, produced by Fairchild
Semiconductor [7], was chosen as a suitable device for this application. The sensor consists of an infrared emitting diode and a NPN silicon phototransistor that are arranged in a housing such that the diode emits infrared light at an angle that would reflect to the phototransistor if a reflective object passed within a certain range of distance from the diode. Since color is correlated with reflectivity, this sensor is capable of telling the difference between the track lines and the track
lanes.
If a reflective object passes in the range of the sensor, the sensor will send an analog signal to the controller that varies based on how reflective the object is. The controller will then convert the signal into a range of values from -128 to +127. This signal can be used to trigger a number of events, including the turning of a robot. The robot code is set to turn the servo motor whenever a sensor signal drops below a certain value. This drop occurs when the sensor passes over from one color to another, or moves off the line of a track. Implementing this logic allows the robot to be controlled such that it turns left when the right sensor moves off the track line, and right when the left sensor moves off the track line.
One of the challenges involved in using these sensors is that they have to be precisely positioned on the robot such that the angle at which the diode and transistor are arranged meet at the object being detected, in this case the floor. The nominal distance between the sensor and the surface of the object being tested should be 0.150 inches.
Furthermore, incorrect sensor readings that result from noise or a sudden jump of the robot must not trigger the robot to turn. The bumps and other irregularities in the sensor readings are inevitable, as the indoor surface is fairly rough, and there can be potential debris on outdoor tracks that lead to a jumpy robot. A number of steps were taken to counteract the inaccuracy of the sensor readings. The sensors were tested over both the brown section and the white line section of the track, and the value directly in between their average sensor reading values was used to trigger the turning of the robot. The test was done using a sensor connected to the controller, which output the sensor reading value to an LCD display.
Sensor Readings
70
-20
70
Figure 13: Robot Sensor Readings on Track
As shown in Figure 13, the average value of the reading over the white track line is negative 20, while the average value of the reading over the brown track lane is positive 70. Therefore
positive 25 was the value used as the indicator that the sensor was moving off the line to a different part of the track. It is interesting to note that the average reading of a sensor over a
white sheet of paper is negative 116, indicating that the roughness of the track surface has a significant effect on the reflectivity of its surface.
Another method that was tried was averaging the values of the sensor readings over a period of time, and comparing that average value to positive 25 to trigger the turning of the robot. This eliminates the accidental triggering due to random occurrences such as a brown speck on the white lane.
The adverse effect of this approach is that it slows down the reaction time of the turning event as the robot moves off the line, which is another major challenge of using sensors to control the movement of the robot. At high speeds, the robot must be able to respond extremely quickly to sensor changes, otherwise the entire robot will go off the track line before a reaction occurs. Once the entire robot is off the line, there will be no line for the robot to follow. As reaction time of the robot to the sensor is highly dependent on the processing speed of the controller and the complexity of the program, there is no simple and elegant solution that can make the robot turn quicker in response to a sensor input change. Therefore, the effects of the reaction time were accounted for in other parts of the robot program logic.
4.2.3 Sensory Feedback Control Logic
The steering control of the robotic pacing device consists of a servo motor attached to the mechanical steering system, two optical sensors, and the controller. The sensors input analog signals into the controller. If the controller receives a signal that is above a threshold value set by the program, it triggers the robot controller to perform a specified task.
Mode 1: Straight
Figure 14: Robot Control State Interactions
The program that controls the steering defines three different states and two different modes for the robot, as shown in Figure 14. The two modes are straight, for when the robot is going on a straight section of the track, and turning, for when the robot is turning around the ends of the track.
The robot is always in one of three states in either mode, and each state has triggers that will set the robot to other states. The first is the neutral state, which is where the robot starts off, and where the both sensors are positioned on the line of the track. In the neutral state the servo-motor is set to the center position, causing the robot to drive straight. This is also the state where the controller constantly checks the two sensors. If neither sensor is triggered, meaning both sensors are still on the line, the state remains at neutral. If the left sensor is triggered, the state is set to the left state. If the right sensor is triggered, the state is set to the right state. Each of the states has individual commands that will execute as long as the robot is still in that state.
In each of the states, when the controller checks the sensors, it does so by taking an average over five values of the sensor reading. It then compares this average with the threshold value set by the program, which defines the difference between the light track line and the dark track lane.
Left
This program that controls the robot steering was developed after a number of other implementations failed. The first implementation did not use states or modes and would adjust the servo by the some amount as soon as either sensor triggered. Because the amount the servo was adjusted by needed to account for the sharper curves on a track, this led to problems when the robot drove on the straight sections. When the sensor left the line slightly, the servo would drastically overcompensate, and the robot would serve significantly around the line. This meant that both sensors would leave the line fairly consistently. Unfortunately, without the state method of control, the steering would not continue to adjust once both sensors had left the line, and the robot would frequently drive straight off the track. The benefit of using states is that the
individual state code will execute until the state changes.
The control logic in each of the individual modes and states has also developed through numerous trials and testing. The initial version did not contain modes, but had the three states. When the left sensor is first triggered, the robot program shifts to the left state. It then checks the left sensor. If the left sensor is still triggered, then the controller checks the right sensor. If only the left sensor is triggered, which is the case when the robot starts to leave the line, the servo will adjust slightly to the right. If both sensors are triggered, this means the robot has veered
significantly off course, and the servo will adjust to a greater degree to the right. The idea is that slight adjustments will allow the robot to follow the straight segments of the track relatively smoothly, while the greater adjustments will help the robot get around the sharper curves on the track. Once the robot gets back on the line and the left sensor is no longer triggered, the robot returns to the neutral state. The right state is exactly the same as the left, except having the opposite effect on the servo, and therefore the turning of the robot.
While this logic was an improvement on the previous program, the robot still experienced high oscillations around the line. Frequent tests showed that the robot rarely had either sensor on the line, and was always in a turning mode. As such, the robot would always overshoot the line before it could adjust to driving straight again in the neutral state. This resulted in a breakdown in the program when the robot reached the curved section of the track, where the error already incurred would not allow the robot to locate the line it was following.
Reducing the amount that the robot tries to turn when both sensors leave the track reduced the oscillations, but the frequent adjusting still resulted in increasing amplitude in the oscillations and eventual instability.
Because the frequency of the oscillations contributed to the instability of the system, as the amplitude of error increased each time the robot oscillated about the line, a different heuristic
was implemented to reduce the frequency of the oscillations. This new logic would still shift the robot into the left state when the left sensor first leaves the line, but would not turn the robot to
go right until the second sensor left the line as well. Then, when the second sensor returns to the line, the robot would immediately adjust to going straight again. Finally, when both sensors are back on the line, the program shifts the robot back into the neutral state. Again, the logic for the right state is equal and opposite to that of the left.
Not only does this new heuristic reduce the oscillation of the robot by reducing the conditions under which the robot must turn, but also attempts to account for the overshoot by
adjusting the robot to drive straight again before both sensors are actually on the line. Testing of this approach found that drastic turning still lead to increasingly large overshoot and instability.
Once again, at high speeds, the robot does not have time to adjust, even though it is controlled to turn to neutral once one of the sensors returned to the line, before the overshoot occurs.
However, at smaller turning angles, this approach does allow the robot to follow the line fairly accurately for the straight sections of the track. Once again, this logic breaks down when the robot reaches a turn in the track, since small turning angles are inadequate for the turning radii of the track lane.
The current implementation of the control system involving sensors still incorporates the three states, but also adds a higher level of control for the two different modes the robot is likely to be in- going straight or turning. This logic arose from the fact that the robot can follow a straight line well given the initial three states, but needs more drastic turning in order to continue following the line on the curved sections of the track.
The robot starts off in the straight mode, and will follow the track line until it reaches the first curve in the track. Since the straight mode logic does not turn the steering mechanism enough to take the turn, the robot will overshoot and cross over to the line next to the one it was following. Assuming the robot is going counterclockwise on the track, this means the robot will enter State 3, right of line, in the Straight mode. In this state the robot is programmed to attempt to steer left until the left sensor sees the white line again. However, there is no programmed control statement for if the right sensor sees the white line first, which is what will happen when
the robot overshoots on the turn. This is therefore the trigger that switches the robot into the Turning mode.
The three states in the turning mode are the same as those in the straight mode. The code for each state changes only in that the neutral state in this mode, when the robot is on the line, the steering is not set to go straight, but to turn. The other two states will turn the robot more or less in order to stay on the line. The same logic is applied when the curve ends to return to the straight mode.
This current method of control works to a degree, in that the robot will be able to make it around the track following one of the lines fairly accurately when moving at approximately eight miles per hour or less. The main problem occurs when the robot attempts to go from a curve to the straight portion of the track. Since the robot needs to turn at a relatively large angle to take the turn, it will overshoot pretty dramatically when it tries to adjust straight again, and sometimes will drive off the track before it will make the adjustment.
4.3
Motor Control
Since the robotic pacing device is designed to run at constant speeds for either 200 or 400 meter spans, it was decided that the robot does not need a precise velocity control system that requires an encoder and a feedback loop. Instead, it would be ideal to develop a model that allows the controller to calculate what gains it needs to drive the motor with in order to reach a certain speed.
Figure 15: Motor Control Calibration Setup
An experiment was set up where the same motor that drives the robot was connected with an optical encoder. These two components and an LCD screen were connected to the controller. The motor speed, in rotations per minute, was calculated with the controller and the encoder. The controller would read the number of counts from the encoder over a period of time, and divide by time to obtain counts per second. Then that value was divided by the counts per revolution to obtain the revolutions per second of the motor. Finally, multiplying by the radius of the wheel and dividing by the gear ratio yields the linear velocity of the robot.
Tar
Integrate, Divide by Time
Figure 16: Motor Control Diagram
This actual velocity was then compared with the target velocity, which is determined by taking 400 meters and dividing by a desired time to complete the distance. A simple proportional control system was implemented to get the actual velocity equal to the desired velocity, and then the motor gain was read and displayed on the LCD screen.
This experiment was repeated for a range of desired velocities, and then a model was developed relating desired velocity to the gains required to reach that velocity. This equation was hard coded into the robot program such that the robot would easily be able to figure out how to drive the motor to reach the pace at which the user would like to run.
Chapter 5: Additional Improvements
5.1
Mechanical Adjustments
The pacing robot that was built is far from an alpha prototype. What time remained to make the parts was considered better used in perfecting the robot and obtaining user feedback once operational. After final testing has been accomplished and a sufficient number of positive and successful runs have been completed with the initial prototype, the robot would undergo slight modifications to ensure the safety of the user and to also make the robot more aesthetically pleasing on the eye.
At the moment, all the crucial components of the vehicle are exposed. This includes the gears, the motor, the servo-motor and joint, the steering axles, and the infra-red sensors.
Although the gears are the only part of the robot that can cause harm due to a pinch point, the other components are very sensitive and should rarely be touched, especially incorrectly.
The first measure of correcting the exposure to the internal components is to make a cover for the robot. This part could be made using vacuum forming. Once the external shape of the cover has been manufactured, it can be attached to the underside of the body of the car.
This would also provide a hood for the sensors. The sensors are very sensitive to reflective surfaces and the amount of light they emit. Therefore, it is important to have a cover over the sensor so that when they are reading different colors, the colors are distinguished correctly.
Another slight modification that would occur would be decreasing the wheel-base. At the moment, it is rather wide for what the robot is required to do. It would take on the shape of a longer car, with wheels closer together as to make going in a straight line simpler. However, it would need to be wide enough so that at relatively high speeds, the car would not tip over.
The last modification would be rearranging the controller box as well as the batter placement. The controller input needs to be smaller and simpler as well as easily reachable by the user. This will allow for easier changes while on the track from one exercise to the next and effectively reduce standby time. The battery must also be placed in an easily accessible
compartment in which when the battery is to die, a new battery can easily be put in its place.
5.2 Control Logic Adjustments
Given the instability and inaccuracy of the current robot prototype, an improved method of control must be developed. A useful tool in controlling the motion of the robot is the set of kinematic equations that define the robot's motion. These equations can be used to accurately define the robot's position, including its orientation, and speed at any given time. This
information can then be used by the robot to more effectively control its position and velocity as it goes around the track.
In order to develop these equations of motion, it would be helpful to first simplify the model of the robotic pacing device as much as possible. Since the two front wheels turn at equal angles, it is reasonable to lump them into one wheel located in the center of the robot, at the same distance from the rear wheel axle as either real front wheel. The new model is of a tricycle like robot with the front wheel capable of steering. Another appropriate assumption to make is that the front wheel spins at the same rotational velocity as the rear wheels.
Given these simplifications to the physical model of the robotic pacing device, the equations of motion can now be developed. The motion equations will first be calculated based
on an axis system that moves with the robot. The X axis of this system is aligned with the rear wheel axle, and the Y axis runs down the center of the robot. Figure 17 shows the two coordinate systems in which the robot's motion can be defined.
y,
Iy
I-
X
R
A i
X,
Figure 17: Robot Coordinate Frames
In this reference frame, the variables that completely define the robot's position are: XR, YR, and theta, where theta is the angle between the x axis of the robot reference frame and the x axis of a fixed frame. The input alpha is the angle the steering wheel turns relative to the Y axis of the moving frame. Given these parameters, the kinematic equations governing the robot's motion can be determined.
In the robot's moving frame of reference, the velocities in the x and y directions are simply the linear speed of the wheel multiplied by the cosine and sine of the alpha angle, respectively.
Vxrobotr
=COS(a)
v. robot = V. sin(a) V, =m
• rwheel(1)
(2)
(3)
As shown by Equation (3), linear speed of the wheel is determined by its rotational speed times the radius of the wheel.
The angular velocity of the robot in its moving reference frame can be calculated by dividing the instantaneous speed of the robot by the radius of rotation. The instantaneous
velocity of the robot is simply the linear velocity of the front wheel, and the radius of rotation is the distance from the center of rotation to the front wheel. Figure 18 depicts the geometry of the rotational motion of the robot.
0
----Figure 18: Variables in Robot Kinematic Equations
The final result is shown in Equation (4).
bF= .sin(a)
d (4)
Equations (1), (2), and (4) represent the model in the robot's moving reference frame. In order to obtain the same equations for the fixed reference frame, a transformation matrix must be used. The matrix that maps positions in the fixed reference frame to the moving robot frame is the following:
cos8 sinG 0
R=-sin9 cosO 0 (5)
0 0 1
By inverting the equation shown above, the model in the fixed reference frame can be obtained from the equations in the moving frame.
"fixed -robot
fired=R- ' ed (6)
fixed fixed
Kixed = V, COS(a)COS(O)+ vs sin(a)sin(O) (7)
Afied = -v cos(a)sin(9)+ vs sin(a)cos(8) (8)
e
= sin(a)
(9)
Equations (7), (8), and (9), represent the equations of motion of the robot pacing device in a fixed reference frame, where the angle theta represents the robot's orientation, the angle alpha represents the steering angle of the robot's front wheel, v represents the linear velocity of the wheels, and d represents the distance between the front and rear wheels.
Given these equations, it is possible to accurately calculate the position and velocity of each of the robot based on the parameters described above, and therefore accurately control the robot's motion.
As an example, if the robot is driving on a straight section of the track, a good parameter to control is the sum of the angles alpha and theta. Controlling this sum to be as close to zero as possible would result in a trajectory that stays straight. Approximating the differential term in Equation (9) to change in theta divided by change in time and knowing the initial value of theta, a basic program can be written that finds approximations of theta and then controls alpha to be the negative value of theta. Assuming the time intervals are sufficiently short, this method of control can be much more accurate than the currently implemented program. The following graph shows the error in the robot trajectory, where the robot's initial orientation is five degrees
from horizontal, y = 0 is the desired trajectory, the speed of the robot is 10 miles per hour, and the time interval used in the approximation is 20 Hz.
Figure 19: Robot Error vs Straight Line Movement
As shown by the Figure 19, if the robot departs the track line at an angle of five degrees, which is reasonable based on experimentation of the current robot prototype, the robot will stabilize completely after about four meters of traveling in the direction of the line. There will be a steady state error, as the control system is controlling the angles rather than the Y position, but the robot would only be two centimeters away from the line, which is acceptable compared with current results of the robot's control program.
Unfortunately, this method of control is extremely difficult to implement given the equipment used for the prototype of the pacing device. The OOPic controller does not handle floating point units or calculations, making it difficult to accurately approximate the results of the differential equations used to control the system. Given a more capable controller in future versions, this logic could be implemented to achieve a better method of control for the robot.
5.3 User
Input
An important functional aspect of the robotic pacer is the ability for users to easily adapt it to their running needs. This means that the runner or trainer needs to be able to program the robot to run variable speeds over different distances. According to a high school track coach, in a
-0.005 C.5 1 1.5 2 2.5 3 3.5 4 4!5 -0.005 -0.01 U -o.o_ E -DDu -0.025 -0.03 -0.035 -0.04 -0.045 X position (meters)
mile run, or four laps on a regular outdoor track, a runner would want to run each lap at a
different pace, typically running faster in the first and last laps. For example, a runner that wants to run close to a four minute mile would spend 57 seconds on the first lap, 61 seconds on the second, 60 seconds on the third, and 57 seconds on the last. An adequate pacing device needs to do be able to be equally flexible.
From speaking with track coaches and runners, it was determined that current methods of pacing account for the runner's variable speed throughout the course of the race. Coaches will pace their runners by using a stopwatch to time the runners over a certain distance. The coach or runner will determine ahead of time an appropriate time to run each interval. At each distance interval the coach will call out their time to let them know whether they should be running faster or slower. Runners who pace themselves will also use this approach, except using a wristwatch to track their time.
Because this is a currently accepted method of pacing, and because it is a relatively simple approach, it is reasonable for the pacing robot to adapt this form of pacing as well. The top of the robot will contain a keypad and potentially an LCD screen that will interface with the user so that the user will be able to input his desired speeds and distances.


![Figure 3: RC Car Example [5]](https://thumb-eu.123doks.com/thumbv2/123doknet/14686373.560360/12.918.80.801.88.1123/figure-rc-car-example.webp)


![Figure 10: OOPic-R Control Board [4]](https://thumb-eu.123doks.com/thumbv2/123doknet/14686373.560360/19.918.78.844.134.1126/figure-oopic-r-control-board.webp)