HAL Id: hal-03136489
https://hal.inrae.fr/hal-03136489
Submitted on 9 Feb 2021
HAL is a multi-disciplinary open access archive for the deposit and dissemination of sci-entific research documents, whether they are pub-lished or not. The documents may come from teaching and research institutions in France or abroad, or from public or private research centers.
L’archive ouverte pluridisciplinaire HAL, est destinée au dépôt et à la diffusion de documents scientifiques de niveau recherche, publiés ou non, émanant des établissements d’enseignement et de recherche français ou étrangers, des laboratoires publics ou privés.
To cite this version:
Marie Weiss, Florence Meunier. PAStiS User Guide – V2.0. INRAE, UMT CAPTE, UMR EMMAH. 2015. �hal-03136489�
2015
Marie Weiss, Florence Meunier UMT CAPTE
Table of contents
1 INTRODUCTION ... 3 2 INSTALLING THE SOFTWARES TO COMMUNICATE WITH THE PASTIS SYSTEMS ... 3 2.1 SOFTWARES TO INSTALL ON YOUR COMPUTER ... 3 3 LOG6200_V25 SOFTWARE: PASTIS CONFIGURATION AND DATA ACQUISITION ... 5 3.1 LAUNCHING LOG6200_V25 ... 5 3.2 LOG6200_V25 MAIN WINDOW ... 63.3 PASTIS SYSTEM CONFIGURATION: CLOCK, CSV FORMAT, DEFAULT PATH ... 6
3.4 LAUNCHING PASTIS DATA ACQUISITION... 7
3.5 DOWNLOADING AND SAVING PASTIS DATA TO THE COMPUTER ... 11
4 CHANGING BATTERIES ... 12 5 UPDATING THE PASTIS SYSTEM FIRMWARE VERSION ... 13 5.1.1 How to check the PASTiS system firmware version? ... 13 5.1.2 How to update the PASTiS system firmware version? ... 13 6 RECOMMENDATIONS FOR PASTIS USE DURING GROUND CAMPAIGN EXPERIMENTS ... 15
List of figures
Figure 1. PASTiS system description. ... 3
Figure 2. Command DOS window automatically opened when executing CDM20824_Setup.exe (PASTiS driver installation) ... 4
Figure 3. Window automatically opened when installing the PASTiS communication software ... 5
Figure 4. Launching LOG6200_V25 software ... 5
Figure 5. LOG6200 Main window ... 6
Figure 6. LOG6200 Menu: “Configuration générale” : setting up the clock and the default path for data saving ... 7 Figure 7. Launching a data acquisition campaign ... 9 Figure 8. Launching a data acquisition campaign: confirmation ... 10 Figure 9. Formatting the PASTiS sytem ... 10 Figure 10 Final confirmation of a data acquisition launch ... 10 Figure 11. Checking that the data acquisition has been launched. ... 11 Figure 12. Downloading PASTiS system data ... 12 Figure 13. Final window displayed after downloading the data ... 12 Figure 14. Launching the LOG6200_V2.5 software (top). Checking the PASTiS system firmware version (Verison FW, Bottom) ... 13 Figure 15. Updating the PASTiS Firmware version using BootLoader Control.exe... 14 Figure 16. PASTiS Firmware updating. Connecting the system to the computer ... 14 Figure 17. DOS command window updating with the percentage of memory read. ... 15
1 Introduction
This document provides you with instructions and step by step procedure to use the PASTiS (Pai Autonomous System from Transmittance Sensors) PAR and PASTiS P57 systems (INRA‐Version, before March 2014).
The PASTiS systems allow monitoring the canopy fraction of Absorbed Photosynthetically Active Radiation (fAPAR) and Plant Area Index (PAI). A PASTIS system is composed of a data logger (2GB memory, 2LR20 batteries) where 6 sensors are connected with wires. Sensors are distributed as shown in Figure 1. Figure 1. PASTiS system description.
2 Installing the softwares to communicate with the PASTiS systems
2.1 Softwares to install on your computer
The PASTiS systems are delivered with two softwares that need to be installed as pre‐requisite, before any use of the systems:
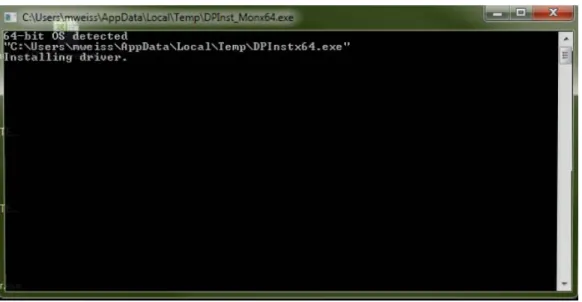
1. CDM20824_Setup.exe : this allows installing the PASTiS drivers on your computer. Click twice on CDM20824_Setup.exe, this will open a command DOS window which indicates that the
driver is installed. The window closes automatically when the driver is installed after having
indicated that the installation is completed.
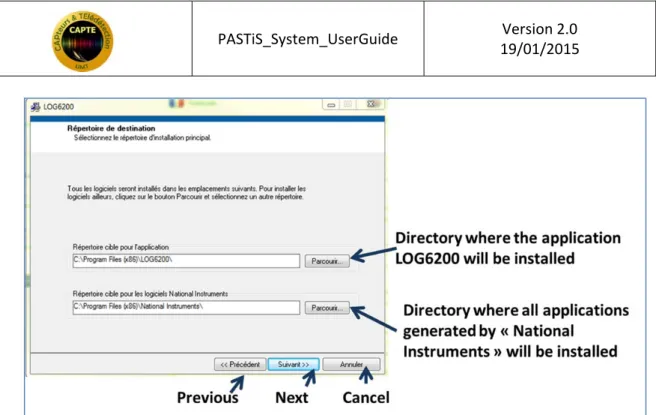
Figure 2. Command DOS window automatically opened when executing CDM20824_Setup.exe (PASTiS driver installation) 2. LOG6200_V2_5.zip: this software allows the communication between the computer and the PAStiS systems (French version only): a. Checking the system (batteries, functioning) b. Launching and stopping an acquisition campaign c. Setting up the parameters of the acquisition campaign d. Updating PASTiS clock system Unzip LOG6200_V2_5.zip. Click twice on setup.exe, and follow the instructions (Figure 3). By default, LOG6200 will be installed in the “Program Files” directory and will be accessible from the windows startup menu.
Figure 3. Window automatically opened when installing the PASTiS communication software
3 LOG6200_V25 software: PASTiS configuration and data acquisition
Before using the LOG6200_V25 software, the PASTiS system must be connected to the computer using the mini‐USB cable (after having opened the box). Note that the LOG6200_V25 is available only in French version.
3.1 Launching LOG6200_V25
Launch the LOG6200_V2_5.exe software from the windows start‐up menu by selecting YBD‐ LOG6200, Figure 14)
3.2 LOG6200_V25 main window
The LOG6200 main window (Figure 5) allows checking the PASTiS system functioning, including: The PASTiS system ID Number (“numéro du boîtier”) The PASTiS system firmware version (“Version FW”) The PASTiS clock time (“Heure du boîtier”) The computer clock time (« Heure du PC ») The number of acquisitions registered in the system (“Nombres d’acquisitions”) The percentage of memory used The battery level The signal value for the 6 channels (Voie 1, ….Voie 6) The temperature of the system The menubar allows configurating the system (“Configuration”) or launching/stopping an acquisition campaign (“Fichier”) and provides some information on the software (“A propos”). Figure 5. LOG6200 Main window3.3 PASTiS system configuration: clock, csv format, default path
1. Open the PASTiS system box 2. Connect the mini‐usb to the PASTiS System and to the computer 3. Launch the LOG6200 software (Start‐Up menu => YBD LOG6200, Figure 4).4. In the LOG6200 main window, select the “Configuration” menu, and then “Configuration
générale”, which opens the window in Figure 6.
5. To update the clock: click on “Remise à l’heure”.
a. Before updating the PAStiS clock time, we highly recommend to save the data already acquired by the system on the computer since the clock updating may induce anomalies in the csv file.
b. In order to avoid confusion when processing the data of a given campaign, it is highly recommended to use the same computer to set up the campaign and to download the data, as well as to configure the computer time as “universal time” (see
http://windows.microsoft.com/en‐us/windows/set‐clock#1TC=windows‐7). 6. Define the csv separator (which differs depending on the country): “POINT VIRGULE”: semicolon ‘;’ “VIRGULE” : comma ‘,’ “ESPACE“ : space ‘ ‘ “TABULATION” : tab ‘ ‘ 7. Define the directory where the PASTiS measurement will be downloaded. Select “Changer de chemin” and then the directory where you want to save the PASTiS data. 8. Close the window by clicking on “Fermer la fenêtre” Figure 6. LOG6200 Menu: “Configuration générale” : setting up the clock and the default path for data saving
3.4 Launching PASTiS data acquisition
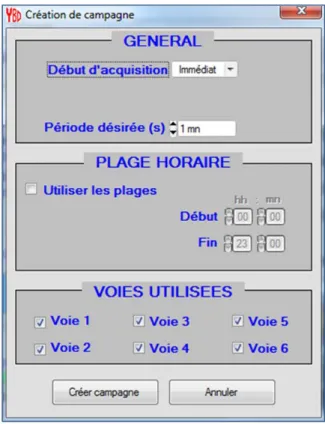
Before launching a new data acquisition campaign, the data already registered in the system must be saved (see section 3.5). The data acquisition is then launched by the following steps (Figure 7): 1. Open the PASTiS box. Connect the system to the computer using the mini‐USB cable. 2. Check that the PASTiS system time is synchronized with the computer time on the LOG6200 main window. If this is not the case, refer to section 3.3 after the data collection. 3. In the LOG6200 main window, select the “Fichier” menu. 4. Then, select “Créer une campagne” 5. A window entitled « Creation de campagne » opens (Figure 7) allowing to define all the data acquisition parameters a. Start time: immediate start (“depart immédiat”) or delayed start (“depart différé”).
It is strongly recommended to select “depart immédiat” since the delayed start is not fully tested up to now.
b. Acquisition period (“période désirée”): select between 1, 5 and 10 minutes. Note that the amount of data is proportional to the acquisition period. Selecting one minute will induce less autonomy for the PASTiS systems.
c. Time frame(“Plage Horaire”) during which the acquisition is performed.
i. If the box “Utiliser les plages” is not selected, then the data acquisition is performed from 00:00 to 23:59.
ii. If the box “Utiliser les plages” is selected, then the user must specify the starting time of the acquisition (“Début”) and the ending time (“Fin”). Note that if he selects a starting time at 10:00 and he uses an acquisition period of 5mns (1mn), then the first data will be acquired at 10:05 (10:01).
d. Specify the used channels (“Voies utilisées”): check the channels you want to use. We highly recommend selecting all the channels (default).
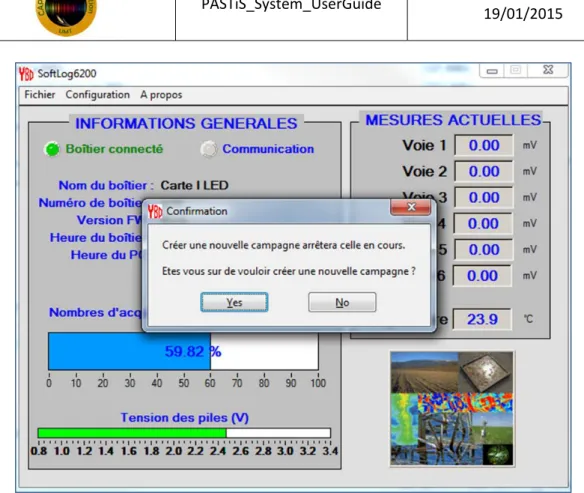
Figure 7. Launching a data acquisition campaign 7. A windows opens and reminds that launching the data acquisition campaign will delete all the data already in the system (Figure 8). Confirm your choice by selecting “yes” (“no” will cancel the operation)
Figure 8. Launching a data acquisition campaign: confirmation 8. A waiting bar is opened until the formatting of the PASTiS system is finished (Figure 9). Figure 9. Formatting the PASTiS sytem 9. Once the formatting is finished, a confirmation window indicated that the data acquisition campaign is launched. Click on “OK” Figure 10 Final confirmation of a data acquisition launch
10. After the first acquisition, it is recommended to check that the system is functioning
correctly by looking at the LOG6200 main window (Figure 11). The system and computer time must be quite equal (there might be a slight shift due to the screen updating), the number of acquisitions must be consistent with the time of acquisition start, and the channel values (“Voie”) must be equal or higher than 0. Note that if an INF or a NAN value is observed, the user must contact INRA. Figure 11. Checking that the data acquisition has been launched. 11. Before unplugging the PASTiS system, close first the LOG6200 window by selecting “Fichier” and then “Quitter”..
3.5 Downloading and Saving PASTiS data to the computer
1. Open the PASTiS box. Connect the system to the computer using the mini‐USB cable. 2. Do not modify the PASTiS time before downloading the data. 3. If needed, Change the default directory where the data will be saved (section 3.3). 4. Select the menu “Fichier” in the LOG6200 main window (Section 3.2) 5. Select “Récupération des enregistrements” (Figure 12)Figure 12. Downloading PASTiS system data 6. The downloading is beginning (showing a waiting bar). 7. A confirmation window is then displayed on the screen, click on OK. Figure 13. Final window displayed after downloading the data
4 Changing Batteries
If you have to change your batteries, you need to follow the steps in that order (otherwise, the time will be wrong in the collected data) 1. Open the system box 2. Put the new batteries 3. Connect the PC and the system5. Update the clock time and synchronize it with the computer (section 3.3).
5 Updating the PASTiS system firmware version
The PASTiS systems firmware version should be version 2.6. Any system set up before the 18th November 2014 is in a previous version. It is therefore required to update it to version 2.6 as pre‐ requisite, using the BootLoader Control.exe software (English version only).
5.1.1 How to check the PASTiS system firmware version?
First, connect the PASTiS system to the computer using the mini‐usb cable. Then launch the
LOG6200_V2_5.exe software (from the windows start‐up menu, select YBD‐LOG6200, Figure 14).
Check that the firmware version is higher than 2.6. Figure 14. Launching the LOG6200_V2.5 software (top). Checking the PASTiS system firmware version (Verison FW, Bottom) 5.1.2 How to update the PASTiS system firmware version? The procedure is provided hereafter step by step. Please, make sure that all the steps are achieved in the following order: 1. Open the PASTiS system box 2. Remove one battery 3. Connect the mini‐usb to the PASTiS System and to the computer
4. Click twice on BootLoader Control.exe. A window is opened: select the file to use (InraCourantV26.s19), select the USB serial port (the COM number –XX‐ varies with the
number of PASTiS system that have been connected to the computer). Use default COM
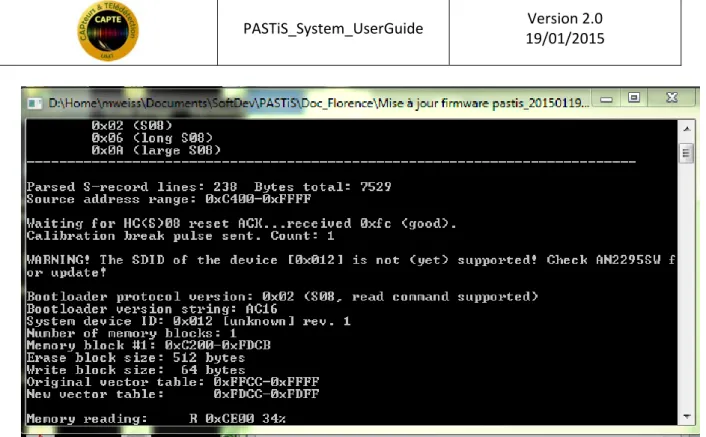
speed. Then, click on the bootload button. Figure 15. Updating the PASTiS Firmware version using BootLoader Control.exe 5. A DOS‐command window is opens and indicates that the system is waiting (Figure 16) Figure 16. PASTiS Firmware updating. Connecting the system to the computer 6. Insert the battery and wait for the message to be updated in the DOS command window. The system reads the memory up to 100% (during less than a minute, Figure 17). After reaching 100% of the memory, the DOS command closes automatically. The system firmware is then updated. The result can be checked by following the instructions of section 5.1.1.
Figure 17. DOS command window updating with the percentage of memory read.
Troubleshooting: if the DOS command shuts down before reading the entire memory, then the batteries must be checked using the LOG6200 software.
6 Recommendations for PASTiS use during ground campaign
experiments
Here are some advices to avoid troubles when using PAStiS systems and to ensure a good quality of the data for the post‐processing:
Use at least three incident sensors per campaign (in case one or two do not work). The best would be to have one incident per system so that the transmitted sensors are fully synchronized with the incident. We are actually working on a post‐processing code to develop a method to synchronize them in case of system temporal drifts.
Use a 5mn acquisition period which represents a good compromise between the requirements in memory and the frequency to collect the data
Use the same computer to download and launch the campaign, or at least if you do not use the same, make sure that all the computers you are using have the same hour and date. It is better to use the universal time (section 3.3).
Before updating the PAStiS clock time, we highly recommend to save the data already acquired by the system on the computer since the clock updating may induce anomalies in the csv file.
END OF DOCUMENT
Download the data every month. Each time you download, do not forget to clean the sensors and check the two batteries (see section 4 to change the batteries). When collecting the data, do not rename the csv files, put them all in the same directory so that they can be processed at once.