Calibration of Sonographic Gel Probe Covers for n-Vivo Mechanical Testing
by
Panasaya Charenkavanich
SUBMITTED TO THE DEPARTMENT OF MECHANICAL ENGINEERING IN PARTIAL
FULFILLMENT OF THE REQUIREMENTS FOR THE DEGREE OF
BACHELOR OF SCIENCE IN MECHANICAL ENGINEERING
AT THE
MASSACHUSETTS INSTITUTE OF TECHNOLOGY
JUNE 2005
© 2005 Panasaya Charenkavanich. All rights reserved.
The author hereby grants to MIT permission to reproduce
and to distribute publicly paper and electronic
copies of this thesis document in whole or part.
MASSACHUSETS INSTrE OF TECHNOLOGY JUN 0 8 2005
LIBRARIES
Signature of Author:
/1Deplrtment of Mechanical Engineering
June 6, 2005
Certified by:
Simona Socrate
Assistant Professor of Mechanical Engineering
Thesis Supervisor
Accepted by:
0
Ernest G. Cravalho
Professor of Mechanical Engineering
Calibration of Sonographic Gel Probe Covers for In-Vivo Mechanical Testing
by
Panasaya Charenkavanich
Submitted to the Department of Mechanical Engineering
on June 6, 2005 in Partial Fulfillment of the Requirements for the Degree of Bachelor of Science in
Mechanical Engineering
A BSTRACT
Cervical insufficiency is a condition in pregnancy in which the cervix asymptomatically dilates
in the absence of uterine contractions, resulting in a spontaneous preterm delivery. The
condition is often misdiagnosed and presents a significant challenge for the clinical community.
In order to establish better diagnostic criteria for cervical insufficiency and to improve
assessment of preterm delivery risk for the individual patient, a non-invasive medical imaging
tool, which uses ultrasound elastography to test the mechanical properties of cervical tissue, has
been developed. The hand-held ultrasound indentation system will enable in vivo collection of
stress-strain data from patients that will provide researchers with the necessary information to be
used in material modeling and improve diagnosis of cervical insufficiency.
The device consists of an ultrasound probe, enclosed by a gel-filled cover. The mechanical
properties of the covers vary with each cap as well as with time and temperature. Therefore, in
order to ensure accurate measurement, the probe covers must be calibrated prior to use.
An experimental study was carried out to examine the effects of various testing conditions on the
mechanical behavior of the probe covers. Different freezing and thawing techniques were
explored in order
todetermine favorable conditions in order to preserve the integrity of the
probes between the time of manufacture and actual use. From the results of the research, the
appropriate combination of testing conditions for probe calibration was determined, as well as
freezing and thawing techniques for probe preservation.
Thesis Supervisor: Simona Socrate
Title: Assistant Professor of Mechanical Engineering
Table of Contents
Page
1.0C Introduction 5
...
Normal Cervical Function
5
C ervical Insufficiency ---
---
5
Causes of Cervical Insufficiency ... 6
Silent Symptoms of Cervical Insufficiency ---
6
Treatm ent for Cervical Insufficiency ---
---
6
Current Diagnosis of Cervical Insufficiency ---
7
Ultrasound Elastography ---
7
New Method of Diagnosing Cervical Insufficiency
7
U ltrasonic V ideo Im aging --- --- 82.0 Experimental Materials and Methods --- 9
Probe Mold
9
Probe Mock-Ups --- 9Gel-Filled Probe Covers 9
Experimental Apparatus ---
10
Experimental Procedure ---
10
3.0 Theory -... 13
4.0 Results
17
5.0 Discussion of Preservation Conditions
21
...Freezing in W ater vs. A ir ---
---
21
Thawing in Water vs. Air Thaw in W ater vs. ing --- --- 21
Water Bathl Time 23
6.0 Discussion of Testing Conditions
25
Varying Test Speed ---
25
Effect of Re-Calibration over Time
26
... 7.0 Conclusion 28 ... References 29Appendix A: Matlab Script for Theoretical Model ---
30
List of Figures
Page
Figure 1.1
Diagram of female reproductive system
---
5
Figure 1.2
Ultrasound images captured with and without gel-filled probe cover ---
8
Figure 2.1
Gel-filled probe cover
10
Figure 2.2
Schematic of experimental set-up
10
Figure 2.3 Probe cover during calibration 11
Figure 3.1
Compression of thin-walled spherical balloon
13
Figure 3.2
Force diagram of compressed balloon
15
Figure 3.3
Theoretical force vs. displacement graph ---
16
Figure 4.1 Typical force vs. time graph. 17
Figure 4.2 Magnification of Figure 4.1. 17
Figure 4.3 Typical force vs. displacement graph. 18
Figure 4.4 Maximum and equilibrium forces for fresh probe covers A-J 20
Figure 5.1 Force vs. time graph for probe thawed at room temp. for 3 hours 21
Figure 5.2
Force vs. displacement graph for probe thawed at room temp. for 3 hours
22
Figure 5.3 Force vs. time graph obtained from an oversaturated probe ... 24
Figure 5.4
Force vs. displacement graph obtained from an oversaturated probe
24
Figure 6.1 Force vs. time graph for probe tested at 0.1, 0.25, and 0.5 mm/s 25 Figure 6.2 Force vs. displacement graph for probe tested at 0.1, 0.25, and 0.5 mm/s 26
Figure 6.3 Force vs. time graph after 1, 10, and 30 minutes 27
F:igure 6.4 Force vs. displacement graph after 1, 10, and 30 minutes 27
List of Tables
Page
Table 4.1
Experimental results for probe covers A-J ---
19
Table 5.1 Weight change in probe covers A-J thawed in water bath 23
Table 6.1
Experimental results of different testing speeds ---
25
1.0
Introduction
Normal Cervical Function
The cervix is an organ located at the end of the uterus and at the top of the vagina. It is situated in the female pelvis between the bladder and rectum (see Figure 1.1).
Oviuct Vertebralcolumn
mmora Labium majora Cervilx Rectum Vagina ... Anus
Figure 1.1: Diagram of female reproductive system.I
The cervical canal passes through the cervix, allowing the menstrual period and fetus to pass from the uterus into the vagina, as well as sperm to pass from the vagina into the uterus. There is
a small amount of smooth muscle fibers contained in the cervix, and most of its structure is
constituted by dense collagenous tissue. During a normal pregnancy, the cervix is sealed closed
with a plug of mucus, holding the fetus in the
uterus.-Cervical Insufficiency
The biomechanical integrity of the cervix is critical in maintaining a healthy pregnancy.
Cervical insufficiency represents an extreme case of impaired cervical function in which the
cervix dilates without clinically apparent contractions or pain. During dilation, the amniotic
membranes bulge through the opening of the cervix and eventually rupture. In many cases, labor is detected once it; is too far advanced to stop. Often the baby is unable to survive outside of the uterus at this early stage in the pregnancy. Miscarriages from cervical insufficiency usually occur during the fifth to seventh month of pregnancy. Cervical insufficiency accounts for
approximately 20 percent of all pregnancy losses during the second trimester. 3 Although its
mCauses of Cervical Insufficiency
Risk factors for an insufficient cervix are a history of insufficient cervix with a previous pregnancy; surgery; cervical injury; exposure to DES (diethylstilbestrol), a synthetic estrogen drug given to millions of pregnant women primarily from 1938-197 l; as well as anatomic
abnormnalities of the cervix.4'5
Studies have found that if surgical dilatation of the cervix has been performed on a pelvis, the
risk of cervical insufficiency in subsequent pregnancies depends upon the number and degree of
dilatation used. Cervical insufficiency is unlikely to occur as a result of a diagnostic dilation and
curettage (scraping of the tissue inside the uterus often conducted for irregular periods or after a miscarriage), unless damage to the cervix has occurred. Three or more first trimester surgical terminations of pregnancy have been found to increase risk for cervical insufficiency by approximately 12%.4
The taking of biopsies as part of investigating an abnormal Pap smear test does not increase the risk for cervical insufficiency. The more commonly performed Loop diathermy or Large Loop
Excision of the Transformation Zone (LLETZ) has not been found to be associated with an
increased risk. A less commonly performed procedure called the Cold Knife Cone biopsy, which involves a general anesthesia and removal of a wedge of the cervix to treat cervical pre-cancer, is associated with about a 2% risk increase.4
Decreased cervical length, as determined by transvaginal ultrasound, is also associated with an
increased risk of preterm delivery.
4Silent Symptoms of Cervical Insufficiency
Women with insufficient cervixes typically have "silent" cervical dilation of 2 cm with minimal
uterine contractions between 16 - 28 weeks of pregnancy. Once the cervix has dilated to 4 cm, active uterine contractions and membrane rupturing may occur. Some women may experience
subtle symptoms prior to miscarriage, such as backaches or heavy vaginal discharge, but there is
often little or no bleeding or pain prior to miscarriage. 3
Treatment for Cervical Insufficiency
The current treatment for cervical insufficiency is a cervical cerclage, which involves placing a stitch high up around the cervix to help keep it closed. The stitch is placed via either the vagina or an abdominal incision.3 Cerclages are usually performed after the twelfth week of pregnancy, the time after which a woman is least likely to miscarry for other reasons. Vaginal cerclages are removed around 37 weeks of pregnancy in order to allow for a vaginal birth. If the cervix is
indeed insufficient as diagnosed, labor will occur fairly rapidly after the stitch is removed. An abdominal cerclage is typically used after a vaginal cerclage has failed. The abdominal cerclage requires an elective caesarean section, and the stitch is usually left in place for future
pregnancies. In one study, a reduction in premature delivery rate of in every 25 women was found for those who had a cerclage procedure. 4
Complications of cerclage include rupture of the membranes at the time of placement and
increased risk of infection. For this reason, the procedure is not performed if there are signs of
membrane rupture or infection already present.
4Current Diagnosis of Cervical Insufficiency
Transvaginal ultrasound has been used to predict cervical insufficiency by measuring cervix
length. Typical cervix length is approximately 4 cm as measured on the transvaginal ultrasound.
Women with a cervical length of less than 2.5 cm have been found to have a 50% risk of preterm
delivery.
4Although present methods of diagnosis are promising, currently, the best predictor of
cervical insufficiency is a previous pregnancy loss.
Ultrasound Elastography
Ultrasound elastography is a new technique that provides soft-tissue strain images based on the
measurements of local tissue deformation in-vivo. Elastography research is advancing at a rapid
pace, and the use of the technique is currently being explored in areas of cardiology, urology,
and gastroenterology. Elastography is beginning to be tried in clinical practice as a tool for
6
diagnosing cancer.
In one study, ultrasound elastography was used to acquire in-vivo images of the prostate in order
to visualize different tissue elasticities and distinguish benign and cancerous tissue. Researchers
were able to correctly classify prostate cancer lesions using this sonographic technique.7 In
another study, the technique was used in imaging in-vivo breast tissue to determine varying
degrees of stiffness, which may be useful in discriminating benign from cancerous masses.
8 New Method of)iagnosing
Cervical InsufficiencyA non-invasive, hand-held medical imaging tool using ultrasound elastography has been
developed to test the mechanical properties of cervical tissue. The device is used to compress the cervical tissue by applying a small force to the cervix using the end of a vaginal ultrasound probe that is enclosed in soft, gel-filled cover. Both the probe cover and cervix deform as a result of the compression. Pre and post-compression images are obtained, and deformation in the
probe cover and cervix is compared using image processing techniques. Two-dimensional
images showing tissue stiffness as a function of position, called elastograms, are derived. The
stress-strain data can be used to determine the mechanical properties of the cervix tissue. The
tool will provide researchers with the necessary information to be used in material modeling and
improve diagnosis of cervical insufficiency.
The mechanical properties of the gel-filled probe covers vary with each cover as well as with
time and temperature. Therefore, in order to ensure accurate measurement of cervical material
Ultrasonic Video Imaging
The covers have been successfully used in-vivo to capture ultrasonic video images by Dr.
Michael House at Tufts-New England Medical Center. Still frames from videos taken with and
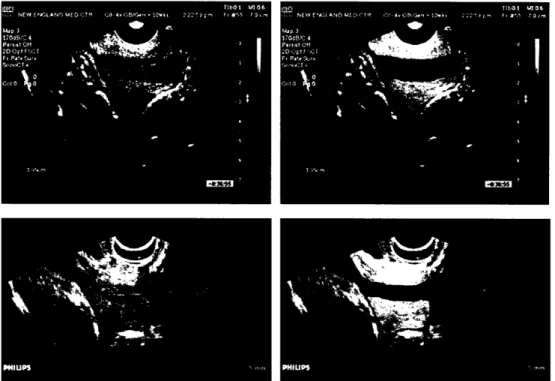
with out the probe cover are shown in Figure 1.2. The probe cover was used on a transvaginal probe of a HDI 5000 machine (Philips Ultrasound.9
9
Figure 1.2: Ultrasound images captured with and without gel-filled probe cover.
cervical stroma= yellow
cervical mucosa = red
Top: Saggital, midline view of the cervix at 2 l-weeks of gestation.
Bottom: Same patient: image taken with the probe cover in place.
8
2.0
Experimental Materials and Methods
Probe Mold
Prior
to
casting, the ultrasound probe was covered in a latex sock and coated with mold release
spray. The probe was then horizontally submerged halfway in liquid mold-making rubber.
Small pins with plastic hemispheres on the end were inserted into the surface of the mold,
creating indentations in the mold to help maintain proper alignment during casting. After the
mold half had set, it was sprayed with a coating of mold release spray and covered with
mold-making rubber until the probe was fully submerged. Once the mold had set, the two mold halves
were separated, and the probe was removed.
Probe Mock-Ups
The mold halves 'were aligned and placed in a plastic container. Smooth-cast liquid plastic
compound was poured into the mold and allowed to harden for 10 minutes. The hardened probe
was removed from the mold and then polished using fine sandpaper. The probes were then
dipped in acrylic polymer emulsion in order to provide a smooth protective coating for the probe.
Gel-Filled Probe Covers
The probe covers were created by combining a urethane top half and a latex/urethane base. To create the top half of the probe cover, the probe mock-ups were dipped in urethane rubber compound and al]lowed to dry for 24 hours. The dipping procedure was repeated for a total of
three layers of urethane. The hardened urethane sock was then rolled off of the probe and cut
approximately 1.5' inches from the tip and again at a width of 0.75 inches in order to create the top half of the probe cover and a band, respectively. Air was blown into the probe cover in order to test for leaks.
To create the base half of the probe cover, the probes were dipped in latex rubber and allowed to dry for 24 hours. The probe was then dipped in two layers of urethane, which were allowed to
dry between coats. The base sock was trimmed while still on the probe at approximately 3.5 inches from the top of the probe in order to allow for easy removal.
The top half of the probe cover was carefully filled with approximately 6 mL of ultrasound
transmission gel. Air bubbles, which could interfere with the ultrasound images, were avoided
as much as possible. The top half of the cover was then placed snugly on the cover base. A small elastic band was placed just below the encapsulated ultrasound transmission gel in order to keep the gel from leaking and to keep the two halves together. Urethane was used to seal the
joint between the cover halves. Once dry, the small elastic band was removed and the band
(previously cut from the probe cover) was placed around the base of the probe tip in order to keep the ultrasound transmission gel from displacing. The final probe cover is shown in Fig. 2.1.
ultrasound transmission gel
]
band
- joint
-probe
Figure 2.1: Gel-filled probe cover.
Once manufactured, the probe covers were frozen in order to preserve the covers for later use. The proper way to freeze and thaw the covers was explored in order to preserve the integrity of the probes as much as possible.
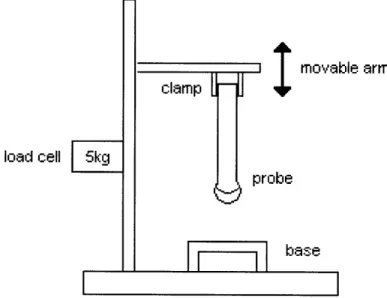
Experimental Apparatus
A stable Micro Systems' Texture Analyser uniaxial compression test machine was used to gather
material data on the probe covers. The apparatus consisted of a movable arm, connected to a 5 kg load cell, which was lowered towards a metal base. The probe was clamped to the movable
armn
in the upright position. During testing, the arm lowered the probe until contact was made
with the metal base. The experimental set-up is shown in a simplified schematic in Figure 2.2.
load cell
ble arm
base
Figure 2.2: Schematic of experimental set-up.
Once the probe made contact with the base, displacement and force readings were measured and recorded in the computer. The program used to gather data was Texture Exponent 32
(TEE32.exe). A photograph of a probe during calibration is shown in Figure 2.3.
Figure 2.3: Probe cover during calibration.
Experimental Procedure
The load cell was first calibrated according to the "Calibrate Force" instructions using a 2 kg weight. The probe was then clamped in the device, and its height was calibrated using the
"Calibrate Probe Height" command. The probes were tested at a testing speed of 0.25 mm/s, a
trigger force of 0.005 kg, and a displacement of 3 mm.
When a test was triggered, the machine lowered the probe towards the plate. Contact was made
between the probe and plate, and the probe was pressed against the plate until a trigger force of 0.005 kg was reached. The probe would then continue to be lowered until displaced by a
distance of 3 mm. The probe was held at 3 mm displacement for 15 seconds, and then raised
away from the plate. The compression was repeated twice for a hold time of 15 seconds each, and then once for 60 seconds.
The set of three compression tests was performed twice more, with the probe covers being frozen and thawed in between sets. The probes were frozen at a temperature of - 7°C and thawed at a
temperature of 25°C.
The differences between freezing the probes in air and in water were examined. Two methods of thawing were also explored: thawing in air at room temperature and thawing in a 25°C water bath.
3.0
Theory
The displacement of the gel-filled probe cover during calibration can be modeled as compression
of a thin-walled spherical balloon between two plates, depicted in Figure 3.1.
F
Patm
atm
Oat
Figure 3.1: Compression of thin-walled spherical balloon.
In Figure 3.1, R is the radius of the uncompressed balloon, P is pressure, Vis the volume of the
balloon, F is the compression force applied to the balloon, dis the distance the surface of the balloon is displaced, Ad is the contact area between the probe and metal plate when the balloon is displaced, L is the radius of contact area, and r is the radius of the toroidal (donut-shaped)
surface not in contact with the plates during compression.
Pressure is defined as force per unit area. Therefore,
F=PA =P,7L.
(1)
As a result of the compression force, the surface of the balloon is displaced by a distance, 5, where:
d= 2(R-r).
The fluid inside the balloon is assumed to be incompressible; therefore, the volume of the
balloon is constant:
4
V=Ij=V 7R3,
V = lV(, = Vt :3
where V is the volume of the uncompressed balloon and Va is the volume of the displaced
balloon. The volume of the displaced balloon is:
(3) (2)
where V(.,i,7ce, is the volume of the cylindrical core in the center of the compressed balloon and
VIoi is the volume of the toroidal region. The volume of the cylindrical core is:
Vc.iinder,. = (TrL )
(2r).
(5)
The volume of the toroidal region is found using Pappus' Centroid Theorem regarding solids of
revolution generated by the revolution of a lamina about an external axis. Applying Pappus'
Centroid Theorem to the toroid:
2
V oroid = Asemi.ircle .d = -- 2K(L + r), (6)
where Ase,lci,.lce is the area of the semicircular lamina, d is the distance traveled by the centroid of the lamina, and r is the geometric centroid of the semicircle. 0 For the semicircular region, the centroid is:
-
4r
r =
(7)
Combining Equations 6 and 7, the volume of the toroidal region is:
V
2 2,4r
., +L). (8)Combining Equations 3, 4, 5 and 8:
-R
=
2L
2r +r2
+
L.
(9)
By
manipulating Equation 9, the radius of contact area, L, is derived:L'- 3gzr~ + 3rl~sr r l + 32(R3 - r3 )] (10)
-3zr + V3r[3T2r3
+32(R
3-r)]
L:= -
(I0)
12r
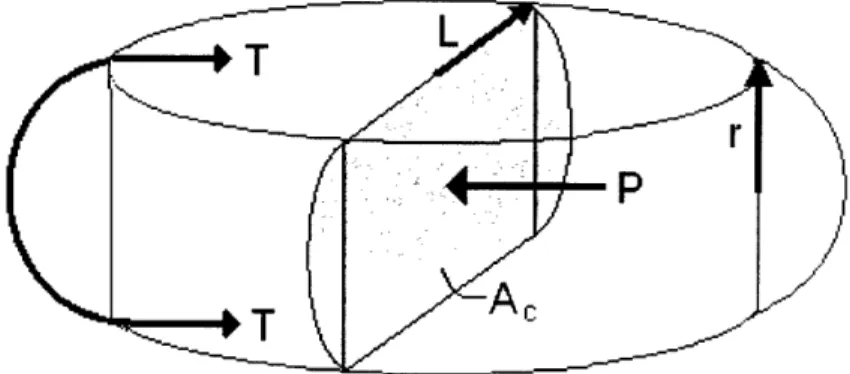
A force diagram of the compressed balloon is shown in Figure 3.2.
Figure 3.2: Force diagram of compressed balloon.
In Figure 3.2, T is tension in the membrane per unit length, P is pressure in the balloon, and A is
the cross-sectional area of the displaced balloon. By balancing forces:
PA =Tp
P(2L 2r + zr')= T(4L + 2=),
(11)
where p is the perimeter of cross-sectional area. Membrane tension is related to surface area, A, by the equation:
T=K AA4
T=K
',
(12)
A''
where K is the areal modulus of elasticity, zAi4, is the change in surface area, and A,.o is the surface area of the uncompressed bubble." Combining Equations
11
and 12, an expression for pressure is derived:p=K As 4(2L +) (13)
Ao
r
2(_r
+4L)
The surface area of the uncompressed bubble, Aso, is described by:A o = 4R-, (14)
while surface area of the compressed bubble, A, is:
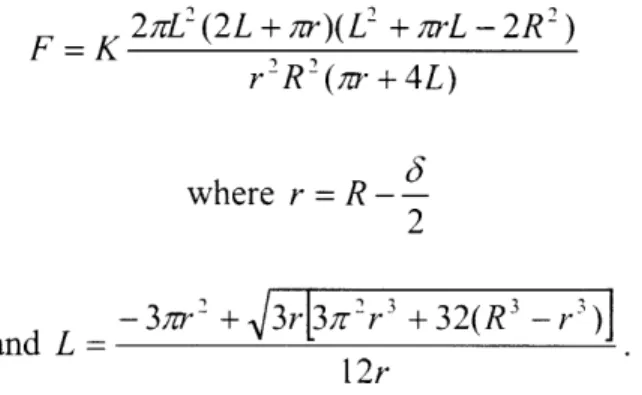
Combining Equations 1, 2, 13, 14, and 16, an expression for force, F, is determined to be:
2F-
L
2(2L +
7r)(L
2+ zrL - 2R
2)
F=K
rIR
2Qzr±4L)
rSR(rr+4L)
where r =
R--2and L=
-313[3
+ V3
r3 +32(R
3
-r)]
12rThe theoretical graph of force vs. displacement for K = 0.027 kg/mm is shown in Figure 3.3.
Figure 3.3: Theoretical force vs. displacement graph.
The Nlatlab program used for the theoretical plot can be found in Appendix A.
16
(17)
Theoretical Force vs. Displacement 0.09 08 0. -- --- ---Lr-~~~~~~~~~~r~~~~~~~~~~~r~~~~~~~~~~~T~~~~~~~~~- S 0.06 5.--- ...- I 11 1 --- --- 1 -r.--- ,,~~~~~~~~~~~~~~~~~~~~~~~~~~~~~~~~~~~~~~~.., --- -0.047. U-0.03 0~.0
-
O~~~~~~~~~~~~~~~~~~~~~~~~~~J . .. ... ... . :-.--- ..-
. ... ... ./' 0 .0 1 --- --- --
---- ----
--- -----
--- -7 -----_
0.02--
-0.01---..
...
.
0 -I 0 0.5 1 .i2 2.5. 3 Displacement (mm)4.0
Results
The experimental results of the ten covers tested (probes A-J) produced results similar to the
graphs shown in Figures 4.1 - 4.3. The data shows force spiking at F,,, and then settling to a
final equilibrium force, Fec. Initial compression produced forces lower than the following two
compressions.
*,% i-) 7I1 Force vs. Time I I I I I I I 1 0.1 .. .--- . .---. max 0.09 --- -- - - --- - -- - --- - - --0.08
OO
----.-- -
Feq
-
Fe
007 ------~i:
~~
~
-,t = min . . . --- . .005i
., ...
....
....-
.. .,
...:
...-
.. . .
,----tt.0
= 4 min 0-040.03
.... --- .---...--- ---.---.- -t --- - - - -- -*--- .--0 ..--02 , , - --- --- * : 0.01:-
-- -- - - -0 10 20O 30 40 50 60 70 0 9 02 .I~~~~~'
...
....
..
Tim m ....... .."...
. . ... o ' ... ., .... . 1 .... , . ... 10 20 30 40 50 60 70 80 90 Time (sec)Figure 4.1: Typical force vs. time graph.
Force vs. Time 0. --- - -I -- -I -nax 0.095
--
',- / " .. ---=
fl OB ,f- - t -9min'I-'--:
---
t4min
07 --- - --0.065 ---- 0.06--.... - ----0.05t 10 15 20 25= minFigure 4.2: Magnification of Figure 4.1.
LL..0.065
...
...- ...-...
0.05
Force vs. Displacement I I I I I I 0.1 --- - - ----... , ,i,
0.09
-0.07 -... ': ...
---i
-i .... .... .'
-. . ....
/-...
..
- ... i
...
..
---0.---
.. .. - / --:~~~~~~~~~a
!
! ,.,
;
0.-
O.
0.04
05. _ _ _ , _ 1.. ___:"'_.
2 , - 3'
.
-..
. ?':J_
0.04-- , I , / ,/, ,003...
0~~.02...--
' /-"
7
' .... 'l i,.
: -"
.
* ...-
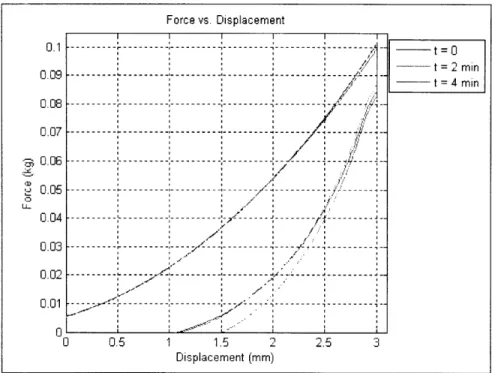
-.... , ~, J '" i. .. ,. ' 0.01 -- a o ,Of : 5 2, 0 0.5 1 '.5 "' 2.5 3 Displacement (mm) t=0 - t=2 min - t=4 minFigure 4.3: Typical force vs. displacement graph.
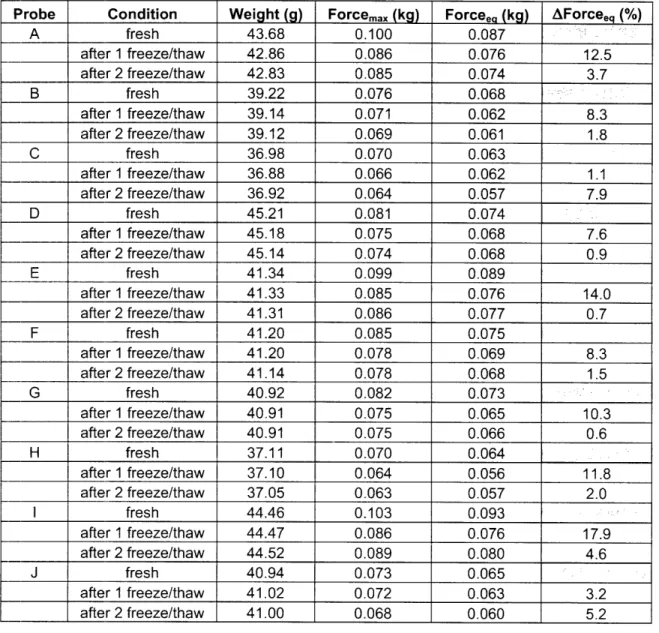
The data from all 30 trials is shown in Table 4.1 and a bar graph comparing maximum force and steady state force values for all fresh probes is shown in Figure 4.4.
Results indicate that the probe cover behaves as a viscoelastic material. The cover stiffens after
initial compression, and then begins to relax. Typically, the second and third compression of the
probe cover produced similar responses. This may perhaps be due to the fact that the gel within
the probe cover is settled into place during the first compression. The first compression acts a
preliminary compression while subsequent compressions produce more accurate data because the
gel with in the cover has shifted and settled into its proper testing position.
18
f:3 ' hi
UI-Table 4.1: Experimental results for probe covers A-J.
Probe Condition Weight (g) Forcemax (kg) Forceea (kg) AForceeq (%)
A fresh 43.68 0.100 0.087 : __ after 1 freeze/thaw 42.86 0.086 0.076 12.5 after 2 freeze/thaw 42.83 0.085 0.074 3.7 B fresh 39.22 0.076 0.068 : after 1 freeze/thaw 39.14 0.071 0.062 8.3 __ after 2 freeze/thaw 39.12 0.069 0.061 1.8 C fresh 36.98 0.070 0.063 _ after 1 freeze/thaw 36.88 0.066 0.062 1.1 after 2 freeze/thaw 36.92 0.064 0.057 7.9 D fresh 45.21 0.081 0.074 __ after 1 freeze/thaw 45.18 0.075 0.068 7.6 after 2 freeze/thaw 45.14 0.074 0.068 0.9 E fresh 41.34 0.099 0.089 after 1 freeze/thaw 41.33 0.085 0.076 14.0 after 2 freeze/thaw 41.31 0.086 0.077 0.7 F fresh 41.20 0.085 0.075 after 1 freeze/thaw 41.20 0.078 0.069 8.3 __ after 2 freeze/thaw 41.14 0.078 0.068 1.5 G fresh 40.92 0.082 0.073 = _ after 1 freeze/thaw 40.91 0.075 0.065 10.3 __ after 2 freeze/thaw 40.91 0.075 0.066 0.6 H fresh 37.11 0.070 0.064 __ after 1 freeze/thaw 37.10 0.064 0.056 11.8 __ after 2 freeze/thaw 37.05 0.063 0.057 2.0 I fresh 44.46 0.103 0.093 : __ after 1 freeze/thaw 44.47 0.086 0.076 17.9 _ after 2 freeze/thaw 44.52 0.089 0.080 4.6 J fresh 40.94 0.073 0.065 after 1 freeze/thaw 41.02 0.072 0.063 3.2 after 2 freeze/thaw 41.00 0.068 0.060 5.2
Maximum and Equilibrium Forces
Figure 4.4: Maximum and equilibrium forces for fresh probe covers A-J.
The average maximum force for the fresh probe covers was 0.084 kg, while the average equilibrium force was 0.075 kg.
20 0. 1 20 ... 0.100 . 0.080 0 I Max. Force 4' 0.060
_
:
X
X
|
*
Eq.
Force
0 u 0. 040 0.020 0.000 A B C D E F G H I J Probe5.0
Discussion of Preservation Conditions
In real-world use, the probe covers would not be used immediately after assembly. When the
probe covers were left at room temperature for several days, the gel-tip caps would continually
lose hydration and eventually deflate. Therefore, the appropriate preservation conditions needed
to be determined. The probe covers were able to better maintain their integrity when kept frozen.
In order to further prolong the life of the covers, the affects of freezing and thawing in both air
and water were examined.
Freezing in Water vs. Air
Freezing the probes in water degraded the urethane layers and led to ultrasound gel leakage. The formation of ice around the cover led to corrosion of the urethane and eventual degradation of
the urethane seal around the joint between the two probe cover halves.
Freezing the probes in air did affect the mechanical properties of the probes but did not degrade
the physical integrity of the probe covers. Therefore, air is a more favorable environment for
fireezing the probes than water.
Thawing in Water vs. Air
Probes were thawed from a frozen state at room temperature for 3 hours. Although they
appeared to be fully thawed, a temperature gradient was present in the probe cover gel. The
results from testing these probes, as shown in Figures 5.1 and 5.2, indicate that the gel was not
evenly thawed.
Force vs. Time0.18
- ----Al I1, -t=0 0.16 --- t 2 m in . . -t = 4 min0.12
-
---
-0 .1 -- ---- - -- - - - -0.06' --- - --- 1 . . .... .. ' .. --- . .. . .---- -- -
---
. ... '...':...'..'..... 0 06 --- --- --- --- - =--tm-n0.02
--- --- -- -- -- -- -- --- --- --- --- --- --- --- -- -- --- -0.04 t- =-
m 0:-T
M
1. , . . . 0 10 20 30 40 -0 60 7O 80 90 Time (ec) ... ...mil
'. Ai
, , ...- i -oo ... i .... .... ... .... .... ... .... .... I , , l, l , : , 0 10 90 30 40 50 60 7'0 80 90 Time (sec)Figure 5.2: Force vs. displacement graph for probe thawed at room temperature for 3 hours.
On the other hand, the probe covers thawed in a water bath produced favorable results similar to
fresh probe covers. Weight loss in the probes was minimal. The effect of thawing in a water bath on probe weight is shown in Table 5.1.
22 Force vs. Displacement 016 I~~~~~~~~~~~~~~~~~~~~~~~~~~~~~~~~~~~~~~~~~~ 0 18 --- --- --- - - - - -- ---0.16 l ~~ , .- " ' , t ,=O O~. L .. ' . .. t= min " 0.16 0.1 --. :--' ... . ... ---...--- - i--- - t .4 ini o rs~~~~~- ---- - '- ---0.14, 0.1 - ,- .---- -0 .-0 - --- --- --- --- ---n ( 0 .06 - - - --- --- --- ... .i 0 .04
OAD2~
---
-- -- ...-....
- - - -- - - - -~
. --_ _
---
-------
-- -
- - - -0 0., 1 1.5 . 3 Displacement (mm)Table 5.1: Weight change in probe covers A-J thawed in water bath.
Probe Condition Weight (g) AWeight (%)
A fresh 43.68 after 1 freeze/thaw 42.86 1.88 after 2 freeze/thaw 42.83 0.07 B fresh 39.22 after 1 freeze/thaw 39.14 0.20 after 2 freeze/thaw 39.12 0.05 C fresh 36.98 after 1 freeze/thaw 36.88 0.27 after 2 freeze/thaw 36.92 0.11 D fresh 45.21 after 1 freeze/thaw 45.18 0.07 after 2 freeze/thaw 45.14 0.09 E fresh 41.34 after 1 freeze/thaw 41.33 0.02 after 2 freeze/thaw 41.31 0.05 F fresh 41.20 after 1 freeze/thaw 41.20 0.00 after 2 freeze/thaw 41.14 0.15 G fresh 40.92 after 1 freeze/thaw 40.91 0.02 after 2 freeze/thaw 40.91 0.00 H fresh 37.11 after 1 freeze/thaw 37.10 0.03 after 2 freeze/thaw 37.05 0.14 I fresh 44.46 after 1 freeze/thaw 44.47 0.02 after 2 freeze/thaw 44.52 0.11 J fresh 40.94 after 1 freeze/thaw 41.02 0.20 after 2 freeze/thaw 41.00 0.04
Results show changes in probe weight of no more possible reason for the weight retention is that the
hydration in the probes.
than 1.88% when thawed in a water bath. One water in the bath was able to maintain
Water Bath Time
When the probe covers were kept in a water bath for a period of 2.5 hours, the covers were over-hydrated and weighed more than before freezing/thawing. The saturation produced a non-homogenous consistency in the cover. The results from these probes are shown in Figures 5.3 and 5.4.
i~~~~~~~~~Frev.Tm
Force vs. Time 0.09 . , !00
--r
.
~
-......
:....
0.08 --- - -0.07 -- - - -- --- --- --- $,l l~;0.06
.---
...-
.---
...
....
....
--i,~
~~i-
,. ... ...i....i
....
0.05
--
- - - --0 .--0 4 --- -- - - -0.03 -- --0.02---
0 04 1 ,--- --,---
---010 o -: ' 0 10 30 40 s 7 Time (se)0 -- t=0 --.. t = 2 min -- t = 4 minFigure 5.3: Force vs. time graph obtained from an oversaturated probe
with weight gain of 0.110%.
Figure 5.4: Force vs. displacement graph obtained from an oversaturated probe with weight gain of 0.1 1%.
The random dips and increases in the graphs could perhaps be due to water pockets. Therefore, in order to avoid oversaturation, the probes should be thawed in the water bath for no longer than
1.5 hours. 24 2 Force vs. Displacement 0.09 0.08 - - - --- -- --- -- -- 0.04 - ' , ' ' ''' :-'''1/, . 0.06 ---.. t - ->':~ ... , , ,l , ,,>t;
,.,.".'-0
.0---
,-,-_----
---;-
--- ---r . 0.05.0 ... -.- - - - -' ---- ---|0.01 I- . -/ ___o~o. .
.
.
....
. ...
....
=
:,
,1 15 2 2.5 Displacement (mm){~~~~~~~~~, ,.<;O . O + , ; ,i....
. .K . O0.02 .. ... , . ... .-_"- .... ' _ _ ,____ --- ,_ ' __ _____, , ., ,~- .:- ;0
,-,-~
~
.1
, .:Q
F~~~~~' .. . . ... ... O0 0.5; 1 '1.5 2 2. 3 S Displac ement (mm) t=O - t = 2 min ---- t=4 min6.0
Discussion of Testing Conditions
Varying Test Speed
The data obtained[ when testing a probe at different speeds of 0.10, 0.25, and 0.50mm/s is shown in Table 6.1. Figures 6.1 and 6.2 show the graphical results obtained at the various testing speeds.
Table 6.1: Experimental results of different testing speeds.
Testing Speed (mnm/s) Max. Force (kg) S.S. Force (kg)
0.10 0.101 0.094
0.25 0.103 0.093
0.50 0.104 0.092
Figure 6.1: Force vs. time graph for probe tested at 0.10, 0.25, and 0.50 mm/s. Force vs. Time
, I I
0.0 --t
-
,
-- - --~0.07-,~~
, 0 7mms,0.08 -- 2
oo0
-O---..
--- -- I---,
---
--
-- ---
-.
---
-- ---
-------
t -- '
0m/
0.06
-
/0.5
/
,
.;
o.os --- --- /- --- . .:---~--- L ...---LL/
0.04----
T - -..
--0.02 6 --- - .- --
-....
-------
-0.01 --- ---- --- 4- ---01I 0 20 40 60 s Time (sec)Force vs. Displacement 0 .1 --- --- - -- -- - --- T--- -- -- -- - --- --- --- --- -- --- -0.09 -
.-
I --il-0.08
-...
0.07- ---0.06 - - --- --- - - --- --- ------
0.05~~~~~~~~~-0.04---
- - - -- -0.03 --- - - -0.02 ---:
:
---.--'
:
..-
r',
:
0 .01 00 0'5 --- - . . --- 1 15 ----.... '3/
Displacement (min) o f . . . . ... ... . .. ... ... ..._o~o. ...
...
~
O - ., , . .-.% , 4 , 0I ,". I I I J 0 1 0.5 1 s. I 2.5 3 Diaceen (ram)-/ I | - 010 mm/s -- 0.25 mm s - 0.50 mm/sFigure 6.2: Force vs. displacement graph for probe tested at 0.10, 0.25, and 0.50 mm/s.
The results from varying test speed show that the covers are not sensitive to strain rate.
Therefbre, calibration of the probe covers is not greatly affected by the testing speed.
Effect of Re-Calibration over Time
The compression data taken at 0, 1, 10, and 30 minutes produces a pattern similar to the data taken at 0, 2, and 4 minutes. The graphs in Figures 6.3 and 6.4 show the variance in results when
a probe cover is calibrated over a longer period of time.
26
.
L.D
Force vs. Time 0.09 .--- - t 0 --- t = ,.1 min 0 .0
-
- - - -- ~~008 _______~~~~~~~~., - - - -t . . . t = 30 min1 m i0.07
----
'
-- -
...
mi
0.06
-
. . . . 0.04 ---- 40 50 I - 7 0 .03 - - - -0.02 . 0 10 ;~ ~ ~~~~~~~~~~~, ; Time (sec)Figure 6.3: Force vs. time graph after , 10, and 30 minutes.
Figure 6.4: Force vs. displacement graph after 1, 10, and 30 minutes.
These graphs produce a similar pattern of distribution to the graphs obtained over a shorter time
interval. Therefore, it appears that the behavior of the probe is more dependent on the number of
compressions and not the amount of time that has passed between compressions.
Force vs. Displacement I I I I I 0.09 -- .-- - .- - ---- -.. t Ot = , . - - -t = 1 min 0.08 ---' ., ', . . . ._ -' ', --- t = 10 min 0.08 -_ t: 10mrai | , ',~ , , . ,
~ ~
, ,~~,
,., -. t = 30 mi0.07
-- - - - -- - - - -- - - - -- - - --- 7 4 ... . . i5 .. . .. . .. , / . . .... .-_ 0 .06 - - - -- - - - -- - - - -- - --...- , - . 0.0 ...- ', -.... --.... --.... -, -.. --- --. ----0 .----0 3 - . ---0 .---0 1-
- -. . . ----. - .- _ 0I0 0. i 1 i , 15 , ' ,> 2 2. 3 Displacement (mm)7.0
Conclusion
The probe cover behaves as a viscoelastic material that is dependent on the number of times it is
compressed. The first compression acts a preliminary compression to shift the gel of the cover
into place, while subsequent compressions produce more accurate data because the gel has
settled into its proper testing position. The average maximum force for the fresh probes was 0.084 kg while the average equilibrium force was 0.075 kg.
The probe covers should be stored in a freezer in order to help preserve their integrity. The covers should be thawed in a 25°C water bath for no longer than 1.5 hours, in order to avoid
over-hydration. This method of storing the probe covers resulted in preservation of probe
hydration and weight, with a decrease in weight of no more than 2%.
References
[ I]-
Website for Human Physiology and Endocrinology classes at University of Houston. 28
April 2005 <http://www.uh.edu/-tgill2/image008jpg>.
[2]-1 "Complications." Essential Baby. 28 April 2005
<http://www.essentialbaby.com.au/Pregnancy/Complications.cfm>.
[3-1
"Cervical Incompetence." Health Scout. O10 April 2005<http://www.healthscout.com/template.asp?page=ency&ap=68&encyid=361 #Definitiono
fCervicallnsufficiency>.
[4]-1 Tucker, Danny. "Cervical Incompetence." Women's Health Information. March 2004. 10
April 2005 <http://www.womens-health.co.uk/cxinc.asp>.
[5-1 "What is I)ES?" DES Action USA. 10 April 2005 <http://www.desaction.org/what.htm>.
[6] Han, L., Noble, J.A., Burcher, M. "A novel indentation system for measuring
biomechanical properties of in vivo soft tissue." Ultrasound in Medicine & Biology 29.6
(June 2003): 813-23.
<http://www.ncbi .nlm.nih.gov/entrez/query.fcgi?cmd=Retrieve&db=PubMed&list-uids=
12837497&dopt=Abstract>.
[7] Sommerfeld, H. J., Garcia-Schurmann, J.M., Schewe, J., Kuhne, K., Cubick, F., Berges, R. R., Lorenz, A., Pesavento, A., Scheipers, U., Ermert, H., Pannek, J., Philippou, S.,
Senge, T. "'Prostate cancer diagnosis using ultrasound elastography. Introduction of a
novel technique and first clinical results." Der Urologe A 42.7 (July 2003): 941-945.
<http://www.ncbi.nlm.nih.gov/entrez/query.fcgi?cmd=Retrieve&db=PubMed&list-uids=
128980388&,dopt=Abstract>.
[8]3-1 Pellot-Barakat, C., Frouin, F., Insana, M. F., Herment, A. "Ultrasound elastography based
on multiscale estimations of regularized displacement fields." IEEE Transactions on
Biomedical Engineering 23.2 (February 2004): 153-63.
<http://www.ncbi.nlm.nih.gov/entrez/query.fcgi?cmd=Retrieve&db=PubMed&list-uids=
14964561 &dopt=Abstract>.
[9]
Paskaleva, Anastassia. "Biomechanics of Cervical Function in Pregnancy: Case of
Cervical Insufficiency." 15 April 2005.
[10] Weisstein, Eric W. "Pappus's Centroid Theorem." MathWorld- A Wolfram Web Resource. 5 May 2005 <http://mathworld.wolfram.com/PappussCentroidTheorem.html>.
[I l]
Fung, Y.C. Biomechanics: Mechanical Properties of Living Tissues. Second Edition.
Appendix A: Matlab Script for Theoretical Model
% Matlab Script for Theoretical Modeld=[0.0001:0.001:3]'; R=[5:0.0003:5.89997]';
K=. 07;
% d = delta = displacement of probe tip [mm] % R = radius of uncompressed bubble [mm] % K = areal modulus of elasticity [kg/mm]
[length, width] =size(d);
for i=1:1: length
r (i) =R (i) -d (i) /2;
L(i)=(-3*pi*r(i) ^2+sqrt(3*r(i)*(3*pi^2*r(i)^3-32*(r(i) ^3-R(i) 3)) ) / (12*r(i));
F(i) =K*(2*pi*L(i) A2*(2*L(i)+pi*r(i))*(L(i)^2+pi*r(i) *L(i)-2*R(i) ^2) ) / (r(i) ^2*R(i) ^2* (pi*r (i) +4*L (i)) ;
end
plct (, F)
grid
xlabel('Displacement (mm)') ylabel('Force (kg)')
title('Theoretical Force vs. Displacement')