A 3-Dimensional Editor for App Inventor
by
Kevin Kyung Bum Cho
Submitted to the Department of Electrical Engineering and Computer
Science
in partial fulfillment of the requirements for the degree of
Master of Engineering in Computer Science and Engineering
at the
MASSACHUSETTS INSTITUTE OF TECHNOLOGY
September 2019
c
○ Massachusetts Institute of Technology 2019. All rights reserved.
Author . . . .
Department of Electrical Engineering and Computer Science
August 23, 2019
Certified by . . . .
Harold Abelson
Class of 1922 Professor of Computer Science and Engineering
Thesis Supervisor
Accepted by . . . .
Katrina LaCurts
Chairman, Master of Engineering Thesis Committee
A 3-Dimensional Editor for App Inventor
by
Kevin Kyung Bum Cho
Submitted to the Department of Electrical Engineering and Computer Science on August 23, 2019, in partial fulfillment of the
requirements for the degree of
Master of Engineering in Computer Science and Engineering
Abstract
3-Dimensional Applications are constantly becoming ever more abundant to audiences of all ages. However, development for such applications have allows been known to be unpleasant. To make 3-Dimensional Application development more appealing and available to people of all ages, this thesis looks to create a working prototype of a 3-dimensional editor for MIT App Inventor. MIT App Inventor is a powerful pro-gramming environment that is accessible to everyone. It is easy to learn and use, which makes it used fairly often to teach many different people about building ap-plications. With the App Inventor’s easy to use block programming, a 3-dimensional editor will make such applications easier to build and learn for everyone.
For this thesis, I have worked on building a prototype 3-dimensional editor that will be usable and easy to learn. Many changes and improvements have been made so that even a person with no prior knowledge would be able to come and start working in the environment. These changes include, but are not limited to, the ability to create conglomerate objects, creating a better user interface, and keeping the process as simple and easy as possible so as not to create the complexity most platforms today give. The editor was tested over a 3 day workshop with 7 students, of the ages 12 to 16, to guarantee the simplicity of developing 3D applications. The results of the workshop showed that students were able to get a better understanding of 3-Dimensional development by using the editor. However, the workshop also shed light that the editor is still too complex and has room for improvement.
Thesis Supervisor: Harold Abelson
Acknowledgments
I would like to thank Professor Hal Abelson for all the support and advice that he has bestowed upon me during my time in his lab. I also would like to thank Evan Patton for helping me through hard development issues of integrating my code with the current code of MIT App Inventor and helping me understand the basic structure of the system. Lastly, I would like to thank Kevin Zhu from the App Inventor Lab for help answering several questions about his previous work on the 3-Dimensional Editor for App Inventor.
Contents
1 Introduction 13
2 Related Work 15
2.1 MIT App Inventor . . . 15
2.2 Scratch . . . 16
2.3 Unity . . . 16
2.4 Three.js and Ammo.js . . . 17
3 Background Information 21 3.1 Current User Interface . . . 21
3.1.1 Design Interface . . . 21
3.1.2 Block-based programming Interface . . . 22
3.2 Three.Js and Ammo.Js . . . 25
4 System Design and Implementation 27 4.1 3-Dimensional Editor . . . 27
4.1.1 Editor and How to Get to the Editor . . . 27
4.1.2 Left Column of the Editor . . . 28
4.1.3 World of the Editor . . . 31
4.1.4 Right Column of the Editor . . . 32
4.2 Block-based Programming Interface . . . 35
5 Example Application 39 5.1 Shape Enlarge and Shrink Application . . . 39
5.2 Simple Bowling Application . . . 41
5.3 Roll a ball . . . 43
6 User Study and Evaluation 47 6.1 First Day . . . 48
6.2 Second Day . . . 49
6.3 Third Day . . . 50
6.4 Analysis of Workshop . . . 51
7 Future Work 55 7.1 Object specific blocks . . . 55
7.2 Optimized Export Method . . . 56
List of Figures
2-1 Comparison of a Scratch 3D project [1], left, and a Unity project [12],
right . . . 17
2-2 Three.js Editor [9] . . . 18
2-3 Three.js Projects [8] . . . 19
3-1 Design Interface . . . 22
3-2 Block-based Programming Interface . . . 23
3-3 QR code for Companion Application . . . 24
4-1 Adding 3D screen . . . 28
4-2 3D Editor . . . 29
4-3 Color Palette . . . 30
4-4 Object Select in Editor . . . 31
4-5 Group Object in Editor . . . 33
4-6 Right Column Buttons . . . 34
4-7 3D Editor Blocks . . . 35
5-1 Red Box in Editor . . . 40
5-2 Block code for the Shape Application . . . 41
5-3 Bowling Application . . . 42
5-4 Example Block Code for Bowling Application . . . 43
5-5 Block code for the Roll a Ball Application . . . 45
List of Tables
6.1 Pre-Workshop Survey . . . 48 6.2 Post-Workshop Survey . . . 51
Chapter 1
Introduction
During the past few years, 3-dimensional applications have been increasing in pop-ularity for the public, virtual reality applications being the most popular. However, developing 3-dimensional applications have never been known to be simple or easy. Extensive knowledge of both programming and physics is usually required for any-one to start developing 3-dimensional applications. As a result, many people see 3-dimensional application development for mobile phones as a skill that is extremely hard to achieve, and it discourages several people from even starting to develop these types of applications.
MIT App Inventor is a powerful tool that anyone can use to create applications on smart devices. It allows students and professionals to come and create mobile applications whether they are proficient in programming or not. The goal of this thesis is to integrate a working 3-dimensional editor into the App Inventor platform to test if such an editor is viable and meets the simplicity and goals of the App Inventor Program.
In this thesis, I have developed a working prototype of a 3-Dimensional editor in App Inventor that anyone, even people with little to no programming knowledge, would be able to use to develop simple applications. I helped modify and clean up the previous prototype that was not fully functional. The existing prototype was implemented, but was lacking in several areas to be launched as a working prototype. Some of the changes I have made to the prototype were but not limited to: creating
a multiple-select protocol for objects in the editor, creating new blocks that would be relevant to 3-dimensional coding, and creating new objects in the editor. These changes have helped clean up the editor to make it much simpler and easier to use.
In order to test the prototype, I created tutorials of a use case scenario for a simple 3-dimensional application. The application has a simple shape in the middle of the screen. By tapping the shape, it would cause the shape to grow in size, and by tapping the area outside the shape, it would cause the shape to shrink in size. With this tutorial, I set up a 3-day workshop to briefly teach what App Inventor was and what my 3-dimensional extension did. I conducted a survey after the workshop and found that the students’ understanding of 3-dimensional development had increased over the time together by using the editor.
The next few chapters go over the exact details of each step in details. Chapter 2 goes over related work that have been done and the limitations of those works that makes it still difficult for an average person to work with. Chapter 3 discusses the user interface and the changes that I made towards the editor. The next chapter contains the implementations of the changes that I made to the editor along with the blocks, and Chapter 5 includes examples of applications that can be made through the extension. Chapter 6 contains the workshop study along with the analysis, and the final two chapters talk over future work for the editor along with concluding remarks.
Chapter 2
Related Work
Currently, there are several platforms that provide an environment for creating 3-dimensional applications. However, each of these environments are inadequate to the majority of students due to the complexity of the platform: requiring extensive knowledge of certain computer programming languages or extensive knowledge of physics in terms of motion and vectors. The platforms listed below are those that were looked into in order to improve the existing editor on MIT App Inventor.
2.1
MIT App Inventor
MIT App Inventor is a platform that uses a block based programming language that allows everyone to create mobile applications. As of today, there are millions of users from hundreds of countries that have come together and created over 38 million apps [4]. Despite these impressive numbers, the App Inventor platform is limited in developing 3-dimensional applications. The interface is limited to creating screens with 2-dimensional objects, and does not have a working 3-dimensional editor.
This project is to integrate a working 3-dimensional editor. This way users can switch from creating 2-dimensional objects to creating 3-dimensional objects in their applications. This editor allows users to expand their imaginations and create a wider variation of applications.
2.2
Scratch
Scratch is another platform that uses a block-based programming language. A differ-ence with MIT App Inventor and Scratch is that Scratch is used mainly for web-based applications and not so much for mobile applications. Similar to MIT App Inventor, Scratch was built for children in the ages 6 to 18 to create games and animations [5]. It is widely used with about a user base of the size of 30 million people creating about 40 million projects total since Scratch’s beginnings [6]. However, even with such a big user base, scratch has decided not to pursue a 3-dimensional editor as it may become too confusing for a beginner level Scratcher [2].
As Scratch currently does not have a 3-dimensional editor, the prototype from this thesis is a step forward. Although the initial 3-Dimensional editor for MIT App Inventor can be considered a little complex, it can be worked towards a design that is simpler and easier to learn and create basic applications with 3-dimensional objects.
2.3
Unity
Unity is a very widely known and used platform for both computer and mobile ap-plication. Although known more widely as a game developing platform, the Unity 3-dimensional editor is used for various different applications: simulations, animations, and modeling [11]. Despite the wide use, Unity uses two computer programming languages for the the code: Javascript and C#. For a student with no knowledge of development, these languages may be difficult to learn along with learning how the Unity 3-dimensional works.
However, despite the complexity, there is a trade-off made in that excellent quality applications are able to be produced through the Unity Environment. In figure 2-1, there is a comparison between a project created through scratch and one created through Unity. It must be noted that with added complexity, the quality and precision of applications can be refined.
Figure 2-1: Comparison of a Scratch 3D project [1], left, and a Unity project [12], right
boost the quality of applications made. The goal of the editor in this thesis is to strive to emulate the quality of work that can be done in the Unity Platform, but at the same time, the MIT App Inventor 3-Dimensional editor should not be as complex and hard to learn.
2.4
Three.js and Ammo.js
Three.js is an open source project that allows users to implement 3-dimensional ap-plications through Javascript [7]. Although not as robust as Unity, Three.js definitely has it’s advantages. Because it is an open source project, it can be used in other projects to help implement features that need to be in a 3-dimensional editor. Be-cause of this fact, this project uses the Three.js library to built an editor space for MIT App Inventor. As shown in figure 2-2, there is already an open source 3-dimensional editor that developers created from the Three.js library. However, although shapes, sprites, and objects can be created easily, it is still fairly hard to navigate where to create these objects and how to delete and edit them. Another downside is that the code that is written for the applications must be written through Javascript and not block-based programming. This is a shortcoming in that users must learn Javascript
Figure 2-2: Three.js Editor [9]
to proficiently use this product.
Ammo.js is used as the physics engine that allows the objects to perform the motions that are assigned to them. It is a powerful tool when combined with Three.js to create 3-dimensional and virtual reality applications. Ammo.js is used in this thesis project to provide the adequate functions in order to make the objects and shapes move as the user wishes. The next chapter will give more detail in how this is possible. There are several interesting projects that have been created using Three.js and Ammo.js shown in Figure 2-3.
However, the limitation still arises that Three.js is not based on block program-ming. Thus, the user would have to learn Javascript and the libraries in order to develop with these tools. The work implemented in this thesis allows users to use these libraries without even knowing. The libraries are used to implement the blocks that the users are placed in the App Inventor environment.
Chapter 3
Background Information
This chapter discusses the background information of the 3-dimensional editor system that was built for this thesis. First, it will go into more detail of how the current MIT App Inventor Interface works. Then it will talk about Three.js and Ammo.js in more detail as to how they are used for this project.
3.1
Current User Interface
In the MIT App Inventor, there are currently two components to the platform: The User Interface Designer Interface, shown in Figure 3-1, and the Block-based Program-ming Interface, shown in Figure 3-2.
3.1.1
Design Interface
The designer interface is where the user creates all the visual components of the mobile application. These components consists of buttons, images, labels, sprites, and much more. Within this interface, the user can also add different aspects from the phone such as a gyroscope, camera, clock, database, and much more. All these aspects of the visual component can be added by dragging them from the left panel and dropping them to the screen in the middle, which is a preview of what would show on the phone. On the right side of the platform, each component’s properties
Figure 3-1: Design Interface
can be adjusted depending on which component is selected.
The visual objects that the user drags and drops into the phone screen will be shown on the phone. However, some non-visual objects such as sensors and databases, will not show up on the phone screen. Instead, it will show up underneath the phone screen. If the user wants to create multiple screens in their application, they are able to by clicking on the add screen button above the phone screen preview. This will add a screen or a page in the application. Objects in all screens can be viewed by the second from the right side organized by the screens. Images and other media are also available to upload and add to the application if the user wishes.
3.1.2
Block-based programming Interface
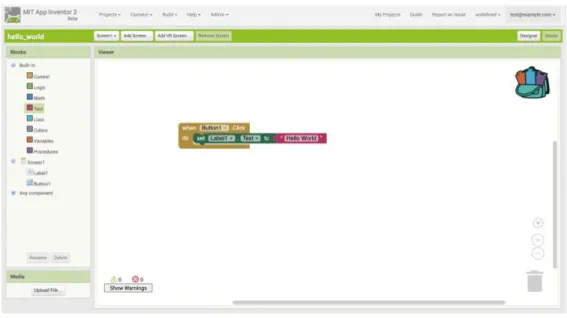
The second interface, reached by clicking the Blocks button on the right side of Figure 3-1 and shown in Figure 3-2, contains all the block-based programming portion of the mobile applications. These blocks are basically the coding portion of the application. They define all the logic that happens when users use the mobile application. All the coding blocks can be divided into two basic categories: The built-in or world blocks and the object blocks. The built-in or world blocks deal with blocks that control or
Figure 3-2: Block-based Programming Interface
deal with the overall application. These blocks are divided further into the following groups:
∙ Logic Blocks: The Boolean value blocks along with all the other logic blocks https://www.overleaf.com/project/5c004738ebc04119dbfb286dsuch as the and, or, and not logic functions.
∙ Math Blocks: Mathematical functions and operations along with number blocks are found here
∙ Color Blocks: the blocks that are used to choose colors
∙ Control Blocks: these are the blocks that contain all loop statements such as if/else, for, and while statements.
∙ Variable Blocks: all blocks related to initializing and changing variables ∙ Procedure Blocks: blocks that contain procedure related operations.
Along with these world blocks, there are specific blocks that are used for certain objects that have been added to the application. These blocks can be used to change
Figure 3-3: QR code for Companion Application
different properties of the object. They may also be used to cause an action to be triggered when something is done to the object such as when a button is clicked, text may appear.
As shown in Figure 3-2, all these blocks can be accessed on the left column. These blocks can be dragged and drop to the middle section, which can be seen as the code base. The blocks can be assembled together to create logical coding statements to make the mobile application run as the user wants. For example, in Figure 3-1 and 3-2, a simple "Hello World" application is made. The Design Interface shows a button that says click here. In the Block Interface, a block code is made by using the button specific block to see if the button was clicked. When the button is clicked, the label in the app is changed to say "Hello World".
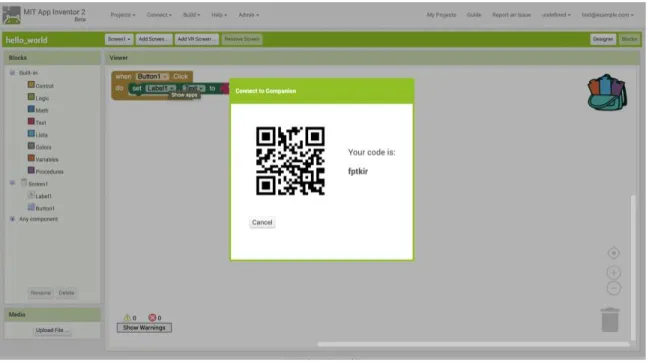
These two components create the platform that users can use in the MIT App Inventor to create innovative and fun mobile applications. Once finished with the application, the user can export their application via the App Inventor Companion Application. A QR code is displayed, as shown in figure 3-3, on the development interface by clicking on the AI Companion button and clicking Connect. After
scan-ning the QR code using the Companion Application, the user sees the application that they have just built on the device and is able to interact and use the application.
3.2
Three.Js and Ammo.Js
As mentioned in Chapter 2, both Three.js and Ammo.js are open source javascript libraries that can be used for 3-Dimensional development for web applications and potentially mobile applications [7]. Although the Three.js has an open source editor available, it would not align with the MIT App Inventor platform because the code behind these projects require Javascript and not the block-based programming that MIT App Inventor uses. Therefore, it is necessary to use the library to create a similar editor that is simpler and easier to use for younger students.
The way that the editor works is that it will be a stand-alone editor added to the MIT App Inventor Platform. The editor creates a Three.js Scene object [10], and has the user add whatever objects they want into the scene. The blocks for the 3-Dimensional editor is then converted to Javascript and added to the scene. This scene is what is exported to another HTML file in the Github repository. When loading the created application through the MIT App Inventor Companion Application, the Companion Application will load this HTML file and display the mobile application the user created on the device.
However, one short coming of Three.js is that the physics and motion of objects are fairly limited. The Ammo.js open source project allows for more complex physics reaction to happen such as collisions, objects breaking, objects flowing through the wind, and much more. The Ammo.js library helps simplify the coding done when coding new blocks for the Blocks Interface, especially those that deal with collisions.
Chapter 4
System Design and Implementation
This chapter discusses the changes that went through the User Interface of the 3-dimensional editor along with the block coding portion. The goal of the features listed is to keep the simplicity and ease of use of MIT App Inventor such that anyone would be able to come and use the product.
4.1
3-Dimensional Editor
This section discusses the editor that is added to MIT App Inventor along with the features that it contains. There are some design choices that are listed along with the implementation of the editor through the Three.js Library.
4.1.1
Editor and How to Get to the Editor
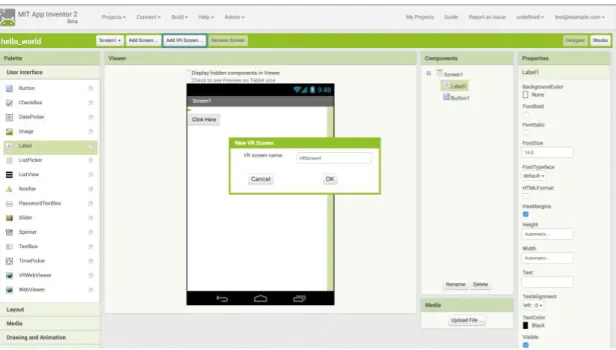
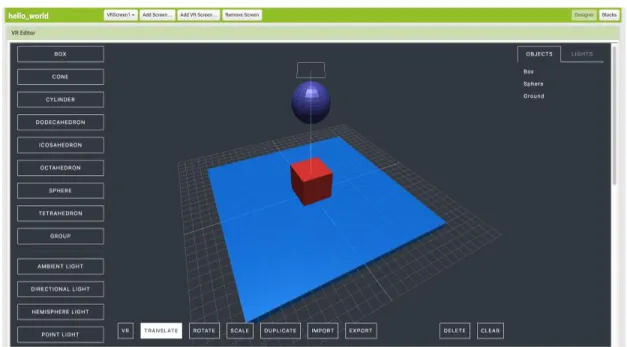
The 3-Dimensional editor component is added to an App Inventor project by first creating the project, clicking the Screen 1 button, and adding a VR screen as high-lighted in Figure 4-1. This leads to the 3-Dimensional editor that users are able to build the visual graphics. This editor, shown in figure 4-2, can be seen to be similar to the Designer Interface from the original MIT App Inventor. However, the main difference is that instead of a screen with drag and drop items on the left, the items on the left are all 3-dimensional objects that are added to the editor when clicked.
Figure 4-1: Adding 3D screen
The right side is just the same in that it lists the properties of the object selected. The user is able to change any properties that they would like through this menu.
One big difference that can be noted is that for this editor, a phone screen preview is not shown as it is in the original. Instead, a three dimensional space is shown in the middle of the screen. This way, the user can click and drag to move the view of the editor. When doing this, the user is able to look at all aspects of the visual components in their application, something that is not applicable in 2-dimensional applications.
4.1.2
Left Column of the Editor
The left column of the editor contains all the objects to build the visual aspect of the application. As shown in Figure 4-2, there are several shapes from cubes, spheres, and other shapes that can be inserted to the scene. Below these shapes is an object called Group. This object is an empty placeholder than can contain several shapes in a group to move together. This is helpful if the user wanted to recreate a bunch of objects. Instead of recreating each and every one of the objects manually, the user
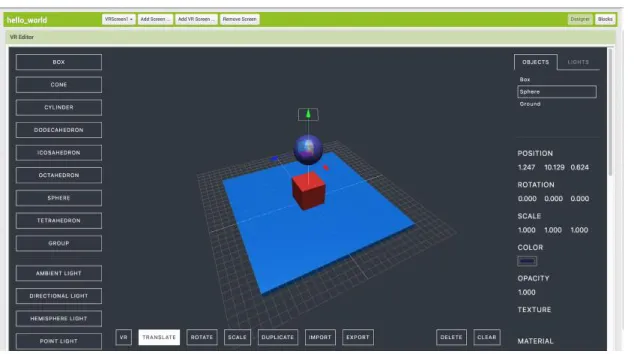
Figure 4-2: 3D Editor
can create a group of these objects and click the clone button in the middle. By clicking on any of these buttons, the wanted shape will appear in the middle of the screen and be in the selected state.
Below the Group button, there are several buttons that correspond to several different lights. Because the application is 3-Dimensional, there has to be light that illuminates some parts of the application. By default, and ambient light is placed in the scene, but it can be deleted and removed if wanted. Each light can be moved and rotated just as the object shapes can. However, the biggest difference is that each light will illuminate the objects in a certain direction or manner and cast shadows where wanted. This feature is a nice tool to add for better 3-dimensional visual aspects.
If the user was to scroll down farther and look below the light section, they would find properties of the overall world. The biggest features in this section would be the Background color, gravity, and camera portion. The color can be chosen and changed to whatever the user desires by using the color palette pop-up as shown in Figure 4-3. The gravity has three numbers in which corresponds to the x, y, and z-axis, in
Figure 4-3: Color Palette
that respective order. The higher the number, the faster the objects will fall in that specific direction. If a negative number is inputted, the gravity will be reversed and go in the opposite direction intended. Lastly, the camera is the view that the user will be seeing when opening the application on a mobile phone. It can be treated as a directional light that has a position and shines on target. The camera is extremely important because whatever direction the camera looks is what the user will see when using the application on a mobile device.
The last two buttons on the bottom are the Labels and Shadows Disabled but-tons. The Labels button opens another interactive editor that lets the user add or delete labels as shown in Figure 4-4. The user may click and drag the labels to put them wherever they want on the screen. These labels act as the text boxes in the actual mobile application. The Shadows Disabled button is a button that will disable shadows for the whole world, regardless of what settings each individual object has.
These features on the left side of the 3-dimensional editor is known to be the "creation" side. Every feature deals with either creating objects or lights for the application or setting different properties for the entire world in how the objects
Figure 4-4: Object Select in Editor
react as a whole or what the user sees when opening the application. When trying to create one of the objects or lights that the developer wants, they would simply just click on the desired button. This causes the shape to appear in the middle portion or the world of the editor. Creating an object also allows it to be in the selected state.
4.1.3
World of the Editor
The middle portion of the screen is known to be the actual editor or the world of the application. This is where all the shapes and lights are inserted after creating them. Figure 4-4 shows that when selecting an object, the user has several options of things to do. On the selected object, there are red, green, or blue lines to click and drag. These lines determine which direction the object is set to change if the user clicks and drags. If the user wanted to translate or move the object around, they can click any of the lines and drag in one specific direction. If the user wanted to freely move the object around in any direction, they can click and drag the small diamond-like object to the desired location.
with the selected object. The user can click these buttons to perform what actions he wants. If the user wants to move the object around, they would click the translate button and click and drag the colored lines or the diamond object to the location they want. The scale button allows the user to enlarge the object in whatever direction they wish. The way to enlarge or shrink the object is exactly the same as translating the object. The user is also able to rotate objects in whatever direction they wish by clicking the rotate button and then clicking and dragging the object in the rotation they wish. If the user would like to create multiple of the same object, they can click duplicate and an exactly same object as the selected one will be created on the screen. The other buttons such as delete and clear deal with removing either the selected object or clearing the whole world.
There are two other buttons in the world that are the import and export buttons. Because this whole editor is written in Javascript with the Three.js Library, there is the option to save all the objects in the world as a JSON file. The Export function allows this to happen. Once clicked, a JSON file of the objects will be saved on the device. If the user were to already have a JSON file with objects made through Three.js in any other editor, they can use the import button. They would simply click the import button and load the JSON file. This would allow the objects in the JSON file to load into the world and be displayed.
4.1.4
Right Column of the Editor
The right column of the editor deals with the actual selected and created objects and lights. As seen in Figure 4-4, the upper portion of this section shows the user which object is selected along with which objects are currently in the world. The user can switch choose which object to be in the selected mode by simply clicking on the object name in this column. Another feature that the user can do is a drag and drop in this column. By dragging one object and dropping on top of another, the user creates a parent-child relationship between the two objects. Another way to view this is through the group object. Because the group object is an empty placeholder, adding actual shapes to be a children of a group object makes a powerful tool when
Figure 4-5: Group Object in Editor
mass producing a similar object. The group relationship also helps when the block codes want to deal with multiple objects at once. For example, if a chair was wanted to be made and moved on swipe, without the group object, the chair would be made of individual boxes that would have a block code portion for each box. With the group object, the boxes can be under a group relationship, and only one block code can be specified to move the group, which causes all the objects in the group to move. In Figure 4-5, it can be seen that the both the Box and Sphere object are under a group object. The slight indentation to the right of both these objects indicate they are under the group parent object.
Once the user selects and object, the properties of that object will appear on the bottom of the right side as shown in Figure 4-5. Depending on the object, the properties that appear will differ. However, for most of the objects, the most important properties listed would be the position, scale, and rotation. Although the user can technically alter these properties through the world editor as discussed in the previous section, they may also alter them through exact numbers in this portion of the editor. Another section that is important is the velocity and acceleration of
Figure 4-6: Right Column Buttons
the object. If the user wants an object to move when the application begins, they may set a velocity or acceleration to the object so that it moves at the start of the application.
On the bottom of the right column, there are four different buttons as shown in figure 4-6. There is the flat shading, wireframe disabled, collision enabled, and rigid object buttons. Each of these buttons can be clicked to enable or disable the features to the selected object. Flat shading can be switched to the smooth shad-ing object that allows the shape to appear to have a smoother surface. Wireframe disabled and enabled just shows how the object is looking in the editor. Having the wireframe enabled makes the object appear with only the wireframe and no shading. The Collision enabled and rigid object buttons deal with the physics engine of the application. Rigid objects are those that cannot be moved in the application. The collision enabled objects will have a collision effect while disabling collisions enables objects to pass through the collision disabled object.
Other features for objects include the material that the object is made of, the texture of the object, mass, and etc. These features allow the user to create visually
Figure 4-7: 3D Editor Blocks
appealing applications. The textures can add a more realistic component through adding pictures or textures to the objects such as ground or grass texture. The mass can affect how the object reacts to other objects in collisions or how fast the object will fall with gravity in effect. Other features such as the opacity are all part of visual appealing features that help the application seem more realistic.
4.2
Block-based Programming Interface
The Block-based Programming Interface is exactly the same as the one in the original MIT App Inventor. However, the blocks that are able to be used are slightly different. As shown in Figure 4-7, there are several groups of the blocks, each that contain blocks that deal with some part of the block-based coding.
A little different from the original blocks, the 3-Dimensional Editor blocks contain object related blocks under the VR_Commands blocks. This category of blocks have several different operations that deal with 3-dimensional objects such as:
the user wishes
∙ Adding and Removing: the user can add or remove certain objects and lights ∙ Camera: Able to set different camera properties
∙ Touch: Able to get the position of the touches that occur when the application is running
These operations allow the user to do what they wish with the 3-Dimensional objects up to certain extents. The user can change the size of objects, move the objects or lights, have the light shine in a different direction, or even have the viewpoint in the application move at any time. These blocks allow the user to play around with the objects in whatever manner they wish.
Another category of built-in Blocks that are added are the VR_Events categories. These blocks deal with what the application does in certain scenarios. The blocks in this category are:
∙ On start do: When the application starts running, what does the user want it to do?
∙ On render do: When the application renders on the device, what does it do? ∙ On touch start: When the device recognizes a touch, what does the application
do?
∙ On touch move: When the device recognizes that the touch moves, what does the application do?
∙ On touch end: When the device recognizes there is no longer a touch, what does the application do?
These blocks allow for the user to create scenarios of when objects are touched and how the objects react. If the user wanted to destroy an object on touch, they have the option to do this through the On touch start block. Whatever scenario arises,
these blocks can be used to help detect the scenario and carry out the actions that the developer wishes to happen.
One big difference that can be noticed from Figure 3-2 is that there are no object specific blocks. This is because all the object specific actions are listed under the VR_Command block group. Another reason is that the 3-Dimensional editor is added to the platform in a different manner than the Visual Interface of App Inventor. The Editor is added through a separate WebViewer Javascript Box in the website. What this means is that whatever objects that are added into the 3-Dimensional editor cannot be read by the Blocks Interface, and this leads to the fact that these objects will not appear in the Blocks column of Figure 4-7. Thus, even if object specific blocks were made, they would not be able to appear in the Blocks Interface for the 3-Dimensional Editor. This lead to the design decision of creating a generic VR_Command block group which would include all the necessary blocks for any object in the 3-Dimensional world.
Just as in the original editor for App Inventor, in order to export out the applica-tion, the user could use the App Inventor Companion Application. The user would click the connect button on the top left side of the editor and click the AI Compan-ion button. Once the QR code pops up and the user scans it using the CompanCompan-ion Application, the 3-Dimensional application that the developer made will pop up on the device, and it will be ready to use.
Chapter 5
Example Application
This section discusses the example application that I prepared for my workshop to teach students about 3-Dimensional development through App Inventor. The appli-cations were designed to be somewhat easy yet still interesting to play and make.
5.1
Shape Enlarge and Shrink Application
In this tutorial, students would pick a shape of their choice and color it with whatever color they wanted. I chose to go with the a box for my application. In figure 5-1, it shows the 3-Dimensional editor with a red color box that was added into the editor. Because the cube should not be moving when the application runs, the students were instructed to set the gravity of the world to 0 for each axis. This way, the cube would remain in the middle of the device’s screen at all time.
The goal of this application is to create the shape and have it either shrink or enlarge depending on where the user touches the screen. If the user touches the shape, then the shape would grow, and if the user touches anywhere but the shape, it would shrink. Because students may not have had a coding background, the tutorials all contained pseudocode on what the application should do. For this application, the pseudocode would have looked like this:
Figure 5-1: Red Box in Editor On t o u c h s t a r t : i f o b j e c t ( " S p h e r e " ) i s t o u c h e d : s e t O b j e c t P r o p e r t y ( " S p h e r e " , s c a l e X , " S p h e r e " . s c a l e X + 0 . 0 1 ) ; s e t O b j e c t P r o p e r t y ( " S p h e r e " , s c a l e Y , " S p h e r e " . s c a l e Y + 0 . 0 1 ) ; s e t O b j e c t P r o p e r t y ( " S p h e r e " , s c a l e Z , " S p h e r e " . s c a l e Z + 0 . 0 1 ) ; e l s e : s e t O b j e c t P r o p e r t y ( " S p h e r e " , s c a l e X , " S p h e r e " . s c a l e X − 0 . 0 1 ) ; s e t O b j e c t P r o p e r t y ( " S p h e r e " , s c a l e Y , " S p h e r e " . s c a l e Y − 0 . 0 1 ) ; s e t O b j e c t P r o p e r t y ( " S p h e r e " , s c a l e Z , " S p h e r e " . s c a l e Z − 0 . 0 1 ) ;
Figure 5-2, accurately represents the block coding that is needed for this simple application. One way that this application could be expanded upon is by using the group object. If instead of one object, the students wanted to create multiple objects, they would be able to first create the shapes in the editor and put them all as children under the group. In the block coding interface, Instead of specifying the name of the shape, they would specify the name of the group and have it expand. This way, all the objects in the group expands and contracts just as the students want it to.
Figure 5-2: Block code for the Shape Application
5.2
Simple Bowling Application
One of the classic 3-Dimensional mobile applications is a bowling game. The visual component consists of a ground alleyway, a bowling ball, and either 6 or 10 pins to knock down. In the 3-Dimensional editor, it is quite simple to create such an application. As shown in figure 5-3, a bowling ball along with 6 pins on a alley is created. This is done in a simple manner of clicking the correct objects and reshaping them to the sizes that are necessary. For this application’s case, a sphere, box, and a group object with 6 cylinders were used.
The pseudocode for this application looks something like this, and an example block code is shown in figure 5-4:
Figure 5-3: Bowling Application
G l o b a l v a r i a b l e s t a r t Y , s w i p e D i f f On t o u c h s t a r t {
w h i l e o b j e c t ( " B o w l i n g B a l l " ) i s t o u c h e d {
I f touchX i s w i t h i n t h e width o f a l l e y { ( Wherever you want t o s t a r t t h e
b a l l i s where we want t o r o l l t h e b a l l ) S e t o b j e c t ( " B o w l i n g B a l l " ) . p o s i t i o n X t o touchX } S e t StartY = touchY S e t s w i p e = t r u e } } On t o u c h end { I f s w i p e {
Var s w i p e D i f f = abs ( touchY − s t a r t Y ) ( S e t t h e b o w l i n g b a l l v e l o c i t y by a
Figure 5-4: Example Block Code for Bowling Application r a t i o * 10 s o t h a t i t n e v e r r e a c h e s a f a s t s p e e d ) S e t o b j e c t ( " B o w l i n g B a l l " ) . VelZ t o s w i p e D i f f / touchY * 10 } } On s t a r t { I f o b j e c t ( " B o w l i n g B a l l " ) . p o s i t i o n Y <= −3.0 { R e s e t a p p l i c t i o n } }
5.3
Roll a ball
The last tutorial that was created is the classic Roll-a-Ball Game. Roll-a-Ball is a classic Unity game that most beginner 3-dimension developers start with [3]. The basic rule of the game is that the user will click on a direction of the phone to roll the ball. The farther the click is away from the ball, the faster the ball will accelerate.
The goal of the game is to collect all the coins on the map.
This tutorial is the most challenging of the three applications, and during my workshop with students, I was not able to reach this tutorial. However, because it is such an iconic and classic 3D application, it is essential that the 3-Dimensional editor is able to create the application. The block code is shown in figure 5-5, and the pseudocode for the application is as follows:
On s t a r t { While O b j e c t ( " b a l l " ) . p o s i t i o n Y > 0 { Get t o u c h x , y , and z . S e t O b j e c t ( " b a l l " ) v e l o c i t y X , Y, Z t o ( abs ( b a l l . P o s i t i o n X − touchX ) ) , Y, Z * 0 . 5 I f b a l l c o l l i d e s w i t h o b j e c t { I f o b j e c t i s i n group ( Coin ) { Remove o b j e c t } }
I f group ( Coin ) i s empty {
Go t o new s c e n e w i t h C o n g r a t s s c e n e }
} }
Chapter 6
User Study and Evaluation
This chapter outlines the user study/workshop that held for three days with the Middle to High School Students of Linden Akademia on Guam, USA. The workshop was held on July 22nd, July 23rd, and July 24th from 1:00PM to 3:00PM. The workshop was held in a standard classroom with access to a computer laboratory. This was necessary so that each student was able to use App Inventor to make applications that they wanted. The devices, Android tablets operating on the android 9.0, Pie, operating system, that were used to test their applications were supplied by myself. Each day of the workshop had an attendance of 7 students, whose ages were between 12 and 16.
The workshop each day was taught in a different manner. The first day and second day, I proceeded to give a lecture for about an hour and the last hour was given to the students to use App Inventor and explore the features available. The last day was dedicated to using App Inventor to create the applications listed in the tutorials in Chapter 5, which uses the 3-Dimensional editor that was created for this Thesis.
Before the workshop began, I administered a short survey at the beginning of the first day and at the end of the last day of the workshop. These surveys are available in Table 6-1 and Table 6-2. The survey was given to gain knowledge of if the students began to have a better understanding of 3-Dimensional Application development through using the editor extension on App Inventor.
Table 6.1: Pre-Workshop Survey
6.1
First Day
The first day of the workshop was held on July 22nd, 2019 at 1:00PM. The lecture for the first hour talked about what MIT App Inventor is, and how to use it. The students were able to listen to how block-based programming worked and how to create mobile applications through App Inventor. At the last hour of the workshop, the students were asked to create a simple Hello World application as outlined in Chapter 3. Once the students were finished with that task, they were free to explore and create applications that they wanted.
The workshop outline that I created looked was as follows:
∙ Survey
∙ Introduce MIT App Inventor – What is App Inventor?
– What is Block-based Programming?
∙ How to use App Inventor – Visual Interface
* Available objects to use
* Different non-visual objects and what they mean – Block-based Interface
* Built-in blocks and what they all mean * Object specific blocks and what they do ∙ Hello World Application
∙ Free Building Time
6.2
Second Day
The second day of the workshop was held the next day, July 23rd, 2019 at the same time. Because the students were somewhat familiar with App Inventor, I believed it was adequate to start diving into the 3-Dimensional Editor and developing with it. The first hour and about fifteen minutes, I gave a quick overview of what the 3-Dimensional Editor was and how to use it. I outlined the different features that it had and how to control the objects and change the properties. I also taught the students how the blocks for the 3-Dimensional editor differed from the original App Inventor and how to use each block. At the end of the lecture, the students began working on the shape enlargement and shrinking application.
The outline of the second day was as follows:
∙ 3-Dimensional Developing – What is 3D Development
∙ 3D editor for app Inventor
– Design Interface
* Objects and lights and world properties
* World and how to maneuver objects and scale them with the buttons * Selected Object properties and what happens when they are changed. – Block Interface
* VR Command Block group * VR Event Block Group
– Shape Enlarge and Shrink Application
6.3
Third Day
On the third and last day of the workshop held on July 24th, 2019, the students were given all two hours to develop the bowling application, and if finished, were given free development time with the 3-Dimensional editor. I helped students through the block coding portion and gave aesthetic tips on using textures and colors when possible. Three students were able to finish the bowling application and were given free development time while the other students tried to finish creating the application. Two of the three students began working on the roll-a-ball tutorial while the other student decided to tinker around with the editor.
The outline of day three was as follows:
∙ Recap on 3-Dimensional Editor ∙ Bowling Application
Table 6.2: Post-Workshop Survey
6.4
Analysis of Workshop
The first day of the workshop began with a survey asking how comfortable the stu-dents were with App Inventor on a scale of 1 to 5. Six of the stustu-dents answered with 1 and comments about how they had never heard of App Inventor while one answered with a 3. When asked if they were familiar with Scratch or any other block-based programming language, 3 answered with a 3 while the other 4 students answered with a 1. When asked if the student knew any programming language or had any background in coding, all seven answered with a 1.
On the second part of the survey, the students were asked if they had a strong background in mathematics and sciences (especially physics). 5 of the students an-swered with a 4, 1 student anan-swered a 2, and the last student anan-swered with a 5. When asked if any had worked with a three dimensional editor or were familiar with a three dimensional editor, only one answered with a 3 and the other 6 answered with a 1.
These answers seemed reasonable as computer science is not a very popular or well taught subject in the schools on Guam. Rather, subjects such as Math, English, and other standard subjects are widely taught. Thus, having a workshop with students
unfamiliar with App Inventor and 3-Dimensional development seemed standard, and much more helpful in testing the product.
On the survey of the last day of the workshop, the students were ask to rate on how comfortable they feel with MIT App Inventor and how likely they would use it again. 3 students answered with 3, 3 students answered with a 4, and the last student answered with a 5. This demonstrated that, without a strong background in computer science, the workshop had helped the students to understand how App Inventor works. When asked on how comfortable they felt with 3-Dimensional development, 4 students answered with a 2, 2 students gave a 3, and the last student gave a 4 for the survey. When asked how challenging they thought 3-Dimensional development was, 5 students answered with a 5, while 1 student gave a 3 and the last gave a 2.
Given this feedback, shown in figure 6-1, it seems that the students did in fact learn that 3-Dimensional development is hard. However, the surveys also shows that the 3-Dimensional editor in App Inventor made it a little less daunting than it was before. During the free development time, I observed how some students were playing around with the editor, and I received adequate feedback as to why there were not certain features that might have been useful. I also saw how by the last day of the workshop, most of the students were understanding and creating the blocks of code for the applications faster than the days before despite the applications being more complex.
Chapter 7
Future Work
As with all systems, the 3-Dimensional editor created for this thesis still has room for improvements. Although it is a system that the students in the workshop enjoyed using, there are still optimizations that can be made to the system. This chapter discusses these changes for future work.
7.1
Object specific blocks
Currently, as discussed in chapter 4, the block interface for the 3-Dimensional editor does not contain object specific blocks. However, it definitely would be better to have object specific blocks present like the ones in the original MIT App Inventor. For instance, in the original 2-Dimensional editor for App Inventor, the object specific blocks for an image sprite are detailed in many instances, shown in figure 7-1. There is a block to detect if the sprite was touched, a block to change the sprite’s properties, and much more. Despite having these blocks as being generic in the 3-Dimensional editor, it would be better to split the blocks to be specific for objects, lights, and the world.
These object-specific blocks would help with organization and breaking apart the VR_Command group which has a myriad of blocks. It was also help with the unifor-mity for users using the 2-Dimensional editor to move over and use the 3-Dimensional editor due to the similarities.
Figure 7-1: Image Sprite Blocks
In order to start this issue, there must be a way for the Blocks Interface to find out which objects and lights have been added to the Designer Interface in the 3-Dimensional Editor. Currently, the editor is a separate file in itself, and has no interaction with the Blocks Interface.
7.2
Optimized Export Method
Currently as discussed in Chapter 3, the method of exporting an application via the MIT App Inventor Companion Application is not the preferred method. Currently, the code for the application calls to an HTML file to load the scene and objects. If the user is not connected to a network, they would not be able to load and use the application. This could be a big inconvenience if the network connectivity was slow or unavailable.
A solution to this case would be to find a way for the application to generate an offline HTML file or Javascript application such that the Companion Application would not have to call onto an HTML on the Github Repository. One method could be that a standard HTML file is generated and loaded when the Companion Application
is loaded with the QR code. However, the downside to this solution is that the HTML file along with all the Javascript would have to be hardcoded into the system, which is not an ideal situation.
Chapter 8
Conclusion
Throughout this thesis, I gave an overview of the 3-Dimensional Editor that was cre-ated for the MIT App Inventor, which is a web-based application that lets students and professionals create mobile applications without any prior programming knowl-edge. The goal was to try and create and editor that was simple and easy to use, along with fun and having all the features necessary to create basic 3-Dimensional applications.
For this project, I worked upon an existing prototype of a 3-Dimensional editor on App Inventor. Gathering inspiration from different 3-Dimensional editor platforms such as Unity and the Three.js editor, I created a working prototype that was able to be tested over a course of three days.
The editor, itself, is very self-explanatory on how it is used. The user would go and navigate the MIT App Inventor page and create a new project. From there, they would add a VR screen, which moves the user to the 3-Dimensional Editor. When using the editor, the user would just be clicking and dragging shapes and objects to rearrange and scale them to the user’s liking. Next, they would add the block code, as they would in any MIT App Inventor project.
After testing the editor with students in both middle school and high school, I found that students, whose ages were 12 to 16, enjoy creating and playing around with the editor. Even if they could not fully understand what the physics were behind the scenes of the applications, they did enjoy creating visually appealing environments
in the editor. Throughout the three day workshop, they also expressed interest in continuing to use App Inventor and look into different 3-Dimensional development platforms such as Unity or Blendr.
Moving forward, additional features may still be added to the editor such as more detailed blocks for the block programming or more objects to add to the scenes. Through this editor and future changes, we wish that the younger generation does not feel discouraged by the complex nature of 3-Dimensional development, but hope that they have the correct tools to help support and let them learn how the development works.
Bibliography
[1] 3D Scratch Project. https://en.scratch-wiki.info/wiki/File: 3D_Scratch_Project.png, 2019.
[2] Discuss Scratch: Rejected Suggesstions . https://scratch.mit.edu/discuss/ topic/4789/, 2019.
[3] Introduction to Roll-a-ball Unity. https://learn.unity.com/tutorial/ introduction-to-roll-a-ball?projectId=5c51479fedbc2a001fd5bb9f, 2019.
[4] MIT App Inventor: About Us. http://appinventor.mit.edu/explore/ about-us.html, 2019.
[5] Scratch: About. https://scratch.mit.edu/about, 2019.
[6] Scratch: Statistics. https://scratch.mit.edu/statistics, 2019.
[7] ThreeJS : Discover . https://discoverthreejs.com/, 2019.
[8] Three.js Featured Projects: animated cloth. https://threejs.org/examples/ #webgl_animation_cloth, 2019.
[9] Three.js Open Source Editor. https://threejs.org/editor/, 2019.
[10] Three.js Scene Documentions. https://threejs.org/docs/#api/en/scenes/ Scene, 2019.
[11] Unity : Solutions . https://unity.com/solutions, 2019.
[12] Unity True FPS Demo. https://forum.unity.com/threads/true-fps-demo. 513573/, 2019.
![Figure 2-1: Comparison of a Scratch 3D project [1], left, and a Unity project [12], right](https://thumb-eu.123doks.com/thumbv2/123doknet/13799346.440979/17.918.150.769.119.386/figure-comparison-scratch-project-left-unity-project-right.webp)
![Figure 2-2: Three.js Editor [9]](https://thumb-eu.123doks.com/thumbv2/123doknet/13799346.440979/18.918.163.756.116.442/figure-three-js-editor.webp)
![Figure 2-3: Three.js Projects [8]](https://thumb-eu.123doks.com/thumbv2/123doknet/13799346.440979/19.918.148.773.402.752/figure-three-js-projects.webp)