The Development of Online Media to
Support Design Prototyping with a Laser Cutter
by
Stephanie Diaz
Submitted to the
Department of Mechanical Engineering
in Partial Fulfillment of the Requirements for the Degree of
Bachelor of Science in Mechanical Engineering
at the
Massachusetts Institute of Technology
June 2018
02018 Stephanie Diaz. All rights reserved.
The author hereby grants to MIT permission to reproduce and to distribute publicly paper and electronic copies of this thesis document
in whole or in part in any medium now known or hereafter created.
Signature of Author:
Signature redacted
Certified by:
-I-Depdrtment of Meclianical Engineering
May 20
Signature redacted
A/
David WallaceProfessor of Mechanical Engineering
^
*Thesis SupervisorSignaiure
redactea
MASSACHUSElTS INSTITUTE MASSACHUSETS INSTRTUTE OF TECHNOLOGYSEP
13
2018
Rohit Karnik Professor of Mechanical Engineering Undergraduate OfficerThe Development of Online Media to
Support Design Prototyping with a Laser Cutter
by Stephanie Diaz
Submitted to the Department of Mechanical Engineering on May 11, 2018 in Partial Fulfillment of the
Requirements for the Degree of
Bachelor of Science in Mechanical Engineering
ABSTRACT
Online education has been growing and there has also been work done to support residential design education with online media. This thesis focuses on developing online media providing
instruction on how to use the laser cutter, a tool that can be used in early-stage prototyping as part of the design process. User research was conducted to understand what information would be helpful for design students while using the laser cutter. The development of the site, targeting MIT Mechanical Engineering design students who are beginner level laser cutter users, is discussed. The resource explains the basics of using the laser cutter and provides additional content and resources that may be useful to design students. The webpage is meant to serve as a reminder of how to operate the tool following training by an authorized laser cutter user. The resource was tested with 7 design students with zero to limited experience using a laser cutter. The tests were successful and showed that the webpage was helpful in providing students with the information needed to create a simple laser cut part without overwhelming them with too many details. A list of revisions and additional media that should be added was developed. Future work should include the development of a webpage targeting intermediate to advanced laser cutter users.
Thesis Supervisor: David Wallace
Acknowledgments
I would like to thank Josh Ramos, who supervised me throughout my research. I have learned a
lot form you about education, creating media, and conducting research. Thank you for all of the time you put into answering my questions and making sure I had the resources needed to complete this thesis.
Table of Contents
Abstract 2 Acknowledgements 3 Table of Contents 4 List of Figures 6 1. Introduction 71.1 The Status of Online Education in the United States and Its Benefits 7
1.2 The Role of the Laser Cutter in Design 9
1.3 Online Educational Resources on the Laser Cutter 10
1.4 Pedagogical Goals 12
2. The Design of the Webpage 14
2.1 User Research 14
2.2 The Design Approach 14
3. The Contents of the Webpage. 16
3.1 Introduction to the Laser Cutter 16
3.2 Laser Parameters and Materials Information 18
3.3 Vector Cutting 20
3.4 Raster Cutting 22
4. Testing, Feedback, and Proposed Revisions 28
4.1 Testing 28
4.2 User Interviews. 29
4.3 Feedback and Observations 30
4.4 Proposed Revisions 32
5. Conclusion 34
Appendix 35
List of Figures
Figure 1: Image of the laser cutter 16
Figure 2: Webpage section titled "The Best Way to Use Laser Beams". 17
Figure 3: Video titled "Operating the Laser Cutter" 18
Figure 4: Webpage section titled "Laser Parameters" 19
Figure 5: Webpage section titled "Materials" 20
Figure 6: Image of a 4x sped up looped video of vector cutting 21
Figure 7: Image of video titled "How to Vector Cut" 22
Figure 8: Image of a lOx sped up looped video of raster cutting 23
Figure 9: Image of video titled "How to Raster Cut" 24
Figure 10: Webpage section titled "MakerCase" 25
Figure 11: Webpage section titled "Gear Generator" 26
Figure 12: Image of video titled "From SolidWorks to Laser Cutting" 27
1. Introduction
The development of a beginner level laser cutting webpage for Mechanical Engineering design students at the Massachusetts Institute of Technology (MIT) is described. The objective was to provide students with the knowledge necessary to utilize the laser cutter in early-stage design prototyping. After some preliminary research, it became evident that students needed help remembering and understanding how to use the laser cutter and prepare the artwork required to cut parts. Therefore, the content of the webpage was designed to teach students as if they did not know how to use the laser cutter at all. Despite this, the webpage is meant to function as a refresher of training as well as a source with other relevant and helpful information. It teaches the basics on laser cutting and how the tool fits in the prototyping world. It does this by providing instruction on how to use Illustrator (a graphics design software used with the laser cutter), the laser driver (the laser cutter's software), and the laser cutter itself. It also provides resources that can be helpful when prototyping.
Section 1 covers background information on the stance of online education in the United States and its benefits, the role of laser cutting in early-stage design prototyping, other laser cutter resources in the web and how the webpage developed compares, and the work's pedagogical goals. Section 2 includes the development of the webpage. Section 3 has information on the testing of the webpage, its results, and feedback from students. Last, section 4 provides a conclusion for the paper and covers future work to be done.
1.1 The Status of Online Education in the United States and Its Benefits Education can take different forms. It can be traditional, hybrid, web-facilitated, or online. "Traditional" refers to face-to-face instruction, while "hybrid" also known as "blended" refers to a combination of online and face-to-face instruction. "Web-facilitated" refers to courses that are essentially taught face-to-face but use some web-based technology to facilitate them. "Online" refers to courses with most of their content online [1]. For the purposes of this thesis, it is important to become familiar with the stance of online education in the United States. The term "distance education" refers to education at a distance or online [2].
Online education has been growing over the years. Grade Increase: Tracking Distance
Education in the United States is a report on statistics for online education in the United States.
The proportion of the higher education student body taking at least one distance (online) education course was at 25.9% in 2012, 27.1% in 2013, 28.3% in 2014, and 29.7% in 2015. In
2016 the proportion was at 31.6%. The number of undergraduate and graduate students taking at
least one distance education course increased by 17.2% from 2012 to 2016. The number
increased by 3.4% from 2012 to 2013, 3.3% from 2013 to 2014, 3.9% from 2014 to 2015, and 5.6% from 2015 to 2016. Interestingly, there was an overall 6.4% decline in the number of
"on-campus" students, or students who need to be physically on campus. This was due to the increase in distance education enrollment and drop in overall enrollment [2].
It is also important to understand how educators view online education since they are the people that work with students. While online education enrollment rates continue to grow, the overall
faculty opinion on it has not improved. In Online Report Card: Tracking Online Education in the
United States, the authors provide statistical information for online education in the United
States. They state "only 29.1% of chief academic officers [in the United States] believe their faculty accept the value and legitimacy of online education. This rate is lower than the rate recorded in 2004." The paper also mentions that 71.4% of academic leaders viewed online education as the same or superior to face-to-face instruction in 2015. The percentage was 77% in 2014 and 57.2% in 2003, so there was a drop, but the percentage was still significantly higher than that in 2003. It is also important to mention that academic leaders remain "far more positive about the learning outcomes for blended instruction than they are for online education." Leaders at schools with large distance education enrollments (10,000 or more) are the most positive when it comes to distance education with 41.7% rating online education as "superior" or "somewhat superior" to face-to-face instruction. Institutions that offer distance courses have been fairly steady in their belief that distance courses are critical to their long-term strategy from 2014
(77.2%) to 2015 (77.1%). On the other hand, institutions that do not offer any distance courses
had a drop to 19.5% in 2015 from 33.8% in 2014. Overall, 63.3% of chief academic leaders said that online learning was critical to their long-term strategy in 2015, while 70.8% said this in 2014 [1.
There are also benefits to online education. It can give instructors the ability to monitor how their students use information online. Media usage order and time spent on resources throughout a term are two factors observed by researchers [3]. Analyzing factors such as these can help improve content and how it is presented to better help students learn. In a different study, students at four universities underwent an engineering course using lecture podcasts, video solutions, animations, and a course wiki (a page were students are allowed to update course content). It was found that students used the solution videos to study, and that they thought blogging or peer-to-peer interaction online could be useful. However, only the school with sufficient blog users saw significant benefits from peer-to-peer interaction online [4]. Online education allows instructors to make portable content available to students at any time. This gives students the ability to revisit content when needed, which could lead to better learning results.
It is also important to note that researchers have found student learning experiences and
performance to be equivalent between virtual and physical activities [5]. This tells us we can use online education to at least acquire similar results as those achieved by traditional education. If we can improve online or hybrid education it could be possible to achieve higher learning results from those achieved by traditional learning.
In summary, online education enrollment rates are growing, and although the overall faculty opinion on the importance and effectiveness of online education has been declining, faculty in institutions who offer online courses continue to be positive on the subject. Moreover, online education can bring benefits that traditional education cannot. All of these factors lead to the conclusion that although there is much more research to be done, online education is a trend that seems promising. Therefore, it is worth exploring what will work well in online education for MIT students.
1.2 The Role of the Laser Cutter in Design
MIT's Product Design Lab (PDL) is a prototyping resource that supports classes where students learn about the design process and how to apply it. The delivery of design content online is being
explored for use in this context. This thesis deals with the use of the laser cutter in early-stage design prototyping.
Product design can be difficult to teach in an online environment since it involves open-ended problem solving. Moreover, it also involves a significant amount of physical activities. A study was conducted to explore traditional, online, or hybrid education in the design setting. It was concluded "early-stage product design and product-design-like material have the ability to be presented in online and hybrid formats without harmful repercussions." There were no
conclusions drawn as to which educational method was superior for teaching design. Learning gains were the same for all three methods [6]. However, more research should be done to explore any possible gains from online and hybrid education.
Prototyping refers to quickly and efficiently fabricating simple models that can be used to answer questions about a concept or idea related to a product in development. Different approaches can be used to fabricate these models. The three main approaches available in the PDL include sketch modeling techniques, such as cutting cardboard and foam core with utility knives, machining, and digital fabrication. The laser cutter, which falls under the digital fabrication umbrella, is a tool that uses a laser to cut or engrave flat sheets of material quickly and precisely. Laser cutting can give students the ability to cut complex shapes without dealing with tooling, machining, or 3D printing, which can be more complicated, time-consuming, and/or costly. Laser-cut parts can be used to make looks-like and works-like models. Students can use these to quickly answer questions on how a product should look and work. Training students on how to use the laser cutter would give them an extra tool to consider when prototyping. If they
understand the advantages and disadvantages of the tool, they can then determine if it is
appropriate for what they are building. Therefore, knowing how to use the laser cutter could help them in the design process by facilitating the making of a model that they can learn from.
1.3 Online Educational Resources on the Laser Cutter
In order to understand how this thesis fits with other work, it is important to learn about other online educational resources on the laser cutter. The Prototyping Library
(http://prototypinglibrary.com) includes an array of different projects. It contains the artwork files, material information, and laser cutter parameters needed for the projects. It has information on different joints you can make as well as hinges. It also contains advanced information on raster cutting. It is a really good tool, especially for intermediate to advanced level users [7].
Instructables (http://www.instructables.com/id/Laser-Cutting-Projects/) offers instructions on
how to build different projects [8]. Similar to the Prototyping Library, it offers the artwork files, material information, and laser cutter parameters needed. Universal Laser Systems
(https://www.ulsinc.com) offers an archive (http://service.ulsinc.com/support/Tip%20Sheets/) of different tutorials on projects or techniques such as how to use the right laser lens and how to make ajigsaw puzzle[9][10]. There are several other sites like the three mentioned that offer similar resources such as Pinterest (https://www.pinterest.com/MooCB/laser-cut-ideas/) [11].
Engravers Network (http://www.engraversnetwork.com) provides a material settings guide on
how to pick laser cutter parameters based on a material [12]. While this is a great resource, it is a long document (http://www.engraversnetwork.com/files/MVXLaser _Settings-Guide.pdf) that can be overwhelming to read. Lastly, there is Trotec
(https://www.troteclaser.com/en-us/knowledge/tips-for-laser-users/laser-parameters-definition/), which provides information on how parameters affect a job [13].
Although all of the resources mentioned are helpful, they lend themselves to students who are intermediate or advanced level laser cutter users. None of these websites aim to teach students how to actually use the laser cutter and how it fits in early-stage design prototyping. They assume students already know the basic functions of the tool. This thesis aims to fill in the gap where these resources fall short. It is meant to teach students what they need to be able to operate the laser cutter and understand its role in prototyping. They can then use these resources if they need to. The webpage provides a common place where all of the essential information to learn how to laser cut is available, which is helpful because it saves students from having to search for it themselves. This is especially a big problem for freshman college students who may not yet have the skills or experience to filter through information online and quickly get to what they actually need. The webpage can be found at
www.productdesigny.com/media/viewer/digital fabricationlasercutter and it is a part of Josh Ramos' website Designy (https://www.productdesigny.com/), which contains pages on different
tools throughout the PDL to help students learn how to use them [14]. (Note: Designy cannot be accessed unless a personal account is created for the user by Josh Ramos. Please refer to the appendix for an image of the website.) Designy targets MIT Mechanical Engineering design students, and the laser cutter webpage targets these students who are beginner level laser cutter users, particularly those involved with MIT's Toy Product Design (2.00b) and Product Design (2.744) courses, both of which take place in the PDL. The work is tailored to the PDL's laser cutter, which is an advantage to the students in that specific lab. However, the material is general enough to help students in other labs or machine shops. The laser cutter webpage is designed to accommodate both using the tool to prepare for working in the shop and using the platform in the shop setting while beside the machine. For working beside the machine, students can come into lab knowing that they need to use the tool, load the webpage by using a QR code located on the tool, navigate through the webpage, and then operate the machine.
1.4 Pedagogical Goals
The first goal of the webpage developed in this thesis project is to teach students the basics of how to use the laser cutter and its system so that they can cut simple parts. The webpage does this by presenting enough information for them to learn, but not too much to overwhelm them. Video tutorials, graphics, and text in the webpage do this by being concise and using simple examples. The hope is that a strong foundation that students can build on when wanting to work on more complicated projects will be established.
The second goal is to provide students with a resource that will give them the confidence necessary to use the tool without an instructor present. That being said it was designed to operate in conjunction with a residential course and not as a standalone tool. Students should have access to instructors or lab staff if they have questions. They should also speak to staff before using the machine for the first time. This webpage is intended as a refresher after initial training. It is not meant to replace training by any means since the laser cutter can be a dangerous tool if operated incorrectly. Often times beginner-level students who have been trained before forget details on how to use the laser cutter system. Consequently, they end up not having the confidence to use it on their own. The webpage is meant to remind them of all of these important
details in three videos and some text that thoroughly explain the entire process of using it,
ranging from preparing artwork for the laser cutter to actually cutting the artwork from a sheet of material.
The third goal is to teach students the role of laser cutting in early-stage design prototyping. The webpage begins to do this by briefly explaining its advantages over other tools that are
commonly used in prototyping such as the 3D printer and machining. There is also a video explaining how to use SolidWorks (a CAD software used often when prototyping) files to laser cut. In the future, a more extensive section on how the laser cutter fits in early-stage design prototyping should be included. Examples of laser cut parts used in prototypes, and information on fastening techniques and how they affect the material used in terms of stress concentration should be added.
A fourth goal is to make students aware of some of the resources that are available to help them
when using the laser cutter to prototype. MakerCase (http://www.makercase.com), which generates artwork of parts that can be laser cut to make a box, as well as Gear Generator (www.geargenerator.com), which generates artwork of gears that can be laser cut are included
[15][16]. Moving forward, more resources should be added.
The last goal is to educate students on safety guidelines they should follow when using the tool. To address this a segment on safety was included in one of the videos presented.
2. The Design of the Webpage
In this section, the webpage's design approach and its contents are discussed. User research was done to identify problems students had when using the laser cutter. This information was used to develop appropriate content.
2.1 User Research
Five upperclassmen in MIT's Department of Mechanical Engineering were interviewed on their experience with the laser cutter in MIT's Introduction to Design (2.00), Toy Product Design
(2.00b), Design and Manufacturing I (2.007), Product Engineering Processes (2.009), and their
research experiences. This was in effort to understand how they learned to use the laser cutter (if they used it at all), where they struggled in that process, and what they thought would be helpful
for the MIT Mechanical Engineering student body to know about the tool. Most of them used the laser cutter to cut simple parts such as gears, boxes, gaskets, and wheels. 1 student had not used the laser cutter, while 3 did not feel confident on knowing the process of operating the laser cutter. 2 mentioned that having information on materials that could be laser cut would be very useful. This information was used in combination with observations made during 2.00b labs and 2.744 open lab hours to guide the first prototype of the webpage. It was concluded that
information on materials should be included, and that at least for the first prototype, basic laser cutter skills in design prototyping should be taught since design students were not really using it to cut complex and detailed parts.
2.2 The Design Approach
The overall approach was to make a website with only the information needed to accomplish the pedagogical goals mentioned above. It was decided that an explanation of what the tool does and how it fits in the prototyping world was needed since the site is targeting design students.
Although the laser cutter is a complex tool, only the basics were included. The role of Illustrator in preparing files for the laser cutter to read, how to operate the laser driver (the laser cutter's printing software), and how to operate the laser cutter itself were explained. Vector and raster
cutting, the two fundamental functions of the laser cutter as well as important parameters are introduced. A list of common materials that should and should not be used with the tool is also included. Last, supplementary resources that can aid in the design process during prototyping are available.
The design approach of the webpage was to have as little text as possible to make navigating through it efficient. Additionally, different forms of media were used to help students better understand the content presented. A combination of looped short videos (acting as animations) and longer videos that were not looped was used. All videos were designed to be reasonably short as well as concise. Simple graphics and pictures were also used to communicate
information. Short looped videos were used when appropriate because it was the most effective way of communicating information quickly without unnecessary details. The idea was for
students to look at these simple graphics and looped videos and quickly understand their main message. Videos over long paragraphs explaining the process of using the tool were chosen so that students could actually see the motions of using it as if they were being re-trained by a member of the teaching staff Enough information was included for students to be able to take a design and laser cut it, but not get lost in details.
3. The Contents of the Webpage
The contents of the webpage and reasons why they were included are explained in detail in this
section.
3.1 Introduction to the Laser Cutter
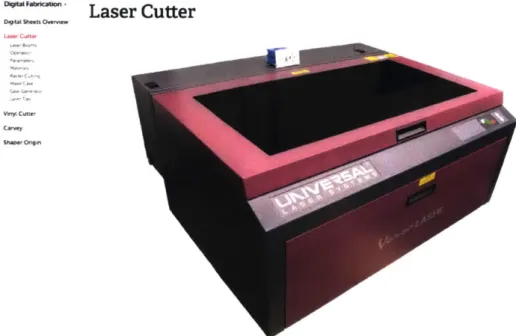
The webpage begins by introducing students to the laser cutter. A picture of the tool is shown
followed by a section titled "The Best Way to Use Laser Beams." This section has a looped
video of the laser cutting a material. The looped video is meant to help students immediately tell
that the laser cutter uses a laser to cut into flat sheets of material. There is a paragraph next to it
that explicitly tells the user what the laser cutter is and that it is used for prototyping. They are
also told about the advantages of the laser cutter over other tools that can produce parts with
similar purposes to those produced by the laser cutter. This information is especially important to
design students who need to take into consideration time and cost.
""
Laser Cutter
UW Ctw
Figure 1: Image of the laser cutter. It is meant to help students quickly recognize the machine in the
PDL. On the left-hand side is the page's menu that can be used to navigate to the different sections of the
webpage.
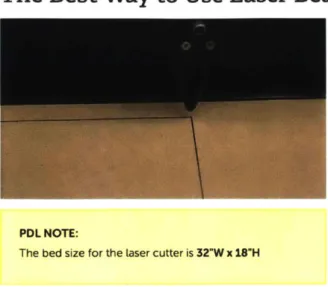
The Best Way to Use Laser Beams
The laser cutter is a fast and precise cutting tool that can be used to cut simple and complex 2D shapes, which can either stand alone or be assembled to build 3D objects. A variety of materials can use used, but plastic (usually acrylic) and wood are most common. It can cut artwork exported from graphic design softwares, giving its users the ability to create detailed and exciting projects!
One advantage of working with a laser cutter is that it is fast for a digital fabrication device, with job and setup times much
lower than tooLs like 3D printers or CNC routers. Laser cutters can be used to make both vector and raster cuts.
PDL NOTE:
The bed size for the laser cutter is 32"W x 18"H
Figure 2: Webpage section titled "The Best Way to Use Laser Beams." It contains a looped video with an
explanation of the laser cutter and a note on specific dimensions of the PDL laser cutter's bed in yellow.
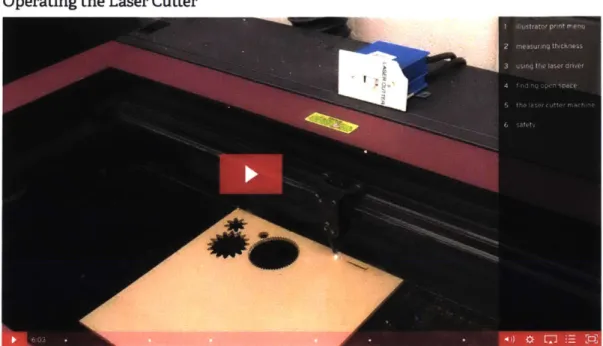
A video titled "Operating the Laser Cutter" explains the overall process of operating the laser
cutter and breaks it up in three parts: working with Illustrator, the laser driver, and the laser cutter itself. The video begins with already prepped artwork for the tool to read in Illustrator and students are told to look at the "How to Vector Cut" and "How to Raster Cut" videos on the page
for help on prepping artwork. Students are taught how to send their artwork to the laser driver
and access the laser cutter's settings window from Illustrator in which the user can control the different parameters of a job. They are taught how to use the materials database in this window, which has a list of materials with pre-set parameters. You can pick a material, set the thickness, and let the database automatically generate the power, speed, pulses per inch, and z-axis
parameters. This is useful if you do not know the parameters for a certain material.
Next, information on how to use the laser driver and its various buttons is introduced. Students learn how to move artwork around on the laser driver's workspace and verify where on the
materials bed (where the material rests) the laser cutter will cut before a job starts. This is useful,
especially when using scraps that have cut outs of old parts already or wanting to save material. Students learn about the laser cutter itself, and its most important parts: the laser head, which
directs the laser using a mirror and focus lens, the gantry, which controls the x and y movement
of the laser cutter, the materials bed, and the power, pause, play, and z-axis buttons. They are
told that turning on the ventilation of the machine and watching their job is important to avoid
any possible fires. Lastly, there is a section on safety and what to do if they see a flare or fire as
the laser cuts.
Operating the Laser Cutter
Figure 3: Video titled "Operating the Laser Cutter." It is 6 minutes and 3 seconds long and has markers
that allow the user to navigate through its different sections. It can also be expanded and sped up.
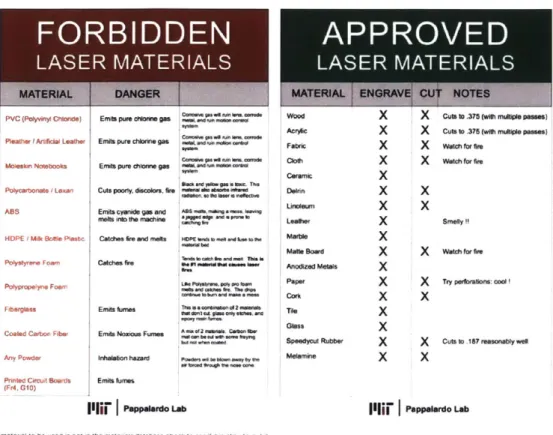
3.2 Laser Parameters and Materials Information
The laser parameters are explained. It is important for students to understand what the
parameters describe and how they affect a job. This is especially useful when troubleshooting an unsuccessful job. It is also helpful when working on more detailed projects or with uncommon materials. There are four parameters: power, speed, pulses per inch, and z-axis. This section is then followed by a materials chart created by MIT's Pappalardo Lab, and important information on material usage and selection [17]. The chart contains prohibited and approved laser materials.
whether approved materials can be engraved or cut is provided. Some notes on maximum thickness that can be cut, warning of possible fire, and smell are included. Students are also told what to do if the material they are using is not in the laser cutter's materials database. Note: all materials in the materials database are approved laser materials.
Laser Parameters
Power: Describes total power output of the laser. The PDL laser cutter is a 60-watt machine. Detail in engravings is sacrificed if too low or too high.
Speed: Describes the speed of the laser head. This is the only parameter that has an effect on runtime. Detail in engravings is sacrificed if too low or too high. A lower speed burns deeper.
PPI (pulses per Inch): Determines how many laser pulses per inch (how many times the laser turns on and off) during cutting. Detail in engravings is sacrificed if too low or too high. A higher PPI increases burning and melting. A lower PPI decreases burning and melting.
Z-Axis: Determines the z-position (i.e. height) of the materials bed. This parameter is important since it makes sure the surface of your material is at the right distance from the laser head for a clean cut.
See the laser setting guide or the laser parameters guide for more detailed information.
Figure 4: Webpage section titled "Laser Parameters." The information is organized in a list structure. There are links to two laser settings/parameters guides for those students who want extra information.
Materials Chart
FORBIDDE\
APPROV-D
_ASER
MAT~AWS
LASER MA~ERIALS
MATERIAL DANGER MATERIAL 1 ENGRAVE CUf NOTES
PVC (Pidyvmnl Chloride) Emile pure chionne 9We .*'* Wood X X Cot to.375 (with multi.e p..es)
AW*RI X X Cubsto *375 (w0 rrmstite p.m) Pleather I Artilkit Lc atWr Emits pWe chlorine PS X
Fabid X )( Wastc fr
Moleel Notebooks Emils poe lorine gas NNW,, X
Ws11= a
Ceam-d x
xwc-Polyprboet I Lexan Cos porl decolors, I = The Don X X
Fibliam E
as loma las te2n X X
"BS Emits, ciiatide gee and I O" . r.WW 0
Cmltsd E mio. Cnto Leather Fth X Smely 9
HOPE I M i Bolt Plmkc Catches fre and me. tA ww ieo .i Maie X
CtBd X X Watch Efirfrd
lilii"|T.. x 1.pe catch s"o ow WAG Th b.k
Pal ty e Fs Cotiheas d k ii-awt~.Os se iia i O tsa Anodized Metals
o h e l n t e F o a m Ibv e W ss yft m ay X T ry pry u nas po nss c o d t I ie ls11 oied cork 7" X
i gle smy cn damin n m tit
Coated Carton pier Emits Nouo Fumes Aeof te ach stk .11
approve laser X X Cts sh.187 resostiry reN Any Pwoe IhlltioC hazard MSIW.wI .x t i,&.rb0X x
printed C inrudt rords Emit tomes
tWr4, G10)
It materiat to be used is not in the materials database check to see if itis ottay to cut it ig the materials chart above. If so. you may wan to cutting tes ery a pieces starting
with with low power and high speed, carefully and inicrmrentaty increasing power
wchile decreasing speed until you can determine the ideal cuti parameters Ithe material is not in the chart please reach out to a mer is of the teachin sta eder ed
Figure
5:
Webpage section titled "Materials." The forbidden laser materials are shown in red and the
approved laser materials are shown in green.
3.3 Vector Cuffing
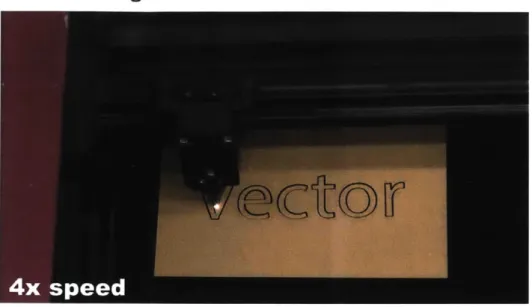
Next, students are introduced to vector cutting. This is done by a looped video of the laser
cutting the word "Vector" into a material and a human hand removing the letters to see that they
have been cut all the way through. It is meant to help students immediately tell that vector
cutting refers to the cutting through the entire depth of a material.
Vector Cutting
Vector cuts are cuts where the laser will cut through the entire depth of the material. following the lines or outlines in the artwork. These cuts are useful for creating parts of custom shapes where you want to make a part by cutting out a section of a larger sheet. In order to do this you need your artwork to be saved in a vector graphics format. Vector graphics formatting uses geometric formulas to describe lines and shapes as a sequence of vectors. This makes it easy for the laser cutter to read and make cuts.
Figure 6: Image of a 4x sped up looped video of vector cutting. Below it is an explanation of vector
cutting.
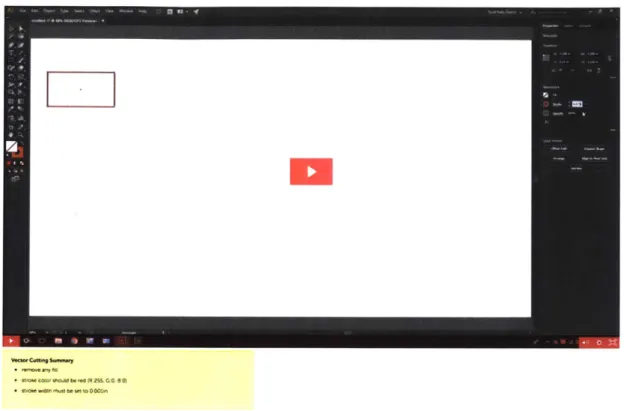
This transitions into a video titled "How to Vector Cut" on how to prepare artwork to be vector cut. It is a screen recording that goes through the motions of drawing a rectangle that is meant to be vector cut and changing its properties for the laser cutter to read properly. It is explained that for a vector cut the outlines of shapes or lines in artwork need to be red (R:255, G:0, B:0), and
very thin (0.001 in). The artwork itself should have no fill, meaning it should only be composed of lines and/or outlines of shapes. A rectangle was chosen because it was simple and it allowed
for a short and concise video. We did not want to overwhelm students with more complex artwork requiring a lot of Illustrator knowledge that is unnecessary for beginner level laser cutter users. At the end of the video an example of an error acquired after using the wrong the
Illustrator properties is shown. A summary below the video with the three critical steps mentioned above for prepping files to be vector cut is included.
How to Vector Cut
* Mwor tosn Mb. to 0 001M
Figure 7: Image of video titled "How to Vector Cut." The video is 1 minute and 25 seconds long. It can also be expanded. This video does not have markers since it is too short. The video's summary is in yellow.
3.4 Raster Cutting
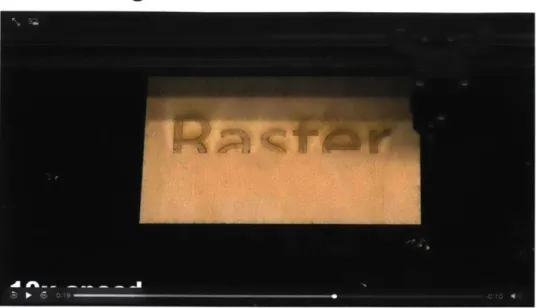
Next, students are introduced to raster cutting. Similar to vector cutting, this is done by a looped video showing the laser raster cutting the word "Raster" onto a material. It is meant to help students immediately tell that raster cutting refers to the engraving of artwork onto a material. A short explanation on what raster cutting is and the types of images that can be raster cut follows
Raster Cutting
Raster cutting (also known as laser etching, Laser engraving, or raster engraving) is different than vector cutting in that
in raster cutting the the surface of the material is etched instead of cutting all the way through. Because rastering
happens by quickly passing the laser head back and forth and precisely turning on and off the Laser, complex images
can be etched into the surface of a variety of materials. In raster cutting you can use vector images or raster images.
Vector images need to have a fill in order to be used for engraving and are not resolution dependent Raster images (also known as bitmap images) consist of pixels, and are resolution dependent.
Figure 8: Image of a 1 Ox sped up looped video of raster cutting. Below it is an explanation of raster
cutting.
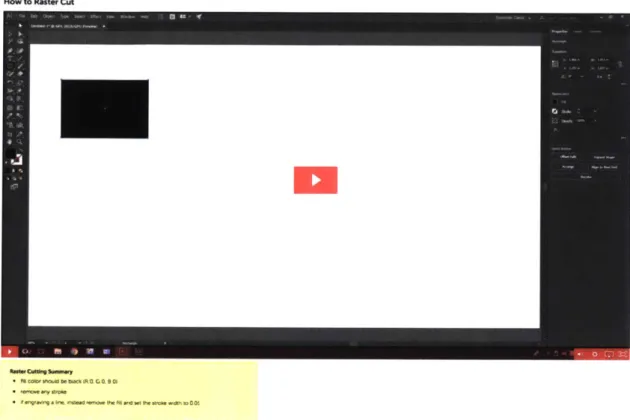
A video titled "How to Raster Cut" follows this information. This short screen recording goes
through the motion of drawing a rectangle that is meant to be raster cut. Again, a rectangle was chosen to make the screen recording short and concise. Students are told that for a raster cut shapes have to have a black (R:O G:O B:O) fill and no stroke. The tutorial focuses on vector images and not raster images since they are simpler and more appropriate for the target audience. A summary below the video with the two critical steps mentioned above for prepping files to be
raster cut is included. Additionally, a note on how to raster cut lines, which is different from shapes is included. The fill needs to be removed, and the stroke has to be black and thicker than
HOW to Rust. Cut
*W mCAWV,~b~.RG S__
N VXXW to** .xo bU ,* JR MO w Q i QdP t.
Figure 9: Image of video titled "How to Raster Cut." It is 42 seconds long and can be expanded.
This video does not have markers since it is too short. The video's summary is in yellow.
3.5
Additional Resources
At this point in the webpage students should have all the information they need to run simple
jobs. Other helpful resources are included. These are meant for students working in the
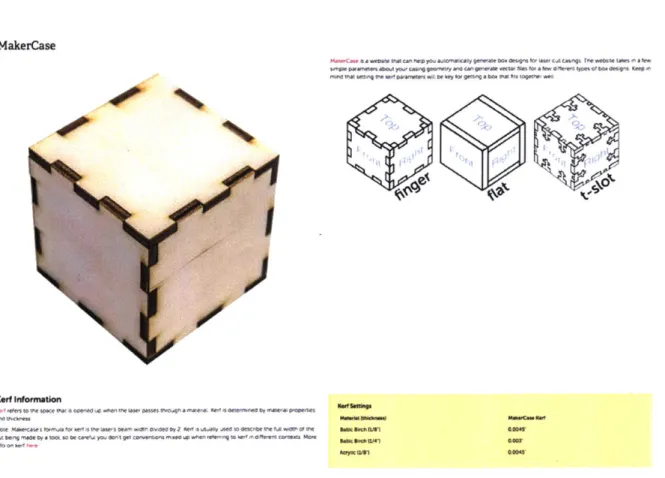
prototyping stages of the design process. The MakerCase website, which can be found at
www.makercase.com is included with an explanation of what it can do. The resource takes in a
few geometric parameters along with the laser cutter's kerf (varies from machine to machine and
depends on material properties and thickness) to create artwork of a box with fingers for press
fits, t-slots for screws and nuts, or simply flat surfaces for adhesive. This artwork can be
imported to Illustrator and be laser cut. This resource was included because it was determined
from observations during 2.00b labs and 2.744 open lab hours as well as from interviews that
students often times need to quickly build box-shaped parts for their prototypes. This resource
prevents them from worrying about the details of designing for good attachment. Moreover, they
can grab the simple box artwork created by the website and customize it as needed.
Consequently, the resource can speed up the prototyping process. The display of its information
on the webpage developed is simple. Students are supposed to be able to look at the pictures (and
not necessarily read the text) and quickly understand the general purpose of the resource. The
text is there to provide secondary information.
MakerCase
tes~a. Npyo.A~I~tO~9~atS~ttaa~fS ta S Oa.00t Satu Coatitta I tat.a Ut aSft
eaW WnetAW OIf y. aw aaoo9&'Y sand CegeaW'W& a N"O III 50. Www.4aao Of ay b" asg " i
ma... W"t ettatoaWO Pttee Wae WLt e key aOW "O. abet as to1aat WOPWWI
K ~
('1
'p--i
K~ef I Onation
-W1 gertalto mef tOSKo OWt 1%O&W W o wn "~t haa~tot eamta aMaae Weat OnVOatmad OW MIMIeteeoaeetl
Kote Ak"WANe %tttA W 61 i V 8W O wnaeeta Seatm e yttOMS 52 SWa 4 UUQ~ 600 atoac~fte Ma "M of SO
Wa bWVfeta byad.a Icoa so t 4ouyo aiegoa caftw*Wtmo* --a up tw mile ' t w Ieta"a O oma M"m
.do W %W1 h"
KWSWA.lM
Nta Sa wS AW~aa
cam.,
Figure 10: Webpage section titled "MakerCase." A short summary of what it does, three simple graphics showing the options it offers, and a picture of a box created using it is shown. Links to websites with more information on kerf as well as a link to the MakerCase website are provided.
The second resource is Gear Generator and can be found at www.geargenerator.com. It was concluded from interviews and observations that several MIT Mechanical Engineering students need gears for prototyping mechanisms. This website takes in geometric parameters and generates artwork that can be used to laser cut gears. The display of its information on the webpage developed is simple for students to quickly understand what the resource does.
Gear Generator
Gear Generator is a website that can help you automatically generate gear vector files. You can then take these files and lasercut custom gears for your project. Neatl
Figure 11: Webpage section titled "Gear Generator." A short summary of what the resource does, along
with a picture of gears laser cut using it is shown. A link to the Gear Generator website is provided.
Lastly, because MIT Mechanical Engineering students use SolidWorks to design parts, a video tutorial titled "From SolidWorks to Laser Cutting" on how to export artwork from SolidWorks to Illustrator is included. The screen recording goes through the motions of making a drawing from a modelled gear, saving it as a Drawing Exchange Format (DXF) file, making sure the drawing to DXF scale ratio is 1:1, and opening it in Illustrator. A gear was chosen because it was simple and helped make the video short and concise. A summary of the main steps to export artwork from SolidWorks to Illustrator is below the video.
From SoUdworks to a Lasercutting
SG_ -T X Shw
-A V 0 a LA M@
ft.U =:d ___ ___ ___0_40_._ _ =_ ______
Vk. Vh V-____ V V". ft iI
For exporg artwork from SotdWorls for use Me w Waser cumg. youl need to talke your SodWo part and mai a
drawing Me From there. you can export a .dxf ft. which can be prepared for laser cutting In llustrator.
Figure 12: Image of video titled "From SolidWorks to Laser Cutting." It is 1 minute and 45 seconds long and can be expanded. It does not have markers since it is too short.
4. Testing, Feedback, and Proposed Revisions
The webpage was tested, feedback was gathered in the form of interviews, and observations were
made. A list of revisions is proposed as a result.
4.1 Testing
In order to test the first prototype of the webpage, 2.00b and 2.744 students who had zero to very
limited prior experience with the laser cutter were contacted. A total of 7 students were trained
by the author. Although it was mentioned that this webpage is not meant to substitute training,
students were trained using it under supervision because this was an efficient manner of testing
the webpage. Each student was allotted one hour of individual time with the laser cutter. The
idea was to get detailed feedback from a few one-on-one sessions to understand the potential
effectiveness of the webpage in detail. Students were told beforehand that they would be
designing a key chain and cutting it out of wood or acrylic as part of the training. If they did not
want to come up with their own design, an Illustrator file with artwork of a building at MIT was
provided for them. Students had to manipulate the colors, widths, strokes, and fills of the artwork
in order to get the laser cutter to raster cut the green artwork, and vector cut the blue artwork
shown in Figure 13. Issues came up when trying to click on parts within the entire artwork since
knowing how to use layers (a more advanced feature in Illustrator) was needed. This feature is
not necessarily needed when making artwork in Illustrator to be laser cut, but it can be very
helpful. All students except one used this file. The exception student made a key chain that
required both raster and vector cutting. For the purposes of the test and the questions that were
being answered, this worked fine.
("ClassOM18
Figure 13: Image of the key chain Illustrator file given to students.
The training tested to see if students could successfully make a laser cut part that involved both raster and vector cutting using the webpage only. Therefore, all parts associated with the operation of the laser cutter, raster, and vector cutting were tested. In the future, the "From SolidWorks to Laser Cutting" video should be tested by giving students a SolidWorks part to laser cut. Additionally, questions on whether or not students think the MakerCase and Gear
Generator information as well as the materials chart are useful should be included in the
interview at the end of the training.
4.2 User Interviews
Students were told to either use their laptop to navigate the webpage or the laser cutter's
computer. They had access to Illustrator on the laser cutter's computer. They were essentially left on their own to navigate the webpage, prepare their artwork, and laser cut their key chain. The training supervisor (the author of this thesis) stayed in the room in case any questions came up and worked on other assignments so that students would not feel pressured. All 7 students completed the training successfully. After the training they were interviewed. The following questions were asked:
1. Which section or video did you use the most?
2. Was there anything on the webpage that you found confusing?
3. Did you watch the videos through their entirety? Why or why not?
5. Is there anything that you would have liked to see on the webpage that is not there?
6. Any other comments or suggestions on anything ranging from layout to content? 7. How much experience did you have with Illustrator before this training?
8. How much experience did you have with the laser cutter before this training?
9. Do you have any questions about the training and how to use the tool (Illustrator, laser
driver, or laser cutter)?
4.3 Feedback and Observations
During the student interviews, notes were taken and summarized. A list of important points is grouped into categories and discussed.
Feedback on the Videos Tested:
Students used the video "Operating the Laser Cutter" the most, followed by the videos "How to Vector Cut" and "How to Raster Cut". Overall, these videos were well received and students commented that they were clear and concise. Students also thought the "How to Vector Cut" and "How to Raster Cut" summaries were helpful. However, there were a couple of minor details that were confusing.
" There was some confusion when the video "Operating the Laser Cutter" mentioned the
terms "raster cut" and "vector cut" because students did not know what they meant. * There was confusion regarding the video "How to Raster Cut" because it does not
mention how to raster cut a line, while its summary does.
Webpage User Interface:
Students did not comment often on webpage layout. When asked about it, they said it was clean and simple, which was good. However, there were complaints about having to scroll through the webpage to get to a specific section.
Suggestions for Additional Media:
Students gave suggestions on additional media or information they would like to see on the webpage. Below is a list of suggestions that were thought could be helpful for the majority of the target audience.
" One student mentioned it would be a good idea to show how to set the z-axis position of
the materials bed manually in case students want to use the webpage for a laser cutter in a different lab without an automatic setup. Note: The PDL's laser cutter automatically sets the z-axis after the material thickness has been inputted into the laser driver.
" Another student mentioned it would be nice to show the versatility of the laser cutter so
that students can see the possibilities in projects the tool offers right away.
* It was suggested that a graphic of the laser driver's buttons and explanations of their functions would be useful as a quick reference.
Other Comments:
Comments that did not necessarily fit in any of the categories mentioned are described below.
" The parameter information needs to be better organized because it is difficult to read. " There were inquiries as to why the laser cutter's settings window showed multiple colors
rather than just the basic red and black (these were the colors used in the videos "How to Vector Cut" and "How to Raster Cut" respectively) mapped to different settings.
" About 4 out of the 7 students struggled with details in Illustrator that were not directly
related to the laser cutter. (For the purposes of laser cutting, a user has to deal with the properties stroke width, fill, and color. However, in order to make more detailed artwork other properties are needed.)
" Some students mentioned it was good to have the materials chart for reference.
It was concluded that the webpage was effective at teaching basic Illustrator and laser cutting skills. However, the biggest sources of confusion came from dealing with Illustrator. Illustrator is a complex program that can be frustrating when not experienced. Therefore, adding more
4.4 Proposed Revisions
It was concluded that short and concise videos were received well by the students. Overall, students felt like they learned enough information from the webpage to use the laser cutter on their own. Moving forward the points made above should be addressed. Actionable items created as a result of the feedback received and observations made during testing are discussed.
Improving Navigation:
Improving navigation would improve the user interface, making the webpage more user-friendly. * Alter the webpage's code (created by Josh Ramos) to have the menu of the page travel
with the user as they scroll through the page.
Media Improvements:
Implementing the following points would make the videos "How to Raster Cut" and "Operating the Laser Cutter" clearer, helping students better understand the material.
" Use a table to better organize the parameters information.
" Edit the "How to Raster Cut" video to mention what properties should be used to engrave
a line.
" Add links to the vector cutting and raster cutting explanations to the "Operating the Laser
Cutter Video" when the terms are mentioned the for the first time.
Additional Media:
Adding the media described below would further clarify information already presented on the website and introduce helpful information that is not currently there.
" Add a schematic of the laser driver buttons with short explanations on what they do. " Add animations of both simple and complex example projects early in the page for users
to quickly see the versatility of the laser cutter. (This could be used to showcase examples of laser cut parts used in prototypes.)
" Add a video showing how to set the z-axis position of the laser cutter's materials bed
manually.
" Introduce a short paragraph explaining how the mapping of artwork colors to different
* Add links to Illustrator tutorials by Adobe (https://www.adobe.com) and Lynda.com
(https://www.lynda.com) that may help students with more advanced Illustrator details [18][19].
5.
Conclusion
Overall, the implementation of a webpage used to teach Mechanical Engineering design students at MIT how to use the laser cutter was successful. Students were able to make laser cut parts fairly quickly by using it. It was concluded that a simple and concise webpage that students can quickly navigate through worked well.
Moving forward, the revisions proposed should be implemented. Additionally, information on how to maintain the tool (cleaning the lens and mirror inside the laser head as well as the materials bed) should be included. A section on how the laser cutter works (the physics behind how it cuts) should also be included. Finally, more information on how the laser cutter fits into early-stage design prototyping should be added.
A separate webpage for intermediate to advanced laser cutter users should be implemented. This
should include advanced information on raster cutting, such as how different laser cutter parameters affect the depth of engravings, and how to engrave pictures with a lot of detail. Tips on how to paint or part finish laser cut materials as well as information on different joints and hinges should be added. Further, different advanced projects (e.g. stamps, frames, engineering mechanisms) made out of different laser cutter materials other than just wood and acrylic should be included. It is also recommended that a separate webpage on Illustrator for product designers be introduced where more detailed information on how to use the various Illustrator features to prepare artwork for the laser cutter should be included. Moreover, other content not related to the laser cutter can be included such as how to use Illustrator to prepare artwork for the vinyl cutter, plotter, and presentations.
Laser Cutter
The Best Way to Use Laser Beams
The Waw cuttw La at nd pMc cuttng tool that can be UsWed to cut Sinplend
2ODe 20 Ops, wNch can either tadaone or be ambed to buld 30 objfcts
A nvaristy at nata can use used bot platic tuaa yacryc) and no d We rot
CdtV O W cart wtWrk d W WOtMd horn gaptiic dsign ftre. giving il user te abit tD m e dailed ard wing proiejCts'
One adardep of worng widh a MW ciWeI W that I fttor dgel tftaratiOn
devi. wMd job Wnd tftOHM Omet mch Lower Own Ctar 30 p entr of CNC MAM.
L-etr c gm con be weed to ma both vectorarMd inter cuts
POLNOTL
The bed Sif for the loercter is 3W X
Appendix
Webpage
WOW Fkdo 0Dgd" ShStU Ovenew Lawar Cu.tw L s, l.o. Pteae.Ctnq cuwyrcube C-eM Sw.er originOperating the Laser Cutter
Laser Parameters
power: Descroes tube power Output of the laser The PDI. later cutter i a 60 -watt wmctane D0M In engraclngs is sacdcsd it toolcw ar too high
Speft Descbes the speed of the asr head The mthe lony premeter that has an effect on suntie. Detn engraIngs a saclficed W totlow of
too high A lower speed hums deeper
PPI Opulasesierldd: Detonnldes how wanyor plAses per intch Pow manytonas the laser ues on and of aseang coning Deed tnengresnge Is
Uctfeced of too low or to high A hgher PP Intreases blInkg and melfta A tower PPI decreases ho"eg and W en
Z-AW: Deternes the x-position P.e. heWahl of the meterlab bed This peranter 4 mnprtnt since it mkes sure Ow awfz e of you mat erlis it
the rgfe distance from the laser head far a clean cut
See the law setng gued at me o oni paramter 9clee for mere detaled m antion
Materials Chart MATERIAL DG .YC.- Oe -mI f ms cow- C ra APad AnDedmer Pte
Pmetdo .co ecA
Fr4 G10)
amem etoso Eeeoe emoonwdwtw
LH--om eA... .-- *
MOsaB oftwoe wmrcoe
elbeiM IM SS S o Co.o.mb .e-.--"= .. ,-.e,.e.... - I.r-o"-.. L"." .. m-r -
-mur
I
lioda
MATERIAL -- e .- ea .ON w.ft U109 S' A.%...ON ... cam no U1-0" ENGRA x x x x x x x xx
x x x x x x x X E CUT NOTES X X Yamfr on x x x x x x x V*kte %V .ar. -.t Cvb aI .I ....atimir I
ftwawf--Vtedrt safe6 $ d 09WS n nty.* .rV tf" imabdldte c~teto 14; tee 0" ctre CO c
'I the r chftt% L Pe aW ltrgwo -S tryyCelffg teee % rCce" W WC~nV wo wan sow power ane tWg spw creralea .&no ecawewaety Acasamo poUe wtarGde eeeg 5pf w"lfyou can detereee me "eai ,au pneren ieteec f am
Vector Cutting
V*ctor cuts are cuts where the Iaser oil cut thtcugh the ontre depth of the masra. tollow g the lines or otowbnes c
te artwork These cuts are useful fir creating parts of custom shapes htiere you want to take a part by cutting out a section of a larger seet In order to do this you need your artwork to be savea in a vector grapdcs foemat Vector
grapNcs forimattng uses geometric octutas to descrbe tnes and shapes as a sequence of vectors. This makes it easy
for the laser cutter to read and make cuts
How to Vector Cut
vector curing Summary
Sremove ary
Sstroke color should be ted (:255, -0. 80) * stroke width must be Wa to 0.001sn
Raster Cutting
Raster cutting also known as aus etching, jaseerngraving. or raster engraving) is anerent Vwan vector cunig in that
n raster cutting the 'he surface of OW nateriat is etched instead of ctAtlg al the way through Because retering
happens by quickly passing the laser head back and forth and precisafy boning on and oft the laser. conpla Irnages can be etched into the surface of a variety of rnateials In raster cutting you can use vector irnages or raster enages Vector riages need to have a AI in order to be ared fot engraving and are not resolution dependent Raster Images (also known as bnnap mages) consist of pit and are resolutiondepe ent
How to Raster Cut
bwe-qrilg &M"- y
fit color shoold be black WO. GQ B:0)
"
-anystroke
* C engraving a tine. noteid fence the A and W Me stroke
qr --~---~--~-
-Iill
A13I
3
/
/
/
I1S
I
I
I
I
I
I
II
'1it
ii
ii
I
I
I
I
I
I
II
it
I
ji
d
II
I
II
Ij
I
1:1
ii
iUI
01 4LfLaser Tips
From SoUdworks to a Laswrcutting
___ag - '--- - .*-e a -=-Ej Urn- _--- * - A- ?. - - B ,~~~.~ _ _ _ _ _ _ _
I
O
ri.pin g Itwe fmmSOdWork6 for oso ~Ww.n Iacaot pOul 0.40 to al your SoutwOrs pan wnd m.k a
References
[1] Allen, I. E., and Seaman, J., 2016, Online Report Card: Tracking Online Education in the
United States, Babson Survey Research Group, pp. 5, 11-12, 26.
[2] Seaman, J. E., Allen, I. E., and Seaman, J., "Grade Increase: Tracking Distance Education in the United States," pp. 5-7.
[31 WIEBE, E. N., and BRANOFF, T. J., 2011, "Online Resource Utilization in a Hybrid Course
in Engineering Graphics," Engineering Graphics, pp. 1-21.
[4] ORANGE, A., and HEINECKE, W., 2012, "An Evaluation of HigherEd 2.0 Technologies in
Undergraduate Mechanical Engineering Courses," pp. 1-29.
[5] GOESER, P. T., 2011, "VIEW - A Virtual Interactive Web-Based Learning Environment for
Engineering," pp. 1-24.
[6] Ramos, J. D., 2013, "Hands-on Online: Towards Experiential Product Design Education
with Online Resources," Thesis, Massachusetts Institute of Technology, pp. 55-59.
[7] "Prototyping Library - Physical Objects to Teach Best Practices in Making" [Online]. Available: http://prototypinglibrary.com/. [Accessed: 03-May-2018].
[8] DeRose, S., "Laser Cutting Projects," Instructables.com [Online]. Available:
http://www.instructables.com/id/Laser-Cutting-Projects/. [Accessed: 03-May-2018]. [9] "Laser Cutting, Engraving & Marking Machines and Equipment" [Online]. Available:
https://www.ulsinc.com/. [Accessed: 03-May-2018].
[10] "Service.Ulsinc.Com -/Support/Tip Sheets/" [Online]. Available: http://service.ulsinc.com/support/Tip%20Sheets/. [Accessed: 03-May-2018].
[11] "Laser Cut Ideas," Pinterest [Online]. Available:
https://www.pinterest.com/MooCB/laser-cut-ideas/. [Accessed: 04-May-2018]. [12] "High Quality Engraving and Laser Equipment I Engravers Network," Engraver's
Network [Online]. Available: http://www.engraversnetwork.com/. [Accessed: 04-May-2018].
[13] "What Do the Laser Parameters Mean?" [Online]. Available:
https://www.troteclaser.com/en-us/knowledge/tips-for-laser-users/laser-parameters-definition/. [Accessed: 04-May-2018].
[14] "Designy" [Online]. Available:
https://ww w.productdesigny.com/media/viewer/digital-fabricationlasercutter. [Accessed:
03-May-2018].
[15] "MakerCase -Easy Laser Cut Case Design" [Online]. Available:
http://www.makercase.com/. [Accessed: 04-May-2018].
[16] Ltd, A. V., Iparigrafika, "Involute Spur Gear Generator and Simulator" [Online]. Available: http://geargenerator.com/. [Accessed: 04-May-2018].
[17] "MIT Pappalardo Lab" [Online]. Available:
https://twitter.com/pappalardolab?lang=en. [Accessed: 04-May-2018].
[18] "Adobe: Creative, Marketing and Document Management Solutions" [Online]. Available: https://www.adobe.com/. [Accessed: 04-May-2018].
[191 "Lynda: Online Courses, Classes, Training, Tutorials," Lynda.com -from Linkedln [Online]. Available: https://www.lynda.com/. [Accessed: 04-May-2018].