HAL Id: hal-01223026
https://hal.inria.fr/hal-01223026v2
Submitted on 2 Nov 2015
HAL is a multi-disciplinary open access
archive for the deposit and dissemination of
sci-entific research documents, whether they are
pub-lished or not. The documents may come from
teaching and research institutions in France or
abroad, or from public or private research centers.
L’archive ouverte pluridisciplinaire HAL, est
destinée au dépôt et à la diffusion de documents
scientifiques de niveau recherche, publiés ou non,
émanant des établissements d’enseignement et de
recherche français ou étrangers, des laboratoires
publics ou privés.
Enterprise Pharo a Web Perspective
Damien Cassou, Stéphane Ducasse, Luc Fabresse, Johan Fabry, Sven van
Caekenberghe
To cite this version:
Damien Cassou, Stéphane Ducasse, Luc Fabresse, Johan Fabry, Sven van Caekenberghe. Enterprise
Pharo a Web Perspective. Square Bracket Associates, pp.279, 2015. �hal-01223026v2�
Enterprise Pharo
a Web Perspective
Damien Cassou Stéphane Ducasse Luc Fabresse Johan Fabry Sven Van Caekenberghe November 1, 2015 commitd7f9861
Copyright 2015 by Damien Cassou, Stéphane Ducasse, Luc Fabresse, Johan Fabry, and Sven Van Caekenberghe.
The contents of this book are protected under the Creative Commons Attribution-ShareAlike 3.0 Unported license.
You are free:
• to Share: to copy, distribute and transmit the work, • to Remix: to adapt the work,
Under the following conditions:
Attribution. You must attribute the work in the manner specified by the author or licensor (but not in any way that suggests that they endorse you or your use of the work).
Share Alike. If you alter, transform, or build upon this work, you may distribute the resulting work only under the same, similar or a compatible license.
For any reuse or distribution, you must make clear to others the license terms of this work. The best way to do this is with a link to this web page:
http://creativecommons.org/licenses/by-sa/3.0/
Any of the above conditions can be waived if you get permission from the copyright holder. Nothing in this license impairs or restricts the author’s moral rights.
Your fair dealing and other rights are in no way affected by the above. This is a human-readable summary of the Legal Code (the full license):
http://creativecommons.org/licenses/by-sa/3.0/legalcode
[
&|]
|Published by Square Bracket Associates, Switzerland. http://squarebracketassociates.org
ISBN xx-xxx-xx-xxx-xxxx-xxxx-First Edition, December 2015.
About this book
Enterprise Pharo is the third volume of the series, following Pharo by Example
and Deep into Pharo. It covers enterprise libraries and frameworks, and in particular those useful for doing web development.
The book is structured in five parts.
The first part talks about simple web applications, starting with a minimal
web application in chapter 1 on Teapot and then a tutorial on building a more complete web application in chapter 2.
Part two of the book deals with HTTP support in Pharo, talking about
charac-ter encoding in chapcharac-ter 3, about using Pharo as an HTTP Client (in chapcharac-ter 4) and server (in chapter 5), and about using WebSockets (in chapter 6).
In the third part we discuss the handling of data for the application. Firstly
we treat data that is in the form of comma-separated values (CSV) in chapter 7. Secondly and thirdly, we treat JSON (in chapter 8) and its Smalltalk coun-terpart STON (in chapter 9). Fourthly, serialization and deserialization of object graphs with Fuel is treated in chapter 10. Lastly, we discuss the Voyage persistence framework and persisting to MongoDB databases in chapter 11.
Part four of the book deals with the presentation layer. Chapter 12 shows
how to use Mustache templates in Pharo, and chapter 13 talks about program-matic generation of CSS files. The documentation of applications could be written in Pillar, which is presented in chapter 14. How to generate .pdf files from the application with Artefact is shown in chapter 15.
The fifth part of the book deals with deploying the web application. This is
explained in chapter 16 that talks not only about how to build and run the application, but also other important topics like monitoring.
This book is a collective work The editors have curated and reformatted the following chapters from blog posts and tutorials written by many people. Here is the complete list of contributors to the book, in alphabetical order:
Olivier Auverlot Sven Van Caekenberghe Damien Cassou Gabriel Cotelli Christophe Demarey Martín Dias Stéphane Ducasse Luc Fabresse Johan Fabry
Cyril Ferlicot Delbecque Norbert Hartl Guillaume Larchevêque Max Leske Esteban Lorenzano Attila Magyar Mariano Martinez-Peck Damien Pollet i
Contents
Contents iii
I Simple Web applications
1 Teapot 3
Attila Magyar with Johan Fabry
1.1 Getting Started . . . 3
1.2 A REST example, showing some CRUD operations . . . 4
1.3 Route . . . 5
1.4 Transforming output from actions . . . 7
1.5 Before and After Filters . . . 9
1.6 Error handlers . . . 10
1.7 Serving static files . . . 10
1.8 Conclusion. . . 10
2 Building and Deploying a Small Web application 11 Sven Van Caekenberghe with Luc Fabresse 2.1 The Web App . . . 11
2.2 Saying Hello World. . . 12
2.3 Debugging our Web App. . . 14
2.4 Serving an HTML Page. . . 15
2.5 Serving an Image . . . 16
2.6 Uploading a New Image . . . 17
2.7 Live Debugging . . . 20
2.8 Image Magic . . . 22
2.9 Adding tests . . . 24
2.10 Saving code to a repository . . . 27
2.11 Defining a project configuration. . . 30
2.12 Running a real cloud server . . . 33
2.13 Deploying for production . . . 34
2.14 Have fun extending this Web app . . . 35
2.15 Solution, part 1, new methods . . . 37
2.16 Solution, part 2, changed methods . . . 37
2.17 Solution, part 3, updated configuration . . . 38
2.18 Conclusion. . . 39
2.19 Listing . . . 39
Contents
II HTTP
3 Character Encoding and Resource Meta Description 45
Sven Van Caekenberghe with Luc Fabresse and Johan Fabry
3.1 Character encoding . . . 45
3.2 Mime-Types . . . 54
3.3 URLs . . . 57
4 Zinc HTTP: The Client-side 61 Sven Van Caekenberghe with Luc Fabresse and Johan Fabry 4.1 HTTP and Zinc . . . 61
4.2 Doing a simple request . . . 62
4.3 HTTP Success ? . . . 66
4.4 Dealing with networking reality . . . 67
4.5 Building URL’s . . . 68
4.6 Submitting HTML forms . . . 69
4.7 Basic Authentication, Cookies and sessions . . . 71
4.8 PUT, POST, DELETE and other HTTP methods . . . 72
4.9 Reusing Network Connections, Redirect Following and Checking for Newer Data 74 4.10 Content-types, mime-types and the accept header . . . 75
4.11 Headers . . . 76
4.12 Entities, Content Readers and Writers. . . 77
4.13 Downloading, Uploading and Signalling progress . . . 79
4.14 Client Options, Policies and Proxies . . . 80
4.15 Conclusion. . . 81
5 Zinc HTTP: The server side 83 Sven Van Caekenberghe with Luc Fabresse and Johan Fabry 5.1 Running a simple HTTP server. . . 83
5.2 Server delegate, testing and debugging . . . 85
5.3 Server authenticator. . . 86
5.4 Logging . . . 87
5.5 Server variants and life cycle . . . 88
5.6 Static file server . . . 89
5.7 Dispatching . . . 90
5.8 Character encoding . . . 92
5.9 Resource protection limits, content and transfer encoding . . . 93
5.10 Seaside adaptor . . . 94
5.11 Scripting a REST Web Service with Zinc . . . 94
5.12 Conclusion. . . 99
6 WebSockets 101 Sven Van Caekenberghe with Luc Fabresse 6.1 An Introduction to WebSockets . . . 101
6.2 The WebSocket Protocol. . . 102
6.3 Source Code . . . 102
6.4 Using Client Side WebSockets . . . 103
Contents
6.5 Using Server Side WebSockets. . . 104
6.6 Building a Pharo Statistics Web Page . . . 106
6.7 Building a Web Chat . . . 107
6.8 A Quick Tour of Zinc WebSocket Implementation . . . 108
6.9 Live Demo . . . 108
6.10 Conclusion. . . 108
III Data 7 Handling CSV with NeoCSV 111 Sven Van Caekenberghe with Damien Cassou and Stéphane Ducasse 7.1 NeoCSV . . . 111 7.2 Generic Mode . . . 113 7.3 Customizing NeoCSVWriter . . . 113 7.4 Customizing NeoCSVReader. . . 115 7.5 Conclusion. . . 117 8 JSON 119 Sven Van Caekenberghe with Damien Cassou and Stéphane Ducasse 8.1 An introduction to JSON . . . 119
8.2 NeoJSON. . . 120
8.3 Primitives . . . 120
8.4 Generic Mode . . . 121
8.5 Schemas and Mappings . . . 122
8.6 Emitting null values . . . 123
8.7 Conclusion. . . 124
9 STON: a Smalltalk Object Notation 125 Sven Van Caekenberghe with Stéphane Ducasse and Johan Fabry 9.1 Introduction . . . 125
9.2 How Values are Encoded . . . 129
9.3 Custom Representations of Objects. . . 132
9.4 Usage . . . 135
9.5 Handling CR, LF inside Strings . . . 138
9.6 Conclusion. . . 138
9.7 Appendix: BNF. . . 138
10 Serializing Complex Objects with Fuel 141 Martín Dias, Stéphane Ducasse, Mariano Martinez Peck and Max Leske with Johan Fabry 10.1 General Information. . . 142
10.2 Getting Started . . . 144
10.3 Managing Globals . . . 146
10.4 Customizing the Graph . . . 148
10.5 Errors . . . 152
10.6 Object Migration. . . 153
10.7 Fuel Format Migration . . . 154
Contents
10.8 Built-in Header Support . . . 155
10.9 Conclusion . . . 156
11 Persisting Objects with Voyage 157 Johan Fabry and Esteban Lorenzano with Damien Cassou and Norbert Hartl 11.1 Setup . . . 158
11.2 Storing objects. . . 160
11.3 Enhancing Storage. . . 164
11.4 Querying in Voyage . . . 168
11.5 Creating and removing indexes . . . 173
11.6 Conclusion. . . 174
IV Presentation 12 Mustache Templates for Pharo 179 Stéphane Ducasse and Norbert Hartl with Johan Fabry 12.1 Getting started. . . 179
12.2 Tags as Variables. . . 180
12.3 Sections . . . 181
12.4 Partial templates . . . 185
12.5 Miscellaneous . . . 187
12.6 Templates made easy . . . 187
13 Cascading Style Sheets with RenoirSt 189 Gabriel Cotelli with Damien Cassou 13.1 Getting started. . . 189
13.2 Defining the rules . . . 190
13.3 Defining the selectors . . . 199
13.4 Important Rules . . . 205
13.5 Media Queries . . . 206
13.6 Vendor-specific extensions . . . 208
13.7 Interaction with other frameworks and libraries . . . 209
14 Documenting your Project with Pillar 211 Damien Cassou and Cyril Ferlicot Delbecque 14.1 Introduction . . . 211
14.2 5 minutes tutorial . . . 213
14.3 Writing Pillar documents . . . 218
14.4 Write a presentation. . . 228
14.5 Configuring your output . . . 229
14.6 Templating. . . 229
14.7 Command-line interface . . . 230
14.8 Pillar from Pharo. . . 231
Contents
15 Generate PDF documents with Artefact 235
Olivier Auverlot and Guillaume Larchevêque with Johan Fabry
15.1 Overview of Artefact . . . 235
15.2 Getting started in 10 minutes . . . 237
15.3 Document Definition . . . 239
15.4 Pages, formats and models . . . 242
15.5 Elements. . . 243
15.6 Stylesheets for newbies . . . 250
15.7 Create your own PDF composite elements . . . 254
15.8 Conclusion. . . 257
V Deployment 16 Deploying a Pharo web application in production 261 Christophe Demarey 16.1 Where to host your application?. . . 261
16.2 Which Operating System? . . . 262
16.3 Build your image . . . 262
16.4 Run your Application . . . 263
16.5 Backup. . . 264
16.6 Monitoring. . . 264
Part I
C H A P T E R
1
Teapot
Attila Magyar with Johan Fabry
We begin the book in this first chapter by showing how basic web applications can be written using just a few lines of code. In the second chapter we will treat the construction of web applications more in depth, also touching on the fundamentals of web application building. But we start by keeping it simple, which is possible thanks to Teapot.
Teapot is a micro web framework on top of the Zinc HTTP web server described in Chapter Zinc Server. It focuses on simplicity and ease of use and is itself small: around 600 lines of code, not counting unit tests. Teapot is developed by Attila Magyar and this chapter is heavily inspired from the original docu-mentation.
1.1
Getting Started
To get started, execute the following code snippet, it will load the latest stable version of Teapot.
Gofer it
smalltalkhubUser: 'zeroflag' project: 'Teapot'; configuration; loadStable.
It is straightforward to launch Teapot and add a page:
Teapot on
GET: '/welcome' -> 'Hello World!'; start.
Opening a browser on http://localhost:1701/welcome results in the follow-ing:
Teapot
Figure 1.1:Go to the Teapot welcome athttp://localhost:1701/welcome
Differences between Teapot and other web frameworks
Teapot is not a singleton and doesn’t hold any global state. You can run multiple Teapot servers inside the same image with their state being isolated from each other.
• There are no thread locals or dynamically scoped variables in Teapot. Everything is explicit.
• It doesn’t rely on annotations or pragmas, the routes are defined pro-grammatically.
• It doesn’t instantiate objects (e.g. ”web controllers”) for you. You can hook http events to existing objects, and manage their dependencies as required.
1.2
A REST example, showing some CRUD operations
Before getting into the details of Teapot. Here is a simple example for manag-ing books. With the followmanag-ing code, we can list books, add a book and delete a book.
| books teapot |
books := Dictionary new.
teapot := Teapot configure: { #defaultOutput -> #json. #port -> 8080. #debugMode -> true }.
1.3 Route
teapot
GET: '/books' -> books;
PUT: '/books/<id>' -> [ :req | | book | book := {'author' -> (req at: #author). 'title' -> (req at: #title)} asDictionary. books at: (req at: #id) put: book ];
DELETE: '/books/<id>' -> [ :req | books removeKey: (req at: #id) ]; exception: KeyNotFound -> (TeaResponse notFound body: 'No such
book'); start.
Now you can create a book with ZNClient or your web client as follows:
ZnClient new
url: 'http://localhost:8080/books/1';
formAt: 'author' put: 'SquareBracketAssociates'; formAt: 'title' put: 'Pharo For The Enterprise'; put
You can also list the contents using http://localhost:1701/books For a more complete example, study the ’Teapot-Library-Example’ package. Now that you get the general feel of Teapot, let us see the key concepts.
1.3
Route
The most important concept of Teapot is the Route. The template for route definitions is as follows:
Method : '/url/*/pattern/<param>' -> Action
A route has three parts:
• an HTTP method (GET, POST, PUT, DELETE, HEAD, TRACE, CONNECT, OP-TIONS, PATCH),
• an URL pattern (i.e. /hi, /users/<name>, /foo/*/bar/*, or a regular expression),
• an action (a block, message send or any object). Here is another example:
Teapot on
GET: '/hi' -> 'Bonjour!';
GET: '/hi/<user>' -> [:req | 'Hello ', (req at: #user)]; GET: '/say/hi/*' -> (Send message: #greet: to: greeter); start.
A wildcard character (*), as in the last route, matches to one URL path seg-ment. A wildcard terminated pattern is a greedy match; for example, '/foo/*' matches to '/foo/bar' and '/foo/bar/baz' too.
Teapot
The second route shows that the action block optionally takes the HTTP request. The third route is an example of a message send, by using the Send class. The selector of the message can take maximum 2 arguments, which will be instances of a TeaRequest and TeaResponse.
It is also possible to use the Zinc client (see Chapter Zinc Client Side) to query the server. The example below illustrates the use of parameters, which we discuss next.
(ZnEasy get: 'http://localhost:1701/hi/user1') entity string. --> "Hello user1"
Parameters in URLs
The URL pattern may contain named parameters (e.g., <user> above), whose values are accessible via the request object. The request is an extension of ZnRequest with some extra methods.
Query parameters and Form parameters can be accessed the same way as path parameters (req at: #paramName). Teapot can perform conversions of parameters to a number, for example as follows:
Teapot on
GET: '/user/<id:IsInteger>' -> [ :req | users findById: (req at: #id) ]; output: #ston; start.
• IsInteger matches digits (negative or positive) only and converts the value to an Integer.
• IsNumber matches any integer or floating point number and converts the value to a Number.
See also the, IsInteger and IsNumber classes for information about introduc-ing user defined conversions.
Using regular expressions
Instead of < and > surrounded named parameters, the regexp pattern may contain subexpressions between parentheses whose values are accessible via the request object.
The following example matches any /hi/user followed by two digits.
Teapot on
GET: '/hi/([a-z]+\d\d)' asRegex -> [ :req | 'Hello ', (req at: 1)]; start.
(ZnEasy get: 'http://localhost:1701/hi/user01') entity string. --> "Hello user01"
1.4 Transforming output from actions
ZnEasy get: 'http://localhost:1701/hi/user' --> not found
How are routes matched?
The routes are matched in the order in which they are defined.
The first route that matches the request method and the URL is invoked. • If a route matches but it returns a 404 error, the search will continue. • If no route matches, the error 404 is returned.
• If a route was invoked, its return value will be transformed to a HTTP response, e.g. if a string is returned it will be transformed to a response with the text/html content-type.
• If a route returns a ZnResponse, no transformation will be performed. • If a route has a response transformer defined (see below), the specified
transformation will be performed.
Aborting
An abort: message sent to the request object immediately stops a request (by signaling an exception) within a route. For example:
Teapot on
GET: '/secure/*' -> [ :req | req abort: TeaResponse unauthorized]; GET: '/unauthorized' -> [ :req | req abort: 'go away' ]; start.
1.4
Transforming output from actions
The default output for Teapot is HTML: the output of an action is interpreted as a string and the content-type of the HTML response is set to text/html. The output of an action may actually undergo any kind of transformations by a response transformer. Response Transformers heve the ultimate re-sponsibility for constructing the outgoing HTTP response (an instance of the class ZnResponse). To clarify, HTTP requests take the following path through Teapot:
ZnRequest -> [Router] -> TeaRequest -> [Route] -> response -> [Resp.Transformer] -> ZnResponse
The response returned by the action can be:
• Any Object that will be transformed by the given response trans-former (e.g., HTML, STON, JSON, Mustache, stream) to a HTTP response (ZnResponse).
Teapot
• A TeaResponse that allows additional parameters to be added (response code, headers).
• A ZnResponse that will be handled directly by the ZnServer without further transformation.
For example, the following three routes produce the same output.
GET: '/greet' -> [:req | 'Hello World!' ]
GET: '/greet' -> [:req | TeaResponse ok body: 'Hello World!' ] GET: '/greet' -> [:req |
ZnResponse new
statusLine: ZnStatusLine ok;
entity: (ZnEntity html: 'Hello World!'); yourself ]
Response transformers
The responsibility of a response transformer is to convert the output of the action block to HTML and to set the content-type of the response. Some response transformers require external packages (e.g., NeoJSON, STON, Mus-tache). See the TeaOutput class for more information, for example the HTML transformer is TeaOutput html.
For example, with the following configuration:
Teapot on
GET: '/jsonlist' -> #(1 2 3 4); output: #json;
GET: '/sometext' -> 'this is text plain'; output: #text; GET: '/download' -> ['/tmp/afile' asFileReference readStream]; output: #stream; start.
Figure 1.2 shows the result for the /sometext route.
If the NeoJSON package is loaded (See chapter NeoJSON.) the jsonlist trans-former will return a JSON array:
(ZnEasy get: 'http://localhost:1701/jsonlist') entity string. --> '[1,2,3,4]'"
If you have a file located /tmp/afile you can access it
ZnEasy get: 'http://localhost:1701/download'
--> a ZnResponse(200 OK application/octet-stream 35B)
If Mustache is installed (See chapter Mustache.) you can output templated information.
Teapot on
GET: '/greet' -> {'phrase' -> 'Hello'. 'name' -> 'World'}; output: (TeaOutput mustacheHtml: '<b>{{phrase}}</b>
<i>{{name}}</i>!'); start.
1.5 Before and After Filters
Figure 1.2:Teapot producing plain texthttp://localhost:1701/sometext.
1.5
Before and After Filters
Teapot also offers before and after filters. Before filters are evaluated be-fore each request that matches the given URL pattern. Requests can also be aborted (by sending the abort: message) in before and after filters.
In the following example a before filter is used to enable authentication: if the session has no #user attribute, the browser is redirected to a login page.
Teapot on
before: '/secure/*' -> [ :req | req session
attributeAt: #user
ifAbsent: [ req abort: (TeaResponse redirect location: '/loginpage')]];
before: '*' -> (Send message: #logRequest: to: auditor); GET: '/secure' -> 'I am a protected string';
start.
After filters are evaluated after each request and can read the request and modify the response.
Teapot on
after: '/*' -> [ :req :resp |
resp headers at: 'X-Foo' put: 'set by after filter']; start.
Teapot
1.6
Error handlers
Teapot also handles exceptions of a configured type(s) for all routes and before filters. The following example illustrates how the errors raised in actions can be captured by exception handlers.
Teapot on
GET: '/divide/<a>/<b>' -> [ :req | (req at: #a) / (req at: #b)]; GET: '/at/<key>' -> [ :req | dict at: (req at: #key)];
exception: ZeroDivide -> [ :ex :req | TeaResponse badRequest ]; exception: KeyNotFound -> {#result -> 'error'. #code -> 42}; output: #json; start.
The request /div/6/3 succeeds and returns 2. The request /div/6/0 raises an error and it is caught and returns a bad request.
(ZnEasy get: 'http://localhost:1701/div/6/3') entity string. --> 2
(ZnEasy get: 'http://localhost:1701/div/6/0'). --> "bad request"
You can use a comma-separated exception set to handle multiple exceptions.
exception: ZeroDivide, DomainError -> handler
The same rules apply for the return values of the exception handler as were used for the Routes.
1.7
Serving static files
Teapot can straightforwardly serve static files. The following example serves the files located on the file system at /var/www/htdocs at the /static URL.
Teapot on
serveStatic: '/static' from: '/var/www/htdocs'; start.
1.8
Conclusion
Teapot is a powerful and simple web framework. It is based on the notion of routes and request transformations. It supports the definition of REST application.
Now an important point: Where does the name come from? 418 I’m a teapot
(RFC 2324) is an HTTP status code. It was defined in 1998 as one of the
tra-ditional IETF April Fools’ jokes, in RFC 2324, Hyper Text Coffee Pot Control Protocol, and is not expected to be implemented by actual HTTP servers.
C H A P T E R
2
Building and Deploying a Small
Web application
Sven Van Caekenberghe with Luc FabresseThis chapter details the whole development process of a Web application in Pharo through a detailed example. Of course, there are an infinite number of ways to make a Web application. Even in Pharo, there are multiple frame-works approaching this problem, most notably Seaside, AIDAweb and Iliad. However, the presented example is directly built on top of the foundational framework called Zinc HTTP Components. By doing so, we’ll be touching the fundamentals of HTTP and Web applications and you will understand the actual basic mechanics of building and deploying a Web application. You will also discover that using nice objects abstracting each concept in HTTP and related open standards makes the actual code easier than you might expect. The dynamic, interactive nature of Pharo combined with its rich IDE and library will allow us to do things that are nearly impossible using other technology stacks. By chronologically following the development process, you will see the app growing from something trivial to the final result. Finally, we will save our source code in a repository and deploy for real in the cloud. Let’s get started.
2.1
The Web App
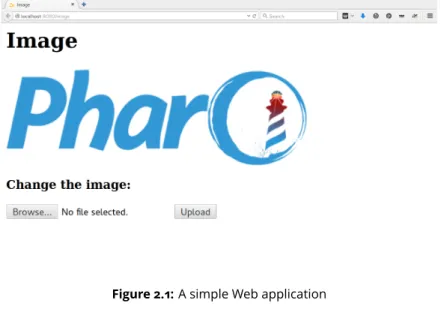
The Web application that we are going to build will show a picture and allow users to change the picture by uploading a new one as shown by Figure 2.1. Because we want to focus on the basic mechanics, the fundamentals as well as the build and deploy process, there are some simplifications. There will be one picture for all users, no login and we will store the picture in memory.
Building and Deploying a Small Web application
Figure 2.1:A simple Web application
In our implementation, /image will serve an HTML page containing the image and a form. To serve the raw image itself, we’ll add a parameter, like /im-age?raw=true. These will be GET HTTP requests. The form will submit its data to /image as a POST request.
2.2
Saying Hello World
Let’s lay the groundwork for our new Web application by making a version that only says ’Hello World!’. We’ll be extending the Web app gradually until we reach our functional goal.
Open the Nautilus System Browser and create a new package (right click in the first column) called something like ’MyFirstWebApp’. Now create a new class (right click in the second column) with the same name, MyFirstWebApp. You will be given a template: edit ’NameOfSubclass’ and accept by clicking ’OK’. Your definition should now appear in the bottom pane.
Object subclass: #MyFirstWebApp instanceVariableNames: '' classVariableNames: '' poolDictionaries: '' category: 'MyFirstWebApp'
Any object can be a Web app, it only has to respond to a message called han-dleRequest: to answer a response based on a request. Now add the following method:
MyFirstWebApp>>handleRequest: request
2.2 Saying Hello World
Figure 2.2:Defining a first version of the application.
request uri path = #image
ifFalse: [ ^ ZnResponse notFound: request uri ]. ^ ZnResponse ok: (ZnEntity text: 'Hello World!')
Create a new protocol called public (by right-clicking in the third column). When the new protocol is selected, a new method template will appear in the bottom pane. Overwrite the whole template with the code above and accept it as shown Figure 2.2.
What we do here is to look at the incoming request to make sure the URI path is /image which will be the final name of our Web app. If not, we return a Not Found (code 404) response. If so, we create and return an OK response (code 200) with a simple text entity as body or payload.
Now we define the method value: to make it an alias of handleRequest: as follows:
MyFirstWebApp>>value: request ^ self handleRequest: request
This is needed so our Web app object can be used more flexibly. To test our Web app, we’ll add it as one of the pages of the default server, like this:
Building and Deploying a Small Web application
Figure 2.3:Your first hello world Web app in action
ZnServer startDefaultOn: 8080.
ZnServer default delegate map: #image to: MyFirstWebApp new.
The second expression adds a route from /image to an instance of MyFirst-WebApp. If all is well, http://localhost:8080/image should show a friendly message as shown in Figure 2.3. Note how we are not even serving HTML, just plain text.
Try changing the text.
2.3
Debugging our Web App
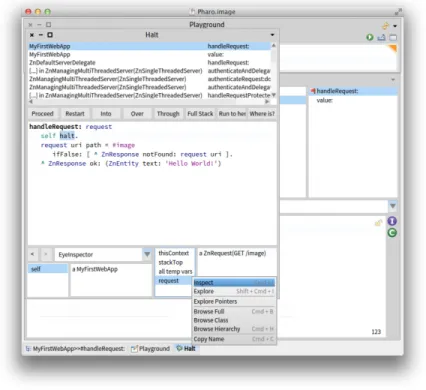
Try putting a breakpoint in MyFirstWebApp>>handleRequest: (by inserting self halt in the method source code). Then, if you refresh the page from the web browser, a debugger will open in Pharo allowing you to inspect things. You can just continue the execution by clicking on the proceed button. Or you can look into the actual request and response objects as shown in Figure 2.4. Note how Pharo is a live environment: you can change the behavior of the application in the debugger window (such as changing the response’s text) and the change is immediately used.
You can leave the server running. If you want you can enable logging, or switch to debug mode and inspect the server instance as explained in Chapter Zinc Server. Don’t forget to remove any breakpoints you set before continu-ing.
2.4 Serving an HTML Page
Figure 2.4:Using the debugger to navigate execution
2.4
Serving an HTML Page
HTML generation can be done with some of existing high-level Pharo frame-works such as Mustache (see Chapter Mustache). In the following, we manu-ally compose the HTML to focus on app building and deployment. Go ahead and add a new method named html.
MyFirstWebApp>>html
^ '<html><head><title>Image</title> <body>
<h1>Image</h1> </body></html>'
Additionally, change the handleRequest: method to use the new method.
MyFirstWebApp>>handleRequest: request request uri path = #image
ifFalse: [ ^ ZnResponse notFound: request uri ]. ^ ZnResponse ok: (ZnEntity html: self html)
Refresh the page in your web browser. You should now see an HTML page as in Figure 2.5.
Building and Deploying a Small Web application
Figure 2.5:Returning an HTML response
You have probably noted the red exclamation mark icon in front of our class name in the browser. This is an indication that we have no class comment, which is not good: documentation is important. Click the Comments button and write some documentation. You can also use the class comment as a notepad for yourself, saving useful expressions that you can later execute in place such as the two expressions above to start the server.
2.5
Serving an Image
For the purpose of our Web app, images can be any of three types: GIF, JPEG and PNG. The application will store them in memory as an object wrapping the actual bytes together with a MIME type.
To simplify our app, we will arrange things so that we always start with a default image, then we always have something to show. Let’s add a little helper: the downloadPharoLogo method:
MyFirstWebApp>>downloadPharoLogo ^ ZnClient new
beOneShot;
get: 'http://pharo.org/files/pharo.png'; entity
Quickly test the code by selecting the method body (not including the name) and inspecting the result. You should get the bytes of an image back. Now add the accessor image defined as follow:
MyFirstWebApp>>image
2.6 Uploading a New Image
^ image ifNil: [ image := self downloadPharoLogo ]
When you try to accept this method, you will get an error. The method is trying to use an unknown variable named image. Select the option to automat-ically declare a new instance variable.
Remember that we decided we were going to serve the raw image itself using a query variable, like /image?raw=true. Make the following modification to existing methods and add a new one as shown below.
MyFirstWebApp>>html ^ '<html><head><title>Image</title> <body> <h1>Image</h1> <img src="image?raw=true"/> </body></html>' MyFirstWebApp>>handleRequest: request request uri path = #image
ifFalse: [ ^ ZnResponse notFound: request uri ]. ^ self handleGetRequest: request
MyFirstWebApp>>handleGetRequest: request
^ (request uri queryAt: #raw ifAbsent: [ nil ])
ifNil: [ ZnResponse ok: (ZnEntity html: self html) ] ifNotNil: [ ZnResponse ok: self image ]
The HTML code now contains an img element. The handleRequest: method now delegates the response generation to a dedicated handleGetRequest: method. This method inspects the incoming URI. If the URI has a non-empty query variable raw, we serve the raw image directly. Otherwise, we serve the HTML page like before.
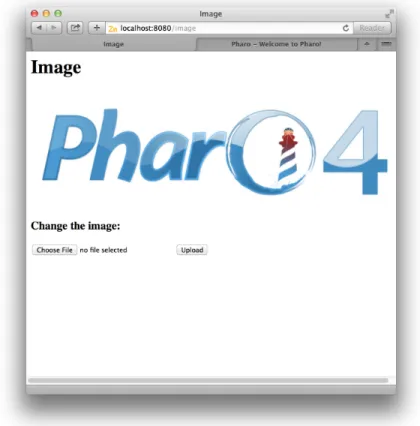
When you refresh the page in the web browser, you should now see an image as in Figure 2.6.
2.6
Uploading a New Image
Interaction is what differentiates a Web site from a Web application. We will now add the ability for users to upload a new image to change the one on the server. To add this ability we need to use an HTML form. Let’s change our HTML one last time.
MyFirstWebApp>>html ^ '<html><head><title>Image</title> <body> <h1>Image</h1> <img src="image?raw=true"/> <br/> 17
Building and Deploying a Small Web application
Figure 2.6:Serving the Pharo logo
<form enctype="multipart/form-data" action="image" method="POST"> <h3>Change the image:</h3>
<input type="file" name="file"/> <input type="submit" value= "Upload"/> </form>
</body> </html>'
The user will be able to select a file on the local disk for upload. When he clicks on the Upload submit button, the web browser will send an HTTP POST request to the action URL, /image, encoding the form contents using a tech-nique called multi-part form-data. With the above change, you will see the form but nothing will happen if you click the submit button: this is because the server does not know how to process the incoming form data.
In our request handling, we have to distinguish between GET and POST re-quests. Change handleRequest: one last time:
MyFirstWebApp>>handleRequest: request request uri path = #image
ifTrue: [
request method = #GET
ifTrue: [ ^ self handleGetRequest: request ]. request method = #POST
ifTrue: [ ^ self handlePostRequest: request ] ]. ^ ZnResponse notFound: request uri
Now we have to add an implementation of handlePostRequest: to accept the uploaded image and change the current one.
2.6 Uploading a New Image
MyFirstWebApp>>handlePostRequest: request | part |
part := request entity partNamed: #file. image := part entity.
^ ZnResponse redirect: #image
We start with a simple version without error handling. The entity of the incoming request is a multi-part form-data object containing named parts. Each part, such as the file part, contains another sub-entity: in our case, the uploaded image. Note how the response to the POST is a redirect to the main page. You should now have a fully functional web application.
Nevertheless, we have taken a bit of a shortcut in the code above. It is pretty dangerous to just accept what is coming in from the internet without doing any checking. Here is an improved version.
MyFirstWebApp>>handlePostRequest: request | part newImage badRequest |
badRequest := [ ^ ZnResponse badRequest: request ]. request hasEntity ifFalse: badRequest.
(request contentType matches: ZnMimeType multiPartFormData) ifFalse: badRequest.
part := request entity partNamed: #file ifNone: badRequest. newImage := part entity. (newImage notNil
and: [ newImage contentType matches: 'image/*' asZnMimeType ]) ifFalse: badRequest.
image := newImage.
^ ZnResponse redirect: #image
Our standard response when something is wrong will be to return a Bad Request (code 400). We define this behavior in a temporary variable so that we can reuse it multiple times over. The first test makes sure the current POST request actually contains an entity and that it is of the correct type. Next, the code checks that there is no file part. Finally, the code makes sure the file part is actually an image by matching with the wildcard image/* MIME type. The user can now upload a new image through the application as can be seen in Figure 2.7. This image is saved in memory and displayed for all visitors until the application is restarted.
If you are curious, set a breakpoint in the handlePostRequest: method and inspect the request object of an actual request. You will learn a lot from inspecting and manipulating live objects.
Building and Deploying a Small Web application
Figure 2.7:Changing the displayed image
2.7
Live Debugging
Let’s make a deliberate error in our code. Change handlePostRequest: so that the last line reads like:
^ ZnResponse redirectTo: #image
The compiler will already complain, ignore the warning and accept the code anyway. If you try to upload a new image, your browser window will display a following text which corresponds to a Pharo error:
MessageNotUnderstood: ZnResponse class>>redirectTo:
But, we can do better and activate the debug mode of the server. Let’s stop and restart our Web app using:
ZnServer stopDefault.
(ZnServer startDefaultOn: 8080) debugMode: true.
ZnServer default delegate map: #image to: MyFirstWebApp new.
2.7 Live Debugging
Figure 2.8:Debugging.
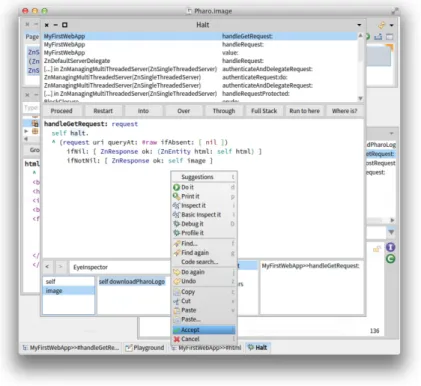
If you now try to upload an image through the Web browser, the debugger will pop up in Pharo telling you that ZnResponse does not understand redi-rectTo: and show you the offending code. You could fix the code and try uploading again to see if it works as shown in Figure 2.8.
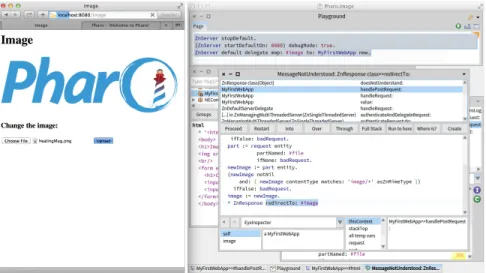
But we can do even better! Just fix the code directly within the debugger window and accept it. Now you can restart and proceed the execution. The same request is still active and the server will now do the correct thing. Have a look at your Web browser: you will see that your initial action, the upload, that first initially hung, has now succeeded.
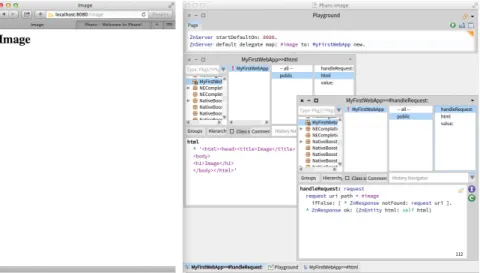
Up to now, the suggestion was that you can use the debugger and inspector tools to look at requests and responses. But you can actually change them while they are happening! Prepare for our experiment by making sure that you change the image to be different from the default one. Now set a break-point in handleGetRequest: and reload the main page. There will be two requests coming in: the first one for /image and the second one for /im-age?raw=true. Proceed the first one.
Now, with the execution being stopped for the second request, click on the image instance variable in the bottom left pane (cf. Figure 2.9). The pane next to it will show some image entity. Select the whole contents and replace it with self downloadPharoLogo and accept the change. Now proceed the execution. Your previously uploaded image is gone, replaced again by the default Pharo logo. We just changed an object in the middle of the execution. Imagine doing all your development like that, having a real conversation with your application, while you are developing it. Be warned though: once you get used to this, it will be hard to go back.
Building and Deploying a Small Web application
Figure 2.9:Live change.
2.8
Image Magic
The abilities to look at the requests and responses coming in and going out of the server, to set breakpoints, to debug live request without redoing the user interaction or to modify data structure live are already great and quite unique. But there is more. Pharo is not just a platform for server applications, it can be used to build regular applications with normal graphics as well. In fact, it is very good at it. That is why it has built-in support to work with JPEG, GIF or PNG.
Would it not be cool to be able to actually parse the image that we were manip-ulating as an opaque collection of bytes up till now? To make sure it is real. To look at it while debugging. Turns out this is quite easy. Are you ready for some image magick, pun intended?
The Pharo object that represents images is called a form. There are objects called GIFReadWriter, PNGReadWriter and JPEGReadWriter that can parse bytes into forms. Add two helper methods, formForImageEntity: and form.
MyFirstWebApp>>formForImageEntity: imageEntity | imageType parserClassName parserClass parser |
2.8 Image Magic
imageType := imageEntity contentType sub.
parserClassName := imageType asUppercase, #ReadWriter.
parserClass := Smalltalk globals at: parserClassName asSymbol. parser := parserClass on: imageEntity readStream.
^ parser nextImage MyFirstWebApp>>form
^ self formForImageEntity: self image
What we do is use the sub type of the mime type, like ”png” in image/png, to find the parser class. Then we instantiate a new parser on a read stream on the actual bytes and invoke the parser with sending nextImage, which will return a form. The form method makes it easy to invoke all this logic on our current image.
Now we can have a look at, for example, the default image like this:
MyFirstWebApp new form asMorph openInWindow.
Obviously you can do this while debugging too. We can also use the image parsing logic to improve our error checking even further. Here is the final version of handlePostRequest:
MyFirstWebApp>>handlePostRequest: request | part newImage badRequest |
badRequest := [ ^ ZnResponse badRequest: request ]. (request hasEntity
and: [ request contentType matches: ZnMimeType multiPartFormData ])
ifFalse: badRequest. part := request entity
partNamed: #file ifNone: badRequest. newImage := part entity. (newImage notNil
and: [ newImage contentType matches: 'image/*' asZnMimeType ]) ifFalse: badRequest.
[ self formForImageEntity: newImage ] on: Error
do: badRequest. image := newImage.
^ ZnResponse redirect: #image
Before making the actual assignment of the new image to our instance vari-able we added an extra expression. We try parsing the image. We are not interested in the result, but we do want to reply with a bad request when the parsing has failed.
Once we have a form object, the possibilities are almost endless. You can query a form for its size, depth and other elements. You can manipulate the
Building and Deploying a Small Web application
Figure 2.10:Automatically create a test class.
form in various ways: scaling, resizing, rotating, flipping, cropping, composit-ing. And you can do all this in an interactive and dynamic environment.
2.9
Adding tests
We all know that testing is good, but how do we actually test a Web app? Writing some basic tests is actually not difficult, since Zinc HTTP Components covers both the client and the server side with the same objects.
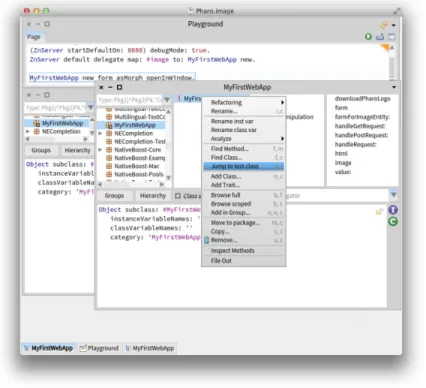
Writing tests is creating objects, letting them interact and then asserting a number of conditions. You should start by creating a new subclass of Test-Case named MyFirstWebAppTest. But the Pharo browser helps you here using the ”Jump to test class” in the contextual menu on MyFirstWebApp (cf. Figure 2.10).
Add now the following helper method on MyFirstWebAppTest:
MyFirstWebAppTest>>withServerDo: block | server |
server := ZnServer on: 1700 + 10 atRandom.
2.9 Adding tests
[
server start.
self assert: server isRunning & server isListening. server delegate: MyFirstWebApp new.
block cull: server ] ensure: [ server stop ]
Since we will need a configured server instance with our Web app as delegate for each of our tests, we move that logic into #withServerDo: and make sure the server is OK and properly stopped afterwards. Now we are ready for our first test.
MyFirstWebAppTest>>testMainPage self withServerDo: [ :server |
| client |
client := ZnClient new.
client url: server localUrl; addPath: #image. client get.
self assert: client isSuccess.
self assert: (client entity contentType matches: ZnMimeType textHtml).
self assert: (client contents includesSubstring: 'Image'). client close ]
In testMainPage we do a request for the main page, /image, and assert that the request is successful and contains HTML. Make sure the test is green by running it from the system browser by clicking on the round icon in front of the method name in the fourth pane (cf. Figure 2.11).
Let’s try to write a test for the actual raw image being served.
MyFirstWebAppTest>>testDefaultImage self withServerDo: [ :server |
| client |
client := ZnClient new.
client url: server localUrl; addPath: #image; queryAt: #raw put: #true.
client get.
self assert: client isSuccess.
self assert: (client entity contentType matches: 'image/*' asZnMimeType).
self assert: client entity equals: server delegate image. client close ]
Note how we can actually test for equality between the served image and the one inside our app object (the delegate). Run the test.
Our final test will actually do an image upload and check if the served image did actually change to what we uploaded. Here we define the method image that returns a new image.
Building and Deploying a Small Web application
Figure 2.11:Running a test case.
MyFirstWebAppTest>>image ^ ZnClient new beOneShot; get: 'http://zn.stfx.eu/zn/Hot-Air-Balloon.gif'; entity MyFirstWebAppTest>>testUpload self withServerDo: [ :server |
| image client | image := self image. client := ZnClient new.
client url: server localUrl; addPath: #image.
client addPart: (ZnMimePart fieldName: #file entity: image). client post.
self assert: client isSuccess.
client resetEntity; queryAt: #raw put: #true. client get.
self assert: client isSuccess.
self assert: client entity equals: image. client close ]
2.10 Saving code to a repository
The HTTP client object is pretty powerful. It can do a correct multi-part form-data POST, just like a browser. Furthermore, once configured, it can be reused, like for the second GET request.
2.10
Saving code to a repository
If all is well, you now have a package called MyFirstWebApp containing two classes, MyFirstWebApp and MyFirstWebAppTest. The first one should have 9 methods, the second 5. If you are unsure about your code, you can double check with the full listing at the end of this document. Our Web app should now work as expected, and we have some tests to prove it.
But our code currently only lives in our development image. Let’s change that and move our code to a source code repository.
The Monticello Browser
For this we first have to use the Monticello Browser tool. In the first pane of the Nautilus Browser, click on the icon in front of your package named MyFirstWebApp as shown in Figure 2.12.
Once opened, Monticello shows on it left pane the list of loaded packages. The currently selected one should be yours as depicted in Figure 2.13.
The left pane of Monticello shows the list of repositories in which the cur-rently selected package can be saved. Indeed, Pharo uses distributed source code management. Your code can live on your local file system, or it can live on a server. As shown in Figure 2.13, by default, your package MyFirst-WebApp can only be saved locally in a directory. We can easily add a remote repository. The main place for storing Pharo code is on SmalltalkHub http: //www.smalltalkhub.com. Go over there and create yourself a new account. Once you have an account, create and register a new project called 'MyFirst-WebApp'. You can leave the public option checked, it means that you and others can download the code without credentials. Your project’s page should look like the one on Figure 2.14.
On this page, select and copy the Monticello registration template (make sure to copy the whole contents, including the username and password parts). Now, go back to Pharo and in Monticello, click on the +Repository button (be sure that your package is selected in the left pane).
Select Smalltalkhub.com as repository type and overwrite the presented template with the one you just copied. It should look similar to Figure 2.15. Before accepting, fill in your user(name) and password (between the single quotes), the ones you gave during registration on SmalltalkHub.
Now, Monticello Browser shows you to repositories to save your package as shown in Figure 2.16.
Building and Deploying a Small Web application
Figure 2.12:Open Monticello on your package.
You may have notice that there is an asterisk (*) in front of your package name. It indicates that the package is dirty, that it has uncommitted changes. By clicking on the ’Changes’ button, you see what has locally changed (or force a change computation). You should get a browser showing all the changes that you made. Since this is the first version, all your changes are additions.
The Changes/Diff Browser
OK, we’re almost done. Go back to the Monticello Browser and click the ’Save’ button (with your package and repository selected). Leave the version name, something like MyFirstWebApp-SvenVanCaekenberghe.1 alone, write a nice commit message in the second pane and press Accept to save your code to SmalltalkHub.
Committing to SmalltalkHub
When all goes well, you will see an upload progress bar and finally a version window that confirms the commit. You can close it later on.
Name: MyFirstWebApp-SvenVanCaekenberghe.1
2.10 Saving code to a repository
Figure 2.13:The Monticello browser.
Author: SvenVanCaekenberghe
Time: 9 July 2013, 2:18:24.638381 pm UUID: adad42a6-ff4c-41a4-a2a3-09f8cb29c902 Ancestors:
First check in of our Web app, following 'Building and deploying your first Web a
Confirmation Version Window
If something goes wrong, you probably made a typo in your repository specifi-cation. You can edit it by right-clicking on it in the Monticello Browser and selecting ‘Edit repository info’. If a save fails, you will get a Version Window after some error message. Don’t close the Version Window. Your code now lives in your local package cache. Click the ‘Copy’ button and select your SmalltalkHub repository to try saving again.
You can now browse back to Smalltalkhub.com to confirm that your code arrived there.
Building and Deploying a Small Web application
Figure 2.14:Smalltalkhub project page.
Looking at our commit on SmalltalkHub
After a successful commit, it is a good idea to save your image. In any case, your package should now no longer be dirty, and there should be no more differences between the local version and the one on SmalltalkHub.
2.11
Defining a project configuration
Real software consists of several packages and will depend on extra external libraries and frameworks. In practice, software configuration management, including the management of dependencies and versions, is thus a necessity. To solve this problem, Pharo is using Metacello (the book Deep into Pharo http://deepintopharo.com contains a full chapter on it). And although we don’t really need it for our small example, we are going to use it anyway. Of course, we will not go into details as this is a complex subject.
To create a Metacello configuration, you define an object, what else did you ex-pect? But we must respect some name conventions so Monticello can help us to generate part of this Metacello configuration. Open Monticello and click on the +Config button to add a configuration named ConfigurationOfMyFirst-WebApp. With a right click on it, you can ”Browse configuration” which open a Nautilus browser on this newly created class. We are now going to define
2.11 Defining a project configuration
Figure 2.15:Adding a Smalltalkhub repository in Monticello for your project.
three methods: one defining a baseline for our configuration, one defining concrete package versions for that baseline, and one declaring that version as the stable released version. Here is the code (if you would be working in Pharo 3.0 you will notice that MetacelloConfigTemplate contains some extra template methods, remove any baseline or version related ones and overwrite stable:)
ConfigurationOfMyFirstWebApp>>baseline1: spec <version: '1-baseline'>
spec for: #common do: [ spec blessing: #baseline; repository: 'http://smalltalkhub.com/mc/SvenVanCaekenberghe/MyFirstWebApp/main' package: 'MyFirstWebApp' ] ConfigurationOfMyFirstWebApp>>version1: spec <version: '1' imports: #('1-baseline')> spec for: #common do: [
spec
blessing: #release;
package: 'MyFirstWebApp' with:
Building and Deploying a Small Web application
Figure 2.16:Multiple repositories for a project in Monticello.
'MyFirstWebApp-SvenVanCaekenberghe.1' ] ConfigurationOfMyFirstWebApp>>stable: spec
<symbolicVersion: #'stable'> spec for: #common version: '1'
Once you committed the project (that consists in both the Metacello con-figuration and the Monticello package ’MyFirstWebApp’), you can test your configuration by trying to load it.
ConfigurationOfMyFirstWebApp load.
Of course, not much will happen since you already have the specified version loaded. For some feedback, make sure the Transcript is open and inspect the above expression.
Now add your SmalltalkHub repository to the ConfigurationOfMyFirstWebApp Monticello package. Double-check the changes in the Monticello Browser, re-member we copied a whole class. Now commit by saving to your SmalltalkHub repository. Use the Web interface to verify that all went well.
2.12 Running a real cloud server
2.12
Running a real cloud server
So we created our first Web app and tested it locally. We stored our source code in the SmalltalkHub repository and created a Metacello configuration for it. Now we need a real cloud server to run our Web app.
It used to be hard and expensive to get access to a real server permanently connected to the internet. Not anymore: prices have comes down and op-erating cloud servers has become a much easier to use service. If you just want to test the deployment of this Pharo Web app, you can use cloud9 (http://c9.io). It freely provides some testing environments after creat-ing an account. Note that cloud9 is for testcreat-ing purpose only and that a real hosting solution such as Digital Ocean (http://www.digitalocean.com) is better.
For this guide, we will be using Digital Ocean. The entry level server there, which is more than powerful enough for our experiment, costs just $5 a month. If you stop and remove the server after a couple of days, you will only pay cents. Go ahead and make yourself an account and register a credit card.
First part of the Create Droplet form
A server instance is called a Droplet. Click the ‘Create Droplet’ button and fill in the form. Pick a hostname, select the smallest size, pick a region close to you. As operating system image, we’ll be using a 32-bit Ubuntu Linux, version 13.04 x32. You can optionally use an SSH key pair to log in - it is a good idea, see How to Use SSH Keys with DigitalOcean Droplets - just skip this option for now if you are uncomfortable with it, it is not necessary for this tutorial. Finally click the ‘Create Droplet’ button.
Second part of the Create Droplet form
In less than a minute, your new server instance will be ready. Your root password will be emailed to you. If you look at your droplets, you should see your new server in the list. Click on it to see its details.
Looking at your Droplet
The important step now is to get SSH command line access to your new server, preferably using a normal terminal. With the IP address from the control panel and the root password emailed to you, try to log in.
$ ssh [email protected]
Your server is freshly installed and includes only the most essential core packages. Now we have to install Pharo on it. One easy way to do this is using the functionality offered by http://get.pharo.org. The following command will install a fresh Pharo 2.0 image together with all other files needed.
Building and Deploying a Small Web application
# curl get.pharo.org/40+vm | bash
Make sure the VM+image combination works by asking for the image version.
# ./pharo Pharo.image printVersion [version] 4.0 #40614
Let’s quickly test the stock HTTP server that comes with Pharo, like we did in the third section of this guide.
# ./pharo Pharo.image eval --no-quit 'ZnServer startDefaultOn: 8080'
This command will block. Now access your new HTTP server at http://82. 196.12.54:8080 after substituting your own IP address of course. You should see the Zinc HTTP Components welcome page. If this works, you can press ctrl-C in the terminal to end our test.
2.13
Deploying for production
We now have a running server. It can run Pharo too, but it is currently using a generic image. How do we get our code deployed? To do this we use the Metacello configuration. But first, we are going to make a copy of the stock Pharo.image that we downloaded. We want to keep the original clean while we make changes to the copy.
# ./pharo Pharo.image save myfirstwebapp
We now have a new image (and changes) file called myfirstwebapp.image (and myfirstwebapp.changes). Through the config command line option we can load our Metacello configuration. Before actually loading anything, we will ask for all available versions to verify that we can access the repository.
# ./pharo myfirstwebapp.image config
http://smalltalkhub.com/mc/SvenVanCaekenberghe/MyFirstWebApp/main ConfigurationOfMyFirstWebApp
'Available versions for ConfigurationOfMyFirstWebApp' 1
1-baseline bleedingEdge last
stable
You should have only one version, all the above are equivalent references to the same version. Now we will load and install the stable version.
# ./pharo myfirstwebapp.image config
http://smalltalkhub.com/mc/SvenVanCaekenberghe/MyFirstWebApp/main ConfigurationOfMyFirstWebApp --install=stable
'Installing ConfigurationOfMyFirstWebApp stable'
2.14 Have fun extending this Web app
Loading 1 of ConfigurationOfMyFirstWebApp... ...
After loading all necessary code, the config option will also save our image so that it now permanently includes our code. Although we could try to write a (long) one line expression to start our Web app in a server and pass it to the eval option, it is better to write a small script. Create a file called ‘run.st’ with the following contents:
ZnServer defaultOn: 8080.
ZnServer default logToTranscript. ZnServer default delegate
map: 'image' to: MyFirstWebApp new;
map: 'redirect-to-image' to: [ :request | ZnResponse redirect: 'image' ];
map: '/' to: 'redirect-to-image'. ZnServer default start.
We added a little twist here: we changed the default root (/) handler to redi-rect to our new /image Web app. Test the startup script like this:
# ./pharo myfirstwebapp.image run.st
2015-06-15 15:59:56 001 778091 Server Socket Bound 0.0.0.0:8080 2015-06-15 15:59:56 002 013495 Started ZnManagingMultiThreadedServer
HTTP port 8080 ...
You can surf to the correct IP address and port to test you application. Note that /welcome, /help and /image are still available too. Type ctrl-c to kill the server again. You can then put the server in background, running for real.
# nohup ./pharo myfirstwebapp.image run.st &
Figure 2.17 shows how the deployment looks like on cloud9.
2.14
Have fun extending this Web app
Did you like the example so far? Would you like to take one more step? Here is a little extension left as an exercise. Add an extra section at the bottom of the main page that shows a miniature version of the previous image. Initially, you can show an empty image. Here are a couple of hints. Read only as far as you need, try to figure it out by yourself.
Building and Deploying a Small Web application
Figure 2.17:Our Web app running in the cloud.
Hint 1
You can scale a form object into another one using just one message taking a single argument. You can use the same classes that we used for parsing as a tool to generate PNG, JPEG or GIF images given a form.
When you are done, save your code as a new version. Then update your config-uration with a new, stable version. Finally, go to the server, update your image based on the configuration and restart the running vm+image.
Hint 2
Change the html method referring to a new variant, /image?previous=true, for the second image. Adjust handleGetRequest: to look for that attribute. Add a helper method pngImageEntityForForm: and a previousImage acces-sor. It is easy to create an empty, blank form as default. Call a updatePre-viousImage at the right spot in handlePostRequest: and implement the necessary functionality there.
2.15 Solution, part 1, new methods
Hint 3
If you found it difficult to find the right methods, have a look at the following ones: • Form>>scaledIntoFormOfSize: • Form class>>extent:depth: • PNGReadWriter>>nextPutImage: • ByteArray class>>streamContents: • ZnByteArrayEntity class>>with:type:
2.15
Solution, part 1, new methods
Here are 3 new methods that are part of the solution.
pngImageEntityForForm: form ^ ZnByteArrayEntity
with: (ByteArray streamContents: [ :out |
(PNGReadWriter on: out) nextPutImage: form ]) type: ZnMimeType imagePng
previousImage
^ previousImage ifNil: [ | emptyForm |
emptyForm:= Form extent: 128 @ 128 depth: 8.
previousImage := self pngImageEntityForForm: emptyForm ] updatePreviousImage
| form scaled | form := self form.
scaled := form scaledIntoFormOfSize: 128.
previousImage := self pngImageEntityForForm: scaled
2.16
Solution, part 2, changed methods
Here are the changes to 3 existing methods for the complete solution.
html ^ '<html><head><title>Image</title> <body> <h1>Image</h1> <img src="image?raw=true"/> <br/>
<form enctype="multipart/form-data" action="image" method="POST"> <h3>Change the image:</h3>
<input type="file" name="file"/>
Building and Deploying a Small Web application
<input type="submit" value= "Upload"/> </form>
<h3>Previous Image</h3>
<img src="image?previous=true"/> </body></html>'
handleGetRequest: request
(request uri queryAt: #raw ifAbsent: [ nil ]) ifNotNil: [ ^ ZnResponse ok: self image ]. (request uri queryAt: #previous ifAbsent: [ nil ])
ifNotNil: [ ^ ZnResponse ok: self previousImage ]. ^ ZnResponse ok: (ZnEntity html: self html)
handlePostRequest: request | part newImage badRequest |
badRequest := [ ^ ZnResponse badRequest: request ]. (request hasEntity
and: [ request contentType matches: ZnMimeType multiPartFormData ])
ifFalse: badRequest. part := request entity
partNamed: #file ifNone: badRequest. newImage := part entity. (newImage notNil
and: [ newImage contentType matches: 'image/*' asZnMimeType ])
ifFalse: badRequest.
[ self formForImageEntity: newImage ] on: Error
do: badRequest.
self updatePreviousImage. image := newImage.
^ ZnResponse redirect: #image
2.17
Solution, part 3, updated configuration
To update our configuration, add 1 method and change 1 method.
version2: spec
<version: '2' imports: #('1-baseline')> spec for: #common do: [
spec
blessing: #release;
package: 'MyFirstWebApp' with:
'MyFirstWebApp-SvenVanCaekenberghe.2' ] stable: spec
<symbolicVersion: #'stable'>
2.18 Conclusion
spec for: #common version: '2'
Of course, you will have to substitute your name for the concrete version.
2.18
Conclusion
Congratulations: you have now built and deployed your first Web app with Pharo. Hopefully you are interested in learning more. From the Pharo website you should be able to find all the information you need. Don’t forget about the Pharo by Example book and the mailing lists. This guide was an introduction to writing Web applications using Pharo, touching on the fundamentals of HTTP. Like we mentioned in the introduction, there are a couple of high level frameworks that offer more extensive support for writing Web applications. The three most important ones are Seaside, AIDAweb and Iliad.
2.19
Listing
Here is the full code listing of the Web app. You can also find the code, includ-ing the tests and the Metacello configuration, on SmalltalkHub in my MyFirst-WebApp project here: http://smalltalkhub.com/#!/~SvenVanCaekenberghe/ MyFirstWebApp. A similar example is also included in the Zinc HTTP Compo-nents project itself, under the name ZnImageExampleDelegate[Tests].
Object subclass: #MyFirstWebApp instanceVariableNames: '' classVariableNames: '' poolDictionaries: '' category: 'MyFirstWebApp' handleRequest: request
request uri path = #image ifTrue: [
request method = #GET
ifTrue: [ ^ self handleGetRequest: request ]. request method = #POST
ifTrue: [ ^ self handlePostRequest: request ] ]. ^ ZnResponse notFound: request uri
value: request
^ self handleRequest: request handleGetRequest: request
^ (request uri queryAt: #raw ifAbsent: [ nil ])
ifNil: [ ZnResponse ok: (ZnEntity html: self html) ] ifNotNil: [ ZnResponse ok: self image ]
Building and Deploying a Small Web application
handlePostRequest: request | part newImage badRequest |
badRequest := [ ^ ZnResponse badRequest: request ]. (request hasEntity
and: [ request contentType matches: ZnMimeType multiPartFormData ]) ifFalse: badRequest.
part := request entity partNamed: #file ifNone: badRequest. newImage := part entity. (newImage notNil
and: [ newImage contentType matches: 'image/*' asZnMimeType ]) ifFalse: badRequest.
[ self formForImageEntity: newImage ] on: Error
do: badRequest. image := newImage.
^ ZnResponse redirect: #image html ^ '<html><head><title>Image</title> <body> <h1>Image</h1> <img src="image?raw=true"/> <br/>
<form enctype="multipart/form-data" action="image" method="POST"> <h3>Change the image:</h3>
<input type="file" name="file"/> <input type="submit" value= "Upload"/> </form> </body></html>' downloadPharoLogo ^ ZnClient new beOneShot; get: 'http://www.pharo-project.org/images/pharo.png'; entity image
^ image ifNil: [ image := self downloadPharoLogo ] formForImageEntity: imageEntity
| imageType parserClassName parserClass parser | imageType := imageEntity contentType sub.
parserClassName := imageType asUppercase, #ReadWriter.
parserClass := Smalltalk globals at: parserClassName asSymbol. parser := parserClass on: imageEntity readStream.
^ parser nextImage
2.19 Listing
form
^ self formForImageEntity: self image
Part II
C H A P T E R
3
Character Encoding and
Resource Meta Description
Sven Van Caekenberghe with Luc Fabresse and Johan Fabry
The rise of the Internet and of Open Standards resulted in the adoption of a number of fundamental mechanisms to enable communication and collabora-tion between different systems.
One such mechanism is the ability to encode strings or characters to bytes or to decode strings or characters from bytes. Different encoding standards have been developed over the years and Pharo supports many current and legacy encodings.
Another important aspect of collaboration is the ability to describe resources such as files. Both Mime-Type and URLs or URIs are basic building blocks for creating meta descriptions of resources and Pharo also has objects that implement these fundamental aspects.
In this chapter we discuss Character encoding, MIME types and URL/URIs. They are essential for the correct implementation of HTTP, but they are independent from it, as they are used for many other purposes.
3.1
Character encoding
First we will show how to get Unicode from characters and strings within Pharo. Second we will show how to decode and encode characters and strings from and to bytes.