Bricoleur:
Creative Learning through Video and Computation
MASSACHUSETTS NSTITUTCby 0 TECHNOLOGY
Sean Hickey
JUL 26 2019
B.A. Mathematics, Macalester College, 2010 LBA EILIBRARIES
Submitted to the Program in Media Arts and Sciences, ARCHIVES
School of Architecture and Planning,
in partial fulfillment of the requirements for the degree of
Master of Science in Media Arts and Sciences
at the
Massachusetts Institute of Technology June 2019
Author
© Massachusetts Institute of Technology, 2019. All rights reserved.
Signature redacted
Programin Media Arts and Scifnces May 10, 2019
Bricoleur:
Creative Learning through Video and Computation
bySean Hickey
Submitted to the Program in Media Arts and Sciences, School of Architecture and Planning,
in partial fulfillment of the requirements for the degree of Master of Science in Media Arts and Sciences
on May 10, 2019.
Abstract
In his theory of constructionism, Seymour Papert asserted the importance of bricolage in the learning process. Papert defined bricolage as "a style of organizing work that can be described as negotiational rather than planned in advance." The bricoleur - one who engages in bricolage - works in dialogue with their materials, continuously experiment-ing and course-correctexperiment-ing as necessary. Throughout this process, the bricoleur creates relations between materials and in doing so, builds mental relations in their head among ideas and knowledge. In this sense, creating with materials is the thinking process and as a result, Papert claimed that "in the most fundamental sense, we, as learners, are all bricoleurs." In light of this, it is important to develop rich bricolage contexts and experiences to support learners in constructing their own knowledge.
This thesis describes Bricoleur, a new tool for creating expressive projects in a brico-lage style. Bricoleur builds off of the programming paradigm developed for the Scratch programming language to allow makers to create a wide variety of dynamic projects by capturing and programming video and audio media on tablet hardware. We describe the design decisions that led to the creation of a tinkerable tool that engages both the mind and body. In addition, we outline the types of projects and working styles that emerged during creative workshops in which makers created projects with Bricoleur. We then look
Bricoleur:
Creative Learning through Video and Computation
by6
Bricoleur:
Creative Learning through Video and Computation
by
Bricoleur:
Creative Learning through Video and Computation
by10
Table of Contents
Acknowledgem ents ...
. 20
Preface...
. 24
Three Vignettes ...
.
28
Introduction ...
. 32
Chapter 1: From Bricolage to Bricoleur ...
38
Chapter 2: Cultural Influences and Inspirations ...
48
Chapter 3: Design ...
. 60
Chapter 4: W orkshops ...
. 70
Chapter
5:
Outcom es...
. 86
Chapter 6: Reflections and Future Work...92
List of Figures
Figure 1 - (Left) The editor for a complete project. (Right) Diagram of the different
parts of the editing interface... . 43
Figure 2 - A blank Bricoleur project. ... . 44
Figure 3 - Drawing a video m ask ... 44
Figure 4 - Recording a masked video clip... 44
Figure 5 - Trimming and adding markers to a video clip after capture. ... 45
Figure 6 - Programming the video clip with blocks... 45
Figure 7 - Example programming blocks for video clips. ... 45
Figure 8 - Trimming and adding markers after capturing audio. ... 46
Figure 9 - Example blocks for audio assets... 46
Figure 10 - An audio script that loops and layers a sound... 46
Figure 11 - Blocks for interacting with tablet hardware sensors... 47
Figure 12 - Still from Maya Deren's Meshes of the Afternoon, shot on a 16mm Bolex cam-era. (credit: public dom ain) ... . 52
Figure 13 - A Sony AV-3400 Portapak camera system. (Photo by Wikipedia user Mwf95, 2005. CC BY-SA 4.0)... . 53
Figure 14 - Still from Switch! Monitor! Drift! by Steina Vasulka, 1976. ... 53
Figure 15 - The Fisher-Price PXL-2000 "pixelvision" camera. (Photo by Joe Lillibridge, 2008. CC BY-SA 2.0)... . 54
Figure 16 - Still from Me & Rubyfruit by Sadie Benning (age 16), shot on a PXL-2000, 1989... 54
Figure 17 - The Scratch project editor... 56
Figure 27 - A "puppet show" project (also shown in Vignette Two) where each character
can be tapped to trigger sound and animated movement... 76 Figure 28 - A soundboard project where polyrhythms can be explored by tapping on
each video clip to start a looped video and sound. ... 77
Figure 29 - A project exploring collaging together different images of concrete floor
textu re. ... 77
Figure 30 - A interactive tree made of body parts. Tilting the device causes the tree
branches to sway. Tapping the tree causes apples (made of faces) to fall from the tree... . 77
Figure 31 - An interactive purse project inspired by the carrying case. The video clips respond to the tilt angle of the device ... 78
Figure 32 - Two hologram projects running next to each other... 78
Figure 33 - A project where the video clip pans across the xylophone keys. As the device
is tilted back and forth, the video frame continuously changes based on the tilt angle. ... . 79
Figure 34 - A project that utilized video masking to define the shapes of the eye. The captured video images simply provide color and texture (e.g., the feathers in the pupil shape)... . 80
Figure 35 - Two makers exhibiting the "capturer" and "performer" division of roles... 81 Figure 36 - A video clip demonstrating the framing style of masking. The round drawn
shape frames the cow in its surrounding context... 82
Figure 37 - An isolated character from the puppet show project shown in Figure 27.... 83 Figure 38 - A textured teardrop shape from the eye project shown in Figure 34. ... 83
-1
Some (Dis)assembly Required:
A
Note on Format
Hello, dear reader! I trust that you are well. In case you are reading a PDF version or a scanned, digital copy of this document, I wanted to let you know a few things...
This thesis is, in fact, intended to be read in its physical form. Some pages in the phys-ical version have been altered such that they have shapes cut out of them. When read as a bound, two-sided document, the cutouts allow you, dear reader, to see through to parts of the next (or previous) page. The way these cutouts work is highly intentional and probably only makes sense in the physical copy. In the PDF version, the cutouts appear as black outlines. I don't even know what the cut-outs in the scanned version will look like.
So I put one here, shaped like a rabbit, so that you can find out for yourself:
So just know that anytime you encounter a shape like that in the document, it is meant to be a cutout. If you really want to read the thesis as it is intended to be read, feel free to print it out, two-sided, on letter-sized paper. Then cut out where all the cutout shapes appear, staple on the left, and enjoy.
qv
V*
V*
V
V
Vo
V
pV
V*
TO faleesa forgoing thr
this wacky two Yearsin Parallel With Ie.
ToCarmeloShruti,
and Kreg for paving the way ahead of me andguiding me onthejourney of writing a master's thesis.
Andmore importantly, for being wonderful friends.
To the f
JFedei lksatSc'
tfJIAetel-niferaL er in Regio En li hilden alfwy ,andLorezo 99J Erila
To Haystack Mountain School of Craftsforreminding g; this PrWorld. t'
p~ct
me that it's Possible to be an eduator, an artist,and a r
technologist all at once.
70A o P u To David B, for always
0~ht1 PcaequLon 0aTe
S Ze orIt cis a aker a being willing to help me in
e,7 Ira toie and re d and the sta whatever wayyoucan. o,12(i 47 e life fo crea tonselors
y
0'~c~~'f/~
the better "elearn. ain eYour, cca 't
e very h is so r pb s go ,ake
rnthia Sotorn e. Yt. y
for being i est fan-.
To Eric R and Tina for the
conversation that led to the
hand-drawn shapes in this project. he 0
etearmi-I etjo
Creativea xe .ut op
-t fo ubhOuse
gt
10the tagsh .~b t lpacva I
al
Toall the folks in
provid r
fn inYlife in Can
ToWilafor lettin
In ebe a Pango
YOuyunglife.
creativit or Yor nspiring Playfulness designing don whenitcnes,
creative toolscoes to'
wA
To Agnes, David, and I for testing earlyversic this project.
b hneeded ac aONK for balance and
bridge.
To Judith for your suggestiol of getting aThesis Uiomti write ir
us.
To Anne G for your ongoing entorship, guidance, and deeply sardonic humor.
To Jennifer 1 your help in
thinking through this grad
school thing.
%to)ovvhIc
c/s'?%'J ea
J
Authorship is weird. No work exists in a vacuum and no project belongs to just one person. Here, presented in not much of a particular order, are folks who can claim co-au-thorship on this work for their help and guidance in ways big and small. I feel incredibly fortunate to have you all in my life.
To the Scratch Team for p laytesting early versiols of this project and for be in credibly lively,fuy
eative group of people to workwiteveryday. .gr'piig
otaettnr datio. ToYou idocument t -th ei eggl naa it t tIs Pobringen sbreading it. ,yotaxo, POIea St" seeinthel enaTo part G the an gthe- aeanstudo, d Alex for being readers on this
project, providing me with rich feedback, and helping get it across the finish line.
To ommyundergraduate to the
advisor, for Your support in met0 t \to
getting me here. febIV the
o g hjch en0e. e t an ndre fo rac
ACv~ d__a_
-.ys remembe w orkadfo
t- orV t elvring toy'
To LilestoetetoYur work an an aestheti ses O
llab,,orator-wenever. t ih me To Andrew for your thoughts,
k d urnidaince onerl W
beingagreat cu feedUaL , a- 6
b g aT gLirz and vali f bersions of this project.
'tqg
:~:::.'Y%
One of my earliest memories is waking up on the morning of
my third birthday. I was wearing blue pajamas and as I climbed
out of bed and stepped out of the room I shared with my older
brother, Jimmy, I already knew that it was a special day. I
climbed down the stairs and walked into the kitchen where I
saw
-
for perhaps the first time
-
a video camera. My parents
had rented the bulky VHS contraption just for the occasion,
and I was fascinated by it. It sat on the counter and I remember
wanting to press the big red "record" button just to see what
happened. The tape we made that day still sits on the shelf in
my parent's house.
We got our own family video camera a few years later
-
a little
mini-VHS handheld with a black-and-white viewfinder. We
pulled it out at every family birthday (of which there were many,
having grown up with three siblings) and I always volunteered
to be the one to capture the event of blowing out the candles.
For school projects, I would always ask if I could make a video
instead of doing a presentation. I loved being able to create
in this medium that felt so intuitive and fluid to me. But the
It's a beautiful, crisp, sunny day outside and two friends sit by the river, watching the gentle waves lap up on the bank. The colors are rich and theywant to capture the moment to remember later. A photograph won't do, because the motion of the river and trees are too important, and a video simply can't fit all the detail in a single rectangular frame. They realize they can capture each piece of the scenery independently and recombine them into the scene they're admiring. They trace the shape of each part of the environ-ment - the sun, the sky, the trees, the sand, the river - and capture a short video clip. They program each clip, so the sun shines and turns while the waves lap on the shore. They make a hand-drawn version of the day
in a motion-landscape.
They love playing the little xylophone they keep on the desk. It's easy to pick out a quick melody on and the clarity of the notes always sounds beautiful. What if they could build their own instrument to play? They begin by capturing video and audio of the xylophone. By programming the video and sound, they can tap on the images of the instrument to get the sounds to play, but it seems like a dull recreation of the physical object. Maybe they can sing instead? They capture a video of a friend's face opening and closing their mouth, but forget to change the sound they've recorded. The xylophone tone comes out when the person opens their mouth! The effect is too rich to discard, so they continue capturing faces until all eight notes of the scale are accounted for. They've made a playable Xylo-Face!
She rolls the clay between her hands form-ing a rough ball. Pokform-ing and proddform-ing here and there, a face starts to emerge. A couple of pipe cleaners for arms and suddenly a character appears! She captures the blob creature from a few different angles, creat-ing a collection of video clips.
A scene slowly takes shape with the
characters on screen. By programming each creature, they move around the screen and interact when tapped. But what does a blob creature say? She records a couple of clips of gibberish language and programs the video clips so that tapping on each plays one of the sounds as well. A story unfolds: a per-formable blob dialogue!
Walk In The Woods
A
To sum it up in a single sentence, this thesis documents the design, development, test-ing, and outcomes of a tool called Bricoleur and the new creative possibilities it affords. Bricoleur combines video, audio, programming, and mobility to open up a new space for creative expression. One challenge when writing about a new space of possibilities is that it can be hard to go into great depth about any one aspect of that space. Newness abounds and often times what is most interesting are the variety of ideas and connec-tions between them rather than any one specific concept. In talking about this with my advisor, Mitch Resnick, he made a suggestion which I found useful in thinking about how to frame the work: think of it like traveling to a new land, exploring the terrain, then coming back to tell others about what you discovered.
I've been going to summer camp for nearly every year since I was nine years old - first as a camper, then a counselor, then a staff member, then the camp cook, and most
recent-ly, as the director. I've participated in, organized, and led my fair share of wilderness trips
in the process, and know quite well the feeling of traveling in unknown and unexplored places. A wilderness trip involves some preparation and packing, traveling to the loca-tion, exploring the area, and eventually coming back to share stories of the experience
In total, our trip will entail:
Preparing (Chapter 1) in which we provide some theoretical underpinnings as well
as an overview of the tool.
Packing Up (Chapter 2) in which we examine a set of tools that have served as
cultural influences and inspirations for Bricoleur.
Heading Out (Chapter 3) in which we look at the design process that brought us to
our new Bricoleur landscape.
Exploring (Chapter 4) in which we examine how and what makers create in that
landscape.
Surveying (Chapter 5) in which we identify and map the types of relational concepts that arise within the landscape.
Coming Home (Chapter 6) in which we consider takeaways and future work based on the project.
This document isn't meant to be an exhaustive treatise on the entire geography, let alone history and culture, of this new landscape, but simply a look at some of the unique hills and valleys of the terrain. Think of it as a walk in the woods. I hope you enjoy the trip.
±4
if
Preparing
From Bricolage to Bricoleur
We begin preparing for our journey by looking at some of the theoretical ideas that un-derlie Bricoleur. In particular, we look at the relationship between making and learning and its implications for designing creative tools. We ground this theory with a overview of Bricoleur and its creative potentials.
Bricolage
This project is about engaging people in bricolage, in the sense that Seymour Papert used the term, which he adapted from Claude Ldvi-Strauss. Papert defined bricolage as "a style of organizing work that can be described as negotiational rather than planned in advance" [8]. Bricoleurs - i.e., those who engage in bricolage - approach their work by experimenting with materials, using the tools they have at hand, and course-correcting as necessary. Bricoleurs are often positioned in contrast to "planners," which Papert
It is exactly this relationship between making and thinking that lies at the root of Papert's theory of constructionism which builds off of Piaget's earlier epistemological theory of constructivism. In short, Piaget's theory says that knowledge is not "acquired"
by a learner (whether through transmission of information from another person, a book,
or otherwise), but rather is always actively constructed in the mind of the learner, by the learner. When a learner encounters new knowledge, that knowledge must be integrated into the learner's existing mental structures. If that knowledge fits well with the existing mental structures, the knowledge can be assimilated directly. On the other hand, when new knowledge comes in conflict with the learner's current mental model, the model must be altered to accommodate the new knowledge to maintain a coherent structure [9]. In either case, the knowledge construction process is relational - putting new knowledge in relation to existing knowledge.
Papert's constructionism took Piaget's theory further by asserting that constructing concrete artifacts in the world is one of the best ways to construct knowledge. It is for this reason that he suggested that, "in the most fundamental sense, we, as learners, are all bricoleurs" [7]. That is, putting materials in dialogue with one another is a rich way to construct knowledge. Moreover, Papert posited that the computer - due to its program-mability - is a tool uniquely suited to bricolage, especially for children. When people are engaged in creative programming activities, they are able to access "powerful ideas," to "think about thinking," and to reflect upon their own learning processes [7].
But how do learners choose which connections to make among ideas, which relations to construct?Vea Vecchi, a career atelierista in the Reggio Emilia schools, notes that aes-thetics offer an especially potent tool for learners to bring disparate ideas into relation with one another. Here, Vecchi refers to the "aesthetic dimension" of learning in which care and attention to quality and a dedication toward creating meaning allows one to make connections between the imaginative and the rational in one's work [17]. Through this process, learners encounter not just the already known, but the newly possible. This view of learning as an aesthetic process has much to offer to the idea of bricolage. As makers dialogue with materials and the world around them, they are, in fact, putting ideas in relation with each other according to their own aesthetic senses. In this way, aesthetics provides a particular avenue for understanding learning through the process of putting materials together in new and unique ways - that is, through a bricolage style of making.
Given that learners are fundamentally bricoleurs, and that aesthetics can be a powerful mechanism for learning by enabling learners to connect disparate concepts in a bricolage style, it is important to develop rich aesthetic bricolage experiences for those learners to engage in. This thesis focuses on a particular context for bricolage which consists of a tool - appropriately called "Bricoleur" - along with materials created to support the tool's use. The following chapters in this thesis describe the design and development of Bricoleur, along with analysis of makers' experiences as they create with it. As a starting point, we give an overview of the tool itself to provide a concrete anchor to the rest of the work.
Bricoleur: An Aesthetic Context for Bricolage
Bricoleur is a mobile application that allows makers to create projects by capturing video and sound clips and programming those captured assets through a blocks-based programming interface. This tool combines video and audio assets with programming and mobility to open new creative possibilities for makers. Rather than capturing tradi-tional rectangular video assets, Bricoleur requires the maker to hand draw a video mask that defines the area of pixels to be captured, enabling them to quickly create assets with complex and organic shapes. The maker can capture multiple video assets which then appear in a common canvas, ready to be programmed. By design, video assets do not con-tain any audio information. That is, a "video" in Bricoleur consists only of a sequence of images (unlike traditional video). Audio assets are captured separately and programmed independently of video assets. Programming entails snapping together visual blocks of code into "scripts" which define behaviors for each asset (e.g., to play back a section of video or audio, or to move a video asset across the canvas). The visual and sound output is rendered in realtime which eliminates the need for an "editing" mode and a "playback" mode. Edits to the assets, composition, and code are reflected immediately in the canvas and sound output.
By capturing and programming a collection of assets, makers can create a wide variety
of rich interactive projects including dynamic artworks, stories, and musical instruments, to name a few. Examples of these types of projects are seen in the Vignettes section at the beginning of this thesis. Figure 1 shows the editor for a complete project (the motion landscape from Vignette One) along with a diagram of the basic parts of the interface.
Making
a
Project
Makers get started by creating a new, empty project in Bricoleur. The interface guides them to begin by capturing either a video or audio asset (Figure 2).
Video
When capturing a video asset, the maker is
prompted to draw the shape of the video they
want to capture. Using their finger, the maker
defines the masked area for where pixels will
be captured via the device camera (Figure 3).
The maker can also choose to use either the
front-facing camera (e.g., to capture their
own image) or the rear-facing camera. While
recording, the pixels outside the masked area
are overlaid with grey to clearly indicate the
pixels that are being captured (Figure 4). Pixels
outside the masked area are still visible through Figure 2 - A blank Bricoleur project.
the semi-transparent grey overlay so that the
maker can see the surrounding image just outside the video shape, which can provide
helpful context when capturing. Clip recording is limited to 10 seconds (i.e., 300 total
frames at 30 frames per second).
Figure 3 - Drawing a video mask. Figure 4 - Recording a masked video clip.
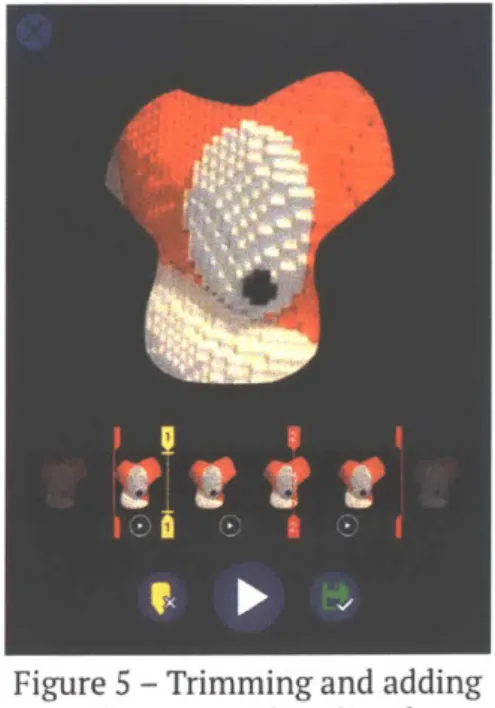
After recording a video clip, the maker is presented with a simple editing interface
where they can playback the captured clip for review, trim the clip to a smaller subset
of frames, as well as add markers to indicate specific frames of interest, which can later
Figure 5 - Trimming and adding markers to a video clip after
capture.
be referenced in the programming blocks (Figure 5).
From here, the maker can choose to discard the clip, rerecord the clip, or save the clip into the project.
When a clip is saved, the maker is brought back to the programming editor where the clip appears in the can-vas. A blocks-based programming interface becomes visible on the lower portion of the interface where the maker can snap programming blocks together to create scripts which define behaviors for the video clip (Figure 6). The palette of programming blocks contains blocks to perform video-specific behaviors
(e.g., ptay from marker [A} to marker [B], or
jump
to f rame [X]), blocks to control motion and state(e.g.,turn [D] degrees, or change size by (P]%), as well as programming flow blocks to control the execution path (e.g., a forever loop or an event trigger when tapped) (Figure 7).Audio
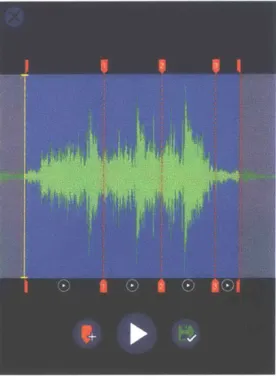
In addition tovideo, makers can capture audio assets with the device's on-board microphone. Similarly to capturing video, after an audio clip is captured the maker can playback, trim, and place markers at particular locations in the audio stream (Figure 8). Once the audio clip is saved, it appears alongside the video clips in the asset selector in the editor interface. Nat-urally, it has no rendered representation in the canvas, but like a video clip, it has its own set of programming blocks associated with it and is programmed independently of the other as-sets. The audio blocks palette contains a set of audio-specific programming blocks, analogous to the video-specific blocks (e.g., play f rom
start to end or set play rate to [P]%) (Figure 9).
Figure 9 - Example blocks for audio assets.
Figure 8 - Trimming and adding markers after capturing audio.
Figure 10 - An audio script that loops and layers a sound.
Bricoleur takes a slightly unusual model to sound playback. When a programming block triggers playback of an audio clip, the tool essentially adds a new copy of that sound to the currently outputting audio stream. Which is to say, if a script contains two blocks that cause audio to start playing, then each will start a new copy of the sound playing and the
46
audio will mix together. This allows for interesting potentials for audio programming, such as programming a custom repeat/echo effect by layering sound, or even creating harmony between musical sounds (Figure 10). Since a video clip can only ever render a single one of its frame at a time, there is no current analog for this type of programming for video assets.
Blocks for Interactivity
In addition to the blocks for audio, video, motion, etc., Bricoleur presents a set of blocks for interacting with the hardware of the tablet device. At the simplest level, a maker can build a script that responds to a user tapping on a video asset. Bricoleur also has blocks to utilize sensor hardware so that the maker can make use of the tilt angle of the device or the compass direction in their programming scripts.
Each of these hardware interfaces have corresponding "event" trigger blocks that enable makers to respond to particular actions (e.g., when tapped, when titted Left, or when pointed toward north) (Figure
11). The video blocks also provide certain event blocks
to respond to moments in the video stream (when I reach marker (A]).
These hardware and event blocks allow for whole new classes of projects to be created. Rather than simply
making a "video" that plays from start to finish, makers Figure 11 - Blocks for interacting can create projects that respond to a user's actions with tablet hardware sensors. directly. Thus projects can become truly interactive.
Packing Up
Cultural Influences and Inspirations
At this point in the journey, we turn to look at a variety of tools and practices that have influenced and inspired the design of Bricoleur. We will take these inspirations with us on our journey as we move into the design phase.
New creative practices often develop hand-in-hand with the emergence of new creative tools. The design of Bricoleur draws from two trajectories of creative tools in particular: film/video cameras and creative programming platforms. Each of these histories provides references and inspirations for designing a new creative tool at the nexus of these two streams, and particularly with young makers in mind. Moreover, we focus on tools that might be described as "convivial" in the sense that Illich uses the word. That is, we draw inspiration from tools "which give each person who uses them the greatest opportunity to enrich the environment with the fruits of his or her vision" [4]. These tools are ones that engender new generations of makers with the power to create new realities.
I
Bolex
The Bolex 16mm film camera was first introduced in the early 1940s. This camera was handheld, able to be operated by a single person, and had adjustments for experimenting with film speed and focal length. Each of these features points to an important aspect that allowed a new type of cinema to arise [2]. The handheld, single person operation of the camera made it such that individual makers could make film without the needs of a larger crew. Furthermore, the portability allowed makers to take the camera into their environment and capture footage of the world around them. Adjustments for film speed and focal length allowed for particular effects to be created on film, which served to in-spire a new class of experimental work. The film speed adjustment, specifically, allowed makers to create works that experimented with time in unique ways.
Quickly, the Bolex became a staple tool
for experimental filmmakers and a new culture of making sprang up around this independent cinema practice [2]. Makers were able to produce work more quickly and perhaps most importantly, cheaply.
With the lower cost of production - both materials-wise and crew-wise - makers
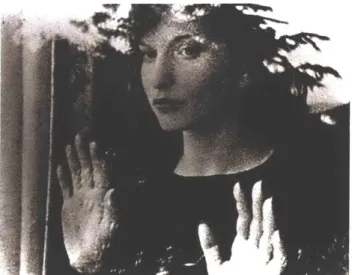
had more leeway to experiment with work that wouldn't necessarily be com-mercially viable. It is no accident that the era produced some of the earliest exper-imental cinema classics. Maya Deren's Meshes of the Afternoon is a particularly well-known example of independent ex-perimental cinema shot on a Bolex 16mm camera (Figure 12).
Figure 12 - Still from Maya Deren's Meshes of
the Afternoon, shot on a 16mm Bolex camera.
(credit: public domain)
Portapak
Video - film's low-fi electronic cousin - is at first glance, superficially similar to film.
Both are media for capturing and playing back moving images. Nonetheless, film and video have been culturally connected to very different practices and institutions since the inception of each. Film grew naturally out of photography practice. Once a camera could take enough photographs per second, the images could be stitched together to produce a motion picture by projecting each in sequence.Video, on the other hand, was deeply connected with the production of television from the start. It was a mass medium and looked at as a mechanism for broadcasting information from huge corporations to the wider citizenry.
However, this mass media role of video began to shift at the introduction of the Sony Portapak in the 1960s, the first portable video camera system (Figure 13). In many ways, what the Bolex did for film, the Portapak did for video. Like the Bolex, this camera was portable and able to be operated by a single person (or team of two) and brought video
into the hands of individual makers - a medium previously only accessible to major television broadcast corporations. And like the Bolex, a new practice of making emerged around the tool: video art [2].
From the beginning, video art practice was connected to a variety of other media and art forms. Many of the earliest video artists worked in other media including dance, music, performance, and visual arts, to name a few.
Joan
Jonas' video work grew out of her performance artFigure 14 - Still from Switch!Monitor!Drift! Steina Vasulka, 1976.
Figure 13 - A Sony AV-3400 Portapak camera
system.(Photo by Wikipedia user Mwf95, 2005.
CC BY-SA 4.0)
background while Nam June Paik used video as a sculptural material through-out his career [2]. Other makers took the affordances of the Portapak as an opportunity to experiment with the medium of video itself. Steina Vasulka, in particular, created work around the apparatus of the camera itself, experi-menting with mirrors, motion, and more to create unique images (Figure 14). Still others utilized the portable camera as a tool for documentary and for activism, using the camera to capture political and social movements on the streets of cities [1]. In each case, the portability and accessibility of the Portapak tools of production helped create new modes of creative expression.
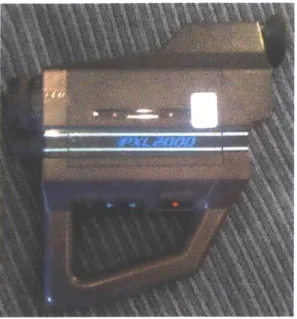
and had the chance to perform their own video experiments and document their lives. The best known youth pixelvision maker is undoubtedly Sadie Benning who used her pixelvision camera to create a series of semi-fictitious diary-esque video works in the confines of her home bedroom. These early experiments allowed her to explore themes of relationships, anxiety, and queerness to name a few [5]. Benning's work highlights the power that creative tools can give to children: to express themselves and explore the world they inhabit.
Each of these cameras allowed for new practices and forms of expression to emerge.
Specifically, the portability, accessibility, and pixelvision" camera.(Photo by Joe the ability to experiment with each camera Lillibridge, 2008. CC BY-SA 2.0) afforded a new population of makers to create
expressive media. Bricoleur was designed with these aspects in mind in order to try to engender the kind of expressiveness and experimentalism that each of these cameras brought to film and video.
Figure 16 - Still from Me & Rubyfruit by Sadie Benning (age 16), shot on a PXL-2000,1989.
Creative Programming
In addition to cameras, Bricoleur draws from the history of programming languages to inform its design. Programming languages have a wide variety of aims and uses and as a result, are designed with different purposes in mind. Some languages are geared toward scientific research, others for application development, and still others for automation. Bricoleur draws particularly from a lineage of languages designed for children which emphasize creativity and experimentation as part of the programming process. Here, we look at these languages in addition to some languages aimed specifically at media programming.
LOGO
LOGO, designed by a team led by Seymour Papert, was the first language developed
specifically for children and came directly out of Papert's thinking and research [7]. The language was designed as a "microworld" in which children would have access to pow-erful ideas in mathematics by programming the behavior of a physical or digital "turtle" through text-based commands and procedures. By writing and executing procedures for the turtle, children could think about their own procedural (or non-procedural) thought processes, thus giving them a way to "think about thinking." Furthermore, the turtle was chosen intentionally so that children could draw a parallel between the movement of the turtle and the movement of their own bodies - a process of identification that Papert referred to as "body syntonicity." Moreover, Papert was also insistent on the role of the personal and affective nature of creating. In light of this, LOGO was designed so that children could be expressive in a variety of different ways and bring their personal interests into their projects.
Bricoleur draws from LOGO in several ways. First, the design of the programming blocks aims to give makers access to thinking about the way the underlying media is represented and how it operates in time (e.g, by referring to a particular frame of a video clip). Second, Bricoleur aims to bring the body of the maker into the creation of the work. As one example, the maker uses their hand to draw the shape of each video. This act is also tied to the third way that LOGO has influenced Bricoleur in that it allows makers to bring their own personal ideas and interests into their projects.
-- --
-deleting the block all together [13].
0
Figure 17- The Scratch project editor.
Scratch projects, by nature, are media oriented. Scratch programmers create projects by building scripts of code that belongs to "sprites" - two-dimensional visual assets which are then rendered onto an on-screen canvas. Sprites not only have code associated with them, but can also have sounds and "costumes" (different on-screen representations of the same sprite) which are also controlled through programming blocks.
Beyond the technical aspects, though, Scratch is designed to enable children with all kinds of interests and backgrounds to be creatively expressive. One way in which is this talked about is the framework of "low floor, high ceiling, and wide walls" [11]. In the context of Scratch, this means that makers should be able to get started making a project quickly (low floor), they should be able to grow their projects in scope and complexity over time (high ceiling), and that makers should be able to bring a wide variety of inter-ests and create a highly diverse set of projects with the tool (wide walls).
Bricoleur draws heavily on Scratch's design and programming paradigm. In some cases, the influence is highly concrete. For example, the blocks-based programming interface from Scratch is integrated directly into Bricoleur and makers enact a similar sort of project building strategy in that each video or audio asset is the equivalent of a sprite in Scratch. Moreover, though, the philosophy and design frameworks underlying Scratch have provided considerable guidance in the design and development of Bricoleur. The low floor, high ceiling, wide walls framework, in particular has helped, as well as Scratch's goal of being as tinkerable as possible.
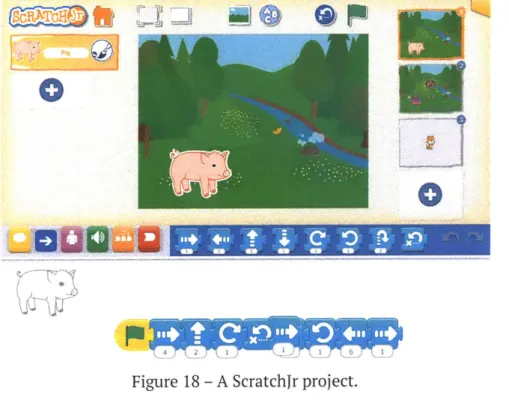
Scratchjr
Scratch is designed for makers 8 years old and older.One specific reason for the minimum age of 8 is that using Scratch requires the ability to read, since the programming blocks are labeled with text explaining their functions. As a result, Scratchr was developed and designed for children ages 5 to 7 to make creative media projects with icon-based programming blocks. ScratchJr runs solely on tablet hardware which has provided some important design ideas for Bricoleur. In particular, ScratchJr makers can utilize the on-board camera to insert images of themselves into sprites. By selecting one of the shapes that comprises a vector-based sprite, the maker can capture an image to fill the pixels only within that area. This provided the inspiration for the hand-drawn video masking in Bricoleur as well as the idea of utilizing the on-board hardware to create projects.
LOOD
O
Figure 18 - A ScratchIr project.
A
Note on Video and
Audio Editing Software
It is perhaps unusual to not mention any traditional video or audio editing tools when describing the design of a new creative video/audio tool. While these types of tools are very powerful and have been carefully designed to do what they do, ultimately their goal is significantly different from that of Bricoleur and ended up not providing much design insight. Editing tools are designed to allow makers to create video and/or audio files as output. As we will see in subsequent chapters, the types of projects that makers create with Bricoleur are not video and audio artifacts, but rather interactive computational projects. Which is to say, many of the things created with Bricoleur simply could not be made with a traditional editing tool. For this reason, Bricoleur focused on the aforemen-tioned camera systems and programming tools as inspirations.
-Heading Out
Design
With our preparations in order and our bags packed, we are now ready to embark on our journey to our new landscape. In this chapter, we describe the design iterations that will bring us there.
Like any design project, Bricoleur developed over the course of many iterative cycles. The initial design experiments were based mostly on intuition and taking cues from the designs of the tools in the previous chapter, especially Scratch. Once it became clear that the project could develop further, a design framework was adopted to guide subsequent design iterations toward making a tool that truly supports bricolage styles of making. In this chapter, we present the design framework and several iterations of Bricoleur from its initial conception into its current form.
Tinkerability
As noted in the introduction, the idea of bricolage as a way of working is largely anal-ogous to that of "tinkering." Given the aim of this project, we drew upon Resnick and Rosenbaum's design criteria for creating tinkerable technologies and activities to inform
Fluid experimentation, the second criterion, refers to the way in which the tool facil-itates the iterative making process. One way to think about this is how makers are able (or not able) to dialogue back and forth with the tool. Can a maker develop a meaningful project over time, even if they don't begin with a specific goal in mind and/or shift direc-tions multiple times? In light of this, fluid experimentation implies that it should be easy for makers to get started making a project in Bricoleur and furthermore, it suggests that projects should be able to naturally grow in complexity over time.
Finally, the open exploration criterion refers to whether or not the tool can support a wide variety of materials, subject matter, and personal interests. In thinking back to the Portapak camera, video already provides a step in the right direction given its ability to combine with other materials and practices (i.e., music, dance, performance, visual arts, etc.). Building off of this, the design of Bricoleur aimed at allowing a wide variety of project types to emerge. Makers can create more traditional linear video context, but they can also create musical instruments, performances, and other interactive types of projects.
We now look at the iterative development of Bricoleur over time and how this frame-work informed the design along the way.
Iteration 1
-
Eisenstein
The genesis of Bricoleur started with an idle wondering: "What would the combination of video and creative computing produce?" Or, to post it as an open-ended design ques-tion, "What would a blocks-based programming paradigm afford to the medium of video, and what would the medium of video afford to a blocks-based programming paradigm?"
Eisenstein, the very first prototype of Bricoleur, was about as simple as the idea could get and still address this question. Built in less than a week, the app consisted of a square video canvas in the upper right corner of the interface and a blocks-based programming workspace that took up the remainder of the screen space. The maker could capture a collection of video assets and then use the blocks to program simple video behaviors such as playing a video forward or backward as well as standard Scratch behaviors like rotating or scaling the video within the canvas frame (Figure 19).
A few important design decisions were made
even at this early stage of the project. Crucially, the maker was only able to capture images with the camera, i.e., without sound. The intention
here was to highlight the unique aspects of the Figure 19 - The Eisenstein editor.
video medium and encourage the maker to explore those in and of themselves without needing to think about the relationship between images and sound. The focus on aspects of the medium also informed the way the video blocks were designed. The blocks allowed simple behaviors like playing a video from start to end, but also allowed the maker to interact with and program using individual frames of the video, the playback rate, and image properties like color.
Importantly, while the maker could capture multiple videos, only a single video could be shown on the canvas at a time. This was partially a technical choice (rendering mul-tiple assets is naturally more complex than rendering a single asset) but also partially a design choice. The thought was that the most common usage would be to sequence clips together much like a traditional video editor, so the interface and blocks were designed to facilitate this type of making experience. However, after a quick initial test of the prototype, it was clear that this assumption was wrong. Makers were far more interested in playing with the blocks that enabled different kinds of outcomes that were difficult to produce in traditional video editing software. For example, capturing a video while rotating the camera, then using the rotation blocks to "cancel out" the rotation within the frame.
Moreover, it became clear that makers were not producing videos as such. The pro-gramming blocks made it quick and easy to create media that did not play from start to finish in the way a traditional video does. Even with the simple introduction of the
f orever loop block, makers could create work that was essentially infinite in run length - an impossibility in traditional editing software. Each project was not "a video made
by programming" but an entirely new type of digital work that expanded beyond the
linearity constraint of video.
The outcomes from this quick initial testing proved to be interesting enough to warrant a second prototype. The programming blocks seemed to break the maker out of the time constraints of traditional video, which led to the question of how to break the maker out of the space constraints as well. Two different, but related space constraints were consid-ered. First, and probably most obvious, was the aforementioned aspect of having a single image on the screen at once. Second was the fact that video, by its nature, is captured and edited in a rectangular format. This constraint is ultimately related to the first since
ScratchJr, the maker can select a closed shape (circle, square, hand-drawn, etc.) and then use the camera on the device to capture an image and fill the shape. A common use of this is to put one's face in place of a sprite's face, thus enabling a maker to put themself in the scene of their ScratchJr project (Figure 20). This led to the idea that when capturing a video, rather than capturing all the pixels within the frame's bounds, the maker could use their finger to trace the shape of the image they want to create and then only capture the pixels within that hand-drawn shape.
@ @.
0@
Figure 20 - Capturing an image of a face inside a sprite in Scratchir.
This idea not only addressed the rectangular video asset dilemma, but since each video asset was only a subset of its original pixels, by nature it would not take up the whole canvas space. This naturally led to being able to layer and program multiple video assets within the same canvas space. Taking a cue from Scratch, each captured video could now exist as its own "sprite" and thus have its own programming blocks associated with it, in contrast with the first prototype.
With the addition of this draw-capture-program workflow, a whole new variety of proj-ects could be made very quickly. The first project consisted of going outside and creating a "motion landscape" in about ten minutes. This project comprised six separate video assets assembled together in realtime to depict a beach scene and can be seen in Vignette One at the beginning of this thesis. Between the programmability, the hand-drawn asset capture, and realtime compositing, it seemed that makers would be able to experiment with breaking the constraints of both time and space of traditional video.
Through a set of in-house workshops at Lifelong Kindergarten, a few threads started to emerge about what makers could make, and how they would make it. One aspect, already apparent from the first prototype but reinforced with the second, was the new
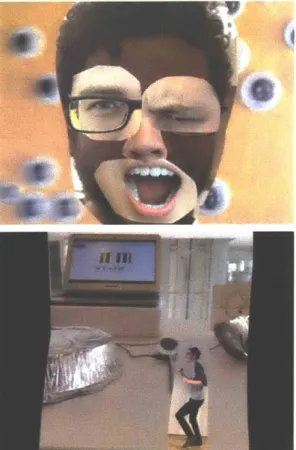
space of possibilities afforded by being able to take the device into the world to capture footage of one's surroundings and then program those clips in situ. Furthermore, the ability to isolate and capture only of a part of the video frame led to a series of projects about disassembly and reassembly of entities from the physical world. It became clear that a common first project to make was to capture different body parts (especially parts of the face) of either one person, or several people, and then reassemble them into a kind of body-mashup (Figure 21). A related aspect that quickly arose was the collaborative potential of the tool. As makers teamed up to create projects together, the mobile nature of the device made it such that the tool could quickly be passed back and forth, thus enabling multiple people to work on a single project with ease. In comparison to standard code sharing practices, this allowed a much, much tighter iteration loop between dif-ferent makers. Projects also continued to explore the ideas from the first prototype (e.g., matching or canceling video motion with motion block programming) (Figure 21).
Figure 21 - Examples of projects made with Steina. (Top) A face mashup.
(Bottom) A side-scroller game.
These workshops also pointed toward next
steps for another prototype. One feature which seemed to be glaringly absent was audio. As makers continued to make projects, the desire to capture sound as well as image arose over and over again. Secondly, while the programming blocks helped to break projects out of linear form, the fact remained that most projects were started by the maker pressing start, and then simply playing the project to completion according to the programming. This pointed toward the idea of introducing interactivity into projects. Blocks could be added to the palette that would enable video behaviors to trigger based on a whole
vari-to play with each medium independently and also have the opportunity vari-to think about and construct relationships between the audio and video in their project. Similarly to video, each audio clip existed as the equivalent of a sprite in Scratch. That is, each audio clip had its own set of programming blocks associated with it. This is different than the Scratch model of a sound "belonging" to a sprite, as a way to further encourage makers to explore the many possible relationships between a particular video clip and audio clip.
With the introduction of audio came a new set of questions about common usages and blocks design. A simple usage is to play a specific section of an audio asset, from a particular starting point to a particular ending point. This can be used both as a way of trimming an audio clip, as well as a way to create an audio loop. With this in mind, an audio capture interface was created that allowed the maker to add markers at particular locations in the audio stream which could then be referenced in programming blocks (e.g., play from marker [a] to marker [b]).
As a first step in adding blocks to support interactivity, a single when tapped hat block was introduced to the blocks palette. This block would trigger a script when the maker touched the video inside the canvas.
Between these two new features, the space of project possibilities expanded further. Audio added the ability to tell stories with one's voice, add atmospheric and ambient background noise to a project, sound effects, and more. The touch interaction further allowed makers to create projects that not only play, but are playable, which is to say, performable. As an example of a use of both audio and touch features, a maker could now create a playable musical instrument by triggering a sound when a particular video sprite is tapped. The "Xyloface" project - depicted in Vignette Three at the beginning of this thesis - became a go-to example for showing new makers the possibilities of the tool. The project consists of eight video assets, each depicting someone's face. When a face is tapped, the video plays showing the person's face opening and closing their mouth. Simultaneously, the sound of a particular xylophone note is played. In this way, a user can "play" melodies or even chords on the Xyloface by tapping on the faces in whatever order, timing, or combination they choose.
At this point, the tool was renamed Bricoleur to highlight the aspect of capturing as-sets (now both audio and video) from the world and combining them into unique works. With a rich set of example projects already built, this prototype laid the groundwork to continue developing a tool designed explicitly for tinkering, and in accordance with the tinkerability criteria.
Iteration
n
+1
As development of Bricoleur continued, iteration cycles became smaller and quicker. Workshops and user testing - described at length in the next chapter - provided a lot of information which informed the next several cycles of development. Here we highlight some of the most important outcomes of these iterations.
Early workshops highlighted some usability challenges with the tool. Makers were
sometimes unsure how to get started and at other times were unable to perform actions that they felt were intuitive. Clearly, this was working against the design principles of both fluid experimentation and immediate feedback. As a result, one iteration focused entirely on the refining the usability of the interface. A few important changes emerged from that iteration and improved the tinkerability of the tool. First, visual signposts were added to help makers get started in making a project (for an example, see the arrows in the editing tool shown in Figure 2). Second, two-finger "pinch" gestures were imple-mented which allowed makers to scale, rotate, and translate video clips without needing to do so through the code blocks interface. Further workshops confirmed the importance of these changes toward fluid experimentation and immediate feedback.
After some workshops highlighted the creative affordances of the tap recognition blocks, another iteration aimed at prototyping new ways to build interactivity into projects. This iteration produced the tilt and compass blocks which opened up a wide variety of new creative possibilities for subsequent makers. This helped encourage open exploration in the workshops that came after their introduction.
Other iterations focused on adding the video and audio editing interfaces, the ability to send projects between devices as a simple sharing mechanism, an expansion of the audio blocks palette to include features like playing audio backward or at different playback rates, and the ability to duplicate and/or delete assets. These changes had a smaller im-pact compared to the first two examples, but each proved to be useful in making Bricoleur more usable and more tinkerable.
Exploring
Workshops
At last, we have arrived at our new landscape and are ready to explore the terrain. We look specifically at what and how makers create with Bricoleur.
ed that would have potentially interesting uses in those media. For example, a variety of noise makers (percussive, melodic, textural, etc.) were selected to generate a wide range of sounds. Specifically for video, materials were chosen that had interesting textures, colors, patterns, and/or optical properties (reflective materials, translucent materials, etc.). A few anthropomorphic materials were added to the mix as well to spark ideas about characters or stories. Craft materials like paper and markers, pipe cleaners, and play-doh were also brought to encourage participants to create objects in the physical world as well (which could then be captured into Bricoleur). These materials would be laid out on a table or other nearby surface and presented such that participants could easily access and use them in whatever way they see fit for their project (i.e., materials were not kept in packages). This process takes a cue from Reggio Emilia atelier contexts in which materials are carefully laid out so that they can be seen, considered, and used as easily as possible (Figure 22).
Figure 22 - Materials setup for a Bricoleur workshop.
In addition to physical materials, other supporting materials were brought to help spark project ideas and to assist in programming. A set of "idea spark" cards were developed for an early workshop and proved to be useful enough to bring to subsequent play tests. The idea spark cards are divided into two
subsets: a set of project "structures" (e.g., a poem") and a set of project "strategies" (e.g., "for two or more people"). Partici-pants could choose a structure and strategy at random in order to provide some ideas for getting started on a project (Figure 23). The cards were designed to provide "open
constraints" - i.e., constraints that could
O
be interpreted in multiple ways and allowfor a variety of unique outcomes. A full list of the idea spark cards is given in Appendix
d
B. Figure 23 - Spark Card decks showing an example draw.
A set of coding cards (in the spirit of Scratch
Coding Cards [14]) were also created to support the E
Make
a
Loop
project making process. Each coding card was titled with a simple, common task that maker might want to perform with code (e.g., "play a video" or "makea loop") along with a minimal example of a block
stack that would accomplish that task (Figure 24). Icons at the top indicated if the code was applicable to video clips, audio clips, or both. A complete set of Bricoleur coding cards is given in Appendix C.
The general structure of a workshop followed a model we use in Lifelong Kindergarten called Image-Create-Share. For Bricoleur workshops, this consisted of an ice breaker activity, a quick demo of the tool including showing a few examples of Figure 24 - Example of a Bricoleur projects (the Imagine phase), an extended time for card demonstrating how to loop a project making in groups of 2 to 3 (the Create phase), video or audio clip. and finally a time to show off projects and reflect on the experience with the other participants (the Share phase). Occasionally, a workshop would have a specific focus like making projects using the tilt or compass features, but most were open-ended in terms of project theme. As a way of examining these workshops, we use Mitch Resnick's 4 P's of creative
learn-ing - projects, passion, peers, and play - to provide four lenses into the workshop
expe-riences. The 4 P's assert that creative learning experiences are characterized by makers "working on projects based on their passions, in collaboration with peers and in a playful spirit" [11]. While the word "play" is most directly analogous to bricolage and tinkering, all four P's are certainly present in any rich bricolage experience.
Projects
What kinds of projects do people make with Bricoleur? Moreover, what kinds of projects can people make with Bricoleur. To investigate this, we draw upon Jay Silver's notion of
2 Project+ a Une 3 Projects +a Spame
Figure 25 - Jay Silver's sample project space. (credit: Jay Silver [15])
Stories
Certainly, it is possible to create projects that operate the way that traditional video media does. That is, makers can create proj-ects that consist of sequenced video and audio clips that are played in order from beginning to end. While these projects do not make use of the interactive capabilities of Bricoleur, a rich space of project possibil-ities still exists in this realm. In particular, makers can create stories through sequenc-ing video clips and syncsequenc-ing audio with the
sequence (Figure 26). Figure 26 - A still from a story Droject about
Figure 27 - A "puppet show" project (also
shown in Vignette Two) where each character
can be tapped to trigger sound andanimated movement.
the moon.
Performances
As opposed to traditional video media
that is simply played from start to finish, many Bricoleur projects are performed rather than played. That is, makers take ad-vantage of the blocks that allow for project interactivity to create works that must be interacted with in order to be experienced. Here, we looks at two specific subtypes of performance-based projects.
Puppet Shows
A typical way makers create performance
projects is by putting multiple video clips on the canvas that each start playing only when they are tapped. The maker must then perform the project for others by tapping on each clip to trigger the behavior (Figure 27).
76