ABSTRACT
Augmented Reality (AR) is an emerging technology that utilizes computer vision methods to overlay virtual objects onto the real world scene so as to make them appear to co-exist with the real objects. Its main objective is to enhance the user’s interaction with the real world by providing the right information needed to perform a certain task. Applications of this technology in manufacturing include maintenance, assembly and telerobotics. In this paper, we explore the potential of teaching a robot to perform an arc welding task in an AR environment. We present the motivation, features of a system using the popular ARToolkit package, and a discussion on the issues and implications of our research.
Keywords —Augmented Reality (AR), Robot Teaching in AR (RTAR), arc welding, kinematics, accuracy, occlusion
I. INTRODUCTION
ugmented Reality (AR) is the environment where computer-generated 3D objects are blended (registered) onto a real world scene to enhance the user’s real time interaction with the real world, by providing the right information at the right time to perform a certain task, [1-2]. It involves two major activities, namely, I) Tracking, where the orientation and position of the camera relative to the entities in the real world scene are calculated and, II) Registration, where virtual objects are rendered onto the scene based on the calculated values from tracking.
In the context of manufacturing, AR has been a subject of intensive research in areas such as maintenance [2,-4] and assembly [2], [4-9]. The first major application of AR in the industry is the Boeing’s AR-assisted wire bundle assembly [9]. In these applications, annotations are usually used to provide instructions to the users in a pre-planned environment or an interactive manner. For assembly tasks, the user is guided by a reasonable amount of intelligence via an expert system that contains information of all the feasible assembly states. The AUDIT system that guides a user in planning assembly sequences and warns the user of any infeasible assembly states has been reported [8]. AR has also been applied to telerobotics for unstructured environments where the operator requires visual feedback of the actual robot and its remote working environment [10].
There is a lag between the operator’s input and, the visual feedback and actual execution of the task due to limitations in the communication channels. The main objective of AR is to provide visual feedback for evaluation in the form of a wireframe robot carrying out the task prior to the actual execution. Recently, AR has also been used for the programming of painting robots [11]. This work is similar to the one proposed in this paper but is less detailed and involves a less demanding manufacturing task. Hence, it is clear that the supplementary information provided in the AR environment has many applications in manufacturing. In this paper, we recognize the potential of AR technology in the teaching of industrial robots.
Industrial robots have long been used to increase productivity and quality through the automation of manufacturing processes. These robots have replaced humans in performing a wide range of tasks which otherwise would be time-consuming and/or dangerous. An important pre-production activity is the planning and teaching of a robot for a certain task that it will be performing repetitively throughout the production stage. We define planning as coming up with a collision-free trajectory and a set of actions for the robot that takes into account the process requirements, and teaching as ‘guiding’ a robot on how to perform the task. The actions taught are communicated as a program to the physical robot controller for execution. The planning and teaching activities can be carried out by the user concurrently if they are performed online at the work cell itself.
At this point, we aim to benchmark our method against existing robot programming approaches (the programming of a robot is synonymous to the teaching of a robot). The different methods of programming a robot as defined by the Occupational Safety & Health Administration (OSHA) under the U.S Department of Labor [12] are:
I) Lead-through Programming or Teaching: This is performed manually using a teaching pendant that will guide the robot in performing a prescribed task.
II) Walk-Through Programming or Teaching: This is performed manually when the user actually moves the robot through physical contact.
An Application of Augmented Reality (AR) in
the Teaching of an Arc Welding Robot
Chong, J. W. S.1, Nee A. Y. C.1,3, Youcef-Toumi, K.2
, Ong, S. K.3
1Innovation in Manufacturing System and Technology (IMST), Singapore-MIT Alliance (SMA)
2Department of Mechanical Engineering, Massachussetts Institute of Technology (MIT)
3Department of Mechanical Engineering, National University of Singapore (NUS)
III) Offline Programming: The robot program is generated using a remote computer console and is later transferred to the actual robot controller.
In general, the task of robot programming is time-consuming and unintuitive [13-14]. The use of lead-through and walk-through programming poses safety issues for the operator. This is one of the main motivations behind the use of offline programming. Virtual Reality (VR) is an example of an offline method aimed at increasing the intuitiveness of the planning task for the human. VR has been applied in the training of robots for object manipulation [15]. However, totally-immersive environments (like CAVETM) are costly and inflexible. Desktop-based offline programming, on the other hand, is less intuitive compared to the lead-through and walk-through methods. It is also restrictive and inflexible to different work cell layouts.
Therefore, we introduce another method in this paper which we define as Robot Teaching in AR (RTAR). Here, a virtual robot model is rendered onto a tracked marker (robot base) and the teaching is performed using a physical probe with an attached marker (welding torch). The objective is to provide an alternative that combines the benefits of all three methods of lead-through, walk-through and offline programming. Therefore, the system should possess the following characteristics:
I) Enables intuitive teaching of the robot with more human-robot interaction similar to the walk-through programming concept;
II) Provides a visual of the robot simulation at the actual work cell that is more convincing and enables the evaluation of various robotic options;
III) Flexible to various work cell and robots; and IV) Safe to use.
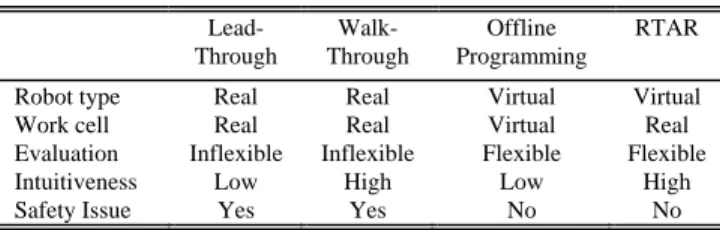
A comparison of the traditional programming methods and RTAR is summarized in Table I.
TABLE I
COMPARISON BETWEEN VARIOUS TEACHING APPROACHES
Lead- Through Walk- Through Offline Programming RTAR
Robot type Real Real Virtual Virtual
Work cell Real Real Virtual Real
Evaluation Inflexible Inflexible Flexible Flexible
Intuitiveness Low High Low High
Safety Issue Yes Yes No No
Without having to transport the actual robot to the work cell, RTAR provides the necessary flexibility to evaluate different robotic options to select the best one. If a robot has already been selected, programming can be performed during the lead time between the shipment of the physical robot and its arrival. In addition, the need to extensively model the work cell entities, such which is required in VR and offline programming, is eliminated. For example, measurements were taken on an actual work cell to model
different entities for the virtual environment [16]. On the other hand, an AR environment can be created on the real work cell itself. This is useful for a dynamic shop floor environment where an in-situ approach is desirable.
We have developed an RTAR system for teaching an arc welding robot using a single IEEE 1394 FireFly camera, the ARToolkit’s marker detection method [17] and OpenGL for rendering. The programming language used is C++. Section two of this paper presents the fundamentals in the tracking method used and the modeling process. Section three describes an example task designed to demonstrate the system’s concepts. The discussions on related issues and the implications of the research are contained in Section four. Section five concludes the paper and sets the direction for future work.
II. SYSTEMDESCRIPTION
2.1 Relationships between Frames
The robot and its work cell were scaled down but can be extended to the actual work cell dimensions. The coordinate systems of the Hiro and markers represent the robot’s base and torch reference frames respectively. The relationship between the camera (Xc, Yc, Zc), robot base (Xb,
Yb, Zb) and welding torch reference (Xw, Yw, Zw) frames are
obtained using the marker detection method in ARToolkit as shown in Fig. 1, whereas the relationship between the welding torch reference and the torch tip (Xw’, Yw’, Zw’)
frames is known. Fig. 2 shows a simple physical representation of the torch using a probe with an attached marker. The matrix T relates any two frames and consists of the rotation, R and translation, t components. Therefore, the relationship between the robot base and torch tip is:
1 ' [ ] ' b b w c c w w w T = T T − T
' b c w cT T Tw w =
(1)
Fig. 1. Relationships between markers and camera
' '[ | ]
w w
w w
T= R t
2.2 RTAR System Description
A six-degree of freedom revolute joint robot (similar to the popular PUMA 560 industrial robot with three axes intersecting at the wrist [18]) was used in this system as shown in Fig. 3a. We denote the angles of the joints as J1, J2, ..., J6. In Fig. 3b, we can see the rendered torch corresponding to the physical probe in Fig. 2. It is interesting to note that different robot models can be used, which provides flexibility in the evaluation of various robotic options. By moving the base marker, we can also adjust and reposition the robot easily in the work cell.
(a) (b) Fig. 3. Six degree-of-freedom robot model
The matrix wb'T that relates the torch tip relative to the base
is in fact the robot model’s kinematics chain, which has to be solved. The kinematics analysis can be divided into forward and inverse kinematics as shown in Fig. 4. The forward kinematics analysis is straight forward, where given the angles of the robot we can determine the unique position and orientation of the torch. The inverse kinematics of the six degree-of-freedom robot is much more complex because there are multiple ways in which the robot can achieve a given torch orientation and position. However, by setting allowable joint ranges, we can avoid multiple solutions and unwanted configurations, such as singularities where the robot loses a degree of freedom. We solved the inverse kinematics by decoupling the problem into the first three angles J1, J2 and J3 and last three angles J4, J5 and J6. This can be done because the last three joint coordinate systems intersect at the wrist. The analytical solutions for both forward and inverse kinematics can be found in [18].
Forward Kinematics: Given J1, J2,.., J6, find the position and orientation of
torch
Inverse Kinematics: Given, the position and orientation of torch, find J1,
J2,.., J6
KINEMATICS ANALYSIS
Straight forward approach Approach: 1) Decouple analysis to solve
J1-J3 and J4-J6 separately 2) Angular constraints
(physical constraints)
Fig. 4. Kinematics analysis approach
It is important to note that the dynamics of the robot are not considered. This is because after the movements of the robot are planned, the dynamic considerations can be taken into account offline by indicating the angle velocities, accelerations, task-related parameters and so forth. Moreover, for robotic welding, the payload is not a critical issue because the burden on the wrist carrying the torch is relatively light as compared to the entire robot.
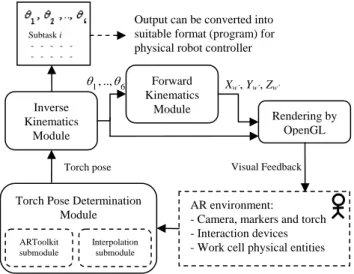
The system architecture is shown in Fig. 5. The input to the inverse kinematics module is the pose of the torch’s marker,
'
b
wT which is obtained using the torch pose determination
module that utilizes the ARToolkit and/or interpolation sub-modules (the function of the interpolation sub-module will be explained later). The inverse kinematics module calculates the necessary angles whereas the forward kinematics module calculates the coordinates of the torch tip based on these angles. If the torch is moved outside the robot’s workspace, the robot will stop and remain at the last feasible configuration prior to the violation. Visual feedback is provided by rendering the robot and weld seams using OpenGL. This is useful to check for collisions between the robot and the work cell entities, and inspect the quality of the weld seam. Dotted lines and dark continuous lines represent the trajectory of the robot’s tip without and during the welding process respectively.
Fig. 5. RTAR system architecture
In this system, we provide two robot-human interaction options to the user, namely, the free-reign and interpolation modes. The free-reign allows the user total freedom of moving the robot by controlling it using the tracked torch. This is useful for a rough evaluation of the robot’s ability to access tight areas or extreme points in the work cell. The expert welder can also use this mode to perform a complex simulated weld in minimal time.
For a novice user, where shaky hands are a concern, interpolation techniques are useful. In this system, a linear
Torch Pose Determination
Module AR environment: - Camera, markers and torch - Interaction devices - Work cell physical entities Inverse Kinematics Module Forward Kinematics Module Rendering by OpenGL Torch pose 1, .., 6 θ θ Subtask i - - - - -
-Output can be converted into suitable format (program) for physical robot controller
Xw’, Yw’, Zw’ Visual Feedback ARToolkit submodule Interpolation submodule
interpolation feature was included where straight line trajectories can be interactively calculated prior to execution. For example, we would like to use linear interpolation for the welding process where the orientation of the torch relative to the weld seam is maintained throughout the process. Firstly, the user places the torch at the beginning of the straight seam in the desired orientation. The orientation and position of the torch obtained by the tracking are then stored. Next, the torch tip is placed at the end of the weld seam at any orientation because we only need the coordinates of the point. Using this information, the intermediate points are calculated. Equations (2) and (3) describe this process, where i = 0 refers to the starting point and i = e refers to the ending or eth point:
' ' ' 0 1
...
b b b wR
i==
wR
i==
wR
i e= (2) ' ' ' 0 1...
b b b wt
i=≠
wt
i=≠
wt
i e= (3) LK defines the vector between the starting (subscript o) andending (subscript e) points:
( ) ( ) ( ) e o e o e o X X Y Y Z Z L ⎡ − ⎤ ⎢ − ⎥ ⎢ ⎥ ⎢ − ⎥ ⎣ ⎦ = K (4) 2 2 2 where |LK|= (Xe−Xo) +(Ye−Yo) +(Ze−Zo) .
The points of the seam will be along the vector LK and the resolution of the weld can be controlled using a factor, res.
The total number of points, k:
+1 if is a positive noninteger if is a positive integer
| | /
| |
| | /
| |
L res L k L res L⎧⎢
⎥
⎪⎣
⎦
= ⎨
⎪⎩
K K K K (5)where res is any real number in mm/(unit time).
Since we know the first and last points on the seam from the tracked torch tip, the number of intermediate points is
2
k− . Therefore, the coordinates of all the intermediate
points are given by:
' ' ( ) /(| | / ) ( ) /(| | / ) ( ) /(| | / ) b o e o b w i o e o o e o w i X i X X L res Y i Y Y L res Z i Z Z L res
t
− + + − + −⎡
⎤
⎢
⎥
=
⎢
⎥
⎣
⎦
K K K (6) where 1 i→ to 2k− .Interpolation methods are common in today’s industrial robots. However, the free-reign concept is something novel,
where the virtual robot can be moved all around without any worry of damage to the robot or workpiece.
III. EXAMPLE
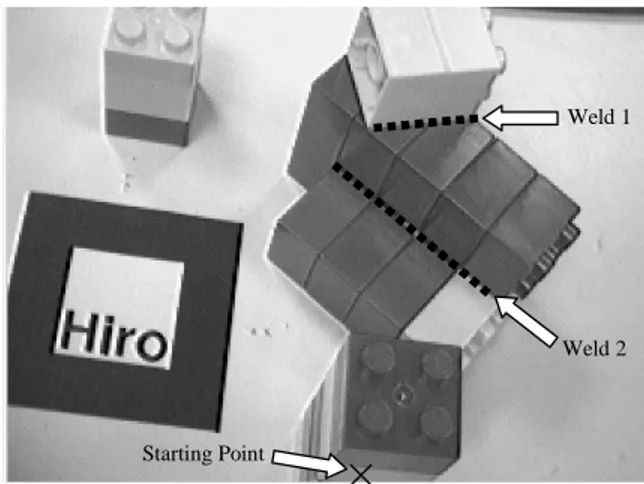
A simple miniature work cell was constructed using toy building blocks as shown in Fig. 6. The task is to move the robot from the starting point and weld two seams without colliding with any obstacles. In addition to this, the welding must be performed at a particular torch orientation along the seam. As the user moves the torch, its tip coordinates relative to the robot’s coordinate system are displayed in the user’s view for guidance. In Fig. 7, we observe that the robot first moves over five blocks stacked on top of each other before moving to the beginning of the weld seam. Using linear interpolation, the welding processes were simulated. The user can also adjust his/her view in order to evaluate the path for collisions (the bottom left and right images in Fig. 7 are alternative view points). At the end of the process, the entire task can be replayed for further checks.
Weld 1
Weld 2
×
Starting Point
Fig. 6. Miniature work cell with indicated tasks (Note: the dotted lines, text and arrows are annotations added to the picture and are not a part of the
video stream).
Fig. 8 shows the angles generated from the example task. The camera used in this system has a video stream of 15 frames per second and therefore each time unit is 0.067s, which is the resolution of the angle update. However, the horizontal axis uses time units for generalization because we are only concerned with the angles needed to achieve the path. Therefore, the angle update rate or angle velocities during this teaching process should not be confused with the actual angle velocities of the physical robot. The actual velocities will depend on the physical actuator resolutions and task requirements, such as the required torch speed during welding. This in turn will affect the accelerations at each joint. Therefore, before the actual task execution, the time units at different stages of the task should be controlled in accordance to the physical properties of the robot and task requirements. J1 J5 J3 J2 J6 J4 Weld 2 Weld 1
Fig. 8. Robot angles for example task
IV. DISCUSSION
4.1 Accuracy
The accuracy of the teaching process depends on the following factors:
Tracking system: The accuracy of the ARToolkit marker
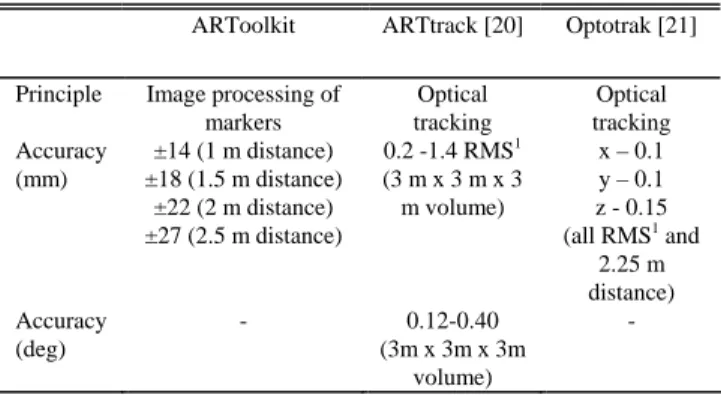
detection method used in this system is insufficient for actual implementation on a shop floor. An effort to quantify the accuracy of ARToolkit was made [19], but in practice, this is a difficult process due to the various inter-dependent sources of error, such as the marker pose, camera position and lighting. However, using more advanced and expensive systems, which employ state-of-the-art optical tracking, the accuracy can be improved to sub-millimeters and is robust over a reasonably large working volume. This is sufficient for the majority of shop floor welding processes. Examples of these systems include the ARTtrack [20] and Optotrak [21]. Table II provides a comparison between ARToolkit and these systems, where the distance refers to the distance between the marker and the camera(s). Ultimately, there needs to be a trade-off between the accuracy requirements and the cost. This is because the typical prices for these commercial systems are in the range of USD 30,000 to USD 50,000.
TABLE II
COMPARISON BETWEEN TRACKING SYSTEMS ARToolkit ARTtrack [20] Optotrak [21] Principle Image processing of
markers Optical tracking Optical tracking Accuracy (mm) ±14 (1 m distance) ±18 (1.5 m distance) ±22 (2 m distance) ±27 (2.5 m distance) 0.2 -1.4 RMS1 (3 m x 3 m x 3 m volume) x – 0.1 y – 0.1 z - 0.15 (all RMS1 and 2.25 m distance) Accuracy (deg) - 0.12-0.40 (3m x 3m x 3m volume) -
Human error: The free-reign mode provides a user with the
flexibility to maneuver the robot and perform complex non-linear welds provided he/she has stable hands. Therefore, the RTAR system is appropriate for users with manual welding experience. Another alternative would be to reduce the noise in the data by smoothing the graph of sudden jerks and movements. Fig. 9 shows a comparison between a manual and a linearly interpolated welding task. Clearly, the weld seam performed manually by hand is more jagged and the orientation of the torch relative to the seam might not always be constant.
Linear interpolation
Manual
Fig. 9. Comparison between manual and pre-calculated weld seams Scaling: Although both the robot and the work cell were
scaled down proportional to each other, the user’s hand movements were not, and therefore slight jerks would translate to errors in the robot movement. However, when implemented for the full-scale work cell, this sensitivity can be decreased and robustness towards small user hand movements is possible.
4.2 Occlusion
Occlusion is the proper registration of a virtual object so that if it is behind a real object, the section of the virtual object that should not be seen by the user needs to be covered by the real object. The purpose of occlusion is to create a more natural environment for the user and avoid confusion. The 1 Root Mean Square error
purpose of occlusion is to create a more natural environment for the user and avoid confusion. To perform occlusion in the video stream, two approaches can be used namely the model-based and depth map methods. These two approaches basically extract information about the real object in the real world and utilize collision detection algorithms. They require a significant amount of computing resources especially for real time applications.
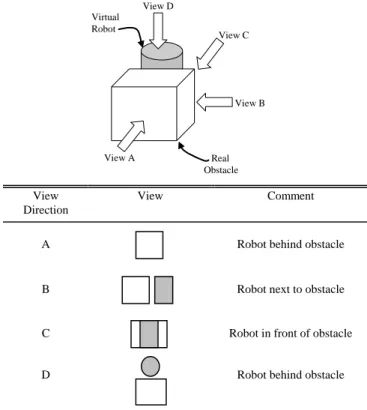
In our application, the occlusion problem is not as crucial as for other view dependent applications such as AR-assisted surgery. This is because as for the training of robots using teaching pendants, the user wants to be able to see the robot in front or side ways of any real obstacles. This can be done easily by adjusting the user’s view as illustrated in Fig. 10.
View A View B View C Real Obstacle Virtual Robot View D View Direction View Comment A
Robot behind obstacle
B
Robot next to obstacle
C
Robot in front of obstacle
D
Robot behind obstacle
Fig. 10. View dependency in occlusion
The occlusion issue would only arise when the virtual robot is behind the real object (View A). In the user’s view, the virtual robot will be incorrectly rendered on top of the real object if occlusion is not dealt with .In this situation, View A might be confused with View C. However, the user can easily change his/her position to Views B or D to determine the virtual robot’s actual position. Although this is not an ideal solution, it is in fact practical because the user follows the robot as it moves and thus the robot must always be in view and not occluded by any real obstacles.
4.3 Implications of Research
There are a number of implications to our research. The teaching of a robot can now be carried out in a short time using a novel and intuitive method. RTAR can also be used for the evaluation of various robotic solutions on the shop
floor, which is a part of work cell layout planning. Besides this, human intelligence and flexibility are maximized in the planning and teaching of the task in an unmodeled environment. More interestingly, RTAR can also be extended to the teaching and coordinating of multiple robots. Lastly, being an attractive and intuitive tool, RTAR would also be valuable for educational purposes.
V. CONCLUSIONANDFUTUREWORK
A system that demonstrates the potential of Augmented Reality (AR) for teaching robots in general has been developed, where a case study of an arc welding robot was used. The main feature of RTAR is that the user is able to plan a task for the robot in an unstructured and/or unmodeled environment, in a relatively short time with assistance from visual feedback provided in the AR environment. This increases the level of intuitiveness in the process and provides the necessary flexibility needed in today’s dynamic shop floor scenario. However, there is still a lot of work that needs to be done before this can be realized in the industry. New robot-user-computer interaction methods that are comfortable and easy to use need to be developed. Besides this, the effects of our modeling assumptions on the accuracy of the actual performed task have to be considered and studied.
REFERENCES
[1] Milgram, P., and Kishino, F., “A Taxanomy of Mixed Reality Virtual Displays,” ICICE Trans. on Information and Systems, E77-D, 9, pp. 1321-1329, Sep 1994.
[2] Azuma, R.T., “A Survey of Augmented Reality,” Presence: Teleoperators and Virtual Environments 6, 4, pp. 355-385, Aug 1997. [3] Feiner, S., MacIntyre, B., and Seligmann, D., “Knowledge-Based
Augmented Reality,” Communications of the ACM, Vol. 36, No. 7, pp. 53-62, Jul 1993.
[4] Neumann, U., and Majoros, A., “Cognitive, Performance, and Systems Issues for Augmented Reality Applications in Manufacturing and Maintenance,” in Proc. VRAIS’98, Atlanta, GA, 14-18 Mar, 1998, pp. 4-11.
[5] Friedrich, W., “ARVIKA-Augmented Reality for Development, Production and Service,” in Proc. ISMAR’2002, Darmstadt, Sep 30-Oct 1, 2002, pp. 3-6.
[6] Barfield, W., Baird, K., Shewchuk, J., and Ioannou, G., “Applications of Wearable Computers and Augmented Reality to Manufacturing,” Fundamentals of Wearable Computers and Augmented Reality, 2001, pp. 695-714.
[7] Tang, A., Owen, C., Biocca, F., and Mou, W., “Experimental Evaluation for Augmented Reality in Object Assembly Task,” in Proc. ISMAR’2002, Darmstadt, Sep 30-Oct 1, 2002, pp. 265-266. [8] Molineros, J., and Sharma, R., “Computer Vision for Guiding Manual
Assembly,” in Proc. 4th IEEE Int. Symposium on Assembly and Task Planning, Fukuoka, Japan, May 28-29, 2001, pp. 362 – 368. [9] Mizell, D., “Boeing’s Wire Bundle Assembly Project,” Fundamentals
of Wearable Computers and Augmented Reality, 2001, pp. 447-467. [10] Rastogi, A., and Milgram, P., “Augmented Telerobotic Control: A
Visual Interface for Unstructured Environments”, in Proc. KBS/Robotics Conference, Montreal, 16-18 Oct, 1995, pp. 16-18. [11] Pettersen, T., Pretlove, J., Skourup, C., Engedal, T., and Lokstad, T.,
“Augmented Reality for Programming Industrial Robots,” in Proc. ISMAR’03, Tokyo, Japan, 7-10 Oct 2003, pp. 319-320.
[12] OSHA Technical Manual, Industrial Robots and Robot System Safety, Section IV: Chapter 4. Available:
http://www.osha.gov/dts/osta/otm/otm_toc.html, Date of Access: 8 Nov 2004.
[13] Pires, J.F., Godinho, T. and Ferreira, P., “CAD Interface for Automatic Robot Welding Programming,” Industrial Robot: An International Journal, Vol. 31, No. 1, pp. 71-76, Jan 2004. [14] Pires, J.F., Loureiro, A., Godinho, T., Ferreira, P., Fernando, B., and
Morgado, F., “Object Oriented and Distributed Software Applied to Industrial Robotic Welding,” Industrial Robot: An International Journal, Vol. 29, No. 2, pp. 149-161, May 2002.
[15] Natonek, E., Zimmerman, Th., and Fluckiger, L., “Model Based Vision as Feedback for Virtual Reality Robotics Environment,” in Proc. VRAIS’95, Los Alamitos, CA, 11-15 Mar 1995, pp. 110 – 117. [16] Robot Work cell Simulation, University of Missouri, Rolla, MO.
Source: http://web.umr.edu/~vrpl/proj-robot.htm, Date of Access: 8 Nov 2004.
[17] Kato, H., and Billinghurst, M., “Marker Tracking and HMD Calibration for a Video-based Augmented Reality Conferencing System,” in 2nd Int'l Workshop on Augmented Reality, San Francisco, Ca, Oct 1999, pp. 85-94.
[18] Craig, J. C., Introduction to Robotics, Mechanics and Control: Addison Wesley, 1989.
[19] Malbezin, P., Piekarski, W., and Thomas, B. H., “Measuring ARToolKit Accuracy in Long Distance Tracking Experiments,” in 1st Int'l Augmented Reality Toolkit Workshop, Darmstadt, Germany, Sep 2002.
[20] ARTtrack Optical Tracking Systems: http://www.ar-tracking.de/, Date of Access: 8 Nov 2004.
[21] Northern Digital Inc Optotrak Certus Tracking System: http://www.ndigital.com, Date of Access: 8 Nov 2004.