Design of an In-Vivo Probe to Detect Cartilage
Degeneration
by
Emerson Cheung Quan
Submitted to the Department of Aeronautics and Astronautics
in partial fulfillment of the requirements for the degree of
Master of Science
at the
MASSACHUSETTS INSTITUTE OF TECHNOLOGY
June 1998
@ Massachusetts Institute of Technology 1998. All rights reserved.
Author ...
Department of Aeronautics and Astronautics
May 22, 1998
Certified by...
/ . . .Alan J. Grodzinsky
Professor
Department of EECS, Mechanical, and Bioengineering
Thesis Supervisor
Accepted by ...
Chairman, Department
Jaime Peraire
Associate Professor
Graduate Committee
i~L
tbJA~9
\
Design of an In-Vivo Probe to Detect Cartilage
Degeneration
by
Emerson Cheung Quan
Submitted to the Department of Aeronautics and Astronautics on May 22, 1998, in partial fulfillment of the
requirements for the degree of Master of Science
Abstract
Currently, detection of the onset of osteoarthritis is very difficult without using de-structive techniques. Without early detection, pharmaceutical intervention to reverse or prevent osteoarthritis cannot be achieved. A technique developed by Frank and Grodzinsky takes advantage of an electromechanical property inherent in cartilage. Upon the introduction of an electrical field to the cartilage surface, a mechanical stress at the surface is produced via an electrokinetic effect. This electrokinetic effect in cartilage is a function of the molecular composition and integrity of the tissue. Past designs to measure this phenomenon have now resulted in a handheld in-vivo probe that utilizes the technology of piezo-electric films. These piezo-electric films can sensitively measure the mechanical stresses developed within the cartilage and convert them into a quantitative electrical signal. Potential applications of this probe include use in arthroscopic surgery to provide surgeons with more quantitative infor-mation for diagnostics and therapeutic intervention. By testing the probe on human tissue and validating such measurements, the goal of this thesis is to show that the size of the handheld in-vivo probe can be reduced for arthroscopic surgery and that the measurements made by the probe can be correlated to the physical properties of cartilage.
Thesis Supervisor: Alan J. Grodzinsky Title: Professor
Acknowledgments
It's amazing how two years can go by so quickly. In the past two years, I've been very fortunate to have spent that time working with a bunch of wonderful people. First of all I must acknowledge the very man who leads us, his troops, in the lab. Al, the Godfather of Cartilage, who has taught me the blend of good research and good nature. What more can I say besides the fact that I've never seen anyone consume an entire rain forest of coffee beans in a year like Al. We practically run a Starbucks in the back of our lab. I'd like to thank the rest of the supporting cast for all of their help (I could write an entire thesis about how great each of these people are, but for the sake of our reviewers I'll keep it short and sweet). First to my crew -the probesters. What a fitting name to a bunch of guys who know all about probes. To Steve "Can I take a swig of that?" Treppo, you've been the best labmate anyone could ever have. I am always deeply in debt for your advise and generosity in helping me around the lab. To David Breslau, who's amazing craftsmanship, helped manufacture the parts of the probe. To Jeff, my partner in crime, thanks for the tag team effort on the project. And of course Nik, who has convinced me that camping out in the middle of winter isn't just a spectator sport. Around the lab I'd like to thank some others. To Linda who's mix of crass humor and kind heartedness always brought a smile to my face. And who can forget Han Hwa, our lab mom. Without her I probably would've accidently blown up the lab by now. Then there's Eliot, who's ability to fix anything, has never ceased to amaze me. And finally there's the rest of the gang: Paula, Marc, Andy, Niti, and Vicki. Thanks for all the fun times and the constant reminder that grad school is all about Tosci's and procrastination.
I'd also like to thank people in the Aero/Astro department. To Dava, a fellow Domer, who has continually inspired me in the field of space physiology, the MVLers, Liz Zotos who has helped me in all aspects of my graduate career, and finally the NASA Space Grant Consortium for keeping the tuition bill out of my hands and keeping a roof over my head.
I'd also like to thank all my friends at Ashdown. Especially my roommates for putting up with me and my stresses. Tom, Frank, and Ben - you guys are the greatest. I'd also like to give a "shout out" to others around the asylum. To Amy, Emily, and Priscilla, thanks for being there through the good times and the bad. And also to my friends at home, Larry, Derek, Bim, Mar, and Sherwin -thanks always for your constant support. And finally I'd like to thank my parents for all their years of hard work, love and support. This day would not have been possible without them.
Emerson C Quan May 22, 1998
To Andres and Margaret with love
Contents
1 Introduction 13 1.1 History ... .. .... ... .. .. 13 1.2 Epidemiology ... ... .. 14 1.3 Pathogenesis ... ... .. 14 1.4 Diagnosis ... ... .. 15 1.5 Treatment ... ... .. 16 1.6 Overview ... ... ... 172 Background and Theory 18 2.1 Cartilage ... .. .... .. 18 2.2 Composition . ... ... ... 19 2.2.1 Collagen ... ... .. 19 2.2.2 Proteoglycans ... ... 19 2.2.3 Chondrocytes ... ... .. . 22 2.3 Cartilage Electromechanics . . . . ... . . . . 22 2.3.1 Streaming Potential ... . ... ... . 23
2.3.2 Current Generated Stress ... .... 23
2.4 Previous Research on Surface Spectroscopy . ... . 24
3 Design and Manufacturing 31 3.1 Probe Construction ... ... . 32
3.1.1 Inner Core ... ... . 32
3.1.3 Outer Stainless Steel Body . 3.2 Fabrication of ETS ...
3.2.1 Assembly ... 3.2.2 Photofabrication ... 3.2.3 Etching ... 3.2.4 Cutting and Mounting . 3.2.5 Fabrication of Silver/Silver C
4 Experimental Method 4.1 Calibration ...
4.1.1 Hardware setup . . . . 4.1.2 Procedure . ...
4.2 Current Generated Stress Experimen 4.2.1 Hardware Setup . . . . 4.2.2 Testing for Parasitic Signals 4.2.3 Tissue Experiments with the 4.3 Confined Compression . . . .. 4.3.1 Hardware Setup . . . . 4.3.2 Procedure . ... 4.4 Biochemistry ... 4.5 Version 5.0 Validation . . . . 4.5.1 Calibration . . . ... 4.5.2 Procedure . ... . . . . . . . . . . . . . . . . . . . . . . . . hloride Electrodes 44 .. . . 45 . . . . . 45 .. . . 45 .. . . 46 .. . . 46 .. . . 46 .. . . 47 .. . . 47 . . . . . 47 .. . . 49 .. . . 49 .. . . 51 . . . . . 51 .. . . . . 51 5 Results 5.1 Patella Experiments 5.1.1 Correlations ... 5.1.2 Joint Comparisons ...
5.1.3 Comparison of Articulating Cartilage Surfaces ... 5.2 Version 5.0 Results ...
6 Conclusions 72 6.1 Significance of results ... .... . . . 72 6.2 Issues ... ... .. 73 6.3 Looking Ahead ... ... .. 73 A Version 4.0 Probe 75 B Version 5.0 Probe 78
B.1 First Iteration of ETS Patterns ... .. 81 B.2 Second Iteration ... ... .. 82
List of Figures
2-1 Collagen, proteoglycans, and chondrocytes are linked together to form Extracellular Matrix (ECM). [Courtesy of S Berkenblit] ... . .. 20 2-2 Structure of proteoglycan. [Courtesy of S Berkenblit] ... 21 2-3 Current Generated Stress (CGS). The negative fixed charges on the
ECM move toward the positive electrode while the ions in the fluid move toward the negative electrode. By driving a sinusoidal current, the ensuing motions of the fluid and solid phases create a mechanical stress within the cartilage that can be measured at the surface.... . 25 2-4 Cartilage is uniaxially confined between two silver electrodes to
pro-duce current generated stress. ... .. . . 26 2-5 Results of a theoretical model showing the flow of the current density
coming from two electrodes on the same side of the testing surface. 27 2-6 A variable wavelength in-vitro probe. Different polarity configuration
give different wavelengths and penetrate at various depths of the tissue. [Courtesy of S Berkenblit] .... ... ... . .... 28 2-7 An experimental setup to test the handheld probe on a disc of cartilage.
[Courtesy of D Bombard] ... ... .. . 29
3-1 Three parts of the version 5.0 probe. A - Inner core, B - Insulating sheath, C - Outer stainless steel body ... .. . 32 3-2 Diagram of the inner core. A - Hollow stainless steel tube, B - Torlon
body ... ... . 34 3-3 Diagram of the sheath placed over the ETS and head of the inner core. 35
3-4 Diagram of the outer body covering the probe's interior. A nut screws the probe parts tightly together ... ... . .... 36 3-5 Dimensions of each layer of ETS materials. . ... .. . .... . 38
3-6 Patterns for the electrodes. Left - Piezo electrodes, Right - Silver
electrodes. [Courtesy of S Treppo] .... ... . . . . 39 3-7 After etching and cutting the ETS. Left - Kynar electrodes, Right
-Silver electrodes . ... ... .. .... .. .. 41 3-8 Left - Crucifix backing plate attached to kynar side of ETS, Right
-Silver electrodes after chloridation. ... 42 3-9 Schematic of proposed measurements in an joint cavity, Right -Picture
of an assembled v5.0 probe. ... .... .. ... 43
4-1 Setup for an intact joint experiment. Patella is placed in a holder and submerged in testing solution. Probe is inserted into a probe sheath clamped to a ring stand. The end of the probe is placed on a flat surface of the joint. A calibrated spring in the shaft provides the required static offset stress... . ... .. .. .. . 48 4-2 Test sites were drilled and a 9.5 mm diameter core was extracted from
the joint. A 1.0 mm thick slice of the cartilage surface was microtomed from the core. From each slice, four 3.0 mm discs were punched out. One disc was tested in confined compression while the others were tested for biochemistry. ... ... 50
4-3 Polarity configurations for A - short and B - extra long wavelengths.
O in electrodes 2 and 3 for (B) denote no current output. The longer wavelength in (B) penetrates deeper into the cartilage tissue. . ... .. 53
5-1 Calibration outputs from the left and right channels of a v4.0 probe. . 55 5-2 Current generated stress versus frequency, N = 8. . ... ... 56 5-3 Correlations of the current generated stress with A - equilibrium
5-4 Correlations of the electromechanical coupling coefficient with A
-streaming potential and B - dynamic stiffness. . ... .... 59 5-5 Correlations of age with A - equilibrium modulus, B - water content,
and C -GAG per tissue wet weight, also D - correlation of equilibrium modulus to hydroxyproline content. ... 60 5-6 Comparing electromechanical results of cartilage from various joint
sur-faces. Cartilage came from TA - talar, F - distal femur, TP - tibial plateau, and PT - patellar joint surfaces. .... ... .. 62 5-7 Comparing biochemical properties of cartilage from various joint
sur-faces. Cartilage came from TA - talar, F - distal femur, TP - tibial plateau, and PT - patellar joint surfaces . ... ... . ... 63 5-8 Comparing electromechanical results of cartilage from surfaces on the
patella that are in contact with cartilage from surfaces on the distal femur. Comparison of data from the same human subjects are denoted by FP-C and PT-C ... ... .. 64 5-9 Comparing biochemical composition results of cartilage from surfaces
on the patella that are in contact with cartilage from surfaces on the distal femur. Comparison of data from the same human subjects are denoted by FP-C and PT-C ... ... . .... ... 65 5-10 Piezo response for each channel at various dynamic amplitudes and at
various frequencies ... ... . . . 66 5-11 Differential amplitude and phase from channels 1-2 and channels 3-4
at various applied current densities and frequencies. Driving current is in a short wavelength configuration. ... ... 67 5-12 CGS output from A - channels 1-2 and B - channels 3-4 at various
current densities and frequencies. ... . 68 5-13 A - Differential amplitude from channels 1-4 at various applied current
densities and frequencies. Driving current is in an extra long wave-length configuration. B - CGS response from an extra long wavelength configuration. C - Phase output. ... .. . . 69
5-14 Normalized stress amplitude for a short wavelength configuration in A
- channels 1-2 and B - channels 3-4. C - Normalized stress amplitude
for an extra long wavelength configuration in channels 1-4. . ... 70 5-15 Parasitic response from differential outputs and phase from channels
1-2 and channels 3-4. ... ... ... 71
5-16 Parasitic CGS from A - channels 1-2 and B - channels 3-4. ... . 71
A-1 Parts of the v4.0 probe being assembled. Outer body diameter of the probe is 1.0 cm. [Courtesy of D Bombard] . ... 76 A-2 Current v4.0 ETS electrode pattern. Left - Piezo electrode; Right
-Silver electrode. Cross patterns are used to align ETS wafers during photofabrication. [Courtesy of S Treppo] . ... .... . .. . 77
B-1 Dimensions of Inner core of the v5.0 probe. .... .... . .. ... ... 79
B-2 Dimensions of A - Bottom part of inner core, B - Insulating sheath,
and C - Outer Body of the v5.0 probe ... .... .. ... 80 B-3 First iteration of v5.0 ETS electrode patterns. Left - Piezo electrodes;
Right - Silver electrodes [Courtesy of S Treppo] . ... 81 B-4 Second iteration of v5.0 ETS electrode patterns. Left - Piezo
Chapter 1
Introduction
Osteoarthritis (OA) is the most common disease that affects the everyday mo-bility and activities of an individual. The disease occurs in the tissue of synovial joints (e.g., knees, hips, and hands) and is characterized by pain, tenderness, and limitations in limb movement. Individuals afflicted with OA often experience a decrease in the quality of life due to prolong discomfort and reduction in daily activities. Although the disease itself is not a cause of death, it is the greatest cause of physical suffering to those afflicted.
It is estimated that in the US alone, the number of people suffering from OA will reach 68 million by the year 2010 [30]. The cost of treating OA is also staggering with an 1989 estimate of 54.6 billion dollars alone in the US [47]. This amount is even greater when considering the amount of work time lost by those afflicted. Research in OA has yielded important knowledge about the disease and some of its causes. Further research will be needed in order to discover viable ways to treat OA.
1.1
History
Osteoarthritis was prevalent even before humans existed, from evidence in the fossils of ancient mammalian species [16]. The symptoms of the disease were well known to ancient man, with the similar feelings of pain and discomfort experienced
today. Even by the early 1700s, the exact cause of OA was still a mystery, although some such as English physician William Herberden began carefully documenting the observations of lesions in their patient's joint tissue. By the mid-20th century, sci-entists had been able to separate the different causes of joint pain [16]. Among the different subsets of joint disease include hypertrophic (degenerative joint disease), at-rophic (rheumatoid arthritis), and OA. Rheumatoid arthritis (RA), which is different in pathology from OA, is caused by inflammation in the joint cavity as a result of some pathogen. The initial symptoms of RA are hard to distinguish from OA [38].
1.2
Epidemiology
Because osteoarthritis is non-discriminate in race, gender, and geography, epi-demiological studies have helped classify groups predisposed to OA. OA is most preva-lent in age groups above 65 (over 70% experience symptoms) with a higher incidence among women than men over 50 [15]. The prevalence of OA generally increases with age. Degeneration of the joint tissue can be seen in individuals as young as 20 years with some abnormalities seen in all by the age of 40 [40]. In addition, individuals having undergone major joint surgeries or experiencing inflammatory joint diseases are more likely to experience OA. Other risk factors for OA include obesity, joint injury, or a genetic predisposition for OA [30]. Interestingly, OA occurs in certain joints at a much higher rate than others. For instance, OA is often seen in knees and hips, but rarely in ankles or elbows [26]. Proper analysis of epidemiological data must include both biological and mechanical factors which can cause OA.
1.3
Pathogenesis
The pathways of OA progression can be observed through the examination of tissue. OA is seen to occur via two major pathways. The first is a breakdown of the cartilage structure which leads to an erosion of the cartilage surface [39]. The initial phases may be confined focally but eventually diffuses to other areas on the
surface. Mechanical stresses may induce additional pitting and fissures creating a roughened surface containing ulcerations. Eventually deterioration takes place down to the bone, eliminating the load bearing capabilities in the joint [40].
A second pathway occurs by the proliferation of cartilage and bony material at the joint periphery [1]. This overgrowth of tissue leads to osteophyte formation and results in incompatible congruity between joint surfaces.
But what events stimulate the initiation of OA? There has been much specu-lation that there is both a mechanical and biochemical interaction that initiates the disease process. Some possibilities include the release of proteolytic or collagenolytic enzymes from cartilage cells in response to mechanical stimuli which causes unrav-eling of matrix integrity [40]. Others believe there is a chemical or immunological abnormality that elicits degradation [8]. Another possibility is that the balance be-tween tissue repair and tissue degeneration is disrupted by either of the two pathways above [10].
By studying the physiology of the tissue from the molecular level to the organ level, OA progression can be monitored in order to understand the process of this disease. Animal models can be used to simulate the progression of OA and as subjects for new treatments. One example of a model for OA progression was created by transecting the anterior cruciate ligament of dogs [46]. This enables an immediate, observable progression to OA. By understanding the pathways of disease progression, researchers can pinpoint areas to target for therapy.
1.4
Diagnosis
Efforts are being made to diagnose the disease progression at it's earliest stages, in order to determine a treatment before further damage can occur. Initial diagnosis of OA begin with patients complaining of pain and stiffness in their joints. Further diagnosis can be made using the current gold standard of radiography [30]. In addition
a visual inspection can be made during surgery via an arthroscope. A grading scheme to characterize the damage is utilized in both methods. The most commonly used scale of radiographic evidence is the Kellgran and Lawrence method [27]. The scale is numbered from 0 to 4 with 0 being no visible defects and 4 showing visible OA. The Collins scale [9], on the other hand, is used during a surgical visual inspection with the same definitions for a scale of 0 to 4. Both the Collins scale as well as radiography fall short in their abilities to detect early onset of osteoarthritis. Visual inspection can only confirm whether tissue has already become osteoarthritic. Visual inspections cannot detect the precursors of OA in tissue.
Laboratory methods such as a synovial fluid extraction or a histological exam-ination (Mankin scale) can be used to further investigate the progression of disease [33]. Unfortunately, synovial fluid extraction can only rule out other possible causes for the pain, such as RA. The Mankin scale categorizes the extent of disease progres-sion in tissue via histology but requires a destructive biopsy. Furthermore, histological examination occurs only where tissue was removed.
Other possible methods include MRI [45] and sonography [44], but they too have limitations in detecting changes in cartilage. New techniques that nondestructively test for OA and its precursors are the driving interests for this study.
1.5
Treatment
Currently there are no specific treatments that have shown the ability to cure, retard or prevent OA in humans. Anti-inflammatory or analgesic medications can typically be prescribed to give temporary relief from pain. In addition, a regimen of rest and a change in one's pattern of physical activity can prevent worsening of pain.
There is much research being done in looking for long term solutions to the problems of OA. Much research is going into the development of medical techniques and drugs that could reverse OA. However, assessment of the treatment's progress
must be made in order to evaluate efficacy of the treatment. Therefore, innovative diagnostic tools, beyond the visual methods that were previously discussed, must be discovered to give a more accurate assessment of tissue integrity.
Prevention through early detection of OA is an important goal if at some point reversal of damaged tissue is impossible. Therefore the discovery of drugs that can target the onset of OA would be of great value to those at high risk for OA.
1.6
Overview
This thesis begins with a short overview of cartilage physiology. We will begin by describing the electromechanical properties of cartilage followed by a discussion of the theories of electrokinetic spectroscopy. The design of an electromechanical surface spectroscopy device to probe cartilage is then described along with the experimental protocol for calibration and subsequent testing of both bovine and human tissue. Finally the last two chapters are devoted to the presentation and analysis of the data along with some concluding thoughts on the results and future directions for our device.
Chapter 2
Background and Theory
This chapter will review some of the basic properties of cartilage tissue and its physiology. Understanding that cartilage is a dynamic tissue which reacts and responds to external forces will enable the reader to appreciate the intricacies that exist. It is important to learn how a biomedical device can take advantage of the natural phenomenons that are a consequence of the properties of cartilage. The design of the device is presented along with some introductory remarks on electromechanical theory in regards to living entities such as tissue. And finally, previous research leading up to the current discoveries will be summarized to give some perspective on the progress that has been made so far.
2.1
Cartilage
Cartilage is an aneural, avascular, and living tissue that lines the ends of load bearing joints. It macroscopically looks pearly white and homogenous yet is micro-scopically composed of a dense network of molecular structures. Cartilage protects joint areas by spreading the compressive loading over a larger area, acting as a damp-ing element durdamp-ing high impact loaddamp-ing. Cartilage is also strong in tensile loaddamp-ing, for example during stretching of a spinal disk. Cartilage also enables frictionless move-ment between joints through the lubrication from synovial fluid in the joint cavity. Lubrication protects the cartilage from trauma that could occur from shear stresses.
These mechanical properties of cartilage are a consequence of the composition and unique physical properties it possesses.
2.2
Composition
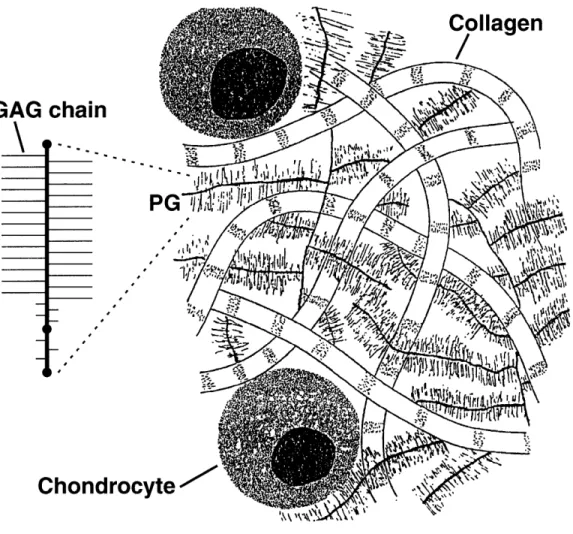
Cartilage is comprised of mostly water (60 - 80% of total weight) and extracel-lular matrix (ECM) [34]. The ECM is made up of collagen fibrils (types II,IX,XI), charged proteoglycans (PGs), and cells (called chondrocytes). Collagen and proteo-glycans form the framework for cartilage (Figure 2-1).
2.2.1 Collagen
Collagen makes up the majority of the dry weight in cartilage (approximately 50%) [32]. In cartilage the most abundant form of collagen is type II which acts as the structural scaffold. Other types of collagen exist, for example type IX helps connect the various matrix elements together while type XI regulates the size of fiber formation [7]. Type II collagen is composed of three tightly interwoven alpha chains, each with a repeating amino acid sequence of Gly-Pro-(Hydroxylysine) [52]. The triple helical structure enables collagen II to have a high tensile strength. The highly enriched amount of hydroxylysine helps collagen II link together the ECM network.
2.2.2
Proteoglycans
Proteoglycans themselves are attached to a core protein like hyaluronate via a link protein. The number of linked PGs depend on the functional nature of the cartilage [21, 23]. Some common PGs that can be found in cartilage include aggrecan, decorin, and versican.
Proteoglycans are a protein chain that contain carbohydrate domains. Their function is to help form molecular aggregates in cartilage [37]. Together PGs form a hydrogel like structure that is immersed in collagen. This material helps cartilage withstand the swelling forces that occur during compression. Attached to each PG
GAG chain
"
,I 11111'I',
e
I
t
\
PG :
Vr a;;!
i
"r
:
I 4IChondrocyte"
"
Figure 2-1: Collagen, proteoglycans, and chondrocytes are linked together to form
is at least one sulfated glycosaminoglycan (GAG) (Figure 2-2). Most PGs contain two types of GAGs [13]. For example aggrecan is the major proteoglycan in articular cartilage (around 90%) and has attached to it two types of GAGs - chondroitin sulfate and keratin sulfate. The amount of GAG attached to each proteoglycan varies depending on the functionality and integrity of the tissue [24].
oligo-Hyaluronate O-linked oligo-saccharide Link protein Hyaluronate Figure 2-2:
I III CS = Chondroitin sulfate
KS-rich region KS = Keratan sulfate
Structure of proteoglycan. [Courtesy of S Berkenblit]
GAGs are chains of repeating disaccharide units that contain highly charged carboxylate and sulfate groups [36]. The high density of negatively fixed charge groups helps attract ions of the opposite charge. These ions osmotically attract water to help maintain a constant concentration and pH within the tissue [23, 35].
GAG chains attach to certain areas along the proteoglycan. In aggrecan, chon-droitin sulfate (10 - 15kDa) attachment begins at all Ser-Gly dipeptide sites along the proteoglycan [24]. The exact site of keratin sulfate (5 - 10kDa) attachment is un-known except for the fact that the majority of keratin sulfate is located in a proline rich region behind the group of chondroitin sulfate [21]. There are approximately 100
- 150 GAG chains per aggrecan unit. Some other types of GAGs found in collagen include heparin sulfate and dermatin sulfate.
2.2.3
Chondrocytes
Because cartilage is avascular, chondrocyte cells must acquire their nutrition through the diffusion of molecules through the ECM matrix. These molecules come from the synovial fluid in contact with the cartilage surface. Chondrocytes help main-tain and repair the ECM structure by synthesizing new collagen and proteoglycans [25]. In addition chondrocytes can adapt to the changes in mechanical loading through their cell receptors [29]. These adaptations, done by balancing the homeostasis of the matrix, maintain cartilage integrity.
2.3
Cartilage Electromechanics
Because of the composition in cartilage, certain properties are exhibited by this tissue. Cartilage is a solid material, of which certain engineering properties can be measured, most specifically stress, strain, and engineering stiffness. Dashefsky once devised an indenting device that could measure the softness of the tissue in order to assess areas that might be damaged [12]. Also because cartilage is a porous material, the permeability of fluid through the matrix can be measured or estimated by models. One model, known as the poroelastic theory, treats cartilage as a fluid-saturated porous medium whose viscous effects occur through the friction between the fluid and solid materials [4, 5]. Another method, known as the biphasic theory, separates the material properties and constitutive relations based on the phase of the material [42]. Through these models fluid flow can be related to mechanical properties like stiffness [41, 43]. Tests like uniaxial confined compression are used to measure these mechanical properties.
Besides having purely mechanical properties, cartilage exhibits electrical prop-erties that are coupled with mechanical stresses [22]. This electromechanical
trans-duction effect is a property of the cartilage composition, specifically the proteoglycans [18, 31]. Two phenomenons are observed - streaming potential and current generated stress [18, 19]. These properties can be modeled by combining electrokinetic coupling laws with the poroelastic or biphasic theory [42]. Experimental tests have shown results that corresponded well with theory.
2.3.1
Streaming Potential
Because cartilage has a high density of charged molecules, the tissue exhibits an electrokinetic effect [18, 19]. Studies have shown that when cartilage is mechanically compressed, the positive charged ions in the tissue fluid are convected away from the negative fixed charges of the ECM [17]. This separation of charge creates an electric field in the direction of the fluid flow called a streaming potential [20]. An experimental protocol was devised which could measure the streaming potential with a mechanical test like confined compression. This protocol is described in Chapter 4.
2.3.2
Current Generated Stress
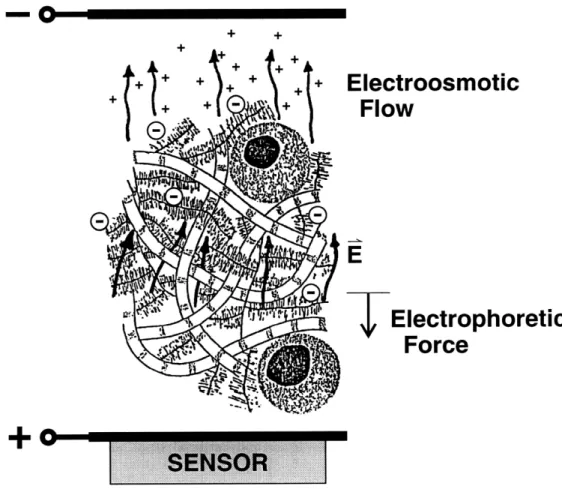
As with the streaming potential, it has been proven that the reverse effect can also occur. This effect, known as current generated stress, occurs when an electric current is applied to the cartilage [18, 19]. The negative fixed charges of the ECM move toward the positive electrode (by electrophoretic migration) while the ions in the fluid phase move toward the negative electrode (by electroosmosis). By driving a sinusoidal current, the ensuing motions of the fluid and solid phases create a me-chanical stress within the cartilage (Figure 2-3). This stress can be measured at the surface.
By measuring the current generated stress in cartilage, certain parameters can be calculated using mathematical models that relate the current generated stress to tissue material properties [49]. The altered state of the cartilage matrix caused by degradation and loss of proteoglycan will change the current generated stress response.
Therefore the difference between normal and degraded tissue can thus be detected.
2.4
Previous Research on Surface Spectroscopy
One dimensional tests to measure the mechanical stress in cartilage produced by an applied electric potential were first performed by Frank and Grodzinsky (1987).
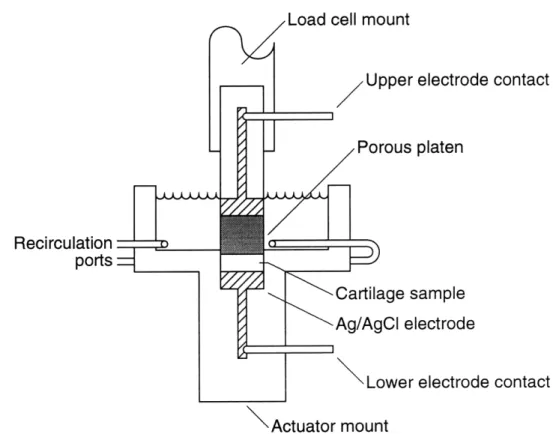
They showed that by placing an excised disk of bovine cartilage between two silver chloride electrodes and then applying a current, a mechanical stress was produced
[18, 19]. Their setup is shown in Figure 2-4.
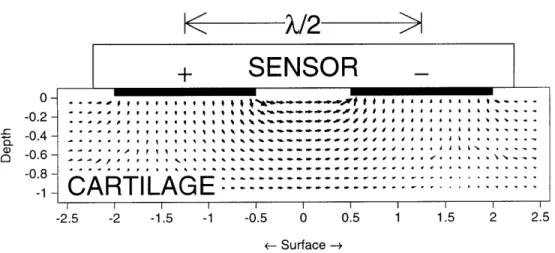
Sachs and Grodzinsky (1989) later completed a mathematical model showing that two silver electrodes placed on the same surface side of cartilage could induce a mechanical response when current is applied [50, 49] (Figure 2-5). This technique, called electromechanical surface spectroscopy, would measure the electromechanical properties of joint surfaces in a nondestructive manner.
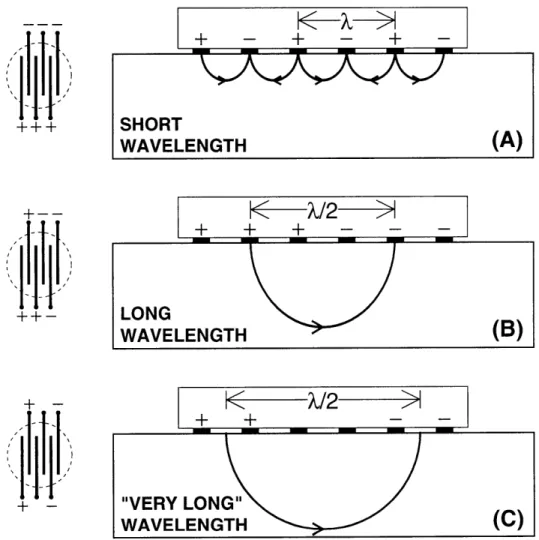
Berkenblit and Grodzinsky (1995) followed with experiments involving multiple interdigitated electrodes to localize cartilage degradation to depths below the artic-ulating surface [2, 3]. By designating different patterns of electrode polarity, wave-lengths of various sizes could be created (Figure 2-6). The longer the wavelength, the deeper the current density penetrated into the cartilage. By calculating the ratio between measurements made from short and long wavelengths, a normalized measure of surface versus full-depth tissue integrity could be found.
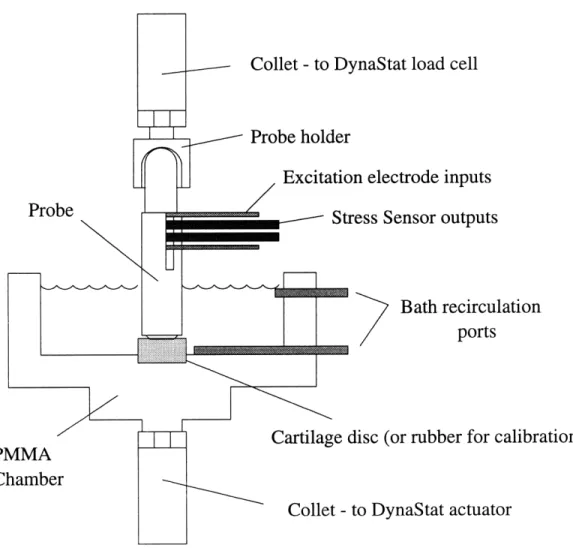
Bombard (1995) designed and constructed a prototypical handheld measuring device to measure for current generated stress [6]. A two electrode probe of 1.0 cm diameter was manufactured. On the end, the probe had an electrode transducer sys-tem (ETS) which could drive current into the tissue while simultaneously measuring the mechanical response of the tissue. Initial validation was done by mounting the probe in a DynaStat chamber and performing tests on excised bovine cartilage disks. Initial results of current generated stress from these experiment corresponded with
+ +
Electroosmotic
Flow
SElectrophoretic
Force
Figure 2-3: Current Generated Stress (CGS). The negative fixed charges on the ECM move toward the positive electrode while the ions in the fluid move toward the negative electrode. By driving a sinusoidal current, the ensuing motions of the fluid and solid phases create a mechanical stress within the cartilage that can be measured at the surface.
Load cell mount
Upper electrode contact
Porous platen
Recirculation
ports
Cartilage sample
Ag/AgCI electrode
SLowerelectrode contact
Actuator mount
Figure 2-4: Cartilage is uniaxially confined between two silver electrodes to produce current generated stress.
I
IL-X/2
SENSOR
CARTILGE,,
IAR
ILAG -
--I I I I -2.5 -2 -1.5 -1 -0 I I.5 2 2.5 -0.5 0 0.5 1 1.5 2 2.5 <- Surface -+Figure 2-5: Results of a theoretical model showing the flow of the current density coming from two electrodes on the same side of the testing surface.
those predicted by the poroelastic theory. A schematic of the experiment setup is shown in Figure 2-7.
0--0.2 --0.4 --0.6 --0.8 1
-+++
+--
++-+-lil
+ + + -LONG WAVELENGTH(B)
+
+-"VERY LONG" WAVELENGTH (C)
Figure 2-6: A variable wavelength in-vitro probe. Different polarity configuration give different wavelengths and penetrate at various depths of the tissue. [Courtesy of S Berkenblit]
Collet - to DynaStat load cell
Ltion electrode inputs
Stress Sensor outputs
Bath recirculation ports
re disc (or rubber for calibration)
- Collet -to DynaStat actuator
Figure 2-7: An experimental setup to test the handheld probe on a disc of cartilage. [Courtesy of D Bombard]
The present project focused on testing an in-vivo probe on an intact human joint. The issues of in-vivo testing were addressed along with the methods for eval-uating the measurements. Also, correlations of CGS measurements with mechanical parameters and biochemical results were performed. In addition, the design and con-struction of a new handheld in-vivo probe was completed. The new version incorpo-rated both the in-vivo properties of the previous handheld probe and the advantages of using multiple electrodes. Also, a reduction in the probe diameter, to the size of an arthroscopic instrument, was made in the new version. Finally, the setup for the probe and its hardware components was assembled for future experimentations.
Chapter 3
Design and Manufacturing
The design of the probe took into consideration a set of requirements that would likely be encountered in a arthroscopic surgical setting. The first requirement of the probe is to be sufficiently small enough to enter into a joint cavity like the knee. Secondly, parts of the probe must be easily replaced or repaired. And finally, the measurements must be translatable into parameters that the end user (the surgeon) could understand and incorporate into a diagnosis.
The current version of the handheld probe (v5.0) improved on the original version (v4.0) in several ways. One significant improvement was the decrease in the outer body diameter by 55% to 4.5 mm (compared to 1.0 cm in the v4.0). Also the v5.0 utilized variable wavelengths to probe beneath the cartilage surface.
The design of the v5.0 probe was proposed by Steven Treppo and manufactured with the aid of David Breslau (Center for Space Research, Cambridge, MA). In this chapter the design and development of the probe to a working instrument is presented. Additional details of the design specifications for the v4.0 and v5.0 probe can be found in Appendix A and B, respectively. The original design of the v4.0 probe is presented in David L Bombard's Masters thesis at MIT(1995).
3.1
Probe Construction
The body of the probe is comprised of three parts (Figure 3-1) (1) Inner core
(2) Insulating sheath
(3) Outer stainless steel body
A
B
Figure 3-1: Three parts of the version 5.0 probe. A -Inner core, B -Insulating sheath,
C - Outer stainless steel body.
3.1.1 Inner Core
The inner core houses the wires that connect to the Electrode Transducer Sys-tem (ETS). The ETS is the component which makes contact with the cartilage surface. The ETS is responsible for driving current into the tissue and sensing the current gen-erated stress response. The components of the ETS will be discussed in full detail in the next section.
The cylindrical steel inner core is hollow (Figure 3-2A), allowing for wires to pass through it. On top of the steel core is a cylindrical torlon body (Figure 3-2B). Four copper tabs come out of the torlon's side and into their respective recesses. Fitted at the end of the torlon body is a head comprised of a steel shell with an inner area filled with a non-conducting two part epoxy. Within the epoxy, four 0.03 inch diameter brass rods are potted into positions at 90 degree intervals along the periphery of the head. The rods make contact with the piezo electrodes of the ETS (see section 3.2.4) and send the signals from the piezo electrode to wires in the core. The steel shell acts as a conductive ground plane that sends extraneous signals to a metal wire connected to ground. A crucifix pattern is machined into the hardened epoxy to enable alignment of the ETS during the mounting phase.
There are two sets of wires that pass through the inner core. The first set of wires are four individually insulated wires that carry the current that is driven into the tissue. Another set of four insulated wires are bundled together by a insulated steel mesh wrapping. These four wires send the response signal from the current generated stress of the tissue. The steel mesh acts as the connection to the ground plane of the steel shell.
3.1.2
Insulating Sheath
The insulating sheath is a thin cylindrical shell made of plastic torlon. The sheath is fitted over the ETS that is placed over the end of the inner core (Figure 3-3). The end of the sheath is open, exposing the surface of the ETS. The sheath is long enough to cover the copper tabs on the side of the torlon body to prevent its contact with the stainless steel outer body. In addition the edge of the sheath is angled to press fit the ETS over the rim of the inner core. The contacts between the silver electrode arms of the ETS and the copper tabs of the inner core are also stabilized by the sheath.
Brass Rods (4) -
H
Hardened Epoxy- .
Crucifix recess
B
A
Figure 3-2: Diagram of the inner core. body.
Insulating Sheath
ETS
Torlon Body
Figure 3-3: Diagram of the sheath placed over the ETS and head of the inner core.
3.1.3
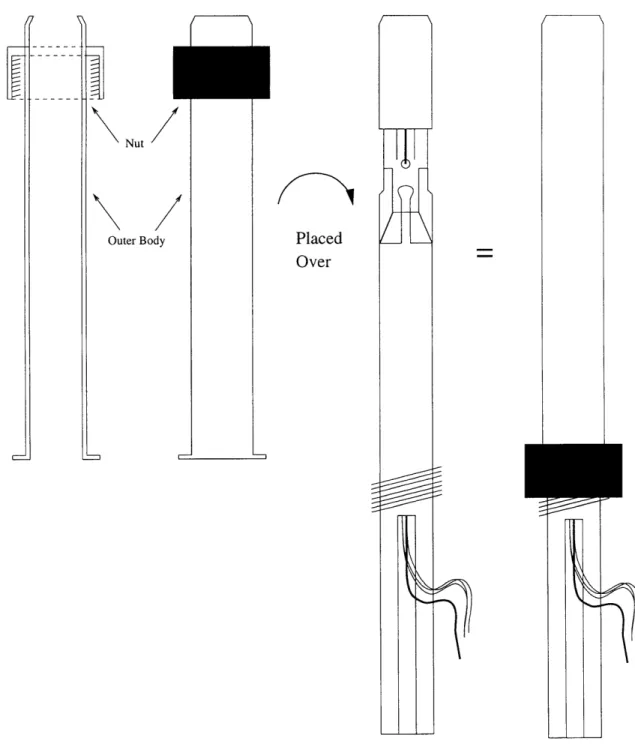
Outer Stainless Steel Body
The outer body is a cylindrical stainless steel tube that acts as a stiff cover to protect the inner components of the probe. One end of the outer body is open to expose the surface of the ETS but angled to catch the edge on the end of the probe. The other end of the outer body is flared outward. The outer body is slid over the sheath/inner core. A nut is then slipped over the outer body, making contact with the threads on the inner core while pulling down upon the flared end of the outer body. As the nut is screwed, the outer body is tightened over the sheath/inner core (Figure 3-4).
3.2
Fabrication of ETS
The Electrode Transducer System or ETS is the element of the probe that delivers the current into the tissue and subsequently senses the mechanical stresses
I
Outer Body Placed Over
Figure 3-4: Diagram of the outer body covering the probe's interior. A nut screws the probe parts tightly together.
from the tissue. The ETS is a 100 /pm thick wafer with silver electrodes on one side and a piezoelectric kynar electrodes on the opposite side. The silver electrode helps deliver the current into the tissue surface. Because the ETS is thin, the current generated stress from the tissue is felt by the kynar electrode. The piezoelectric property of the kynar converts mechanical stresses into an electrical voltage. This voltage is proportional to the amount of stress experienced by the kynar film. This output from the kynar is the parameter by which we measure the current generated stress of the tissue.
The fabrication process of an ETS is composed of 5 phases. (1) Assembly
(2) Photofabrication (3) Etching
(4) Cutting and Mounting
(5) Fabrication of Silver/Silver Chloride Electrodes
3.2.1
Assembly
The assembly begins by cutting the material to their appropriate sizes. The materials to be bonded together are an 18 mm x 18 mm piece of 25.4 /m thick silver foil (Johnson Matthey, Ward Hill MA), an 11 mm x 11 mm piece of 25.4 upm thick Mylar polyester film metallized only on one side with aluminum (MADICO, Woburn MA), and a 4.5 mm diameter circular punch of a 52 am thick PVDF (Polyvinyli-denefluoride) piezo film called Kynar (AMP Inc., Norristown PA) [11]. After cutting, the Kynar and silver pieces are washed in a detergent solution (PEX) and rinsed in deionized water to remove any residues. The silver is then dipped in 15% nitric acid for 30 seconds and rinsed in deionized water. A two-part urethane epoxy Tycel 7000/7200 (Lord Corp, Erie PA) is mixed at a 50:1 by volume ratio and diluted with methylethylketone at a 1:1 by volume ratio. The epoxy mixture is then applied to the unmetallized side of the Mylar. After letting the epoxy evaporate for 15 minutes, the Mylar is bonded to the silver. Next silver epoxy TRADUCT2902 (TRA-CON Inc., Medford MA) is applied to the unstriated side of the piezo film and then bonded
to the metallized side of the Mylar. The assembled ETS is then pressed together between towels in a vise for an hour.
cure for the next phase (Figure 3-5).
The resulting product is stored overnight to
Silver Epoxy between Kynar and Mylar
Tycel Epoxy between Silver and Mylar Kynar Film
Striated Side of Kynar Up
Metallized Sideof Mylar
Figure 3-5: Dimensions of each layer of ETS materials.
3.2.2
Photofabrication
The purpose of photofabrication is to place the patterns of the electrodes on both sides of the ETS. First the ETS is baked at 800C for 10 minutes to remove any
- Metallized Mylar - Silver Foil 18 mm 18 mm I ' ,,F If
moisture. Then in a darkroom, KPR Photoresist (KTI Chemicals, Sunnyvale CA) is applied on both sides of the ETS and left to dry hanging for 30 minutes. The ETS is baked again at 800C for 10 minutes. The ETS is then placed between two registered masks that contain the patterns of the electrodes (Figure 3-6). The masks with the ETS are exposed to UV light for 15 minutes. The translucent patterns on the masks enable the exposed photoresist to crosslink. The various versions of the electrode patterns are presented in Appendix B. Afterwards the ETS is dipped in a xylene based KPR Developer (KTI Chemicals, Sunnyvale CA) bath for 30 seconds and then into another bath with fresh developer for 30 seconds. This step washes off the uncrosslinked photoresist surrounding the electrode patterns. The ETS is then rinsed with warm running water and then with deionized water.
NW
l
T
Figure 3-6: Patterns for the electrodes. Left - Piezo electrodes, Right - Silver elec-trodes. [Courtesy of S Treppo]
3.2.3 Etching
Etching is performed on the ETS to dissolve away areas of the silver and met-allization on the piezo film not protected by the crosslinked photoresist. The ETS is sealed in a holder with a well that exposes the silver side of the ETS. 55% w/v ferric nitrate etchant at 450C is placed in the well. The holder is stirred to help etch the silver material. Used etchant is replaced by fresh etchant every 2 minutes. After all the silver around the electrode pattern is removed, the ETS is rinsed with deionized water. To etch the piezo side of the ETS, the etching process is confined within the 4.5 mm diameter circle of piezo film with etching taking only 10 seconds. After etching both sides, the remaining crosslinked photoresist is removed by wiping it off with a cotton swab dipped in KPR developer solution. After rinsing with deionized water, the result is an ETS with silver electrodes on one side and piezo electrodes on the other.
3.2.4
Cutting and Mounting
The next step in ETS fabrication involves cutting the ETS into a pattern that enables it to be fit onto the head of the probe. During the photofabrication step, the outlines of the border were also marked onto the ETS. Cutting is performed along the borders with a sharp scalpel (Figure 3-7). After cutting, a 0.33 mm thick crucifix shaped plastic backing plate is attached to the piezo side of the ETS by a 2-part epoxy and dried overnight (Figure 3-8). The backing plate helps with the alignment of the ETS onto the probe and ensures it to be flat. The head of the probe has a machined recess in the shape of the crucifix so that the ETS can fit with the proper orientation to line up the electrical contacts. The brass contacts at the head of the probe receive signals from the piezo electrodes while the copper tabs on the side of the torlon body connect with the arms of the silver electrodes. The current is driven through wires leading up to the copper tabs and onto the silver electrodes while the current generated stress is transferred to the piezo electrodes and transmitted through the
is fitted over the head of the probe, making sure the ETS is lying flat on the surface of the head. Before the torlon sheath is completely fitted over the head, electrical connections are tested to the silver electrodes. Once all contacts are established, a thin layer of waterproof RTV108 silicon rubber adhesive (GE, Waterford NY) is placed on the inside edge of the torlon sheath. Finally the outer stainless steel cylindrical body is slipped over the probe. Adhesive is also placed on the inside edge of the outer body before the probe finally assembled. Excess adhesive is wiped off the edges. The sealed probe is allowed to dry for at least 24 hours.
Metallized Mylar Areas
Silver Electrodes Piezo Electrodes
0 25 inch
Figure 3-7: After etching and cutting the ETS. Left -Kynar electrodes, Right -Silver electrodes.
3.2.5
Fabrication of Silver/Silver Chloride Electrodes
Chloridation of the silver electrodes facilitates the transfer of current onto the surface being tested by lowering the interfacial impedance of the electrode/electrolyte interface. Chloridation is performed by placing the head of the probe into a 0.1 M NaCl solution. A closed loop electrolytic cell is produced with the silver electrode as the anode and a platinum strip placed in the bath as the cathode. A current is driven through the leads to deposit chloride ions onto the silver electrode. The total amount of chloride deposition was set at 1000 mAsec/cm2. So given an electrode area of 1.59
mm2 the time of chloridation and amplitude of current can be varied according to the deposition amount. The process is repeated with each of the four silver electrodes until they are all chloridated (Figure 3-8). A picture of the fully developed probe is shown in Figure 3-9.
H
Backing Plate Chlonded Electrodes
Figure 3-8: Left -Crucifix backing plate attached to kynar side of ETS, Right - Silver electrodes after chloridation.
Figure 3-9: Schematic of proposed measurements in an joint cavity, Right - Picture of an assembled v5.0 probe.
Chapter 4
Experimental Method
Sixty human patella joints were donated by the Rush-Presbyterian Hospital (Chicago, IL) for this study. The patellas varied in gender, age, race, and Collins grade. Each patella was sent in individual containers and frozen at -200C. The ver-sion 4.0 (v4.0) probe was used to test eight patellae at two sites on the cartilage surface. The probed sites were then excised for electromechanical testing by confined compression. These measured parameters were compared with probe measurements to determine if any correlations existed between the two types of measurements. In addition, biochemical composition measurements were performed on the tested tissue to relate the probe and electromechanical measurements with biochemical composi-tion. The goals of the experiment were to demonstrate the ability to use the probe on human tissue, to identify differences between tissue grades, and to detect changes between tissue that appears to have the same visual grade.
Also included in this chapter is a synopsis of the validation tests performed on the version 5.0 (v5.0) probe. Like the earlier stages of the v4.0 development, the v5.0 was extensively tested in a controlled environment using excised slices of bovine tissue. Validation of the v5.0 probe will enable its use on the remaining human patella joints.
4.1
Calibration
Calibration was performed in order to correlate the signal output of the piezo electrode to a known mechanical stress. This was done to convert the output during current generated stress experiments to a mechanical stress. Calibration also gave reassurance that the connections between the piezo electrodes and the brass contacts were reliable as well as to ensure proper sealing. An incorrectly sealed probe would enable seepage of the buffer fluid into the probe and risk short-circuiting the system.
4.1.1
Hardware setup
Outputs from the probe through two coaxial cables (labelled left and right channels) were attached to a two channel electrometer. The electrometer had an impedance control box that controlled the drift of the piezo electrodes. Output from the electrometer went through a low-pass filter (Model 1022F, Rockland Systems, West Nyack NY) set at a cutoff frequency of 15.7 Hz. The output from the filter was sent to both a chart recorder (Brush 2200, Gould Electronics, Cleveland OH) and an analog to digital converter (ADC) box to a computer running the program Dynssp (Eliot Frank, Cambridge MA). The computer program also sent signals, through a digital to analog converter (DAC), to control a mechanical-servo material testing device (DynaStat, IMASS, Hingham MA). The Dynastat is able to measure the load in materials under controlled displacement.
4.1.2
Procedure
Calibration began by attaching the probe in the DynaStat. The head of the probe was lowered into a chamber and onto a rubber disk, and a static offset stress of 50 kPa was imposed by the DynaStat. Phosphate Buffered Solution (PBS) was added to the chamber. There was a waiting period of fifteen minutes to let the system thermally equilibrate. The computer program Dynssp was programmed to direct the DynaStat in applying a dynamic stress amplitude of 10 kPa in a frequency range of 1.0 to 0.025 Hz. The procedure was repeated again at an amplitude of 2.5 kPa. The
resulting outputs signals were saved on the computer.
4.2
Current Generated Stress Experiment
4.2.1
Hardware Setup
Outputs from the probe were attached to the two channel electrometer. From the electrometer the signal was passed through the Rockland filter. Both outputs from the filter were fed into a differential amplifier (Model 11-4113-01, Gould Electron-ics, Cleveland OH). The differential signal was displayed on the chart recorder. The differential output from the chart recorder was fed through the ADC box to the com-puter. Dynssp was used as the data aquisition program and controller of the current generation. The computer sent its current controlling signal, through a DAC box, to a current source (Kepco, Flushing NY). The Kepco was attached to a frequency syn-thesizer (Rockland Systems, West Nyack NY) and monitored by an ammeter (Keith-ley Instruments, Cleveland OH). The frequency generator sent the current to the wires leading to the silver electrodes of the probe. The frequency generator also sent impedance measurements to the Gould chart recorder.
4.2.2
Testing for Parasitic Signals
"Parasitic" testing was done to measure any artefactual response that may have been induced by application of the current but not related to the mechanical stresses within the cartilage. Testing for the parasitic response was done by suspending the probe in buffer and applying a current into the solution. Because the solution does not respond with a mechanical stress, the ETS should not produce an output piezo signal. However it had been observed in past experiments that there were some parasitic signals either created by incomplete shielding or perhaps by some other unknown coupling phenomenon. The need to record any parasitic response was important to correct for the actual responses when probing cartilage tissue.
4.2.3
Tissue Experiments with the Probe
Patellae were thawed at room temperature for one hour in Phosphate Buffered EDTA (PBE) containing protease inhibitors (1.0 mM PMSF, 1.0 mM E64, 1.0 uM pepstatin, and 1.0 uM leupeptin). Extraneous tissue surrounding the cartilage was carefully removed with a scalpel, taking care not to injure the cartilage surface. PBE w/inhibitors was sprayed onto the surface to keep the cartilage moist and safe from proteolytic enzymes. The patella was then mounted in a chamber filled with the same buffer (Figure 4-1).
Probe measurements were done at two locations on the cartilage surface. The head of the probe was placed on a flat area of the curved cartilage surface to obtain the most reliable measurements. The other end of the probe was placed in a cylindrical shaft which contained a calibrated spring. The probe compressed the spring a set distance ensuring that when the shaft was clamped to a fixture, the spring would produce a static stress of 50 kPa onto the probe and subsequently on the tissue
(Figure 4-1).
The computer program Dynssp, which controlled the driving current, was set to a current density of J = 0.5 mA/cm2. The current was programmed to be applied as
a sinusoid at frequencies ranging from 1.0 to 0.025 Hz. The procedure was repeated again at a current density of J = 1.0 mA/cm2. The two piezo electrodes sensed the
mechanical stresses from the tissue and each produced an output voltage. The signals were then processed and recorded by Dynssp.
4.3
Confined Compression
4.3.1
Hardware Setup
A confined compression chamber which holds tissue samples was mounted in the DynaStat. The bottom of the chamber contained a silver electrode. Another electrode was suspended in the bath solution. The electrodes measured the streaming potential
Figure 4-1: Setup for an intact joint experiment. Patella is placed in a holder and submerged in testing solution. Probe is inserted into a probe sheath clamped to a ring stand. The end of the probe is placed on a flat surface of the joint. A calibrated spring in the shaft provides the required static offset stress.
that occurred during dynamic tissue compression. The signal from the electrodes was fed to a chart recorder and a computer running Dynssp. Dynssp also sent signals via a DAC to the DynaStat in order to control the displacement of the metal platen that was applied to the tissue. The load and displacement signals were sent from the DynaStat to the chart recorder and computer.
4.3.2
Procedure
After testing with the v4.0 in-vivo probe, the identical sites in contact with the probe were drilled and a 9.5 mm diameter core of cartilage/bone was extracted from the joint. Two cores were taken, one from each site probed with the articular surface intact. A 1.0 mm thick slice of the cartilage surface was microtomed from the core and placed in a 0.15 M NaCl/Trizma buffer. From each slice, four 3.0 mm diameter disks were cut out with a biopsy punch (Figure 4-2). The thickness of one disk was measured and placed on the silver electrode in the confined compression chamber (mounted in the DynaStat) with the articular surface facing away from the ground electrode. A porous platen was placed on top of the disk and a metal platen was lowered onto the porous platen. Buffer was poured into the chamber and the other silver electrode was submerged into the bath. The cartilage disc was compressed to various strain levels (10%, 15%, 20%, 25%) and allowed to stress relax for 400 seconds at each level. At a 15% strain, a 0.5% dynamic compressive strain was applied and the resulting load and streaming potential were measured at frequencies between 1.0 to 0.01 Hz. The equilibrium modulus, hydraulic permeability, and the electrokinetic coupling coefficient of the tissue were calculated from these measurements using previous established methods [18, 19].
4.4
Biochemistry
The remaining 3.0 mm diameter disks were kept for biochemical measurements. The samples were first weighed wet and then re-equilibrated in a hypotonic solution of 0.01M NaCl for two hours to induce swelling. The samples were then weighed again
Mechanically Tested T O via Confined Compression Cut Out 9 mm Diameter Core
*
Microtome 1 mm Thick Slice of Articulating Surface U 0 Un#1
#2 O#3 QQ
tested4
0
Biochemistry Testing -Swelling - GAG - DNA - HydroxyprolinePunch Out Four 3 mm Diameter Disks
9 mm Diameter Plug
Figure 4-2: Test sites were drilled and a 9.5 mm diameter core was extracted from the joint. A 1.0 mm thick slice of the cartilage surface was microtomed from the core. From each slice, four 3.0 mm discs were punched out. One disc was tested in confined compression while the others were tested for biochemistry.
Patella Joint
(called a swell weight). Samples were subsequently placed in individual cyrovial tubes to be lyophilized 48 hours to remove all water from the tissue. The samples were then weighed dry. The water content of the tissue was found by calculating the difference in wet and dry weights. Next, papain solution was added to digest the samples down to its individual biochemical components. The digested samples were then analyzed for GAG content (via a DMB dye binding assay using a spectrophorometer) [14],
DNA content (using Hoechst dye 33258 with a spectroflourimeter) [28], and collagen content by measuring the amount of hydroxyproline present [53].
4.5
Version 5.0 Validation
4.5.1
Calibration
The usual calibration setup was repeated with the only difference being that all four channels were individually calibrated. The output wire from the probe went to a split box which separated each channel to an individual coaxial cable output. With the two input electrometer, two piezo sensors were calibrated at a time. In addition, the filter was set to give the input signal an external gain of 20dB (or 10 times).
4.5.2
Procedure
Calf knee joints were delivered within 24 hours of slaughter (Research 87, Boston MA). The distal femur knee joint was dissected out and a 9.5 mm core was removed from the femoropatellar groove. A 1.0 mm slice of articulating cartilage was mi-crotomed off the core and placed in a chamber with the articulating side up. The chamber and probe were mounted in the DynaStat and the probe was lowered onto the tissue. IX PBS was added to the chamber and an offset stress of 50 kPa was placed on the tissue. The setup for the current generated stress experiment was the same as the v4.0, except the current from the current generator goes through a switch box that can vary the polarity pattern of the silver electrodes. The polarity of the four silver chloride electrodes were varied to give the different spatial wavelengths applied
to the tissue (either short, long, or extra long). In the validation, only short and extra long wavelengths were used. For the short wavelength configuration, the polarity for the channels was 1 + 2 - 3 + 4 - (Figure 4-3). The area of a silver electrode was 1.59 mm2, so for a current density of J = 0.5 mA/cm2, the amplitude of the driving
current was 15.9 /A. The current was split between the two positive electrodes. For J = 1.0 mA/cm2, the amplitude was 31.8 pA. Because the electrometer could only
measure two electrodes at a time, the test was repeated twice. The first run tested the differential output between channels 1 and 2, and the second run between channels 3 and 4. For the extra long wavelength configuration, the only channels used were 1 + and 4 - (Figure 4-3). Therefore for J = 0.5 mA/cm2, the driving amplitude was
8 AA, and 15.9 ALA for J = 1.0 mA/cm2. The extra long test required one run with
outputs coming from channels 1 and 4.
Parasitic tests were also done using the previous technique. Parasitic runs were performed using the short wavelength configuration at J = 0.5 and 1.0 mA/cm2 Again only two channels could be measured at a time