Design of an Electric Scooter Drivetrain
by Andrew T. Carlson
Submitted to the
Department of Mechanical Engineering
in Partial Fulfillment of the Requirements for the Degree of Bachelor of Science in Mechanical Engineering
at the
ARCHIVs
M S S TT INST fE
OF TECHNOLOGY
[JUN 2 8 2012
...BRARIES
Massachusetts Institute of TechnologyJune 2012
@ 2012 Massachusetts Institute of Technology. All rights reserved.
,/1 I
Department of Mechanical Engineering May 24, 2012
Certified by:
Prof s nical and Electrical Engineering and
Steven B. Leeb Computer Science Thesis Supervisor
Accepted by:
John H. Lienhard V
Samuel C. Collins Professor of Mechanical Engineering Undergraduate Officer
A
#
Signature of Author:Design of an Electric Scooter Drivetrain
by Andrew T. Carison
Submitted to the Department of Mechanical Engineering on May 24, 2012 in Partial Fulfillment of the
Requirements for the Degree of Bachelor of Science in Mechanical Engineering
ABSTRACT
Professor Steven Leeb teaches Power Electronics Lab, which teaches the fundamentals of power electronic systems and has students build their own motor controllers. As a fun way to test these student built motor controllers, Professor Leeb has been using large go-karts built specifically for the class. However, these go-karts are large, heavy, and difficult to maintain. Professor Leeb recently acquired a number of production stand-up electric scooters with the intention of replacing the aging go-karts. To enhance the educational value of the scooters, Professor Leeb wanted them heavily modified to allow students to explore the effect of gearing on electromechanical systems. Furthermore, the scooters were modified to incorporate a modular motor mounting system, allowing students to easily switch out different motor models, including brushed and BLDC motors. This thesis details the design and construction of the scooter transmission and motor mount.
Thesis Supervisor: Steven B. Leeb
Table of Contents
Abstract ... 3 Table of Contents ...5 Table of Figures...6 Table of Figures...6 1 Introduction ... 7 2 Design...7 2.1 Gearing Ratio ... 7 2.1.1 M otor Characterization... 9 2.2 Housing ... 10 2.2.1 Chain Drive ... 10 2.2.2 Bearing Selection ... 13 2.2.3 Shifter...14 2.2.4 W heel M ounting ... 16 2.3 M otor M ount ... 17 3 Fabrication ... 19 3.1 Housing ... 19 3.1.1 W heel Sprockets ... 20 3.1.2 Shifter...21 3.1.3 W heel Shaft...22 3.1.4 Chain Tensioner ... 23 3.2 M otor M ount...24 3.3 Final Assembly ... 25 4 Future Im provements...28 4.1 Chain Tensioner ... 28 4.2 M otor M ount...28 4.3 Bearings...28 5 Appendix ... 31 6 Bibliography ... 33Table of Figures
Figure 1 Gear ratio vs steady state w heel speed ... 8
Figure 2 M otor characterization setup ... 9
Figure 3 Stock housing ... 10
Figure 4 CAD m odel of the chain drive ... 11
Figure 5 Delrin "w ing" for chain tensioning ... 13
Figure 6 Shifter assem bly w ithout spacers ... 15
Figure 7 Key flexure for shifting...15
Figure 8 Stress distribution in the key flexure ... 16
Figure 9 Shifter shaft...16
Figure 10 CAD m odel of the housing m otor m ount adapter ... 17
Figure 11 CAD m odel of the adapter w ith nut installed ... 18
Figure 12 M otor-side coupling assem bly... 18
Figure 13 The housing stock fixtured for m achining... 19
Figure 14 Finished transm ission housing... 20
Figure 15 The finished w heel sprockets...21
Figure 16 Shifter sub-assem bly...21
Figure 17 The first setup of m achining the w heel shaft ... 22
Figure 18 Setup for keyway m achining... 23
Figure 19 M achining the chain tensioners... 23
Figure 20 Housing coupling plate...24
Figure 21 Nut blanks before threading ... 24
Figure 22 A steel test piece being m achined ... 25
Figure 23 #25 roller chains m ade to length ... 26
Figure 24 Transm ission housing w ithout cover ... 26
Figure 25 M otor m ount assem bly...27
1
Introduction
Professor Leeb recently acquired seven EMPower electric scooters that he intends to use to replace the electric go-karts currently used in Power Electronics Lab(6.131). The go-karts are extremely large, heavy, difficult to store, and difficult to maintain. The goal for this thesis was to design modifications to the drivetrain of the scooters to enhance the educational value of the scooters. To do this, a 3-speed transmission was designed to replace the existing scooter drivetrain and a modular motor mount was designed to allow easy swapping of motors. The intention for these modifications was that students could quickly and easily investigate the effects of different gear ratios on the performance of the scooter and the scooter could be used with multiple motor models and types. The ability to easily swap motors was needed because students in the class build both brushed and BLDC motor controllers. The current go-karts are only compatible with brushed motor controllers.
2 Design
When designing the components for the scooter modification, emphasis was put on designing a robust and easily serviceable system. The system was designed to be easily operated without the use of any tools. The system was also designed to work with multiple motors models, including different motors that may be chosen in the future.
2.1 Gearing Ratio
One of the primary purposes for designing a housing to replace the existing design was to allow students to change the gear ratio between the motor and wheel. Before designing the transmission, the correct gear ratios had to be calculated that would demonstrate the desired concepts. At first glance, it would seem that changing gear ratios is a simple trade-off between wheel torque and wheel speed; however, more detailed analysis of the dynamics of the system indicates that this is not the case. If the motor and transmission are modeled as linear time-invariant systems, using standard motor and viscous friction
models, a relationship between gear ratio and maximum scooter speed can be established. A motor
was modeled as having torque constant, k, viscous friction, bm, winding resistance, R, and powering a
transmission with a gear ratio ( i of a. A additional viscous friction coefficient, bw ,
kinotor speed)
represents the combined frictional losses in both the drivetrain and wheel-ground interface(e.g. rolling resistance). At steady state, the torque output of the motor is equal to the frictional torque. For a given
motor speed, w, the motor torque, T, is given by the equation:
'= (bm + bwa2)o
Modeling the motor as resistor in series with a voltage source of magnitude V = kao, the current, i,
through the motor is given by:
V -kmo R
If the motor torque is assumed to be proportional to current by the equation
r
= ki, then the above equations can be combined to show that:Vk - k2
&w
R = (bm + bwa2)c
This can be rearranged to express steady state motor speed as a function of the gear ratio, giving the equation:
Vk
k + Rbm + Rbwa2
Steady state wheel speed can then be found simply by multiply by a factor of a:
Vka
k2+Rbm+Rbwa2
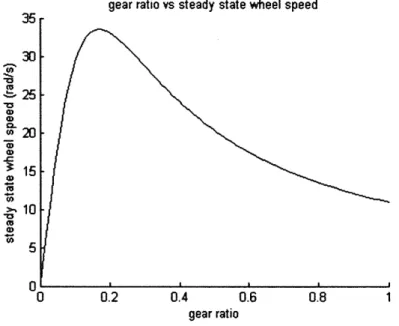
Using motor and drivetrain values obtained experimentally, described in section 2.1.1, the following plot of steady state wheel speed vs. gear ratio can be obtained:
gear ratio vs steady state wheel speed 35 30--25 0 0 S15 0 >' 10 M 0 0.2 0.4 0.6 0.8 gear ratio
Figure 1 Gear ratio vs steady state wheel speed
1
Based on information obtained from motor characterization, the motor viscous friction was assumed to be negligible. Differentiating the above equation with respect to a and setting the result equal to zero, the peak motor speed is found at a value of:
k
a = - b
The objective of designing a transmission was to allow students to explore different regions of the gear ratio vs. speed plot. Based on the plot above, gear ratios of approximately 5:1, 4:1, and 3:1 were chosen. This corresponds to values of 0.2, 0.25, and 0.33 in Figure 1, respectively. Ideally, gear ratios of
as high as 10:1 would be used; however, practical limitations of the transmission design set a maximum possible ratio of 5:1. These target values were validated by the original drivetrain gear ratio of 3.23:1
2.1.1 Motor Characterization
Two brushed DC motors were selected by Professor Leeb for use on the scooters, motor models XYD-15B and MY6812 from Currie Technologies. To create a more accurate model of the scooter
transmission, the motors were tested to determine their relevant motor parameters. To determine the motor constants, the two motors were coupled to one another and one of the motors was powered. The voltage across the leads of the driven motor was measured using a multimeter, and the rotational speed of the two motors was measured using an optical tachometer. The voltage across the driving motor was varied from 5V to 25V in increments of 2.5V, and the resulting motor speeds and driven motor voltages were measured. The driven motor was then modeled as a voltage source of magnitude,
V, proportional the motor speed, (o, by the motor constant, k. The voltage-speed data and fits for both
Vss
motors are shown in Appendix A. Model XYD-15B was determined to have motor constant of 0.051-V
and model MY6812 was determined to have a motor constant of 0.063 S. The winding resistance of
the motors was measured using a multimeter. Multiple readings were taken with the rotor in different positions and the average of the values used. The winding resistance for model XYD-15B was found to be 2.50 and the resistance of model MY6812 was found to be 1.4Q.
Figure 2 Motor characterization setup
The viscous friction inherent in the motors was estimated by running the motors unloaded and
measuring the current across the motor and voltage across the motor leads using two multimeters. The viscous friction measurement setup is shown in Figure 2. The voltage measurement across the motor was measured as close as possible to the motor, to minimize any discrepancy due to voltage drop across
the motor leads. The viscous friction of model XYD-15B was estimated to be 1.7e-5 and the viscous
The viscous friction in the scooter drivetrain was more difficult to quantify, as it is affected by many factors such as the condition of the scooter wheel, bearings, and the weight of the rider. An approximate estimate was obtained by measuring the top speed of the stock scooter and finding a viscous friction value which when used in the MATLAB motor model gave a predicted steady state speed equal to the measured top speed. This model was only used only used to determine the order of magnitude of the viscous drivetrain friction. The drivetrain viscous friction was found to be on the order
of 0.1--, far greater than the motor friction term.
rad'
2.2 Housing
The new housing was required to have a simply adjustable 3-speed transmission, to incorporate a modular motor mounting system, and to be easily installed into the existing scooter. These
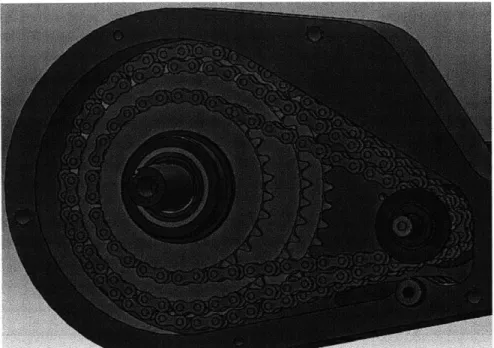
requirements proved especially difficult due to the small size of the existing housing. The stock housing, pictured in Figure 3, measures approximately 8.5" x 4.5" x 1.25". In the original design, the motor is bolted directly onto the inboard side(towards the inside of the scooter) of the housing, with the motor shaft extending into the housing. The motor shaft is then coupled to the wheel shaft using roller chain.
A 13 tooth sprocket riding on the motor shaft drives a 42 tooth sprocket welded onto the wheel shaft.
The shaft then has a tapered section extending out of the housing, which mates with a female taper on the wheel, relying on the resulting friction to transmit torque. The shaft-wheel attachment mechanism proved to be unreliable, resulting in the wheel slipping, which also had to be resolved in the redesign.
Figure 3 Stock housing 2.2.1 Chain Drive
The transmission was designed to use sprockets in a configuration similar to the existing design, but use three sets of sprockets which could be engaged independently of one another. A model of the
transmission is shown in Figure 4. The sprockets are stacked axially on two shafts extending through the housing, with the large diameter sprockets fixed to the wheel shaft and the small diameter sprockets
free to rotate on the shifter shaft, unless engaged by the shifter. All sprockets and both shafts are keyed, which allows sprockets to be easily removed to achieve different gear ratios or replace damaged components.
Figure 4 CAD model of the chain drive
The stock housing used #25 roller chain, which is the smallest standard roller chain size available. It was desired to use the narrowest roller chain available to prevent interference of the chains with one another. The chain width and number of chains effectively set the minimum housing thickness. If desired, the housing could be made thicker and the transmission could achieve more gear ratios, the only limitation set by the shifting mechanism. To determine if #25 chain would be suitable in the new design, the maximum torque from the motors was calculated using the following equation relating the
stall torque of the motor, Tstall, to the motor constant, k, and the stall current of the motor, istall:
Tstau = kistaul
The current, and thus the torque, through the motor is maximized when the motor is stalled because there is no back-EMF. Because there is no back-EM F, the motor can be modeled simply as a resistor of
value, R, in series with a voltage source of magnitude, V, which then gives the equation:
kV
Tstall R
Using the motor values obtained previously and assuming a voltage of 25V, the larger stall torque of the two brushed motors was calculated to be, 1.13Nm, or 0.84 ft-lbf. For a pitch radius of approximately 0.375" for the 9 tooth sprocket, this gives a chain tension of 27 lbf, well below the working load rating of
chain, except transients due to rotational inertia. The rotational inertia of the motor was determined to be small enough for this not to be an issue.
These motor stall torque values were then used to ensure that the keys coupling the shafts to the sprockets would not yield under the worst case load conditions. The highest expected stress on the shaft keys was found using the motor stall torque and highest gear ratio of the transmission. For a ratio of 5:1, the maximum torque on the wheel shaft was found to be 4.2 ft-lbf, ignoring frictional losses in the chain. For a shaft of diameter 0.75", this gives a shear force on the key of 135 lbf. The key can fail
by two mechanisms, shearing of the key or yielding of the sprocket/shaft at the interface with the key. Both must be checked when selecting the appropriate key size. For consistency of components, an 1/8" keyway was selected for the sprocket shaft and the yielding calculations were performed using the appropriate dimensions. The lower limit of expected shear strength of alloy steel is taken to be 240 MPa[1].
The shear stress in the key can then be found from the shear force, Fshear, keyway width, w, and key
length, L, by the equation:
Fshear Uy,shear =
In this case, the width is fixed but the length can be modified. Using the equation above, the minimum key length for worst case loading conditions was calculated and found to be 0.03", significantly smaller than the width of the sprockets. The compressive stress on the keyway can be calculated using the
same shear force and a cross sectional area of length L and width wdue 2 to only half of the key width
engaging on each keyway). By inspection, the cross sectional area in compression is half of that which is in shear, but the compressive yield strength of steel is approximately twice that of the shear strength, assuming the sprocket and key have comparable material properties. Therefore, the keyways will not yield under compression.
The shafts had to then be placed to avoid interference of the shifter with the wheel and the motor mount with the scooter frame. The wheel shaft was kept in the same position as it was in the stock housing to ensure that the foot brake on the scooter would function as intended. The shifter shaft was positioned to avoid interference with the wheel. The shaft was also moved approximately 0.5" down, to avoid interference of the motor with the frame of the scooter.
The use of three separate chains meant that it would not be possible to position the sprockets such that all three were appropriately tensioned, as in the stock housing. A chain tensioning mechanism was necessary to remove the slack in the chain drive. The final design for the chain tensioner uses three delrin "wings", shown in Figure 5. To attach the wings to the housing, a small protrusion on the inside wall of the housing, visible in Figure 4, is undercut and a X" hole is drilled to approximately 3/8" from to back side of the housing. A 10-24 hole is then tapped the rest of the way through the housing. The
wings are inserted into the undercuts and a X" shoulder bolt is inserted into the drilled hole. The wings
Figure 5 Delrin "wing" for chain tensioning
The chains are tensioned using three /-20 set screws, inserted through tapped holes on the underside of the housing. The set screws push wings up and into contact with the chains. The position of each wing can be set independently.
2.2.2 Bearing Selection
The bearings used to support the shafts were selected for ease of installation and compatibility with the shaft and housing design. The expected operating loads on the bearings were then calculated and the life of the selected bearings estimated to determine if the selected bearings were
appropriate for use on the scooter.
Flanged bearings were chosen for the housing due to their ease of installation. With flanged bearings, the bearing bores could be machined straight through the housing and the bearings pressed in. If non-flanged bearings had been used, the bearing bores would have had to include a feature to constrain the axial motion of the bearing. The worst case loading on the bearings was calculated by approximating the wheel as a beam supported by two bearings spaced a distance of
L, apart, with a load of magnitude F10a applied at a distance of L2 from one of the bearings. A force
and moment balance was used to determine the reaction forces, F1 and F2, of the bearing on the
shaft Setting the bearing reaction force F2 as the reaction force closest to the applied load, the
following equations were obtained:
F1 = Fload
(L)
F2 = Floa 1
+-The worst case loading scenario used was a load of 200 lbf applied to the wheel. This value was selected assuming that a rider weighing 200lbs put all of their weight on the one wheel.
Realistically, the driven wheel will take less than half of the weight of the rider, which gives the following calculation an inherent factor of safety. Bearing life was only calculated for the two wheel shaft bearings, not for the shifter shaft bearings. The shifter shaft bearings do not have to support nearly as much radial load, as shown in the roller chain tension calculation in Section 2.2.1. The following equation was used to estimate bearing life for the estimated bearing load [2]:
(LD I
C1 0 = FD L-/
\LR)
The catalog load rating, C10, is related to the design operating load, FD, design bearing life, LD, rated
bearing life, LR, and coefficient, a. The bearing life is measured in revolutions and the coefficient a for
ball bearings has been empirically determined to be 3. The catalog load rating must not be confused with the actual load capacity of the bearing. The CIO rating is actually the load at which the bearing will
operate for one million revolutions with a 10% chance of failure of the bearing. Rearranging the bearing
life equation to solve for LD, the following equation is obtained:
LD = LR (-1a
The load on the outboard bearing was calculated to be 3301bf and the load on the inboard bearing was calculated to be 1321bf. For the outboard bearing, with a rated load capacity of 4501bf, this gives a 10% failure of the bearing at 2.5 million revolutions. For the inboard bearing, with a rated load capacity of 3251bf, this gives the bearing a 10% chance of failure after 15 million revolutions. These values were determined to be well within the expected operational life of the scooters.
2.2.3 Shifter
A shifting mechanism was necessary to allow users to selectively engage different sprocket sets. The shifter had to be simple to manufacture, allow easy shifting by hand, and ensure that only one sprocket set would be engaged at any time.
The finalized shifter design uses keyways on the shifter shaft and sprockets, with a key that can be moved axially along the shaft to engage sprockets independently. Spacer sleeves are positioned between the sprockets to constrain their axial motion, preventing the chains of multiple sprocket pairs from interfering with one another. A CAD model of the assembly is shown in Figure 6. However, the spacers do not have keyways cut on their interior. To allow the key to move axially past the spacers while still being able to engage the sprockets, the key was designed to be a flexure, shown in Figure 7. The flexure was designed to be compliant in the radial direction, with its neutral position such that the
"nub" on the top of the key would protrude into the sprocket keyway when unloaded. When moved axially between sprockets, the nub is pushed down by the spacers, disengaging the key from the sprockets. The nub was angled in the axial direction, to facilitate radial flexing of the key when pushed
or pulled axially. When the nub becomes positioned within a sprocket, it will spring up into the keyway of the sprocket, engaging that sprocket set. If the keyway is not in the correct rotational position, the wheel can be rotated until the key engages.
Figure 6 Shifter assembly without spacers
Figure 7 Key flexure for shifting
The key flexure was designed to allow a minimum of 0.055" of radial motion, require a maximum of 0.5|bf of pull/push force for shifting, and to not fatigue or yield within the expected operating life of the scooter. A MATLAB model was created to obtain first-order dimensions for the flexure. The design was then verified and further refined using FEA. The MATLAB model treated the flexure as a cantilevered beam. The inputs to the model were the Young's modulus of the flexure material, width of the flexure, desired pull force, angle on the nub, desired length of the flexure, and maximum radial travel of the flexure. The model output the required thickness of the flexure and maximum stress in the flexure. The maximum stress was used to verify that the flexure would not yield under static load and to estimate the fatigue life of the flexure.
The MATLAB model indicated that a flexure of width 0.125", length of 1.25", and thickness of 0.03" would give a factor of safety of 1.5 for static yielding and a maximum stress of 45% of the ultimate tensile strength, right below the approximate endurance limit for alloy steels of 50% of the UTS[3]. FEA confirmed these approximate values; however the maximum stress was found to be greater than the value estimate in MATLAB. The stress plot, shown in Figure 8, was obtained using CosmosWorks. The
bottom of the flexure was fixed and the nub was subjected to a 0.5lbf downward load. This analysis predicted 0.057" of displacement of the nub and a maximum Von Mises stress of 292MPa. This
maximum stress value was above the MATLAB predicted value of 200MPa due to a stress concentration
at the base of the flexure. Assuming a yield strength of 370MPa and UTS of 440MPa, this still gives a
factor of safety of 1.3 and 65% of UTS. Using the strain-life method of fatigue analysis, this still gives the
flexure an expected lifetime of approximately 1OA6 cycles, well within the expected operational
requirements of the scooter[21.
Figure 8 Stress distribution in the key flexure
The shifter shaft was designed with a large keyway cut along its length, in which the key flexure could move axially. The outboard side of the shaft was designed to extend through the housing cover, with the end of the shaft flush with the outside face of the bearing. A flange on the shaft prevents inboard axial motion of the shaft. The inboard side of the shaft extends through the inboard bearing, with
approximately %A" extending past the inboard face. The inboard side of the shaft is keyed, to mate with
a spider coupling used in the motor mount subassembly. The spacers and sprockets stacked on the shaft prevent outboard axial motion of the shifter shaft.
Figure 9 Shifter shaft 2.2.4 Wheel Mounting
The shaft-wheel attachment mechanism had to be modified to prevent slipping of the interface, which proved to be an issue with the stock scooter wheels. The previous attachment mechanism used a tapered wheel shaft which was inserted into a corresponding female tapered hole in the wheel. The
shaft was inserted into the wheel and a 5/16-24 flanged bolt was threaded into an axially tapped hole in the shaft. The bolt pressed the shaft and wheel together, relying on the resulting friction to transmit torque. A more robust design was required to withstand the abuse of student use. To prevent slipping of the wheel and shaft, the components were modified by cutting keyways in the wheel and shaft. An 1/8" keyway was chosen for compatibility of parts with the sprocket key.
2.3 Motor Mount
The functional requirements for the motor mount were that the design was modular to allow the use of different motors, and that the motor attachment mechanism was simple, intuitive, and did not require the use of any tools. A motor coupling was necessary to connect the motor shaft to the transmission. This coupling had to be able to transmit the expected torque of the motors, tolerate any parallel or angular misalignment of the shaft, and allow easy removal of the motor. A type B spider coupling was chosen for this purpose. The type B coupling with Buna-N spider can tolerate up to .015'' parallel and 1 degree angular misalignment, and is rated to a working torque of approximately 3 Nm. The
misalignment tolerances were deemed to be within capable machining tolerances, and the torque rating of the coupling was found to be greater than the stall torque of the motors, found previously in section Errori Reference source not found..
To rigidly attach the motors to the transmission housing, a tube-like structure was designed to fit around the motor couplings. A model of the transmission-side components of the tube structure is shown in
Figure 10. The tube extends out from the housing, surrounding the spider coupling. The tube is bolted to an adapter, which is then bolted to the housing. A flange on the tube is necessary for constraining the axial motion of a 2"-10 nut which rides on the outside of the tube, shown included in Figure 11, and dowel pins pressed into the tube face locate the transmission-side and motor-side tubes when mated.
Figure 11 CAD model of the adapter with nut installed
A model of the motor-side components of the motor mount is shown in Figure 12. Another adapter plate attaches to the motor and a tube extends from the plate. The motor-side plate includes 2"-10 male threads, which mate with the nut on the transmission-side tube, and slightly oversized holes which mate with the transmission-side dowel pins. The motor is attached to the housing by lining up and inserting the dowel pins of the transmission-side tube into the motor-side tube, which aligns the spider couplings. The nut is then tightened to fasten the tubes together. The large outer diameter of the nut allows it to be easily fastened by hand, eliminating the need for tools.
3
Fabrication
3.1 Housing
The housing was the most difficult component of the system to fabricate. It has many features which must be machined precisely to align with every other subassembly of the system. The housing was machined on a Bridgeport EZ Trak 3-axis CNC knee mill. The housing was machined from a 6" x 12" x 1.5" bar of 6061-T651 Aluminum, purchased from McMaster-Carr. The geometry of the stock wasted a considerable amount of material, but subsequent housings should be machined from a more
appropriate 5" x 9" x 1.5" piece of bar stock, preferably purchased from a local supplier. The housing stock was faced the minimum amount necessary to remove the mill finish and fixtured to the mill table
using step clamps and spaced off the table surface by a " sheet of acrylic, which allowed the cutting
tool to cut below the plane of the bottom of the aluminum without damaging the mill table. Figure 13 shows the stock faced and fixtured before machining.
A 5/8" endmill was used to machine the pocket for the transmission and rough out the bearing bores. The locating dowel holes, bolt holes, and bushing hole were then drilled in the same setup. A 5/16" woodruff cutter was then used to machine the undercuts for the chain tensioners. To machine the
profile of the housing, the part was removed, deburred, and bolted onto a steel fixture plate made for the housing. The dowel pins were pressed into the housing and were used to locate the unfinished
housing stock relative to the fixture plate. The profile of the housing was then machined, the bolt holes on the back side of the housing drilled and tapped, and the bearing bores machined to their final
diameters. A boring head was used to machine the bearing and bushing bores accurately and ensure concentricity of the bores.
Figure 13 The housing stock fixtured for machining.
The %-20 holes for the chain tensioner and 5/16-18 hole for mounting the rubber spacer were drilled by clamping the housing in a milling vise and using a dial test indicator along the surface through which the
holes were to be drilled. The indicator was moved along the X-axis and the rotation of the housing adjusted until the surface was aligned horizontally. An edge finder was then used to set the coordinate system and the bolts holes were then drilled and tapped.
Figure 14 Finished transmission housing
The housing cover was machined from 5"x8"x.375" 6061-T6 stock. The stock was clamped in a milling vise and the bolt holes, locating dowel holes, and bearing bores drilled. The bearing bores were then bored to final size using a boring head. The stock was then removed and bolted to the fixture plate, the same plate as used previously for the housing. The fixture plate was put in the milling vise and the profile of the cover was machined.
3.1.1 Wheel Sprockets
All sprockets used in the chain drive were machinable bore sprockets, purchased from McMaster-Carr. The thickness and bore of the purchased sprockets was not suitable for the scooter, so machining was necessary. The sprocket bore was machined by holding onto the outer diameter of the sprocket in a lathe, then drilling and boring the hole to size. The sprocket was faced to length by clamping onto the sprocket teeth in a lathe chuck and facing the remaining material incrementally. Finally, a 1/8" keyway was broached on the bore. The finished wheel sprockets are shown in Figure 15.
Figure 15 The finished wheel sprockets
3.1.2 Shifter
The shifter assembly consists of the shifter shaft, sprockets, spacers, and key flexure. The sprockets and stock were all purchased from McMaster-Carr.
The sprockets were reamed and faced to the desired thickness on a lathe. The sprockets were then broached using an 1/8" A-style broach and 5/16" bushing, similarly to how the wheel sprockets were
done. The spacers were machined from %" aluminum round stock. The stock was drilled and reamed to
5/16". The stock was then faced and a cutoff tool used to cut the required lengths of spacers. The spacers were then chamfered on the ID and deburred on a disc sander.
The shifter shaft was turned from 0.75" steel round stock in two setups. The /" diameter section of the
shaft was turned, the part flipped, faced to length, and the 5/16" diameter section turned. Spring passes were performed on the 5/16" section to eliminate taper on the shaft. The fit of the sprockets on the shaft was checked to ensure that the sprockets rotated smoothly before removing the part from the
lathe. The keyways were cut using an 1/8" woodruff cutter, in the same way as described in Section 3.1.3 for the wheel shaft. The flexure key was cut from 1/8" mild steel plate on a waterjet.
3.1.3 Wheel Shaft
The wheel shaft was machined from Y%" mild steel round stock. The shaft was turned in two setups. In
the first setup, the wheel taper and sprocket surface was machined. The wheel taper was machined using the compound on the lathe. Because the degree markings on the compound were not reliable enough to be used to set the compound angle, a dial test indicator was mounted on the compound, in a
dial indicator holder. A scooter wheel was then clamped in the chuck, the dial indicator set to measure the tapered bore of the wheel, and the compound was moved in and out. The angle of the compound was then adjusted until the travel of the compound was aligned with the taper of the bore(the dial
indicator measured minimal variance). A more time efficient method would have been to simply turn the shafts on a CNC lathe. For the second setup, the part was flipped and the inboard bearing surface was machined.
Figure 17 The first setup of machining the wheel shaft
The keyways on the shaft for both the wheel and sprockets were machined on a Bridgeport EZ Trak CNC knee mill. The shaft was held using a 5C collet in a collet block clamped in a vise. The keyways were machined using an 1/8" woodruff cutter. The sprocket keyway could have been machined using an
endmill, but the angled keyway for the wheel was much easier to machine using a woodruff cutter and
Figure 18 Setup for keyway machining 3.1.4 Chain Tensioner
The chain tensioners were machined from 3" delrin round stock. Round stock was only used because it
was readily available in Professor Leeb's lab. A puck of delrin was cut from the rod of stock, faced to approximately 3/8" thick on a lathe, and flats machined on the puck. The profiles of the tensioners were then CNC milled and the holes drilled and reamed. The puck was made thicker than the final thickness of the tensioners for fixturing purposes, so the parts had to then be cut out on a bandsaw, clamped in milling vise, and the remaining stock faced off.
3.2 Motor Mount
The motor mount subassembly consists of five individual parts, all machined from 6061-T6 aluminum. The housing coupling plate was machined from 1.75"x2.25"xl/2" 6061-T6 stock. The bolt clearance holes were first drilled and counterbored. The pockets and profile were then machined. The profile was cut to 0.385" below the top surface of the stock. The stock was then removed, flipped, and the part faced to its final thickness.
Figure 20 Housing coupling plate
The coupling nuts were machined from 2.25" round stock, purchased from McMaster-Carr. Approximately 1" thick blanks were cut using a cold saw. The blanks were then faced to their final thickness, drilled, and bored through their length to the diameter of the flange. The blanks were then bored to approximately .01" larger than the nominal thread minor diameter, up to 1/16" from the back side of the blank, creating the flange. An internal groove was then turned at the base of the flange for thread relief for the subsequent threading operation.
The 2"-10 threads on the nut had to be single-point threaded, as it is not a common thread size. The nuts were threaded on a Haas TL-1, a CNC toolroom lathe, in the MIT Edgerton Center Student Shop.
Figure 22 A steel test piece being machined
The male threaded coupling component was machined from 2" 6061-T6 round stock. The stock was chucked in a lathe, faced, drilled, and bored to the desired hole size. A groove was then cut in the stock approximately 1" from the stock face, to act a thread relief for the subsequent threading operation. The threading was done on the Haas TL-1 at the MIT Edgerton Center Student Shop. The threaded section was then cut off. The part was faced to its final thickness by threading it into a completed nut and chucking the nut in the lathe. This was done to prevent damage to the threads. The male threaded section was left in the nut and clamped in a milling vise, using a V-block. The hole center was located using a dial test indicator on the bore. The dowel holes and tapped holes were drilled in this setup.
The flanged component was turned from 1.75" 6061-T6 round stock. The OD was turned and the
through hole drilled and bored to its final diameter. The part was then cut off with a parting tool, the cutoff piece chucked in the lathe, and the flanged side of the part faced to reach the final thickness. The
part was then clamped in a milling vise using a V-block, the hole center located using a dial test indicator, and the bolt and dowel holes drilled.
3.3 Final Assembly
After assembling the transmission subassemblies, the #25 roller chain purchased from McMaster-Carr was measured and cut to length for each sprocket set. The roller chains were assembled using #25
Figure 23 #25 roller chains made to length
When assembling the chain drive, it was found that the tensioners did not have the enough travel to be able to properly tension the chains. To remove enough slack in the chains, the tensioners had to be pushed out further than originally designed for, which the set screws were not able to do. To solve this
issue, three new X4-20 holes were tapped for the set screws, 5/8" closer to the pivot. Although this did
give the tensioners the required travel, the tensioners were not designed to operate in the position that was found to be necessary. It was found that having the chain bend around the small radius at the tip of the tensioner produced significant friction in the chain drive. The friction could be reduced by loosening the tensioner, but this risked letting the chain slip off of the sprockets.
The motor mount components were then fully assembled, shown in Figure 25. To assemble, the motor adapter plate is bolted to the male threaded part. The coupling must then be put onto the motor and the motor bolted to the adapter plate. For the transmission-side components, the nut is slid over the flanged component and the transmission coupling plate bolted onto the flanged component.
Figure 25 Motor mount assembly
The entire drivetrain was then assembled by bolting the transmission-side motor mount components onto the transmission housing and then attaching the motor. The housing cover was then installed. The complete drivetrain assembly is shown in Figure 26.
Figure 26 Fully assembled transmission and motor mount
The motor was then powered using one of the currently functional scooters. The motor was not able to be mounted onto the scooter due to an unforeseen interference of the motor with a frame member on the underside of the scooter, described in more detail in Section 4.2. Testing of the standalone
drivetrain showed that the system worked as expected. The shifter was able to easily engage and disengage the sprockets. After adjusting the chain tensioner positions, the friction due to the tensioners was not found to have any significant effects on the performance of the transmission.
4 Future Improvements
4.1 Chain Tensioner
When designing the chain tensioner, it was very difficult to predict the length of chains and thus the amount of slack that would have to be taken out of the chain by the tensioner. #25 roller chain lengths
can only be adjusted in increments of %", which becomes a significant amount of additional chain for
such a small chain drive.
Although the current tensioner design is functional, the chain must make a sharp turn at the small radius at the tip of the tensioner. To improve the design, a new tensioner design could be made which
eliminates that sharp transition. This change would be easy to implement and installation would simply be a matter of replacing the current tensioners.
4.2 Motor Mount
After fabricating and installing the transmission and motor mount, several issues were identified which could be resolved in a future design. The most significant issue is interference of the motor with the sub-frame of the scooter. The brushless motor casing interferes with a structural member on the underside of the scooter. While a cutout could be made in the structural member without
compromising the strength of the frame, a transmission housing redesign would be a much more robust
solution. To eliminate the interference, the motor would need to be shifted approximately %"
downwards. This change would require a redesign of the housing, but not of any other components. Another issue that was found was that the tolerances on the inner diameter of the tube-structure of the coupling were set tighter than the cumulative tolerances of the machining and of the purchased spider couplings. This meant that unless carefully positioned when bolted onto the transmission housing, the inner diameter of the tube structure would hit the spider coupling. Although this aspect of the motor mount is currently functional, a redesign of the tube to increase its inner diameter is recommended.
4.3 Bearings
Upon receiving the bearings purchased for the housing, it was realized that the flanged bearings used were of poor quality. It was later found that, in general, for the same price of bearing, flanged bearings were of a poorer quality than standard ball bearings. Although the bearings used are functional, they had significant axial play and very loose tolerances on critical dimensions such as the outer diameter. The housing could be redesigned to use standard ball bearings. However, this would make fabrication more difficult because the bearing bores would be required to have a shoulder at the bottom to prevent
the bearings from being pushed through the bore. Use of standard ball bearings would also increase the life time of the bearings. Standard bearings of the same size and price as the flanged bearings used were found to be rated for higher loads.
5
Appendix
Appendix A: Motor characterization Speed-Voltage plots
20 18F 16 a, a, w 0 0 0 14- 12- 10.-8 6 4 2 0 0 50 100 150 200 250 Motor Speed(radfs) 300 350 400
motor model XYD-15B
01 5 1 15 2 2 3 3 f I
0 50 100 150 200 250 300 350 400 450 500
Motor Speed(rads) motor model MY6812
It t I I t I I 30- 25- 20- 15-10 -15 0) 5 0
6 Bibliography
[1] Oberg, Erik. Jones, Franklin D. Horton, Holbrook L. and Ryffel, Henry H., Machinery's Handbook 28 h
ed., New York, NY, Industrial Press, 2008
[2] Budynas, Richard G. and Nisbett, J. Keith, ShigIev's Mechanical Engineering Design 9th ed., New York,
NY, McGraw-Hill, 2011