FileMaker Pro 5
2
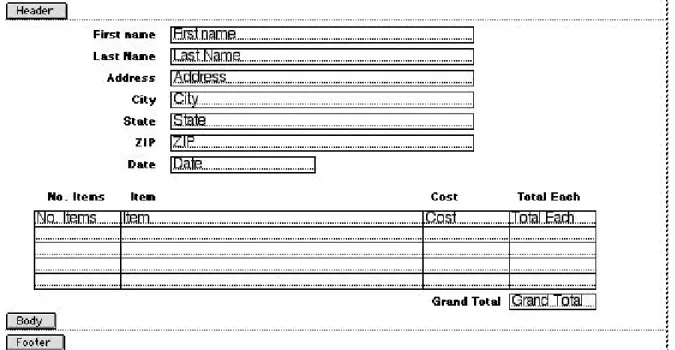
ETSFigure 1. Field Names in a Label Layout
FileMaker Pro is an easy-to-use, yet powerful database program. Databases organize information. Common examples of databases include address books, cookbooks, to-do lists, and the ubiquitous phone book.
The popular spreadsheet program, Microsoft Excel, contains a database feature, but FileMaker is a much more powerful database program. Spreadsheets are limited to showing data in columns and rows. Using FileMaker, you can create forms, address labels and just about any format that you’d like to use to display your data. In addition, you can easily transfer information back and forth between Excel and FileMaker, allowing you to use whichever program works the best for a particular project.
Data contained in a database is located in a field. The field is the smallest unit of the database. For example, if you have a database of information to be used to create mailing labels, a single field would contain information pertaining to first names. Another field would contain information on last names. For an entire mail label you would need fields for first name, last name, address, city, state, and ZIP code.
A record contains all the information about a single person/element, etc. In our mail label example, a single record would contain all the information about a single person; for example, Joe Ragey. Another record would contain all the information about another person; say Nile Norton.
A database contains information from a whole bunch of records. For example, a phone book contains all the names, addresses and phone numbers for thousands of people.
A layout, or view, is a way to control how the information is displayed. A single record can be displayed in numerous ways, or layouts. Not all information in a record needs to be displayed on all layouts.
D a t a b a s e s
D e f i n i t i o n s
3
Foothill-De Anza CCD4
ETSFigure 3. Opening screen for FileMaker Pro 5 Figure 4. Saving a new file
Getting
Started
5
Foothill-De Anza CCDClick on the FileMaker Pro 5 icon to launch the program . A box will appear asking what you want to do: Create a new file using a template, Create a new empty file…, or Open an existing file…. When you choose to open a new file using a template, then you choose the template from the list at the right. Most of the existing templates are more suited to business use, rather than education.
For this exercise click on the second choice: Create a new, empty file . . . .
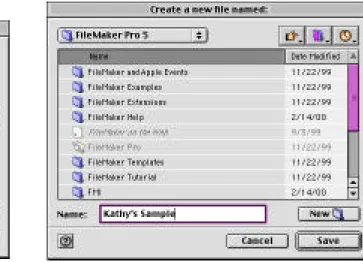
FileMaker Pro saves documents automatically. In order to do so, a new document has to be saved initially. So the first thing that
appears when you create a new file is the Save dialog box opens up (see figure 4). Give your document a title and save it in a location where you want it.
For this exercise save it onto the desktop.
After you click on the Save button, another dialog box appears (see figure 5). In this dialog box you have to define the field names you will use in your database. Prior to starting to create a FileMaker Pro document, you should spend some time thinking about all the data you want to collect. In this dialog box type in a Field Name for the first element of data you need. Choose what type of information this data should be: Text, Number, Date, or something else. If you’re not sure, then make it Text – it can be altered later. Then click on the Create button or hit your Return Key on the keyboard. Keep typing in new field names until you have created all the elements that you think you’ll need for your data. Fields can be defined later, but it is easier to do it all at once initially.
For this exercise, create these fields: First Name text Last Name text Address text City text State text ZIP text
6
ETSFigure 6. Auto-Enter the Creation Date
Figure 7. Layout of Items Table
The rest of the fields we will create are a little more elaborate. Continue creating fields using the instructions below:
Date date
Once you’ve created the Date field, click on the Options button. From the Auto-Enter field, choose Creation Date and click on the OK button at the bottom of the window (see figure 6). When a new
record is started, the current date will automatically be inserted into that field.
We will create a table for the next part of the layout (see figure 7). There will be fields for quantity of items, item description, cost for one of each item, and total cost of items desired. We only need to define each field once, but then we want the fields to be able to repeat five times, allowing us to order five different items.
No. items number repeating Item text repeating Cost number repeating
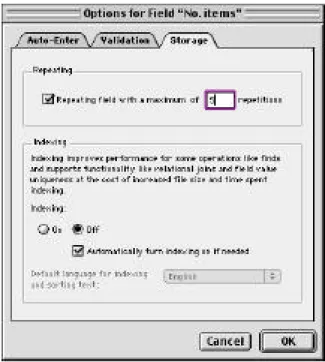
Now that these fields have been created, we need to set them up so that they repeat five times. On the list of defined fields, click once on the No. items field, then click on the Options button (lower right of window).
Click on the Storage tab -- the right-most tab. Click on the box to make this a repeating field and type in 5 for the number of times for it to repeat. Then click on the OK button. (see figure 8)
Repeat this procedure for the Item and Cost fields.
7
Foothill-De Anza CCD8
ETSFigure 9. Creating a calculation for item totals
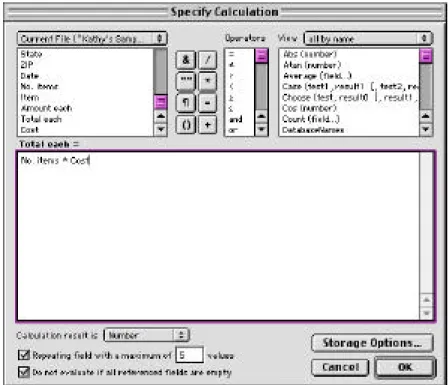
The Total each field is a calculation. We want FileMaker Pro to automatically multiply the number of items ordered by the price of one item to get this total. In order to set up the calculation,
Total each calculation repeating
When you create the field and click on the calculation button, the calculation window automatically appears (see figure 9). To create the calculation, follow these steps:
1. Double-click on the No. items field located in the left box. 2. Double-click on the asterisk icon next to that left box. 3. Double-click on the Cost field (you’ll need to scroll down) As you are creating this calculation, you will see it appear in the box in the middle of the window. You can see that there’s lots of room for very elaborate calculations, but we’re not going to get into that today.
This field also needs to be a repeating field, so at the bottom of this window, click in the Repeating fields and make it repeat five times, too. Then click the OK button.
The last field that we need to create is a Grand Totals field. This field will add up all the totals of items ordered, so we know each
customer’s final total. (If this were a real order form we would need to create tax fields and shipping and handling charges, but for this exercise we’re going to skip all that.)
Grand Total calculation
Once again, as soon as you name the field and identify it as a calculation, the calculation window appears. In the right hand box, scroll down and double-click on Sum(field…). That puts the formula in the box. Then, in the left box, double-click on the Total each field. Your formula is complete. This field doesn’t need to be repeating so just click on the OK button.
You’re done defining fields, so in the Define Fields box, click on the Done button at the bottom of the window.
Creating a
C a l c u l a t i o n
F i e l d
9
Foothill-De Anza CCD10
ETSFigure 11. Default Layout
Figure 12. Default Layout
When you click on the Done button, the Define Fields dialog box closes and you are finally in a place where you can start entering data (you’re in Browse Mode). But when you look at your fields, you’ll notice that all those repeating fields you created are arranged across the page, instead of down in a neat table. YUCK! You’ll need to arrange the fields yourself so they look good. Now’s as good a time as any to do that.
From the View Menu, change your view to Layout Mode. You will see field titles and boxes identified with the field names (see figure 12). Each object can be moved by placing your cursor on top of the object, holding down the mouse button and dragging the object to where you want it. Several objects can be dragged at once by Shift-Clicking on the objects to select them and then dragging.
Notice that there are three areas of our layout: Header, Body, and Footer. Right now everything is located in the Body area. As a matter of fact, that’s where we want everything to stay, but we need to make the Body a little larger so we have some room to
manipulate. Place your cursor on the line between the Body and the Footer and drag that line down, which will make the body longer. Shift-click on all the objects below the Date field (No. items, Item, Cost, Total each, and Grand Total). When they are all selected, place your cursor on any one of them and drag the fields down to give yourself some working space. Click outside of these fields to deselect them.
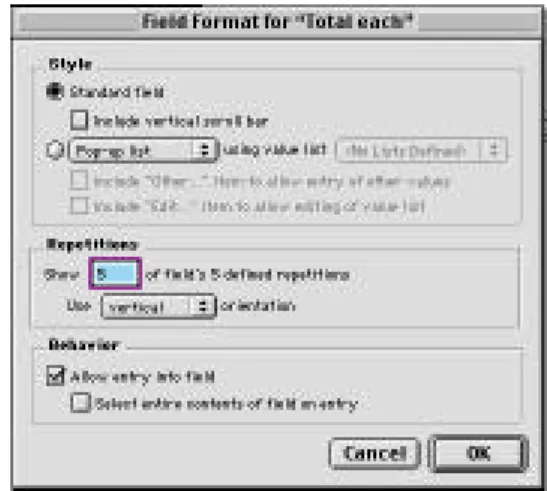
Now, click on the box named No. items. From the Format Menu, choose Field Format…. In the middle of the resulting dialog box, change the Horizontal orientation to Vertical orientation and click OK. The field boxes will now be oriented downwards, overlapping all the rest. That’s OK. Just move your cursor onto the box and drag it up into the empty area you created earlier. Leave a space at the top for the field title.
Repeat this process for the rest of the repeating fields: Item, Cost, and Total each.
Layout
Mode
11
Foothill-De Anza CCD12
ETSFigure 15. Adjusted layout
When you are moving the field boxes next to each other, notice that a line extends horizontally from each edge of the box. If you look closely at the field boxes, you’ll see that the box title is sitting on a dotted line. When you line up the line extending from a box your moving with the line in a not-moving box, the line will disappear. That means that the two boxes are aligned correctly.
Once you’ve changed the repeating field boxes to be vertically aligned instead of horizontal, and moved them into place, then move the Field Titles into the area at the top of the boxes. Then move the Grand Total title and box to below the rest. Lastly, you can make the body part smaller by clicking on the line between the body and footer and dragging it up. (The opposite of what you did
earlier.) Your layout should look similar to figure 15.
This first layout is simply a data entry layout. It contains all the fields that have been defined and data can easily be entered here without missing any fields. Later you can create custom layouts that contain as many or as few fields as you wish. For example, you may want to create a mail label layout that just contains the fields
necessary to send a letter. That would be the name, address, city, state and ZIP fields only. Or you may want to create a customer list, containing customer information in a list format. These are all fine ways to show your data, but if you enter your data using one of these formats, there there will be fields which don’t get any data entered into them because the fields don’t show when you entering the information.
One more thing we need to do before leaving the Layout Mode is to format our number fields to look like dollar amounts. To do so, click on the Cost field to select it. Choose Format–Number… You’ll get a dialog box like Figure 16. Click on the button to format as decimal. Then click in the Fixed number of decimal digits box and leave it at 2 decimals. Then click in the Use notation: box and leave it as a currency symbol. Click the OK button. Repeat these steps for both the Total Each and the Grand Total fields.
You’re finally done setting up the layout, so switch back to the Browse mode (under the View Menu).
Aligning
Fields
Number
Formatting
13
Foothill-De Anza CCD14
ETSFigure 17. Browsing a record containing data
Figure 19. Delete Warning Figure 18. Icon showing which record is being browsed
The Browse Mode is where you enter all your data and where you’ll print from. To get a blank form to enter data into, type z-N (the fast way) or choose New Record from the Record Menu (the slow way). If your cursor is not already in the top box, click in that box. If you can’t see the box, click in the area right next to First Name and the boxes will appear. Hit the tab key to move from field to field. If you forget and hit the Return key, nothing drastic will happen. Just hit the tab.
The fields which have been identified as currency don’t need the dollar sign typed. Just type in a figure. The fields which are totals will be calculated automatically.
As you create more records, the little book icon on the left side gets more and more pages (see figure 18). You can scroll up and down on this book to get to previous records. This little book also shows you how many records you have in total, in addition to telling you which record you are currently browsing. Above the little book is a pop-down menu which allows you to switch to different layouts, if any have been created.
For this exercise, make four new customer records: For the database we are creating, make four new customer records. Make up your own data using your imagination. Each customer doesn’t need to purchase five different items, but they should each purchase something and several of them should purchase some of the same items. Notice as you work that the totals are tallied automatically - you don’t need to add them up yourself. To get a new blank data form, type z-N. To move back to a previous customer, use the little book icon in the left frame.
Remember that FileMaker Pro saves automatically. If you need to delete a record, choose Delete Record (z-E) from the Record Menu. A warning box asks if you REALLY want to do that, because once it has been deleted, there is no recovering it. It’s gone. No Undo! In Figure 19, notice that the default is to cancel the action, leaving the record intact.
Browse
Mode
Deleting a
Record
15
Foothill-De Anza CCD16
ETSFigure 21 Creating a new layout
Figure 22 Labels layout setting
As I mentioned before, the Browse Mode is where data is entered. The layout we’ve been working with so far is called the Data Entry layout because it contains all the fields that have been defined. When you enter data in this layout, you won’t miss any fields that you’ll later need to add data to since they are all on this page. However, it is likely that you won’t want to print your data in this basically linear format. You’ll need to create new layouts to arrange the fields in a more useful format.
For this exercise, we’ll create some mail labels:
All the information we need is already in the database because we inserted this information in the Data Entry layout. All we need to do is to create a new layout containing just the information needed on a mail label (name, address, city, state, zip).
1. Open the document Exercise One. It is just like the document you already created except it has several data records created. 2. From the View Menu, switch to Layout Mode.
3. From the Layouts Menu, choose New Layout…
4. From the list of layout types, choose Labels and click the Next button (see Figure 21).
5. The next dialog box lets you choose the type of labels you will be printing to. The most common mail label used is the Avery 5160, so choose that one from the drop-down list. If you’re using a different label number, select that choice. Click the Next button (see Figure 22)
6. The next dialog box allows you to arrange the fields on the label. You need to click on a field title (eg. First Name), insert any punctuation or line breaks and click on the next field title. For us, follow this procedure:
Double-click on First Name, type a space, double-click on Last Name, hit return Double-click on Address, hit return
Double-click on City, type a comma and a space, double-click on State, type a space,
double-click on ZIP Click on the Next button
Label
Layout
17
Foothill-De Anza CCD18
ETSFigure 25 Actual label
Figure 26 Layout Setup
7. In the last dialog box, choose to view in Layout Mode and click on the Finish button.
At this point, the label layout appears. You don’t need to do anything more to this layout. In fact, that’s good because you don’t have a lot of maneuvering room to move stuff around.
Switch to Browse Mode (under the View Menu). You’ll probably only see one label. To see a list of labels including everyone you’ve entered, choose View as List from the View Menu.
To see how these labels will print, choose Preview Mode from the View Menu.
Your labels are probably set to print down the page. If you would prefer, you can adjust it so they print across the page. Switch back to the Layout Mode. From the Layouts Menu, choose Layout Setup… (see Figure 26). In the middle of the box, choose to print across first rather than down first.
Another good thing to do is to name your layout. While you’re still in the Layout
Setup… dialog box, double-click in the Layout Name area at the top of the box and type in a name, such as Labels. After you’ve created several layouts you won’t automatically remember that Layout 2 is labels and Layout 5 is a list of names.
When you are printing labels, it is very important to print at least one page out on regular white paper first. That way, if they don’t fit correctly, you’ve not wasted a sheet of expensive label paper.
To switch from one layout to another, click on the little box located just above the book of records on the left side. This is a pop-down list of all layouts. Just drag over to the layout you want to switch to (see Figure 27) and release the mouse button.