Design of a Low-Cost Meso-scale, Detachable Fixturing System For Probe-based Nanomanufacturing Equipment and Instruments
by
Adrienne Watral
Sc.B. Mechanical Engineering
Massachusetts Institute of Technology, 2009
MASSACHUSETTS INSTITUTE
OF TECHNOLOGY
SEP
IBRARIES6 2009
LIBRARIES
Submitted to the Department of Mechanical Engineering in Partial Fulfillment of the Requirements for the Degree of
Bachelor of Science in Mechanical Engineering at the
Massachusetts Institute of Technology
ARCHIVES
May 8, 2009
© 2009 Massachusetts Institute of Technology All rights reserved.
Signature of Author ...-..
..--epartm t of Mechanical Engineering May 8, 2009
Certified by..*/
7
Martin L. CulpepperAssociate Professor of Mechanical Engineering
- -- Thesis Supervisor
Accepted by... ...
Professor J. Lienhard V Collins Professor of Mechanical Engineering Chairman, Undergraduate Thesis Committee
Design of a Low-Cost Meso-scale, Detachable Fixturing System For Probe-based Nanomanufacturing Equipment and Instruments
by
Adrienne Watral
Submitted to the Department of Mechanical Engineering on May 8, 2009 in Partial Fulfillment of the Requirements for the Degree of Bachelor of Science in
Mechanical Engineering
ABSTRACT
This paper introduces a low-cost, meso-scale, detachable kinematic fixturing system for use in alignment in probe-based nanomanufacturing. The fixturing system will be applied specifically to a nanopositioning system developed for the functionalization of DNA via dip pen nanolithography. A ball and groove kinematic coupling design was modified by the addition of flexural hinges to reduce the offset of friction on the coupling interface, thereby improving repeatability. A prototype fixturing assembly was fabricated and tested for repeatability in six degrees of freedom. The test results concluded that the kinematic fixturing system has a 1-y repeatability of approximately 50 nanometers and 3.5 microradians. This optimized kinematic coupling system will enable suitably repeatable, quick, and elegant assembly, thus advancing the manufacturing capabilities of dip pen nanolithography.
Thesis Supervisor: Martin L. Culpepper
Title: Associate Professor of Mechanical Engineering ~~~i~-;s~,~,~,,~,~;;-LI.~~II~,~..~-~ *~a
ACKNOWLEDGEMENTS
First and foremost, I would like to thank Professor Martin Culpepper for his guidance and inspiration throughout this project. He has been an invaluable resource not only for my work on this thesis but also for my professionalism as an engineer. The opportunity to continue working with Professor Culpepper led me to the decision to pursue graduate studies at MIT beginning in July 2009.
I would also like to thank Christopher DiBiasio for consistently being available to offer advice when I needed it. Chris has a great deal of wisdom and is always willing to share it.
Lastly, I would like to thank Patrick McAtamney for all of his help in the machine shop with the very small features that were necessary for the fabrication of the prototype assembly. Pat always made time to help, even when the LMP shop was at its busiest, and I greatly appreciate that.
CONTENTS
Abstract ... 3
A cknow ledgem ents ... 5
Contents ... 6
List of Figures ... ... 7
List of Tables ... 8
Chapter 1 Introduction ... 9
Chapter 2 K inem atic Coupling D esign ... 13
2.1 Flexural H inge D esign ... ... 16
2.2 Groove D esign ... 25
Chapter 3 Fabrication and A ssem bly ... ... 30
Chapter 4 Repeatability Testing ... ... 32
Chapter 5 Results and Conclusions ... ... 35
Chapter 6 Futher W ork ... 39
References ... 41
Appendix A: Kinematic Coupling Design Spreadsheet... 42 ~~i -;~ ~~~XI~~W~;Z~.-~ u~ ~- --- -;~~ ---~~----,
LIST OF FIGURES
Figure 1: HexFlex Nanopositioner... 9
Figure 2: Kinematic Fixturing System... 10
Figure 3: D PN Schem atic ... ... 11
Figure 4: DPN Nanomanufacturing Array... 12
Figure 5: A lignm ent M echanism s... ... 14
Figure 6: 3 Groove Kinematic Coupling ... 15
Figure 7: Kelvin Kinematic Coupling... 15
Figure 8: Ball and G roove Layout ... ... 16
Figure 9: Flexural H inge ... 17
Figure 10: H inge D im ensions ... ... 18
Figure 11: Rectangular, Elliptical, and Circular Hinges ... ... 20
Figure 12: Rectangular Hinge FEA Results... 21
Figure 13: Elliptical Hinge FEA Results ... 22
Figure 14: Circular Hinge FEA Results ... 22
Figure 15: Final Flexure Hinge Design ... 25
Figure 16: C antilever B eam ... ... 27
Figure 17: G roove D esign... 28
Figure 18: Final G roove D esign ... ... 29
Figure 19: Kinematic Coupling Assembly ... ... ... 29
Figure 20: EDM Groove and Hinge... 31
Figure 21: Assembled Ball and Flexure... 31
Figure 22: Assembled Kinematic Coupling... 32
F igure 23: T est Set-U p ... 33
Figure 24: Electrically Grounded Test Set-Up ... ... ... 34
Figure 25: Capacitance Probe Arrangement ... 35
Figure 26: R epeatability Test R esults ... ... 36
LIST OF TABLES
Table 1: Common Alignment Mechanisms ... ... 13
Table 2: Flexure Hinge Perform ance ... ... . 23
Table 3: Absolute Fillet Radius Comparison... 24
Table 4: Normalized Fillet Radius Comparison ... ... 24
CHAPTER
1
INTRODUCTION
The purpose of this research was to understand the effect and promise of flexures on fixtures for nanomanufacturing processes. The research encompassed the modeling, optimization, and fabrication of a low-cost, meso-scale, detachable fixturing system for probe-based nanomanufacturing equipment and instruments. Such a fixturing system will allow for accurate, repeatable, and quick interchange of parts within various nanomanufacturing systems. This is important, as it will allow for improved alignment and positioning of parts and tools with respect to relevant equipment, thus improving reliability, rate, quality, and cost parameters. The impact of this research will be to bring fixturing technology to a level that allows for cost-appropriate methods of suitably accurate and repeatable alignment with improved rate and quality.
This thesis focuses on the design and fabrication of a meso-scale fixturing system specifically for the SenseFlex nanopositioning system developed by the Precision Compliant Systems Laboratory (PCSL) at MIT, shown in Figure 1.
Contact Kinematic
Actuator /
central
Stage
f
Y --Figure 1: HexFlex nanopositioner and the 6 degree-of-freedom motion its central stage achieves [11] . ...
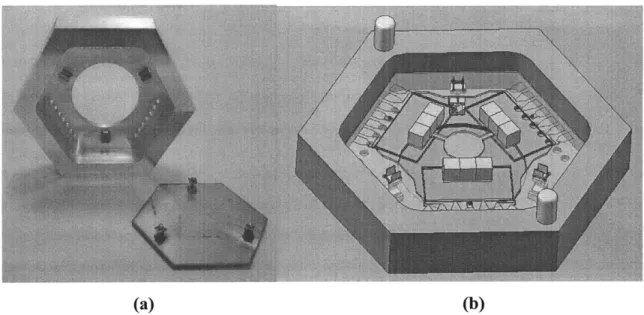
This fixturing system will be used to attach the HexFlex to the plate and later to connect each HexFlex to various testing machines. The developed fixturing system is shown in Figure 2.
(a) (b)
Figure 2: Kinematic Fixturing System Prototype (a) and Solid Model (b) Nanopositioners are used to move a tool, part, probe, or other device to a desired position with nanometer accuracy and repeatability. They are used in applications including precision machining, high-speed imaging processes, and probe-based nanomanufacturing.
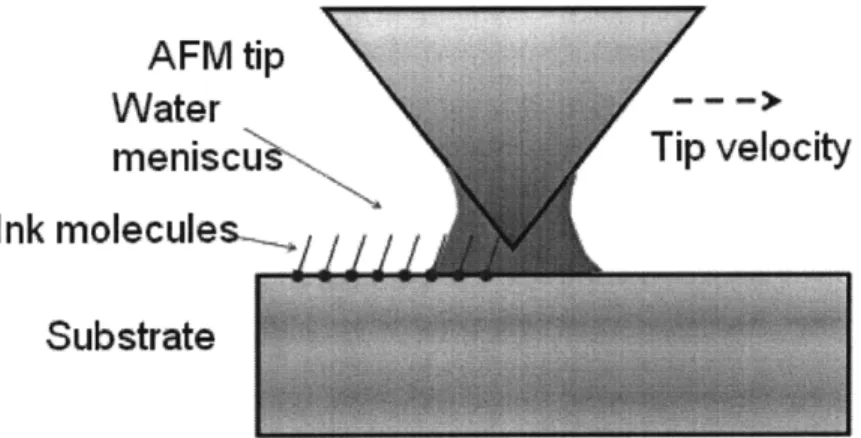
The SenseFlex meso-scale nanopositioners with integrating sensing are to be used to control the orientation with respect to parallel of probes used in probe-based nanomanufacturing. This particular system was developed by the PCSL at MIT in collaboration with Ohio State University as a means of functionalization of DNA via Dip Pen Nanolithography (DPN). DPN is a method of nanofabrication in which materials are deposited onto a solid-state substrate through an atomic force microscope (AFM) tip. It can be thought of as the nano-scale equivalent of a quill pen, in which the AFM tip acts as the "pen," which is coated with a chemical compound acting as the "ink," which is delivered to the substrate, the "paper," via capillary transport [2]. A schematic representation of DPN is illustrated in Figure 3 below. This process was explored as a means of writing on DNA because it allows for highly controlled interaction with nanoscale structures, enables deposition of various nanoscale materials onto various surfaces, and has proven to be scalable to arrays of up to 55,000 tips for massive parallelization [3].
AFM tip
Water
- - ->
meniscu
Tip
velocity
Ink molecules,
Substrate
Figure 3: DPN Schematic: molecules are transported from the AFM tip to the substrate via capillary transport
The DNA functionalization process is currently performed by using a single AFM tip to write on a single strand of DNA, a process that would take 6064 years per 100 micro-grams of DNA. The SenseFlex system uses a 6 degree-of-freedom flexure (HexFlex) to hold an array of 55,000 tips, thus reducing the write time to 40 days per 100 micro-grams of DNA. If the DPN array is not perfectly parallel to the sample, there is a risk of crushing a portion of the DNA strands, while leaving other strands unmarked. Aligning a pair of flat two-dimensional surfaces so that they are perfectly parallel has been difficult to achieve in the past. There are no prior small scale technologies that are able to accurately and repeatably control six degrees-of-freedom. The HexFlex was designed as a 6 degree-of-freedom flexure to accommodate for any misalignment of the probe, both translational and rotational. It is 4.14 cm in diameter, with the smallest flexural beam being 125 micrometers across.
Each HexFlex is actuated in and out of plane by Lorentz force actuator coils that are attached to a removable aluminum heat sink cap. The nanomanufacturing system combines an array of ten HexFlex-circuit board-heat sink systems in a compact arrangement on a single aluminum plate. The system is shown in Figure 4.
Flexible
Circuit Heat Sink HexFlex
Positioner
Main
Structure ple
Figure 4: Image of the DPN nanomanufacturing array: Note various components have been removed to enhance clarity [1]
It is important that the HexFlex be accurately, repeatably, and detachably fixtured to the nanopositioning system. The design requirements of the system include passive repeatability, ability to be attached and detached on demand, stiffness, accuracy, accommodation of the removable lid and coils, thermal and material stability over time, and load capacity. The demands of this application led us to develop a new kinematic fixturing system.
CHAPTER
2
KINEMATIC COUPLING DESIGN
As high repeatability was one of the most critical functional requirements for the fixturing system, various exact constraint mechanisms were considered, including the passive kinematic coupling, active kinematic coupling, quasi-kinematic coupling, compliant kinematic coupling, and elastic averaging. Kinematic couplings are a reliable, simple, and inexpensive means of linking systems with fine repeatability. The design of a kinematic coupling is deterministic in that the number of constraints is equal to the number of degrees of freedom constrained. These aforementioned exact constraint mechanisms are compared in terms of type of constraint, accuracy, repeatability, stiffness, and cost in Table 1 below. The achievable repeatability and relative cost of each mechanism is compared in Figure 5. The potential for repeatability, on the order of tens of nanometers, led to the selection of the passive kinematic coupling mechanism for the fixturing system.
Repeatability 0.01 pm 0.10 pm 1.0 pm 10 pm Elastic averaging Compliant kinematic Quasi-kinematic W Active kinematic Passive kinematic
Figure 5: Cost and Repeatability Comparison for Alignment Mechanisms [4]
In considering the design requirements, the ball and groove kinematic coupling was chosen based on its accuracy, repeatability, ease of attachment and detachment, stiffness, and load capacity. Other design requirements, including thermal and material stability over time, size, and accommodation of the removable lid and coils were based on material and geometric properties.
Design of the kinematic coupling began with consideration of the functional requirements of a general kinematic coupling:
* it connects two parts or assemblies * can be separated and rejoined on demand * fine repeatability
* some level of accuracy * some level of stiffness * is low cost
The intrinsic flaws of kinematic coupling design were considered, in that kinematic couplings contain very high stress concentrations at the contact points, do not permit sealed joints, and usually offer moderate stiffness and load capacity.
The first design considered was a 3-ball, 3-groove design, shown in Figure 6. The advantages of the 3-groove design are that it is symmetric and therefore more evenly distributes the contact forces and is also less expensive and easier to manufacture. This design allows for better centering and is not sensitive to thermal expansion, as it tends to expand about a center point. Its disadvantages are that the six point contacts create high stress concentrations and this design usually has low stiffness and load carrying capacity in comparison to the other designs.
-..wI
Figure 6: A generic 3 groove kinematic coupling [4]
The 3-groove design was then compared with the Kelvin model: a tetrahedral socket, groove, and flat, as shown in Figure 7. The tetrahedral socket of this model adds a natural pivot point for angular adjustment, but it still contains six contact points, therefore still incorporating the same high stress concentrations. Countermeasures to the high stress concentrations and low stiffness and load capacity in both the 3-groove and the tetrahedral-groove-flat designs include turning the point contacts into line contacts (for example, turning the tetrahedral socket into a conical socket) or using a quasi-kinematic design on the entire coupling, thereby increasing the area of contact by substituting gothic arches for the grooves or canoe-shaped balls for the traditional spheres.
Balls
Tetrahedral
groove
V groove
Figure 7: Kelvin kinematic coupling [4]
Based on the precision and symmetric advantages, the 3-groove design was selected. Once it was determined that the 3-groove design would be used, the orientation of the grooves needed to be optimized. In order to guarantee stability in a 3-groove kinematic coupling, the normals to the contact forces should bisect the angles between the balls [5]. Additionally, the
contact force vectors should intersect the plane of coupling action at a 45 degree angle to balance stiffness in all directions, therefore implying a 90 degree angle groove. A stable 3-groove kinematic coupling layout is shown in Figure 8 below.
Ball I -Groove 1 Contact
Figure 8: Ball and Groove Layout for Optimal Stability [6]
Contact forces between the ball and groove, contact stresses between the ball and groove, deflections at the contact points, and error motions were analyzed in terms of the design variables, including ball diameter, groove radius, coordinate location of the balls, contact force direction, preload force magnitude and direction, and material properties of the coupling by a kinematic coupling design spreadsheet designed by MIT Professor Alexander Slocum [7]. This simulation was used in order to optimize as many of the input parameters as possible to meet the functional requirements of the coupling. The optimized coupling geometry, material properties, and preload force, as well as the resulting stresses, deformations, and error motions, are summarized in Appendix A.
2.1
Flexural Hinge Design
A risk associated with using the ball and groove kinematic coupling design is that the kinematic coupling wants to settle into its lowest energy state. This means that if it is not
-il-perfectly aligned when first assembled, the balls will have the tendency to slip into a lower energy state, thus changing the position of the HexFlex stage. This risk was addressed by adding an elastic averaging approach to the kinematic coupling design, achieved by attaching the balls to flexures. The flexures were designed as hinges that are compliant in the stiff direction of the grooves. The balls of the kinematic coupling sit on top of these flexural hinges, thus allowing the balls to settle into the lowest energy state in the grooves. A flexure hinge is shown in Figure 9.
Figure 9: Flexural Hinge
The design of the hinge as compliant in the stiff direction of the groove enables the ball to adjust its position in the groove slightly, facilitating the ball's settling into its lowest energy state. This orientation also allows the coupling to slightly rotate about its z-axis, which also permits the balls to establish their settled state more easily. This orientation will later be
compared with orienting the compliant direction of the hinge along the compliant direction of the groove, which would allow the balls to slip freely along the groove.
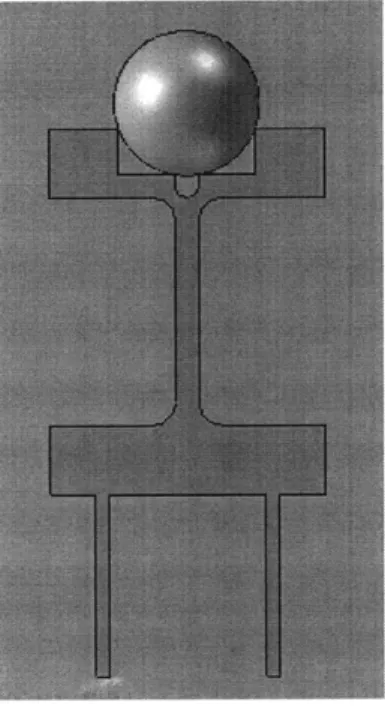
A single-axis flexure hinge must be flexible about the sensitive axis and as stiff as possible about the cross axis and along the longitudinal axis. Figure 10 shows the dimensions that define the hinge and the various forces and moments for which the angular and linear compliances are calculated. The equations for the compliances were derived from basic beam bending equations. The principle of superposition may be applied when a combination of loads is
applied to determine overall deflection of the hinge.
---I
Fy
Figure 10: Hinge dimensions and various loads which cause deflection [8]
The hinge is compliant about the z-axis. An applied moment of M- imposes a deflection through angle a-. The compliance in the compliant direction is then calculated by
+ - (1+ i (1 ) I +
i2)
j
tanw (1)
where /=t/2R and y=h/2R.
Application of a force F,, applied at the end of the hinge also causes a deflection through angle aS. The compliance in this case can be calculated by
F = RsinOm (2)
a. 3 1 + p
M. 2Ebl 2P+k L 8 x
where the solution for a/M is found by Equation 1. The hinge should be as stiff as possible about the y-axis, thus deflection about this axis should be as little as possible. If a moment M, is
applied, the hinge bends through angle ay, and the compliance in the stiff direction is calculated by
a 12 )/-,g 2(1 P) - J2+6
a - 2 tan-- + tan (3)
M, Eb3 J -(1+ -_Y2 29+
82+
1-(1+ -y) 2A force F_ applied at the end of the hinge imposes a deflection through angle a, as well, and the y-axis compliance is calculated as
F: + P - )2 (4)
where a/M, is calculated by Equation 3. Linear deflection along the z-axis, Az, is caused by an applied force F_ and moment M,,. Compliance is calculated for the case of an applied moment M, as
z = RsinOm
K
=R 1-(1+Y (')2 5)M - (5)
Linear deflection due to a force is given by
= R2 Sin7 +
F_ M,
A linear deflection along the x-axis, Ax, is caused by an applied force Fx. This axis should be as stiff as possible. The compliance in the x direction is calculated by
(7)
Optimizing the hinge geometry through the solutions to the above equations required multiple iterations due to the numerous geometric variables. Thus three basic designs were analyzed for comparison of behavior. These designs included a rectangular hinge, an elliptical hinge, and a circular hinge, shown in Figure 11.
(a) (b) (c)
Figure 11: Rectangular (a), Elliptical (b), and Circular (c) Flexure Hinge Designs
These three flexural hinges were optimized for bending stiffness per area, axial stiffness per area, load capacity, range of motion, ease of manufacturing, and angular error in position using Cosmosworks finite element analysis (FEA). The FEA was run on the three hinge geometries with equal critical dimensions. Each hinge measured 5.08 cm tall with a 2.54 cm square base. The thin dimension of the hinge measured 2.54 mm for each. The material chosen for the FEA simulation was stainless steel since this is the material to be used in the actual coupling fabrication and in each simulation 1 N of force was applied. FEA was run to determine displacement, stress, and strain in the compliant bending direction, stiff bending direction, and
I
--x = - 7 f- 2(1 + P) 2 + 1 _17,- 2
F 2 tan +2+--- + tan x
-F, Eb (1+1_7) 2 +12
axial direction. It was important for the flexures to be stiff in the axial and stiff bending directions and as compliant as possible in the compliant bending direction. The displacement and stress results from the FEA run in the compliant bending direction are shown below in Figures 12 through 14.
von Mises (Nkr^2)
URES (im)URES (m) 1.417e+006
2.504e-006 .299e+006 2.295e-006 1 .16 8e+006 2.086e-006 I 1.063e006 . 1.878e-006 9.450e+005 1.669e-006 8.269e+005 1.460e-006 7.088e+005 1.252e-006 5.907e+005 1.043e-006 4.725e+005 8.345e-007 3.544e+005 6.259e-007 2.363e+005 4.173e-007 1.1 82e+005 2.086e-007 6.495e+O01
1.00e-033 -*Yield strength: 3.51 6e+008
Figure 12: Rectangular Hinge Displacement (left) and Stress (right) FEA Results
URES (m) 8.997e-007 8.248e-007 7.498e-007 6.748e-007 5.998e-007 5.248e-007 4.499e-007 3.749e-007 2.999e-007 2.249e-007 1.500e-007 7.498e-008 1.000e-033 von Mises (Nnm^2) 8.712e+005 7.986e+005 7.260e+005 6. 534e+005 5.808e+005 5.082e+005 4.356e+005 3.630e+005 2.904e+005 2.178e+005 1,.453e+005 7.266e+004 7.049e+001 -Yield strength: 3.516e+008 Figure 13: Elliptical Hinge Displacement (left) and Stress (right) FEA Results
URES (m) 4.805e-007 4.368e-007 3.932e-007 3.495e-007 3.058e-007 2.621 e-007 2.184e-007 1.747e-007 1.311 e-007 8.737e-008 4.368e-008 1.000e-033 von Mises (Nkn^2) 7.044e+005 6.457e+005 5.870e+005 . 5.283e+005 4.696e+005 4.109e+005 3.522e+005 2.935e+005 2.348e+005 1 .761e+005 11,74e+005 5.873e+004 2. 612e+001 -- Yield strength: 3.516e+008
Figure 14: Circular Hinge Displacement (left) and Stress (right) FEA Results
Once the stiffness values in all three directions (compliant bending, stiff bending, and axial) were determined, the ratios of stiff to compliant stiffnesses were calculated in order to compare the performance of each hinge in the compliant bending direction as compared to the stiff directions. The overall performance of each hinge is summarized in Table 2. The obtained absolute values were normalized for easy comparison of the three designs.
Table 2: Flexure Hinge Performance
Absolute Normalized
Rectangle Ellipse Circle Rl:tangle Ellipse Circle Max von Mises 1417490 871185 704418 1.000 0.615 0.497
y (Nim'2)
Equivalent 5.55E-06 3.53E-06 2.82E-06 1.000 0.637 0.508
Strain y
UY (m) 2.50E-06 9.00E-07 5.24E-07 1.000 0.359 0.209
UL (mn) 2.49E-09 1.84E-09 1.39E-09 1.000 0.737 0.556
UCz (m) 4.39E-08 3.21E-08 2.55E-08 000 0.730 0.581
k, (N/mr) 3.99E+05 1.11 E+06 1.91E+06 0.209 0.581 1.000
k, (N/rn) 4.01E+08 5.44E+08 7.22E+08 0.556 0.754 1.000
kz (Nrm) 2.28E+07 3.12E+07 3.92E+07 0.581 0.796 1.000
k, 1.00E+03 4.90E+02 3.78E+02 1.000 0.488 0.377
5.70E+01 2.81E+01 2.05E+01 1,000 0.492 0.360
Range 625 362 250 1.000 0.579 0.400
Equations 1 through 7 and the FEA determined that the best design for the hinge was a rectangular geometry due to the high stiffness ratios. The rectangular design incorporated high stress concentrations at the corners where the bending occurred. In order to eliminate these high stress concentrations a fillet was added. FEA was used again to optimize the fillet diameter. A force of 0.2N was applied with uniform distribution. A solid mesh was used with a mesh element size of 0.17 mm. Each hinge measured 3 mm tall with a hinge length of 2 mm and a 2 mm square base. The radius of the fillet was varied from 1/10 the dimension of the hinge length
to 2 the hinge length, or from 0.2 mm to 1 mm. The thin hinge dimension measured 0.2 mm.
The hinge was again analyzed in the compliant bending direction, the stiff bending direction, and the axial direction. The results of the analysis are displayed in Table 3 below and normalized for easy comparison in Table 4.
Table 3: Absolute Fillet Radius Comparison
R = 1/10 L R = 1/ L R = 1/4 L R = 1/3 L R = 1/2 L Mx o Mfises 3.44E+07 3.09E+07 2.,87E+07 2.67E+07 2.23E+07 Equivalent 1. 08 -0 06E-04 1, 07E-04 1.02E-04 7,70E-05
Strain y
(. (m7) 3.96,E-06 3.22E-06 2.84E-06 2.23:E-)6 1.09E-06 UJ (mn) 8.26E-09 7.00E-09 7.00E-09 5.44E-09 3.78E-09
Z (rn.) 7.41E08 664E-06.64E08 64E-08 5.55E-0S 4.21 E-08
k (N/m) 5.05E+04 6.21E+04 7.03E+04 8.96E+04 1,83E+05
k, (N/m) 2.42E+07 2.86E+07 2.86E+07 3.68E+07 5.29E+07
kz (N/nm) 2.70E+06 3.01E+06 3.01E+06 3.601+0i 4.7E+06
k, 4.80E+02 4.60E+02 4.06E+ 102 4.10E +02 2.89E+02 ky
5.34E+01 4,85E+01 4.28E+01 4.02E+01 2.60E+01
Range 4.03E+01 3.65E+01 3.47E+01 2.93E+01 1.71E+01
Table 4: Normalized Fillet Radius Comparison
R = 1/10 L R = 1/5 L R = 1/4 L R = 1/3 L R = 1/2 L
Max von Mises 1.00 0.90 0.83 0.78 0.65
y (N/n,) Equivalent 1.00 0,98 0.99 0.95 0.71 Strain y Up (m) 1.00 0.81 0.72 0.56 0.28 L. (m) 1.00 0.85 0.85 0.66 0.46 rU (mn) 1.00 0.90( 0.90 0.75 0.57 k, (N/rn) 0.28 0.34 0.38 0.49 1.00 k (N/rn) 0.46 0.54 0.54 0.69 1.00 k0 (N/m) 0.57 0.63 0.63 0.76 1.00 kx 1.00 0.96 0.85 0.86 0.60 kv kZ 1.00 0,91 0.80 0.75 0.49 Range 1.00 0.91 0.86 0(.73: 0.43 (p)m ,)
Based on the stiffness ratios, the 0.2 mm radius fillet was selected. As in the previous hinge analysis, the most important qualification of the hinge was that it remain as compliant as possible in the compliant lateral direction while maintaining high stiffness in the stiff lateral and axial directions.
The top of the hinge was designed with a cutout to hold the 1.59 mm diameter ball. The cutout was filled in with epoxy to secure the ball in place. The hinge fits into the 2mm square holes in the HexFlex by the same snap fit legs that were designed for the groove (section 2.2). The final flexure hinge design is shown below in Figure 15.
Figure 15: Final Flexure Hinge Design
2.2
Groove Design
The groove components of the kinematic coupling were designed to be mounted to the aluminum plate that the HexFlex sits on. Two concepts were developed in the design of the groove, including an epoxy-made groove and a machined insert. The epoxy-made groove consisted of placing a mound of epoxy on the hole in the aluminum plate where the groove would be situated; the epoxy would then be imprinted with a triangular or cone-shaped impression such that upon its removal the epoxy would hold the shape of the groove.
The machined insert consisted of designing a separate piece that would be mounted to the aluminum plate. These two concepts were compared in terms of stiffness, manufacturability, load capacity, stability over time, and thermal performance. The insert showed a clear advantage
over the epoxy-groove with respect to load capacity, stability over time, and thermal performance. The epoxy showed the only advantage of being easier to manufacture, but the uncertainty of performance over time and thermal variations led to the selection of the insert.
Once the insert was chosen as the optimal groove mechanism, a few different options were considered in terms of how to secure the insert to the aluminum plate. The first option was to design a simple insert that would fit into a hole machined into the plate. The insert would be made undersized and the excess around the hole filled with epoxy. This idea was dropped due to the earlier mentioned thermal instability and creep of the glue; since a critical design requirement is fine repeatability these inconsistencies proposed too high of a risk to the performance of the coupling.
The second option was a thermal expansion press fit in which the insert would be cooled and inserted into the hole and then heated so that it would expand to a tight fit. This concept was appealing, as it would eliminate any forcing of the insert into the delicate silicon HexFlex hole upon insertion of the hinge, as the hinge used the same design for mounting to the HexFlex. The necessary temperature to cool the insert to in order for it to fit the hole accordingly was
determined by
T =L Linitial
inal inal Tinit nitial (8)
aLinitial
Where Lfinal is the expanded length of the part, in this case 2.00 mm, Linitial is the cooled length of the part, in this case 1.99 mm, a is the coefficient of thermal expansion for stainless steel (chosen material) which is 17.3 x 10⁻⁶, and Tinitial is the temperature at which the piece is originally cooled from, in this case room temperature, about 230C. Solving Equation 8 for Tfinal resulted in the insert having to be cooled to a temperature of -266.60C, which ruled this design out due to difficulty in reaching that temperature.
The final option was a snap fit design where the piece would snap into place. A benefit of this option was that it allowed for the insert to be removed and reinserted, whereas the glue option requires permanent assembly. Unlike the glue-in and thermal press fit assemblies or typical bolted or screw-in assemblies, the snap fit is exempt from creep, vibration-proof, and robust in addition to being a quick and simple assembly. No extra steps or parts (i.e., heating or gluing) are required for a snap fit assembly. One of the most important considerations for the snap fit design was that the snap-in and snap-out forces be enough to hold the insert in place
without putting so much stress on the brittle silicon HexFlex as to break it. In the press fit design, both the insert and the HexFlex would be under a constant stress, thus increasing the risk of breaking the HexFlex. In the snap fit, however, the silicone is only under a high stress state during the insertion process. The snap fit for the groove and hinge was designed to have two cantilever-type snaps. A cantilever beam with labeled geometry is diagramed in Figure 16.
F
b
/
h
L
Figure 16: Cantilever Beam Geometry and Forces
It was important to design the snap fit such that the residual stress in the cantilevers after the groove was inserted into the silicon hole was less than the fracture stress of silicon (7000 MPa) to ensure that the HexFlex would not break upon insertion of the coupling grooves. The stress in the cantilever was calculated by
3E'
2
= (9)
2L2
Where a is the stress, 6 is the deflection of the cantilever, E is the Young's modulus, h is the cantilever height, and L is the length.
Using the relationship a=Ee, Equation 9 can be manipulated to calculate the strain in the cantilever by
33h
= (10)
2L2
It was also important to design the snap fit for easy insertion and removal, which is driven by the deflection and spring constant of the cantilever.
The deflection may be calculated by
FL3
3
= (11)
Where 6 is the cantilever deflection, F is the exerted force, L is the cantilever length, E is the Young's modulus of the material, and I is the moment of inertia, which for a rectangular beam can be calculated by
bh3
I b (12)
12
Where b and h are the cantilever width and height, respectively. The spring constant, k, is calculated by
k= E.hj (13)
4 L
Equations 9 through 13 were used to construct a solid model of a snap fit groove, and Cosmosworks FEA was performed on the solid model to confirm that with an applied insertion force of iN, the residual stress in the cantilevers would be approximately 50,000 Pa, which is 100,000 times smaller than the fracture stress of silicon. The optimized snap-fit design is shown in Figure 17 below and was sent in for a fabrication price quotation.
Figure 17: Groove Snap-Fit Design
This design had high manufacturing costs due to the small snapping "feet." To reduce costs a modified design was considered. The feet were removed and it was decided that the legs of the groove would be plastically deformed after insertion to hold the groove securely in place rather than being secured by the feet. The final design is shown in Figure 18.
Figure 18: Final Modified Groove Snap-Fit Design
The final ball-groove interface of the coupling and the entire HexFlex-coupling assembly are shown in Figure 19 below.
inematic Coupling
CHAPTER
3
FABRICATION AND ASSEMBLY
Fabrication was an important consideration in the design of the kinematic coupling parts. The small sizes of the groove and hinge inserts surpassed the limitations of in house machining capabilities, so the manufacture of these parts was outsourced to be made by electron discharge machining (EDM). Wire-EDM is manufacturing process commonly used to machine features on the micrometer scale with high accuracy. This process is done by creating an electrical discharge between the charged wire and the work piece, which is submerged in dielectric fluid. Material is removed from the work piece by this discharge jumping across the gap between the wire and the work. Since the wire and the work piece never touch, no stress acts on the work piece, thus wire EDM can be used to machine complex parts and precision details from hard conductive materials.Material characteristics were important to take into consideration, especially to prevent the fixturing system from interfering with the actuation of the HexFlex; thus it was important that the material chosen for the kinematic coupling components to be non-magnetic. Stainless steel 304 was selected because it is non-magnetic, does not rust, is hard and stiff, and is easy to EDM. The final machined groove and hinge components are seen in Figure 20.
Figure 20: Groove and Hinge Manufactured by EDM
The 1.59 mm diameter balls were mounted on top of the flexures, surrounded by epoxy that filled in the gap between the ball and the cut-out in the top of the flexure. The hinges were then mounted into the 2 mm square holes in the HexFlex and the grooves into the 2 mm x 4 mm rectangular holes in the aluminum plate. The legs of the clips were then plastically deformed to ensure a secure fit. An assembled ball side of the coupling can be seen in Figure 21 below, mounted to a sample silicon HexFlex.
CHAPTER
4
REPEATABILITY TESTING
A sample kinematic coupling system consisting of the coupling and a mock HexFlex and plate was assembled for testing. The assembled kinematic coupling test system is shown in Figure 22. The aluminum hexagon-shaped plate was machined on a CNC milling machine. The plate measured 12.7 mm deep with a pocket milled 10.16 mm deep to hold the mock HexFlex. Holes for the grooves to fit into were milled with dimensions of 2 mm x 4 mm. In order to get the most accurate test results, the motion of the center of the HexFlex was constrained. Thus a rigid stainless steel hexagon piece was machined on the water jet. The hinges were mounted in the 2 mm x 2 mm holes in the hexagon piece.
(a) (b)
Figure 22: Assembled Kinematic Coupling for Testing
Six capacitance probes were used to measure the position of the coupling in six degrees of freedom. Figure 23 shows the test system and the orientation of the capacitance probes. A
rigid aluminum cube was mounted to the top of the steel hexagon in order to preload the coupling as well as to provide sufficient surfaces for all six capacitance probes to measure off of. A testing fixture was fabricated to position the capacitance probes around the coupling; the probes were secured in place by adjustable flexural clamps. Probes 1, 2, and 3 were clamped to the top flexure plate, measuring the out of plane position of the coupling; probes 4 and 5 were mounted to one side, measuring in plane position, while probe 6 was secured at a 90 degree
angle from probes 4 and 5, also measuring in plane position. A DSpaceTM program was set up to obtain the readings from the probes.
Figure 23: Test Set-Up
The system was bolted to an air table to eliminate vibrations. High pressure grease was used at the ball-groove interface to reduce friction and contact wear, allowing the ball to settle into its lowest energy state in the groove. Noise in the system was determined by measuring variations in position as the test system sat still; the noise measured to be on the order of 15 to 20 nanometers. In order to reduce the random noise, the system was grounded by attaching one end of a copper wire to the aluminum block and the other end to ground, shown in Figure 24. The system was also surrounded by an aluminum foil cover to reduce any electrical noise. The grounding and aluminum foil cover reduced the noise in the system to between four and ten nanometers.
Figure 24: Electrically Grounded Test Set-Up
The coupling was uncoupled and coupled by lifting the cube and replacing it for a total of 33 cycles. It was important to prevent any thermal energy from entering the system so the cube was lifted by a wooden dowel. The order of engagement was kept constant; the balls were lifted off of the grooves and replaced in the same order for each test cycle. The coupling was allowed a 20 second settling time before acquiring readings from the capacitance probes. The 200 point average displacement over a 10 second time period was measured and recorded.
CHAPTER
5
RESULTS AND CONCLUSIONS
The coupling repeatability in 6 degrees of freedom was calculated from the raw data collected from the six capacitance probes over 33 testing cycles. The probes are numbered and their arrangement is diagramed in Figure 25 below. The x-axis position was obtained directly from the reading from capacitance probe 6. The y-axis position was calculated as the average of the readings from probes 4 and 5 since probes 4 and 5 were centered around the center of the cube and parallel with each other. The z-axis position was calculated as the average of readings from probes 1, 2, and 3 since probes 1, 2, and 3 were arranged in an equilateral triangle centered around the center of the cube. The Ox position was calculated by the difference in the readings from probes 3 and 1 divided by the distance between them, using a small angle approximation to
approximate the tangent of the angle Ox as Ox. The 0y position was calculated by the difference in the readings between probe 2 and the average reading of probes 1 and 3 divided by the distance between probe 2 and the center between probes 1 and 3. The Oz position was calculated by the
difference in the readings from probes 4 and 5 divided by the distance between probes 4 and 5.
Figure 25: Capacitance Probe Arrangement
The mean data values were calculated and the readings were normalized to the mean values. The displacements from the mean reading in six degrees of freedom were plotted. Results of the repeatability tests are summarized in Figure 26 with error bars according to the noise in the system.
X Repeatability
0 5 10 15 20 CycleOx Repeatability
25 30 35 0 5 10 15 20 Cycle 25 30 35Y Repeatability
10 0o
u 0 10 20 30 CycleZ
Repeatability
10 0o -10 10 20 30 CycleOy Repeatability
lit
0 10 20 30 41 CycleOz Repeatability
I
0 10 20 30 4 CycleFigure 26: Repeatability Test Results
60 40 20 0 -20 -40 -60 60 40 20 0 -20 -40 -60 0
,,n
,.S
0 E r- I-L W -- I I IThe three-dimensional repeatability in x, y, and z was also calculated by taking the square root of the sum of the squared x, y, and z displacements. The three-dimensional repeatability was normalized to the mean and plotted in Figure 27.
40
20
E
0L-W
-20
-40
Translation repeatabili
10
20
30
Cycle
Figure 27: 3D Translational Repeatability
The repeatability was measured by one standard deviation and three standard deviations from the mean of the data. The 1-a and 3-G repeatability in each degree of freedom is summarized in Table 5.
X (tm) Y (pm) Z (pm) 0x (prad) O, (prad) Oz (prad) 3D (fm)
a 0.028 0.020 0.019 3.505 3.905 2.573 0.023
3 0.084 0.060 0.056 10.515 11.714 7.719 0.068
Table 5: 1-o and 3-a Repeatability Measurements
In many kinematic couplings, there is a wear-in period due to deformation and brinelling of the surface roughness of the ball and groove as they make repeated contact. No obvious wear-in was observed wear-in this couplwear-ing for the 33 cycles measured. This could be because not enough
coupling cycles were measured or because the addition of the flexures and the lubrication decreased the consequences of the surface roughness.
The test results conclude that the developed meso-scale kinematic fixturing system is repeatable on the scale of tens of nanometers and 3.5 microradians. Past kinematic couplings have been observed to be repeatable to a range of tens of nanometers to micrometer. The high performance of this coupling can be attributed to the addition of the flexural hinges as well as the lubrication, polished ball surface, and fine EDM surface finish of the grooves, all of which reduce the friction at the coupling interface.
The outcomes of this research include an optimized design and prototype of a meso-scale detachable kinematic fixturing system for probe-based nanomanufacturing equipment. The fixturing system is repeatable on the scale of tens of nanometers, which will enable quick and elegant precision assembly of the HexFlex to the SenseFlex nanopositioning system. The fixturing system will be modified and expanded for broad use in alignment and positioning of nanomanufacturing instruments and equipment, thus improving cost, quality, rate, and flexibility in nanomanufacturing. This kinematic fixturing design can also be implemented in the fields of optics, wafer processing, and small-scale machine design as a method of highly repeatable alignment and fixturing.
CHAPTER
6
FURTHER WORK
The purpose of this research was to understand the effect and promise of flexures on fixtures for nanomanufacturing processes, which is important because it improves the alignment and positioning of parts and tools relevant to these processes. The impact of this research is that we have allowed fixturing technology to reach a level that allows for cost-appropriate and repeatable alignment with improved rate and quality. We have successfully generated a low-cost, meso-scale, detachable kinematic fixturing system that is repeatable to 10s of nanometers for the SenseFlex nanopositioning system for use in DPN. Next steps include performing additional testing on the test kinematic coupling assembly to validate the 33 cycle repeatability tested in this thesis. The coupling will be autonomously coupled and decoupled for up to 1000 cycles. This will allow for observation of any wear-in that occurs as the balls and grooves make contact for repeated cycles.Additionally, the test assembly will be used to determine and improve the accuracy of the kinematic coupling. Accuracy as well as repeatability is highly critical for applications in DPN equipment beyond the coupling of the HexFlex to the plate. Further research has already been started to generate the knowledge, technology, and methods that are required to design and fabricate kinematic fixtures that are both accurate and repeatable. This continuing research will include the construction of an adjustable fixturing system that will be based on the kinematic coupling discussed in this thesis. In addition to the repeatability requirements, there are accuracy requirements that must be fulfilled. Achieving accuracy with a kinematic coupling requires calibration. Thus the fixturing system will be an adjustable kinematic coupling partnered with a calibration system that will correct for alignment errors. The calibration will be achieved by the design and fabrication of a micro-vision system that will allow for errors between actual and desired probe tip position to be identified and corrected for. After adjusting any misalignment,
the fixture will be permanently set by a UV-curing epoxy in an accurate, stable, and calibrated position.
An accurate and repeatable alignment and fixturing system will allow for improvements in the DPN industry, including improvements in rate, quality, and reliability of accurately attaching DPN tools. It will also establish limits for alignment capacity, as well as accuracy and repeatability limits for tool change fixtures. Finally, this research will help determine a relationship between fixture design, added cost, quality of alignment, and tool change rate. The general kinematic coupling fixturing design can be used to generate custom fixtures, calibration equipment, and calibration processes. Such a fixturing system will advance the automation in the DPN process, thus leading to benefits in cost, rate, quality, and flexibility, thus advancing the
REFERENCES
[1] DiBiasio, Christopher M., Culpepper, Martin L., Whitson, Michael J. "Design of a Meso-Scale Six-Axis Nanopositioner with Integrated Position Sensing." Proc. of the 2008 International Symposium for Nanomanufacturing, 2008.[2] R. Piner, et al. "Dip-Pen Nanolithography." Science, January 1999. Volume 283, pp 661-663.
[3] Culpepper, Martin L. "Massively Parallel Positioning of Dip-Pen Lithography Arrays." Ohio State University Proposal. September, 2006.
[4] Culpepper, Martin L. ASPE 2007 Kinematic Coupling Tutorial.
[5] Slocum, A. H., 1992, "Precision Machine Design", Prentice-Hall, Inc., Englewood Cliffs, New Jersey , pp. 401-412.
[6] MIT Precision Engineering Research Group. "Kinematic Couplings Website." <<http://pergatory.mit.edu/kinematiccouplings/index.htm>>.
[7] Slocum, A.H. "Kinematic Coupling Design Spreadsheet." Kinematic Couplings Website: General Kinematic Coupling Design Tools.
<<http://pergatory.mit.edu/kinematiccouplings/index.htm>>.
[8] Paros, J.M. and Weisbord, L. "How to Design Flexure Hinges." Machine Design, 1965. Volume 37, No. 27, pp 151-156.
APPENDIX
KINEMATIC COUPLING DESIGN
SPREADSHEET
Appendix A contains the relevant portions of the kinematic coupling design spreadsheet created by MIT Professor Alex Slocum. The spreadsheet in its entirety can be accessed at <<http://www.kinematiccouplings.org/>>.
Kinematic Coupling3GrooveDesignt.xis Spreadsheet to design three groove kinema couplings.
Written by Alex Slcum. Recently modified 11/ 172000 by John Hart and /3!2005 by Patrick Wiloughvby Max shear stress criteron updated on 6/17 2004 by Slocum
tnstructions:
1 Color codw
Red Bold = User required
R: -System calculates, user can change desied
Blue Bold = FinaI results
Blue -Irtemal values to help user select inputs
1 -Internal calculations, diange withi care
2. SETUP FOR METRIC UNITS OF IN, m BE CONSISTENT WITH UNITS THROUGHOUT
3. XY plare is assumer. to centai, the ball centers
4 For star rd CoupIrin desanrs, rSntat frces are rirned at 45 the XY pllane
For r stiadart dss ns, eter geometry and materals into require spaces in Geometr iData Entl Section b aw.
Input Parameters:
Coupling Geomefry:
Staard 120 dere equal se
groocoup TRUE Dbetqr lb75E03 Rbmineor 79375E-04 Rgreove = t.OoE,0 Costieta = TRUE Coupling= 3.4It7E-02 Equivale/t Radius- 0.00602467 Stress Ratio 023 Error Repotting L ocation:
Xerr 0 000
Yerr= 0.000
Zerr 0 000 Afateal Selection:
Auto select nastea/ va~les, MERIC units ae used (N rml all Material Value= 2
Groove ate~nrieiValue= 2
Mn :aeid strngth (Pa, pal
Equivalent diameter bat that wou crdta the groove t the same points
Minor radius
MaFor radius
Groove adtius (neative for a trough)
Is ball major radius ablog groove axis? Couping diameter
Calculated equivaernt radius of ifteracing elemerts
Calculated rat of ontacl stess to al able stressf r this gemetry
X location of error reporting Y locatin of error reporting
Z location of errorteporti
Enter I for plastic
Enter 2 fr steel
Enter 3 for carbde
En ter 4 for User Speedf ed
Enter for different materials for each elenert ard enter -ns r Geometry Data Eitry area H(Er may appear ntil numrbers are entered)
1,712E409 2498550725
Material properties: hertz stress Plastlc 34E+7 RC 62 8itl i1- iLE.
U arbSpdce 2E08
User Specfie .75L108
System Forces:
Fpreload= -1.63E000
Appied orces X,% 2 values nd coordinates
FLx z O00
FLy = 0.00
FLy =4.00
Prelead force ver each al iN)
XL= 0,000 YL= 0000 ZL 0.000 Poisson raio 0120 : OE+ i -C, 80L- i 0 Coupibn gerid xc 000 yc.000 c 0.000 ~- --
~-Results: Hertz stresses and deformations
Bal-Groove I
Max shear stress/ (ut Contact ellise
Groove normal forces Contact stress (Pa) tensie/2) Deflection (+into ball) Rmajor (m) Rminor (m)
Fbnone 2.12E-01 si ne 6,55E+08 0.23 delone -2.33E-07 1.82E.05 8.5 E.0
Fbntwo 2.12E-01 sigtwo 6.55E+08 0.23 deltwo -2.33E.07 1.82E.05 8.51 E.0
Ball-Groove 2
Max shear stress/ (t. Contact ellipse
Groove normal forces Contact stress (Pa) tense/2) Deflection ball Rnao~r r (m) Rminor (m E+into
Fbnthree 2.12E-01 sigthree 6.55E+08 0.23 delthree -2,33E-07 1.82E-05 8.51E0
Fbnfour 2.12E-01 siour 6,55E+08 0.23 delfour -2.33E07 1.82E.05 8.51 E06
Ball-Groove 3
Ma shear stress/ (uit. Contact ellipse
Groove normal forces Contact stress (Pa) tensile/21) Deflection (+into ball) Rmaior (m) Rminor fm)
Fbnfive 2.12E.01 sigfive 6.55E+08 0.23 delfive -2.33E-07 1.82E-05 8.51 E06
Fbnsix 2.12E-01 sigsix 6,55E+08 0.23 delsix -2,33E-07 1.82E-05 8.51 E06
Results: Error motions
Error motions are at X YZ coordinates: 0.000 0.000 0.000
deltaX= 2,80E-23 EpsX= 0,00E+00
deltaY= O,00E+00 EpsY= -5.93E-21
deltaZ= .2.09E-07 EpsZ= -1.29E.21
Maximum Delta= 2.80E-23 Maximum Eps= 0.00E+00
RMS Delta= 2,09E-07 RMS Eps= 6,07E-21
Homogenous Transformation Matrix:
1,00E+00 1.29E-21 -5.93E-21 2.80E-23 -1.29E-21 1.00E+00 0.00E+00 0.00E+00
5.93E-21 0.OOE+00 1.00E+00 -2.09E07
0.00E+00 0,00E+00 0.0OE+00 1.00E+00
RMS force (N)= 4
![Figure 1: HexFlex nanopositioner and the 6 degree-of-freedom motion its central stage achieves [11]](https://thumb-eu.123doks.com/thumbv2/123doknet/14684952.559999/9.918.132.853.768.1017/figure-hexflex-nanopositioner-degree-freedom-motion-central-achieves.webp)
![Figure 4: Image of the DPN nanomanufacturing array: Note various components have been removed to enhance clarity [1]](https://thumb-eu.123doks.com/thumbv2/123doknet/14684952.559999/12.918.266.698.118.435/figure-image-nanomanufacturing-various-components-removed-enhance-clarity.webp)
![Table 1: Common Alignment Mechanisms [4]](https://thumb-eu.123doks.com/thumbv2/123doknet/14684952.559999/13.918.113.813.726.1046/table-common-alignment-mechanisms.webp)
![Figure 5: Cost and Repeatability Comparison for Alignment Mechanisms [4]](https://thumb-eu.123doks.com/thumbv2/123doknet/14684952.559999/14.918.117.815.143.307/figure-cost-repeatability-comparison-alignment-mechanisms.webp)
![Figure 6: A generic 3 groove kinematic coupling [4]](https://thumb-eu.123doks.com/thumbv2/123doknet/14684952.559999/15.918.317.678.131.296/figure-generic-groove-kinematic-coupling.webp)
![Figure 8: Ball and Groove Layout for Optimal Stability [6]](https://thumb-eu.123doks.com/thumbv2/123doknet/14684952.559999/16.918.254.713.211.575/figure-ball-groove-layout-optimal-stability.webp)
![Figure 10: Hinge dimensions and various loads which cause deflection [8]](https://thumb-eu.123doks.com/thumbv2/123doknet/14684952.559999/18.918.245.661.105.609/figure-hinge-dimensions-various-loads-cause-deflection.webp)
