Design of a Humanoid Biped for Walking Research
by
Daniel Joseph Paluska
Submitted to the Department of Mechanical Engineering
in partial fulfillment of the requirements for the degree of
Master of Science
at the
MASSACHUSETTS INSTITUTE OF TECHNOLOGY
September 2000
@
Massachusetts Institute of Technology 2000
Signature of Author
MASSACHUSETTS INSTITUTE OF TECHNOLOGYOCT 0
2
2003
LIBRARIES
MASSACHUSETTS INSTITUTE OF TECHNOLOGYLIBRARIES
Department of Mechanical Engineering
August 31, 2000
C ertified by ...
.
-Gill A. Pratt
Assistant Professor of Electrical Engineering and Computer Science, MIT
Thesis Supervisor
Certified by...
Ernesto
Blan6'0--Adjunct Professor of Mechanical Engineering, MIT
Thesis Supervisor
A ccepted by ...
Ain onin Chairman, Departmental Committee on Graduate Students
Design of a Humanoid Biped for Walking Research
by
Daniel Joseph Paluska
Submitted to the Department of Mechanical Engineering on August 31, 2000, in partial fulfillment of the
requirements for the degree of Master of Science
Abstract
This thesis presents the design of the robot M2. The primary motivation behind the work is to create a platform for research into bipedal walking. Bipedal robots have been built in the past, but most of them relied heavily on lessons from robotic arm research. There is evidence that suggests actuation and design for legged locomotion should deviate from the past standard of robotic arm design. Specifically, there should be an emphasis on low impedance actuation, shock tolerance, passive control mechanisms, and weight reduction. Human data which supports these points is presented.
The robot M2 was designed with these things in mind. M2 is a humanoid bipedal robot with twelve active degrees of freedom. It is essentially a torso and two legs and with linear dimensions of a 50th percentile US male. It weighs approximately 60 lbs(25kg). All the active degrees of freedom are powered using Series Elastic Actuators, which provide force control and shock tolerance. For simplicity, degrees of freedom above the hip are absent.
Thesis Supervisor: Gill A. Pratt
Title: Assistant Professor of Electrical Engineering and Computer Science, MIT Thesis Supervisor: Ernesto Blanco
3
Acknowledgments
The development of the robot has been a three person project from the beginning. Jerry Pratt and David Robinson worked on the robot with me. Jerry performed preliminary simulations to determine feasibility of mass distributions and power requirements. David Robinson is responsible for the actuator design. I also had lots of help from Ben Krupp and Chris Morse who each had there own robot to build in the process. Pete Dilworth contributed plenty of tips from his own bipedal robot building experience. Allen Parseghian has been working hard with me trying to get the robot to actually walk. John Hurst has helped with debugging some actuator problems and designing a battery rig. Thanks to Mike Wessler and Andreas Hofmann for creation of and help with software tools. Thanks to Chris Barnhart for developing the DSP platform and handling my ignorance of all things DSP.
During the construction, I had help from many people. We had several soldering parties in the lab which involved people sitting around the main lab table soldering. Jerry, Ben, Chris, Mike, Gaddy, Pete, and others participated in these. In addition, Jess helped me with cable making and was an immense help with my supposed native language.
Professor Pratt has been a wonderful advisor. I am constantly amazed at how he has always placed his students first. I have loved working in the lab and getting to play around!
Special thanks goes to my friends and family who have made the time outside the lab great! You've kept me sane during the worst of thesis despair.
Contents
1 Introduction 9
1.1 Goals of Thesis . . . . 9
1.2 Summary of Thesis . . . . 10
2 Human Characteristics 11 2.1 The Human Form . . . . 11
2.1.1 W eight Distribution . . . . 11
2.1.2 Link Lengths . . . . 11
2.2 Human Motion . . . . 14
2.2.1 Energetics of Human W alking . . . . 14
2.2.2 Human Kinetic and Kinematic Data . . . . 15
3 Robots and Actuators 16 3.1 Robotic Arms vs. Robotic W alkers . . . . 16
3.2 Passive Dynamic W alkers . . . . 16
3.3 Powered Bipedal W alkers . . . . 17
3.4 Series Elastic Actuators . . . . 17
4 Robot Mechanical Design 19 4.1 General Robot Architecture . . . . 19
4.2 The Design . . . . 19 4.2.1 Overall Structure . . . . 19 4.2.2 Actuators . . . . 22 4.2.3 Ankle . . . . 22 4.2.4 Foot . . . . 22 4.2.5 Hip . . . . 24 4.2.6 Knee . . . . 25
5 Electronics and Control Systems 27 5.1 Electronics Overview . . . . 27
5.1.1 48 Volt bus . . . . 27
5.1.2 Robot Sensors . . . . 27
5.2 Custom Circuit Boards . . . . 29
5.2.1 The Signal Conditioning Boards . . . . 29
5.2.2 The Analog Force Control Boards . . . . 29
5.2.3 The Analog Breakout Board . . . . 31
5.2.4 The Power Distribution Boards . . . . 31
5.2.5 The DSP and Analog I/O . . . . 31
5.3 Control Software . . . . 31
CONTENTS 5
A Joint Math 34
A .1 K nee Joint . . . . . 34
A.2 Ankle Joint ... ... 36
A .3 H ip Joint . . . . 37
A .3.1 H ip P itch . . . . 37
A .3.2 Hip Roll and Yaw . . . . 37
B Electrical Schematics 39 C Suppliers and Costs 50 C .1 C osts . . . . 53
List of Figures
2-1 The X velocities of the various parts of the body during a normal walking cycle. Adapted from data in Winter(20). . . . . 12 2-2 The frontal plane dimensions of a 50th percentile U.S. male. Adapted from data in
Dreyfus(2). All dimensions are in inches. . . . . 13 2-3 Several strides of the compass gait shown with corresponding potential and kinetic
energy curves. From Krupp(8). . . . . 14
3-1 Some previous powered bipedal walking robots. . . . . 17
3-2 An annotated rendering of the Series Elastic Actuator which is used in the robot M2.
Modeled and rendered by David Robinson. . . . . 18
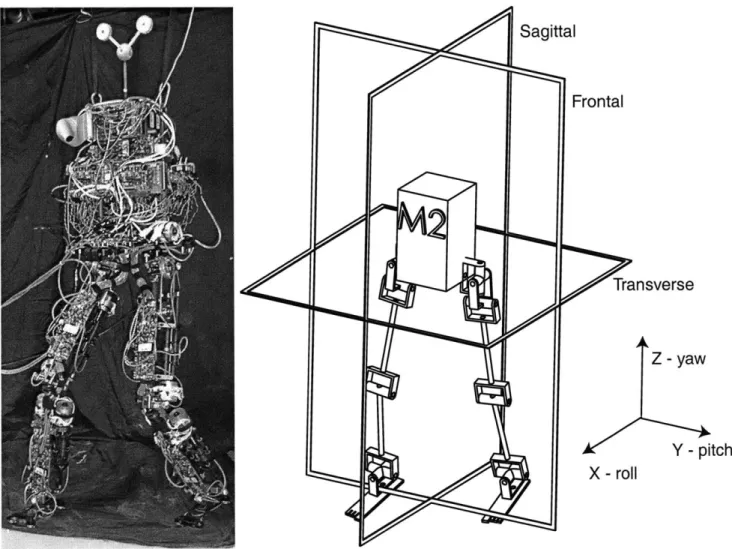
4-1 A photo of the completed robot and a joint schematic view of the robot. The schematic shows active degrees of freedom only. The optional passive toe joint is not shown. . 20 4-2 The dimensions of the biped in the frontal plane. The body and links are
approxi-mately axially symmetric about their longitudinal axis. Dimensions are in inches. 21 4-3 A schematic of the ankle joint actuation scheme. The axes shown are fixed to the
center of the universal joint. The points A,E, and 0 are referenced in Appendix A. 23
4-4 The dimensions of the biped foot with passive toe joint. The X's represent the location of the load cells. . . . . 23
4-5 A schematic of the biped hip. The pitch actuator is not shown. It lies along the axis of the thigh . . . . 24 4-6 A photo of the biped thigh illustrating the hip pitch cable drive system. . . . . 24 4-7 The ranges of motion on the robot ankle joint. The ankle roll is symmetric(+- 20 deg). 25 4-8 The range of motion of the robot knee. The knee has 80 degrees of motion. . . . . . 26 5-1 An overview of the biped electronics. Thick lines indicate power transfer and
arrow-heads indicate information flow. . . . . 28
5-2 A photo of M2 with annotations of electrical systems. . . . . 29
5-3 A photo of the biped strain gauge signal conditioning board. This board handles two
strain gauges. There are a total of four of these boards on the robot. . . . . 30
5-4 A photo of the analog force control and joint pot buffer board. There are six identical boards on the robot. . . . . 30 A-1 The robot knee joint with superimposed lines and points. Points 0, A and M all refer
to pin joints. 0 is the knee joint. M is where the actuator is mounted to the thigh and A is where the actuator is attached to the shin. . . . . 35 A-2 A line drawing of the knee for the calculation of knee actuator desired force. The
actuator is the line segment MA. This drawing also pertains to the geometry of the hip and ankle joints but the hip and ankle actuators have motions out of the plane whereas the knee actuator is always in the plane perpendicular to the knee axis. . . 35
LIST OF FIGURES
A-3 A simple view of the actuation of the robot ankle. This is a tranverse plane slice of
the robot ankle. Point 0 is the intersection of the X and Y axes as well as the center of the ankle universal joint. Points Al and A2 represent the attachment points of the two actuators respectively. Forces in the actuators create torques about both the X and Y axes. Joint rotations change the relative lengths of the X and Y projections(rz and ry) of the moment arms, therefore affecting the torque to force transformation. 36
A-4 The robot hip joint schematic. Point 0 refers to the hip universal joint. The Z(hip yaw) and Y(hip roll) axes intersect at point 0. Point Mr refers to the universal joint on the body where the roll actuator is mounted. Point A, refers to the ball joint on the thigh where the roll actuator is attached. Point MY refers to the pin joint where the yaw actuator is attached to body. Point Ay is the pin joint attachment of the yaw
actuator to the yaw universal block. It is hidden in this schematic. . . . . 37
B-1 Page 1 of 6 of the biped force board. . . . . 40
B-2 Page 2 of 6 the biped force board. . . . . 41
B-3 Page 3 of 6 of the biped force board. . . . . 42
B-4 Page 4 of 6 the biped force board. . . . . 43
B-5 Page 5 of 6 of the biped force board. . . . . 44
B-6 Page 6 of 6 the biped force board. . . . . 45
B-7 Page 1 of 2 of the strain gauge conditioning board. . . . . 46
B-8 Page 2 of 2 of the strain gauge conditioning board. . . . . 47
B-9 Page 1 of 1 of the analog I/O breakout board. This board is designed to interface with the ANA070 and ANA064 from Digital Designs and Systems. . . . . 48 B-10 Page 1 of 1 of the M2 power distribution board. This board has two different
popu-lation options. One to power the DSP and one to power the Intersense IS-300 tracker. 49
List of Tables
2.1 Human Mass Distribution. From Dempster(3). . . . . 11
2.2 Human walking parameters from normalized data contained in Human Walking(18). Forces and power calculated for a for 1.83 m(6'2"), 80 kg(1781b) person. Table displays
non-concurrent maximum values which occur during an average walking cycle. . . . 15
4.1 Robot Joint Specifications. Torque and rad/s numbers are given for maximum mo-ment arm. Power, torque, and velocity are symmetric due to the actuator. *The ankle roll and pitch are not independent. Their maximum values can not be applied sim ultaneously. . . . . 19
4.2 Approximate distribution of mass in humans, the biped M2, and McGeer's kneed pas-sive dynamic walker(PDW). Human data adapted from Dempster and Gaughran (3). Robot weight distribution is driven primarily by actuator locations. Each actuator is approxim ately 1.2kg(2.5 lbs). . . . . 22
5.1 Circuit Boards on the Robot . . . . 27 5.2 Sensors on the Robot . . . . 28
C.1 Basic robot budget. See Robinson et al.((17)) for more detail on the actuator. This
budget does not include prototyping or development costs. Part quantities and indi-vidual costs are not necessarily meant to imply identical parts but rather to give an average price for all units of a certain type. . . . . 54
Chapter 1
Introduction
1.1
Goals of Thesis
The goal of this research project was to design a three dimensional, free standing bipedal robot. The main goal of the biped, M2, is to be a testbed for control ideas and walking research. Originally the robot was not specifically 'humanoid,' but after a bit of research we determined it would be the best course of action for several reasons.
" There is a vast amount of data regarding human form and motion.
" The robot can be considered a human replacement for hazardous situations. " The robot will be large enough to avoid problems of miniaturization.
" Ideas regarding human control of locomotion can be tested.
This thesis concentrates on documenting the mechanical portion of the project. The design of the robot was guided by several specific goals which include walking 1 m/s, climbing normal stairs, looking biological, turning dynamically, a three year life-span, and ten hours working time between mechanical or electrical failures.
The following points dominated the design decisions of the robot.
1. Series Elastic Actuators Series Elastic Actuators(12) are used for all of the active degrees
of freedom. These actuators provide force control as well as shock tolerance. Evidence sug-gests both factors are necessary for the task of biologically similar walking. The low output impedance of the actuators allows us to take advantage of the robot's natural dynamics. All joints employ the same actuator design to minimize complexity and facilitate repairs.
2. Human Proportions The use of human proportions allows for easy comparison with biome-chanics data. Human sizing also allows for use of large, standard components which are easy to see and debug. Also, by using human proportions, the research stays focused on walking and not on miniaturization.
3. Lightweight The robot frame is carbon fiber and most other components are plastic or
alu-minum. The necessary actuator forces are kept low. A less massive robot is more manageable in a research environment. It is easier to handle and less likely to damage itself or harm researchers.
4. Mechanical Control Mechanisms Each joint (most importantly the knee) has adjustable stops with rubber pads. The foot of the robot is equipped with a passive toe joint. This joint has an adjustable range as well as a return spring. The limit stops are essentially high frequency non-linear PD loops which are difficult to implement in digital control even with the use of sophisticated electronics and sensors. The low impedance actuators allow for uncertain
CHAPTER 1. INTRODUCTION 10
contact, an inevitable occurence during walking on rough terrain. These mechanical features eliminate the need to operate any digital high frequency control loops on the robot.
The robot is a three dimensional continuation of the work that began with the planar robot Spring Turkey(13) and continued with the planar robot Spring Flamingo(15). The previously enumerated points are the key areas where M2 differs from some other current three dimensional humanoid walkers(6, 21) which rely more on high impedance actuation and trajectory following control schemes.
1.2
Summary of Thesis
This thesis presents the design of the humanoid robot M2.
" Chapter 2 describes the human mechanisms and the forces, torques, velocities, etc. which are
exhibited during a normal walking cycle. The human is a good starting point for the design of the robot. Human locomotion is well documented and there is a wealth of information on the human walking motion.
" Chapter 3 describes previous robots and actuators. It presents some of the differences between
robotic arm and walking robot technology. There is a brief introduction to Series Elastic Actuators.
" Chapter 4 describes the mechanical specifics of the robot.
" Chapter 5 details the electronic, sensor, computer, and control systems on the robot.
* Chapter 6 gives some conclusions and some advice for future research.
" Appendix A describes the transformations from joint torques to actuator linear forces. " Appendix B contains all the schematics for the custom circuit boards on the robot. " Appendix C has a list of all of the suppliers that were used.
Chapter 2
Human Characteristics
There is a large database of knowledge regarding both the human form and human motion. We believe that mechanical characteristics found in humans aid in the control of walking and we should try to consider which of these characteristics can be embodied with current mechanical and robotic technologies.
2.1
The Human Form
2.1.1
Weight Distribution
An approximation of the human weight distribution is shown in Table 2.1.
From this we can see that nearly 70% of the mass in humans is located at the waist and above. Figure 2-1 shows the linear velocities(in the walking direction, X) of different body areas. It can be seens that the body has the least fluctuation in forward velocity and the foot has the most fluctuation.
Since kinetic energy is a direct function of velocity, the lower extremities have the greatest fluctuations in kinetic energy. It is clear that more mass at the feet means more energy change.
If this energy is all lost it would be very costly. In efficient walking, the mass is able to resonate
with gravitational or elastic potential energy. An example of this can be seen in the compass gait described in the next section.
2.1.2
Link Lengths
The dimensions of a 50th percentile male are shown in Figure 2-2. The center of gravity is just above the hip at approximately 38".
Table 2.1: Human Mass Distribution. From Dempster(3).
Body Area Percentage per Part No. of Instances Total Mass Percentage
Head, neck, Shoulders, Thorax 31% 1 31%
Arm 5% 2 10%
Ab/Pelvic 27% 1 27%
Thigh 10% 2 20%
Shin and foot 6% 2 12%
12
CHAPTER 2. HUMAN CHARACTERISTICS
-ribcag( ~ shin t-p knee -- ankle - -- toe 5 10J 15 20 25 30 3 0 4 50 55 60 65 / I / / I
-/
,~. - .. /,. -1 *Ij '-I Frame NumberFigure 2-1: The X velocities of the various parts of the body during a normal walking cycle. Adapted from data in Winter(20).
4 3 1 4j 0 2 1 0 -1
1
HUMAN CHARACTERISTICS
L
7.00 (Hip Spacing) 14.20 LI I -KH-I I I IFigure 2-2: The frontal plane dimensions of a 50th percentile U.S. male. Dreyfus(2). All dimensions are in inches.
Adapted from data in
6.10
i
-69.10 60.20 56.70 36.50 19.80 3.20 0 0 3.90 -CHAPTER 2. 13CHAPTER 2. HUMAN CHARACTERISTICS
KE
PE
I\ /
\ / \ /
Figure 2-3: Several strides of the compass gait shown with corresponding potential and kinetic energy curves. From Krupp(8).
2.2
Human Motion
2.2.1
Energetics of Human Walking
Data in Rose et al.(18) shows us that a 1801b person walking at a normal pace consumes about 320 Watts of power. It is estimated that roughly one quarter of that is mechanical power. This means that at a comfortable pace, a 1801b human can walk with only 80 Watts of mechanical power. This can be a somewhat depressing fact considering one of the electric motors used on the robot M2 can output 90 Watts continuously - and there are 12 motors on the robot! Hopefully research on M2 will allow future robots to walk as mechanically efficient as a human.
A simplified human gait known as a compass gait can give us insight into the energetics of
walking. The compass gait model consists of two rigid, massless legs attached at the hip with a pin joint. A point mass is modeled at the hip joint. With the only degree of freedom located at the hip, the body is forced to follow an arc defined by the length of the leg. The compass gait can be seen in Figure 2-3.
The compass biped has instantaneous, discretely changing dynamics. It simply changes from one inverted pendulum to another when the swing leg touches the ground. Calculating the external work on the model, namely the potential and kinetic energy of the system
PE = MgLcosO (2.1)
KE = MgL(1-cosO) (2.2)
By graphing the equations 2.1 and 2.2 in Figure 2-3, the cyclical nature of potential energy and
kinetic energy can be seen. Note that the kinetic energy is maximum when the potential energy is minimum and vice versa. Similar cyclical transition of potential and kinetic energy was recorded
CHAPTER 2. HUMAN CHARACTERISTICS
Table 2.2: Human walking parameters from normalized data contained in Human Walking(18). Forces and power calculated for a for 1.83 m(6'2"), 80 kg(1781b) person. Table displays non-concurrent maximum values which occur during an average walking cycle.
in human subjects by McMahon (11) using force plate data to calculate the changes in mechanical energy of the body's center of mass.
The compass gait is similar to the behavior found in the passive dynamic walkers described in the next section. There is also evidence that humans use some passive dynamics during the gait cycle. At the beginning of swing phase, the leg receives a tiny impulse of energy and then the natural pendulum motion carries it forward to extension. The leg receives another tiny impulse of energy to bring it to a sudden halt before touchdown. Electromyographic data record by McMahon (11) shows little electrical activity in the leg muscles of humans during the swing phase at normal walking speeds. This suggests that the leg is swinging freely during this period. In addition, electromyographic records show significant electrical activity in leg muscles during stance.
2.2.2
Human Kinetic and Kinematic Data
There is a wealth of data from recordings of human motion. These recordings have been transferred into data regarding joint motions and joint torques during the walking cycle. In addition, the author relied on a rather low-tech method for extracting velocity data from the graphical position data. Power, torque, position, and velocity data for an average human walking cycle are shown in Table 2.2. deg rad/s Nm W hip(pitch) 30,-18 3.6,-2.0 -111.0 56 hip(roll) 8,-7 1.6,-1.0 -63.5 +-28 hip(yaw) 5,-15 4.0,-3.0 8.0 -16 knee(pitch) 68,8 5.8,-7.8 -71.4 -79.5 ankle(pitch) 10,-15 3.0,-4.2 -63.5 280 ankle(roll) na NA 40.0 -16 15
Chapter 3
Robots and Actuators
3.1
Robotic Arms vs. Robotic Walkers
Many high performance robotic arms and hands have been developed for use in factories, space, and research(19). It might seem to an outside observer that these technologies could be exploited for use in a legged robot. Most of the time this is not the case. There are several reasons why.
" Fixed vs. Floating Reference Robotic arms are generally fixed to an inertial reference
frame(factory) or a body whose mass is large enough that it can be considered fixed(spacecraft).
A walking robot is not fixed to any reference frame and has a limited set of torques which it
can apply due to its limited contact with the world.
" Onboard vs. Offboard Robot arms can often place their heavy motors at their fixed end.
Then the motors are only responsible for moving the frame of the arm and not themselves. Because a walking robot must carry all its components, the motors support themselves as well as the structure of the robot. Carrying power is also an issue for walking robots although most are tethered due to battery limitations.
* Environmental Awareness Robot arms are not usually expected to perform in unknown
situations. They generally are designed for specific working conditions and their ability to handle unexpected disturbances is limited. Ideally, walking robots are supposed to handle rough and unknown terrain.
" Success Metrics Robotic arms are often judged on their ability to position their end effectors
precisely. Robotic walkers are usually not judged on their ability to position precisely but rather on their ability to get from Point A to Point B without falling down.
" Impacts Most robot arms are not designed to handle impacts. Walking, however, has an
impact at every touchdown.
3.2
Passive Dynamic Walkers
Much research has been done on completely passive walking machines (5, 1, 4). Passive dynamic walkers use Earth's gravity as a power supply. They rely on special geometry and mechanical mech-anisms as control systems to achieve gaits very similar to the compass gait depicted in Figure 2-3. Though they are not robots in the traditional sense, they can give insight into walking machines. These 'robots' exploit passive dynamic elements and mechanical mechanisms to achieve highly effi-cient gaits. In the limit, a passive dynamic walker relies entirely on passive dynamic motions and thus requires no external power source other than a small incline. Several passive legged 'robots' such as these have been constructed and succesfully demonstrated (5, 1, 4, 9).
CHAPTER 3. ROBOTS AND ACTUATORS
Figure 3-1: Some previous powered bipedal walking robots. From top left to bottom right are WL-10RV1 from Waseda, P2 from Honda, Toddler from UNH, the Moscow State University Biped,
SD-2 from Clemson and Ohio State, Biper from University of Tokyo, Meltran II from Mechanical
Engineering Lab in Tsukuba, and Timmy from Harvard. Figures compiled by J. Pratt.
3.3
Powered Bipedal Walkers
Many bipedal walking robots have been built over the years. Several of these robots are shown in Figure 3-1. These biped walking robots fall into two broad categories: those which predominantly use pre-recorded trajectory playback and those which predominantly use an algorithmic controller.
All the robots employ a high impedance actuation scheme and none take advantage of natural
dynamics.
Passive dynamics were successfully implemented in actuated robots as well. J. Pratt (16) de-veloped algorithms that used the natural dynamics of the swing leg to efficiently control a planar bipedal robot. More recently, J. Pratt has developed three-dimensional simulations of M2 using passive elements such as a knee cap, a compliant ankle, and a passive swing leg to achieve natural looking and efficient walking.
3.4
Series Elastic Actuators
Series Elastic Actuators(SEA's)(14) are actuators which have an elastic element in series with the motor and gear train. A sensor measures the displacement of the elastic element and force is implied
by Hooke's Law, F = kx. In short, SEA's provide force control, shock tolerance, and low impedance
actuation. A more detailed account of their benefits and limits can be found in Robinson et al.(17)
A rendering of the SEA used on M2 can be seen in Figure 3-2. The brushless DC motor is
modified to have a ballscrew as its rotor. The output of the ballscrew is attached to an aluminum
CHAPTER 3. ROBOTS AND ACTUATORS
Figure 3-2: An annotated rendering of the Series Elastic Actuator which is used in the robot M2. Modeled and rendered by David Robinson.
piece which is sandwiched between a set of linear compression springs. The other ends of the springs are attached to the output of the actuator. A linear potentiometer measures the ballscrew displacement with respect to the output shaft, thereby measuring the spring compression and giving an indication of the force output.
On the specific SEA designed for M2(17), a simple analog PD controller is implemented to control the spring deflection. When the output of the actuator is clamped, a force control bandwidth of 30hz is observed. The actuator is capable of outputting 300 lbs and capable of resolving forces on the order of 1.5 lbs.
Chapter 4
Robot Mechanical Design
This chapter presents the design specifics of the bipedal robot M2.
4.1
General Robot Architecture
The robot stands approximately 5 feet high and weighs 60 pounds. The robot has 12 active degrees of freedom. Table 4.1 lists the specifications for the joints of the robot. Power at each joint is the same due to the single actuator design employed for all the joints. The power to the individual degrees of freedom of the ankle joint is limited by the power of the other.
The robot joint ranges of motion were chosen based on data from humans as well as the robot Spring Flamingo and preliminary dynamic computer simulations.
4.2
The Design
4.2.1
Overall Structure
A photo of the robot and a joint schematic view are shown in Figure 4-1. The leg of the robot has
six active degrees of freedom plus an optional passive degree of freedom in the foot. The vertical axis, Z, is the yaw axis. The X axis is the roll axis and the Y axis is the pitch axis. The hip has three degrees of freedom. These three degrees of freedom are made up of a universal joint (yaw and roll) followed by a pin joint (pitch). The pitch pin joint is offset slightly(about 2cm) from the yaw and roll axes.
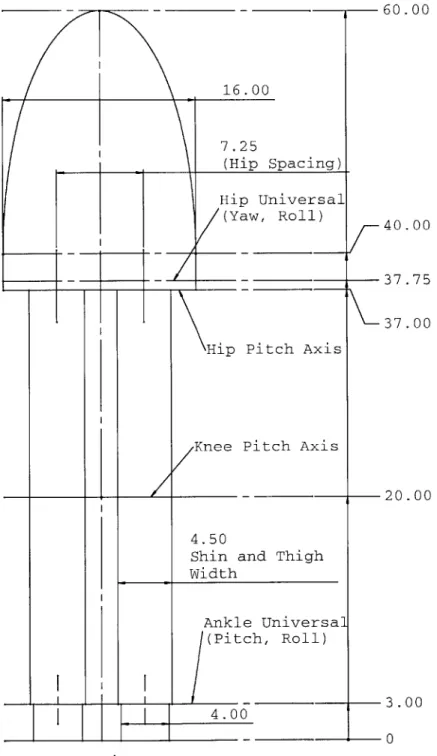
The frontal plane dimensions of the robot are shown in Figure 4-2. The dimensions are very close to the dimensions for a 50th percentile US male as given by Whitney(2). The ranges of motion are adapted from robot simulations and data found in Rose, et al.(18), Winter(20), and Kapandji(7).
Table 4.1: Robot Joint Specifications. Torque and rad/s numbers are given for maximum moment arm. Power, torque, and velocity are symmetric due to the actuator. *The ankle roll and pitch are not independent. Their maximum values can not be applied simultaneously.
19
deg rad/s Nm Drive Type hip(pitch) 80,-30 7.3333 50 Pulley hip(roll) 30,-20 6.8 59 Push-rod hip(yaw) 30,-15 5.5 67 Push-rod knee(pitch) 80,0 8.8 42 Push-rod ankle(pitch) 45,-20 8.8 88* Push-rod ankle(roll) 20,-20 7.3 100* Push-rod
ROBOT MECHANICAL DESIGN
Sagitt
al
Frontal
Transverse
Z -
yaw
Y - pitX -
roll
tch
Figure 4-1: A photo of the completed robot and a joint schematic view of the robot. The schematic shows active degrees of freedom only. The optional passive toe joint is not shown.
CH APT ER 4. 20
CHAPTER 4. ROBOT MECHANICAL DESIGN 16.00 7.25 (Hip Spacing) Hip Universal (Yaw, Roll)
Hip Pitch Axis
Knee Pitch Axis
-60.00 40.00 37.75 37.00 -1 20.00 4.50
Shin and Thigh
Width Ankle Universal (Pitch, Roll) 4.00
0
3~ 00Figure 4-2: The dimensions of the biped in the frontal plane. The body and links are approximately axially symmetric about their longitudinal axis. Dimensions are in inches.
/
21
-ICHAPTER 4. ROBOT MECHANICAL DESIGN
Table 4.2: Approximate distribution of mass in humans, the biped M2, and McGeer's kneed passive dynamic walker(PDW). Human data adapted from Dempster and Gaughran (3). Robot weight distribution is driven primarily by actuator locations. Each actuator is approximately 1.2kg(2.5 lbs).
The mass distribution of the robot is dominated by the location of the actuators within the links. As a result, the robot's mass distribution is centered lower than an average human's. Table 4.2 shows the percentage mass distributions for an average male, M2, and a planar passive dynamic walker(10). The robot mass distribution is closer to that of a planar passive dynamic walker than to that of a human. Due to successful computer simulations(16), it was not necessary to add additional weight to the torso in order to put the proportions more in line with a human.
4.2.2 Actuators
The actuators used in the robot are 90W, 1.2KG Series Elastic Actuators(17). They are capable of a maximum force of roughly 1320N (3001bs) and a maximum speed of roughly 0.28 m/s (11 in/s). The actuators have a force control bandwidth of 30Hz. Linear actuators where chosen over rotary actuators due to the available space in the robot. Linear actuators allowed for placement along the longitudinal axis of the leg links. The actuators are symmetric in their power, speed, and force capabilities.
4.2.3 Ankle
The ankle of the biped is a universal joint. The pitch axis is followed by the roll axis. This is a slight deviation from the structure of the human ankle. The human ankle is often likened to a universal joint where the second axis is at 45 degrees to the first rather than at 90 degrees(7). For engineering simplicity we use a universal joint with orthogonal axes. The instantaneous power requirement for ankle pitch is the greatest. The actuators were placed in a configuration so they can act together in the pitch direction.
Photos of the ankle are shown in Figure 4-7 and a schematic of the ankle and its actuators are shown in Figure 4-3. The ankle has two series elastic actuators placed along the longitudinal axis of the shin. The actuators are mounted by a universal joint near the top of the shin and attached to the foot by a ball and socket joint (rod-end). This is a linkage variation of a standard geared differential. When the actuators push in unison, a moment is generated about the pitch axis. When they push in opposite directions, a roll moment is generated.
4.2.4 Foot
Two different feet were designed for the robot. One foot is a simple rectangular design with four single axis load cells residing at each of the corners. This foot closely resembles the foot that was used in computer simulations in the lab. Another more involved foot was designed in order to explore the roll of the toes in walking.
Body Part/Area Human Biped Robot PDW Shin & Foot (x2) 6% 13.5% 10%
Thigh (x2) 10% 11% 15%
Ab/Pelvic 27% 51 % 50%
Arm (x2) 5% NA NA
Thorax to Head 31% NA NA
CHAPTER 4. ROBOT MECHANICAL DESIGN A Actuato Y axi E 0 X axi Ball Joint 0
Figure 4-3: A schematic of the ankle joint actuation scheme. The axes shown are fixed to the center of the universal joint. The points A,E, and 0 are referenced in Appendix A.
Ankle Heel Joint .19 Toe 2 . 8 8Joint 2.88 A_ ont
Figure 4-4: The dimensions of the biped foot with passive toe joint. The X's represent the location of the load cells.
The more intricate second foot of the biped robot contains a passive joint which is modeled after the toe of a human. The joint is believed to smooth the center of mass trajectory of the body during a walking cycle(18). The toe joint is simply a pin joint with two limit stops and a soft return spring. Ground contact and sensing on the foot consists of four single axis load cells. One cell is placed at the heel and three cells are placed in a triangle at the toe/ball of the foot. The three cells in the toe are all constrained to the same plane. The three toe contact points can rotate about the foot Y-axis with respect to the heel contact point. The layout of the sensors can be seen in Figure 4-4.
Standard through-hole button load cells are used. There is a rubber bumper which contacts the ground roughly 0.875" in diameter attached to each load cell. On the simple four point foot there is a rectangular pastic piece with a 0.25" piece of neoprene for grip and shock absorbtion. This can be seen in Figure 4-7. Single axis load cells were chosen over a six axis sensor because of their size and weight, and chosen over strain gauges because of their ease of use and quick replaceablility.
On the more complicated biped foot, force control and a passive toe joint are the reasons the four contact points of the foot are not over-constrained. Since ankle roll is force controlled rather than position controlled, it can adjust itself so the three points of the toe lie flat. The passive toe
CHAPTER 4. ROBOT MECHANICAL DESIGN
Mr
Yaw R0 0 L YL Roll Body irame My Pitch Ar ThighFigure 4-5: A schematic of the biped hip. The pitch actuator is not shown. It lies along the axis of the thigh.
Figure 4-6: A photo of the biped thigh illustrating the hip pitch cable drive system.
joint(a pitch joint) then allows the fourth point on the heel to lie flat as well.
4.2.5
Hip
The biped hip has three degrees of freedom. The joint consists of a universal joint followed by a slightly offset pin joint. A schematic of the hip is shown in Figure 4-5. The yaw axis is first and the the yaw actuator is mounted to the body frame with a pin joint. The roll actuator is next. Since its attachment point passes through the roll angle, it is mounted to the body by a universal joint. Its endpoint is attached by a ball and socket joint. The pitch actuator, which is not shown, lies along the longitudinal axis of the thigh. It is the only actuator which is attached using a cable and pulley rather than a rod-end. The range of motion of the hip pitch joint is the largest. The moment arm changes associated with a drive arm would be too great at the extents of the pitch motion. At sixty degrees from the perpendicular drive position, the moment arm would be half its original length.
CHAPTER 4. ROBOT MECHANICAL DESIGN
Figure 4-7: The ranges of motion on the robot ankle joint. The ankle roll is symmetric(+- 20 deg).
4.2.6
Knee
The robot knee is a simple pin joint. The joint is actuated by a SEA located in the thigh. Two photos demonstrating the range of motion of the knee can be seen in Figure 4-8.
CHAPTER 4. ROBOT MECHANICAL DESIGN 26
Chapter 5
Electronics and Control Systems
5.1
Electronics Overview
The basic electronic subsystems of the robot are shown in Figure 5-1. The robot is powered by a 48 Volt power supply. There is also an Ethernet connection not shown in the figure which can be used to load control code and retrieve data from the on-board computer. The circuit boards are summarized in Table 5.1. The sensors are summarized in Table 5.2.
All signals are sent and received differentially between the computer and the analog boards.
5.1.1
48 Volt bus
All the electronics on the robot receive power from a 48 Volt bus. The current setup has the robot
connected to several offboard 48V power supplies. All the electronics were designed with this power bus in mind. The voltage choice was dictated by the brushless motor amplifiers. It was also chosen because it is a standard voltage and the robot will eventually be augmented with batteries for future autonomous demos.
5.1.2
Robot Sensors
The robot is equipped with a total of 33 sensors. There are 12 rotary potentiometers that are used to measure joint position and this is differentiated to give the joint velocity. The joint position measurements are relative displacements between joints. There are 12 linear potentiometers which measure the spring compression in the Series Elastic Actuators. These signals are local to the analog force control loop only. They are not used by the DSP in the control. There are 8 single axis load cells on the feet of the robot. These sensors are connected to the strain gauge conditioning board which amplifies and buffers the signal on its way to the DSP. There is a single Intersense Inertia
Table 5.1: Circuit Boards on the Robot
QTY Voltage Input Vendor Motor Amplifiers 12 +48 Copley Controls
DSP 1 +5 Dideas
ANA074 1 5,12 Dideas
ANA063 1 5,12 Dideas
Analog Force Control Board 6
+48
Leg Lab Power Distribution Board 2 +48 Leg Lab Signal Conditioning Board 4 12 Leg LabIS-300 Signal Conditioner 1 +12 Intersense
CHAPTER 5. ELECTRONICS AND CONTROL SYSTEMS
Table 5.2: Sensors on the Robot
Sensor QTY I Voltage Input Vendor Rotary Potentiometers 12
+-5
Bourns Linear Potentiometers 12+-5
Novotechnik Single-Axis Load Cells 8+-9
Transducer Techniques3-axis inclinometer 1 NA Intersense
48Volt bus
Vesibla Snsrs Brushless
Actuator Motor Amp
Computer
A/D and D/A
C
Analog PID
Regulated 5V Buffers S Instrumentation -Power L Joint -+-5 Pots +- 12 , Load Cells
Figure 5-1: An overview of the biped electronics. Thick lines indicate power transfer and arrowheads indicate information flow.
CHAPTER 5. ELECTRONICS AND CONTROL SYSTEMS
CubeTM which measure the roll, pitch, and yaw(magnetic) of the robot body. The Inertia Cube is connected to a IS-300 motion tracker unit which communicates with the DSP through a RS-232 serial line. Table 5.2 provides a summary of the robot sensors. Figure 5-2 contains an annotated photo of M2 with the sensor locations.
Figure 5-2: A photo of M2 with annotations of electrical systems.
5.2
Custom Circuit Boards
5.2.1
The Signal Conditioning Boards
The signal conditioning boards are four layer printed circuit boards. They have a ground plane, a power plane, and two routing layers. The signal conditioning boards handle two 350 ohm wheatstone bridge sensors each. They have adjustable gain and offsets.
5.2.2
The Analog Force Control Boards
The analog force control board provides two channels of PID force control for the Series Elastic Actuators and two channels of joint potentiometer buffering and differentiation. The analog force control boards have a 48 Volt power input and communicate with the DSP through differential amplifiers and receivers.
The analog force control boards are four layer printed circuit boards. They have a ground plane, a power plane, and two routing layers.
CHAPTER 5. ELECTRONICS AND CONTROL SYSTEMS
Figure 5-3: A photo of the biped strain gauge signal conditioning board. This board handles two strain gauges. There are a total of four of these boards on the robot.
Figure 5-4: A photo of the analog force control and joint pot buffer board. There are six identical boards on the robot.
CHAPTER 5. ELECTRONICS AND CONTROL SYSTEMS
5.2.3
The Analog Breakout Board
The analog breakout board connects to the ANA070 and ANA064 analog input and output boards. It has no power and simply allows for the use of smaller connectors to easily distribute the 64 channels of analog input and output from the ANA070 and ANA064 boards. There are two 64 pin connectors which connect to the ANA064 and ANA070 boards respectively. Then there are multiple
3,5, and 10 pin connectors which connect to the signal conditioning boards and analog force control
boards. The analog breakout board is a two layer printed circuit board.
5.2.4
The Power Distribution Boards
The power distribution board has a 48 Volt input and outputs a variety of lower voltages. It appears in two places on the robot. There is one printed circuit for the two power distribution boards but there are two different DC-to-DC converters which are used when assembling the board.
* Board Configuration 1 This board supplies power to the DSP (+5V) and two analog boards (+-12V, +-5V). The analog and digital grounds are isolated.
e Board Configuration 2 This board provides power to the Intersense IS-300(+12V) and the
four signal conditioning boards (+-12V).
The power distribution boards are four layer printed circuit boards. They have a ground plane, a power plane, and two routing layers.
5.2.5
The DSP and Analog I/O
M2 has a custom DSP system that was designed by Chris Barnhart at Digital Designs and Systems. The DSP is a Texas Instruments C-31. There are three circuits boards that make up the system.
1. DSP. Mulitple Serial Lines and Digital I/O.
2. 16 Analog Ins, 16 Analog Outs, and Ethernet.
3. 32 Analog Inputs.
5.3
Control Software
Control code for the robot is written in C. It is compiled offline on a Unix machine and downloaded to the robot via Ethernet. The main robot control code runs at 500Hz on the DSP and sends desired forces to the analog boards. Currently, the control system treats the actuator and analog boards as a 'black box' force source. This means it is assumed that the desired force sent out to the actuator is the actual force applied to the joint. This is true within the realm of frequencies needed for walking(less than 15Hz). The analog boards have PD control loops for the Series Elastic Actuators. The analog boards also buffer and differentiate the joint potentiometers and send the information to the DSP.
This is similar to the electronics used for Spring Flamingo. The main differences are the addition of Ethernet for faster communication with the outside world and differential send and receive for signals within the robot.
Bibliography
[1] Jesper Adolfsson, Harry Dankowicz, and Arne Nordmark. 3-d stable gait in passive bipedal
mechanisms. Proceedings of 357 Euromech, 1998.
[2] Henry Dreyfus Associates. The Measure of Man and Woman. Whitney Library of Design, New York, 1993.
[3] W.T. Dempster and G. Gaughran. Properties of body segments based on size and weight.
American Journal of Anatomy, 1965.
[4] J. Fowble and A. Kuo. Stability and control of passive locomotion in 3d. Proceedings of the Conference on Biomechanics and Neural Control of Movement, pages 28-29, 1996.
[5] Mariano Garcia, Anindya Chatterjee, and Andy Ruina. Speed, efficiency, and stability of
small-slope 2d passive dynamic bipedal walking. IEEE International Conference on Robotics and Automation, pages 2351-2356, 1998.
[6] K. Hirai, M. Hirose, Y. Haikawa, and T. Takenaka. The development of honda humanoid robot.
IEEE International Conference on Robotics and Automation, 1998.
[7] Ibrahim Adalbert Kapandji. The Physiology of the Joints. Churchill Livingstone, 1982. [8] Benjamin Krupp. Design and control of a planar robot to study quadrupedal locomotion.
Master's thesis, Massachusetts Institute of Technology, August 2000.
[9] Tad McGeer. Passive dynamic walking. International Journal of Robotics Research, 9(2):62-82, 1990.
[10] Tad McGeer. Passive dynamic biped catalogue. Proceedings of the 2nd International
Symposium of Experimental Robotics, 1991.
[11] Thomas A. McMahon. Mechanics of locomotion. The International Journal of Robotics
Reasearch, 3(2):4-28, 1984.
[12] Gill A. Pratt and Matthew M. Williamson. Series elastic actuators. IEEE International Conference on Intelligent Robots and Systems, 1:399-406, 1995.
[13] J. Pratt, P. Dilworth, and G. Pratt. Virtual model control of a bipedal walking robot. IEEE
International Conference on Robotics and Automation, pages 193-198, 1997.
[14] Jerry E. Pratt. Virtual model control of a biped walking robot. Master's thesis, Massachusetts Institute of Technology, August 1995.
[15] Jerry E. Pratt and Gill A. Pratt. Exploiting natural dynamics in the control of a planar bipedal
walking robot. Proceedings of the Thirty-Sixth Annual Allerton Conference on Communication, Control, and Computing, pages 739-748, 1998.
[16] Jerry E. Pratt and Gill A. Pratt. Exploiting natural dynamics in the control of a 3d bipedal
walking simulation. Proceedings of the International Conference on Climbing and Walking Robots (CLAWAR99), 1999.
BIBLIOGRAPHY 33
[17] David W. Robinson, Jerry E. Pratt, Daniel J. Paluska, and Gill A. Pratt. Series elastic actua-tor development for a biomimetic robot. IEEE/ASME International Conference on Advanced Intelligent Mechatronics, 1999.
[18] Jessica Rose and James G. Gamble. Human Walking. Williams and Wilkins, 1994. [19] Mark Roshiem. Robot Wrist Actuators. John Wiley and Sons, Inc., 1989.
[20] D. A. Winter. Biomechanics and Motor Control of Human Movement. John Wiley and Sons, Inc., New York, 1990.
[21] Jinichi Yamaguchi, Eiji Soga, Sadatoshi Inoue, and Atsuo Takanishi. Development of a bipedal humanoid robot - control method of whole body cooperative dynamic biped walking. IEEE International Conference on Robotics and Automation, pages 368-374, 1999.
Appendix A
Joint Math
Since all of M2's rotary joints are actuated by linear actuators, transformations are needed to get from joint torques to actuator forces. These are dependent upon the joint layout and actuation scheme. If the force is known, the torque is somewhat easily computed using the formula, T = ix F.
The cross product T = xF operation can be rewritten as a matrix multiplication T = AF where A is a singular matrix.
i
j
k0
-r3 r27 = r XF rI r2 r3 = r3 0 -ri
f
= AF (A.1)F1 F2 F3 -r2 r1 0
However, if the cross-product is written as 7 =R Fl sin(O) then we can easily invert. In the
case of most of the robot joints, this requires use of the arctan function or the law of cosines to find the angle 0. In general, the direction of F is fixed by the geometry of the joint and F1 is the quantity of real interest.
A.1
Knee Joint
The knee joint is a single degree of freedom rotary joint allowing relative motion between the shin and the thigh. When all the joints of the robot are zero(it is standing with locked knees), the knee axis is parallel to the global Y axis. Rotation about the knee joint is referred to as pitch.
The knee actuator is connected to the knee joint via a push rod of length 1OA1 = rk at the shin
and a fixed pin joint at the thigh.
The knee joint has three points of interest which we will use for the derivation of the transfor-mation. The knee pivot 0, the actuator pushrod attachment A, and the actuator mounting pivot
M. The robot knee joint and points can be seen in Figure A-1 and a simple line drawing is seen in
Figure A-2.
r = r x F rk sin(ZOAM)Fknee (A.2)
The actuator force required given Tk is
Fke7 ( A. 3)
nee rk sin(ZOAM)
where Fknee is a scalar and
ZOAM
can be defined as followsZOAM =Of ixed + Ok - ZAM Of ixed + Ok - arctan r sin(Ofixed + 9
k) - (A.4)
L1 + r sin(Ofixed + Ok)
APPENDIX A. JOINT MATH
Figure A-1: The robot knee joint with superimposed lines and points. Points 0, A and M all refer to pin joints. 0 is the knee joint. M is where the actuator is mounted to the thigh and A is where
the actuator is attached to the shin.
L
Oknee
M
A
/ Ofixed
LMA
Figure A-2: A line drawing of the knee for the calculation of knee actuator desired force. The actuator is the line segment MA. This drawing also pertains to the geometry of the hip and ankle joints but the hip and ankle actuators have motions out of the plane whereas the knee actuator is always in the plane perpendicular to the knee axis.
APPENDIX A. JOINT MATH X
x
r
r
A2 $
Al
ry
Figure A-3: A simple view of the actuation of the robot ankle. This is a tranverse plane slice of the robot ankle. Point 0 is the intersection of the X and Y axes as well as the center of the ankle universal joint. Points Al and A2 represent the attachment points of the two actuators respectively. Forces in the actuators create torques about both the X and Y axes. Joint rotations change the relative lengths of the X and Y projections(r, and ry) of the moment arms, therefore affecting the torque to force transformation.
The angle between the shin and the thigh is Ok and the constant, Of ixed, is the angle between the shin and the segment
OA.
It is also possible to derive the equations avoiding the inverse tangent by using the law of cosines.It would be possible to simplify the equations a bit by assuming the actuator is always parallel to the thigh, i.e.
ZAM
= 0. This simplifies the equations and shouldn't reduce accuracy muchconsidering that L,
>
L2. Equation A.3 then becomesFknee = (A.5)
rk sin(Of ied + Ok)
where Fknee is once again a scalar quantity.
A.2
Ankle Joint
The ankle joint is a universal joint(2 d.o.f.) allowing relative motion between the foot and the shin. When all of the joints of the robot are zero, the axes of the ankle joint line up with the global X and Y axes. The Y axis is proximal to the shin. Rotation about the Y axis is referred to as pitch and rotation about the X axis is referred to as roll. The math for the ankle is an extension of the math for the knee.
We can consider the ankle as two decoupled cases of the knee joint. Then one can simply add the forces from Tr7oll and Tapitch. There is a slightly more complicated analogy to the knee in two
planes of the ankle. The ankle roll considers what is happening in the XZ plane and the ankle pitch considers what is happening in the YZ plane. Both planes are coming out of the page in Figure
A-3. Each plane looks similar to the knee diagram shown in Figure A-2. The main difference is that
OA
= r is a function of the other ankle angle.APPENDIX A. JOINT MATH 37 Mr R Yaw L Yaw L Roll Body trame MY Pich Ar Thigh
Figure A-4: The robot hip joint schematic. Point 0 refers to the hip universal joint. The Z(hip
yaw) and Y(hip roll) axes intersect at point 0. Point M, refers to the universal joint on the body
where the roll actuator is mounted. Point A, refers to the ball joint on the thigh where the roll actuator is attached. Point MY refers to the pin joint where the yaw actuator is attached to body. Point Ay is the pin joint attachment of the yaw actuator to the yaw universal block. It is hidden in
this schematic.
A.3
Hip Joint
A.3.1
Hip Pitch
The math for the hip pitch is the simplest of all the joints since the hip pitch actuator is attached
by a pulley. The desired torque at the joint(Thp), leads to the force(fhp) command to the hip pitch
linear actuator.
fA - Thp (A.6)
Thippitch
The transformation from actuator velocity to joint velocity is quite simple as well.
Whp Velhp (A.7)
A.3.2
Hip Roll and Yaw
The yaw actuator transformation is identical to that of the knee actuator except for the addition of a small term which can be ignored with little affect.
The actuator force required given Thya, is
F -ya ' Thyaw 6hroll (A.8)
sin(/OyAyMy)
where E is a small factor due to the torque applied to hip roll which is a function of the hip roll
APPENDIX A. JOINT MATH 38
The actuator force required given Throll can be simplified to
Fhroll =hr hr (1 + Ehyaw) (A.9)
sin(/ZOhrAhrMh,)
The exact equation for the hip roll incorporates the yaw angle. Since the hip roll actuator attachment point Ahr is attached to the leg below the yaw degree of freedom, the points Ohr, Ahr,
and Mhr do not always lie within the plane perpendicular to the roll axis as in the case of the knee joint where they are fixed in the plane perpendicular to the knee axis.
When the roll actuation plane(plane formed by the three points Ohr, Ahr, Mhr) is skewed with respect to the roll axis, a small torque will be contributed to the yaw axis. This is where the term
Appendix B
Electrical Schematics
This Appendix contains the electrical schematics for all the custom circuit boards used on the robot. The basic functionality of the boards and their role in the overall robot is decribed in more detail in Chapter 5. There are six pages for the analog force board, 2 pages for the signal conditioning board, 1 page for the analog breakout board, and 1 page for the power distribution board.
5 1 4 1 3 2 5 I PB1 J1 +12 OUT GC o:FST DC/DC -PNPT CONVERTER CN" 48INCONN +-12V DFC10U48D12 REG1 TP3 7N +ciOUT Test I PC2 2 I4340 6 10uf 2 Joint Pot Si DSP TP1 Test Pcit plus12 BC1 lu f BC2 luf SGND GND1 TP2 minus12 GND2 GND2 gnals out to
2 Joint Pot Derivatives
-in - + M P n e out to IDSP
A-A-ioinl- W" t- +D-o RV+ 3o t 1e B+rmRV-OPIN copleystyle REG2 :-]I43314 -C 10uf T4minus5 JjPO -5 GND 4pin-pot JFP1 F-- SigaP A> --- s--~r-r Signal. L7 JJP2 +53) Signal 4pin-pot SGNDO GND20 GND3 GND4
2 Actuator Command from DSP J2 'O // V,1 A CA-- -Vo A 4Vo B . enomnd Ii --5 JFP2 4pinot .> . o Signal 4pinpot
zsvs 2 Current Commands on their
way to Copleys
GND
SPIN-copleystyle
'- nl> -I
ritle
MIT LEG LAB, BIPED FORCE BOARD
3i I Document Number [ev
A POWER AND CONN ECTORS {Re,
Date: Tuedav. Dppmbpr 21 .1999 heet 1 of 6
2 1 5 1 4 -- 1 3 A) CD CD 0 01 0 CD 0~ CD 0 el CS CD 0 H de} c
5 1- 4 3 111 TP5 FC1 0 1 f 7k5k 5 IA R3 5k R4 + LM3 24 5k 0. Il BC3 10k 1B POT C R5 LM3 24 20k R6 LM3 24 5k TP7 R7 t 5k LM3 2 40 1' 10k BC4 R luf BC5 << -Mnse P R 8 -Z-- 0 luf ... ... 5k 5k C'.9 C3 RIO 0 .1 ---5 k 2 A 2 INA7137 BC7 LM3 24 LM3 24 Ril FC2 f2A 10k luf I I I I R12 TP9 R13 PO 5k 20k i 2B R14 5k BC8 0 . luf LM3 24 5k TP10 TP11 '2 2C C R15 LMLM324 TP 12 10k Test poit . U2D R16 ritle
MIT LEG LAB, BIPED FORCE BOARD
LM324 5
P
5k im Document NumberI A FORCE ERROR, A and B
3 1 2 I1 1 C CDt CD CI UD2
4-5 - ate ReWpn-sday DecebrO -14-9~he 2 nf 6
e -{Re, A
APPENDIX B. ELECTRICAL SCHEMATICS I U V ('UJ ~SI
IH
V. H .H o HII,
HO I OJ2 0 l~
F H 9 H ... Figure B-3: Page 3 of 6 of the biped force board. 42 II, I. QI t I CAPPENDIX B. ELECTRICAL SCHEMATICS