Characterizing the Material Properties of Polymer-Based Microelectrode Arrays for Retinal Prosthesis
By
Christina Soyeun Park B.S. Mechanical Engineering
Massachusetts Institute of Technology, 2002
SUBMITTED TO THE DEPARTMENT OF MECHANICAL ENGINEERING IN PARTIAL FULFILLMENT OF THE REQUIREMENTS FOR THE DEGREE OF
MASTER OF SCIENCE IN MECHANICAL ENGINEERING AT THE
MASSACHUSETTS INSTITUTE OF TECHNOLOGY JUNE 2003
@2003 Christina Soyeun Park All rights reserved
MASSACHUSETTS INSTITUTE OF TECHNOLOGY
JUL 0 8 2003
LIBRARIES The author hereby grants to MIT permission to reproduce and to distribute publicly paperand electronic copies of this thesis document in whole or in part.
Signature of Author:
Department of Mechanical Engineering May 9, 2003 Certified by:
Accepted by:
Rohan Abeyaratne Professor of Mechanical Engineering i"""Thesis Supervisor
Ain A. Sonin Professor of Mechanical Engineering Chairman, Graduate Thesis Committee
Characterizing the Material Properties of Polymer-Based Microelectrode Arrays for Retinal Prosthesis
By
Christina Soyeun Park
Submitted to the Department of Mechanical Engineering On May 9, 2003 in Partial Fulfillment of the Requirements for the Degree of Master of Science in
Mechanical Engineering Abstract
The Retinal Prosthesis project is a three year project conducted in part at the Lawrence Livermore National Laboratory and funded by the Department of Energy to create an epiretinal microelectrode array for stimulating retinal cells. The implant must be flexible to conform to the retina, robust to sustain handling during fabrication and implantation, and biocompatible to withstand physiological conditions within the eye. Using poly(dimethyl siloxane) (PDMS), LLNL aims to use microfabrication techniques to increase the number of electrodes and integrate electronics.
After the initial designs were fabricated and tested in acute implantation, it became obvious that there was a need to characterize and understand the mechanical and electrical properties of these new structures. This knowledge would be imperative in gaining credibility for polymer microfabrication and optimizing the designs. Thin composite microfabricated devices are challenging to characterize because they are difficult to handle, and exhibit non-linear, viscoelastic, and anisotropic properties.
The objective of this research is to device experiments and protocols, develop an analytical model to represent the composite behavior, design and fabricate test structures, and conduct experimental testing to determine the mechanical and electrical properties of PDMS-metal composites.
Previous uniaxial stretch tests show an average of 7% strain before failure on resistive heaters of similar dimensions deposited on PDMS. Lack of background information and questionable human accuracy demands a more sophisticated and thorough testing method.
An Instron tensile testing machine was set up to interface with a digital multiplexor and computer interface to simultaneously record and graph position, load, and resistance across devices. With a compliant load cell for testing polymers and electrical interconnect grips designed and fabricated to interface the sample to the electronics, real-time resistance measurements were taken. Wafers of test structures were fabricated with variables such as lead width, pad to lead interface shape, PDMS thickness, metal (Ti and Au) thickness, and lead shape. Results showed that the serpentine shaped leads were 70% more effective, and that thicker adhesion layers of Ti were too brittle for testing. The other variables did not produce significant results.
Thesis Supervisor: Rohan Abeyaratne
Index Title Page 1 Abstract 2 Index 3 Dedication 4 Acknowledgements 5 List of Figures 6 1.0 Introduction 8
1.1 Retinal Prosthesis Project Background 8
1.2 Previous work in Retinal Prosthesis 11
1.3 Device Fabrication Procedure 12
1.3.1 PDMS Preparation 12
1.3.2 PDMS Patterning for electroplating 13
1.3.3 PDMS Metalization 14
1.4 Understanding the Mechanical Properties 17
2.0 Theory 18
2.1 Residual Stress 18
2.2 Composite Theory 20
2.2.1 Metal comparisons 20
2.2.2 Polymer-metal composite 21
2.3 Sinusoidal stretch model 26
3.0 Mechanical Testing Design 32
3.1 Previous stretch tests 32
3.2 Mechanical Testing Solution 33
3.2.1 Testing System Design 33
3.2.1.1 Upper Grip Design - Mechanical 33 3.2.1.2 Lower Grip Design - Electrical 35
3.3 Lead Design 39
4.0 Testing Results 41
4.1 Calibration and Setup 41
4.2 Metallized and Non-Metallized PDMS 42
4.3 Adhesion Layer Thickness 43
4.4 Lead Width and Shape 44
4.5 Regaining Conductivity 47
5.0 Discussion 49
5.1 Lead Width and Shape 49
5.2 Extrinsic and Intrinsic Stresses 50
5.2.1 Extrinisic Stresses 50
5.2.2 Intrinisic Stresses 51
5.3 Comparison to Similar Metallized PDMS Developments 55
6.0 Conclusions and Recommendations 57
6.1 Future Mechanical Testing Design 57
6.2 Future Lead Design 60
Dedication
I would like to dedicate this thesis to my parents Hee Dahl and Jai Eun Park for their continual support, love, and sacrifice on my behalf. You have set before me a tremendous example of diligence and drive towards success and have always encouraged me to try my best and give thanks for whatever outcome results. Your single-minded sacrifice equipped me for and provided me with the opportunities and education that you did not have, and for that I thank you and consider you my partners in this achievement.
Acknowledgements
I would like to thank all of the people who made this thesis possible, be it through giving me the opportunity, guidance, technical support, or encouragement. First, I thank my mentor Dr. Peter Krulevitch for providing me with this project at the Lawrence Livermore National Laboratory (LLNL) Microtechnology Center and for his continued guidance and support in my research endeavors. I thank the members of LLNL's Retinal Prosthesis Team: Courtney Davidson, Julie Hamilton, Peter Krulevitch, Mariam Maghribi, and Armando Tovar for their positive energy and enthusiasm to this project. In particular, I would like to acknowledge Mariam Maghribi, whose drive and dedication to furthering science challenged me not to be satisfied with mediocrity. It was my pleasure and privilege to work with and learn from you.
I offer my thanks to Tom Wilson, Bill Benett, Klint Rose, and Jeff Florando for sharing their knowledge of polymers, design, mechanics, and materials. To Emily Carr, Jack Kotovsky, and Cheryl Stockton for their technical support, to Mitchell Anthamatten and Dr. Stephen Letts for sharing their resources and knowledge of the Instron machine, and to Randy Hicks for his machining expertise. I would also like to thank my thesis advisor at MIT, Professor Rohan Abeyaratne for his continued support and encouragement in both my academic and personal goals at the Institute.
List of Figures
Figure 1: Diagram of human eye 9
Figure 2: Concept of Retinal Prosthesis Project 10
Figure 3: PDMS Thickness as function of spin rate 13
Figure 4: Dimensioned side-view of preliminary structures 15
Figure 5: Live implant tests at USC 16
Figure 6: 2"d generation 9-electrode devices with reinforced perimeter 17 Figure 7: Longitudinal "wrinkling" of residual stress 18 Figure 8: Evolution of residual stress during curing of PDMS at 60' C 20
Figure 9: Comparison of relative metal modulii 21
Figure 10: Visual representation of Phase One 22
Figure 11: Parallel model of composite in uniaxial tension 22
Figure 12: Visual representation of Phase Two 24
Figure 13: Series model of composite in tension 24
Figure 14: Visual representation of Phase Three 25
Figure 15: Graphical representation of three phases 26
Figure 16: Curved bar segment with radius of curvature R 27
Figure 17: Straight bar segment pulled in tension 27
Figure 18: Stress distribution of curved bar 30
Figure 19: Schematic of manual stretch tests 32
Figure 20: Upper grip redesign of Instron 34
Figure 21: Lower grip insert pieces 35
Figure 23: Lower grip of Instron with assembly gripped and pins plugged in Figure 24: Complete experimental setup
Figure 25: Wafer fabrication plan Figure 26: Test sample
Figure 27: Preliminary tests of plain PDMS
Figure 28: Comparison of metallized and non-metallized PDMS
Figure 29: SEM photographs of 500 angstroms Ti adhesion layer cracking Figure 30: Table of average strains to failure and standard deviations Figure 31: Comparison of resistance failures between 100 um straight,
200 um straight, and 100 um serpentine leads designs Figure 32: Sample of sinusoidal patterned lead with bubbled interface Figure 33: Graph of conductivity regained
Figure 34: Effect of cure time and temperature on the modulus of PDMS Figure 35: SEM photographs of cracks in deposited platinum
Figure 36: SEM photographs of devices deposited with platinum and gold Figure 37: SEM photograph gives evidence that the leads are not broken
prior to tensile testing
Figure 38: Schematic of testing structure redesign for "soft contact" mechanical testing.
Figure 39: 100um serpentine patterened lead with fold out of plane next to a flat straight 200 um sample.
37 38 40 40 42 43 44 45 46 47 48 52 53 54 55 58 61
1.0 Introduction
1.1 Retinal Prosthesis Project Background
The Retinal Prosthesis Project is a three year project funded by the Department of Energy involving National Laboratories, Universities, and one commercial company. In particular, Oak Ridge National Laboratory and physicians from the University of Southern California led by Dr. Mark Humayan have been leading the efforts in developing this new technology to bring artificial vision to patients with damaged retinal cells.
An eye is a complex organ, made up of many parts that must function together to transmit a visual image. Light is received first by the cornea and transmitted through the aqueous humor, the lens, and the vitreous humor before reaching the retina where light is sensed. (Figure 1) There are two types of cells in the retina: rods, which determine vision in low light, and cones, which discern color and detail. When contacted by light, these cells create the photosensitive chemical "activated rhodopsin", which creates electrical impulses in the optic nerve. These nerve fibers reach to the back of the brain, where the image is interpreted.
The proposed concept of the Retinal Prosthesis project is to create a microelectrode array that would be implanted into the back of the eye. This epiretinal device (placed directly on the retina) would have electrodes that would stimulate the remaining live retinal cells.
2.. Cwnsaissa
Figure 1: Diagram of human eye (Bianco )
The concept of the project is to have a video camera in front of the eye, mounted to be worn like traditional eyeglasses. The camera would capture and transmit an image back to the retina, where it is received by the implanted device. (Figure 2) A retina is composed of ganglion cells and photoreceptors, which contain the rod and cone cells. In a healthy retina, images are transmitted through the ganglion cells to the photoreceptors
-but patients with retinal damage have areas of photoreceptors where the rods and cones are destroyed by disease and therefore the complete image is not accurately transmitted. However, the neural cells that synapse to these photoreceptors remain intact, and visual perception can be obtained from electrically stimulating these cells. (Liu, Wentai, Humayun 2000)
Figure 2: Concept of epiretinal implant's function in replacing the missing electro-chemical signals that a healthy retina would transmit.
The proposed device's electrodes would substitute for the missing electrical signals of activated rhodopsin via thin film conducting traces and electroplated electrodes, and the brain would decode the signals into the original captured image. The objective of the research conducted at the Lawrence Livermore National Laboratory is to design and fabricate the microelectrode array for stimulating these damaged retinal cells. The team aims to use microfabrication techniques to increase the number of electrodes and integrate electronics. The device must be flexible to conform to the natural contours of the retina, and also robust to sustain handling during fabrication and implantation. Other functional requirements of the device include biocompatibility to withstand the physiological conditions of the eye, and the ability to interface with electronics.
1.2 Previous work in Retinal Prosthesis
In the retina, the most concentrated collection of photosensitive cells are found in the center zone called the macula. Macular degeneration is the name of the group of diseases that cause the rods and cones in the macular zone to malfunction or lose function, resulting in debilitating loss of vision. Retinitis Pigmentosa is another genetic disorder in the eye that affects one's night and peripheral vision. The Usher Syndrome is a disorder similar to Retinitis Pigmentosa, but affects hearing as well. These are a few examples of diseases that leave millions of people partially or totally blind due to loss of photoreceptor function in the retina. (Liu, Wentai, Vichienchom 2000) The concept of electrically stimulating the neural cells to restore vision has resulted in efforts worldwide to restore vision to patients through a retinal prosthesis device. (Liu, Wentai, Humayun, 2000; Liu, Wentai, Vichienchom 2000; Hung, 2002; Meyer, 2000)
In the various research attempts to bring artificial vision to the blind, two possible approaches are taken: subretinal and epiretinal. Unlike the previously mentioned concept of epiretinal prosthesis, subretinal prosthesis aims to implant a device directly into the photoreceptor region of the retina, inserted via an incision in the retina. (Zrenner 2002) Light entering the eye triggers a series of events that lead to stimulation of the appropriate neural cells by the device, replacing the function of the damaged photoreceptor cells. A cochlear implant has successfully been developed with an external sensor and an implanted microelectrode device to stimulate the auditory nerves. (Rauschecker 2002) Despite the fact that the visual system is significantly more complex than the auditory system, the success of this analogous study and modem advancements
in microfabrication, integrated circuit, and wireless technologies give hope towards a counterpart for the eye.
1.3 Device Fabrication Procedure
Based on these constraints, it was decided to work with the silicone elastomer poly(dimethyl siloxane) (PDMS), specifically Sylgard 184@ manufactured by Dow Coming. PDMS is an ideal material because it is an elastomeric rubber which can be fabricated into membranes and also molded into thicker, sturdier pieces. It is designed to protect against moisture, environmental attack, mechanical and thermal shock as well as vibration. PDMS exhibits hydrophobic properties and is biocompatible, with only known adverse effects of indigestion if ingested, according the Material Safety Data Sheet (MSDS). A PDMS metallization procedure was developed at LLNL and published in IEEE by Maghribi et. al. outlining the procedures used to fabricate the devices for testing. (Maghribi 2002)
1.3.1 PDMS Preparation
First, PDMS is mixed with its curing agent in a 10:1 ratio, and the bubbles in the solution are removed by degassing under a low vacuum environment. Then the PDMS is spun onto a gold-coated silicon wafer to a desired thickness, at spin rates varying from 1000 to 7000 rpm for spin times ranging from 20 to 90 seconds.
80 60 2400 seconds 90 seconds o 2 0-0 2000 4000 6000 8000 Spin rate (rpm)
Figure 3: PDMS thickness as a function of spin rate (rpm).
Gold was used as a seed layer for the electroplating process, and also to facilitate removal of the PDMS membrane from the Silicon (Si) wafer. This wafer is put in an oven and cured at 66 degrees Celsius for 1 hour and the thickness measured using a Tencor® P-10 stylus profilometer. Based on these measurements, the membrane thickness was determined as a function of spin rate. (Figure 3)
1.3.2 PDMS patterning for electroplating
To pattern the PDMS, photoresist (AZ*PLP 100XT, Clariant) is spun onto the gold-coated wafer and baked at 60'C for 30 minutes. It is then exposed to ultraviolet light using a high-resolution glass mask (created by Imagesetters, Pleasanton, CA). Upon development of the pattern (AZ 400K: H20 1:3 ratio), PDMS is applied at a spin rate
resulting in a membrane thickness less than the height of the photoresist. The PDMS is kept at room temperature for 15 minutes or until planar, then cured at 60'C. After curing,
the photoresist features are gently swabbed to remove excess PDMS before stripping the resist, which ensure the removal of the photoresist and the complete clearance of the patterned area. Gold or platinum is then electroplated in the PDMS vias to form an array of electrical stimulators.
1.3.3 PDMS Metallization
Before the photoresist is applied in the metallization procedure, the wafer is placed in an oxygen plasma to oxidize the surface. This procedure, carried out for 1 minute at an RF power of 100 Watts with oxygen flowing at 300 sccm, allows the resist to wet the PDMS surface, eliminating beading and ensuring the formation of a smooth and uniform coat of photoresist on the surface of the polymer. Then the photoresist (AZ*PLP 100XT, Clariant) is spun onto the surface of the polymer membrane and baked at 60'C for 30 minutes. The photoresist features were then exposed and developed as in the electroplating procedure, and placed for a second time in the oxygen plasma to activate the newly exposed PDMS surface, and promote adhesion of the metal. To create the leads, a 200 angstrom (A) layer of Titanium (Ti) was deposited as an adhesion layer, then a 1500 A layer of Gold (Au) was deposited on top of the Ti. The metal adhered to the PDMS in developed regions in the photoresist and the excess was removed through a lift-off process by placing the wafer in acetone. The wafer was then prepared for passivation by rinsing with ethanol and drying gently.
100 uM
1700 A
40
pm
4mm
Figure 4: Preliminary structures: Dimensioned side-view (not drawn to scale). PDMS membrane with TiAu leads.
The devices used in the initial testing consisted of a 40 micron (pm) thick PDMS membrane with a device width of 4 mm. Both metal layers created leads 100 um in width. As a protective variation, a 10 micron passivation layer of PDMS was spun and bonded onto the device. The purpose of this layer was to protect the leads during handling, exposing only the electrical contact pads. These dimensions and proportions were chosen for the initial tests based on the size of the eye, and considerations for the number of devices that a wafer could yield. The results of this research will show further effects of optimizing these dimensions and variables.
Three first generation devices were fabricated then implanted into the eye of a live dog at the University of Southern California (USC). From these experiments, it was observed that the PDMS conformed nicely to the form of the retina. However, the devices were difficult to handle as they folded and curled up onto themselves due to the static and "tacky" nature of the PDMS. The electrode traces near the edges were also found to be damaged, likely attributed to having been grabbed and stretched by the surgical tools. The final observation was that it was difficult to make electrical contact to the pads patterned onto the device with the probing tools present.
Figure 5: Live animal implant tests of devices at the University of Southern California. Viewed through a magnifying glass, the device is shown as it is pulled through the eye into place on top of the retina.
From these tests, second generation nine-electrode devices were designed and fabricated. The major improvement in this design was the presence of a reinforced "ribbed"
perimeter, which addressed the robustness issues of the first tests. The presence of the ribs facilitates handling, eliminating curling and folding of the device. It also protects the traces near the edge by encapsulating them and giving the physicians a clearer view of the "safe" areas to grab.
Figure 6: 2"d generation 9-electrode device with reinforced perimeter. Electrodes on right are
implanted in the eye, and longer pads on left provide surfaces fro electrical connection and probing.
1.4 Understanding the Mechanical Properties
As the project progressed, it became clear that there was an imperative need for an understanding of the mechanical properties of these devices. Thin composite elastomeric microfabricated devices are challenging to characterize because they are difficult to handle, and also because they exhibit non-linear, viscoelastic, anisotropic behavior. Knowledge of these material properties is essential to establishing credibility for polymer microfabrication, and also crucial in the optimization of device designs.
The objectives of my research in the Retinal Prosthesis Project is to devise experiments and protocols, create an analytical model to predict composite behavior, design and fabricate test structures, conduct experimental testing to determine the mechanical and electrical properties of PDMS-metal composites.
2.0 Theory
2.1 Residual Stress
Since the deposition of metal occurs while the PDMS is in its stretched state, the removal of the devices from the wafer results in a compressive strain, directly correlated to the tensile strain in the PDMS due to volume contraction upon curing. Even though the PDMS "shrinks" in the oven as it is cured, it remains stretched on the wafer during the deposition process, until the membrane is removed. Upon closer examination, visual evidence of "wrinkling" appears longitudinally along the metal traces. (Figure 7)
Figure 7: Longitudinal "wrinkling" seen in metal traces due to compressive strain. 50 pm lead on PDMS substrate.
Stress in thin films can be measured by measuring the change in curvature of a coated substrate before and after deposition using a laser beam technique, where a polished substrate with well defined mechanical properties such as the poisson ratio and elastic modulus is coated with a diamond-like coating. Two laser beams are then reflected off the surface of the substrate, and the change in radius of curvature can be calculated from
measuring the deflection of the beams before and after the coating. With the assumptions that the substrate is usually between three to fifty times longer than it is wide, the film is uniformly stressed, and the substrate is unstressed, the residual stress is then calculated using the Stoney equation (Maissel 1970):
Esubstrate t 2substrat( tPDMS =6 l -Vsubs,,a,, tPDMS
Pf Ps)
where Esubstrate is the Young's modulus of the substrate, tsubstrate is the substrate thickness,
tpDMs is the film thickness, Vsubstrate is the Poissons's ratio of the substrate, and ps and pf are the measured wafer radii at the start of and during the PDMS cure.
A 47 ptm thick film of PDMS was spun onto a gold-coated silicon substrate, and substrate curvature was monitored in the PDMS over time as it was cured at 600 C. The data collected resulted in an average final residual stress of 0.15 MPa in the PDMS film, corresponding to a residual strain of 10%. Analagous to pre-stressed concrete, this phenomenon leads to promising possibilities to improving the life of the devices.
0.18
0.16
0.14
-0.12
0.1
A
2'0.08
0.06
Cn 0.04
0.02-0 j_-I I I I I0:00
0:15
0:30
0:45
1:00
1:15
1:30
1:45
2:00
Time (hr:min)
Figure 8: Evolution of residual stress during curing of PDMS at 600 C, calculated using (1) based on measurements.
2.2 Composite Theory 2.2.1 Metal comparisons
The material used in these experiments were carefully chosen based on characteristics such as strength, conductivity, and price. The relative elastic modulii of these metals play a large role in predicting the strength of the overall product. For example, when comparing Platinum, Titanium, and Gold, the respective modulii are 170 GPa, 106 GPa, and 78 GPa. The fundamental definitions of stress and strain (Equation 2) indicate that materials with higher modulii are stiffer, and for a given stress value, experience a lower strain to failure than materials with lower modulii.
P
= - = EE (2)
If the thickness of the metals are varied, the values of the cross-sectional areas change, which would result in lower strains to failure, since the term is in the denominator.
Stress
failure
Pt 170 GPa
Ti 106 GPa
Au 78GPa
I I I ePt Ti CAuStrain
Figure 9: Comparison of relative strains to failure for a given stress 0 failure corresponding to the Young's Modulus of Platinum, Titanium, and Gold show that stiffer materials with high modulii will fail first.
2.2.2 Polymer-metal composite
The fabrication process for the implantable devices yields a composite structure between the polymer and the metal. This structure can be modeled in different ways depending on the progression in the tensile testing: examining how the composite behaves as two springs in parallel prior to the first failure, in series between the broken and unbroken segments, and a combination of parallel and series as the metal continues to fail.
Due to the residual stress discussed earlier, the initial layers of Ti and Au exhibit a "wrinkled" effect, and will experience uniaxial tension as the metal traces are smoothing out. At this stage labeled as Phase One, the material properties of the PDMS dominate and the effective stiffness is assumed to be that of the PDMS: 750 kPA.
TiAu
Figure 10: Visual representation of Phase One with the metal wrinkled on the PDMS.
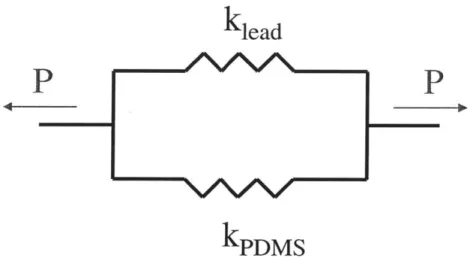
Once the metal is pulled taut, the composite can be modeled as two springs in parallel with equal and opposite load P, and the metal and the polymer are subject to the same strain. (Figure 10)
klead
P
---
~
P
kPDMS
Figure 11: Parallel model of composite in uniaxial tension, which is what the device experiences in Phase Two.
This stage is called Phase Two, and since the device is pulled in uniaxial tension, the initial strains the device encounters until the first break occurs are equal. From the
fundamental definitions of stress and strain (Equation 2), and noting that all strains are equal and therefore falls out of the equation, a relation for the effective Young's Modulus
(E) of the composite can be calculated (Equation 3).
E :omoi, = Ele a A lead+ E PDMS APDMS (3)
ccomposite
However, this equation assumes that the strain of the PDMS is taken from the beginning of Phase Two. When examining the relative stresses and strains of the lead and the PDMS, it should be noted that the PDMS has a small compensation value e in the strain for the amount it stretched during Phase One where the PDMS experiences stress and strain, but the metal does not. Therefore, the stress in the PDMS begins at a slightly higher absolute value than that of the metal. The equivalent equation for the modulus then becomes:
Ecomposite = r Eled Aled + EPDMS APDMS + EPDMS ApDms (4)
Acomposite Acomposite
where e. is the strain experienced by the PDMS in Phase One, and F is the overall strain experienced by the composite in Phase Two.
In Phase Two of tension testing, both the Young's modulus and the cross-sectional area of each material affect the resultant modulus of the composite. Although the modulus of
the PDMS (750 kPa) is approximately five orders of magnitude less than those of Ti (106 GPa), and Au (78 GPa) (Ashby 1996), the respective cross-sectional areas of the polymer
(1.6 x1i- 7 m2) is four orders of magnitude greater than the effective A of the metals (1.7 x10¹¹m2). Therefore, the quantity of EA for each material cannot be discounted in evaluating the effective modulus while in the parallel state.
TiAu
Figure 12: Visual representation of Phase Two with the metal pulled taut in parallel with the PDMS.
As the leads on the devices begin to fail, segments of the structure exhibit properties closer to a combination of springs in series and in parallel. (Figure 12)
p
klead
kPDMS
P
kPDMS
Figure 13: Series model of composite in tension
The effective modulus for this phase cannot isolate the effects of the individual materials as easily as the model in parallel. Simplifying the equations by examining the composite
structure without the factor of e,, the effective modulus for two materials modeled as springs in series (Jones 1998) is:
Ecomposite = ( EldEPDMs Aomposi (5)
s Elea APDMS + EPDMS Aead)
With each successive failure, the structure enters Phase Three, where it reduces to segments where the metal and polymer are still in parallel, but also in series with smaller segments of PDMS in the segments between the breaks. (Figure 13)
TiAu
Figure 14: Visual representation of Phase Three when failures occur.
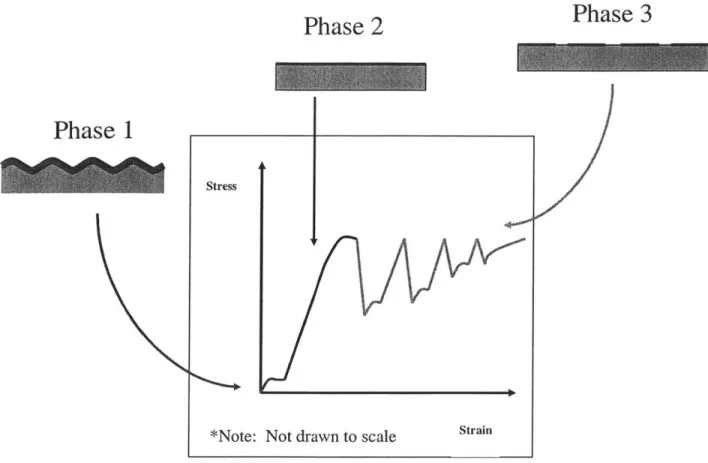
The three phases are represented graphically in Figure 14, with exaggerations to each section to demonstrate the effects of each phase.
In Phase One, the curve should represent that of PDMS, which begins linearly then begins to exhibits exponential behavior. In Phase Two, the modulus of the metal dominates in the linear section, until the metal reaches failure and the stress is temporarily relieved. This drop is small, but occurs until the PDMS segment is fully stretched, and the material undergoes a similar process until the next break, and continues until the PDMS itself fails, which occurs at approximately 140% strain.
Phase 2
Phase 1
Figure 15: Graphical representation of three phases in device failure.
It is predicted behavior until absolute value
that the graphical segments to each break will be repeatable with similar the stress relief occurs at failure, with the exception of the fact that the of the stress relief will decrease with each successive break.
2.3 Sinusoidal stretch model
In the case of curved metallic lead shapes, the stress and strain experienced can be modeled in two modes. Initially, the curves act as springs and the device stretches, then the leads break at the stress concentrations and failure occurs.
Phase 3
Stress
P
2R
Figure 16: Curved bar segment of cross sectional area bh with radius of curvature R pulled in tension by equal and opposite forces P. When pulled 2R becomes 2R+J.
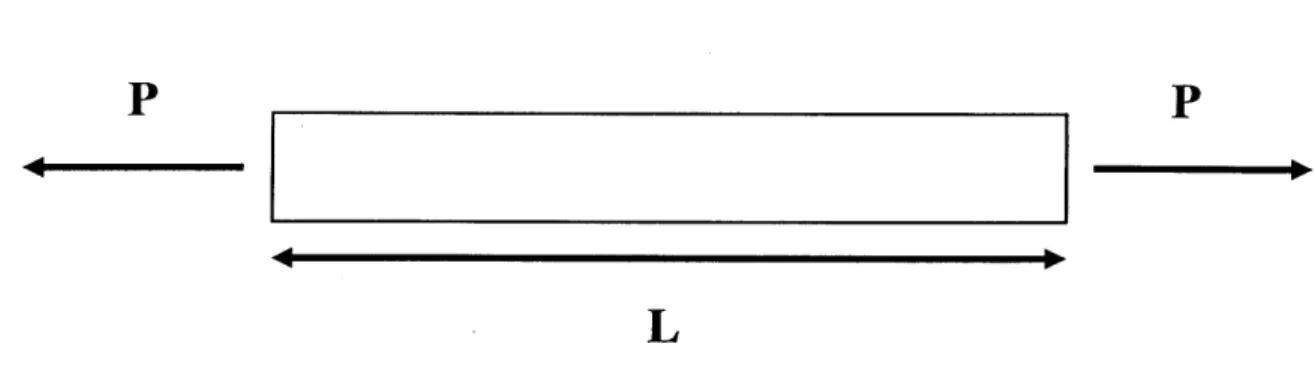
Unlike a straight bar pulled in tension (Figure 17), the curved bar (Figure 16) is predicted to have the capability to pull to a larger strain before failure because of this spring-like tendency. When pulled with equal and opposite forces P, a straight bar of length L will deform to a value of L+6. Under the same conditions, a curved bar of the same material with diameter of 2R will deform to a diameter of 2R+6. For the purposes of comparison, we will set the values of L = 2R.
]
P
4
L
Figure 17: Straight bar with cross sectional area bh pulled in tension by equal and opposite forces P. When pulled, L becomes L+.
For a straight bar, the change in length, 6, can be defined as a function of the load applied
P, initial length L, Young's modulus E, and cross sectional area bh:
PL (6)
E(bh)
Combining Equations 2 and 6 gives the relation between the maximum stress o. and 8:
Lo _ 2Ro,
E E (7)
Defining the terms S ,,, as the critical change in length at which a bar fails and J. as the overall change in length in the bar at failure, it is clear that S,., = J. for a straight bar of uniform cross-section since each segment of the bar experiences uniform stress.
Conversely, a curved bar experiences a stress distribution and stress concentrations that vary along the bar as a function of the curve, h(x). (Equation 13) The maximum stress
o. varies as a function of the radius of curvature R, height h, inertia I, and load P:
(8)
Umax curved - R+
-2 - RP)
R+ (h I
The corresponding change in length 6 is:
Pcurved
=
2R E
2EI (9)
and combining Equations 8 and 9 gives the value of 8 as a function of o. (Bickford 1998): 5 curved -2R" E 2RE" EF 2R h + (10) h 4 2R R J
Failure occurs when the critical stress meets the maximum stress ( am, = o. ), and therefore the critical change in length meets the maximum change in length (4,cr, = o.).
For even a slightly curved shape in these experiments, the value of
-h will always be much greater than 1 since the values of R are much larger than the values of h. Therefore it can be extrapolated that:
|"rved > jstraight
Since the material is the same, the modulii of the straight and curved beams are also equal. Substituting equal values of E into Equation 2 gives the prediction that the strain to failure of the curved beam will be greater than that of the straight beam:
ecr -avg >Estraight
ecrit >8cit (12)
The stress in a curved bar is represented as:
M(R -r) curved bar - R
- Ar(F -R)
(13)
where r is an arbitrary point on the curve, and M is the moment at this point, A is the cross-sectional area, R is the radius of curvature, and 7 is the distance from the center to the centroid. (Hibbeler 2000)
R is defined as a function of A and r:
A
R =A dA
A r
(14)
M is defined as a function of h(x), which is defined as the sine function, dependent on the characteristic length Lc and the distance x along the axis of the curved bar.
h(x) = h sin 7j (15)
(LC
The stress distribution in a curved bar shows that the maximum value of h(x) occurs in the center of the bar, where it is most likely to fail. (Figure 18)
h(x)
hmax
X
Figure 18: Stress distribution of curved bar indicates that maximum stress concentration occurs at the center. Assuming a uniform cross-sectional area, each segment of a straight beam is subject to the same force and stress upon tensile loading. Therefore, the critical stress Cc at which failure occurs is the same as the overall stress a7 in the beam. In the case of the curved beam, however, the stress distribution causes a discrepancy, and the model predicts that the overall stress will be greater than the critical stress, which occurs at hr, and therefore a curved sinusoidal design for the metal leads mav improve the overall strain to failure of the devices.
3.0 Mechanical Testing Design
3.1 Previous Mechanical Testing
To gain an understanding of the strain to failure properties of metalized PDMS, manual stretch tests were conducted with resistive heater devices. A micrometer was used to monitor the axial elongation of the samples, which were stretched in constant increments. The pads were then probed with an ohm-meter to check for a break in the circuit, which corresponded to failure.
Ohm-meter
Figure 19: Schematic of manual stretch tests.
The results from these tests showed an average strain to failure of 7%, yet the accuracy remained questionable. The sample was pulled by rotating the handle connected to a spring, which had not been calibrated. Since the metal layers were so thin, the constant probing from the ohm-meter could have resulted in breaks in the pads themselves, instead of indicating failure in the devices. The lack of background information on such material properties, and the ubiquitous presence of human error indicated a need for a constant, real-time measuring procedure, with mechanical and electrical monitoring capabilities.
3.2 Mechanical Testing Solution
An Instron tensile-tester (model #4201) with real-time visualization and monitoring of trace conductivity was procured and set up for continuous testing. The Instron was set up in conjuction with a digital multi-plexor (Agilent 34970A Data Acquisition/Switch Unit) that was programmed to collect and convert voltage data collected into measurements corresponding to position, load, and resistance. This data was then transmitted and represented graphically on a computer, using Agilent BenchLink Data Logger.
3.2.1 Testing System Design
Once the system was set up, several obstacles surfaced that indicated a need for redesign and modifications. The first occurred in obtaining the mechanical measurements of position and load, which was addressed by designing a new upper grip to address weight issues. The second occurred in the continuous monitoring the electrical resistance, which was addressed in a design of inserts to be inserted into the lower grip of the Instron.
3.2.1.1 Upper Grip Design - Mechanical
Since the metal traces were inclined to fail at such low strains, the experimental setup had to be modified to allow for these measurements. A compliant 10 pound compressive load cell for testing polymers was obtained and set up to replace the standard 100 pound tensile load cell used in the Instron. Although the load cell was made for compression tests, it was found that it should be able to record data output in tension for the low forces of these experiments (0.01 Newtons). However, once the load cell was replaced, it was
observed that the load was still unable to be measured. Upon closer inspection, this occurrence was attributed to the heavy pneumatic grips in the Instron. Since the bottom grip remained stationary, the problem could be solved by modifying the upper grip design.
The functional requirements of this design were that it had to be lightweight, and also easily removable to facilitate frequent testing. These requirements were fulfilled by choosing a light plastic material, and modeling the design after the inserted portion of the original pneumatic grip to interface with the Instron. The new design consisted of two pieces - a cylindrical piece that interfaced to the moving upper mechanism of the Instron, and a rectangular clamping piece to secure the sample into place with screws.
3.2.1.2 Lower Grip Design - Electrical
In order to monitor continuous electrical resistance, it was necessary to create an insert to the lower grip. The grips of the Instron were far too rough to be able to handle the devices directly, and the air emitted from the pneumatic mechanism and the movement of the grips towards each other caused the sample to fly out of the desired position upon closure. The main functional requirements of this insert were to conform to a uniform thickness, protect the sample from the pneumatic grips, and to conduct for electrical resistance measurements.
These requirements were met with gold-coated glass pieces with strips masked off in the coating process to prevent shortage. The small piece was a one inch square piece of glass with a 120 nm strip masked away in the center, and the large piece was a standard glass slide (1" x 3") with a larger section stripped away.
Gold-coated male-female plug-in pins were procured, and the female halves were attached to the large glass insert piece via silver epoxy to maintain conductivity. The male counterparts were soldered onto the ends of wires leading to the digital multiplexor. The design concept was to lay the sample face-down on the small piece so that the stripped away section without gold ran in-between the two metal lines that were looped together. This setup ensures that the current runs from one gold-coated half of the glass piece, through the looped device, to the other gold-coated half. The large glass piece is then placed face-down on this sub-assembly, and current is then allowed to flow from one connector through one gold-coated half of the large piece, then is transmitted through the sub-assembly which includes the sample, through the other gold-coated half of the large piece, and out of the second connector. Once the male pins are plugged in to either connector, the circuit is complete and the resistance can be measured and recorded by the multi-plexor.
Preliminary tests with these connector pieces did not yield electrical resistance measurements. Upon closer investigation, the failure was attributed to the thickness of the sample. Although 40 ptm is a thin membrane, it could not be discounted as trivial, as it provided just enough of a gap in between the two glass pieces to prevent contact. The solution to this hitch was found in Indium foil, which is extremely soft and conformable to any surface. Two strips of foil were cut and placed on the gold-coated halves of the small square glass piece. These strips compressed slightly to give the necessary closure in the gap while maintaining conductivity.
Figure 22: Square glass piece with Indium foil lining and device in place.
Once a sample was "sandwiched" into place, the entire assembly was inserted into the lower grips of the Instron, and the grips were closed so that the assembly was in line and flush with the pneumatic grips. Then the male connector pins were plugged in, and the device was ready to be tested.
Although this procedure required two people to run each test, it was fairly reliable and consistent to giving resistance measurements for devices that matched those of an external ohm-meter.
3.3 Lead Design
Once the experimental setup was determined, possible variables in design and fabrication were examined for testing. As the fabrication time required for each wafer was approximately 3 hours, and the number of devices that could fit on each wafer was constrained by the size of the wafer, the number and combination of variables were carefully scrutinized. This selection process resulted in the choice of the following variables as the most crucial:
" Lead width (50 Rm, 100 ptm, 200 ptm) - design variable
" Pad to lead interface (straight, bubbled transition) - design variable " PDMS thickness (40 ptm, 70 ptm) - fabrication variable
" Metal thickness - fabrication variables
>
Ti thickness (50, 500A)
>
Au thickness (1000, 2000, 3000A)
* Lead shape (straight, sinusoidal curve) - design variable
Design variables are those variables that would be accounted for in the wafer layout design. One mask was made and reused for each wafer produced. (ImageSetters, Pleasanton CA). Fabrication variables are those variables that would be accounted for in the fabrication procedures. The mask was designed to fit 22 rectangular test samples with dimensions of 4mm x 40mm on each wafer, and a plan was devised to fabricate 12 wafers which would account for all of the fabrication variable combinations. (Figure 25)
PDMS Ti Au Wafer # (microns) (angstroms) (angstroms)
1 40 50 1000 2 40 50 2000 3 40 50 3000 4 40 500 1000 5 40 500 2000 6 40 500 3000 7 70 50 1000 8 70 50 2000 9 70 50 3000 10 70 500 1000 11 70 500 2000 12 70 500 3000
Figure 25: Wafer fabrication plan.
The deposition rate was kept constant at 2 angstroms/second. A single loop design was chosen to keep the electrical resistance measurement apparatus simple and isolated on the bottom grip of the Instron.
Figure 26: Sample with straight pad-to-lead interface, 200 um lead width, 40 um PDMS thickness, 5 nm Ti thickness, 10 nm Au thickness.
4.0 Experimental Testing Results
4.1 Calibration and setup
The Instron was first calibrated to the multiplexor and computer to ensure that the load and resistance readouts were correct and consistent. Since the Instron gave output data in volts, conversions were necessary to extrapolate the values of load, stress, strain, modulus, and resistance in the samples during testing. Given the low forces (0.01 Newtons) predicted to failure, the sensitivity of the machine was adjusted to 5% mode, and the sampling rate of the multiplexor was increased to 10 measurements per second. Several pull rates were tested, at 10 mm/min, 5 mm/min, and 1 mm/min, and the lowest rate of 1 mm/min was selected to increase accuracy.
Initial tests were performed with pieces of non-metallized PDMS membranes to examine the behavior of the polymer. These pull tests indicated very large strains to failure ranging from 90% to 200%, averaging close to the listed strain to failure of 140% from Dow Corning. The variations in strains to failure can be attributed to the width, height, and length of the specimen. The samples that exhibited unusually high levels of strain to failure (above 180%) produced stress vs. strain curves with a sudden stress drop, which could be attributed to the sample having slipped in the grip at high strains. The general shape of the stress-strain curves were consistent with each other, with an initial linear region which gradually turned into an exponential function before failure. (Figure 27)
PDMS
PDMS
-2.0 +o
strain
Figure 27: Preliminary tests of plain PDMS indicates failure at 90% strain.
4.2 Metallized and non-metallized PDMS
Based on the calculations of effective modulus (Equations 3, 4, 5), it was predicted that metallized PDMS would be less compliant than plain PDMS. Samples of metallized PDMS (50 angstroms Ti, 1000 angstroms Au) were pulled in comparison to samples of non-metallized PDMS from the same wafer, and the stress vs. strain curves were extracted and compared. (Figure 28) These experiments gave consistent results amongst the metallized samples, whose curves all resembled the same shape, as well as having similar strains to failure. In comparison, the plain PDMS piece begins with a linear region with a significantly lower slope corresponding to modulus, and then proceeds to fail close to 200%. However, a huge stress relief is seen around 160%, where it is
believed that the specimen slipped from the upper grip slightly. This occurrence resulted in an increase in length of the sample, which prolonged the life of the device.
50 Ti 1000 Au vs. PDMS -Ti50 5As_3 Ti50 5As_2 Ti50 5As_1 PDMS -5.0(E! 9S +00 strain
Figure 28: Comparison of metallized (50 angstroms Ti, 1000 angstroms Au) and non-metallized PDMS.
4.3 Adhesion Layer Thickness Upon testing, it was found that of Ti had already failed prior scanning electron microscope devices were removed from the brittle. (Figure 29)
nearly all of the test pieces fabricated with 500 angstroms to mechanical testing. Upon closer inspection under a (SEM), observations were made that even before the wafer, severe cracking was occurring and the Ti was too
Figure 29: SEM photographs of 500 angstroms Ti adhesion layer cracking.
Therefore, all of the data taken reflects only those samples which were fabricated using 50 angstroms of Ti.
4.4 Lead Width and Shape
After testing 200 samples, the Instron tests gave average strains to failure of 2.4% for the 100 pm leads, 2.3% for the 200 ptm leads, and 4.2% for the 100 jim serpentine (curved) leads. (Figure 30) Based on these results, it appears that there is no overall benefit to increasing or decreasing the lead width dimension. The variables of pad-to-lead interface, PDMS thickness, and gold thickness also did not produce significant results, and therefore these variables were combined to produce more data points to compare other variables tested.
Average Standard Deviation
4.2% 2.0
2.4% 0.9
2.3% 1.4
Figure 30: Table of average strains to failure and respective standard deviations for the 100 um serpentine, 100 pm straight, and 200 pm straight leads. The variables of pad-to-lead interface, PDMS thickness, and gold thickness did not produce significant results, and therefore these variables were combined to produce more data points to compare other variables tested.
However, it was observed that the resistance measured before failure was approximately twice as large for the 100 ptm lead when juxtaposed to that of the 200 pm leads. (Figure 31). For this particular comparison, the 200 gm straight leads failed at 2.24%, the 100 pm straight leads at 2.82%, and the 100 pm serpentine leads at 3.9%. Although the variables of lead width and shape and adhesion layer thickness could be isolated and observed, the variables of Ti thickness, Au thickness, and pad-to-lead interface shape did not result in any conclusatory results.
50A Ti, 2000A Au, 40um PDMS
2.OOE+02 1.80E+02 1.60E+02 1.40E+02 1.20E+02 1.OOE+02 8.OOE+01 6.00E5+01 4.OOE+01 2.OOE+O1 O.OOE+00Q.OOE+00 5.OOE-03 1.QQE-02 1.50E-02 2.OOE-02 2.505-02 strain
3.OQE-02 3.50E-02 4.OOE-02 4.50E-02
Figure 31: Comparison of resistance failures between 100 um straight, 200 um straight, and 100 um serpentine leads designs from wafer #2 (40 um PDMS, 50 angstroms Ti, 2000 angstroms Au)
Compared to the initial manual stretch test data, though, the Instron data resulted in much lower strains to failure overall. Manual stretch tests were re-conducted with the current masked designs, to compare the discrepancy between the initial stretch test data and the Instron data. Three new wafers were fabricated with 50
A
of Ti as the adhesion layer, and 1000, 2000, and 3000A
of gold, respectively. The experiments resulted in higher strains to failure, closer to the results found from the original manual stretch tests. The 100sm
straight leads failed at an average of 5.1%, the 200 pm straight leads at 6.0%, and the 100 jim serpentine leads at 8.9%. Although the absolute strain to failure values were much larger, the relative failure values were consistent between the two tests.E 0
Figure 32: Sample of sinusoidal patterned lead with bubbled pad to lead interface.
4.5 Regaining Conductivity
During the initial manual stretch tests, it was observed that after the leads failed, if the stress was relieved and the material was allowed to relax, conductivity could be regained. This occurrence was consistently repeatable with the Instron as well, and is attributed to the extremely elastic nature of the PDMS and how it does not tend to permanently deform. As the polymer relaxes, the broken leads are brought back together to touch and give an electrical readout. A few simple tests were conducted, pulling the specimens to failure, jogging the machine back down until the device returned to slack, pulling to 20% strain, returning to slack, pulling to 40% and so forth until the device itself failed. The
resistances observed prior to failure for each of the incremental increases in strains to failure showed a steady increase of a few ohms for each increase, and each curve was similar in shape and strain to failure. (Figure 33)
4.15E+02 s+ Resistance1 4.1OE+02 -- Resistance2 Resistance3 4.05E+02 4.OOE+02 3.95E+02 3.90E+0O2 3.85E+02 t 3.80E+02
O.00E+00 1.00E&02 2.OOE-02 3.OOE-02 4.OOE-02 5.00E502 6.OOE-02 7.00&02 8.OOE-02 9.OOE-02 1.00E-01 strain
Figure 33: Graph of three pull tests on the same sample. Conductivity is regained after each failure,
5.0 Discussion
5.1 Lead width and shape
The proportionate difference of the resistance to failure in the 100 pm leads when compared to the 200 ptm leads can be explained by examining the definition of resistance:
R =L $(16) A
where R is the resistance, p is the resistivity of the material, L is the length, and A is the cross-sectional area. The length is constant since all of the samples were identically dimensioned, and the resistivity is also constant because the materials and proportions on each wafer were identical. Therefore the only variable that determines the resistance value is the cross-sectional area. Since the deposition thickness of the metals did not vary on the same wafer, the increase of width (and hence, area) by a factor of 2 for the 200 pim leads resulted in a proportionate resistance drop (calculated and observed).
The serpentine leads consistently resulted in higher strains to failure, regardless of the other variables, which was predicted by the analysis of curved beams (Equations 6-12). For this experiment, the outer radius and inner radius of the curved leads were designed at 400 pim and 300 jim, respectively. Since the cross-sectional area was rectangular and of a uniform thickness, the centroid was the midpoint of the outer and inner radii, and r = 350 pim. Running the numbers through Equation 14 gave a value of R = 347 im, leaving a positive but small value of (F - R) in the denominator of the stress equation
(Equation 13). A redesign increasing the value of (F - R) could decrease the value of this stress and therefore increase the potential life of a sinusoidal device. This could be accomplished by increasing the cross-sectional area, which can be achieved by either a thicker layer of gold, or increasing the lead widths.
5.2 Extrinsic vs. Intrinsic Loads and Stresses
For our applications, it was deemed that the effect of the intrinsic properties dominate the extrinsic ones, as many of the extrinsic loads and stresses were not able to be monitored or controlled. Given the variables that could be controlled, such as device dimensions and shapes, the objective was to examine these variables to optimize the lead design for maximum strains to failure.
5.2.1 Extrinsic Stresses and Loads
Extrinsic stresses for these experiments are defined as variables such as temperature and pressure in the e-beam, and other fabrication variables. However, those variables were not able to be monitored, so an analysis of the extrinsic loads was executed as a substitute. Extrinsic loads are defined as stresses that occur due to external circumstances, such as handling and implantation, or the forces seen when comformed to the curvature of the eye. While it is extremely difficult to measure the forces that occur due to handling of the device, an attempt was made at modeling the forces necessary to withstand the curvature of the eye. Examining a simple model of the eye as a semi-sphere, the relevant equation is:
lo =c , = (17)
where E, and e, are the strains in the x and y directions, z is half the thickness of the membrane layer, and p is the radius of curvature, which is about 12 mm. (Gray 2000)
For a sample with PDMS thickness of 50 microns, Equation 9 indicates that the device could only see 0.2% strain before failure would occur. However, these calculations assume that the PDMS is flat. The residual stresses in our devices create a curve and the added feature of the protective ribs tend to give a stiffness that is advantageous to our applications.
5.2.2 Intrinsic Stresses
Intrinsic stresses are defined as stresses that occur that are inherent to materials. For our devices, the stresses involved focus around how the material was deposited. Although these intrinsic stresses can be tailored based on the pressure and temperature settings of the e-beam, we were unable to control the exact parameters of the electronic beam deposition process, such as temperature or the power needed to melt the metals. Therefore, our devices are only varied by the thickness and type of deposited metal.
Rheological Tests were conducted (Dynamic Curing Kinetics) to determine the stiffness of the PDMS as a function of cure time, cure temperature. From these tests, it was found that the stiffness increased as a function of both cure time and temperature, and to
increase the optimal intrinsic elasticity, the curing combination of a 1 hour cure at 60 degrees Celsius was chosen.
Cure Time (Hours) Curing Temperature (C) Young's Modulus (MPa)
1 60 0.9 2 60 1.35 3 60 1.8 >3 60 plateau 1 75 2.1 2 75 2.4 >2 75 plateau 1 90 2.7 2 90 3.0 >2 90 plateau
Figure 34: Rhealogical data of the effect of cure time and temperature on the modulus of PDMS.
In the electronic beam deposition phase of the fabrication procedure, it was noted that gold is deposited under compression, while titanium and platinum are deposited under tension. With a high Young's modulus (170 GPa) and high internal stress (499-673 GPa) (MEMS Clearinghouse) tests with platinum gave results similar to those of thick layers of Ti, with brittle layers showing severe cracking upon fabrication under a scanning electron microscope. (Figure 35) Gold is a much more compliant material, and for preliminary
tests, is biocompatible enough although platinum would be the preferred material of choice for the future.
Figure 35: SEM photographs of cracks in deposited platinum.
Films of gold and platinum were analyzed and juxtaposed to view the differences in cracking. (Figures 36a, 36b) The SEM photographs of platinum clearly show the presence of cracks, and also give a three-dimensional viewpoint that the platinum is delaminating from the surface of the PDMS as a result of these cracks. In comparison, the SEM photographs of the gold samples do not indicate evidence of cracks. Furthermore, Figure 36c and 36d shows the presence of wrinkling, which was shown earlier to improve the overall strength of the device. Based on these observations, it is safe to say that the intrinsic stresses associated with the material selection plays a huge role in the success of the devices.
Figure 36: SEM photographs of devices deposited with Platinum (a, b) and Gold (cd). Platinum shows evidence of cracking, while Gold shows evidence of wrinkling.
Investigating the theory that the gold traces are also cracked, a closer scan was taken on an individual gold lead (Figure 37) to maintain mechanical and electrical integrity. Based on this SEM photograph close-up, it is clear that the metal is wrinkled and does not contain discontinuity.
Figure 37: SEM photograph gives evidence that the leads are not broken prior to tensile testing.
5.3 Comparison to Similar Metallized PDMS Developments
In the journal article entitled "Spontaneous formation of ordered structures in thin films of metals supported on an elastomeric polymer" (Bowden, Brittain et al. 1998), Whitesides et al. describe a similar process for layering metal on PDMS via e-beam deposition. This article focuses mostly on the effects of temperature in the curing process, and the wave patterns produced in the PDMS at various stages of fabrication. However, the relative thicknesses used in these procedures are significantly larger from our applications, with a PDMS thickness of 1 centimeter as opposed to 40 microns. The drastic increase in cross-sectional area decreases the effect of the metal in the composite structure (Equations 3, 4, 5) and at such thicknesses, the effect of the PDMS would dominate the modulus calculation. Additionally, the authors use a modulus value for
PDMS of 20 MPa which is far greater than the value of 750 kPa used for the thin membranes in this research.