Crafting technology with circuit stickers
The MIT Faculty has made this article openly available.
Please share
how this access benefits you. Your story matters.
Citation
Qi, Jie, Andrew “bunnie” Huang, and Joseph Paradiso. "Crafting
Technology with Circuit Stickers." in Proceedings of the 14th
International Conference on Interaction Design and Children,
IDC'15, June 21 - 25, 2015, Medford, MA, USA. ACM.
As Published
http://dx.doi.org/10.1145/2771839.2771873
Publisher
Association for Computing Machinery (ACM)
Version
Author's final manuscript
Citable link
http://hdl.handle.net/1721.1/103639
Terms of Use
Creative Commons Attribution-Noncommercial-Share Alike
Crafting Technology with Circuit Stickers
Jie Qi
MIT Media Lab 75 Amherst St
E14-548 Cambridge, MA 02142
[email protected]
Andrew “bunnie” Huang
Chibitronics 233 Bain St #10-01 SINGAPORE, 180233
[email protected]
Joseph Paradiso
MIT Media Lab 75 Amherst St
E14-548 Cambridge, MA 02142
[email protected]
ABSTRACT
Chibitronics circuit stickers are a new toolkit for crafting with electronics. Circuit stickers are modular, flexible circuit components with conductive adhesive pads. They feel like stickers but behave like electronic units and can be stuck to any conductive connector, such as copper foil tape, conductive ink or conductive thread, to make circuits. The toolkit includes, LEDs, sensors, pre-programmed function generators and a programmable microcontroller. Along with the circuit stickers, we have also created a suite of educational support resources such as the Circuit Sticker Sketchbook, which contains lessons and activities for crafting circuits onto templates inside the book. In this paper we describe the design and initial public adoption of the Chibitronics circuit sticker toolkit.
Categories and Subject Descriptors
K.3 Computers and Education
Keywords
Paper computing, construction kit, stickers, papercrafts
1. INTRODUCTION
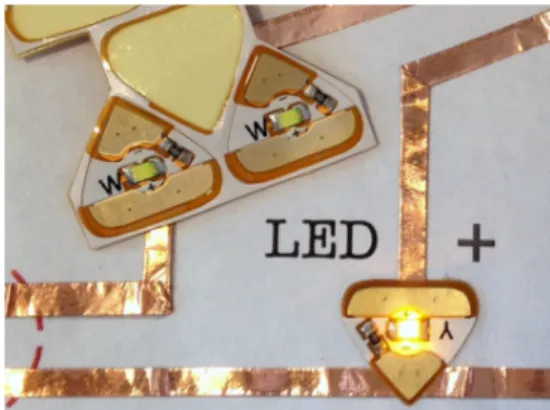
Stickers are a common art material and tool for quickly adding pre-designed and pre-fabricated images to any adhesive-friendly surface. With the goal of introducing wider audiences to crafting with electronics, we take inspiration from the humble sticker to create a toolkit of modular adhesive circuit boards, called Chibitronics circuit stickers (see Figure 1).
Rather than working with unfamiliar techniques and materials like bending wires, plugging into breadboards and clipping to LED legs, children can use circuit stickers to build electronics by simply peeling off the sticker and pressing it down over conductive materials like conductive paints and foils.
Permission to make digital or hard copies of part or all of this work for personal or classroom use is granted without fee provided that copies are not made or distributed for profit or commercial advantage and that copies bear this notice and the full citation on the first page. Copyrights for third-party components of this work must be honored. For all other uses, contact the Owner/Author. Copyright is held by the owner/author(s).
IDC '15, June 21-25, 2015, Medford, MA, USA ACM 978-1-4503-3590-4/15/06.
http://dx.doi.org/10.1145/2771839.2771873
We designed the experience to feel just like crafting with traditional stickers, except with the additional functionality of light, sensing and programmability. In doing so, our goal is to create an “on ramp” to new electronics concepts like inputs and outputs or series and parallel circuits through familiar materials and interactions. Following the constructionist tradition, our kit aims to be tangible and open-ended so that children will be motivated to learn these new concepts in order to create more complex and personally meaningful craft projects [1].
Figure 1. Illuminated LED circuit sticker
2. RELATED WORK
The Chibitronics circuit stickers toolkit builds upon prior work in paper electronics as well as using stickers to create interactive technologies.
Paper computing—creating electronics on paper—has been more frequently used recently as a medium for circuit building and creative expression. For example, the Teardrop toolkit uses removable magnetic modules to cling to conductive traces painted onto the page [2] and StoryClip uses a clip-on circuit board to turn painted traces into capacitive touch elements for interactive storytelling [3]. Off-the-shelf electronic components can also be used on paper to create functioning circuits [4]. Researchers have also found new material approaches that combine electronic functionality with aesthetics, such as the paper power generators [5] and printed speakers [6].
Stickers and adhesive modules have also been used as building material for interactive electronic technologies. For example, the Stickers are often used as tags or visual labels in interactive systems, such as the interactive sticker storybook [7] and tangible programming robot toolkit [8]. Stickers in the form of adhesive
electronic elements have also been used for prototyping electronics [9][10] and as removable modules for building interactive electronic interfaces, in the case of the Telescrapbook and I/O stickers [11].
In our work, we combine the creative affordances of paper electronics with the ease and familiarity of stickers. We also designed Chibitronics circuit stickers to be widely accessible outside the lab, so all of our tools and resources are made with manufacturing processes for scalability and under open and creative commons licenses so others can share and build upon this work.
3. CIRCUIT STICKER TOOLKIT
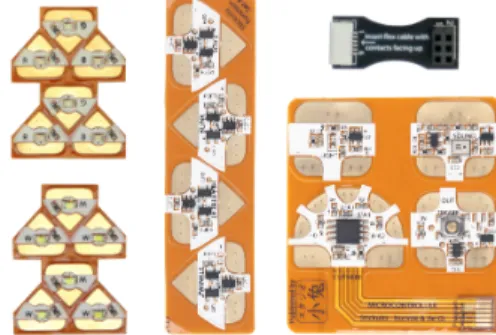
The Chibitronics circuit sticker toolkit is designed to enable the most basic electronic interactions. Thus far, it includes LEDs, pre-programmed function generating effect stickers, light sensor, sound sensor, resistive touch sensor and a programmable microcontroller (see Figure 2). To build a circuit, users would first create conductive traces on the page by sticking down conductive copper tape or drawing in conductive ink. Next they would stick on the circuit sticker and add a battery to power the circuit. Finally, they can decorate over or around the circuit to create a personal project.
The LED is the most basic circuit sticker, with two contacts and a power-limiting resistor. We envision a learning process where users begin with basic battery-powered LED circuits, using copper tape, conductive ink or conductive threads to make the connections. Advanced interactions can be crafted using paper switches. These explorations remain in the mechanical domain where effects in the circuit are made through manually manipulating physical connections.
Next, to add non-mechanical and automated interactivity to their projects, users would explore sensor and effect stickers. Sensor stickers are control LED brightness with respect to environmental input. The light sensor sticker responds to the amount of light hitting the sticker. The sound sensor reacts to the vibration experienced by the sticker. Finally the touch sensor reacts to the amount of resistance between two electrodes on the sticker. These sensors can also be used creatively to sense higher levels of information. For example, the sound sensor can sense noise in the environment, tapping on the paper or wind (by blowing into the microphone), which all generate vibration. The resistive touch sensor allows users to turn any two conductive materials into sensor electrodes. For example, users can create scenes where objects drawn in copper tape or conductive ink can be touched to control the brightness of lights. Finally, the light sensor allows “remote” interactions. That is, by casting shadows or changing ambient light levels, the circuit automatically responds without physical connections to the controlling object.
Effects stickers automatically change the light brightness through code rather than environmental inputs. These are pre-programmed microcontrollers that automatically general different dynamic patterns: blinking, fading in and out, twinkling and heartbeat pulsing. Effects stickers have the same footprint so that the creator can change the pattern by simply switching out one effect sticker for another. This gives users freedom to access different programmed functionalities through physical connections without needing to edit the code. The goal is to allow users to learn the circuitry before learning to program. The
crafting process also remains in the material domain, rather than being interrupted to work with code on a computer screen. Through effects stickers, users get a first taste of the microcontroller—that is, connecting LEDs (or any actuator component) to electronically controlled pins which automatically turn the components on and off in repeating patterns. If the user wants to speed up, slow down or otherwise customize the output pattern, then they can move on to programming the microcontroller sticker.
The microcontroller sticker behaves as a simplified Arduino— users can program it with Arduino software [12] and the ATtiny85 library [13] but there are fewer pins than a full Arduino board so circuit complexity is limited. The microcontroller sticker also comes with a default program that has one resistive touch sensor and four output functionalities based on this sensor’s reading. One output to highlight is the repeat pin, which saves the pattern tapped on the touch sensor pin and replays this pattern on loop. This enables users to create custom patterns simply by tapping on the sensor, without needing to dive into the code, again supporting programming functionality without the complexity of bringing a computer into the crafting experience.
Once users are ready to control their circuits through code, there is a library of existing code that beginners can simple take and upload like a song—except instead of playing music, the microcontroller plays out the instructions on its pins. When users are finally ready, they can look into the code itself, tweak the existing instructions, remix and finally write their own programs.
Figure 2. Left to right: LED stickers, Effect stickers, Sensor and Microcontroller stickers and programming connector.
4. DESIGN FOR CRAFT AND LEARNING
We designed the stickers to work with a multitude of media. They stick well to paper, as an introductory medium, and thus can adhere to conductive foils and inks placed on paper. However, the adhesive also makes them self-secure onto any surface that accepts stickers. For example, they can stick to fabrics and then be sewn to with conductive thread. The stickers also have metal pads on top, which can be soldered to for more permanent connections. We hope to use this feature as an intermediate step to introduce users to working with traditional electronic components and fabricating techniques.
The stickers are also designed to support undoing and redoing in that they continue to work even after a few times of peeling and re-sticking like regular stickers. However, with enough peeling and sticking, they will eventually lose their stickiness. In this situation, users are encouraged to recycle their stickers by cleaning off the old adhesive and applying new conductive adhesive. The idea is that it is okay to tinker, make mistakes and
peel back the stickers as many times as needed and only when ready are the stickers stuck down for permanent projects. Finally, we designed the shapes of the stickers to be graphical representations of the function of the electronic elements so that users could “read” the sticker to figure out how to use it. For example, the LED sticker was designed to look like the triangle of a diode symbol, where the point is the cathode and the wide end is the anode. Not only does this begin to introduce traditional electronic component notation, it also subtly prompts makers to consider the directional flow of electricity through the circuit.
5. CIRCUIT STICKER SKETCHBOOK
In addition to the circuit stickers, there must also be the resources to help support and inspire the use of these new tools. The Circuit
Sticker Sketchbook is a guide that both teaches the theory behind
circuit design and provides space for users to craft circuits right into the book [14].
Just as in regular books, the covers protect both the pages and the circuitry within. The power supply in all of these is a coin battery, which can be clipped to the book for storage. The sketchbook is small and light so that it can be carried around and robust enough to endure the journeys. This allows users to craft circuits in the classroom, at home, in the park or even on the bus, as they might with a traditional sketchbook. Also, as a book, it is easy to lend and trade, so that the electronics, craft and information are easy to share with friends.
The pages of the sketchbook itself are meant for building. Users are guided to build working circuits right on its pages, much like coloring in with copper tape and LEDs instead of markers. Completing the activities lets users experience the physical process of making circuits and the resulting completed book acts as a guide with functioning examples to look back on for inspiration and instruction when reproducing these circuits in personal projects. The example pages also help prototyping by offering sample interactions to try out. This style of offering functional and instructional examples in the book is inspired by
The Elements of Pop-Up, which creates an analogous gallery for
paper engineering mechanisms [15].
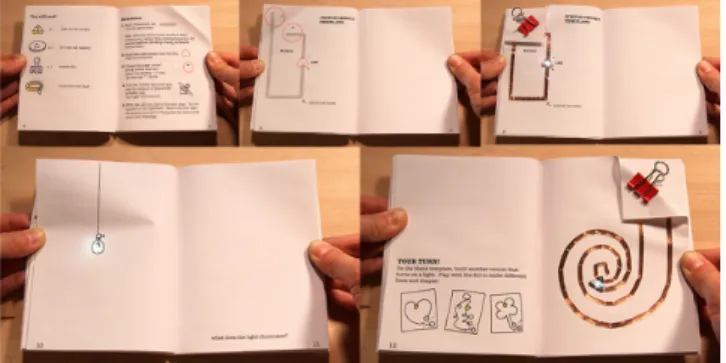
The book is divided into five chapters, each themed after a circuit concept with complexity building up from single LEDs, to multiple LEDs in parallel, to a switch, to hacking the switches geometrically to create a blinking effect and finally to making a pressure sensor so that the light can gradually fade in and out. These chapters share both electronics theory and craft techniques, all with a focus on using these new ideas to create more interesting paper electronics effects and tell personal stories (See Figure 3).
Each chapter begins with an explanation of the circuit, followed by a circuit template with instructions. The template is an image with footprints of where the lights, stickers and battery go on the page, so that the reader simply needs to place conductive tape and components over the corresponding parts in the drawing. These templates are designed to give users as much guidance as possible while still providing some space for error to learn exactly what makes the circuit function. The goal is ultimately to help readers have successful circuit building experiences early on so they feel inspired and empowered to continue on their own.
After completing the circuit, the user turns the page to see a drawing illuminated by the circuit. For example, in the first chapter the LED illuminates a drawing of a light bulb. The
graphic transforms an abstract light into the light bulb shining in an open space. Each page after a circuit template is a pre-drawn graphic to suggest the scene, but that is also open-ended and incomplete. This gives room for the reader to fill out the scene with their own ideas and bring in tools that they are familiar with. For example, they can illustrate the scene with markers and ink, craft over it with paper and fabric, or even write a poem and highlight parts of the text. This process enables users to appropriate the new paper electronics medium through their own interests and tools.
Figure 3. Sample Circuit Sticker Sketchbook chapter: instructions and template, completed circuit, illuminated
illustration and open-ended circuit design activity
The goal with these circuit craft activities is also to create space for both technical and expressive exploration, deliberation and success. With technical activities, there is a “known” right answer in that the user knows when the circuit behaves as intended, or simply “it works.” With expressive activities, there is no “right” answer since it is up to the creator to give personal meaning to scenes they create and to decide when this message has been successfully communicated. Both processes require a kind of confidence. In working toward a clear technical end, the creator must believe that he or she is capable of creating the project, endure setbacks and patiently debug until the circuit works as intended. On the creative side, the user must have confidence in his or her own message and create her own metrics for success. In putting these two approaches together, these different sorts of confidences and successes complement each other allowing for both hard and soft approaches [16]. If a creator starts with successfully building a working circuit, this light helps energize him or her toward the next step of creating meaning around the circuit. If the creator comes up with an expressive idea first, then the personal desire to express this message helps motivate the tinkering and debugging process of making the circuit work. After the guided circuit template activity in each chapter, there is a blank circuit template with only space for the battery. Here it is up to the users to design their own circuits—to explore and try out applying the new circuit technique in their own styles. If they forget how, users can simply turn back one page to see the functioning example circuit, and then turn back again to see the explanation. This section also presents a craft technique suggestion, such as drawing a pattern or shape with the copper traces. The idea is that once users understand the physics and interaction of the circuit, they are encouraged to also try playing with the material and artistic properties of the circuit. Finally, the last section of each chapter offers more ideas for advanced technical and artistic explorations.
6. EARLY ADOPTION
We released the circuit stickers toolkit publicly and have since followed user activities through workshops, online communities and media from organizations who have used our resources. While the ***** circuit stickers toolkit is still early in its public release, we are already observing adoption in diverse settings as museums, after-school activities, households and craft studios. We’ve found users as young as 6 making with parental guidance, as well as professional artists and crafters.
Most users begin by creating circuits on paper, often through templates on the Circuit Sketchbook. However, we seen them soon move on to their own projects and into their own mediums. Most commonly, people have created glowing greeting cards, books and dioramas. During a festival, one artist created a wall-sized mural and invited children at the festival to add circuits onto the mural to highlight and illuminate particular characters. More recently, we have seen explorations with textiles and sewn circuits that incorporate the circuit stickers such as light up costumes. Finally, we’ve observed others creating their own support resources based on templates from the Circuit Sticker Sketchbook, such as the Illuminate Your Thinking notebook for English educators [17].
While we have yet to do more formal user studies, we have found the most users are successful at creating functioning electronic pieces, as well as personalized artworks. One of the main challenges is in the size of the sticker, often users would place conductive traces too far apart to span the LED sticker. Also, especially with learners, many users would unstick the LED repeatedly until the adhesive was no longer able to make a reliable connection.
7. FUTURE WORK
We intend to continue developing both the circuit stickers as well as the support resources. As users become more familiar with basic light outputs, we hope to create new modules for other outputs like sound and motion. We are also interested in exploring how different shapes for the same circuit might influence the circuit-building experience. Now that the basic tools are available, we plan to hold more user studies and surveys with diverse audiences and contexts to see how these tools are used in the wild. Finally, we would like to investigate if design or use principles and patterns emerge as more users create with the circuit stickers toolkit.
8. ACKNOWLEDGMENTS
More to come!
9. REFERENCES
[1] Papert, S. Mindstorms: children, computers, and powerful ideas. Basic Books, Ink, New York, NY, USA, 1980. [2] Buechley, L., Hendrix, S. and Eisenberg, M. 2009. Paints,
paper, and programs: first steps toward the computational sketchbook. In Proceedings of the 3rd International
Conference on Tangible and Embedded Interaction (TEI
'09). ACM, New York, NY, USA, 9-12.
[3] Jacoby, S. and Buechley, L. 2013. Drawing the electric: storytelling with conductive ink. In Proceedings of the 12th
International Conference on Interaction Design and Children (IDC '13). ACM, New York, NY, USA, 265-268.
[4] Mellis, D. A., Jacoby, S., Buechley, L., Perner-Wilson, H. and Qi, J. 2013. Microcontrollers as material: crafting circuits with paper, conductive ink, electronic components, and an "untoolkit". In Proceedings of the 7th International
Conference on Tangible, Embedded and Embodied Interaction (TEI '13). ACM, New York, NY, USA, 83-90.
[5] Karagozler, M. E., Poupyrev, I., Fedder, G.K. and Suzuki, Y. 2013. Paper generators: harvesting energy from touching, rubbing and sliding. In Proceedings of the 26th annual ACM
symposium on User interface software and technology (UIST
'13). ACM, New York, NY, USA, 23-30.
[6] Perner-Wilson, H. A kit-of-no-parts. Master's thesis, MIT, 2011.
[7] Horn, M. S., AlSulaiman, S. and Koh, J. 2013. Translating Roberto to Omar: computational literacy, stickerbooks, and cultural forms. In Proceedings of the 12th International
Conference on Interaction Design and Children (IDC '13).
ACM, New York, NY, USA, 120-127.
[8] Gordon, M., Ackermann, E., and Breazeal. C. 2015. Social Robot Toolkit: Tangible Programming for Young Children. In Proceedings of the Tenth Annual ACM/IEEE International
Conference on Human-Robot Interaction Extended Abstracts (HRI'15 Extended Abstracts). ACM, New York,
NY, USA, 67-68.
[9] Hodges, S., Villar, N., Chen, N., Chugh, T., Qi, J., Nowacka, D. and Kawahara, Y. 2014. Circuit stickers: peel-and-stick construction of interactive electronic prototypes.
In Proceedings of the 32nd annual ACM conference on
Human factors in computing systems (CHI '14). ACM, New
York, NY, USA, 1743-1746.
[10] Savage, V., Zhang, X. and Hartmann, B. 2012. Midas: fabricating custom capacitive touch sensors to prototype interactive objects. In Proceedings of the 25th annual ACM
symposium on User interface software and technology (UIST
'12). ACM, New York, NY, USA, 579-588.
[11] Freed, N., Qi, J., Setapen, A., Breazeal, C., Buechley, L. and Raffle, H. 2011. Sticking together: handcrafting personalized communication interfaces. In Proceedings of the 10th
International Conference on Interaction Design and Children (IDC '11). ACM, New York, NY, USA, 238-241.
[12] Arduino. http://www.arduino.cc/ [13] Attiny. http://github.com/damellis/attiny [14] Circuit Sticker Sketchbook. http://*****
[15] Carter, D. A. and Diaz, J. The Elements of Pop-Up. Little Simon, 1999.
[16] Turkle, S. and Papert, S. 1990. Epistemological pluralism and the reevaluation of the concrete. SIGNS: Journal of
Women in Culture and Society. 16(1), 128--157.
[17] Cole, D. and Dick, J. Illuminate Your Thinking. NEXMAP, 2014.