Design and Construction of Vertical Axis Wind Turbines using
Dual-Layer Vacuum-forming
by
Christopher T. Carper
SUBMITTED TO THE DEPARTMENT OF MECHANICAL ENGINEERING IN PARTIAL
FULFILLMENT OF THE REQUIREMENTS OF THE DEGREE OF
BACHELOR OF SCIENCE IN MECHANICAL ENGINEERING
AT THE
MASSACHUSETTS INSTITUTE OF TECHNOLOGY
JUNE 2010
M@
2010 Christopher Carper. All rights reserved.
The author hereby grants to MIT permission to reproduce and to distribute
paper and electronic copies of this thesis document in whole or in part any
known or hereafter created.
ARCHNES
ASSACHUSETTS INSTITUTE OF TECHNOLOGYJUN 3
0
2010
LIBRARIES
)ublicly
medium
now
Signature of Author:
Departm6nt of Mechanical Engineering
May 19, 2009
Certified by:
Pr6fes'sor
D. R. Wallace
rofessor of Mechanical Engineering
Thesis Supervisor
Professor J. Lienhard V
LGomns
Professor of Mechanical Engineering
Chairman, Undergraduate Thesis Committee
Accepted by:
Design and Construction of Vertical Axis Wind Turbines using
Dual-Layer Vacuum-forming
by
Christopher T. Carper
Submitted to the Department of Mechanical Engineering
on May 19, 2010 in Partial Fulfillment of the
Requirements for the Degree of Bachelor of Science in
Mechanical Engineering
Abstract
How does one visualize wind? Is it the way trees bend in a strong gust or the way smoke is carried in a breeze? What if wind could be visualized using design, technology, and light? This thesis documents the design of a large scale display of vertical axis wind turbines that can be used to visualize wind. The intent is to build a matrix of several hundred turbines at MIT as part of the 150t* anniversary celebration in
2011. The main focus is the appearance of the turbines, which are fabricated using a novel dual-layer
vacuum-forming process. In it, one layer of pre-cut plastic is sandwiched between a polyurethane foam mold and a top layer of plastic which is heated and forms the seal for the vacuum. The top layer is subsequently removed and discarded leaving a formed part with clean, smooth edges. In order to optimize the manufacturing process and achieve repeatable results, variables such as heating time and material alignment had to be controlled. PETG and polystyrene were tested in a variety of configurations to maximize the respective strengths of each material and minimize their weaknesses. Each turbine is
also designed to power its own LEDs. Potential designs for the necessary electronics are also included.
Thesis Supervisor: David Wallace
Title: Professor of Mechanical Engineering
Design and Construction of Vertical Axis
Wind Turbines using Dual-Layer
Vacuum-forming
Author
Christopher T. Carper
Acknowledgements
For his assistance and insight, I would like to thank
Yushiro Okamoto.
He has been the real brain behind this project from its inception in the summer of 2009. Although he is currently pursuing a master's degree in architecture, he would also make an excellent candidate for a degree in mechanicalengineering. Throughout this project, professor
Meejin Yoon
has assumed the role of my chief motivator. Without her insistence on regular meetings and progress reports, I do not know where I would be right now. I also thank her for putting up with my limited knowledge of aesthetics and visually pleasing design.Shane Colton
is an all-around Mech E genius and one of the kindest, most approachable people I have met at MIT.David
Wallace
not only introduced me to this project but also gave me many of the tools that I would need to complete it in his phenomenal product design class,2.009.
Table of Contents
Abstract...2
Acknow ledgem ents ... 4
Table of Figures...6
Introduction...7
Savonius versus Darrieus vertical axis w ind turbines ... 8
Constructing paper turbine m odels... 9
M aking turbines...10
Introduction to vacuum -form ing ... 10
Constructing a turbine using single-layer vacuum -form ing... 10
The dual-layer vacuum -form ing concept ... 12
M aking turbines using dual-layer vacuum -form ing ... 14
M aking the polyurethane m olds...14
M aterial selection for top and bottom layers... 16
Controlling for top layer heating variability... 17
Controlling the orientation of the pre-cut bottom ... 18
Final assem bly of turbine halves... 18
Electronic Circuit Design ... 19
Testing the Electronic s ... 19
Final thoughts...21
References ... 23
Introduction: . ... 23
Savonius versus Darrieus vertical axis w ind turbines:... 23
Introduction to vacuum-form ing: ... 23
Table of Figures
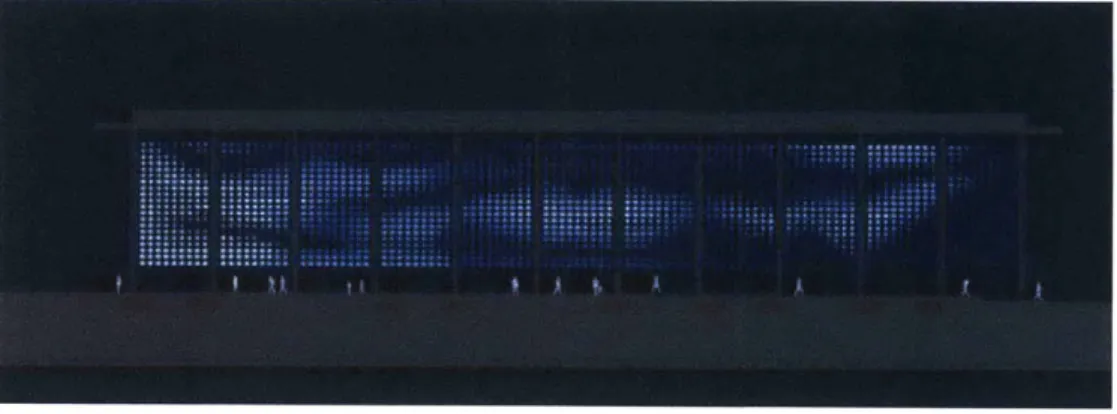
Figure 1: A rendering of what thousands of individually powered VAWTs equipped with LEDs might
look like at night (Y oon, 2010). ... 7
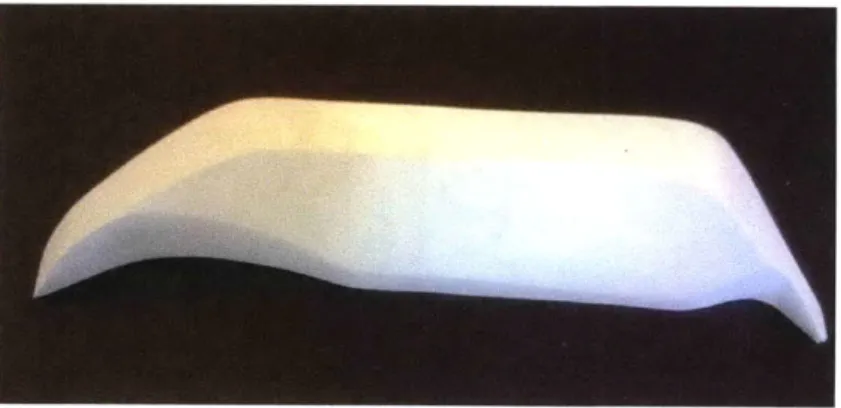
Figure 2: Final product - vacuum-formed vertical axis turbines... 8
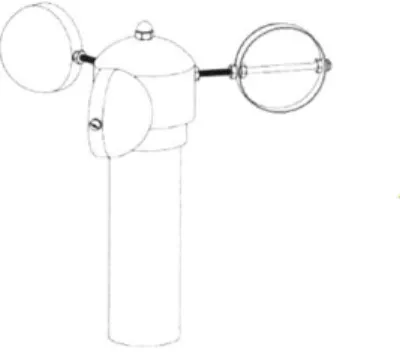
Figure 3: A wind anemometer is a good example of a Savonius type turbine (aprsworld.com). ... 9
Figure 4: A Darrieus type vertical axis wind turbine (centerbrook.com)...9
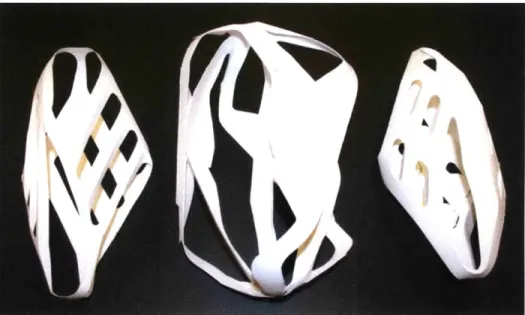
Figure 5: Paper m odels of turbine concepts ... 10
Figure 6: Polyurethane m old for a single blade. ... 11
Figure 7: A polystyrene turbine where each blade was formed individually...12
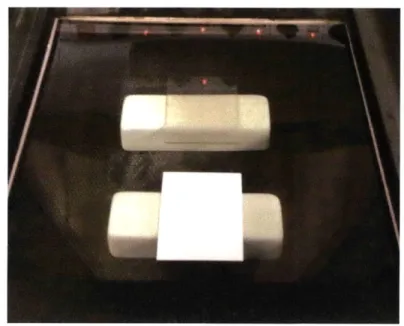
Figure 8: An experimental setup used to determine the feasibility of dual-layer vacuum-forming. In this example, a clear PETG top layer is being used... 13
Figure 9: PETG (clear) held its shape well when used as the bottom pre-cut layer in the dual-layer vacuum-forming process, however, polystyrene (white) did not... 14
Figure 10: CNC milling of polyurethane foam used for vacuum-forming mold. ... 15
Figure 11: The polyurethane mold used for the double-layer vacuum-forming process as well as a piece of laser-cut P E T G ... 15
Figure 12: When polystyrene is used as the top layer, it is relatively easy to remove with a knife...16
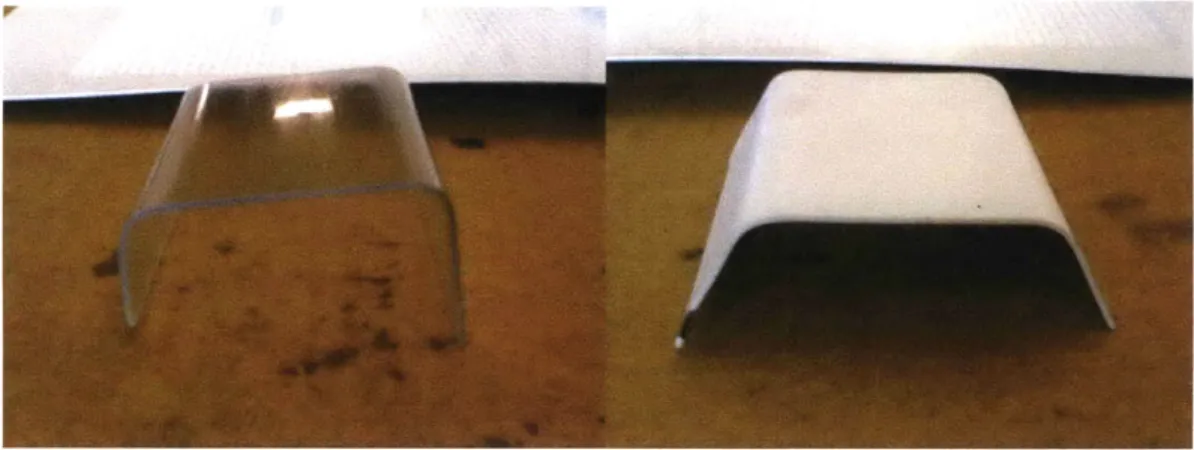
Figure 13: Springback in the dual-layer vacuum-forming process can be seen in the differences between the polystyrene (left) and the polyurethane mold (right)...17
Figure 14: Alignment system consisting of a notch in the laser cut piece and marks on the polyurethane m o ld ... 18
Figure 15: Analog circuit for powering LEDs. ... 19
Figure 16: Electronics test setup with Firewinder generator, power drill (to simulate a spinning turbine), and an oscilloscope...20
Figure 17: Verification of analog circuit design. ... 20
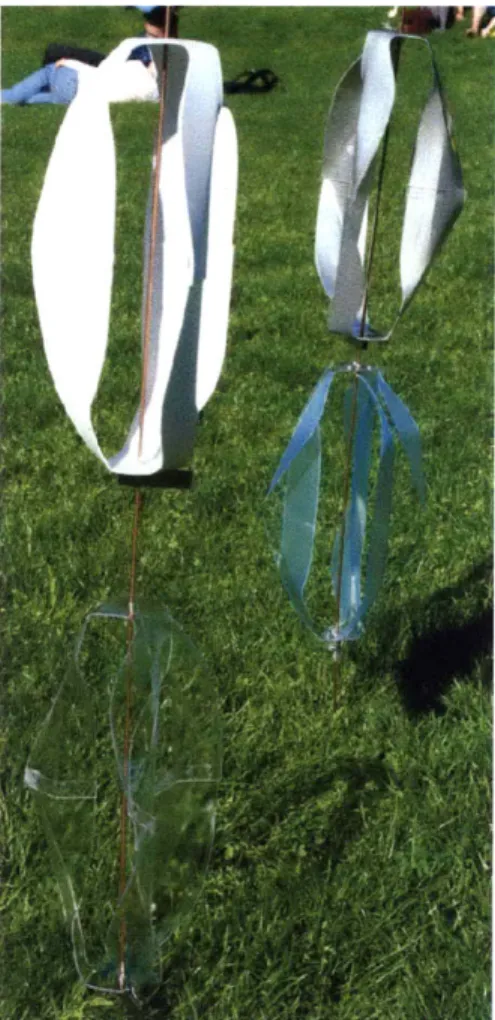
Figure 18: Final turbine prototypes. From left to right - untreated PETG, polystyrene, silver painted P E T G , laser-cut acrylic ... 22
Introduction
This whole project started with visualizing wind. Wind cannot be seen, but its effects on the
world around us can, from swaying trees in a gust, to wisps of smoke in a breeze. Many of the ways we
visualize wind are through natural phenomena like plants and clouds. Perhaps there are interesting man-made structures that could help us visualize wind, too? How can we use design, technology, and light to better visualize wind? These were some of the questions that Professor Meejin Yoon of the architecture department at MIT set out to answer when she first embarked on this project. Eventually, a proposal developed for a two-dimensional array of thousands of vertical axis wind turbines or VAWTs, each equipped with its own generator and LED lights. The turbines themselves would have unique and visually appealing shapes for visualizing the wind during the day. At night, LEDs would enhance visualization.
Figure 1: A rendering of what thousands of individually powered VAWTs equipped with LEDs might
look like at night (Yoon, 2010).
When I came on board with the project, many turbine designs had already been made from paper; however, little or no work had been done with regards to producing the turbines in such a way so that they would be resistant to outdoor weather conditions. The generator and electronics problems had not been looked at in great detail, either. I was tasked with finding a way to produce turbines so that they would be resistant to outdoor weather conditions as well as solving the generator and electronics problems. In the end, I spent most of my time wrestling with the turbine manufacturing problem. This led me to do some
7 of 23
experimentation with a novel vacuum-forming technique that will be discussed in much greater detail
later on.
Figure 2: Final product - vacuum-formed vertical axis turbines.
Savonius versus Darrieus vertical axis wind turbines
Vertical axis wind turbines or VAWTs can be divided into two major classifications. Savonius
type turbines are drag-based like the simple wind anemometer in Figure 3.
Figure 3: A wind anemometer is a good example of a Savonius type turbine (aprsworld.com).
Darrieus type turbines, on the other hand, are based on Bernoulli's Principle that faster moving
air is relatively lower in pressure. These turbines have airfoil-like blades.
Figure 4: A Darrieus type vertical axis wind turbine (centerbrook.com).
Each turbine type has its respective advantages and disadvantages. Savonius type turbines work
well with low-speed wind and are self-starting. Darrieus type turbines, on the other hand, have great
difficulty starting and operate better under high-speed wind conditions. I chose to investigate Savonius
turbines mainly because of their ability to self-start, an attribute that would be useful in a situation such as
mine where a rapid response to changing wind conditions is necessary.
Constructing paper turbine models
In order to better visualize turbine designs, Yushiro Okamoto constructed several paper models. These
varied in complexity from relatively simple Savonius turbines to highly complex Darrieus turbines. Some
limited testing revealed that the simple Savonius designs showed the most functional promise.
Figure 5: Paper models of turbine concepts.
Making turbines
Introduction to vacuum-forming
Vacuum-forming is a process whereby a sheet of plastic is heated to a forming temperature,
stretched onto or into a single-surface mold, and held against the mold by applying a vacuum between the
mold surface and the sheet (Wikipedia). Any thermoplastic can be used for vacuum-forming. Some
common thermoplastics used in vacuum-forming include polystyrene, polyethylene terephthalate (PET), acrylonitrile butadiene styrene (ABS), and poly(methyl methacrylate) (PMMA). Cyclohexane dimethanol
can be added to the polymer backbone of PET in place of ethylene glycol to produce a polymer with a
lower melting temperature (Wikipedia). This copolymerized version of PET is known as PETG and is
used extensively in this project.
Constructing a turbine using single-layer vacuum-forming
Initially, one of the most promising methods of producing the turbines appeared to be traditional
single-layer vacuum-forming. In order to do this, a geometrical configuration that had no undercuts had
10 of 23
to be chosen so that the polyurethane mold could be extracted after each forming procedure. I considered forming each half of the turbine and then attaching the two halves in the middle the way many of the paper models were constructed, however, the mold for this process would be very large and fragile in the center where the three blades met. It also appeared to be an inefficient use of the expensive polyurethane foam. In the end, I chose to form each of the three blades separately. I shaped the polyurethane mold using a bandsaw, files and sandpaper. The most accurate method of shaping would have been CNC milling, but at this point in the design process, I was more interested in seeing what the final product looked like as opposed to ensuring that it was dimensionally accurate. It was faster than modeling the abstract geometry on a computer, but I would learn later on that having a solid model is useful in the product design process. After sanding the mold using 320-grit sandpaper, I applied Butcher's Bowling Alley Wax (manufactured by White Diamond) with a dry cotton cloth. The wax is commonly used to make the mold easier to release from the vacuum-formed part.
Figure 6: Polyurethane mold for a single blade.
For the vacuum-forming process, I chose polystyrene because it is inexpensive and has an attractive matte white finish. The polystyrene sheet was 1/16" thick, which was just thick enough to provide the necessary rigidity for a turbine. Using a thinner material as opposed to a thicker one speeds up the vacuum-forming process and saves money, both of which are objectives in mass-production processes. Some vacuum-forming variables such as material heating time and vacuum duration were not well-controlled for these initial forms. Material was heated until it reached a desirable level of ductility
11 of 23
measured by lightly tapping the hot plastic with one's finger and judging the response. Similarly, a
vacuum was applied for a duration based on observation and general intuition.
Cutting out the formed polystyrene blades proved to be the most difficult part of the
manufacturing process. I chose to cut the polystyrene with a sharp box-cutter style knife because the
material is very easy to snap apart once it has been scored. However, it is impossible to make a perfectly
straight cut by hand, which results in a turbine with irregular edges. The irregular edges are not as
visually appealing as straight ones and a brief examination of the turbine quickly leads to the conclusion
that it was cut out by hand. Professor Wallace suggested that a small indentation be made around the
perimeter of the polyurethane model so that the box-cutting knife would have a path to follow and
potentially obscure the fact that it was cut by hand. I modified the polyurethane model accordingly, but
never actually vacuum-formed using it. Instead, I decided to investigate the dual-layer, vacuum-forming
concept.
The three polystyrene blades were attached to one another at the top and bottom using pop rivets.
The resulting product was functional, but not satisfactory in terms of visual appearance.
Figure 7: A polystyrene turbine where each blade was formed individually.
The dual-layer vacuum-forming concept
The dual-layer, vacuum-forming concept, originally suggested by my colleague Yushiro
Okamoto, is simple. A pre-cut sheet of thermoplastic is sandwiched between a mold and another layer of
12 of 23
thermoplastic. The top layer of thermoplastic forms the vacuum and can be discarded after the
vacuum-forming process is complete. The pre-cut bottom sheet will thus be thermoformed with smooth edges that
need little or no finishing. To test this concept, simple block-shaped polyurethane molds were used.
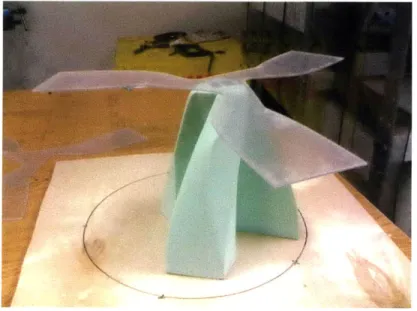
Figure 8: An experimental setup used to determine the feasibility of dual-layer vacuum-forming. In this example, a clear PETG top layer is being used.
All four combinations of PETG and polystyrene as top and bottom sheets were tested. Dissimilar
materials were easy to delaminate; however, when the same material was used for both the top and
bottom sheets, it was more difficult to delaminate. In addition, it was interesting to note that, regardless
of top layer, the polystyrene did not hold its shape as well as the PETG following vacuum-forming.
13 of 23
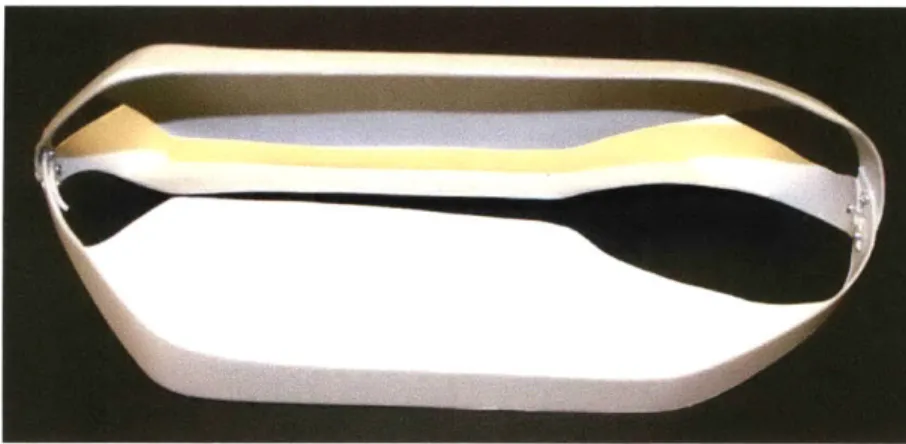
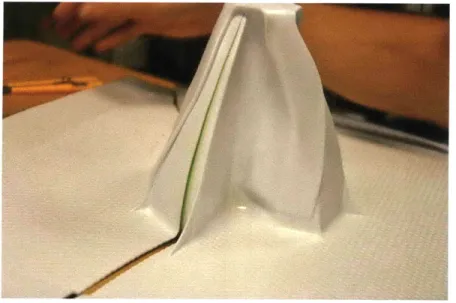
Figure 9: PETG (clear) held its shape well when used as the bottom pre-cut layer in the dual-layer
vacuum-forming process, however, polystyrene (white) did not.
Based on these results, I decided to move ahead with the dual-layer vacuum-forming concept
using PETG as the bottom layer (pre-cut) and polystyrene as the top layer.
Making turbines using dual-layer vacuum-forming
At first, producing turbines using the dual-layer vacuum-forming method proved to be somewhat
difficult to parameterize, however, once I had learned how to control certain variables, the process
became much more efficient. Dual-layer vacuum-forming reduces the number of vacuum-formed parts
from three to two by forming the turbine in two halves. In its 2D form, the turbine roughly resembles a
three petal flower. The forming process bends the three petals down and into the shape of the turbine
blades.
Making the polyurethane molds
The first step was to make the polyurethane molds for the top and bottom. Because of undercuts, the mold was broken down into four machinable parts - three exterior surfaces for the turbine blades to
form on and one triangular prism for the center core. The mold pieces were milled on a CNC milling
machine, sanded using 150 grit sandpaper to remove the tool texture left by the milling machine, and then
14 of 23
finished with 320 grit sandpaper for greater smoothness. They were attached to one another using
5-minute epoxy. Finally, Butcher's Bowling Alley Wax was applied to make removal of the finished product easier.
Figure 10: CNC milling of polyurethane foam used for vacuum-forming mold.
Figure 11: The polyurethane mold used for the double-layer vacuum-forming process as well as a piece
of laser-cut PETG.
Material selection for top and bottom layers
I initially selected PETG as the material to be laser cut and sandwiched between the polyurethane
mold and the top layer of plastic because it had exhibited the best shape-retention properties. The specific type of PETG that I used has a protective film on both sides, which I removed prior to laser cutting. During the laser cutting process, however, smoke discolored the PETG making its appearance
unattractive. In subsequent testing, I left this protective film on throughout the manufacturing process. It did not pose a problem with either the laser cutting or the vacuum-forming and could easily be removed following the vacuum-forming process.
I selected polystyrene for the top sheet because it is relatively inexpensive and I knew that it
would not laminate to the PETG during vacuum-forming. It worked well, and the polystyrene peeled off of the mold easily after being scored with a knife. It took about five minutes to remove a molded
polystyrene top sheet. I also used PETG for the top sheet while making turbines out of polystyrene.
PETG was not as easy to remove. It exhibits glassy material properties and instead of peeling off the
mold, it shatters. It is also less easy to score with a knife.
Figure 12: When polystyrene is used as the top layer, it is relatively easy to remove with a knife.
The most apparent difference between making turbines out of polystyrene and making turbines out of PETG was the level of springback the models exhibited. While PETG models held their shape well, polystyrene models did not.
Figure 13: Springback in the dual-layer vacuum-forming process can be seen in the differences between
the polystyrene (left) and the polyurethane mold (right).
Controlling for top layer heating variability
The extent to which the top layer is heated plays a significant role in how easy it is to remove after vacuum-forming. If it is heated too long, the highly ductile plastic is sucked into the space between the mold and the bottom layer. If the material is not heated long enough, it will not vacuum form properly. All vacuum-forming for this thesis was conducted on a Formech 660 vacuum former, which, based on my testing, takes about 30 minutes to reach steady state temperature. After the vacuum former has been allowed to reach steady state temperature, 45 seconds of heating is ideal for a one-sixteenth inch thick piece of polystyrene.
17 of 23
Controlling the orientation of the pre-cut bottom layer
As can be seen in Figure 11, the bottom pre-cut layer of plastic is rested on top of the
polyurethane mold prior to vacuum-forming. It is held in place using a pin made from welding rod and some tape that is used to prevent the plastic sheet from rotating. Initially, the orientation of the piece was set by eye, but after making a few models, it became apparent that a better system was needed in order to decrease variability in the finished product. I modified the laser cutting process slightly so that a notch was cut in the same place in each bottom layer and added marks to the polyurethane mold at one sixteenth
inch intervals to line up with the notches. After some testing, an optimal and repeatable orientation was achieved.
Figure 14: Alignment system consisting of a notch in the laser cut piece and marks on the polyurethane
mold.
Final assembly of turbine halves
The turbine halves were joined using IPS Weld-On #3 curing solvent cement and C clamps were used to hold the parts in place for up to an hour. The cement works equally well for polystyrene and
PETG.
Electronic Circuit Design
A key part of the design of the VAWT array is the integration of dynamic light in the form of
LEDs. In order to power the LEDs, some circuitry needs to be used along the lines of what is shown in
Figure 15. This circuit design is derived from the Firewinder, a commercially available VAWT, and
essentially converts a sinusoidal AC power supply into a steady DC power supply (www.firewinder.com).
In the event that strong winds lead to unusually high power generation levels, a Zener diode is included to
protect the LEDs. This diode acts like a floodgate that is set at a certain height. If the voltage on one side
builds up beyond a certain level, in this case 7.7 volts, the Zener diode breaks down and allows current to
flow both ways unimpeded. The two normal diodes ensure that current always flows the same way
through the right half of the circuit and the two 1 000pF capacitors act as a low-pass filter for the power
being supplied to the LEDs.
Zener Diode 7.7V
Repeatable LED Unit
4700
16V 1000lpF
16V 220piF
Figure 15: Analog circuit for powering LEDs.
Testing the Electronics
To test the circuit design, I constructed a setup where the electric generator from the Firewinder
VAWT is run by a handheld power drill. A white slip of paper attached to the generator enables an
optical tachometer to measure the angular velocity of the generator in revolutions per minute. In this
way, it is easy to test a variety of electronics configurations.
Figure 16: Electronics test setup with Firewinder generator, power drill (to simulate a spinning turbine),
and an oscilloscope.
The experimental setup enabled me to verify the circuit design shown in Figure 15 and
experiment with different components.
Figure 17: Verification of analog circuit design.
20 of 23
Conclusions and final thoughts
Four working prototype turbines were completed: two made from PETG, one from polystyrene, and one from laser-cut acrylic. The main focus was the appearance of the turbines, which are fabricated using a novel dual-layer vacuum-forming process. In it, one layer of pre-cut plastic is sandwiched between a polyurethane foam mold and a top layer of plastic which is heated and forms the seal for the vacuum. The top layer is subsequently removed and discarded leaving a formed part with clean, smooth edges. PETG and polystyrene were tested in a variety of configurations to maximize the respective strengths of each material and minimize their weaknesses.
I had originally intended to produce a complete working prototype of a vertical axis wind turbine
with LED lights for my thesis. In the end, the actual manufacture of the turbines ended up occupying most of my time. However, I did learn a great deal about vacuum-forming and process optimization. In general, a repeatable process has to have measurable parameters, which is something I spent a great deal of time attempting to establish with respect to the heating of the plastic in the vacuum former and the orientation of the bottom plastic sheet in the dual-layer vacuum-forming process. It was also fascinating to explore a manufacturing method that may not have ever been used before. The finished products are visually appealing and highly functional. Simply walking down a hallway with one in hand results in
spinning. I hope to continue my work with this project in the future. Perhaps someday it will become a reality.
Figure 18: Final turbine prototypes. From left to right - untreated PETG, polystyrene, silver painted
PETG, laser-cut acrylic
22 of 23
... ... .... ... ... ... ...
References
Introduction:
Yoon, Meej in. Proposalfor Micro Wind Turbine Installation. Jan 28, 2010. Presentation.
Savonius versus Darrieus vertical axis wind turbines:
Anemometer. Digital image. Web. 1 May 2010.
<http://www.aprsworld.com/sensors/images/anemometerpvc.500.png>.
Darrieus Turbine. Digital image. Web. 1 May 2010. <http://centerbrook.com/blog/wp-content/uploads/2009/1 1/Darrieus-diagram.jpg>.
Introduction to vacuum-forming:
"Vacuum-forming." Wikipedia, the Free Encyclopedia. Web. 1 May 2010. <http://en.wikipedia.org/wiki/Vacuumforming>.