Computer Science and Artificial Intelligence Laboratory
Technical Report
m a s s a c h u s e t t s i n s t i t u t e o f t e c h n o l o g y, c a m b r i d g e , m a 0 213 9 u s a — w w w. c s a i l . m i t . e d u
MIT-CSAIL-TR-2015-031
October 19, 2015
Dynamic Prefetching of Data Tiles for
Interactive Visualization
Dynamic Prefetching of Data Tiles for Interactive
Visualization
Leilani Battle
MIT
[email protected]
Remco Chang
Tufts University
[email protected]
Mike Stonebraker
MIT
[email protected]
ABSTRACT
In this paper, we present ForeCache, a general-purpose tool for ex-ploratory browsing of large datasets. ForeCache utilizes a server architecture, where the user interacts with a lightweight client-side interface to browse datasets, and the data to be browsed is re-trieved from a DBMS running on a back-end server. We assume a detail-on-demand browsing paradigm, and optimize the back-end support for this paradigm by inserting a separate middleware layer in front of the DBMS. To improve response times, the middleware layer fetches data ahead of the user as she explores a dataset.
We consider two different mechanisms for prefetching: (a) learn-ing what to fetch from the user’s recent movements, and (b) us-ing data characteristics (e.g., histograms) to find data similar to what the user has viewed in the past. We incorporate these mech-anisms into a single prediction engine that adjusts its prediction strategies over time, based on changes in the user’s behavior. We evaluated our prediction engine with a user study, and found that our dynamic prefetching strategy provides: (1) significant improve-ments in overall latency when compared with non-prefetching sys-tems (430% improvement); and (2) substantial improvements in both prediction accuracy (25% improvement) and latency (88% im-provement) relative to existing prefetching techniques.
1. INTRODUCTION
Exploratory browsing helps users analyze large amounts of data quickly by rendering the data at interactive speeds within a view-port of fixed size (e.g., a laptop screen). This is of particular interest to data scientists, because they do not have the time or resources to analyze billions of datapoints by hand. One common interaction pattern we have observed in data scientists is that they analyze a small region within a larger dataset, and then move to a nearby region and repeat the same analysis. They initially aggregate or sample these regions when looking for a quick answer, and zoom into the raw data when an exact answer is needed. Thus, we focus on supporting a detail-on-demand browsing paradigm, where users can move to different regions within a single dataset, and zoom into these regions to see them in greater detail.
While users want to be able to drill down into specific regions of
Figure 1: A diagram of ForeCache’s tile storage scheme. a dataset, they also want their actions within the browsing tool to be fluid and interactive. Even one second of delay after a pan or zoom can be frustrating for users, hindering their analyses and distracting them from what the data has to offer [17, 15]. Thus, the goal of this project is to make all user interactions extremely fast (i.e., 500 ms or less), thereby providing a seamless exploration experience for users. However, although modern database management systems (DBMS’s) allow users to perform complex scientific analyses over large datasets [20], DBMS’s are not designed to respond to queries at interactive speeds, resulting in long interaction delays for brows-ing tools that must wait for answers from a backend DBMS [2]. Thus, new optimization techniques are needed to address the non-interactive performance of modern DBMS’s, within the context of exploratory browsing.
In this paper, we present ForeCache, a general-purpose tool for exploratory browsing of large datasets at interactive speeds. Given that data scientists routinely analyze datasets that do not fit in main memory, ForeCache utilizes a client-server architecture, where users interact with a lightweight client-side interface, and the data to be explored is retrieved from a back-end server running a DBMS. We use the array-based DBMS SciDB as the back-end [23], and insert a middleware layer in front of the DBMS, which utilizes prefetch-ing techniques and a main-memory cache to speedup server-side performance.
When the user performs zooms in ForeCache, she expects to see more detail from the underlying data. To support multiple levels of detail, we apply aggregation queries to the raw data. However, complex scientific analyses take time, and may not execute at inter-active speeds in the DBMS. To ensure that zooms are fast in Fore-Cache, we compute each level of detail, or zoom level, beforehand, and store them on disk. A separate materialized view is created for each zoom level, and we partition each zoom level into equal-size blocks, or data tiles [16].
The user cycles through the following steps when browsing data in ForeCache: (1) she analyzes the result of the previous request, (2) performs an action in the interface to update or refine the request (e.g., zooms in), and then (3) waits for the result to be rendered on the screen. ForeCache eliminates step 3 by prefetching
neighbor-ing tiles and storneighbor-ing them in main memory while the user is still in step 1, thereby providing the user with a seamless browsing ex-perience. At the middleware level, we incorporate a main-memory cache for fetching computed tiles, shown in Figure 1. When tiles are prefetched, they are copied from SciDB to the cache. However, in a multi-user environment, there may be too little space on the server to cache all neighboring tiles for every user. Furthermore, we may only have time to fetch a small number of tiles before the user’s next request. Thus, we must rank the tiles first, and fetch only the most likely candidates.
While prefetching is known to be effective, ForeCache needs ac-cess to the user’s past interactions with the interface to predict fu-ture data requests. We have observed that the client has extensive records of the user’s past interactions, which we can leverage to im-prove our prefetching strategy. For example, the client knows what regions the user has visited in the past, and what actions she has recently performed. One straightforward optimization is to train a Markov model on the user’s past actions, and to use this model to predict the user’s future actions [6, 8]. We refer to these prediction techniques as recommendation models throughout this paper.
However, the user’s actions are often too complex to be described by a single model (which we will show in Section 5). Thus, existing models only cover a fraction of possible analysis goals, leading to longer user wait times due to prediction errors. A comprehensive approach is needed, such that we can consistently prefetch the right tiles over a diverse range of high-level analysis goals.
To address the limitations of existing techniques, we have de-signed a new two-level prediction engine for our middleware. At the top level, our prediction engine learns the user’s current analy-sis phase (i.e., her current frame of mind), given her most recent ac-tions. The user’s analysis phase hints at her current analysis goals, and thus provides context for which actions in the interface she may use to reach her goals. Furthermore, users frequently employ sev-eral low-level browsing patterns within each analysis phase (e.g., panning right three times in a row). Therefore at the bottom level, our prediction engine runs multiple recommendation models in par-allel, each designed to model a specific low-level browsing pattern. Using this two-level design, our prediction engine tracks changes in the user’s current analysis phase, and updates its prediction strategy accordingly. To do this, we increase or decrease the space allotted to each low-level recommendation model for predictions.
Taking inspiration from other user analysis models [19], we have observed that the space of user interaction patterns can be parti-tioned into three separate analysis phases: Foraging (analyzing in-dividual tiles at a coarse zoom level to form a new hypothesis), Sensemaking (comparing neighboring tiles at a detailed zoom level to test the current hypothesis), and Navigation (moving between coarse and detailed zoom levels to transition between the previous two phases). The user’s goal changes depending on which phase she is currently in. For example, in the Navigation phase, the user is shifting the focus of her analysis from one region in the dataset to another. In contrast, the user’s goal in the Foraging phase is to find new regions that exhibit interesting data patterns.
We consider two separate mechanisms for our low-level recom-mendation models: (a) learning what to fetch based on the user’s past movements (e.g., given that the the user’s last three moves were all to “pan right,” what should be fetched?) [8]; and (b) using data-derived characteristics, or signatures, to identify neighboring tiles that are similar to what the user has requested in the past. We use a Markov chain to model the first mechanism, and a suite of sig-natures for the second mechanism, ranging from simple statistics (e.g., histograms) to sophisticated machine vision features.
To evaluate ForeCache, we conducted a user study, where
do-main scientists explored satellite imagery data. Our results show that ForeCache achieves (near) interactive speeds for data explo-ration (i.e., average latency within 500 ms). We also found that ForeCache achieves: (1) dramatic improvements in latency com-pared with traditional non-prefetching systems (430% improvement in latency); and (2) higher prediction accuracy (25% better ac-curacy) and significantly lower latency (88% improvement in la-tency), compared to existing prefetching techniques.
In this paper, we make the following contributions:
1. We propose a new three-phase analysis model to describe how users generally explore array-based data.
2. We present a tile-based data model for arrays, and architec-ture for enabling interactive exploration of tiles in SciDB, 3. We present our two-level prediction engine, with an SVM
classifier at the top level to predict the user’s current analysis phase, and recommendation models at the bottom to predict low-level interaction patterns.
4. We present the results from our user study. Our results show that our approach provides higher prediction accuracy and significantly lower latency, compared to existing techniques.
1.1 Background
Here, we provide an overview of the main concepts, some of which were introduced in Section 1.
User Interactions/Moves: The user’s interactions with ForeCache are the actions she makes in the front-end interface to explore her data. We also refer to these interactions as moves.
User Session: A user session refers to a single session for which the user has logged into ForeCache and explored a single dataset.
Data Model: The ForeCache data model defines: (1) the struc-ture and layout of data tiles, and (2) how to build data tiles. We explain the ForeCache data model in detail in Section 2.
Analysis Model: Our analysis model is defined by our three anal-ysis phases, and how these phases interact with each other. We explain our analysis model in detail in Section 4.2.
Analysis Phase: The user’s current analysis phase represents her frame of mind while exploring data in ForeCache. Analysis phases can be inferred through the user’s interactions; we explain how we predict analysis phases in Section 4.2.2.
Browsing Patterns: Low-level browsing patterns are short chains of interactions repeated by the user (e.g., zooming in three times). We explain how we predict these patterns in Section 4.3.
Recommendation Model: A recommendation model is an al-gorithm used to predict low-level browsing patterns (e.g., Markov chains). ForeCache employs two kinds of recommendation models: Action-Based (Section 4.3.2) and Signature-Based (Section 4.3.3).
2. DATA MODEL
In this section, we describe the kinds of datasets supported by ForeCache, and our process for building zoom levels and data tiles.
2.1 Datasets Supported by ForeCache
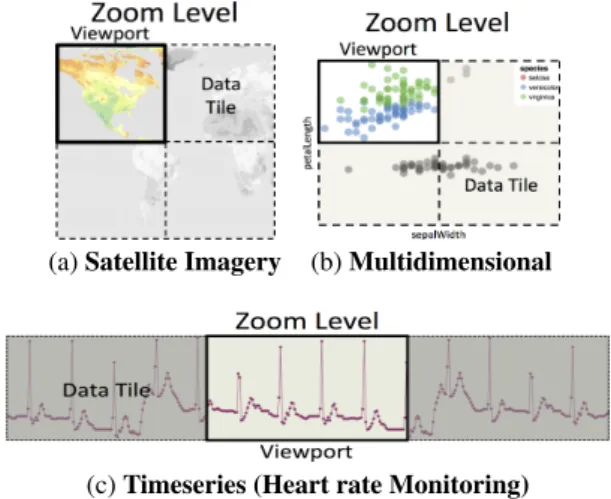
The datasets that work best with ForeCache share the same prop-erties that make SciDB performant: (a) the majority of column types are numerical (integers, floats, etc.), and (b) the relative posi-tion of points within these columns matters (e.g., comparing points in time, or in latitude-longitude position). These properties ensure that the underlying arrays are straightforward to aggregate, parti-tion, and visualize in ForeCache. The following three example datasets share these properties: geospatial data (e.g., satellite im-agery in Figure 2a), multidimensional data (e.g., iris flower classi-fication in Figure 2b), and time series data (e.g., heart rate moni-toring in Figure 2c). Beyond these three examples, SciDB has also
(a) Satellite Imagery (b) Multidimensional
(c) Timeseries (Heart rate Monitoring) Figure 2: Potential tiling schemes for three types of data. been used for efficiently analyzing genomics data [24] and astron-omy data [22]. Given its extensive support for complex analyt-ics over multidimensional datasets, we use SciDB as the back-end DBMS in ForeCache.
Consider Figure 2a, where the user is exploring an array of snow cover measurements computed from satellite imagery. Each array cell has been mapped to a pixel, where orange and yellow pixels correspond to snow. We have partitioned the current zoom level along the array’s two dimensions (latitude and longitude), resulting in four data tiles. The user’s current viewport is located at the top left data tile; the user can move to other tiles by panning in the client-side interface. The user can also zoom in or out to explore different zoom levels.
2.2 Interactions Supported by ForeCache
In this paper, we focus on supporting data exploration through two-dimensional (2D) views, where exploration means that the user can browse, but not modify the underlying dataset. In addition, we assume that users are interacting with the data using consistent, incremental actions that only retrieve a fraction of the underlying dataset. For example, if the user wants to go from zoom level 0 to 4 in ForeCache, she must go through levels 1, 2, and 3 first. Otherwise, users are essentially performing random accesses on the underlying data, which are generally difficult to optimize for any back-end DBMS (e.g., “jumping” to any location in the dataset).These assumptions define a specific class of exploration inter-faces, characterized by the following four rules: (a) the interface supports a finite set of interactions (i.e., no open-ended text boxes); (b) these interactions cannot modify the underlying dataset; (c) each interaction will request only a small fraction of data tiles; and (d) each interaction represents an incremental change to the user’s current location in the dataset (i.e., no “jumping”). Note that given rule (c), ForeCache does not currently support interactions that force a full scan of the entire dataset, such as searches (e.g., find all satellite imagery pixels with a snowcover value above 0.7).
2.3 Building Data Tiles
To improve performance, ForeCache builds all data tiles in ad-vance, and stores them on disk in SciDB. In this section, we ex-plain how ForeCache builds zoom levels and data tiles in advance, which is done in three steps: (1) building a separate materialized view for each zoom level; (2) partitioning each zoom level into non-overlapping blocks of fixed size (i.e., data tiles); and (3) com-puting any necessary metadata (e.g., data statistics) for each data tile. The most detailed zoom level (i.e., highest resolution) is just
Figure 3: A 16x16 array being aggregated down to an 8x8 array with aggregation parameters (2,2).
Figure 4: A zoom level being partitioned into four tiles, with tiling parameters (4,4).
the raw data without any aggregation.
Building Materialized Views: To build a materialized view, we apply an aggregation query to the raw data, where the aggregation parameters dictate how detailed the resulting zoom level will be. These parameters form a tuple ( j1, j2,..., jd), where d is the number
of dimensions. Each parameter j specifies an aggregation interval over the corresponding dimension, where every j array cells along this dimension are aggregated into a single cell. Consider Figure 3, where we have a 16x16 array (on the left), with two dimensions labeled x and y, respectively. Aggregation parameters of (2,2) cor-respond to aggregating every 2 cells along dimension x, and every 2 cells along dimension y (i.e., the red box in Figure 3). If we com-pute the average cell value for each window in the 16x16 array, the resulting array will have dimensions 8x8 (right side of Figure 3).
Partitioning the Views: Next, we partition each computed zoom level into data tiles. To do this, we assign a tiling interval to each di-mension, which dictates the number of aggregated cells contained in each tile along this dimension. For example, consider our aggre-gated view with dimensions 8x8, shown in Figure 4. If we specify a tiling window of (4,4), ForeCache will partition this view into four separate data tiles, each with the dimensions we specified in our tiling parameters (4x4).
We choose the aggregation and tiling parameters such that one tile at zoom level i translates to four higher-resolution tiles at level i + 1. To do this, we calculated our zoom levels bottom-up (i.e., starting at the raw data level), multiplying our aggregation intervals by 2 for each coarser zoom level going upward. We then applied the same tiling intervals to every zoom level. Thus, all tiles have the same dimensions (i.e., tile size), regardless of zoom level.
Computing Metadata: Last, ForeCache computes any necessary metadata for each data tile. For example, some of our recommen-dation models rely on data characteristics, or signatures, to be com-puted for each tile, such as histograms or machine vision features (see Section 4 for more detail). As ForeCache processes each tile and zoom level, this metadata is computed and stored in a shared data structure for later use by our prediction engine.
Choosing a Tile Size: Pre-computing tiles ensures that Fore-Cache provides consistently fast performance across zoom levels. However, choosing a bad tile size can negatively affect performance. For example, increasing the tile size reduces the number of tiles that can be stored in the middleware cache (assuming a fixed cache size), which could reduce ForeCache’s prefetching capabilities. In our evaluation (Section 5), we take this into account by varying the number of tiles that are prefetched by ForeCache in our experi-ments. We plan to perform an in-depth study of how tiling param-eters affect performance as future work.
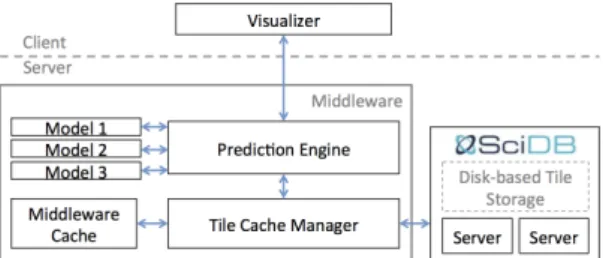
Figure 5: Overview of the ForeCache architecture. ForeCache has four primary components in its client-server ar-chitecture: a web-based visualization interface on the client; a pre-diction engine; a tile cache manager; and the back-end DBMS. Fig-ure 5 illustrates the relationship between these components. The visualizer sends tile requests to the tile prediction engine, and the prediction engine then sends these requests to the cache manager for retrieval. To anticipate the user’s future requests, the prediction engine sends predictions to the cache manager to be fetched ahead of time. The cache manager stores predicted tiles in the middleware tile cache, and retrieves tiles requested by the client from either the middleware cache or SciDB. We elaborate on the first three com-ponents of the ForeCache architecture in the rest of this section.
Front-End Visualizer: ForeCache is agnostic to the front-end visualizer, which can be implemented in any language or platform on the client. The only requirement for the visualizer is that it must interact with the back-end through tile requests. As the user inter-acts with the client-side interface, requests are sent to the back-end to retrieve the corresponding tiles. For our experiments, we imple-mented a lightweight, front-end interface that runs in a web browser on the client machine (see Section 5 for more details).
Prediction Engine: The purpose of the prediction engine is to manage ForeCache’s tile requests, which consists of two major tasks: responding to tile requests from the client; and managing both the high-level (analysis phase classifier) and low-level (rec-ommendation models) predictions used to infer the user’s future requests. To fulfill existing tile requests, the prediction engine re-trieves requested tiles from the cache manager, and sends them back to the client for visualization. This component also man-ages ForeCache’s predictions. At the top-most level, this compo-nent runs an SVM classifier that predicts the user’s current analysis phase. At the lower level, the prediction engine manages several tile recommendation models running in parallel. These recommen-dation models make suggestions for what data tiles to fetch, and the actual fetching of the tiles is left to the cache manager. After each user request, the prediction engine retrieves a separate list of pre-dictions from each recommender, and forwards these prepre-dictions to the cache manager for further processing. We describe our SVM classifier and recommendation models in detail in Section 4.
Tile Cache Manager: The cache manager decides which tiles will be stored in the main-memory middleware cache. Each rec-ommendation model is allotted a limited amount of space in this cache to make predictions. The remaining space in the middleware cache is used to store the last n tiles requested by the interface. We refer to the allocations made to our recommendation models as the cache manager’s current allocation strategy. This allocation strategy is reevaluated after each request to ensure that space is al-located efficiently across all models. We explain how we update these allocations in Section 4. The cache manger then uses the tile recommendations from the prediction engine to fill the cache once the allocations have been updated.
4. PREDICTION ENGINE DESIGN
The goal of our prediction engine is to identify changes in the
user’s browsing patterns, and update its prediction strategy accord-ingly. In this way, our prediction engine ensures that the most rel-evant prediction algorithms are being used to prefetch data tiles. To do this, our prediction engine makes predictions at two separate levels. At the top level, it learns the user’s current analysis phase. At the bottom level, it models the observed analysis phase with a suite of recommendation models.
We chose a two-level design because we have found that users frequently switch their browsing patterns over time. In contrast, recommendation models make strict assumptions about the user’s browsing patterns, and thus ignore changes in the user’s behavior. For example, Markov chains assume that the user’s past moves will always be good indicators of her future actions. However, once the user finds a new region to explore, the panning actions that she used to locate this region will be poor predictors of the future zooming actions she will use to move towards this new region. As a result, we have found that recommendation models only work well in specific cases, making any individual model a poor choice for predicting the user’s entire browsing session.
However, if we can learn what a user is trying to do, we can identify the analysis phase that best matches her current goals, and apply the corresponding recommendation model(s) to make predic-tions. To build the top level of our prediction engine, we trained a classifier to predict the user’s current analysis phase, given her past tile requests. To build the bottom level of our prediction engine, we developed a suite of recommendation models to capture the differ-ent browsing patterns exhibited in our analysis phases. To combine the top and bottom levels, we developed three separate allocation strategies for our middleware cache, one for each analysis phase.
In the rest of this section, we explain the top and bottom level designs for our prediction engine, and how we combine the two levels using our allocation strategies.
4.1 Prediction Formalization
Here, we provide definitions for all inputs to and outputs from ForeCache, and a formalization of our general prediction problem. User Session History: The user’s last n moves are constantly recorded by the cache manager and sent to the prediction engine as an ordered list of user requests: H = [r1, r2, ..., rn]. Each request
ri∈ H retrieves a particular tile Tri. Note that n (i.e., the history
length) is a system parameter set before the current session starts. Training Data: Training data is used to prepare the prediction engine ahead of time, and is supplied as a set of traces: {U1, U2, ...}. Each trace Ujrepresents a single user session, and consists of
an ordered list of user requests: Uj= [r1,r2,r3,...].
Allocation Strategy: The cache manager regularly sends the cur-rent allocation strategy to the prediction engine: {k1, k2,...}, were
k1is the amount of space allocated to recommendation model m1.
General Prediction Problem: Given a user request r for tile Tr,
a set of recommender allocations {k1, k2, ...}, and session history H, compute an ordered list of tiles to prefetch P = [T1,T2,T3,...],
where each tile Ti∈ P is at most d moves away from Tr. The first
tile (T1) has highest priority when prefetching tiles. d is a system parameter set before the current session starts (default is d = 1).
4.2 Top-Level Design
In this section, we explain the three analysis phases that users alternate between while browsing array-based data, and how we use this information to predict the user’s current analysis phase.
4.2.1 Learning Analysis Phases
We informally observed several users browsing array-based data in SciDB, searching for common interaction patterns. We used
Table 1: Input features for our SVM phase classifier, computed from traces from our user study (see Section 5 for more details).
Feature Name Information Accuracy for Recorded this Feature X position (in tiles) X position 0.676 Y position (in tiles) Y position 0.692 Zoom level zoom level ID 0.696 Pan flag 1 (if user panned), or 0 0.580 Zoom-in flag 1 (if zoom in), or 0 0.556 Zoom-out flag 1 (if zoom out), or 0 0.448
these observed patterns to define a user analysis model, or a general-purpose template for user interactions in ForeCache. Our user anal-ysis model was inspired in part by the well-known Sensemaking model [19]. However, we found that the Sensemaking Model did not accurately represent the behaviors we observed. For exam-ple, the Sensemaking model does not explicitly model navigation, which is an important aspect of browsing array data. Thus, we extended existing analysis models to match these observed behav-iors. We found that our users alternated between three high-level analysis phases, each representing different user goals: Foraging, Sensemaking, and Navigation. Within each phase, users employed a number of low-level interaction patterns to achieve their goals. We model the low-level patterns separately in the bottom half of our prediction engine, which we describe in detail in Section 4.3.
In the Foraging phase, the user is looking for visually interesting patterns in the data and forming hypotheses. The user will tend to stay at coarser zoom levels during this phase, because these levels allow the user to scan large sections of the dataset for visual pat-terns that she may want to investigate further. In the Sensemaking phase, the user has identified a region of interest (or ROI), and is looking to confirm an initial hypothesis. During this phase, the user stays at more detailed zoom levels, and analyzes neighboring tiles to determine if the pattern in the data supports or refutes her hy-pothesis. Finally, during the Navigation phase, the user performs zooming operations to move between the coarse zoom levels of the Foraging phase and detailed zoom levels of the Sensemaking phase.
4.2.2 Predicting the Current Analysis Phase
The top half of our two-level scheme predicts the user’s current analysis phase. This problem is defined as follows:
Sub-Problem Definition: given a new user request r and the user’s session history H, predict the user’s current analysis phase (Foraging, Sensemaking, or Navigation).
To identify the current analysis phase, we apply a Support Vec-tor Machine (SVM) classifier, similar to the work by Brown et al. [3]. SVM’s are a group of supervised learning techniques that are frequently used for classification and regression tasks. We used a multi-class SVM classifier with a RBF kernel. We implemented our classifier using the LibSVM Java Library1.
To construct an input to our SVM classifier, we compute a fea-ture vector using the current request r, and the user’s previous re-quest rn∈ H. The format and significance of each extracted feature
in our feature vector is provided in Table 1. Because this SVM classifier only learns from interaction data and relative tile posi-tions, we can apply our classification techniques to any dataset that is amenable to a tile-based format. To build a training dataset for the classifier, we collected user traces from our user study. We then hand-labeled each user request from the user traces with its corre-sponding analysis phase. We describe our user study and evaluate the accuracy of the analysis phase classifier in Section 5.
1https://github.com/cjlin1/libsvm
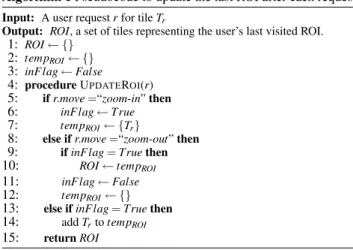
Algorithm 1 Pseudocode to update the last ROI after each request.
Input: A user request r for tile Tr
Output: ROI, a set of tiles representing the user’s last visited ROI.
1: ROI ← {}
2: tempROI← {}
3: inFlag ← False
4: procedure UPDATEROI(r) 5: if r.move =“zoom-in” then
6: inFlag ← True
7: tempROI← {Tr}
8: else if r.move =“zoom-out” then
9: if inFlag = True then
10: ROI ← tempROI
11: inFlag ← False
12: tempROI← {}
13: else if inFlag = True then
14: add Trto tempROI
15: return ROI
4.3 Bottom-Level Design
Once the user’s current analysis phase has been identified, Fore-Cache employs the corresponding recommendation model(s) to pre-dict specific tiles. ForeCache runs these models in parallel, where each model is designed to predict specific low-level browsing pat-terns. These recommendation models can be categorized into two types of predictions: (a) Action-Based (AB): learning what to pre-dict from the user’s previous moves (e.g., pans and zooms); and (b) Signature-Based (SB): learning what to predict by using data char-acteristics, or signatures, from the tiles that the user has recently requested (e.g., histograms). For an individual recommendation model m, the prediction problem is as follows:
Sub-Problem Definition: given a user request r, a set of can-didate tiles for prediction C, and the session history H, compute an ordering for the candidate tiles Pm= [T1, T2,...]. The ordering
signifies m’s prediction of how relatively likely the user will re-quest each tile in C. The prediction engine trims Pmas necessary,
depending on the amount of space allocated to m.
Here, we describe: (1) the inputs and outputs for our recommen-dation models; (2) how the individual models were implemented; and (3) how we allocate space to each model per analysis phase.
4.3.1 General Recommendation Model Design
Our Signature-Based recommendation model requires one addi-tional input in order to make predictions: the last location in the dataset that the user explored in detail, which we refer to as the user’s most recent Region of Interest, or ROI. Here we explain how we derive C, and the user’s most recent ROI.
Candidate Tiles for Prediction: We compile the candidate set by finding all tiles that are at most d moves away from r. For example, d = 1 represents all tiles that are exactly one move away from r.
Most Recent ROI: We represent the user’s most recent ROI as a set of data tiles, and use a simple heuristic to compute this set; the pseudocode is provided in Algorithm 1. When a new user request is received, the prediction engine calls UPDATEROIto update the
user’s most recent ROI. To find the most recent ROI, this heuris-tic searches through H for a match to the following pattern: one in, followed by zero or more pan’s, followed by one zoom-out. In lines 5-7 of Algorithm 1, a zoom-in triggers the collection of a new temporary ROI (tempROI), and the requested tile Tris added
to tempROI(line 7). We track zoom-in’s using the inFlag variable
(line 6). In contrast, an observed zoom-out tells the prediction en-gine to stop adding tiles to tempROI(lines 8-12). If the inFlag was
set while the zoom-out occurred, we replace the user’s old ROI with tempROI(lines 9-10). Then, tempROIis reset (line 12). Last,
if r.move = pan while the inFlag is true, Tr(i.e., the requested tile)
is added to tempROI(lines 13-14).
Algorithm 2 Pseudocode showing the Markov chain transition fre-quencies building process.
Input: For PROCESSTRACES, a set of user traces, and sequence length n. Output: F, computed transition frequencies.
1: procedure PROCESSTRACES({U1,U2,...,Uj,...}, n)
2: F ← {}
3: for user trace Ujdo
4: Vj← GETMOVESEQUENCE(Uj)
5: F ← UPDATEFREQUENCIES(Vj, F, n)
6: return F
7: procedure GETMOVESEQUENCE(Uj)
8: Vj← [ ]
9: for i = 1,2,..., where i ≤ | Vj| do
10: Vj[i] ← Uj[i].move
11: return Vj
12: procedure UPDATEFREQUENCIES(Vj= [v1,v2,v3,...], F, n)
13: for i = n+1,n+2,..., where n < i ≤ | Vj| do
14: F[sequence(vi−n,vi−(n−1),vi−(n−2),...,vi−1) → vi] += 1
15: return F
4.3.2 Actions-Based (AB) Recommender
As the user moves to or from ROI’s, she is likely to consistently zoom or pan in a predictable way (e.g., zoom out three times). Doshi et al. leverage this assumption in their Momentum model, which predicts that the user’s next move will match her previous move [8]. We expand on this idea with our AB recommender, which builds an n-th order Markov chain from users’ past actions.
To build the Markov chain, we create a state for each possible sequence of moves, where we only consider sequences of length n (i.e., the length of H). For example, if n = 3, then the following are two sequences that would have their own states in the Markov chain: panning left three times (i.e., le ft, le ft, le ft), and zooming out twice and then panning right (i.e., out, out, right). After creat-ing our states, we create an outgocreat-ing transition from each state for every possible move the user can make in the interface. In the n = 3 case, if the user is in state (le ft, le ft, le ft) and then decides to pan right, we represent this as the user taking the edge labeled “right” from the state (le ft, le ft, le ft) to the state (le ft, le ft, right).
We learn transition probabilities for our Markov chains using traces from our user study; the traces are described in Section 4.1. Algorithm 2 shows how we calculate the transition frequencies needed to compute the final probabilities. For each user trace Uj
from the study, we extract the sequence of moves observed in the trace (lines 7-11). We then iterate over every sub-sequence of length n (i.e., every time a state was visited in the trace), and count how of-ten each transition was taken (lines 12-15). To do this, for each sub-sequence observed (i.e., for each state observed from our Markov chain), we identified the move that was made immediately after this sub-sequence occurred, and incremented the relevant counter (line 14). To fill in missing counts, we apply Kneser-Ney smoothing, a well-studied smoothing method in natural language processing for Markov chains [7]. We used the BerkeleyLM [18] Java library to implement our Markov chains.
4.3.3 Signature-Based (SB) Recommender
The goal of our SB recommender is to identify neighboring tiles that are visually similar to what the user has requested in the past. For example, in the Foraging phase, the user is using a coarse view of the data to find new ROI’s to explore. When the user finds a new ROI, she zooms into this area until she reaches her desired zoom
(a) Potential snow cover
ROI’s in the US and Canada. (b) Tiles in the user’s history,after visiting ROI’s from (a). Figure 6: Example ROI’s in the US and Canada for snow cover data. Snow is orange to yellow, snow-free areas in green to blue. Note that (a) and (b) span the same latitude-longitude range. Table 2: Features computed over individual array attributes in Fore-Cache to compare data tiles for visual similarity.
Signature Measures Visual Characteristics Compared Captured
Normal Mean, standard average position/color/size Distribution deviation of rendered datapoints 1-D histogram bins position/color/size distribu-histogram -tion of rendered datapoints SIFT histogram built distinct “landmarks” in the
from clustered visualization (e.g., clusters SIFT descriptors of orange pixels)
DenseSIFT same as SIFT distinct “landmarks” and their positions in the visualization
level. Each tile along her zooming path will share the same visual features, which the user depends on to navigate to her destination. In the Sensemaking phase, the user is analyzing visually similar data tiles at the same zoom level. One such example is when the user is exploring satellite imagery of the earth, and panning to tiles within the same mountain range.
Consider Figure 6a, where the user is exploring snow cover data derived from a satellite imagery dataset. Snow is colored orange, and regions without snow are blue. Thus, the user will search for ROI’s that contain large clusters of orange pixels, which are circled in Figure 6a. These ROI’s correspond to mountain ranges.
Given the user’s last ROI (i.e., the last mountain range the user visited), we can look for neighboring tiles that look similar (i.e., find more mountains). Figure 6b is an example of some tiles that may be in the user’s history if she has recently explored some of these ROI’s, which we can use for reference to find new ROI’s.
We measure visual similarity by computing a diverse set of tile signatures. A signature is a compact, numerical representation of a data tile, and is stored as a vector of double-precision values. Table 2 lists the four signatures we compute in ForeCache. All of our signatures are calculated over a single SciDB array attribute. The first signature in Table 2 calculates the average and standard deviation of all values stored within a single data tile. The second signature builds a histogram over these array values, using a fixed number of bins.
We also tested two machine vision techniques as signatures: the scale-invariant feature transform (SIFT), and a variant called dens-eSIFT (signatures 3 and 4 in Table 2). SIFT is used to identify and compare visual “landmarks” in an image, called keypoints. Much like how seeing the Statue of Liberty can help people distinguish pictures of New York city from pictures of other cities, SIFT key-points help ForeCache compare visual landmarks in two different visualizations (e.g., two satellite imagery heatmaps with similar clusters of orange pixels, or two line charts showing unusually high peaks in heart-rate signals). We used the OpenCV library to
com-pute our SIFT and denseSIFT signatures2.
Algorithm 3 outlines how we compare candidate tiles to the user’s last ROI using these signatures. We first retrieve all four signatures for each candidate tile (lines 3-4). We also retrieve these four sig-natures for each ROI tile on lines 5-6. Then we compute how much each candidate tile (TA) deviates from each ROI tile (TB), with
re-spect to each signature (lines 7-8). To do this, a distance function for the signature is applied to the candidate tile and ROI tile (de-noted as distSi in Algorithm 3). Since our signatures do not
au-tomatically account for the physical distance between TAand TB,
we apply a penalty to our signature distances based on the Man-hattan distance between the tiles. Since all four of our current sig-natures produce histograms as output, we use the Chi-Squared dis-tance metric as the disdis-tance function for all signatures. We then normalize the computed distance values (lines 10-11).
To produce a single distance measure for a given candidate-ROI pair, we treat the four resulting distance measures as a single vec-tor, and compute the `2-norm of the vector (lines 12-13). To adjust
how much influence each signature has on our final distance mea-surements, we can modify the `2-norm function to include weights
for each signature. All signatures are assigned equal weight by de-fault, but the user can update these weight parameters as necessary.
`2weighted(A,B) =r
∑
Si
wi(di,A,B)2
At this point, there will be multiple distance values calculated for each candidate tile, one per ROI tile. For example, if we have four ROI tiles, then there will be four distance values calculated per candidate tile. We sum these ROI tile distances, so we have a single distance value to compare for each candidate tile (lines 14-15). We then rank the candidates by these final distance values.
Note that it is straightforward to add new signatures to the SB recommender. To add a new signature, one only needs to add: (1) an algorithm for computing the signature over a single data tile, and (2) a new distance function for comparing this signature (if the Chi-Squared distance is not applicable).
Algorithm 3 Computes the visual distance of each candidate tile, with respect to a given ROI.
Input: Signatures S1-S4, candidate tiles, ROI tiles
Output: A set of distance values D
1: for Signature Si, i = 1 − 4 do
2: di,MAX← 1
3: for each candidate tile TAdo
4: Retrieve signature Si(TA)
5: for each ROI tile TBdo
6: Retrieve signature Si(TB)
7: for each candidate/ROI pair (TA,TB) do
8: di,A,B← 2dmanh(TA,TB)−1[distSi(Si(TA),Si(TB))]
9: di,MAX← max(di,MAX,di,A,B)
10: for each candidate/ROI pair (TA,TB) do
11: di,A,B←ddi,MAXi,A,B
12: for each candidate/ROI pair (TA,TB) do
13: dA,B← q
∑Siwi(di,A,B)2
dphysical(A,B)
14: for each candidate tile TAdo
15: dA← ∑BdA,B
return D ={d1,d2,...,dA,...}
4.4 Cache Allocation Strategies
2http://opencv.org
In this section, we describe the recommendation models gener-ally associated with each analysis phase, and how we use this in-formation to allocate space to each recommender in our tile cache. In the Navigation phase, the user is zooming and panning in or-der to transition between the Foraging and Sensemaking phases. Thus, we expect the AB recommendation model to be most ef-fective for predicting tiles for this phase, and allocate all available cache space to this model.
In the Sensemaking phase, the user is mainly panning to neigh-boring tiles with similar visual features. Therefore, we expect the SB recommendation model to perform well when predicting tiles for this phase, and allocate all available cache space to this model.
In the Foraging phase, the user is using visual features as cues for where she should zoom in next. When the user finds a ROI that she wants to analyze, the tiles she zooms into to reach this ROI will share the same visual properties. Thus, the SB model should prove useful for this phase. However, the user will also zoom out several times in a row in order to return to the Foraging phase, exhibiting a predictable pattern that can be utilized by the AB model. Therefore, we allocate equal amounts of space to both models for this phase.
5. EXPERIMENTS
Although the goal behind ForeCache is to reduce user wait times, we will demonstrate in Section 5.5 that there is a linear (constant factor) correlation between latency and the accuracy of the predic-tion algorithm. As such, we claim that we can improve the observed latency in ForeCache by reducing the number of prediction errors that occur when prefetching tiles ahead of the user. Our aim in this section is to show that ForeCache provides significantly bet-ter prediction accuracy, and thus lower latency, when compared to existing prefetching techniques.
We validate our claims about user exploration behavior through a user study on NASA MODIS satellite imagery data, and evaluate the prediction accuracy of our two-level prediction engine using traces collected from the study. To validate our hypothesis that prediction accuracy dictates the overall latency of the system, we also measured the average latency observed in ForeCache for each of our prediction techniques.
To test the accuracy of our prediction engine, we conducted three sets of evaluations. We first evaluate each prediction level sepa-rately. At the top level, we measure how accurately we can predict the user’s current analysis phase. At the bottom level, we measure the overall prediction accuracy of each recommendation model, with respect to each analysis phase, and compare our individual models to existing techniques. Then we compare the accuracy of the full prediction engine to our best performing individual recom-mendation models, as well as existing techniques. Last, we evalu-ate the relationship between accuracy and levalu-atency, and compare the overall latency of our full prediction engine to existing techniques.
5.1 MODIS Dataset
The NASA MODIS is a satellite instrument that records im-agery data. This data is originally recorded by NASA in a three-dimensional array, where the dimensions are latitude, longitude and time. Each array cell contains a vector of wavelength mea-surements, where each separate wavelength measurement is called a MODIS “band.”
One use case for MODIS data is to estimate snow depths in the mountains. One well-known MODIS snow cover algorithm, which we apply in our experiments, is the Normalized Difference Snow Index (NDSI) [21]. The NDSI indicates whether there is snow at a given MODIS pixel (i.e., array cell). A high NDSI value (close to 1.0) means that there is snow at the given pixel, and a low value
(close to -1.0) corresponds to no snow cover. The NDSI uses two MODIS bands to calculate this. We label the two bands used in the NDSI as VIS for visible light, and SWIR for short-wave in-frared. The NDSI is calculated by applying the following function to each cell of the MODIS array. It is straightforward to translate this transformation into a user-defined function (UDF) in SciDB:
NDSI =(visible light − short wave in f rared)(visible light + short wave in f rared).
5.1.1 Modifications for User Study
Our test dataset consisted of NDSI measurements computed over one week of raw NASA MODIS data, where the temporal range of the data was from late October to early November of 2011. We downloaded the raw data directly from the NASA MODIS web-site3, and used SciDB’s MODIS data loading tool to load the data
into SciDB. We applied the NDSI to the raw MODIS data as a user-defined function, and stored the resulting NDSI calculations in a separate array. The NDSI array was roughly 10TB in size when stored in SciDB.
To ensure that participants could complete the study in a timely manner, we chose to simplify the dataset to make exploring it easier and faster. Prior to the study, The NDSI dataset was flattened into a single, one-week window, reducing the total dimensions from three (latitude, longitude, time) to two (latitude and longitude only). The NDSI dataset contained four numeric attributes: maximum, mini-mum and average NDSI values; and a land/sea mask value that was used to filter for land or ocean pixels in the dataset. After applying ForeCache’s tile computation process, there were nine total zoom levels in this dataset, where each level was a separate layer of data tiles.
5.1.2 Calculating the NSDI in SciDB
In this section, we explain how to compute the NSDI in SciDB. We assume that we already have a NDSI UDF written in SciDB, which we refer to as “ndsi_func”.
Let SVISand SSWIRbe the SciDB arrays containing recorded data for their respective MODIS bands. We use two separate arrays, as this is the current schema supported by the MODIS data loader for SciDB [20]. SVIS and SSWIR share the same array schema. An example of this schema is provided below.
SVIS/SWIR(reflectance)[latitude,longitude].
The array attributes are denoted in parentheses (reflectance) and the dimensions are shown in brackets (latitude and longitude). The attributes represent the MODIS band measurements recorded for each latitude-longitude coordinate.
The following is the SciDB query we execute to compute the NDSI over the SVISand SSWIRarrays:
Query 1: SciDB query to apply the NDSI.
1 store( 2 apply(
3 join(SVIS,SSWIR),
4 ndsi,
5 ndsi_func(SVIS.reflectance,
6 SSWIR.reflectance)
7 ), 8 NDSI 9 );
We first perform an equi-join, matching the latitude-longitude coordinates of the two arrays (line 3). Note that SciDB implicitly joins on dimensions, so latitude and longitude are not specified in the query. We then apply the NDSI to each pair of joined array cells by calling the “ndsi_func” UDF (lines 5-6). We pass the reflectance
3http://modis.gsfc.nasa.gov/data/
attribute of SVISand the reflectance attribute of SSWIRto the UDF.
We store the result of this query as a separate array in SciDB named NDSI (line 8), and the NDSI calculations are recorded in a new “ndsi” attribute in this array (line 4).
5.2 Experimental Setup
5.2.1 Hardware/Software setup
The ForeCache front-end for the study was a web-based visual-izer. The D3.js Javascript library was used to render data tiles. We describe the interface in more detail below.
The data was partitioned across two servers running SciDB ver-sion 13.3. Each server had 24 cores, 47GB of memory, and 10.1 TB of disk space. Both servers ran Ubuntu Server 12.04. The first server was also responsible for running the ForeCache middle-ware (prediction engine and cache manager), which received tile requests from the client-side interface.
5.2.2 Measuring Accuracy
The number of cache misses (i.e., prediction accuracy) directly impacts whether delays occur in ForeCache, and thus also deter-mines the length of user wait times (i.e., the latency). Therefore, we used prediction accuracy as one of our primary metrics for compar-ison, similar to Lee et al. [12]. To compute this, we ran our models in parallel while stepping through tile request logs, one request at a time. For each requested tile, we collected a ranked list of pre-dictions from each of our recommendation models, and recorded whether the next tile to be requested was located within the list.
We simulated space allocations in our middleware cache by vary-ing k in our accuracy measurements. Thus measurvary-ing prediction accuracy becomes equivalent to measuring the hit rate of our tile cache. For example, k = 2 meant that ForeCache only had space to fetch two tiles before the user’s next request. We varied k from 1 to 8 in our experiments. At k = 9, we are guaranteed to prefetch the correct tile, because the interface only supports nine different moves: zoom out, pan (left, right, up, down), and zoom in (users could zoom into one of four tiles at the zoom level below).
Given that ForeCache prefetches new tiles after every request, we found that having ForeCache predict further than one move ahead did not actually improve accuracy. Therefore, predicting be-yond the user’s next move was irrelevant to the goals of these ex-periments, and we only considered the tiles that were exactly one step ahead of the user. We leave prefetching more than one step ahead of the user as future work.
5.2.3 Comparing with Existing Techniques
To compare our two-level prediction engine with existing tech-niques, we implemented two models proposed in [8], the “Momen-tum” and “Hotspot” models. Several more recent systems, such as ATLAS [6] and ImMens [16] apply very similar techniques (see Section 7 for more information).
Momentum: The Momentum model assumes that the user’s next move will be the same as her previous move. To implement this, the tile matching the user’s previous move is assigned a proba-bility of 0.9, and the eight other candidates are assigned a probabil-ity of 0.0125. Note that this is a Markov chain, since probabilities are assigned to future moves based on the user’s previous move.
Hotspot: The Hotspot model is an extension of the Momen-tum model that adds awareness of popular tiles, or hotspots, in the dataset. To find hotspots in the NDSI dataset, we counted the num-ber of requests made for each tile visited in our user study, and chose the tiles with the most requests. When the user is not close to any hotspots, the Hotspot model defaults to the behavior of the
Figure 7: ForeCache browsing interface.
Momentum model. When a hotspot is nearby, the Hotspot model assigns a higher ranking to any tiles that bring the user closer to that hotspot, and a lower ranking to the remaining tiles. We trained the Hotspot model on trace data ahead of time. This training process took less than one second to complete.
5.3 User Study
To ascertain whether prefetching was a viable strategy for ex-ploring multidimensional scientific datasets, we worked directly with earth and ocean scientists at the University of California Santa Barbara (UCSB) and the University of Washington (UW) to: (1) choose a use case of interest to our collaborators (MODIS snow cover); and (2) develop a set of search tasks for this use case that do-main scientists with diverse backgrounds and skill sets could com-plete during the study. In this section, we outline the study design, and validate whether our analysis phases are an appropriate classi-fication of user behavior using results from the study. We avoided biasing the behavior of our study participants by caching all data tiles in main memory while the study was being conducted. This prevented our participants from choosing their movements based on response time (e.g., avoiding zooming out if it is slower than other movements). This also ensured that all study participants had the same browsing experience throughout the study.
5.3.1 Study Subjects
The study consisted of 18 domain scientists (graduate students, post doctoral researchers, and faculty). Most of our participants were either interested in or actively working with MODIS data. Subjects were recruited at UW and UCSB.
5.3.2 Browsing Interface
Figure 7 is an example of the client-side interface. Each visu-alization in the interface represented exactly one data tile. Partici-pants (i.e., users) used directional buttons (top of Figure 7) to move up, down, left, or right. Moving up or down corresponded to mov-ing along the latitude dimension in the NDSI dataset, and left or right to the longitude dimension. Each directional move resulted in the user moving to a completely separate data tile. User’s left clicked on a quadrant to zoom into the corresponding tile, and right clicked anywhere on the visualization to zoom out.
Directional buttons ensured that users’ actions mapped to spe-cific data tiles. Though different from existing geospatial interfaces (e.g., Google Maps), our browsing interface provides clear and ef-ficient button-based navigation through the dataset. Furthermore, study participants commented that this navigation design is useful when selecting specific data ranges for further analysis.
5.3.3 Browsing Tasks
Participants completed the same search task over three different regions in the NDSI dataset. For each region, participants were asked to identify four data tiles (i.e., four different visualizations) that met specific visual requirements. The tasks were as follows:
1. Find four data tiles in the continental United States at zoom
(a) Disribution of moves (b) Distribution of Phases
(c) Moves (Task1) (d) Moves (Task 2) (e) Moves (Task3) Figure 8: Distribution of moves (a) and phases (b), averaged across users, partitioned by task; distribution of moves for each individual user for Task 1 (c), Task 2 (d), and Task 3 (e). In Figures (c), (d), and (e): panning is red, zooming in is green, and zooming out is blue; and users with similar move distributions are grouped together.
level 6 with the highest NDSI values.
2. Find four data tiles within western Europe at zoom level 8 with NDSI values of .5 or greater.
3. Find 4 data tiles in South America at zoom level 6 that con-tain NDSI values greater than .25.
A separate request log was recorded for each user and task. There-fore, by the end of the study we had 54 user traces, each consisting of sequential tile requests.
5.3.4 Post-Study: General Observations
The most popular ROI’s for each task were: the Rocky Moun-tains for Task 1, Swiss Alps for Task 2, and Andes MounMoun-tains for Task 3. The average number of requests per task are as follows: 35 tiles for Task 1, 25 tiles for Task2, and 17 tiles for Task 3. The mountain ranges in Tasks 2 and 3 (Europe and South America) were closer together and had less snow than those in task 1 (US and Southern Canada). Thus, users spent less time on these tasks, shown by the decrease in total requests.
We also tracked whether the request was a zoom in, zoom out, or pan. Figure 8a shows the distribution of directions across all study participants, recorded separately for each task. We see that for all tasks, our study participants spent the most time zooming in. This is because users had to zoom to a specific zoom level for each task, and did not have to zoom back out to the top level to complete the task. In tasks 1 and 2, users panned and zoomed out roughly equally. In task 3, we found that users clearly favored panning more than zooming out. We also found that large groups of users shared similar browsing patterns, shown in Figures 8c-8e. These groupings further reinforce the reasoning behind our analy-sis phases, showing that most users can be categorized by a small number of specific patterns within each task, and even across tasks.
5.3.5 Evaluating Our Three Analysis Phases
To demonstrate some of the patterns that we found in our user traces, consider Figure 9, which plots the change in zoom level over time for one of our user traces. The coarsest zoom level is plotted at the top of Figure 9, and the most-detailed zoom level was plotted at the bottom. The x-axis represents each successive
Figure 9: Change in zoom level per request as study participant 2 completed task 2.
tile request made by this user. A downward slope corresponds to the user moving from a coarser to a more detailed zoom level; an upward slope corresponds to the reverse; and a flat line (i.e., slope of 0) to the user panning to tiles at the same zoom level.
We see that the user alternates between zooming out to a coarser zoom level, and zooming into more detailed zoom levels. We know that the coarser views were used to locate snow, and the high-resolution views to find specific tiles that satisfied task 2 (hence the four tile requests specifically at zoom level 8).
We see in Figure 9 that this user’s behavior corresponds directly to the three exploration phases described in Section 4.2.1. The user’s return to coarser views near the top of Figure 9 correspond to the user returning to the Foraging phase (e.g., at request ID’s 20 to 23). The user’s zooms down to the bottom half of the plot correspond to the user moving to the Sensemaking phase, as they searched for individual tiles to complete the task requirements. Fur-thermore, we found that 13 out of 18 users exhibited this same general exploration behavior throughout their participation in the study. 16 out of 18 users exhibited this behavior during 2 or more tasks. Furthermore, we found that only 57 out of the 1390 total requests made in the study were not described adequately by our exploration model.
Therefore, we conclude that our three analysis phases provide an accurate classification of how the vast majority of users actually explored our NDSI MODIS dataset.
5.4 Evaluating the Prediction Engine
Now that we have established that our three analysis phases pro-vide a comprehensive labeling scheme for user behavior, we move on to evaluating our two-level prediction engine. In particular, we evaluated each level of our prediction engine separately, and then compared the complete prediction engine to the existing techniques described in our experimental setup.
At the top level of our prediction engine, we measured how accu-rately we could predict the user’s current exploration phase. At the bottom level, we measured the accuracy of each recommendation model, with respect to each analysis phase.
The following experiments apply leave-one-out cross validation [11], a common cross-validation technique for evaluating user study data. For each user, the models were trained on the trace data of the other 17 out of 18 participants, and tested on the trace data from the remaining participant that was removed from the training set. After evaluating each user individually, we averaged the results across all users to produce our final accuracy calculations.
5.4.1 Predicting the User’s Current Analysis Phase
The goal was to measure how accurately we could predict the user’s current analysis phase. To build a training and testing set for this experiment, we manually labeled each request in our request logs with one of our 3 analysis phases. Figure 8b shows the dis-tribution of phase labels. We see that users spent noticeably less
time in the Foraging phase for tasks 2 and 3 (i.e., looking for new ROI’s), which is consistent with our user study observations.
To test our SVM classifier, we performed leave-one-out cross validation (see above), where all requests for the corresponding user were placed in the test dataset, and the remaining requests were placed in the training set. Training the classifier took less than one second. We found that our overall accuracy across all users was 82%. For some users, we could predict the current analysis phase with 90% accuracy or higher.
5.4.2 Accuracy of Recommendation Models
To validate the accuracy of our individual recommenders, we conducted two sets of experiments, where we: (1) compared the accuracy of our AB recommender to existing techniques, and (2) measured the prediction accuracy of our SB recommender sepa-rately for each of our four tile signatures. The goal of these ex-periments was two-fold. First, we wanted to find the phases where existing techniques performed well, and where there was room for improvement. Second, we wanted to test whether our AB and SB models excelled in accuracy for their intended analysis phases. To do this, we evaluated how accurately our individual models could predict the user’s next move, for each analysis phase.
Action-Based (AB) Model To evaluate the impact of history length on our AB recommender, we implemented a separate Markov chain for n = 2 to n = 10, which we refer to as Markov2 through Markov10, respectively. Each Markov chain only took millisec-onds to train. We found that n = 2 was too small, and resulted in worse accuracy. Otherwise, we found negligible improvements in accuracy for lengths beyond n = 3, and thus found n = 3 (i.e., Markov3) to be most efficient Markov chain for our AB model.
Figure 10a shows the prediction accuracy of our AB model com-pared to the Momentum and Hotspot models, with increasing val-ues of k. Note that k represents the total space (in tiles) that each model was given for predictions (see Section 5.2.2 for more infor-mation). In Figure 10a, we see that for the Foraging and Sense-making phases, our AB model matches the performance of existing techniques for all values of k. Furthermore, we found that our AB model achieves significantly higher accuracy during the Navigation phase for all values of k. This validates our decision to use the AB model as the primary model for predicting the Navigation phase.
Signature-Based (SB) Model: Figure 10b shows the accuracy of each of our individual signatures, with respect to analysis phase. To do this, we created four separate recommendation models, one per signature. Amongst our signatures, we found that the SIFT sig-nature provided the best overall accuracy. We expected a machine vision feature like SIFT to perform well, because users are compar-ing images when they analyze MODIS tiles.
We found that the denseSIFT signature did not perform as well as SIFT. denseSIFT performs worse because it matches entire im-ages, whereas SIFT only matches small regions of an image. Here, relevant visualizations will contain clusters of orange snow pixels, but will not look similar otherwise. For example, the Rockies will look very different from the Andes, but they will both contain clus-ters of snow (orange) pixels. Thus, many relevant tiles will not appear to be similar with regards to the denseSIFT signature.
5.4.3 Evaluating the Final Prediction Engine
We used the accuracy results for our phase predictor and best individual recommendation models as inputs to our final two-level prediction engine. Our prediction engine only incorporated two recommenders, the AB recommender with n = 3 (i.e., Markov3) and the SIFT SB recommender. Note that we updated our original allocation strategies based on our observed accuracy results. When
(a) Accuracy of our best AB model
(Markov3) and existing models. (b) Accuracy of the four signatures in ourSB model. (c) Accuracy of our final engine (hybrid)and our best individual models. Figure 10: Accuracy of our AB model, SB model, and final prediction engine (i.e., hybrid model).
Figure 11: Accuracy of the hybrid model compared to existing techniques.
Figure 12: Plot of average response time given prefetch accuracy, for all models and fetch sizes (linear regression: Adj R2=0.99985,
Intercept=961.33, Slope=-939.08, P=1.1704e-242.
the Sensemaking phase is predicted, our model always fetches pre-dictions from our SB model only. Otherwise, our final model fetches the first 4 predictions from the AB model (or less if k < 4), and then starts fetching predictions from the SB model if k > 4.
Figure 10c shows that our final prediction engine successfully combined the strengths of our two best prediction models. It was able to match the accuracy of the best recommender for each anal-ysis phase, resulting in better overall accuracy than any individual recommendation model. We also compared our final prediction en-gine to existing techniques, shown in Figure 11. We see that for the Foraging phase, our prediction engine performs as well (if not bet-ter) than existing techniques. For the Navigation phase, we achieve up to 25% better prediction accuracy compared to Momentum and Hotspot. Similarly for the Sensemaking phase, we see a consistent 10-18% improvement in accuracy.
5.5 Latency
We used the same setup from our accuracy experiments to mea-sure latency. To meamea-sure the latency for each tile request, we recorded the time at which the client sent the request to the middleware, as well as the time at which the requested tile was received by the client. We calculated the resulting latency by taking the differ-ence between these two measurements. On a cache hit, the mid-dleware was able to retrieve the tile from main memory, allowing ForeCache to send an immediate response. On a cache miss, the middleware was forced to issue a query to SciDB to retrieve the missing tile, which was slower. On average, the middleware took
Figure 13: Average prefetching response times for hybrid model and existing techniques.
19.5 ms to send tiles for a cache hit, and 984.0 ms for a cache miss. To evaluate our claim that accuracy dictates latency, we plot-ted the relationship between prefetching accuracy and average re-sponse time (i.e., average latency), shown in Figure 12. Accuracy and response times were plotted for all models and fetch sizes. We see a strong linear relationship between accuracy and response time, where a 1% increase in accuracy corresponded to a 10ms de-crease in average response time (adjusted R2= 0.99985). Given this
constant accuracy-latency factor, we found that the higher predic-tion accuracy of our hybrid algorithm translates to a time savings of 150-250ms per tile request, when compared with existing prefetch-ing techniques. The difference in latency is plotted in Figure 13, where we calculated the average response times for three models. We found that our hybrid model reduced response times by more than 50% for k ≥ 5, compared with existing techniques.
This latency evaluation indicates that ForeCache provides signif-icantly better performance over not only traditional systems (i.e., exploration systems without prefetching), but also existing systems that enable prefetching (e.g., [8, 6, 16]). Specifically, as shown in Figure 13, with a prefetch size of 5 tiles (k = 5), our system demon-strates a 430% improvement over traditional systems (i.e., average latency of 185ms vs. 984ms), and 88% over existing prefetching techniques (average latency of 185 ms vs. 349 ms for Momentum, and 360 ms for Hotspot).
In addition, ForeCache provides a much more fluid and interac-tive user experience than traditional (no prefetching) systems. As shown in HCI literature, a 1 second interaction delay is at the limit of a user’s sensory memory [4]. Delays greater than 1 second make users feel like they cannot navigate the interface freely [17, 15]. In this regard, traditional systems (i.e., a constant latency of 1 second per request) are not considered interactive by HCI standards.
In contrast, ForeCache remains highly interactive during most of the user’s interactions with the interface, with only 19.5ms of delay per tile request. As shown in Figure 11, with a fetch size of 5 tiles (k = 5), the prediction algorithm succeeds the vast majority of the time (82% of the time), making a cache miss (and the full 1 second delay) an infrequent event. Thus our techniques allow systems with limited main memory resources (e.g., less than 10MB of prefetching space per user) to operate at interactive speeds, so