Distortion Analysis on an Improved Mask
Technology for X-Ray Lithography
by
Kevin P. Pipe
Submitted to theDepartment of Electrical Engineering and Computer Science in Partial Fulfillment of the Requirements for the Degrees of
Bachelor of Science in Electrical Engineering and Computer Science
and
Master of Engineering in Electrical Engineering
and Computer Science
at the Massachusetts Institute of Technology May 20, 1999
@ Kevin P. Pipe, MCMXCIX. All rights reserved.
The author hereby grants to M.I.T. permission to reproduce and distribute publicly paper and electronic copies of this thesis and to grant others the right to do so.
Author... .... Department of Electrical Engineering and Compute Science
May 20, 1999 Certified by ... ... .. ... ... .. . . -. r... . Henry I. Smith Thesis Supervisor Accepted by ... ... - - - - . Arthur C. Smith
Chairman, Departmgafr uate Theses
MASSACHUSETTSINSTIT) OF TECHNOLOG
Distortion Analysis on an Improved Mask Technology for
X-Ray Lithography
by
Kevin P. Pipe
Submitted to the Department of Electrical Engineering and Computer Science
May 20, 1999
in Partial Fulfillment of the Requirements for the Degrees of Bachelor of Science in Electrical Engineering and Computer Science and Master of Engineering in Electrical Engineering and Computer Science
Abstract
In order to investigate a new technique for fabricating X-ray masks, several studies related to mask distortion measurement were performed. The Holographic Phase-Shifting Interferometer was used to obtain one-dimensional distortion data, and the interferometric lithography setup was overhauled to make possible the acquisition of two-dimensional data. Several possible sources of distortion were then evaluated. Finally, preliminary measurements were made on the stress characteristics of several thin films which might serve as the material for a pattern which would compensate for the distortion in the mask.
Thesis Supervisor: Henry I. Smith
Acknowledgments
First and foremost, I would like to thank my advisor, Hank Smith, for his technical guidance, financial support, and overall enthusiasm regarding this project. This work represents only a "drop in the bucket" of his vast legacy in the field, and without his breadth of knowledge and experience, it could never have gotten off the ground. Secondly, I would like to thank Mike Lim, for his superior technical assistance in all areas of this project (especially processing), and for his patience in putting up with my naivete. Mike put in many months of work on this project before I ever came to the NSL. Thirdly, I would like to thank Juan Ferrera, for his always finding the time to meet with me regarding interferometric lithography, the HPSI, the new holography stage components, etc. Any advancements that are a result of this work are attributable in large part to the expertise of Hank, Mike, and Juan, for I knew next to nothing of the issues presented in this thesis before coming in contact with the three of them.
Next, I would like to thank Tim Savas, the wayward physicist, who sets a high standard for technical knowledge and devotion to work within the NSL. I would also like to thank Jim Daley, for his always making the time to do evaporations for me and for his attention to safety in the lab. In addition, I would like to thank Ed Murphy, for his expertise in generating particle-free nitride and for his thoughtfulness in labeling my wafers based on particle count. I would also like to thank Ken-ichi Murooka, who worked in parallel with me on issues related to this project such as 2D distortion modeling and using melting wax to place the membrane on the Pyrex ring. Finally, I would like to thank my friends and family, who have supported me for many years and kept me from breaking down like so many x-ray mask membranes.
Contents
1 Introduction
1.1 The Use of X-ray Masks in Lithography . . . . 1.2 Previous W ork . . . . 1.3 Distortion Analysis . . . .
2 Fiducial Grating: 1D Analysis of Mask Distortion
2.1 Creation of the Grating . . . . 2.2 Anodic Bonding of the Membrane . . . . 2.3 HPSI Data . . . . 2.3.1 Phase Unwrapping . . . . 2.3.2 Experimental Setup . . . .
2.3.3 Distortion Measurement . . . . 2.3.4 M ITa599 . . . . 2.3.5 Consistency of Distortion Measurement . . .
3 Fiducial Grid: 2D Analysis of Mask Distortion
3.1 Modifications to the SML Holography Setup . . . . 3.2 HPSI Data. . . . .
4 Possible Sources of Distortion
4.1 Pyrex Ring Warping Under Anodic Bonding Heat . . . . 4.2 O ther . . . .
5 Preliminary Stress Measurements of Thin Film Candidates for a 10 10 11 12 17 17 18 18 19 19 20 27 34 40 40 41 45 45 48 . . . . . . . .
Compensating Material 50
5.1 X-Ray Attenuation . . . . 50
5.2 Stress M easurements . . . . 52
5.2.1 In-Plane Distortion Model . . . . 52
5.2.2 Experimental Stress Data . . . . 57
5.3 R epeatability . . . . 61
6 Conclusion 63
A Designs for New Parts for Use in the SML Holography Setup 65
B Matlab Code for Stress Calculations 75
List of Figures
1-1 Improved X-Ray Mask Design ... 11
1-2 Interferogram Demonstrating Flatness of Bonded Membrane . . . . . 12 1-3 Holographic Phase-Shifting Interferometer . . . . 15 1-4 Fringes on Mask MITa598 Produced by Phase Distortions in its Grating 16
2-1 Phase Map of MITa598 (Run 1): Phase Steps of E ... 21 2-2 Cross-section of Phase Data for MITa598 (Run 1), Taken by a
Hori-zontal Cut at the Center . . . . 22 2-3 Calculated Linear Phase Component for MITa598 (Run 1): Phase
Steps of . 24
2-4 Calculated Nonlinear Phase Component for MITa598 (Run 1): Phase
Steps of . 25
2-5 Calculated 1D Distortion Vector Field for MITa598 (Run 1): Largest
Vector Represents a Shift of 28.77 radians or 1.83pm . . . . 26 2-6 Calculated ID Nonlinear Distortion Vector Field for MITa598 (Run 1):
Largest Vector Represents a Shift of 5.82 radians or 370nm . . . . 27 2-7 Phase Map of MITa599 (Run 2): Phase Steps of E ... 28 2-8 Cross-section of Phase Data for MITa599 (Run 2), Taken by a
Hori-zontal Cut at the Center . . . . 29 2-9 Calculated Linear Phase Component for MITa599 (Run 2): Phase
Steps of . 30
2-10 Calculated Nonlinear Phase Component for MITa599 (Run 2): Phase Steps of 2... . .. ... 313
2-11 Calculated ID Distortion Vector Field for MITa599 (Run 8): Largest
Vector Represents a Shift of 20.40 radians or 1.30pm . . . . 32
2-12 Calculated 1D Nonlinear Distortion Vector Field for MITa599 (Run 8): Largest Vector Represents a Shift of 3.72 radians or 240nm . . . . 33
2-13 Phase Map of MITa598 (Run 2): Phase Steps of ! ... 35
2-14 Calculated Nonlinear Phase Component for MITa598 (Run 2): Phase Steps of . 36 2--15 Phase Map of MITa599 (Run 8): Phase Steps of i... 37
2-16 Calculated Nonlinear Phase Component for MITa599 (Run 8): Phase Steps of . 38 3-1 Top View of Changes to the Holography Setup . . . . 42
3-2 Simulated 2D Distortion Vector Field for MITa598 (Run 1): Largest Vector Represents a Shift of 30.50 radians or 1.94im . . . . 44
4-1 Positions of Markers for the First Pyrex Ring Distortion Test . . . . . 46
4-2 Positions of Markers for the Second Pyrex Ring Distortion Test . . . 47
5-1 Titanium: Incident X-ray Photon Energy vs. Bulk Mass Absorption C oefficient . . . . 51
5-2 Chromium: Incident X-ray Photon Energy vs. Bulk Mass Absorption C oefficient . . . . 52
5-3 Amount of Attenuation for a Given Compensating Layer Thickness . 53 5-4 Log-Log Plot of Compensating Layer Parameters . . . . 55
5-5 Linear Scale Plot of Compensating Layer Parameters . . . . 56
5-6 Y Slice Before and After Ti Deposition, With Radius of Curvature Fits 58 5-7 Y Slice Before and After Cr Deposition, With Radius of Curvature Fits 60 A-1 Front View of New Mounting Block . . . . 66
A-2 Side View of New Mounting Block . . . . 67
A-3 Top View of New Mounting Block, Showing Dimensions . . . . 68
A-5 Three-View Schematic of New Mounting Block . . . . 70
A-6 Part 1 of New Rotating Assembly . . . . 71
A-7 Parts 2 and 3 of New Rotating Assembly . . . . 72
A-8 Part 4 of New Rotating Assembly . . . . 73
List of Tables
2.1 Overall Phase Drop Consistency for MITa598 and MITa599 . . . . 34
4.1 Data from First Pyrex Ring Distortion Test . . . . 4.2 Data from Second Pyrex Ring Distortion Test . . . .
47 48
Chapter 1
Introduction
1.1
The Use of X-ray Masks in Lithography
For the last few decades, optical lithography has been the dominant method in the production of increasingly small features as required for increasingly complex inte-grated circuits. Through advances in resolution and exposure area, optical lithogra-phy has been the key technology driver that has taken the semiconductor industry
from 10pm minimum feature size in the late 1960's to present feature sizes of 0.25prm. However, because fundamental limits in the physics of optical lithography will most likely prevent it from being usable for pattern transfer below 100nm, a new method must be implemented in the near future1.
One method which has emerged as a candidate for post-optical lithography is X-ray lithography. As the name implies, X-ray lithography uses source radiation of 0.4-4.5nm; at such short wavelengths, diffraction effects (a physical limitation of optical lithography) are reduced by a factor of 100-1000 [15]. Although issues such as costly, fragile masks and very small mask-substrate gaps currently limit its use in production, X-ray lithography has been used in the laboratory to create feature sizes down to 30nm [16].
1 "Near future" as predicted by an extrapolation of Moore's Law, which has reliably predicted the
growth of the industry for the last thirty years. The "law" states that the number of transistors per chip area doubles every eighteen months, while the cost is cut in half.
incident
x-rays
Pellicle
Support Ring
Clean Enclosure'
Patterned Absorber
Membrane with Grid
Figure 1-1: Improved X-Ray Mask Design
1.2
Previous Work
Several problems arise with the implementation of conventional X-ray mask technol-ogy at feature sizes less than 100nm. First of all, because the required size of the mask-to-substrate gap becomes less than 10pm, the mask membrane must be con-siderably flatter than 1pum, preferably on the order of 100nm. Secondly, it must be possible to easily clean the mask membrane to remove dust and contamination. To address these problems, a new method for X-ray mask fabrication was invented at the MIT NanoStructures Lab (NSL). It is the development of this fabrication process which is the subject of this thesis.
The novel method for fabricating X-ray masks is shown in Figure 1-1. In brief, the process calls for creating an absorber pattern on a silicon nitride (or silicon car-bide) membrane, which is then bonded anodically to the mesa rim of a ring-shaped Pyrex2 frame. With the addition of an X-ray-transparent pellicle on the back side of
the frame, the absorber pattern can be sealed inside a helium-filled enclosure, thus protecting it from dust and contamination. Because of the strength of the bonded membrane, aggressive cleaning methods such as brushing can be used to clean the unsealed side of the membrane. Aggressive cleaning of the pellicle is not necessary,
Interferogram of Surface
<30nm flatness
8nm.
Membrane
Figure 1-2: Interferogram Demonstrating Flatness of Bonded Membrane
because dust particles on the pellicle are not imaged on the substrate as a result of diffraction and penumbral blurring effects.
Results from testing the flatness of the bonded membrane are shown in Figure 1-2. The anodic bonding process yields masks which have a flatness on the order of 30nm, which meets the requirement given above.
1.3
Distortion Analysis
A critical issue in the implementation of the new X-ray mask fabrication technique
is the distortion produced in the process. A solution to the problem of X-ray mask fabrication needs to be able to both quantitatively determine the distortions that are present in the process and also correct these distortions.
One method that has been proposed for measuring distortion in the mask mem-brane depends on creating a grid on the back side of the memmem-brane (as shown in Figure 1-1) prior to deposition of the absorber and bonding to the Pyrex ring. By measuring the phase errors in this grid after bonding is complete, the distortion can be mapped out. Once it is mapped out, a method could possibly be found to lay out a pattern of stressed compensating material which would eliminate distortion in the mask.
In order to get an initial grasp of the issues involved in the process, the first step is to create a fiducial pattern on the membrane, bond it to the ring, and look at the distortions caused by the bonding process. This will provide information indicating how best to attack the problem of measuring the distortion in the final mask process. Interferometric lithography is employed to create the fiducial pattern on the mem-brane [14]. This system, contained in the Space Microstructures Laboratory (SML), is routinely used by members of the NSL to generate highly coherent gratings. In this technique, two phase-coherent spherical beams interfere, creating a standing wave on the substrate surface; this standing wave is captured in photoresist. While the current setup is not able to precisely rotate the substrate by 900 and thus cannot create grids with the degree of precision needed for distortion measurement, it is adequate as an initial step to simply create a grating instead of a grid in order to measure phase distortion across the mask in one dimension.
The next step in the process is to anodically bond the membrane to a Pyrex glass support structure. In the process of anodic bonding, a metal surface is first brought into contact with the Pyrex. The glass is then heated, and a voltage applied that biases the metal (the anode) positively with respect to the bottom of the glass. In the case of a sodium borosilicate glass such as Pyrex, positively-charged and highly-mobile sodium cations in the glass drift away from the metal anode and build up at the bottom of the glass (the cathode) [1]. This produces a depletion layer with a high electric field in the glass adjacent to the metal contact, analogous to the depletion region associated with a PN junction. Under the force of the high electric field, metal cations in the anode cross over into the depletion layer of the glass. This dissolution of metal ions creates a very strong bond between the metal and the glass[1, 2].
Because the current bonding process is somewhat crude, involving high heat and manually setting the membrane upon the ring with tweezers, there are many ways that the membrane could be distorted. It is important to identify the causes of distortion so that a more refined way of bonding could eventually be developed.
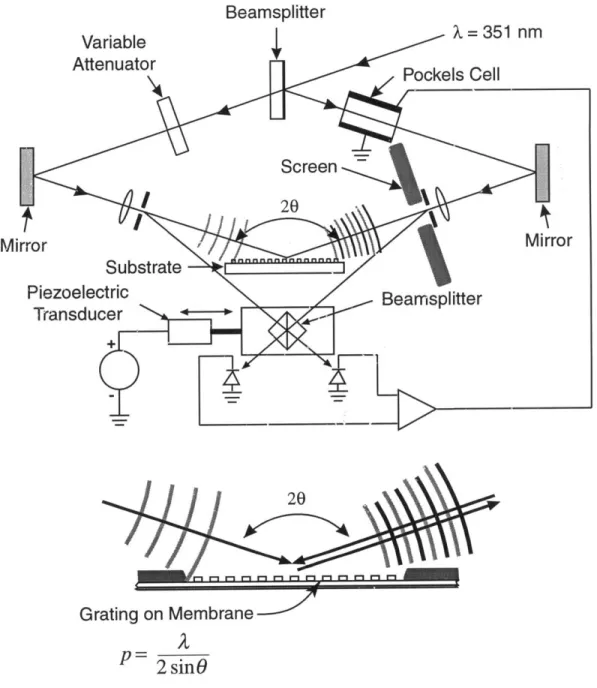
The technique that is used to analyze the phase distortions in the fiducial grating employs the Holographic Phase-Shifting Interferometer (HPSI) that Ferrera et al.
used to measure the phase distortion of interferometrically-generated gratings[6, 17]. As shown in Figure 1-3, the HPSI is used to compare a standing interference pattern with a grating; the phase differences appear as fringes on the screen. These fringes are the product of interference between the reflected beam of one arm of the interferometer and the retrodiffracted beam of the other arm. An undistorted reference grating (one that was made in the same exposure run as the bonded membranes but which was not bonded) is first placed in the HPSI. By adjusting the angle that the two incoming beams make with the substrate, the HPSI can be "zeroed" so that the incoming beams interfere to produce a standing wave that has exactly the same period as the reference grating. In this configuration, no fringes appear on the screen, and the two beams exactly mimic the spherical beams that originally created the grating. A bonded membrane is then placed in the HPSI, in which case the retrodiffracted beam is distorted due to phase differences in the grating. This distorted beam creates an interference fringe pattern with the reflected beam. These fringes directly correspond -to the phase differences of the distorted grating, and thus can be used to map out
the distortions caused by the bonding process.
A CCD camera is used to capture the fringe pattern (example mask MITa598 is
shown in Figure 1-4); notice that the image shows both the interference fringes and the reflected image of the Pyrex ring structure itself. After the fringe pattern has been digitized, several published methods are available that will analyze the grayscale pattern of fringes through the process known as phase unwrapping, which assigns to each pixel a displacement value that corresponds to the number of radians (in terms of grating periods) that the membrane has shifted at that point due to distortion[13]. This will produce a displacement vector field that maps out the distortions of the mask membrane in one dimension.
After gathering one-dimensional distortion data and getting an idea of the sources of distortion in the process, the next step is to generate two-dimensional distortion data. This requires interferometrically-exposed gratings that are precisely
perpen-3The picture of the mask is compressed (i.e. the round mask appears elliptical) because the pixels
Beamsplitter
Mirror
20
Grating on Membrane
2sin6
Figure 1-4: Fringes on Mask MITa598 Produced by Phase Distortions in its Grating
dicular to one another; accomplishing this entails a drastic overhaul of the SML interferometric lithography setup and the redesign of a number of parts that hold the wafer in place.
Once it is possible to interferometrically generate precise grids, the procedure outlined above is applied to generate one-dimensional distortion data along each of the two axes of the grid. The data will thus consist of X and Y components which can be added together to map out a two-dimensional distortion vector field. This two-dimensional distortion data is necessary for the eventual patterning of stressed material that will compensate for it.
Finally, after the quantification of the distortion that takes place in processing the mask, methods are examined for compensating for the distortion. Specifically, the tensile/compressive properties of thin films of certain metals are examined for their possible use as a compensating layer.
Chapter 2
Fiducial Grating: 1D Analysis of
Mask Distortion
2.1
Creation of the Grating
The process described below details the steps used in creating a 1pm-thick silicon nitride membrane, 54mm in diameter, that has a 400nm period fiducial grating etched 150nm deep into the back side. The steps used in creating the grating are typical of those used in interferometric lithography.
In order to create an X-ray mask membrane, a 4-inch diameter silicon wafer is first coated on both sides with silicon nitride to a thickness of 1pm. Photoresist is spun onto the back side, and a circular hole with diameter 54mm is then lithographically transferred onto the center of the wafer. After the silicon nitride and silicon within the circular region on the back side are etched away, the remaining structure is made up of a silicon ring that supports a large circular silicon nitride membrane.
In order to etch a grating into the back side of the membrane, a trilayer process is used. To minimize orthogonal standing waves, a layer of anti-reflection coating (ARC) is spun on. A thin layer of oxide is evaporated onto the ARC, and then a layer of photoresist is spun on. The thicknesses of the layers are chosen so as to minimize reflection. The membrane is then taken to the SML, where interferometric lithography is used to expose a 400nm period grating in the photoresist. By etching
through the trilayer and into the silicon nitride, a shallow fiducial grating pattern is transferred into the mask membrane.
2.2
Anodic Bonding of the Membrane
To ensure a clean, flat interface for metal evaporation and anodic bonding, a Pyrex ring and the membrane described in Section 2.1 are separately put through piranha and RCA cleans. A 30nm-thick film of nickel (to function as the metal anode) is then immediately evaporated onto the front side of the membrane, and the membrane is immediately placed onto the Pyrex ring. Approximately 100V is applied, and the glass is heated on a hot plate. When the temperature reaches 300 C, the voltage is increased slowly. An ammeter in series with the voltage source is used to measure current flow. When bonding occurs (at approximately 1.2kV for most of the membranes), a small current spike of approximately 0.5mA marks the charge transfer. The interface is held at 400'C (for MITa598) and 1.2kV for 15 minutes, and then is allowed to cool to room temperature. The membrane is then punctured in the area outside of the ring, allowing the removal of the silicon ring and the membrane material outside of the Pyrex ring.
2.3
HPSI Data
When the mask is examined in the Holographic Phase-Shifting Interferometer, fringes appear on the screen (see Figure 1-4) that correspond to distortion-induced phase shifts in the fiducial grating. The intensity at each point of the fringe pattern is captured using a digital camera; this yields a grayscale value for each pixel in the pattern. The technique discussed below is used to derive the phase data from this pattern.
2.3.1
Phase Unwrapping
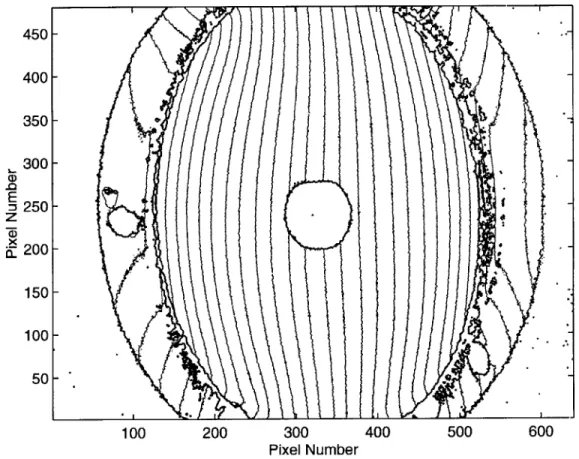
Within a given pattern, two adjacent fringes mark the borders of a region over which a complete 27r phase shift (i.e. a single period of the underlying grating) is known to occur. In the same way that a geographical contour map shows lines corresponding to discrete (100m, for example) changes in height, Figure 1-4 shows fringes corresponding to discrete (27r) changes in phase.
The relative phase of two points that lie between adjacent fringes is easily calcu-lated by a computer algorithm which simply takes the difference of their grayscale values. However, the situation is much more difficult for two points which have one fringe between them. This is because it is ambiguous without a priori knowledge whether going across the fringe from point A to point B represents a phase increase beyond 2?r or a phase decrease below zero. The sign (+/-) of the slope of the phase between each fringe must be determined in order to correctly relate distant points. This process of relating phase across fringes is known as phase unwrapping. Phase un-wrapping inputs a pattern of fringes that is by its nature modulo 27r ("wrapped") and outputs a pattern which resolves this ambiguity by calculating each point's absolute height.
Most people, if given a geographical contour map in which the height label for each contour line has been removed, could still make sense of the way the land slopes. For example, concentric contours would immediately suggest a mountain or a valley. However, this intuitive understanding which the human brain possesses has not yet been programmed into a computer algorithm which is correct in all cases.
2.3.2
Experimental Setup
In order to use the HPSI to compare the phase data of the reference grating with that of the bonded membrane, both wafers must be in the same plane (i.e. 0 from Figure 1-3 must be the same). This is not trivial, because the latter membrane has been bonded to a relatively thick Pyrex ring.
holog-raphy setup is "zeroed" (i.e. its components are aligned such that they produce a standing wave pattern which matches the reference grating), a Michelson interferom-eter is assembled. The two arms of the interferominterferom-eter contain the reference grating and a mirror, and the system is illuminated by a collimated, short-coherence-length light source. The distance to the reference mirror is set to maximize the contrast of the Michelson's interference pattern, and then the bonded membrane is placed in the interferometer. By again maximizing the contrast of the interference pattern, the bonded membrane can be moved into the same plane as that of the reference grating. The particular technique currently employed to unwrap the phase data of the HPSI fringe pattern is the five-step Hariharan phase-measuring algorithm [7, 10, 9, 8]. This method derives the complete phase map of the mask by analyzing the intensity distributions of different fringe patterns created by discrete ' phase steps in the retrodiffracted beam.
In order to create these phase steps, the beamsplitter cube of the HPSI is moved by a piezo. The fringe-locking circuit' then compensates by driving the Pockels cell to produce a ! phase shift. This technique is repeated to produce further discrete 7r phase shifts; the fringe pattern images are captured by a CCD camera and trans-ferred to a computer, where the Hariharan algorithm discussed above generates the complete, unwrapped phase map.
2.3.3
Distortion Measurement
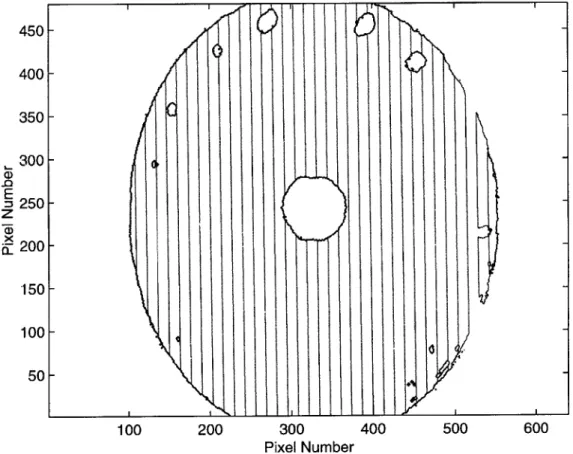
The technique discussed above was used to calculate the phase at each point on a mask. Figure 2-1 shows the output of the phase-unwrapping algorithm when the fringe pattern of MITa598 (shown for one of the phase steps in Figure 1-4) is unwrapped. As can be seen in the figure, there is a rather abrupt discontinuity in the phase contours at the inner edge of the Pyrex ring. This suggests that the bonding process is responsible to some extent for the distortion in the mask; a discussion of this will la feedback circuit used by the IL/HPSI setups to stabilize the fringe pattern on the surface of the wafer; as shown in Figure 1-3, it consists of a differential amplifier whose inputs are two photodetectors and whose output drives a Pockels cell
450 400 350-300 -E 5 250 -z 200 - 150- 100-50 100 200 300 400 500 600 Pixel Number
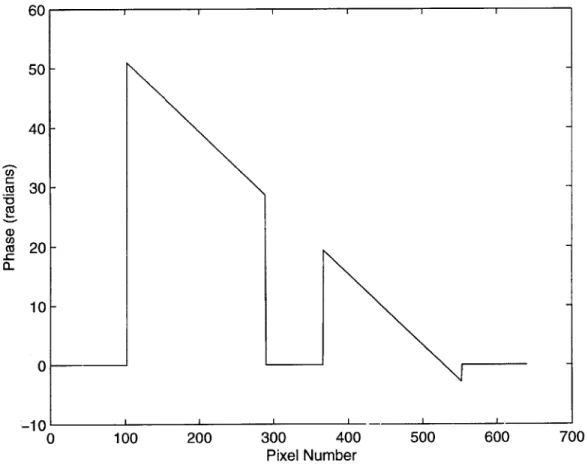
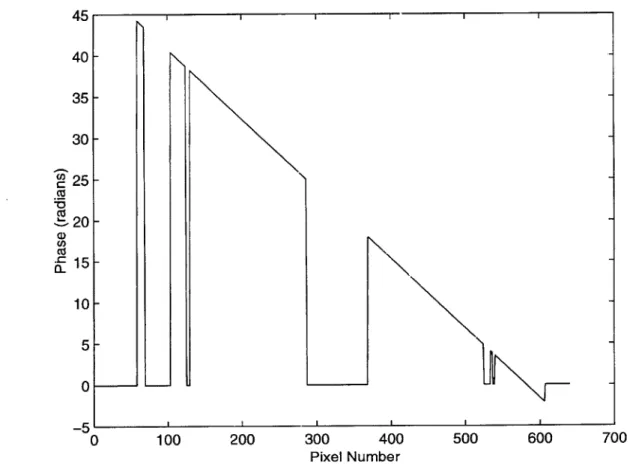
60 50- 40-U) c. 30-Co (> c 20-.._ a_ 10-0 -10 0 100 200 300 400 500 600 700 Pixel Number
Figure 2-2: Cross-section of Phase Data for MITa598 (Run 1), Taken by a Horizontal Cut at the Center
follow in Section 4. The large hole in the middle of the phase map corresponds to the hole in the center of the screen in the HPSI (cf. Figure 1-3), and the small holes on the rim correspond to "bubbles" formed in the anodic bonding process due to particles in the silicon nitride. The bubbles do not extend into the interior of the ring.
Figure 2-2 shows a cross-section of the phase data in Figure 2-1, taken by a horizontal cut at the center of the pattern. The total difference in phase across this diameter (from the outer edge of the Pyrex ring) is 53.82 radians. This corresponds to 8.57 periods, or 3.43pm. Given that the diameter of the inner edge of the Pyrex ring is 3.10cm, there are 6.83 periods (2.73pm) of difference across the usable area of the mask.
pattern that results from interference between an undistorted grating and a distorted one. However, it is not apparent from the fringe pattern whether the distortion is from a period which is, overall, expanded or compressed. In order to determine which of these two possibilities is the case, the wafer stage is moved forward, causing a cor-responding increase in 0 (cf. Figure 1-3) and therefore a decrease in the period of the pattern with which the distorted pattern interferes. If the fringe pattern is minimized by moving the wafer stage forward, this means that the distorted period is smaller than the reference period, indicating that the distortion is caused by compression. Likewise, if the fringe pattern is minimized by moving the wafer stage backward, this indicates expansion.
In the case of MITa598, the fringe pattern was minimized by moving the stage forward; this means that 8.57 extra periods are compressed onto the mask membrane. Given that the outer diameter of the Pyrex ring is 3.89cm, this means that the period has been compressed overall from 400nm to 399.96nm. Given the very linear nature of the phase data in Figure 2-2, it is reasonable to suggest that the compression is fairly smooth over the entire mask.
In order to investigate the variations from linear phase-slope distortion, another calculation was run, in which the linear component was subtracted from the phase map. Figure 2-3 shows the linear phase element that was derived from MITa598. Figure 2-4 is equivalent to the difference between Figures 2-1 and 2-3; it represents the nonlinear component in the phase distortion.
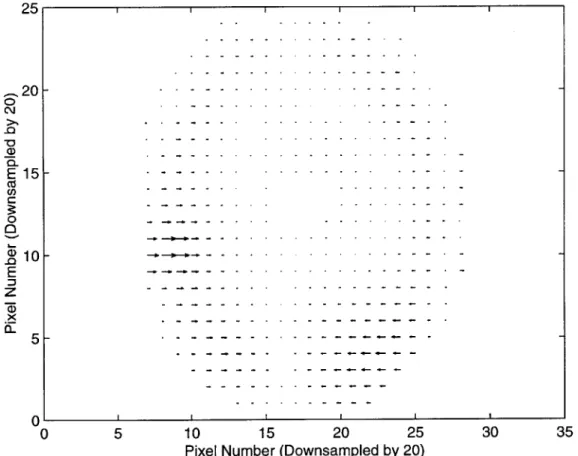
Figure 2-5 shows the vector field representation of the distortion in MITa598. Each vector represents how far a point on the mask has been shifted from its original position, multiplied by a scaling factor to make the arrows visible in the figure. The scaling factor is set to make the largest vector in the plot equal to the vector spacing unit; therefore, the vector lengths within a plot are comparable relative to one another because they are all multiplied by the same scaling factor, but vector lengths in different plots are not comparable because they are multiplied by different scaling factors. The actual data for two masks, of course, can be compared; the scaling is used just for the purpose of illustration. It is important to note that the distortion
E z xd 0X 100 200 300 400 500 600 Pixel Number
Figure 2-3: Calculated Linear of ,2
450 400-350- -.300 -(D E 5 250 --z XQ 200 -150 100- 50-100 200 300 400 500 600 Pixel Number
Figure 2-4: Calculated Nonlinear Phase Component for MITa598 (Run 1): Phase Steps of '
10 15 20 25 30 35
Pixel Number (Downsampled by 20)
Figure 2-5: Calculated ID Distortion Vector Field for MITa598 (Run 1): Largest Vector Represents a Shift of 28.77 radians or 1.83pm
25 |-F 20 c' CD E 15 CU) C 0 0 E z z a-5 0 0 5
10 15 20 25 30
Pixel Number (Downsampled by 20)
Figure 2-6: Calculated 1D Nonlinear Distortion Vector Field for Largest Vector Represents a Shift of 5.82 radians or 370nm
MITa598 (Run 1):
vectors only point along one axis; this is because the distortion gathered from phase shifts in a fiducial grating is inherently one-dimensional. It is only upon moving to a fiducial grid (cf. Chapter 3) that two-dimensional data be captured. Figure 2-6 shows the distortion vector field specifically for the nonlinear distortion of Figure 2-4.
2.3.4
MITa599
For comparison purposes, data was also gathered for a different mask, MITa599. Fig-ures 2-7 and 2-8 show a phase map and cross-section, respectively. Though this data is more noisy, it is still plain that there is a much larger phase contour discontinuity for MITa599 at the inner edge Pyrex ring. While this might seem to imply a greater amount of distortion in the bonding process, the total phase drop across the
cross-25 9n 1--0 a E 15 0 .0 E
z
7x 0X 5 0 F 0 5 35 . . . . . . . .- 450-400 350-300 E 250 -z 200 150 100- 50-100 200 300 400 500 600 Pixel Number
4l5 40- 35- 30- $25-CZ (I) 15- 10- 5- 0--5 1 1 -111 0 100 200 300 400 500 600 700 Pixel Number
Figure 2-8: Cross-section of Phase Data for MITa599 (Run 2), Taken by a Horizontal Cut at the Center
450 400 -350 -300 E = 250 -z -E200 150 -100- -50 -100 200 300 400 500 600 Pixel Number
Figure 2-9: Calculated Linear Phase Component for MITa599 (Run 2): Phase Steps of ,2
section (46.15 radians) is less than that for MITa598. This discrepancy might be due to the fact that during anodic bonding, MITa599 was only heated to 350'C, whereas
MITa598 was heated to 400'C.
The calculated linear phase-slope component is shown in Figure 2-9, and the
derived nonlinear distortion is shown in Figure 2-10. To see the distortion more
clearly, refer to Figure 2-11 for the overall one-dimensional distortion vector field for MITa599, and Figure 2-12 for the nonlinear component. Because both the linear and nonlinear distortions differ significantly between MITa598 and MITa599, it is probable that a single compensating pattern will not be sufficient; the distortion
correction process for this new style of X-ray mask will have to determine the phase map for each mask and output different compensating patterns accordingly.
450 400-350 -*- 300--E -=250 -z 200 -* 150 -*-100 - ~ 50-100 200 300 400 500 600 Pixel Number
Figure 2-10: Calculated Nonlinear Phase Component for MITa599 (Run 2): Phase Steps of '
-4- 4-4-4-4--- 4- 4-4--4- 4---- 4- 4-4- 4--- 4- 4-4-4--4- 4--- 4- 4-4-4-4-- 4--- 4-4-4-4-4--- 4- 4-4--- 4- 4-4-4---- 4- 4-4-4-15 20 25 30
Pixel Number (Downsampled by 20)
35
Figure 2-11: Calculated 1D Distortion Vector Field for MITa599 (Run 8): Largest Vector Represents a Shift of 20.40 radians or 1.30pm
F 25 ,20 0 E 1 . E5 C 0 0 F 0 5 10
25 ,20 - -- - - - - - -. - 10 - - - -.0..) . .. .4 .. CL E l - -.-- - - - - -- -- -5 - - - -0 by.3 0 5 10 15 20 25 30 35
Pixel Number (Downsampled by 20)
Figure 2-12: Calculated ID Nonlinear Distortion Vector Field for MITa599 (Run 8): Largest Vector Represents a Shift of 3.72 radians or 240nm
Table 2.1: Overall Phase Drop Consistency for MITa598 and MITa599
2.3.5
Consistency of Distortion Measurement
In order to verify the consistency of HPSI measurements, several runs were completed on MITa598 and MITa599, and critical data were compared. Table 2.1 lists the total phase drop across a horizontal cut at the center of the pattern for each run. The standard deviations in the total phase drop show that the error in the HPSI measurement for the cumulative distortion across the 3.89cm outer diameter of the Pyrex ring is approximately 0.02 periods (9nm) for MITa598 and 0.08 periods (30nm) for MITa599.
A graphical comparison of the phase distortion for MITa598 can be made by
examining Figure 2-13 vs. Figure 2-1 and Figure 2-14 vs. Figure 2-4. For MITa599, examine Figure 2-15 vs. Figure 2-7 and Figure 2-16 vs. Figure 2-10. It is especially important to note that the pattern stays roughly the same in the nonlinear distortion
MITa598 MITa599 Phase Drop Phase Drop
(radians) (radians) Run 1 53.82 46.15 Run 2 53.79 46.36 Run 3 53.69 46.22 Run 4 53.53 45.46 Run 5 53.96 47.27 Run 6 53.86 45.92 Run 7 53.98 45.93 Run 8 53.95 45.86 Run 9 53.88 45.92 Run 10 53.70 45.92 Mean 53.82 46.10 Std. Dev. 0.14 0.48
E
I
=3 25C -zd:200
))-~N
100 50-100 200 300 400 500 600 Pixel NumberE : 250-z 200- 150-100 50-100 200 300 400 500 600 Pixel Number
Figure 2-14: Calculated Nonlinear Phase Component for MITa598 (Run 2): Phase Steps of '
E I = 250 -z d:200 - 150-100 50 -100 200 300 400 500 600 Pixel Number
E 5 250 z d 200 -150 100 50 100 200 300 400 500 600 Pixel Number
Figure 2-16: Calculated Nonlinear Phase Component for MITa599 (Run 8): Phase Steps of '
figures; this indicates that the HPSI measurement is consistent in predicting not only long-range distortions, but also localized ones. This is critical in order to be able to map out a pattern for a compensating material.
Chapter 3
Fiducial Grid: 2D Analysis of
Mask Distortion
3.1
Modifications to the SML Holography Setup
Although quantifying the distortion in the mask membrane in one dimension is useful for gaining an appreciation of the magnitude and source of the distortion effects, it is necessary to make the leap to measuring a full two-dimensional distortion vector field in order to be able to produce a corresponding compensating pattern. Capturing the two-dimensional field can be accomplished by exposing two gratings that are exactly perpendicular to one another, thus composing a fiducial grid. Each grating is then associated with distortion along its axis, and the distortion vectors for each grating can be added as a vector sum to produce the two-dimensional distortion vector field. The critical step in measuring 2D distortion is the alignment of the two gratings with respect to each other. The angle must be known to a high degree of precision in order to be able to correctly sum the components. For this level of precision in wafer rotation, the pre-existing design of the SML Holography setup was inadequate; it was therefore necessary to redesign the setup and fabricate new components.
The overhaul of the pre-existing setup1 is rather drastic, as is shown in Figure 3-1
(technical schematics can be found in Appendix A). In the pre-existing setup, the wafer holder was connected directly to the rotation stage; this provided the ability to turn the wafer along the axis shown in Figure 3-1, but not with any degree of precision. In the new setup, a spacer is added between the wafer holder and rotation stages, attached to both of them. The spacer is connected to a long cylinder, which passes through a hole in the new mounting block. A 1.5" x 1.5" prism, the angle of which has been measured precisely, is mounted on the end of the cylinder, in line with a hole through the side of the mounting block.
In the operation of the new setup, the laser from the autocollimator is first po-sitioned to reflect off of the prism. The prism mount has three knobs on it which control three axes of rotation; these knobs are adjusted to zero the reading from the auto-collimator (this indicates that the auto-collimator beam is exactly normal to the prism surface). The prism is then turned until the reading zeroes again, indicating that an exact 900 turn has been completed. Any precession along an axis other than that which the wafer is turning on can be eliminated by setting the knobs correctly on the prism mount. It has been verified that when the knobs are properly tuned, the signals from the autocollimator at the endpoints of a 90' rotation are almost exactly the same; this indicates that the angle between the exposed gratings is sufficiently precise to be able to add their components.
3.2
HPSI Data
Due to the fact that the interferometric lithography system was offline for a number of months during the installation and testing of the Scanning Beam Interferometric Lithography setup (and is still offline as of the writing of this thesis), it was unfortu-nately not possible to generate 2D distortion data for this thesis.
As mentioned above, however, the components necessary for the gathering of this data have all been put in place and tested. When it is possible to do interferometric lithography again, it will be a simple matter to generate the data. From looking at the ID data, it can be safely assumed that the 2D data will show radial compression.
Interfering Beams
Wafer
Wafer Holder
Spacer
Rotation Stage
Mounting
Auto-Collimator
\ANVVv\VVVV\-"
Prism Mount
Prism Mount Holder
As a simulation of what this data will probably look like, the 1D data for MITa598 was rotated 90', and the vector components were summed. Refer to Figure 3-2 for the illustration that resulted. This calculation assumes that the 1D data will be approximately the same when the wafer is rotated 90'; hence Figure 3-2 only shows a best guess of what the actual 2D data will look like. The 2D nonlinear distortion, of course, cannot be simulated in this simple manner.
11
11
1/
// // // 1/ / / / -- - - - -/// 1/////
1
10\\
\\\ // \ A A .4.4~ 15 20Pixel Number (Downsampled by 20)
25 30
Figure 3-2: Simulated 2D Distortion Vector Field for MITa598 (Run 1): Largest Vector Represents a Shift of 30.50 radians or 1.94pm
25 20 F-.0 E 1 :) 0 z x 5 0' 0 5 35
Chapter 4
Possible Sources of Distortion
4.1
Pyrex Ring Warping Under Anodic Bonding
Heat
One of the possible sources of distortion in the process of fabricating the X-ray mask is the warping of the Pyrex ring due to the high heat of anodic bonding. For a ring structure of diameter do and coefficient of thermal expansion a [cm/cm/OC], a simple linear approximation of the expansion produced by a temperature change AT can be performed as follows:
7rd = rdo + a7rdoAT (4.1)
Ad= d - do = adoAT = 37pm (4.2)
for do = 3.5cm, a = 32.5 * 10-7 cm/cm/0C, and AT = 325'C.
This predicts an increase in the diameter of the ring of about 37pm during the heating of the Pyrex ring (and a corresponding 37pm decrease during cooling). It is likely that a complex process ensues, which may include the taut silicon nitride membrane slipping on the softening Pyrex. In addition to slipping, another pos-sible source of distortion arises from the deformation of the Pyrex ring during the heating/cooling cycle. The expansion model introduced above does not take such
A
Figure 4-1: Positions of Markers for the First Pyrex Ring Distortion Test
distortion into account, but instead assumes that the Pyrex ring maintains its cir-cular shape during heating and cooling. To test whether warping occurs, a second experiment was performed.
In this experiment, markers were placed on an unbonded Pyrex ring mesa, and their relative positions were measured before and after a 350'C test heat was applied. The markers were created by coating the Pyrex ring mesa with gold and scratching small X's into the gold, as shown in Figure 4-1. Relative positions were measured with the precision stage of the NSL's VS-2 Scanning-Electron-Beam Lithography system, giving sub-micron accuracy. The results from this experiment are summarized in Table 4.1.
As can be seen from the data, line segments AB, AC, AD, and BC increased in size, while line segments BD and CD decreased in size. This leads to the conclusion that the Pyrex ring does not maintain its circular shape under the heat of anodic bonding, but instead warps in a complicated and probably unpredictable way.
To add confirmation to these observations, the experiment was duplicated for a second Pyrex ring, as shown in Figure 4-2 and Table 4.2. The results likewise show
Table 4.1: Data from First Pyrex Ring Distortion Test
A
Dt
Table 4.2: Data from Second Pyrex Ring Distortion Test
that the Pyrex ring warps in an unpredictable way. Not only are there both positive and negative changes in length, but the magnitudes of the length changes are also much greater in general for the second ring. For example, AD in the first Pyrex ring and CD in the second Pyrex ring show a large difference in expansion (0.52pim vs. 2.73ttm) over approximately the same length (15mm).
4.2
Other
In addition to the warping of the Pyrex ring under the heat of anodic bonding, other distortions are expected to occur in the fabrication process. As mentioned above, the
current bonding method includes the use of tweezers to place the membrane upon the Pyrex ring; because the membrane cannot be held precisely level, this inevitably leads to an uneven placement and a certain amount of "bouncing". Distortions are expected to occur as the membrane settles into place. One method [11] that is currently being explored as a solution to this problem makes use of small beads of wax which are placed underneath the silicon ring outside of the membrane and which melt slowly, causing the membrane to slowly and evenly come into contact with the Pyrex ring. Another proposed idea [12] is the design of an entirely new structure for
anodic bonding. The new structure would include a precision stage for controlling vertical motion and an interferometer to measure the tilt of the membrane; this would allow more control over the membrane as it is lowered.
The absorber pattern itself is also expected to cause distortion in the membrane, both inside and outside the plane of the membrane. The details of these types of distortion have been worked- out elsewhere [19]. Out-of-plane distortion (OPD) is a localized "puckering" effect which is proportional to absorber stress and inversely pro-portional to substrate tensile stress. IPD is a long-range effect which is propro-portional to absorber stress, proportional to feature size, and independent of initial substrate stress. IPD is also a function of the substrate stiffness; a membrane material which is stiffer than silicon nitride (such as silicon carbide or diamond) will exhibit less IPD for the same absorber stress.
Chapter 5
Preliminary Stress Measurements
of Thin Film Candidates for a
Compensating Material
In order to calculate for and deposit a pattern of compensating material that will pull the distorted mask back into its original pattern, it is vital to know the mate-rial parameters of the compensating substance. The two candidates examined below, titanium and chromium, were chosen because they are easily deposited and charac-teristically exhibit high stress.
5.1
X-Ray Attenuation
When X-rays (or any other type of radiation) pass through a material, their intensity is attenuated by the material's absorption mechanisms. The two main mechanisms are photoelectric absorption (T), which produces fluorescence or Auger electrons, and (to a lesser extent) Compton scattering (o), which diverts photons in directions different from the primary beam. These mechanisms can be mathematically combined into a
single bulk mass absorption coefficient p
[cm
2/g] = T + o which depends upon the material and the incident radiation frequency.Z = 22, E = 0.500 - 2.000 keV
5000 0. 0,9 11 1.3 1.5 17 . 0.5 0.7 0.9 1.1 1.3 1.5 1,7 1.9 Current - Henke Energy (keV) Figure 5-1: CoefficientTitanium: Incident X-ray Photon Energy vs. Bulk Mass Absorption
[g/cm3] is described by Beer's Law, which relates incident intensity 1o to transmitted
intensity I by
I = Ioe-l (5.1)
Defining the attenuation in units of decibels (dB),
= 10logo( ). (5.2)
In order to have attenuation less than y dB, the material's thickness must obey
t < 7 ln(10)
lpp (5.3)
Figures 5-1 and 5-2 show calculated values of p for a 0.5 - 2.OkeV range of X-ray photon energy incident upon titanium and chromium, respectively [4]. For X-ray radiation at 1.32nm (such as the CuL radiation of the NSL's X-ray point source),
30000 25000 20000 15000 10000 iU
Z
=
24, E
=
0.500
-
2.000
keV
30000 25000 20000 15000 10000 5000 0 ' ' ' ' 0.5 0.7 Current -- Henke 0.9 1.1 1.3 1.5 1.7 1.9 Energy (keV)Figure 5-2: Chromium: Incident X-ray Photon Energy vs. Bulk Mass Absorption Coefficient
E = hv = 939eV. At this photon energy, pTi = 7,283 cm2/g and p1cr = 9, 182 cm2/g
[5]. Given that pri = 4.53 g/cm3 and PCr = 7.18 g/cm3 [4], the amount of attenuation
caused by a given compensating layer thickness can be calculated.1 This calculation is illustrated in Figure 5-3.
5.2
Stress Measurements
5.2.1
In-Plane Distortion Model
As discussed in Chapter 4, the uncompensated mask is expected to exhibit both in-plane and out-of-plane distortion. When used in a system with an X-ray point source, OPD within the mask will cause misalignment of the printed features due to
'As a good rule of thumb, the absorption coefficient a = Ip for chromium is approximately twice
that of titanium at A = 1.32nm. Thus, for a given thickness, the attenuation in decibels of chromium is roughly twice that of titanium.
0.8- 0.7- 0.6- -0.5-0 o4 Cr 0.3 - 0.2-0.1 -0 0 5 10 15 20 25
Compensating Layer Thickness [nm]
the mask-substrate gap and the finite distance to the point source. IPD, on the other hand, will cause misalignment regardless of the source or gap.
Assuming a setup that has a collimated X-ray source (a synchrotron, for example) and a very small mask-substrate gap (which can be achieved due to the flatness of this mask: cf. Figure 1-2), distortion in the mask can be approximated by IPD. Therefore, the thin-film compensating pattern must produce an "equal and opposite" distortion; the IPD caused by a single feature within the compensating pattern can be written [19] as
(1 - vi2 )rctc d
2Et, 1 +
(
2x
In this model, 6 is the maximum IPD at the edge of the compensating feature, oc is the inherent stress of the compensating material, E and v are the respective Young's modulus and Poisson ratio of the substrate, te and t, are the respective thicknesses of the compensating layer and substrate, d is the width of the compensating feature, and x is the distance from the compensating feature to the edge of the mask.
Typical values for the silicon nitride mask are: E = 304 GPa, v = 0.24, and t, l-= 1m. For a worst-case (i.e. maximum IPD) scenario, x is equal to the radius of the mask, 1.55cm.
One assumption that can probably be made is that the large radial component of the distortion (cf. Section 3.2) can be compensated for by depositing a layer of material just inside the inner edge of the Pyrex ring. Since transparency to X-rays is not as important in this region, the layer can be very thick, and as shown in (5.4), its stress 6 will increase linearly with its thickness tc. This leaves the nonlinear distortion; an approximate worst-case value for 6 is 370nm (cf. Figure 2-6).
It is useful to define a compensating pattern "maximum linewidth" which is equal to the feature size that will compensate for the maximum mask distortion. In order to create a compensating pattern, the parameters of the compensating material (thick-ness, composition, etc.) must be such that the maximum linewidth is not only smaller than the size of the mask itself, but sufficiently small to generate a pattern. In other words, it must be small enough to be usable in following at least roughly the shape
103 2.5nm Layer Thickness 12 -C 10 a) S101-10 10- 103 10 Maximum Linewidth [m]
Figure 5-4: Log-Log Plot of Compensating Layer Parameters
of the distortion pattern. Heavy distortion that has a spatial frequency greater than the spatial frequency determined by the compensating pattern's maximum linewidth will lead to an uncorrectable "distortion noise level" across the mask.
Using the above approximations for the quantities in (5.4), the stress c, needed for the compensating material can be calculated as a function of compensating layer thickness and maximum linewidth. This calculation is illustrated in Figure 5-4. Figure 5-5 shows the same data, but in a linear scale format, with the maximum linewidth axis truncated to keep the stress variable in a range that is most likely to be achieved. It is also necessary to keep in mind that the X-ray attenuation varies
as a function of layer thickness (as discussed in Section 5.1). Table 5.1 lists the attenuation values for these thicknesses, for A = 1.32nm.
100-90 80- 70-a. 0 60- 50-0) 40- 2.5nm Layer Thickness 30-5nm 20 - Onm 10 0 1 2 3 4 5 6 7 8 9 Maximum Linewidth [mm]
Figure 5-5: Linear Scale Plot of Compensating Layer Parameters
10
Table 5.1: Attenuation Values at A = 1.32nm for Different Layer Thicknesses Layer Thickness (nm) Ti Attenuation [dB] Cr Attenuation [dB]
2.5 0.036 0.072
5.0 0.072 0.144
10.0 0.144 0.286
5.2.2
Experimental Stress Data
For a thin film of thickness tc deposited onto a substrate of thickness t. >> tc, the compressive stress o- [N/m 2] of the thin film can be derived from the change in radius
of curvature of the substrate (R - Ro) [18] by the relation
E t2 1 1
o-c = - (_ "_ ) (5.5)
" -v6tc R Ro
where E and v are, respectively, the Young's modulus and Poisson ratio of the sub-strate. In the case of a silicon substrate, E = 155.8 GPa and v = 0.2152 [3].
To test this theoretical model, different thicknesses of titanium and chromium were deposited onto silicon wafers, and the resulting changes in radius of curvature were measured using the NSL's WYKO interferometer. The wafers were chosen based on two criteria: overall flatness (to ensure broad, distinguishable fringes) and simple, spherical contour (to ensure a relatively good radius of curvature fit). For each prime wafer to be used, a contour map of the surface was plotted out with the WYKO; the software was then used to show horizontal (X) and vertical (Y) cross-sections, each passing through the center of the wafer. Certain points on these cross-sections were then tabulated, to be used as "initial" data points in later calculations.
For the first test, 5nm of titanium were deposited onto a prime 3-inch silicon wafer at 10 A/sec. (or as fast a rate as the evaporator could attain before it reached 5nm). This thickness was chosen because it is very transparent to X-ray radiation (less than 0.1 dB attenuation); the fast rate was chosen because it was hypothesized that a faster rate of deposition would lead to a higher film stress, as the titanium atoms would have less time to reach a relaxed state. X and Y cross-section points were then gathered as before, and Matlab was used to calculate the stress of the 5nm titanium layer.
The Matlab code used in the first test is given in Appendix B. It first transforms the WYKO data into metric units, and then does an iterative least-squares approx-imation to find the radius of curvature. This calculation was performed for both cross-sections, before and after deposition of titanium. Figure 5-6 shows the data
3 2.5- X 2-IE 150 0.5-0 Without Ti laye x With Ti layer 0 -4 -3 -2 -1 0 1 2 3 4
Distance from Center of Wafer [cm]
points and radius of curvature fits for the wafer's vertical cross-section. As can be seen from the plots, the wafer bent only slightly; the corresponding stress calculated by Matlab for the vertical cross-section was approximately 300 MPa, and the stress
calculated for the horizontal cross-section was approximately 200 MPa. Further tests were conducted in which 5nm of titanium were deposited at lower rates (5 A/sec. and 1 A/sec.). These tests showed virtually no change in the curvature of the wafer. For no deposition rate did 5nm of titanium create above 1 GPa of stress; thus, this combination of material and thickness is not usable for a compensating layer (cf. Figure 5-4).
In another attempt to remain below 0.1 dB attenuation, 2.5nm of chromium were deposited onto a prime 3-inch silicon wafer, set at a rate of 5 A/sec. (it only made it up to 2.2 A/sec. before the evaporation was complete). In this case, the wafer bowed dramatically; Figure 5-7 shows the data points and radius of curvature fits for the wafer's vertical cross-section. The chromium-induced stresses on the vertical and horizontal cross-sections were calculated as 25.5 GPa and 24.3 GPa, respectively, giving an average stress value of 25 GPa for 2.5nm of chromium. Notice that although the chromium layer is half as thick as the titanium layer discussed above, the amount of stress it exerts is two orders of magnitude greater.
In order to verify this result, a second evaporation of 2.5nm of chromium onto a prime 3-inch silicon wafer was carried out, and in this case the vertical and horizontal stresses were calculated to be 31.8 GPa and 24.9 GPa, respectively. This gives an average stress value of 28 GPa, which is on par with the previous estimate.
Making use of Figure 5-4, this puts the compensating pattern maximum linewidth (in a worst-case scenario) at approximately 4mm, which is probably sufficient to map out a pattern that will correct most nonlinear distortion.
As a side note, the stress of the 30nm nickel layer (used in anodic bonding; cf. Section 2.2) was calculated to be less than 1 GPa, and thus relatively small.2
2However, this calculation was not performed on a wafer from the 3-inch batch discussed
10 0 x Without Cr layei With Cr layer 9 -' 8- 7- 6-E 4-0 3-x 2-0 x 0 1 x 0 -4 -3 -2 -1 0 1 2 3 4
Distance from Center of Wafer [cm]