CHAPTER
8
Lab 8: Arduino
Contents
8.1 Goal of this assignment . . . 61
8.2 Results . . . 61
8.3 Primer . . . 62
8.4 Assignment . . . 62
8.1
Goal of this assignment
This week you will use your Arduino board to experiment with microprocessor programming. Begin by installing the Arduino IDE as explained in appendixA.
Tip: Install the Arduino IDE before the lab of week 8 to prevent wasting time on installation issues when you should be working on the exercises.
We will be building a Knight Rider light effect using the LEDs from your Arduino kit. You will be practising with low level control logic.
8.2
Results
All the exercises have to be checked by a lab assistant. Make sure you can provide:
1. The implementations of your algorithms in C, including comments explaining your code. Every exercise should be available in a ‘Sketch’ file; incremental steps can be grouped together, as long as intermediate steps are visible. If you are asked to rewrite code, make sure to save it in a separate sketch!
2. If your algorithm has adjustable parameters, make sure to explain them using comments. 3. Keep your code clean and readable: if code should be rewritten, save a new ‘Sketch’.
8.3
Primer
If we look at the structure of an “Arduino Sketch we see it looks like standard C. The difference with a program on your own computer is that there is no visible main(). Instead you can define a function to run at the start of your program, called setup(), and a function which will be called each time ends, called loop().
While the Arduino tooling hides a lot of hardware related function to run the micro-controller, the programmer can think of a Sketch like the following pseudo-code:
Listing 8.1: Arduino Meta Program
int main() { setup(); while(1) loop(); }
8.4
Assignment
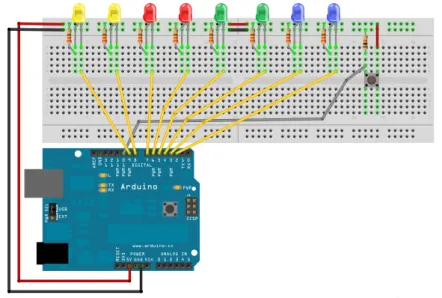
1. Lets begin by building the electronic circuit from fig.8.1. Make sure to connect the 5V from the POWER connector to the common positive rail on your breadboard. Connect the GND from the POWER connector to the negative rail.
Figure 8.1: Schematic view of 8 LEDs and button connected to Arduino
LEDs
Place a 330Ω resistor at the positive rail on the breadboard and plug the other end into a free row on the breadboard. Plug a LED in with its long leg at the resistor. Finally,
add a wire from the other leg of the LED to one of the digital pins on the Arduino. Repeat for all 8 LEDs and group them together for a festive look e.g. : yellow, yellow, red, red, green, green, blue, blue.
Note: Pin 0&1 are used for serial communication including programming the Arduino -use pin 2 to 9 instead or you will not be able to program your Arduino board! Button
Use a 10kΩ resistor for the button. When the button is not conducting, the Arduino will read 0V at an input pin, or LOW (0). When the button is pushed, the Arduino will read 5V, which is logic HIGH (1).
2. Lets test your circuit by blinking one of the LEDs you just connected. Load the Arduino IDEand the blink sketch from File > Examples > 1. Basics > Blink. Press the Upload button to load it into your Arduino UNO. There should be a blinking LED near pin 13. The example should be similar to listing8.2.
Modify the example to also drive pin 2 together with pin 13. Explain why the LEDs are blinking the way they are.
Listing 8.2: Blink LED Demo
void setup() {
// Set pin 13 as an output pin
pinMode(13, OUTPUT); }
void loop() {
digitalWrite(13, HIGH); // Set pin 13 high
delay(1000); // Wait for 1000 ms
digitalWrite(13, LOW); // Set pin 13 low
delay(1000); }
3. After testing a LED, we will test the push button. We would like to show the state of the button using the serial console.
Before we can print the status of the button, it important to note that printf() is not available. In the default Arduino configuration, printf() sends its output to a non-existing display. To be able to print things to the serial console, add the replacement function p() to the top of your program, see listing8.3. Alternatively, you can print static strings using Serial.print() directly.
Since we want to use the serial port, we need to initialize it from the setup() function using Serial.begin(9600). The argument of that function denoted the serial port speed and is required to match with the speed you use on your computer.
Set the pin mode to INPUT for pin 10. Use the digitalRead(pin) function to get the button state from pin 10. Use the new p() function to repeatedly print the value to the serial console.
The Arduino IDE has a built-in serial port monitor which you can find at in the main window under Tools > Serial Port Monitor. The added advantage of using the built-in serial monitor is that the serial port is available when you press the Upload button. If you would use an external program to view the serial port, you would need to terminate it every time you wish to upload a new sketch.
Listing 8.3: Mini printf replacement
#include <stdarg.h>
void p(char *fmt, ... ){
char tmp[128]; // Output limited to 128 chars
va_list args; va_start(args, fmt); vsnprintf(tmp, 128, fmt, args); va_end(args); Serial.print(tmp); } void setup() { Serial.begin(9600); }
4. We are not interested in a stream of button states, but rather a state change. For a button this means we want to detect the push of a button or the release of it. Modify your code to only print the status of the button when it changed.
5. Modify the code from exercise2to blink all 8 LEDs on your board. You might need to create a new “Sketch” to save your work as the examples are read-only.
Do not forget to mark the correct pins as OUTPUT pins.
6. Add the toggle logic from exercise Item4for the button to the blinking LEDs program. Releasing the button should switch the delay() functions on or off. This means you switch between slowly blinking every 2 seconds or blinking as fast as possible. Hint: For example, put the delay() calls in an if block.
7. If you look closely at the intensity of the LEDs when they blink slowly and fast, you will see they differ. When it toggles as fast as possible, the LEDs seem to burn a bit less bright. This is simply the effect of having the LEDs turned off half of the time. The effect of switching lights and other electronics on and off very fast with different on and off periods is called Pulse Width Modulation. As we observed, having a LED 1/2 of the time turned off, will lower the (average) light intensity for the human eye. Implement a PWM scheme where you divide the on/off time in 255 steps. Every time the loop() function executes, you increment a counter. If the counter is larger than the PWM value, you turn the light off, otherwise you turn it on. When the counter reaches 255, it will wrap around to zero.
Since we want to do this as fast as possible to prevent flicker, make sure to remove the delays and serial output from the loop.
Start at 255 for full intensity of all 8 LEDs and lower the PWM setting to see the lights dim. Compile your program with different PWM values and observe the light intensity. 8. While the digitalWrite() function is convenient, it is also fairly slow. The reason
for this is that it does more than just drive the pins.
The pins on the Arduino are memory mapped : you can access them from your code as a variable. On http://www.arduino.cc/en/Reference/PortManipulation you can read that digital pins in the output mode are mapped to PORTD for pin 0 to 7 and PORTB for pin 8 to 13.
Each bit in these 8-bit wide registers corresponds to a pin number. So if we wanted to enable pin 2, we would set the 3rd bit in PORTD to 1.
However, using PORTD = B00000100 is bad idea as it would override the state of all 8 pins in PORTD, instead of the one we would want to set. We can use a logical OR to mask the bit we wanted into the existing state of the output pins of PORTD. For example, use something like PORTD = PORTD | (1 << bitid) to set an arbitrary bit to 1 regardless of the state of the other pins.
Implement your own logic (you do not have to make a new function) to set and clear a bit in one of the 8 bit registers. Test your logic by making all the LEDs blink again with a delay() statement.
Hint: To clear a bit, use a logical AND.
Note: The type of PORTD and PORTB is volatile uint8_t. If you would put the logic in a function, you would need to pass the ports as a pointer type. Otherwise you will end up with a local volatile variable, which is not the same as the port itself! Note: While we aim to drive individual pins, the observant reader will have seen the possibility to drive multiple pins with a single write. Indeed a smart method which can improve I/O speeds over 1000%!
9. When you used loops before to iterate over the LEDs, you will now find this hard because the LEDs span 2 registers. Add a wrapper function led_enable(int id) which internally switches between PORTD and PORTB based on the passed LED id. The range of “id” should be 0 to 7.
Note: As we use the Arduino to provide the negative side of the circuit, setting a pin HIGHturns a LED off and vice versa. Make sure your enable() functions actually enables the LED.
10. Implement led_disable(int id) as well.
11. It is time to implement a visual effect to spruce things up.
Implement a “Knight Rider” style effect: using a single light, swipe from left to right and then from right to left. At any given time, only one LED should be active. The swipe speed should be configurable at run time: use a variable. Use the functions from exercise9and10.
Instead of using delay(), use a counter to before enabling the next LED. The loop() function should end after enabling or disabling the respective LEDs (no delaying loops in loop() are allowed).
12. Expand your light effect to fade all LEDs using a PWM. Note that you will need to have a PWM value for each LED.
When you enable the next LED in the sequence, the previous LED should slowly dim. This effectively creates a glowing tail following the active LED in the swipe, just like the original “Knight Rider” effect.
Hint: Use a global counter to trigger the modification of the PWM values and step through all LEDs.
Hint: since the fade is non-linear you can use a bit shift to fade. This effectively fades in 8 steps, which is enough for relatively fast animation. This is a hint; your own smooth fading algorithm is fine as well.
13. Add the button logic to change the swipe speed on the fly. When you release the button, the speed should change. Repeatedly pushing the button should cycle through all speeds.