HAL Id: hal-00862232
https://hal.archives-ouvertes.fr/hal-00862232
Submitted on 16 Sep 2013HAL is a multi-disciplinary open access archive for the deposit and dissemination of sci-entific research documents, whether they are pub-lished or not. The documents may come from teaching and research institutions in France or abroad, or from public or private research centers.
L’archive ouverte pluridisciplinaire HAL, est destinée au dépôt et à la diffusion de documents scientifiques de niveau recherche, publiés ou non, émanant des établissements d’enseignement et de recherche français ou étrangers, des laboratoires publics ou privés.
Angular approach combined to mechanical model for
tool breakage detection by eddy current sensors
Mathieu Ritou, Sébastien Garnier, Benoît Furet, Jean-Yves Hascoët
To cite this version:
Mathieu Ritou, Sébastien Garnier, Benoît Furet, Jean-Yves Hascoët. Angular approach combined to mechanical model for tool breakage detection by eddy current sensors. Mechanical Systems and Signal Processing, Elsevier, 2014, 44 (1-2), pp.211-220. �10.1016/j.ymssp.2013.02.004�. �hal-00862232�
Angular approach combined to mechanical model
for tool breakage detection by eddy current sensors
http://dx.doi.org/10.1016/j.ymssp.2013.02.004
M. Ritou*, S. Garnier, B. Furet, J.Y. Hascoet
IRCCyN (UMR CNRS 6597), 1 rue de la Noe, 44321 Nantes, France * Corresponding author: E-mail: mathieu.ritou@irccyn.ec-nantes.fr,
tel.: +33 2 72 64 22 22, fax: + 33 2 28 09 20 21
Abstract
The paper presents a new complete approach for Tool Condition Monitoring (TCM) in milling. The aim is the early detection of small damages so that catastrophic tool failures are prevented. A versatile in-process monitoring system is introduced for reliability concerns. The tool condition is determined by estimates of the radial eccentricity of the teeth. An adequate criterion is proposed combining mechanical model of milling and angular approach.
Then, a new solution is proposed for the estimate of cutting force using eddy current sensors implemented close to spindle nose. Signals are analysed in the angular domain, notably by synchronous averaging technique. Phase shifts induced by changes of machining direction are compensated. Results are compared with cutting forces measured with a dynamometer table. The proposed method is implemented in an industrial case of pocket machining operation. One of the cutting edges has been slightly damaged during the machining, as shown by a direct measurement of the tool. A control chart is established with the estimates of cutter eccentricity obtained during the machining from the eddy current sensors signals. Efficiency and reliability of the method is demonstrated by a successful detection of the damage.
Keywords:
Tool condition monitoring, milling, cutting force model, synchronous average, eddy current sensor.
1 Introduction
With High Speed Machining (HSM), cutting speeds and feedrates were significantly increased over the last decades. It results in higher productivity and better product quality. But, in the same time, risks of severe damages of workpieces or machine-tool components were also significantly increased. Indeed, if problems occur during machining, the operator
reaction time has become insufficient and the significant speeds will cause serious damages. This is the reason why Tool Condition Monitoring (TCM) systems are needed. Commercial systems are proposed for mass production [1]. They are based on the teach-in method: a few workpieces need to be machined in order to set the thresholds of breakage detection. This is incompatible with flexible manufacturing systems.
Abundant literature is proposed. However, there is a lack of reliable TCM solutions for small batch and one-off productions in milling [2]. It is mainly due to misinterpretations between simple transient cuts and real incidents. Yet, reliability is the major issue according to the industrial end-users [3].
Most of methodologies are essentially based on signal processing techniques, such as statistical analysis in time or frequency domain, wavelet analysis, neural networks and fuzzy logic [3- 5]. Other authors combine signal processing to mechanical model of the machining operation. Notably, the fact that a damage tooth removes less material leads to the monitoring of each tool tooth individually [6-8]. Few works deal with angular approach. It can be mentioned that Girardin et al. [9] studied the instantaneous angular speed from spindle encoder signal. Besides, Lamraoui et al. [10] introduced new criteria based on the cyclostationarity principles for the monitoring of chatter and tool wear.
TCM generally rely on the measurement of cutting force, vibration, spindle power, acoustic emission or tool temperature. Accuracy and bandwidth of forces issued from a dynamometer table are interesting but it is incompatible with industrial applications. Thus, alternatives for indirect estimate of cutting force are proposed: force ring at spindle housing [11] and capacitance [12] or eddy current [13-15] displacement sensor close to spindle nose. The latter requires signal processing because simple RMS (Root Mean Square) values are lowly sensible to cutting forces. The effects of thermal dilatation and centrifugal force can be removed implementing sensors on each side of the spindle in the two radial directions [15]. The bandwidth can be extended by disturbance Kalman filter technique so as to compensate distortions due to the three main eigenfrequencies of the tool-spindle system [12].
The paper proposes a new complete approach of TCM in milling. Firstly, a versatile in-process monitoring system is introduced for reliability concerns. A criterion is established combining mechanical model of milling and angular approach. It estimates the radial eccentricity of tool teeth. Secondly, a solution is presented for the estimate of cutting force using eddy current sensors implemented close to spindle nose. A signal processing methodology that analyse signals in the angular domain, notably by synchronous averaging
cutting forces issued from a dynamometer table. Lastly, the method is implemented in an industrial case of pocket machining operation in order to investigate the efficiency and the reliability of the method.
2 Monitoring of cutter eccentricity
Tool breakages are unpredictable and may lead severe consequences. This is the reason why the aim of the approach is to detect small damages as early as possible, in order to be able stop the machine-tool before a catastrophic failure.
2.1 Criterion principle
It is proposed to characterize the tool condition by an estimate of the radial eccentricity of teeth. Indeed, if a new endmill is considered, a radial eccentricity of a few hundredth millimetres can be measured for each cutting edge, once the tool clamped into the spindle. The radial eccentricity of teeth distributes the material to be removed unevenly between the teeth. Cutting forces are affected by the variations of chip thickness (Figure 1-a). This distribution is changed after the partial breakage of one of the cutter: the chipped tooth removes less material and the following one has to compensate, removing more material (Figure 1-b).
Fig. 1: Effect of the cutter eccentricity of tool teeth on cutting force.
The estimate of cutter eccentricity seems interesting for cutter breakage detection, notably in the case of low defects. To do so, the contribution of each tooth to the cutting force is investigated. In order to know which tooth produced a given force peak, an angular approach is suitable.
2.2 Cutting force model
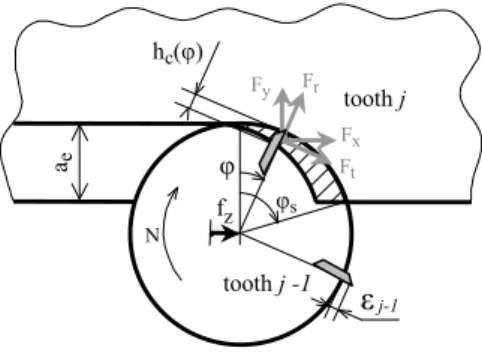
In presence of radial eccentricity of the teeth, Kline and DeVor [16] expressed that the chip thickness hc removed by a given tooth j is given by:
j j z j j j z j c f f h (ϕ)= sinϕ +ε −ε −1= sinϕ +Δε (1) j Z j ϕ π ϕ = −2 (2) 53.92 53.93 0 100 200 Time (s) new cutters fo rce (N ) 0 1 revolution 2 a 53.92 0 100 200 Time (s) damaged cutter fo rce (N ) 0 1 revolution 2 b
where fz is the feed per tooth and per revolution, and j are respectively the angular position
of the tool and of the tooth j, Z the teeth number, j the radial eccentricity and j the relative
radial eccentricity (c.f. Fig. 2).
s N ae fz Ft tooth j j-1 tooth j -1 hc( ) Fx Fr Fy
Fig. 2: Cutting force model.
Besides, Altintas [17] introduced that the tangential cutting force Ft can be obtained by:
p e t j c p c t j t k a h k a F (ϕ)= . . (ϕ)+ . (3)
where kt c and kt e are specific cutting coefficients that depend on the tool/workpiece
characteristics. ap is the depht of cut.
Assuming that the radial force Fr is proportional to the tangential one (Fr=kr Ft [16]) and that
only one tooth is engaged into the material, the resultant force can be calculated for each tooth. The force peak generated by a tooth j, i.e. the maximum magnitude of resultant force, is given by: p e j c p c j K a h K a F = . ( * +Δε )+ . (4)
where hc* is the maximum of nominal chip thickness. Kc and Ke are specific cutting
coefficients that can be deduced from the previous ones. The mean of force peaks is equal to:
p e c p c j K a h K a F = . . *+ . (5)
Difference between force peaks can be written . .
j j j c p j
F F F K a ε
Δ = − = Δ (6)
It leads to a criterion for the estimate of cutter relative eccentricity:
. j j j c p F F K a ε − Δ = (7)
Cutter eccentricity j is deduced from Eq. 7, fixing 1=0. In this way, the tool state can be
2.3 Versatile monitoring principle
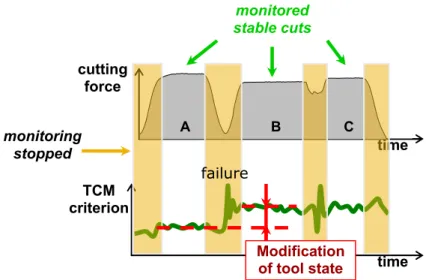
The complete manufacturing of a given workpiece is based on series of machining operations with various tools and associated cutting conditions. At C.A.M (Computer Aided Manufacturing) level, complex toolpath can be programmed. During a machining operation, numerous changes of cutting conditions can be noticed, notably due to turns along the toolpath or entry/exit of the tool. It was shown that the monitoring of tool condition is very arduous during those transient cuttings and the reliability of most of approaches is affected [8]. False alarms result from misinterpretations of cutting force transients. Indeed, distinguishing cutter breakage from sudden changes in cutting conditions is very difficult. This is the reason why a new versatile method is proposed. To tackle the problem of reliability, monitoring is stopped during force transients (Fig. 3). The tool state is estimated from cutting forces where there are zones of stable cuts, i.e. while cutting conditions and consequently cutting forces remain identical.
Fig. 3: Principle of the versatile monitoring.
In the example presented in Fig. 3, the TCM criterion varies during the transient cut between B and C zones, whereas the tool state do not change. The versatile monitoring avoids a false alarm. Conversely, the tool failure that occurs between A and B zones is detected by the increase of the TCM criterion.
The aim is to detect small early damage on tools, so as to stop the machining before the severe tool breakage that comes after. So, following this approach, stopping the monitoring during a few tenths of a second is not a problem. Besides, the evaluation of cutter eccentricity seems adapted to early detection of low defect on tool.
During stable cuts, the tool state is evaluated every spindle revolution, based on Eq. 7. Indeed,
Kc is related to a given workpiece material – tool interaction and remains identical during any
time TCM criterion time B A cutting force monitored stable cuts monitoring stopped Modification of tool state failure C
machining of this material with this tool. Generic values can be found in literature or it can be identified experimentally from trial cuts. The exact value is not necessary because only the evolution of the criterion is studied, not the absolute value (Fig. 3). During most of machining operations of small batch productions (e.g. pocket machining operation of structural aeronautic part), the depth of cut is constant during the operation and similar values are programmed from one part to another. So, a generic value of the tool can be considered or the right one can be transmitted to the Tool Condition Monitoring system. Also teeth number is necessary, to know how many force peaks must be found.
The main issue is to correctly assign a force peak to the right tooth. To do so, forces must be envisaged through an angular approach (Fig. 1). Force measurements must be associated to the tool angular position. Besides, changes of machining direction along the toolpath induce phase shifts of force signals in the time domain and in the tool angular domain that must be corrected. Machining direction can be obtained from axis encoders of the machine-tool or from the CNC by industrial field bus. Then, every tool revolution, a force peak is extracted for each tooth passing and the cutter eccentricity is estimated. In this way, the tool condition can be evaluated.
Lastly, thresholds need to be set up in order to determine whether the tool is damage or not. To do so, it is proposed to machine a few trial cuts in order to evaluate the initial tool state and to evaluate the variability the estimates due to the process. The standard deviation of the estimates of cutter eccentricity is computed and the thresholds are set at +/-3 around the initial values of estimated of cutter eccentricity jinit.
3. Monitoring of cutting forces with eddy current sensors 3.1 Instrumentation
As often in milling, the TCM approach proposed in this paper is based on the monitoring of cutting forces. Force measurements in research works are usually carried out with a dynamometer table to obtain high precision at a few kHz. However, it is not compatible with industrial productions due to limitations of the working zone. An interesting alternative consists in estimating the cutting force at tool tip, from measures of the bending of the tool by eddy current sensor that can be integrated close to the spindle nose.
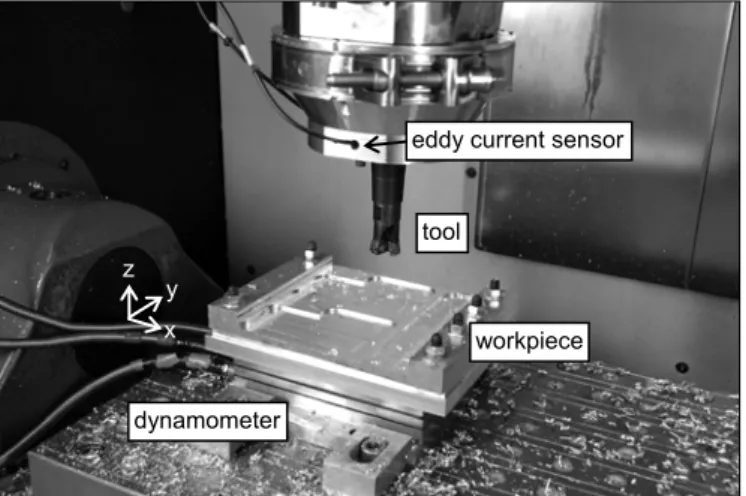
Fig. 4: Experimental set-up.
Two Keyence eddy current sensors were fixed on a ring mounted at spindle nose, in order to measure the radial displacements of the tool - spindle shaft system from the spindle housing, due to bending under cutting forces (Fig. 4). A 9257A Kistler dynamometer table was also mounted under the workpiece in order to calibrate and analyse the results from the eddy current sensors.
3.2 Signal processing
The paper proposes a methodology in order to estimate the tool condition with eddy current sensors. Useful signal represents a very small part of the raw signals x. Note that the signal corresponding to a given machining operation includes the preceding and following idle rotations of the cutting tool at the required spindle speed. The key steps of the signal processing are:
1) Low-pass filtering at twice the tooth passing frequency fp, that is teeth number times
spindle frequency (fp=Z.N/60). In this way, robustness of TCM is improved because
frequency response distortion of higher harmonics of tooth passing is limited and high frequency noise r is deleted [18]. The noise is mainly due to cyclostationarities involved by interactions between the eddy current sensor technology and the target material. Thus, it is not interesting for TCM.
2) Resampling of the signals in relation to spindle angular positions. In this paper, a two steps method is applied a posteriori and without encoder. It is based on the tool runout signature and the hypothesis that spindle speed is constant. Firstly, the approximate spindle frequency is estimated on a frequency spectrum computed from idle rotation
dynamometer
workpiece tool
eddy current sensor
x y z
measures. The approximate number of points by spindle revolution is obtained by rounding the ratio of sampling frequency to spindle frequency. Then, the signal is segmented into consecutive blocks of that length and they are synchronized. Secondly, two synchronous angular averages are calculated considering 20 idle revolutions respectively before and after the machining. The phase shift between the two signatures is identified by least square fitting. It results from the spindle frequency estimate error and it leads to the determination of the exact spindle frequency. The signal is then resampled by linear interpolation, segmented and synchronized in relation to a finite number of spindle angular positions.
3) The synchronous average of signals measured during idle rotations at the spindle speed N used for the machining operation, is computed and denoted xN. Then, this
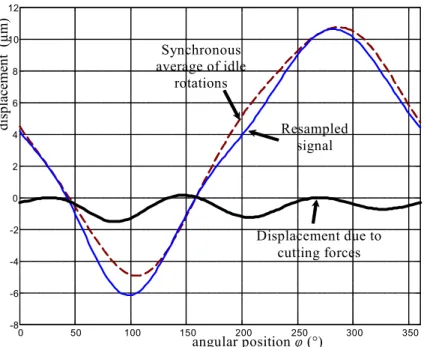
synchronous average is subtracted from the angular signal of each spindle revolution of the machining. Indeed, the radial displacement measures are significantly affected by circularity defects of the measured surface (mainly due to the tool runout), deformation due to centrifugal force at high spindle speed and thermal dilatation of the tool/shaft. During machining operations, they are suppressed by synchronous averaging technique and the displacements xF due to the cutting forces are revealed, as
shown in Fig. 5.
4) Phase shifts induced by changes of machining direction along toolpaths are corrected. The angle between tool moving direction and X direction is computed into the X-Y plane. It is deduced from the X and Y axes velocity of the machine-tool.
5) An estimate of cutting force Fx along the measuring direction is obtained multiplying
by the radial stiffness Ks of tool-spindle system (Fx=Ks.xF). Then, the resultant is
computed from forces in both radial directions. Since the dynamic behaviour is neglected and most of the harmonics are filtered, only an estimate of cutting force is obtained. It is sufficient for TCM. Indeed, spindle speed is constant during a machining operation and a tool breakage can be detected in presence of similar distortions due to the frequency response. The hypothesis of proportionality between force and displacement will be validated in the following section.
6) Cutter eccentricity is estimated based on Eq. 7, after extraction of the resultant force peaks per tooth. A control chart is established and allows the evaluation of tool condition during steady cuts.
0 50 100 150 200 250 300 350 -8 -6 -4 -2 0 2 4 6 8 10 12 Synchronous average of idle rotations Resampled signal Displacement due to cutting forces angular position (°) d is p la ce m en t (µ m )
Fig. 5: Signal processing for the estimation of cutting forces from displacements.
Therefore, the displacement signal can be considered as a sum of three main components: ) ( ) ( ) ( ) (ϕ ϕ ϕ ψ r ϕ K F x x s x N + + + = (8)
Relevance of the estimate of cutting force with eddy current sensors is investigated in the following section.
3.3 Experimental validation of the approach
Four paths were machined based on the cutting conditions presented in Tab. 1, on a Hermle C800 U machining centre (Fig. 4). The workpiece was made of 2017 aluminium alloy. A 25 mm diameter tool with 3 uncoated Seco inserts was used at a spindle speed of 7 650 RPM. Depth of cut was 2 mm. The sampling frequency was 20 kHz.
Path
Feed per tooth
ft (mm/rev/tooth) Width of cut ae (% of tool diameter) 1 0.08 100 % 2 0.15 100 % 3 0.08 30 % 4 0.15 30 %
Tab. 1: Cutting conditions of trial cuts.
The signal processing method proposed in the previous section was applied. An approximate spindle frequency of 127.39 Hz was firstly estimated via FFT. After synchronization of blocks of 157 points long, a phase shift of 39°, i.e. 17 points, was found by least square fitting
between the synchronous averages calculated before and after the machining, distant of 290 spindle revolutions. It led to the identification of the exact spindle frequency at 127.341 Hz and allowed the angular resampling.
The synchronous average associated to idle rotations of the tool at 7650 RPM is shown in Fig. 5; as well as the displacements due to the cutting forces in X direction concerning the fourth trial cuts.
At the calibration step, a linear regression was carried out between mean forces (from the dynamometer table) and mean displacements xF (from eddy current sensors) concerning the
four trial cuts. A very good correlation was obtained (Fig. 6) and stiffness Ks of the
tool-spindle system of 288 N/µm was found. In spite of a length to diameter ratio of 4.5 on the tool, the apparent stiffness is in agreement with expectable values at spindle nose [19]. Note that this calibration step is not necessary for the monitoring method proposed in the paper, but it facilitates the comprehension of the method.
Fig. 6: Identification of the radial stiffness Ks of the tool-spindle system.
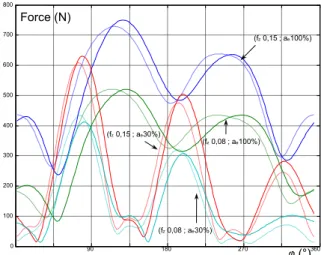
Fig. 7: Comparison between estimation of resultant cutting force from eddy current sensor (solid line) and measure with dynamometer table (dotted line).
0 20 40 60 80 100 120 140 160 0 100 200 300 400 500 600 700 800 (fz 0,15; ae100%) (fz 0,08; ae100%) (fz 0,15; ae30%) (fz 0,08; ae30%) 90 180 270 360 ϕ (°) Force (N) 0 0.2 0.4 0.6 0.8 1 1.2 1.4 1.6 1.8 0 100 200 300 400 500 600 force (N) displacement (µm)
Force signals measured with the dynamometer table were also low-pass filtered at twice the tooth passing frequency, i.e. with a cut-off frequency of 765 Hz. Fig. 7 illustrates a comparison of resultant cutting forces obtained from both sensor technologies. Couples of curves evolve with great similarity for each trial cuts (Tab. 1). Only a low delay of the eddy current sensor can be noticed. Consequently, the new method for the estimate of cutting force using eddy current sensor with dedicated signal processing is validated by this very good results. Note that, at some very high spindle speeds, larger deviations might be observed due to the frequency response of the tool-spindle assembly and of the dynamometer table.
4 Cutter breakage monitoring during a machining operation
In order to validate the proposed monitoring method, it has been implemented during a pocket machining operation. A small tooth breakage will be produced during the machining. However, before process monitoring, a calibration step is necessary in order to identify the initial tool state and set the damage detection thresholds from process variability.
4.1 Calibration step
Four cutting tests were machined under the cutting conditions presented in Tab. 1 and Fig. 7. The results of the identification based on eddy current sensor are the following:
• specific cutting coefficients Kc = 1260 MPa • initial tool state 2init = +10 µm and 3init = -40 µm
• damage detection thresholds at +/- 20 µm
v insert a b c d 4 trial cuts
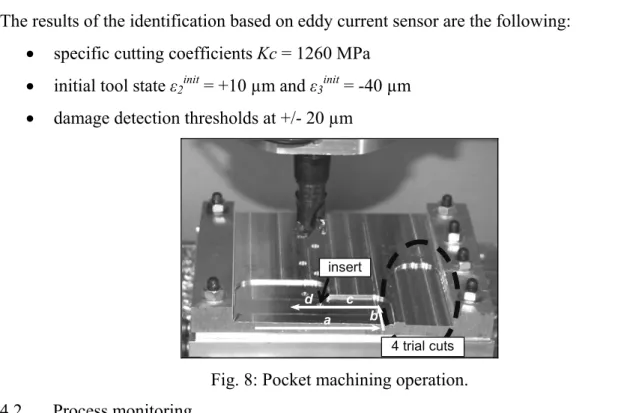
Fig. 8: Pocket machining operation. 4.2 Process monitoring
The industrial case of study of a pocket machining operation was chosen. Focus is done on the 3 first paths (cf. white arrows in Fig. 8):
• The first path (a) was machined in up-milling with a width of cut ae of 44% of tool
diameter.
• The second path (b) was a slot milling (ae = 100%).
• The third path (c and d) was machined in down-milling with ae =76%.
• In order to damage one of the teeth during the machining, a small insert made of hardened steel (65 HRC) was placed in a hole located at the middle of the third path (between c and d in Fig. 8).
• Feedrate was 0.15 mm/tooth, depth of cut 2 mm and spindle speed 7650 RPM.
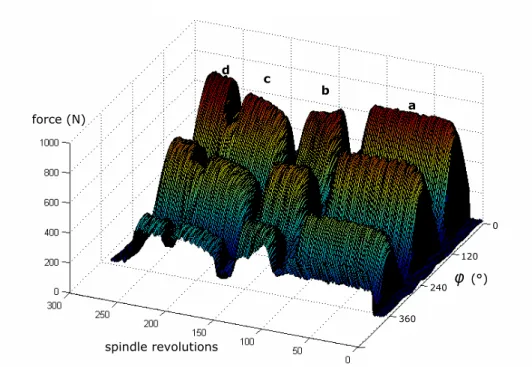
Fig. 9: Estimations of resultant cutting force from eddy current sensor during pocket machining operation.
The methodology of signal processing presented in section 3.2 was applied to the displacements measured with eddy current sensors in order to estimate the resultant cutting force during the machining. The synchronous average of idle rotations was subtracted and phase shift were corrected in relation to the machining direction. Forces generated by the passing of the three teeth of the tool can be clearly observed every spindle revolution on Fig. 9. Cutting forces decrease during turns before and after path b. It is explained by necessary slow downs of the machine-tool feedrate during turns. The small decrease of forces between c and d is due to the hole where less material needs to be removed. No significant peak is observed when a tooth encounters the insert. We can notice that force magnitude
360 0 120 240 ϕ (°) spindle revolutions force (N) a b c d
generated by tooth N°1 (on the right) slightly increase after the hole. But it is somewhat difficult to determine whether an incident occurred.
Then, force peaks were extracted for each tooth passing, every spindle revolution, as illustrated in Fig. 10.
Fig. 10: Force peaks per tooth during the pocket machining operation.
By applying the criterion of cutter eccentricity estimate (Eq. 7) to the force peaks, estimates of
j are obtained. When the tool is machining and the cut is stable, the versatile monitoring
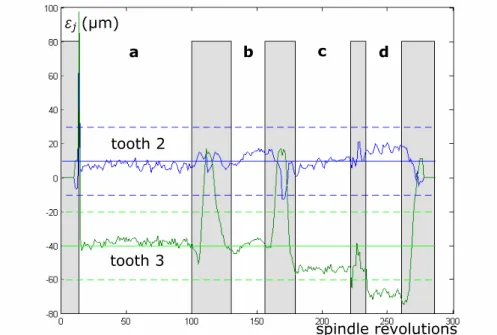
operates. The estimates of cutter eccentricity are analysed in relation to the damage detection thresholds that were set around the initial value of cutter eccentricity, issued from the calibration step. Results are presented as a control chart of the tool condition in Fig. 11.
Fig. 11: Control chart of the tool condition during the pocket machining operation.
εj (µm) spindle revolutions tooth 2 tooth 3 a b c d 0 50 100 150 200 250 300 0 100 200 300 400 500 600 700 800 spindle revolutions force (N) tooth 1 tooth 2 tooth 3
During the machining of the zones a, b and c, it can be noticed that no estimate is out of the thresholds. Thus, no false alarm would be sounded. But, immediately after the hole (path d), it is detected that tooth N°3 seems damaged, probably due to the insert.
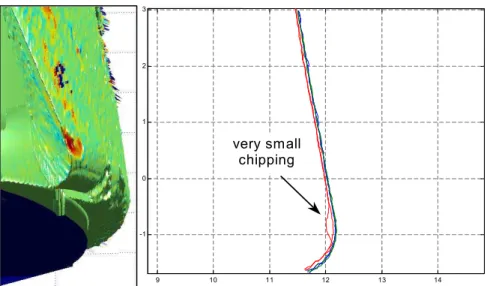
In order to confirm this hypothesis, the tool was directly measured with a specific device before and after machining [18]. Fig. 12 presents on the left a zoom of the rebuilt 3D numerical model on tooth N°3. The green colour indicates that it is similar to before machining, whereas the red colour indicates that material is missing on the tooth. It reveals a chipping of the cutting edge. The cutting edges are then extracted from the 3D model. On the right, Fig. 12 compares the radii of the three teeth obtained before and after the incident, in relation to the height of the tool. It shows that the chipping is very small: the depth is about 0.2 mm along 0.8 mm height. Besides, it can be noticed on the rest of the cutting edge that tooth N°3 presents a radial eccentricity of approximately -0.05 mm, compared to the other ones. It is accordance with the values identified with the cutting force model and the eddy current sensors during the calibration step.
9 10 11 12 13 14 -1 0 1 2 3 very small chipping
Fig. 12: Scanning of the tool before and after the machining.
The tool scanning proves that a small chipped occurred on tooth N°3. Therefore, we can conclude that the proposed monitoring method correctly identified the incident on the control chart (Fig. 11). It is shown that the method is very accurate because it can detect cutter chippings as small as 0.2 mm depth.
Furthermore, during the cutting transients, the thresholds may be passed over (tooth N°3 in Fig. 11) since the proposed versatile monitoring is stopped. Consequently, the reliability is
significantly increased. Therefore, during this industrial case study, the proposed method has performed an accurate and reliable monitoring of cutter damage and proved the efficiency.
5 Conclusion
This paper presents a new method for the TCM of flexible productions. A versatile in-process monitoring system is suggested, in order to ensure the reliability. Then, it is found relevant to characterize the tool state by estimates of the radial eccentricity of the teeth. Adequate criterion is proposed based on a mechanical model of milling considered in angular domain. Then, a new solution is proposed for the estimate of cutting force using eddy current sensors implemented at spindle nose. Signals are analysed in the angular domain, notably by synchronous averaging techniques. Phase shifts are compensated in relation to the machining direction. Results are in accordance with cutting forces measured with a dynamometer table. The proposed method has been implemented in an industrial case of a pocket machining operation. One of the cutters has been slightly damaged during the machining, as demonstrated by a direct measurement of the tool. It has been successfully detected on the control chart established with the estimates of cutter eccentricity obtained during the machining from the eddy current sensors. Yet, the cutter chipping was very small (0.2 mm depth). Efficiency and reliability of the method are consequently validated and the results are promising.
6 References
[1] K. Jemielniak, “Commercial Tool Condition Monitoring Systems”, International
Journal of Advanced Manufacturing Technology, 15 (1999) 711-721.
[2] F. Klocke, M. Reuber, “Process monitoring in mould and die finish milling operations - challenges and approaches”, Proceedings of the 2nd International Workshop on Intelligent Manufacturing Systems, Leuven, Belgium, (1999) 747-756.
[3] G. Byrne, D. Dornfeld, I. Inasaki, G. Ketteler, W. König, R. Teti, “Tool Condition Monitoring (TCM) - The Status of Research and Industrial Application”, Annals of the CIRP, 44 (1995) 541-567.
[4] A.G. Rehorn, J. Jiang, P.E. Orban, “State-of-the-art methods and results in tool condition monitoring: a review”, International Journal of Advanced Manufacturing
Technology, 26 (2004).
[5] P.W. Prickett, C. John, “An overview of approaches to end milling tool monitoring”,
[6] Y. Altintas, I. Yellowley, “In-process detection of tool failure in milling using cutting force models”, ASME Journal of Engineering for Industry, 111 (1989) 149-157.
[7] J.M. Lee, D.K. Choi, J. Kim, C.N. Chu, “Real time tool breakage monitoring for NC milling process”, Annals of the CIRP, 44 (1995) 59-62.
[8] M. Ritou, S. Garnier, B. Furet, J.Y. Hascoet, “A new versatile in-process monitoring system for milling”, International Journal of Machine Tools and Manufacture, 46 (2006) 2026-2035.
[9] F. Girardin, D. Rémond, J.F. Rigal, “Tool wear detection in milling - An original approach with a non-dedicated sensor”, Mechanical Systems and Signal Processing, 24 (2010) 1907-1920.
[10] M. Lamraoui, M. Thomas, M. El Badaoui, I. Zaghbani, V. Songméné, “New indicators based on cyclostationarity approach for machining monitoring”, Proceedings of Surveillance 6, Compiegne, France, (2011) 1-27.
[11] M.B. Jun, O.B. Ozdoganlar, R.E. De Vor, S.G. Kapoor, A. Kirchiem, G. Schaffner, “Evaluation of a spindle-based force sensor for monitoring and fault diagnosis of machining operations”, International Journal of Machine Tools and Manufacture, 42 (2002) 741-751. [12] A. Albrecht, S. Park, Y. Altintas, G. Pritschow, “High frequency bandwidth cutting force measurement in milling using capacitance displacement sensors”, International Journal
of Machine Tools and Manufacture, 45 (2005) 993-1008.
[13] M.K. Müller, “On-line process monitoring in high speed milling with an active magnetic bearing spindle”, Swiss Federal Institute of Technology doctoral thesis, Zürich, Swiss, 2002.
[14] Prometec, “Advanced Spindle Monitoring - S3A ring”, Poster_EMO2003.GB.pdf, Prometec GmbH, Aachen, Germany, 2003.
[15] A. Matsubara, M. Sugihara, A. Sarhan, H. Saraie, S. Ibaraki, Y. Kakino, “Research on spindle and process monitoring for intelligent machine tools”, International conference on Leading Edge Manufacturing, Nagoya, Japan, (2005) 469-474.
[16] W.A. Kline, R.E. De Vor, “The effect of runout on cutting geometry and forces in milling”, International Journal of Machine Tool Design and Research, 23 (1983) 123-140. [17] Y. Altintas, “Manufacturing automation, metal cutting mechanics, machine tool vibrations and CNC design”. Cambridge University Press, New York, 2000.
[18] M. Ritou, “Spindle instrumentation for tool condition monitoring of complex workpiece manufacturing in milling”, University of Nantes doctoral thesis, Nantes, France,
[19] D. Noel, M. Ritou, S. Le Loch, B. Furet, “Bearings influence on the dynamic behaviour of HSM spindle”, Proceedings of the ASME 11th Biennial Conference & on Engineering Systems Design and Analysis, Nantes, France (2012).

