The Digital Dissector: A Study of Design Issues in
Educational Multimedia
by
Christopher A. Horton
Submitted to the Department of Electrical Engineering and Com-puter Science in Partial Fulfillment of the Requirements for the
Degree of
Bachelor of Science in Computer Science and Engineering and Masters of Engineering in Electrical Engineering and Computer
Science
at the
MASSACHUSETTS INSTITUTE OF TECHNOLOGY
May 16, 1994
©
Copyright Christopher A. Horton, 1994. All Rights Reserved.The author hereby grants to M.I.T. permission to reproduce and to distribute copies of this thesis document in whole or in part, and to grant others the right
to do so.
Author
...
oo~,,,,,o,,...,.
.-.
Department of Electrical Engirleering and Computer Science
May 16, 1994
Certified by ...
5lj.b'.°I
Wilson . Hayes, Ph.D. Mueller Professor of Biomechanics 'Y Department of Qfthopaedic Surgery, Harvard Medical School Division jalth Scies i4f d Technology, MIT
"/
'
~j1is Supervisor
A ccepted by ... ... .. ...
\ F.R Morgenthaler
Committee on Graduate Theses ;ineering and Computer Science
The Digital Dissector:
A Study of Design Issues in Educational Multimedia
by
Christopher A. Horton
Submitted to the Department of Electrical Engineering
and Computer Science in Partial Fulfillment of the
Requirements for the Degree of
Bachelor of Science in Computer Science and
Engineer-ing and Masters of EngineerEngineer-ing in Electrical EngineerEngineer-ing
and Computer Science
Abstract
This thesis examines the design and implementation of two educational multimedia modules that are intended to help medical students learn anatomy and dissection. The primary goal of both modules is to facilitate the completion of a dissection laboratory by presenting students with dissection instructions and elaborative material such as pictures and animations. The modules are also intended to be extremely user friendly and easily expandable. The structure of the modules is linear and rigid compared to most other multimedia programs because they are designed to minimize cognitive overhead and restrict users to single page digressions. The software also provides information regarding common surgical techniques, a quizzing facility, an annotation feature, and a usage tracking feature.
Wilson C. Hayes, Ph.D.
Mueller Professor of Biomechanics
Department of Orthopaedic Surgery, Harvard Medical School Division of Health Sciences and Technology, MIT
$$ This thesis is dedicated to my parents, Phil and Katy Horton who graciously $$ $$ funded my college education. $$
Acknowledgments
Thanks to Dr. Peter Ratiu and the Digital Anatomist Group at the University of Washington who provided me with ten of the animations in my software. Thanks to Michael Harrington who provided advice and support.
Thanks to the Orthopaedic Biomechanics Lab of Beth Israel Hospital for letting me use your equipment.
Table of Contents
1 Multimedia and Educational Multimedia ...6
1.1 Introduction ... 6
1.2 D efinitions ...7
1.3 The Structure of Multimedia Documents ...9
1.4 Educational M ultim edia ... 11
1.5 Some Educational Multimedia Applications ... 12
2 The Digital Dissector Design, Part I ... 17
2.1 Background ... 17
2.2 Prim ary Design Goals ... 19
2.3 Information Issues ... 20
2.4 Module Structure ... 21
2.5 Preliminary Objections ... 27
3 The Development Environment ... 32
3.1 Hardware ... 32 3.2 Software: A.D.A.M ... 32 3.3 Supercard ... 33 4 Interface Design ... 38 4.1 Page Layout ... 38 4.2 Interface design ... 38
4.3 The Menu and Help System ... 41
5 The Larynx Module ... 43
5.1 Module One, The Larynx ... 43
5.2 Additional features ... 52
5.3 Problems with the Larynx module ... 57
6 The Knee Module ... 64
6.1 Introduction ... 64
6.2 D esign ... 64
6.3 Knee Module Features ... 66
6.4 Code Improvements ... 72
7 The Digital Dissector: Discussion and Conclusions ... 76
7.1 Intro duction
...
76
7.2 Computer Related Design Issues ... 76
7.3 Hypermedia Issues ... 78
7.4 Educational Issues ... 82
7.5 Advice for Other Developers ... 83
7.6 Future Extensions ...85 7.7 Conclusion ...86 Appendix A ... 88 Appendix B ... 106 Appendix C ... 119 Appendix D ... 127 Bibliography ... 130
List of Figures
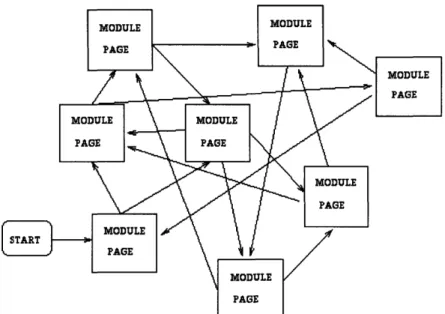
Figure 2.1: An Unstructured Module ... 22
Figure 2.6: A Highly Structured, Linear Module ... 25
Figure 2.9: The Digital Dissector Structure ... 26
Figure A. 1 The A.D.A.M. Interface ... 89
Figure A.2 The Larynx Module Main Menu ... 90
Figure A.3 The Larynx Module Introduction Page ... 91
Figure A.4 A Larynx Module Dissector Page ... 92
Figure A.5 A Larynx Module Atlas Page ... 93
Figure A.6 The Larynx Module Help Page One ... 94
Figure A.7 A Knee Module Introduction Page With Annotation Field On ...95
Figure A.8 A Knee Module Dissector Page ... 96
Figure A.9 A Knee Module Common Procedures Page ...97
Figure A. 10 A Knee Module Atlas Page ... 98
Figure A. 11 The Knee Module Quiz Page ... 99
Figure A. 12 The Knee Module Programmers Page . ... 100
Figure A. 13 The PICT Viewer ... 101
Figure A. 14 An Animation, Courtesy of Dr. Ratiu ... 102
Figure A. 15 An Animated Scan, Courtesy of Dr. Ratiu ... ... ...103
Figure A. 16 The Director Movie Viewer ... 104
Chapter 1
Multimedia and Educational Multimedia
1.1 Introduction
Until recently, desktop computers were too slow to display digitized movies at acceptable speeds. The specialized hardware necessary to display animation or video often cost as much as the computer itself, making widespread use of high-end graphics only a dream. However, thanks to the furious pace of technology and the competitive pricing of current systems, nearly every computer sold today comes with graphics and sound capabilities that would put the high end system of yesterday to shame. The availability of this technology coupled with the growing popularity of CD ROMS has caused an explosion of multimedia computers and software.
While multimedia is popular as an entertainment medium, it also holds great promise as an educational tool. Computer based training has been found to improve retention and steepen learning curves.1 In addition, multimedia allows students to efficiently browse
through large databases and access dynamic forms of information that would be impossible to put in conventional textbooks. This makes it useful in the classroom and powerful as a general educational tool.
This thesis centers on a pair of educational multimedia modules that I wrote to help medical students learn anatomy and dissection. In the course of discussing the development of these modules, I will provide the reader with a survey of important issues relating to the design of highly structured educational multimedia programs like my own.
This thesis can also be used as a reference for creating the remaining modules of the "Digital Dissector." Chapter 1 introduces the reader to the basics of hypertext, multimedia and educational multimedia. Chapter 2 presents background information on the software and addresses my high level design goals and decisions. Chapter 3 provides an overview of the development environment used to create the software. Chapter 4 finishes up the discussion of module design. Chapters 5 and 6 describe the implementation of the two modules. Chapter 7 discusses a few other design issues and provides some suggestions for future work. A collection of pictures and a partial code listing are included in the appendix.
1.2 Definitions
1.2.1 Hypertext
hyper- pf prefix [ME iper-, fr L hyper-, fr Gk, fr: hyper - more at OVE]R
1: above: beyond: SUPER- hyperphysical} 2a: excessively hypersensitive] 2b: excessive hyperemia] 3: that is or exists in a space of more than
three dimensions hypercube]} hyperspace - Webster's Dictionary
The earliest ancestor of the modern multimedia application is what is known today as
hypertext. 1 Hypertext is simply a computerized document that allows the reader to call up
other related texts. For instance, a hypertext document may have a number of footnoted references like a regular document but would allow the user to browse through the text of those references without any more effort than a mouse click or a few key strokes. From a functional standpoint, a good analogy for the typical hypertext session might be a library search. You begin by reading one book, but notice an interesting footnote on one of the pages. You look up the book referenced in the footnote and skim through it. One of the chapters mentions an interesting idea, so you look up the books cited in the chapter
bibliography. Your search for information continues through the library in this manner, and information from one source refers you to other sources. In a similar fashion, hypertext provides the user with a network of linked documents and a method for going from one document to another. The difference is that browsing and searching though a hypertext document is orders of magnitude faster and more efficient than browsing
through a library.
1.2.2 Hypermedia and Multimedia
Once computers were able to display graphics, the first hypermedia documents were
developed1. The only real difference between hypermedia and hypertext documents is that
hypermedia documents are not constrained to pure text. Instead they may contain many forms of information including text, graphics, pictures, sound, animation, and video clips. The difference between hypermedia and multimedia is much more subtle, but only exists
in a non-computer sense.
The term multimedia describes anything (project, performance, or software) that uses "multiple media." This would include sales presentations that make use of films, computerized "guided tour" programs (where the user has little or no control), or multimedia software. Currently, the majority of multimedia applications are presentation tools, games, databases, and educational programs. Major software labels have been producing multimedia presentation tools and games for some time, but the educational market is just starting to take off. Use of multimedia as a global information retrieval and communication tool is also becoming popular as demonstrated by the rapid growth of the World Wide Web and Mosaic software.2
Software manufacturers have been selling both multimedia and hypermedia programs as "multimedia," effectively negating any differences between the two words, at least in a
1. Woodhead, p 7
computing context. Today you will only see advertisements for "multimedia" software. "Hypermedia" is almost never mentioned except in academic and technical literature. Throughout this thesis, I will use the two terms interchangeably.
1.3 The Structure of Multimedia Documents
Both hypertext and multimedia documents have the same high level composition, each consisting of chunks of information and paths between those chunks. The technical terms used to describe the parts of a hyper-document are based on the idea of an information network. The chunks of information are called nodes, and the paths between nodes are called links. A network of nodes and links is known as a collection, network, or module. Since "collection" does not stress an underlying unifying principle and "network" has structural implications, I will use the term "module" throughout this paper.
1.3.1 Nodes
The most important part of a hyper-document is the node which consists of bits of text, graphics, video, sound, or other information1. A node might be a fragment of text (e.g., a
quotation), a picture, an animated sequence with some explanatory text, an entire book, or anything in between. A single node can be thought of as a "page" in the hyper-document,
and nodes are usually the smallest piece of information presented to the user. In order to
emphasize the idea that each node is a separate packet of information, two nodes are almost never displayed in the same window at the same time. In systems that use multiple windows this still holds true, although more than one node (window) may be on screen at
the same time. Using a house analogy, a node can be thought of as one room and its
contents. The room may contain everything from a lone scrap of paper to a full set of furniture.
The size or granularity of a node usually depends both on the type of information being presented and the goal of the hyper-document. Most of the time the system designer would like to present a specific group of concepts to the user, so node granularity reflects the conceptual level the designer had in mind. In some cases, it may be desirable to have nodes of varying granularity so that the user can delve into greater detail or explore higher level concepts. Using the house analogy, granularity can be thought of as the size of the rooms.
1.3.2 Links
A link establishes the relationship between two nodes and is used to transport the user
from one node to another.1 In terms of the house analogy, a link is a teleporter or
passageway from one room to another. Note that besides being used to go between adjacent rooms, teleporters can be used to travel to a room on the other side of the house or
even to a room in a different house. Similarly, links can take the user to any page in the
current module or even to a page in a different module.
In hypermedia software, links are typically embedded into the text and graphics of a node, but can also be independent of the node's informational content (e.g. in the form of a button or menu). There will usually be some sign of where embedded links are, and a common technique for indicating textual links is to bold face or underline the linked word or phrase. Most links take the user to one specific destination node, but this does not always have to be the case; it is possible for a link to be context sensitive and jump to different nodes depending on the user's previous actions. Since today just about every computer has a pointing device such as a mouse, the most common way to activate a link is by clicking on it.
Browsing is the term commonly used to describe the standard method of using a
hyper-document, where the user starts at some page and proceeds to travel through the nodes of the document via links, following some interesting line of thought. Depending on how nodes are interconnected, a hyper-document may have many paths through it. Because of this path variability, it is common for modules to have a large number of links so that the user has a better chance of visiting every important node while browsing.
1.3.3 Modules
A module is a collection of related nodes linked together. A module can be considered
a complete hyper-document by itself but may also be linked with other modules to form a larger document. For instance, a group of nodes might be collected and connected together to construct an American History module which could then be used to form a World History module. The important thing is that there is a high level unifying subject among the nodes of a module, in this case, American history.
1.4 Educational Multimedia
While presentation tools and games are certainly useful, multimedia can make the biggest impact in the area of education. The educational variety of multimedia is the same as any other kind except that its focus is on transferring useful knowledge to the user. As teachers and professors know, keeping the interest of students is as much of a challenge as getting them to learn and remember material. But it is exactly these two points that multimedia can be used to address. Among the other advantages of educational multimedia software are
1. Lessons become more interesting to the student. If nothing else, graphics, animation, sound, etc., make the software more likely to hold the user's attention. 2. The students can learn at their own pace and target individual needs. In conventional
instruction, all students are taught the same material and are required to do the same
work. By taking advantage of the multiple paths through a hyper-document, a student can bypass areas that are already familiar. By the same token, students can
3. Information is easier to absorb and retain when it is presented in more than one
format. Studies have also shown that student performance is directly related to the amount of interactivity with they system. 1
.4. Lessons become richer because more modes of expression are available. A prime example of this is reading Shakespeare. To the first time reader, Shakespeare may seem dry and boring, but when the text is augmented with spoken dialogue and videos of plays being performed, the works suddenly take on a whole new life.
1.5 Some Educational Multimedia Applications
Research in the area of educational multimedia is growing rapidly. However, the field
is still in its infancy and tools and methodology are still emerging. As of yet, only a small
number of development tools exist, and none are very good. Therefore, as work in the field progresses, the quality of applications will undoubtedly improve. Because addressing the
state of the art would be a thesis by itself, I will only present enough information to give
the reader an impression of current educational and medical multimedia. The Internet sources cited in this section provide an excellent starting place for a more in-depth inquiry.
1.5.1 The WWW
Arguably the most exciting hypermedia development is the World Wide Web, or
WWW as it is more commonly known. The WWW is a global network of hypermedia documents linked together and based on a simple scripting language that allows users to cluickly write up their own nodes or "pages." This network is accessible and expandable by anyone with an Internet connection. The information on this network includes on-line magazines, weather maps, virtual libraries, art galleries, and commercial advertising. On
June 1, 1993 there were approximately 130 WWW sites on the Internet and in less than a year that number has increased to about 13002 (note that one site may store a large number
of pages). Because of the amount of information contained in the network, the WWW is
also a powerful tool for learning. A comprehensive list of general multimedia sites is
l. Silva, p 145
available at http://cui_www.unige.ch/OSG/MultimediaInfo/index.html. Here is a small sampler of WWW pages that are related to education:
1) http://life.anu.edu.au/education.html ANU Educational Material
2) http://utis 179.cs.utwente.nl:8001/esperanto/hypercourse Esperanto Hypercourse
3) http://www.uji.es
Department of Education - Universitat Jaume I, Castello, Spain
4) http://english-server.hss.cmu.edu/langs.html
Languages and Linguistics
5) http://eryx.syr.edu/COWSHome.html
ASKEric
6) http://www.exploratorium.edu
The Exploratorium - Museum of Science, Art, and Human Perception with over 650 "hands-on" exhibits.
7) http://life.anu.edu.au/education.html
Australian National University Science and Math resources for Education
8) http://cfa-www.harvard.edu/home/deutsch/SED/index.html
Science Education Dept. at Harvard-Smithsonian Center for Astrophysics
9) http://ultralab.anglia.ac.uk
ULTRALAB - Anglia Polytechnic University - Learning Technology Research
Center.
10) http://www.ed.gov
U.S. Department of Education
11) http://wwwetb.nlm.nih.gov
Educational Technology Branch of the National Library of Medicine (this site contains a database of multimedia medical programs)
12) http://hub.terc.edu
TERC Science and Math Education
13) http://tecfa.unige.ch/info-edu-comp.html
WWW Virtual Library of Educational Technology
1.5.2 Medical Multimedia
Because many groups involved in medicine already have high power computers for imaging work, the medical field is one of the fastest growing educational multimedia software markets. This is not to say that the software currently available is especially high quality or widely used. Instead, a number of sites are developing customized applications to suit their own needs and distributing this software to other groups. In addition, some people have developed animated videos and visual databases which can usually be
purchased by other research groups. As multimedia techniques and tools develop, the medical industry will probably be among the first to benefit.
A survey of groups working on medical multimedia would take many pages, so instead I will briefly mention two of note. Each of these groups has produced a number of programs, some of which are available to outsiders. A relatively long listing of commercially available educational medical software is accessible on the Internet via Mosaic at http://wwwetb.nlm.nih.gov/coursedb/methods.index.html. Many other interesting medical sites can be found on the net, including the Virtual Hospital (http:// vh.radiology.uiowa.edu/) which has a number of on-line multimedia "textbooks."
1.5.3 SUMMIT
The Stanford University Medical Media and Information Technologies (SUMMIT) group exists to help incorporate new technology into the classroom. Under the directorship of Dr. Parvati Dev, SUMMIT's primary role is to harness the power of computers as educational tools and resources. Along these lines, a number of multimedia projects aimed at medical students are currently under development, including "The Anatomy Lesson" which is designed to teach basic anatomy to first year medical students. Here is a description of the program:
"The program uses the format of a discussion section with questions, diagrams, interactive images, and animations to draw students in and maintain their interest. The interactive labeled images and diagrams allow students to learn and to test their knowledge by actively seeking out information. Leading questions focus the student on key structures and systems. An enormous database of multiple choice ques-tions allows students to test their knowledge as they learn. Animations are used to illustrate difficult concepts." 1
In a personal communication, Phil Constantinou, one of the programmers involved with The Anatomy Lesson, said that a number of studies have been performed with varied success rates. He did not reference any specific papers, but mentioned that in one study half of an anatomy class used the software and the other half did not. It turned out that test scores were not significantly different between the two groups. He said that other projects had shown better results but did not mention them by name.
Two completed SUMMIT projects include BrainStorm and Walk About. BrainStorm is a highly interactive program designed for use in the teaching and review of human neuroanatomy. It features four different presentations of neuroanatomical structures including cross sections, dissections, diagrams, and textual explanations. These four modes are interconnected so that students can efficiently examine all aspects of a particular region. Walk About is primarily a quiz program, being designed to simulate the Stanford medical exams. The program features interactive images, multiple choice and free response questions, and offers a mode for learning and a mode for testing. This software is popular with the Stanford medical students.
1.5.4 The Digital Anatomist
The Digital Anatomist group in the Department of Biological Structure at the University of Washington is developing a multimedia system intended to teach gross anatomy. Two products are currently available from this group, the Digital Anatomist Browser, and a video disk featuring animations of the brain. The Browser is a front end to a multimedia server accessible on the Internet and has been used to teach neuroanatomy for 2 years. The Human Brain laserdisk contains a number of 3D animations of the brain from various perspectives and in various states of dissection. The model used for the animations was created by digitizing slices of a real brain and then rendering the resulting
data points on a high end graphics workstation. This same technique was used by Dr. Peter
Chapter 2
The Digital Dissector Design, Part I
2.1 Background
The idea behind the modules which I wrote comes from the Center for Advanced Biomedical Education (CABE) at Beth Israel Hospital in Boston and Wilson C. Hayes, Ph.D., a principal of CABE and a faculty member at MIT. Dr. Hayes is interested in bringing computers into the classroom for the purpose of teaching medical students, and one of his ideas is to use computers in dissection labs. It is hoped that students will find lab assignments easier and more beneficial if they are assisted through multimedia software. Based on this idea I decided to write software modules which will help students during dissection labs, possibly replacing the cumbersome dissection manual and anatomy atlas combination. The software I have written is being freely licensed to CABE in hopes that it will be expanded and used by future students.
2.1.1 Dissection Labs Now
During standard training, medical students are required to take an anatomy course that
involves dissecting a human cadaver. As would be expected, the areas to be explored in
lab are discussed beforehand in lecture. The students are then required to prepare for the lab by reading from a dissection manual1 which describes the steps and techniques to be used during dissection. This manual is extremely dense, primarily consisting of descriptions of the correct procedure for dissection and explanations about the structure of the relevant anatomical parts. There are only a few black and white illustrations to augment the dissector text, so to make up for this the dissection manual frequently refers to illustrations in an anatomy atlas. The atlas contains a large number of color drawings of
1. The dissection manual is commonly called the dissector, and I will use these two terms inter-changeably
just about every part of the body and a small number of scans, x-rays, and MRI's. In most cases the illustrations are accompanied by a few explanatory paragraphs. Students also attend prosections during which dissection techniques are demonstrated on prepared specimens. However, these prosections sometimes occur after the completion of the lab.
As one might guess, the actual laboratory procedure leaves a little to be desired. The
student begins a regional dissection by following the steps outlined in the dissection manual. However, human cadavers vary enough that identifying anatomical parts is hardly a trivial task. As a result, during the dissection many references must be made back and forth between the atlas, manual, and specimen. The dissection is not easy even with the help of the atlas, since the atlas does not show actual pictures of human anatomy, only unnaturally colored illustrations where everything is labeled and shown without its
surroundings. In a real body, fluids, muscles, vessels, etc., hide interesting areas and
everything tends to be the same color. Students may find the dissection manual technically
sophisticated and hard to follow. They may also be forced to learn by trial and error as the lab proceeds because they are not familiar with the area being dissected. Finally, students may find the details and technique of the dissection elusive.
2.1.2 Improvements
The above scenario suggests a number of improvements. First, the dissection manual and atlas could be combined into a single entity. Second, pictures of real anatomy could be presented in addition to illustrations. Someone could demonstrate the proper steps and techniques to the students prior to the dissection lab. Higher level material could be distributed to augment the confusing passages of the dissection manual. Besides just information on the dissection, the manual could describe common medical practices and how they relate to the anatomy being dissected. Finally, the students could be given some method to test and improve their knowledge before going into the lab.
By implementing these changes, the lab would be easier to carry out and more
beneficial to the student. Because it is ideal for presenting the wide variety of information necessary to effect the changes above, it makes sense to use multimedia software as the vehicle of implementation.
2.2 Primary Design Goals
2.2.1 Identification of the Primary Design Goal
It was clear that my software should take the student through the dissection step by
step, and with no less information than available in the dissection manual and atlas. Even
if I only ended up combining the dissector and atlas, students might find the software preferable over the two books because of speed and efficiency considerations. At the same time, it was not clear that the benefits of combining the two manuals would compensate for any features lost as a result of moving everything to a computer (see section 7.2-7.4). However, since I originally expected to be able to test the first module in lab, my initial plan was to quickly develop a prototype that I could then improve. Quick development meant only a few features, so I determined that my first module would concentrate on the main objective of getting students through the lab.
2.2.2 Identification of the Typical User
Having identified my primary goal, I decided that it was time to figure out what other aspects I should concentrate on. It became apparent that I should identify who my users would be since this would influence a number of design decisions. This was simple enough since my user base (medical students) was defined in the statement of my primary goal. However, I needed to determine what these users had in regard to computer skill level and prior knowledge of the subject matter being taught.
Obviously I could not make any assumption about the computer expertise of the medical students. Simply from the facts that most children now have computers at home
and those that do not tend to be exposed numerous times from elementary school to college, I could conclude that a large majority of my users would have used a computer before. However, it would be unwise to base any part of my software design on this assumption since doing so might cripple anyone who had no experience to the point that they would be unable to finish the lab given only my software. As a result, I had to make sure that the software was as easy to use as possible.
As far as prior knowledge was concerned, in general I could not safely conclude that my users would be familiar with many aspects of dissection. On the other hand, I could assume prior knowledge for the first module because the anatomy class in which I hoped to test my software would have already been through a few labs by the time I was finished coding. I could therefore assume that my "testers" would have some knowledge of the common terms used in medicine, the dissector and atlas format, and standard dissection lab procedures. At the same time, if I ended up writing a complete Digital Dissector to be used in lab from day one, I could not allow these assumptions to influence my module design because during the first lab I would have students with no previous experience using my software. As a result, I decided it was better to assume little or no prior knowledge, at least in regard to standard dissection procedures and the dissector and atlas formats. This decision helped me clarify what types of information I wanted to include in
the software.
2.3 Information Issues
One of the hardest things to decide when designing a multimedia program is what information should be made accessible to the user. For me, this was relatively easy since I assumed that I would be creating the functional equivalent of a dissector-atlas combination. This obviously meant that I needed to have dissection lab instructions along with illustrations and pictures. It was also important that the information I presented was
equivalent to that contained in standard lab manuals. While I could make additional information available, it would be risky to use non-standard core information because doing so might handicap my users and make it harder to analyze the benefits of my software. I therefore decided to use text and pictures straight from Grant's Dissectorl and Grant's Atlas of Anatomy.2'3
Since I was assuming that my users would not have much prior knowledge, I thought it would be a good idea to include background information and examples in the software. This gave me the idea of using video clips of an actual dissection to demonstrate each step of the lab. I also thought that videos or animations of anatomy like those seen on PBS shows would be useful for demonstrating how the anatomical parts functioned. Together, I felt that the dissector text, atlas pictures, animations, and video clips would be enough for my prototype module.
2.4 Module Structure
Once I had identified what kind of information I wanted to include in the module, it was necessary to choose a module structure. Typically, multimedia applications are very unstructured, with a lot of interconnected nodes.4 However, I did not think that this sort of
structure would promote the kind of goal I wanted the software to accomplish. As a result, I researched the factors that influence module structure. It turned out that there were a number of issues that needed to be considered, but in the end, the obvious solution was the correct one. In this section I present some of those issues.
1. Sauerland, Eberhardt: Grant's Dissector; Williams and Wilkins, Baltimore 1991 2. Agur, Anne: Grant's Atlas of Anatomy; Williams and Wilkins, Baltimore 1991
3. I currently have no plans to sell or distribute my software, so this should not be a problem.
Figure 2.1: An Unstructured Module
2.4.2 Structural Implications of the Module Goal
First and foremost, the goal of the software should be considered when determining module structure. In my case, this factor alone was enough to convince me that my modules should have a relatively rigid and linear structure. The whole point the software was to help students complete a task, so allowing them to deviate significantly from the dissection procedure would only increase their chances of not finishing. Furthermore, the freedom of an unstructured module would mean that each student would be learning something different. This would be problematic for dissection labs since everyone is responsible for the same material. Therefore it seemed that I should channel all the students down the same path, providing them with the opportunity to access elaborations, helpful pictures, and videos, as long as they ended up at the right place. In a standard dissection lab, the anatomy atlas serves as a means of clarification, so it was logical to assume that atlas page accesses would comprise most of the elaboration.
2.4.3 Cognitive Overhead
A second issue to be considered regarding module structure is that of cognitive
overhead. 1,2 Cognitive overhead refers to the added mental demand that results from
presenting the user with multiple courses of action. One advantage of textbooks is that the author can present material in the way that best promotes learning. In other words, authors hopefully have a good idea of how information should be structured in order to maximize its effect. In unstructured hypermedia, however, it is not possible to insure that the user makes the best decisions when choosing where to go next. For instance, the user may be pursuing a train of thought through the module but accidentally make a wrong decision regarding which link to follow next. This error may then cause the user to lose their train of thought. Alternatively, the path that the user follows may result in a wildly changing conceptual model because information is not gathered in a logical order. To prevent such mishaps it is necessary for the user to monitor their own mental state. The problem is that all this additional "cognitive overhead" may detract from the learning process. As one researcher says, "the richness of non-linear representation carries a risk of potential intellectual indigestion, loss of goal-directness, and cognitive entropy."3 Because studies
have shown that users with less prior knowledge are more susceptible to cognitive overhead and I was assuming that my users would be novices, I had an additional reason to worry about this problem.
Minimizing cognitive overhead had direct implications regarding how the modules should be structured. One obvious way to reduce cognitive overhead was to constrain the options available to the user. This implied fewer links between nodes. A second way to minimize it was to increase the level of organization within the module4. From the
1. Jonassen & Grabinger, p 20
2. Mayes, Kibby, & Anderson, pp 236-237
3. Dede
discussion above, it should be apparent that cognitive overhead will be more of a factor in large, highly interconnected hypermedia. Minimizing it therefore suggested that the linear structure I had in mind would be better than the alternatives.
2.4.4 Conceptual/Module Structure
'The third and final issue relating to structure involves the relationship between the concepts that the author wishes to communicate to the user and the module structure. If the
author presents information directly to the user, some concepts may be "hidden" in the
structure of the hyper-document. For instance, the document's structure might reflect a conceptual hierarchy or links in the document might reflect connections between ideas. To use a concrete example, imagine a hyper-document designed to teach students about the
phases of water. It begins with an ice cube and a puddle of water on the screen. Clicking
the block of ice activates a link that jumps to a picture of water in its ice crystal form. Thus
this link represents the idea that ice is composed of water molecules in a certain structure. Clicking a water molecule in the ice crystal activates a link that jumps to an illustration of
how hydrogen and oxygen bond to form water, and this link represents the concept that
water is composed of hydrogen and oxygen.
On the other hand, the system designer may choose to teach concepts indirectly by facilitating the completion of a task either inside or outside of the computer. In certain
circumstances such as my own, this is the only option, while in others it is simply an
alternative. From a structural standpoint, there is no reason for task completion modules to be any more complicated than needed to achieve the task. Since no concepts need to be represented in module links, the structure should be simple enough that the learning process will not be impeded. Because the task I was attempting to facilitate involved following a series of steps, it seemed clear enough that my module structure should be
2.4.5 Structural Conclusion
As I had originally guessed, all factors indicated that my module structure should be
simple and linear. As a result, I chose a model based on the idea that the user should
progress sequentially through the dissection steps, digressing only to get clarification or help from a relevant atlas page, video, or picture. This structure could be imposed by
connecting the dissector nodes together linearly with branching links to atlas pages
(reflecting dissector references). The atlas pages should not have any links, however,
thereby forcing the user to return back the main flow of the module after any digression.
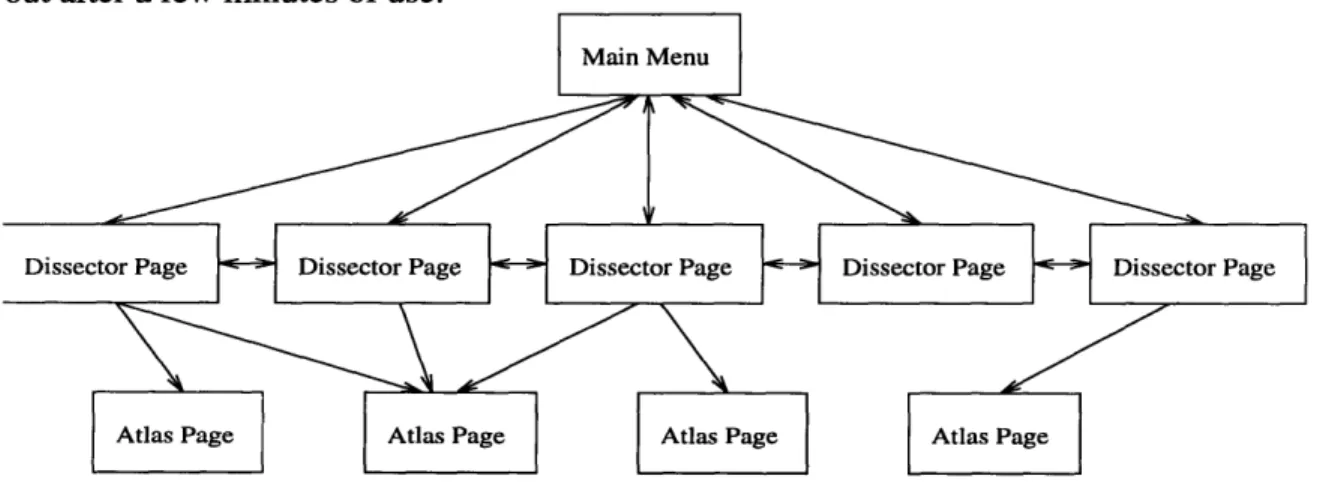
Figure 2.6: A Highly Structured, Linear Module
2.4.7 Node Granularity
Having identified what kind of information I wanted to include and how I wanted to
structure things, I now needed to decide how much information I would put in each node.
By the time I was at this stage, I had already determined that my prototype module would
focus on the larynx. The first subsection of the larynx chapter of the dissection manual provided an introduction to the larynx, describing its primary features. I decided that all of
this information could be grouped together onto one page along with a picture of the entire
larynx. I decided to break up the rest of the larynx section into paragraphs and put one or two paragraphs on a node. Along with the text, I planned to include some relevant picture
and the video clips demonstrating the steps explained in the paragraphs.
The atlas portion of the module was much easier to segment. The dissector refers to the anatomy atlas in terms of subsections, each which has a number like "8.32." Individual subsections typically have a single picture and a few paragraphs of explanatory text. This seemed to match the format I planned to use for the dissector, so I decided to make each atlas subsection one node.
2.4.8 Module Layout
By now I had a clear idea of what I wanted the user to perceive as the structure of the module. First, I expected the software to start on a menu page from which every other page in the module could be accessed. Furthermore, every page in the module would have a simple way to return to the menu. The menu would therefore be the top level or root node of my module. The second level of the module would be the series of pages devoted to the actual dissection procedure. The third level would consist of the "elaborative material" including information from the anatomy atlas and other relevant sources. Hopefully I could make this structure apparent in the menu, and the user would figure it out after a few minutes of use.
Figure 2.9: The Digital Dissector Structure
2.5 Preliminary Objections
At first look, incorporating a dissection manual and anatomy atlas into a multimedia program seems like a good idea except for four things: cost, the hazards of having computers in the lab, development issues, and the fact that multimedia may not be good for this application. In this section I address all four problems but pay special attention to the last issue.
2.5.1 Cost
Cost is definitely a problem, at least if a large number of machines are needed. However, because of the fact that students take the quality of the learning environment into account when deciding where to go, schools need to computerize in order to stay competitive. More importantly, the price of multimedia-capable machines is on a steady decline thanks to vendor price wars and the fast pace of technology. It is also possible that in the long run, computerizing will prove to be more cost effective then buying textbooks and teaching "the old way." If it turns out that the advantages of computerized instruction include significantly faster absorption rates and longer retention times, computers used in the classroom will pay for themselves in a very short amount of time.
2.5.2 Computers in the Lab
The problem of needing to use the software in lab is the most difficult to solve. The
concern here is that if computers replace or augment the standard dissection manual in lab, students will transfer the grime from their specimens to the computer during the normal course of use. Fluids or flesh may get into the machine or fall onto the mouse pad, etc. If such events become common place, it will be hard to justify using an expensive piece of machinery rather than an easily replaceable and moderately resilient book.
Keeping things from falling into the computer and peripherals is prevented easily enough by encasing the keyboard and mouse in plastic membranes and by putting the CPU and monitor in special boxes. All of these items can be purchased for a reasonable
price. If something falls on the mouse pad, a roll of paper towels will do, as will a spare mouse pad. In fact, the mouse can be done away with entirely by using a touch screen monitor. Another alternative is to have students pair up into teams and have one team member interact with the computer while the other works. So while there is definitely the potential for trouble, a little care and common sense can prevent mishaps.
2.5.3 Maintenance
The third problem cited above relates to the maintenance of the software. New facts may be discovered, old information might become obsolete, the focus of the lab course might change, and other factors might influence the course in such a way that a change would need to be made in the software. Furthermore, when things need updating, the original developer will no longer be available for system maintenance so modifying the software will suddenly become a very real and difficult issue. However, with a little foresight on my own part as the designer, this problem can be easily prevented. Standard software engineering techniques such as modular design and full documentation can insure that any competent programmer will be able to modify the system whenever necessary.
2.5.4 Applicability of Multimedia in this Instance
Determining the utility of a multimedia program that helps students during dissection labs revolves around two questions. First, is it practical, and second, is multimedia suited for this particular task. The three points above address the practicality issue and if anything, I think the most difficult problem will be getting computers in the lab. On the other hand, the most important problem is establishing that multimedia is useful for highly structured applications such as directing lab work, since even if getting machines into lab is troublesome, computers can still be used to prepare for dissections. This problem basically comes down to a question of whether multimedia is useful for directed learning. In hypermedia literature, a number of researchers argue that multimedia is only useful for
undirected learning, but I believe a good argument exists for the other side as well. Rather than assuring the reader, though, I will present the argument.
Teaching may occur in a number of ways, and can be directed or undirected. Directed learning involves leading the student along a predetermined path, while undirected learning lets the student follow his own interests. Different subjects and goals may be better suited for a particular method1. Highly structured learning promotes uniformity of
knowledge across students, but sometimes at the expense of better understanding. In conventional courses, the main tool of learning is the textbook. When using a textbook, students typically read information in the same order that it appears in the chapters, and as a result there is not likely to be much student directed browsing or searching. Therefore, the sequence of information in the book determines the conceptual model produced in the mind of the student.
Unlike textbooks, unstructured multimedia gives the student control over the order in which information is explored and allows for a wider variety of conceptual models. To illustrate, imagine two ways of teaching a subject: A subtopic is picked and thoroughly covered, then the next subtopic is covered, and so on. Alternatively, one aspect of the subject is picked and all subtopics are analyzed in terms of this aspect. Then another aspect is picked, and so on. Research has found that the first method focuses the student's attention on how the information about individual topics is intertwined while the second method causes the student to concentrate on the similarities and differences between topics.2 Furthermore, evidence from these and other studies3 indicates that the first
method is better suited to students with less prior knowledge about the subject because less mental context switching is required. Similarly, the latter method was found to be
1. Harland, p 89
2. Schnotz pp 81-98
more effective for students with greater prior knowledge. An unstructured multimedia program allows for either method, while a regular textbook forces the reader into one method or the other.
However, this undirected nature of multimedia may make it unsuitable for directed learning. If it is agreed that hypermedia documents are best suited to informal learning where the user follows interesting trains of thought through the software, we can conclude that what drives browsing and learning is user interest and curiosity. Therefore, as one researcher contends "Attempts to structure the information elements in particular ways, even if these attempts are meant to assist the user in understanding the information encountered, may instead do violence in some way to the user's particular interest at that moment in time in the topic being explored. One should therefore be cautious of structure."1 Based on this reasoning, it is possible to argue that conventional hypermedia is not very useful for highly structured learning tasks.2'3
However, other scientists provide an answer to this claim, citing hypermedia as a good
way to access elaborations on core information.4' 5 Since the goal in a directed lesson is to
provide the student with specific concepts and ideas, the structure of the hyper-document will necessarily be more rigid than in an undirected lesson. However, even for directed learning it is necessary to provide elaboration or explanations. Hypermedia is attractive for this kind of activity since it allows students to explore a relevant side branch when
necessary, and to do so very efficiently.
From this observation we can conclude that to be useful for directed learning, software must be fairly linear, but can have a large number of short "offshoots." In other words, the
1. Duchastel, pp 140-141 2. Whalley, p 65
3. Duffy & Knuth, p 204 4. Duffy & Knuth, p 201
logical flow of the program should be very rigid and constrained to a narrow path since this will prevent the user from getting side tracked or lost on an irrelevant branch. At the same time, a large number of short, unconnected digressions can be made available for students who need elaboration or examples. Thus, because the software allows instant access to elaborations while maintaining a directed approach, multimedia seems superior to books for directed learning as well. In fact, the structure of the module described exactly matches my own.
Chapter 3
The Development Environment
3.1 Hardware
Development was done on a Macintosh Quadra 850 with a 21" color monitor, 1 gigabyte hard drive, and 24 megabytes of RAM. While I did not need all of the disk space for the two modules I wrote, a large hard drive will be necessary to store all of the pictures, animations, etc., if development continues. The 24 megabytes of RAM was also more than I needed but was useful for complex image editing and multitasking. The most important aspects of the system from a hardware perspective turned out to be the color monitor and processor speed. Without color, the software quality would have suffered greatly and much of the detail in the images I used would have been lost. The processor speed was an important factor because the scripting language that I used to develop my modules was rather slow.
Because I needed to scan images from two books, a 4" black and white strip scanner was obtained for the first module. By the time I was developing the second module, a flatbed color scanner had been located. This made a tremendous amount of difference and second module's pages are much more attractive. The animations I used in the second module were created on a Silicon Graphics workstation using custom software developed by Jeff Prothero, a researcher at the University of Washington.
3.2 Software: A.D.A.M.
Since my modules were intended to help students during dissection labs, it made sense to work within the A.D.A.M. software package. A.D.A.M. is an attempt at a virtual cadaver. The program begins with a human body in a central window, and the user can
select the race, gender, and one of four views (anterior, posterior, lateral, medial). Clicking on an area of the body magnifies that region. The user can then "box cut" which strips off one layer of anatomy inside a user defined box or use a "scalpel" which strips off an oval shaped layer of anatomy wherever the user "cuts." Since these methods usually turn out to be too slow, a third alternative is to strip off entire layers of anatomy using a slider on the side of the window. Clicking on an organ, bone, etc., produces a pop-up menu that displays the name of the selected body part. The menu sometimes contains links to histology (tissue samples) or radiology (x-rays) images, and can also access a list of links that the user can add to. A.D.A.M. also contains a rudimentary testing function and a few animations of common surgical techniques. However, it does not allow you to simulate a
real dissection and is really only useful as an anatomy atlas. See Figure A. 1 in Appendix A
for a picture of the A.D.A.M. interface.
A.D.A.M. also has a project editor which allows developers to create their own multimedia projects using the Supercard scripting language. Developers can make their projects available to other A.D.A.M. users either by linking them to a particular anatomical part (via the link list described above) or through the Projects function which lets users open an arbitrary project. As a result, even though my modules were written
"under A.D.A.M." they are really only standard Supercard scripts.
3.3 Supercard
Supercard is a superset of the well-known Hypertalk scripting language. Hypertalk is a high level, english-like, interpreted language that is object oriented and event driven. In Hypercard, a program is referred to as a "Hypercard stack" since the metaphor used is that of a stack of index cards, where each node is a card. In Supercard, a program is a project, but nodes are still called cards.
A Supercard project can be thought of as a hyperbook. Again, the nodes of this book are objects called cards, and the user is presented with one card of information at a time. Cards can contain text field, graphic, and button objects. Text fields can only contain text, buttons almost always have text based namesl, and "graphics" can be arbitrarily shaped bits of graphics. Every object has a number and can be given a name, but different types of objects are addressed in different manners. For instance, the code to hide a text field is
hide cd field Help_text or hide cd field 3
while the code to hide a graphic is
hide cd grc Hyoid_bone or hide cd grc 7
The "cd" in these statements means that the function is being applied to a text field or graphic on the current card. Each object also has a set of properties specific to its type. For instance, text fields can be locked or unlocked, transparent or opaque, and so on. Furthermore each object can have a set of event driven scripts that control what it does in response to user or system activity.
3.3.1 Event Driven vs. Procedure Driven
Like most other Macintosh programs, Supercard is event driven rather than procedure driven. A procedure driven program executes code in a primarily linear fashion. In order
to respond to user activity, a procedure driven program tests its input and branches to the
appropriate place depending on input values. If no user activity occurs, the program must wait a bit and then check again. Event driven programs are more object oriented in nature and have segments of code that are executed only when a specific message is received from the operating system or run time environment. The Macintosh operating system is event driven, and sends messages to programs every time an "Apple event" occurs. These
1. If the programmer wishes to use a picture as a button name, the picture must be stored in a dif-ferent file than the rest of the project.
messages tend to reflect user activity and include things like "mouseUp," "mouseDown," "openCard," and "openProject." Thus most Supercard object scripts are written to handle specific user actions. For instance, here is the script of a graphic that prints "HI!" on the screen when you press it:
on mouseUp answer "HI" end mouseUP
The system will monitor for user activity, and if it detects mouse activity over the graphic, it will send messages to the graphic telling it what happened.
Most of the time, designers want their software to do something in response to user activity so event driven software is perfect. Because each object has its own script, the developer can specify what happens when a project or page is open or closed, when a button or graphic is clicked, and so on. Thus icons can be created by making a graphic with the desired picture and then writing a script that does the appropriate thing when the graphic is pressed. The graphic can also be made to change its picture to reflect the current state of affairs, thus acting both as a function and status icon.
In many cases it is desirable to let the user access an image or movie from a project,
but Supercard does not provide a way to do this. Fortunately, the authors of A.D.A.M. included a mechanism to link PICT images, QuickTime movies (Apple's digital movie format), other A.D.A.M. projects, LaserDisks, and Macromind Director movies to any project. When such a link is created, a special graphic is placed on the current page that displays the image or movie when it is clicked. By copying the script of these links into other objects it is possible to have any graphic or button display images or movies.
One drawback of using an interpreted language such as Supercard is that projects get slow as code is added. If each page does a substantial amount of housekeeping before
letting the user do anything, the watch icon will become a familiar sight (this icon is used to mean "wait a bit"). For this reason it is important to make scripts short and fast.
3.3.2 Development Environment: Conclusion
Because I was working on a Macintosh using Supercard, a number of user interface issues had already been decided for me. The Macintosh makes use of what is commonly called the "WIMP" interface (for "windows, icons, mouse, pull-down menus"). Unlike the software that runs on Intel based machines and unix workstations, it is therefore primarily mouse controlled. This means that pointing and clicking are usually all that is needed to get something done. For the sake of consistency, it made sense to preserve this in my software.
Chapter 4
Interface Design
4.1 Page Layout
In order to make things as simple and familiar as possible, it made sense to have a standard page layout. The simplest way to develop the layout was by experimenting on the computer, so at this point I actually started implementing the first module. I felt that to a certain extent, the module's page layout should mimic a textbook page. This was mostly because I did not want the users to have to adapt to something totally foreign. Along these lines, I decided to keep the text together in one area and put any pictures below the text. For my first page I created a text field and typed in the introduction paragraph from the larynx section of the dissector. Below this text I pasted an image of the larynx that I had copied from ADAM's virtual cadaver. I then sectioned off the top inch of the page, colored this region light blue, and typed in the page title. I hoped that making the page title distinct like this would make it easier for users to figure out where they were. I also left room at the bottom of the page for whatever page controls I ended up needing (see Figure A.3 of Appendix A for a picture of this page). Having come up with a satisfactory page layout, I now went about designing the rest of the user interface and coming up with the features that I thought the software should have.
4.2 Interface design
The user interface for my software clearly had to be easy to use. This was true for two reasons. First, my users were not going to be computer experts. This merely meant that I would have to make my software especially user friendly. Second, my software should avoid interfering with the completion of the dissection lab as much as possible. This meant
that moving around should be simple and straightforward. I tried to guarantee that my software would be easy to use by implementing a small number of controls and making the interface consistent across the module. I also kept user input restricted to pointing and clicking.
4.2.1 Identification of necessary controls
In order to figure out what controls I needed to implement, I had to clarify what the
user should be able to do with the software. Obviously there had to be links so the user
could jump to referenced atlas pages, and once there, the user had to be able to get back to the main flow of the module. However, it did not seem like a good idea to use links to return from an atlas page. If an atlas page had one return link for every dissector page that referenced it, it would be possible for the user to choose the wrong return link and end up lost. Instead I decided to provide one "smart" link per atlas page that remembered where the user had come from. I was only going to allow the user to digress one page, so I could instantiate this as a "Previous Page" command.
In addition to links, I needed a small collection of commands that would allow the user to move through the module. The most obvious of these were the forward and backward commands which would be used to move through the linear sequence of dissector pages. I also decided it would be a good idea to include the previous page command on the pages in the main flow of the module. Finally, I would need commands that could be used to jump to the main menu and access help information. As far as implementation was concerned, I could use key-strokes, menus, buttons, or icons. Coherence to the WIMP design philosophy ruled out the first of these so I only needed to decide between the latter three. After thinking about these three options, I chose to use buttons rather than menus or icons, and this decision was based partly on efficiency and partly on utility.
4.2.2 Elimination of Menus
A standard way to shelter the user from input overload is by hiding functions in pop-up menus. Since most of the time the user is probably entering text or manipulating data (or in my case, browsing), it is not necessary to display every available command. Instead, functions are commonly divided up into related groups and these groups are accessible through menus. Buttons provide an alternative to menus when only a few functions are available or there is a set of frequently used commands. Accessing a function in a menu requires opening the menu and then selecting the function, whereas buttons only require a single click and are therefore more efficient to use.
Based on this observation, it was easy to decide against using menus. First of all, it
would be senseless to hide the forward and backward commands in a menu. If users
wanted to move back a few pages to see something, they would be forced to keep opening the menu and clicking the control. On the other hand, with a button or icon, this would
only take a few clicks. There was no reason to go through the trouble of hiding the other
three commands in a menu since it seemed clutter would not be a problem.
4.2.3 Buttons vs. Icons
In most cases icons are small pictures that, when clicked, invoke some function. They may also be used to indicate program status. Icons are especially useful for representing functions that are frequently used or take too long to describe with text. However, it is very common for an icon's picture to poorly represent the function that the icon invokes. 1 My decision to use buttons rather than icons was primarily based on this fact. Creating a button was just a matter of typing some text, and it was totally obvious what words I should use. On the other hand, it was not obvious what kind of graphic I should use for the "menu" or "previous page" commands. As a result, I decided to use buttons for everything.
4.3 The Menu and Help System
The only things left to design after the controls were the menu and help pages. After finishing these two, everything else would be a matter of implementation.
4.3.1 Help System
I hoped that my software would be intuitive enough that I would not need to supply much help information. At the same time I decided that the user should be able to get help from every page, whether this feature was context sensitive or not. In my original design, I hoped to have context sensitive help so that the user would not have to sift through irrelevant information. I planned on having at least three help pages, one for the menu, one for the dissector pages, and one for the atlas pages. The context sensitive feature would detect in which of these three locations the user had requested help and would display the appropriate screen. Until I had enough features implemented to merit three help pages, though, I decided to have one text based page with the expectations that it would evolve as I wrote code.
In addition to providing help pages I also thought it would be good to use the balloon help feature that Macintosh System 7 provides. Normal operation of a Macintosh with the System 7 operating system occurs with balloon help off, but if the user goes to the upper right corner of the screen, pressing on the balloon icon and selecting "Show Balloons" will turn it on. With balloon help on, some buttons and objects will display a bit of explanatory text when the mouse pointer is over them. This allows users to get an idea of what something will do without having to activate the help pages or use trial and error.
4.3.2 The Main Menu
Rather than getting fancy and implementing a graphical menu, I decided that the easiest thing to do would be to make a text outline of my module and then provide links from the outline to the actual module pages. I thought that this would be simple enough for the user to understand, and it would be relatively easy for me to modify if I wanted to
change the module. I wanted the user to be able to access the atlas pages as well, so I
decided to list them towards the bottom of the outline in a smaller font, or do something similar to distinguish them from the main flow of the module. See Figure A.2 of Appendix A for a picture of the Larynx module's main menu.