Application Of Overset Grids For Aerodynamic
Assessment Of An Advanced Civil Transport
Aircraft
by
Alejandro E. Espitia
S.B., Aerospace Engineering, Massachusetts Institute of Technology, 2011
Submitted to the Department of Aeronautics and Astronautics
in partial fulfillment of the requirements for the degree of
Master of Science in Aeronautics and Astronautics
at the
MASSACHUSETTS INSTITUTE OF TECHNOLOGY
September 2013
-©
Massachusetts Institute of Technology 2013. All rights reserved.
A u th o r . . . .. ... . . . . .. ....
. . . .. . . . .. . . . .. . . ..
Department of Aeronautics and Astronautics
September 30, 2013
C ertified by ... ...
.
...
..
..-...
Edward M. Greitzer
H. N. Slater Professor of Aeronautics and Astronautics
Thesis Supervisor
..
ce t.,...
...Eytan
H.
Modiano
TProfessor of Aeronautics and Astronautics
Chair, Graduate Program Committee
AASSACHUsETTS I0S1TflE OF TECHNOLOGY
MAR
2
0 2014
,LIBRARIES
Application Of Overset Grids For Aerodynamic Assessment
Of An Advanced Civil Transport Aircraft
by
Alejandro E. Espitia
S.B.,
Aerospace Engineering, Massachusetts Institute of Technology, 2011
Submitted to the Department of Aeronautics and Astronautics on September 30, 2013, in partial fulfillment of the
requirements for the degree of
Master of Science in Aeronautics and Astronautics
Abstract
Simulations are presented for 1:20 and 1:11 scale configurations of an advanced civil transport designed to use boundary layer ingestion (BLI). Comparison with wind tunnel results on unpowered configurations show that the computed and measured
lift slopes agree within 15% and the drag at simulated cruise point to within 20%.
Computations have been carried out for an initial and a redesigned configuration of the aft section of the aircraft. The redesigned version showed a reduction in lift and an increase in drag compared to the initial design. The mechanical power for a 1:11 powered configuration at cruise, without BLI, has also been calculated.
Thesis Supervisor: Edward M. Greitzer
Acknowledgments
First and foremost, I would like to thank my advisor, Professor Edward Greitzer,
for his guidance and his wisdom that he has imparted onto me over the past two years.
I owe him my deepest gratitude for both encouraging, challenging, and mentoring me.
I would like to thank Dr. Alejandra Uranga for her support and wisdom. Her
guidance and insight helped me press on when the path forward was not clear. My
learning experience would not be the same without her.
I also owe my deep gratitude to Shishir Pandya, whose wisdom and helpfulness
allowed me to learn the software to perform numerical simulations. His knowledge
helped resolved the numerous issues associated with computational work. I would
not have been able to accomplish this thesis without him.
I am thankful for my labmate Michael Lieu, whose experimental work and
knowl-edge guided and complemented my computational work. In addition, I thank Arthur
Huang and David Hall for their support and knowledge of the power balance equation.
Many thanks to my fellow N+3 team members, Nina Siu, Adam Grasch, and Sho
Sato, for their knowledge, support, and shared discussions that benefited me. My
experience on the N+3 project would not have been the same without them.
I would like to thank my family for their constant love and support during my
time at MIT.
Lastly, I would like to thank Dr. Xiaolu Hsi for lending her ear and her advice
Contents
1 Introduction
1.1 Motivation: The D8 Aircraft . . . .
1.1.1 Fuselage Lifting Body . . .
1.1.2 Boundary Layer Ingestion (B]
1.2 Description of the Overflow Code .
1.3 Contributions of the Thesis . . . .
1.4 Organization of Thesis . . . .
2 Methodology
2.1 Overset Grid Approach . . . .
2.2 Review of Overset Gird Research .
2.3 Grid Generation . . . .
2.4 Connecting Grids . . . .
3 Assessment of the D8 Overflow Simulations
3.1 Computational Setup . . . .
3.2 Comparison of Simulations and Experiments . . . . .
3.2.1 Computational Representation of the WBWT
3.2.2 Lift Force and Distribution . . . .
3.2.3 Drag Comparison . . . .
3.2.4 Boundary Layer Characteristics . . . .
3.3 Summary and Conclusion . . . .
17 . . . . 17 . . . . 18 . . . . 18 . . . . 20 . . . . 20 . . . . 22 23 . . . . 2 3 . . . . 2 4 . . . . 2 6 . . . . 3 0 33 . . . . 33 . . . . 34 . . . . 34 . . . . 36 . . . . 41 . . . . 41 . . . . 44
4 Assessment of the D8 Empennage Redesign 47
4.1 D8 Empennage Design ... 47
4.2 Effects on Aerodynamic Forces . . . . 48
4.2.1 Lift and Pressure Distribution . . . . 48
4.2.2 Drag Coefficient . . . . 50
4.2.3 Additional Considerations . . . . 50
4.3 Summary and Conclusion . . . . 53
5 Required Power for the 1:11 D8 Podded Configuration 55 5.1 Problem Setup . . . . 55
5.2 Application of Power Balance Method . . . . 57
5.2.1 O verview . . . . 57
5.2.2 Application to 1:11 D8 Podded Configuration . . . . 58
5.3 Chapter Summary . . . . 59
6 Summary, Conclusions and Recommendations for Future Work 61 6.1 Summary and Conclusions . . . . 61
6.2 Recommendations for Future Work . . . . 62
A Numerical Dissipation Schemes for Low Mach and Reynolds Number Flow 63 A.1 Excess Numerical Dissipation . . . . 63
A.2 Aerodynamic Performance Metrics . . . . 68
A .3 Sum m ary . . . . 70
B Grid Convergence Study for D8 1:11 Scale Simulations 71 B.1 M ethodology . . . . 71
B.2 Convergence of Aerodynamic Performance Metrics . . . . 73
List of Figures
1-1 Comparison of 737-800 and D8 fuselage cross section [1] . . . . 18
1-2 Comparison of 737-800 and D8 fuselage lift fraction . . . . 19
1-3 Benefits of BLI for an aircraft . . . . 20
1-4 D8 podded (top) and integrated (bottom) configurations . . . . 21
2-1 The overset grid approach [2] . . . . 24
2-2 Automatically refined D8 grid for inviscid simulations . . . . 25
2-3 D8 fuselage and wing triangulation with seam curves . . . . 27
2-4 D8 fuselage and wing surface grids . . . . 27
2-5 Near body volume grid and wake grid of a D8 wing section . . . . 28
2-6 Unpowered 1:20 D8 grid system . . . . 29
2-7 Example of orphan grid points . . . . 31
3-1 Unpowered D8 1:20 configuration . . . . 35
3-2 Side view of 1:20 and 1:11 configurations in the WBWT . . . . 35
3-3 Beavertail D8 1:11 configuration . . . . 36
3-4 Lift curve for D8 1:11 beavertail configuration in a wind tunnel with straight walls and with a contraction and diffuser . . . . 37
3-5 Drag curve for D8 1:11 beavertail configuration in a wind tunnel with straight walls and with a contraction and diffuser . . . . 37
3-6 Location of WBWT pressure probes . . . . 38
3-7 Difference in Cp between upper and lower pressure probes and probe
locations in the WBWT with the 1:11 scale beavertail configuration . 39
3-9 Computed sectional CL along the 1:20 D8 fuselage . . . . 42
3-10 Drag polar for D8 1:20 unpowered model and 1:11 beavertail configu-ration . . . . 42
3-11 D8 1:11 beavertail boundary layer profiles at engine fan face locations 43 3-12 Near wake contours of C, at fuselage trailing edge of 1:11 Beavertail configuration . . . . 44
4-1 D8 fuselage design; top view . . . . 48
4-2 D8 tail design; side view . . . . 49
4-3 Lift curve comparison of Empennage designs . . . . 50
4-4 Sectional pressure distribution along the fuselage for empennage designs 51 4-5 Drag curve comparison of empennage designs . . . . 52
5-1 1:11 D8 podded configuration surface grids inside NASA LaRC 14' x 22' W ind tunnel . . . . 56
5-2 Power balance method applied to a non BLI configuration . . . . 57
5-3 CpK vs CH for 1:11 D8 podded configuration in the LaRC wind tunnel 58 A-i Numerical Boundary Layer Profiles Cp, for D8 1:20 Simulations . . . 64
A-2 Contour of Cp, for D8 1:20 Simulations . . . . 65
A-3 Contour of C, for D8 1:11 simulations with Pressure (top) and Mo-mentum (bottom) Boundary Conditions . . . . 66
A-4 Contour of Cp, for D8 1:11 simulations with Scalar (top) and Matrix (bottom ) Dissipation . . . . 67
A-5 Numerical Boundary Layer Profiles Cp, for D8 1:11 simulations at 0.25 of the Default values . . . . 68
A-6 y+ vs u+ for Various Matrix Coefficient Values at x/D = 0.5 of the Fuselage . . . . 69
B-i Grid points of the near body mesh for the grid study with BL profile 72 B-2 BL profiles for 3 grid cases . . . . 74
List of Tables
1.1 NASA N+3 Goals [3] ... 18
3.1 Calculated fuselage fraction of total lift for D8 1:20 unpowered model 41 A.1 Force coefficients for various dissipation values (a = 00) . . . . 68
B.1 Grid study input parameters . . . . 72
B.2 Grid study aerodynamic results . . . . 73
Nomenclature
Latin Letters
c Wing chord
Cf Skin friction coefficient
CH Net horizontal force coefficient
Cp Pressure coefficient
CpK Coefficient of engine propulsive power
Cp, Stagnation pressure coefficient
D D8 fuselage length
Df Diameter of D8 fan
rh Mass flow
n Normal direction
PK Engine propulsive power
Re Reynolds number
U,, Freestream velocity
u+ Viscous wall velocity
v Velocity in the span-wise direction
w Velocity in the z direction
X Chord-wise direction
y Span-wise direction
y+ Viscous wall spacing
z Direction perpendicular to the chord-wise and span-wise directions
Greek Letters
a Angle of attack
* Boundary layer height
P Kinematic viscosity
v Dynamic viscosity
< Dissipation source
q00 Freestream dynamic pressure
T Shear stress Subscripts
f
Fan fuse Fuselage 00 Free-stream conditions j jet s surface v vortexw
wakeAcronyms
BL Boundary Layer
BLI Boundary Layer Ingestion
CAD Computer Aided Design
CAEP Committee on Aviation Environmental Protection
CFD Computational Fluid Dynamics
CGT Chimera Grid Tools
Df D8 Engine Fan Diameter
LTO Low Temperature Oxidation
NASA National Aeronautics and Space Administration
NOx Nitrogen Oxide
Chapter 1
Introduction
Rising fuel prices and more stringent environmental regulations and noise restriction,
have created a demand for step changes in aircraft fuel efficiency and noise
reduc-tion. To address these challenges, in 2008 NASA awarded four research contracts to
define advanced concepts and enabling technologies for subsonic aircraft in the 2035
timeframe that could meet a set of aggressive goals for fuel efficiency, emissions, and
noise. The research was part of the NASA N+3 program, where N+3 refers to aircraft
three generations beyond those currently flying. An MIT team that includes Aurora
Flight Sciences and Pratt & Whitney, and is working in collaboration with NASA, is
developing the D8 series aircraft to meet these future demands.
This thesis describes numerical simulations to determine the aerodynamic
perfor-mance of the D8 including the required mechanical power for non boundary layer
ingestion configuration.
1.1
Motivation: The D8 Aircraft
The goals of the NASA N+3 program [3] are summarized in Table 1.1 '. The reference
base aircraft used by the MIT/ Aurora/ Pratt & Whitney team was the Boeing
737-800. The D8 aircraft has a "double bubble" fuselage with two engines flush-mounted
'The initial N+3 Phase I fuel reduction goal was 70% relative to the 737-800. This has since been modified.
Table 1.1: NASA N+3 Goals [3]
Metric N+3 Goals
Fuel Burn 60% Reduction Below Baseline Noise 71 EPNdb Below Stage 4 LTO NOx 80% below CAEP 6
(a) 737-800 (b) D8
Figure 1-1: Comparison of 737-800 and D8 fuselage cross section [1]
at the top-rear of the fuselage. The principal aerodynamic features of the conceptual
aircraft are described by Drela [11, but the important features are high aspect ratio
wings, a lifting body, and engines that ingest the fuselage boundary layer.
1.1.1
Fuselage Lifting Body
Cross sections of the D8 fuselage and a 737-800 fuselage are shown in Figure 1-1. The
wider fuselage of the D8 carries a larger lift fraction than the 737 [1] as in figure 1-2,
so there is less lift required from the wings and the wing span can be reduced.
The D8 fuselage is designed with an upturned nose as a lifting surface. This has
two effects. First, it reduces the lift required by the wing. Second, lift at the leading
edge of the fuselage helps offset the moment due to the lift from the wings, resulting
in a smaller tail surface
1.1.2
Boundary Layer Ingestion (BLI)
The concept of aircraft BLI was initially presented in the 1940s [4], but it has yet to be
Fuselage-lift fraction Smaller required D8 wing Nft
~
INose
t
I
lift Lighterwing tilwnla Fuselage-lift fraction 13%B737-800
Figure 1-2: Comparison of 737-800 and D8 fuselage lift fraction
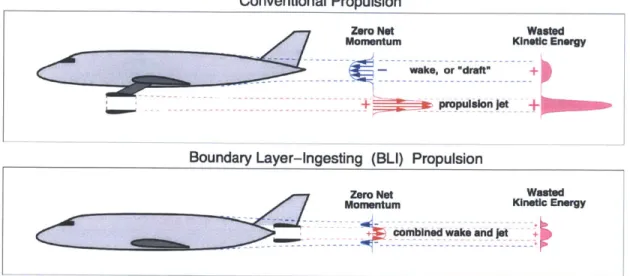
of two primary benefits shown in figure 1-3. [5]
1. Improvement in propulsive efficiency relative to non-BLI configurations by in-gesting lower kinetic energy flow and hence, production of propulsive power with lower kinetic energy in the jet
2. Reduction in airframe wake drag through ingestion of part of the airframe wake, reducing the downstream defect.
The reduction in required power when using BLI over non-BLI configurations has been estimated to be 20% over non-BLI configurations [61, but these savings depend on fan and duct loss [7]. Initial estimates of the benefit of D8 BLI give a 6-8% reduction in required power [3].
To evaluate the benefits of BLI, a podded (non-BLI) and an integrated (BLI) configuration of the D8 have been designed and are shown in Figure 1-42. The podded configuration has engines mounted on pylons at the aft of the D8. The integrated configuration has engines flush mounted at the aft of the D8 to incorporate BLI. The two configurations share the same body and wings for 66% of the fuselage upstream
2
Conventional Propulsion
Zero Net Wasted
Momentum Kinetic Energy
wake, or draltr
- -- propulsion
jet-Boundary Layer-Ingesting (BLI) Propulsion
Zero Net Wasted
Momentum Kinetic Energy
combolned wake and 1t +
Figure 1-3: Benefits of BLI for an aircraft
of the engines. In this thesis, viscous simulations with powered engines have been conducted to determine the required power for the podded configuration.
1.2
Description of the Overflow Code
The viscous simulations were carried out using Overflow, a three-dimensional time-marching implicit Navier-Stokes flow solver developed by NASA researchers [8]. The solver features full viscous terms that resolve surface boundary layers with both one and two equation turbulence terms available. Boundary conditions for inviscid sur-faces, viscous sursur-faces, symmetry planes, and an actuator disk with a user specified pressure jump, are also available. Overflow uses structured overset grid systems to calculate solutions for complex geometries. Chapter 2 discusses the benefit of overset grids and the generation process for the grids used in the Overflow simulations.
1.3
Contributions of the Thesis
The main contributions of this thesis are the following:
of lift, drag, and boundary layer profiles for 1:20 and 1:11 scale unpowered
configurations.
2. Quantification of the effects of a design change of the D8 empennage and vertical
tails on lift, drag, and pressure distribution.
3. Calculation of the input power required to achieve horizontal force equilibrium
for a 1:11 scale powered podded configuration.
1.4
Organization of Thesis
Chapter 2 provides background on Overflow and describes the computational
method-ology employed to generate the D8 aircraft and engine grids.
Chapter 3 gives an assessment of the Overflow simulations through comparison
with experimental results on an unpowered D8 wind tunnel model.
Chapter 4 presents the changes in aerodynamic forces and fuselage pressure
dis-tributions due to a redesign of the aft section of the D8.
Chapter 5 presents an estimation of the required power for a 1:11 scale D8 powered
podded configuration.
Chapter 2
Methodology
2.1
Overset Grid Approach
Simulating complex fluid flow problems with a single, contiguous grid is a challenge in
CFD and a solution is to decompose the complex geometry into a system of simpler
geometric overlapping grids. During the solution process, the boundary points of
a given grid exchange information with nearby points in the grids it overlaps. This
process of decomposition of complex geometries into simpler components is commonly
referred to as the chimera or overset grid approach.
The flow simulation process that takes in a CAD input for the generation of overset
grids and then used by the flow solver is shown in figure 2-1, in which CGT refers to
the grid generation software, Chimera Grid Tools. CGT is used to generate surface
grids, volume grids, and connect the separate grids together. The final connected grid
system is used by Overflow for computational simulations.
The overset grid approach and the software for overset meshes is applied here
in simulations of the D8 on a 1:20 and 1:11 scale. Configurations of the D8 share
common geometries (e.g. wings, forward part of the fuselage, horizontal tail), and so
the common geometry needs to be created once. The different geometries need to be
CAD definitioniultirt Overset grid system VFLWowsutn-Ps-pcssg Edge curves
Volume grid Grid conniectivity
Near-bod Off-body Xray
Figure 2-1: The overset grid approach [2]
2.2
Review of Overset Gird Research
Overset grids have been shown to create useful computational grids for aircraft [9]
[10]. For the D8, the work of Pandya [11] , Rogers et al. [12] and Chanderjian et al. [13] are applicable. In these, aircraft simulations were performed with inviscid solvers to identify regions where high resolution is required for accurate calculations of aircraft aerodynamic forces. The implementation of actuator disks to simulate engine power is also discussed.
Pandya performed an inviscid simulation with an automatic grid generation sys-tem for an unpowered D8 model in MIT's Wright Brothers Wind Tunnel (WBWT)
[11]. The inviscid solver works in a closed loop with the grid generation system to
automatically refine regions of the grid where the solution error is above a specified tolerance. An example is shown in figure 2-2 in which 4 regions were identified where high resolution, indicated by the darker regions, was desired: the leading and trailing edges of the wings and tails, the leading edge of the fuselage, and the boundary layer region near the aft of the fuselage. Pandya's grid adaptation results serve as the basis for the grids generated in the overset grid approach for viscous simulations of the D8 described here.
Rogers et al. generated grids, obtained viscous flow solution results, and validated the results with wind tunnel experimental data for a 1:25 scale model of a Boeing
777-200 in a landing approach configuration [12]. Their results showed agreement
I I
Low Resolution
High Resolution
Figure 2-2: Automatically refined D8 grid for inviscid simulations
of lift at a > 100, relative to the experimental results, attributed to simplifications
in the geometry, which resulted in stall occurring at a lower a in the Overflow model
than the wind tunnel experiments.
Rogers et al. description of the challenges of applying the overset grid approach
to model an aircraft in a wind tunnel guides the present approach [12]. Rogers et al.
detailed the geometric inputs used in their surface and volume grid generation that
resulted in < 5% error relative experimental data for a < 100.
Chanderjian et al. applied an overset grid approach for a powered YAV-8B Harrier
aircraft [13] to capture the ingestion of ground vortices at different a and height above
the ground. The powered engines were simulated by a specified pressure jump across
an actuator disk. The simulations showed the formation and ingestion of ground
vortices as observed by a full scale YAV-8B Harrier during takeoff [13].
The benefits of Chanderjian's work for the D8 is two-fold. First, they expedited
the grid generation process for different operating conditions by creating scripts for
at different operating conditions. For example, at higher a, higher resolution is
required near the leading edge of the aircraft to accurately capture lift and drag.
A second benefit is that an engine represented by an actuator disk pressure jump
replicated empirically observed ground effects, showing an actuator disk gives useful
representation of an engine in these types of computations.
2.3
Grid Generation
The software Chimera Grid Tools (CGT) facilitates the overset grid approach [14]
through documented best practices in generating grids [9] and the creation of a script
library to generate common types of grids and perform grid manipulations [15]. The
best practices provide recommendations for geometric grid inputs such as grid
spac-ing, cell growth rate, mesh overlap, and addressing how to resolve common grid
singularities.
The first step in applying the overset grid approach is to obtain the CAD geometry
and to create a surface triangulation and seam/edge curves. Figure 2-3 shows the
surface triangulation and seam curves for the D8 fuselage and wing. The seam curves
serve as a starting point or edge boundary that the surface grid generator follows as
it marches to create grid points. The surface triangulation serves as a skeleton for
the surface grid generator that marches along to replicate the shape of the aircraft
with a structured grid.
The surface grid generation process for the D8 begins by defining a curve, or using
a seam curve, with the number and distribution of grid points along the curve defined
to achieve the desired resolution. The curve is marched along the surface triangulation
for a specified distance. Changes in the local curvature (e.g. the fuselage aft section) or edges of the geometry (e.g. wing tip and wing root) can lead to the marching
process becoming unstable, and, at these locations, a new grid must be generated.
The surface grid generation process is scripted to allow changes to the grid points, grid spacing, and marching distance to be made to create a group of overlapping
--
Fuselage
Seam Curves
Wing Seam Curves
Surface Triangulation
-Figure 2-3: D8 fuselage and wing triangulation with seam curves
Fuselage
Surface Grids
Wing Surface Grids
Figure 2-4: D8 fuselage and wing surface grids
surface grid for the D8 fuselage and wing with each color representing an individual
grid. The fuselage and wing are each composed of 4 overset grids.
To generate near-body volume grids, a hyperbolic marching scheme with user
inputs is applied to the surface grids [9]. As with the surface grid generation, the
user controls the number of points, the marching distance normal to the surface, and the specification of boundary conditions on the volume. The volume generation
process and specification of boundary conditions can be scripted with the surface grid
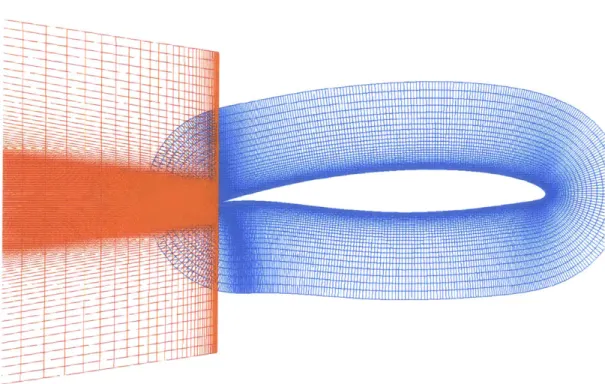
generation for each component. Figure 2-5 shows the near body volume grid of an
airfoil section of the D8 wing with an overlapping grid to capture the wake. Wake
~1-Figure 2-5: Near body volume grid and wake grid of a D8 wing section
wake.
For free air simulations, Overflow uses the near-body volume grids to automati-cally generate off-body grids. The user has the ability to control the initial spacing and distance of the off-body grids [16].
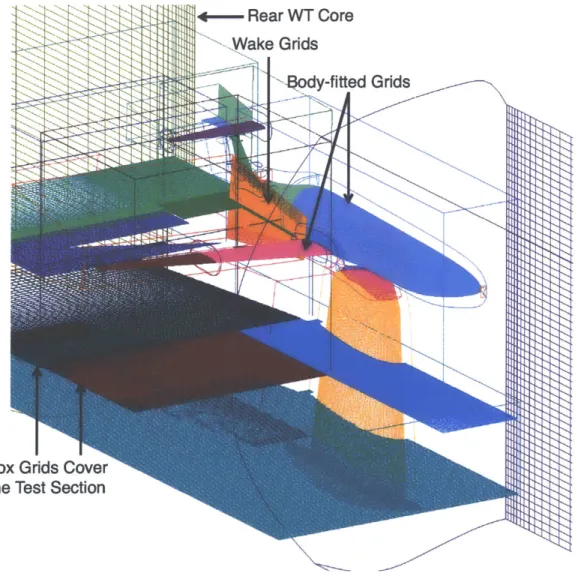
For simulations in a wind tunnel, in addition to creating surface and near body volume grids of the wind tunnel geometry, the user must create volume grids to occupy the relevant domain. The script library of CGT has functions that automatically create Cartesian box grids and circular core grids [15]. The spacing and dimensions of these grids are connected to the spacing and dimension of the adjacent grid and, if applicable, the component of the body it encompasses. Figure 2-6 shows an outline of the box and core volume grids for an unpowered 1:20 scale D8 in the WBWT. The box and core grid generation is scripted separately from the components because the grids often require input from more than one component.
-4--
Rear WT Core
----
,Wake Grids
ARody-fitted Grids
Figure 2-6: Unpowered 1:20 D8 grid system
2.4
Connecting Grids
The boundary/fringe points of all grids must identify which grid point from a neigh-boring grid they need to interpolate data from. Overlapping grid points not considered fringe points (e.g. the trailing edge of the wing near body grid that is covered by the wake grid in Figure 2-5) must be determined, and ignored, during simulations. The two processes of identifying and ignoring overlapping non-fringe points and connecting fringe points are referred to as domain connectivity and hole cutting.
The hole cutting process, which is automatic and efficient [17], occurs prior to the domain connectivity process. To determine which grid points need to be cut or blanked out during the solution process, the user inputs which grid cuts the grids it overlaps. For the wing and wake grid in figure 2-5, the user specifies that the wake grid (the "cutter") cuts into the wing near body grid ("the cutee") so the overlapped wing grid points should be removed.
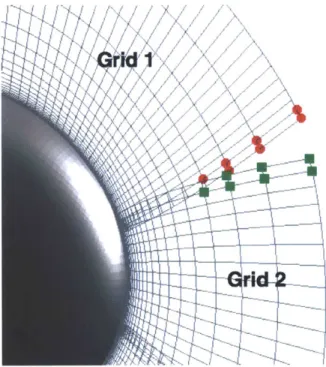
After hole cutting, the user runs a connectivity program that determines which fringe points of neighboring grids to associate or connect together. If there is insuffi-cient grid overlap, or if hole cutting removed too many or too little grid points, the resultant fringe points will have no neighboring fringe point to interpolate from. A fringe point in this situation is known as orphan point. Figure 2-7 shows examples of orphan points that resulted from insufficient grid overlap. To address orphan points, the surface and volume grids must be regenerated with more overlap or we must adjust the amount of grid points the hole cutting process removes. If orphan points are not removed, they will be ignored during the solution process and the domain they occupy will be interpolated by neighboring points, effectively increasing the lo-cal volume cell size and increasing the solution error. All cases reported in this thesis had either no, or single digit, orphan points. The orphan points that remained were deemed acceptable because of either being an isolated orphan point or being at the boundary of a box grid, consistent with best practices for overset grids [9].
When domain connectivity is completed (and if applicable, the location and num-ber of orphan points is acceptable), the final grid and a run file that specifies the
%
Figure 2-7: Example of orphan grid points
operating conditions and numerical schemes is inputted into Overflow. Simulations
run until at least each grid converges to 4 orders of magnitude of the L2 norm of the
Chapter 3
Assessment of the D8 Overflow
Simulations
To assess the viscous simulations performed using the overset grids for the D8
config-uration, we compare results with experiments performed at MIT's Wright Brothers
Wind Tunnel (WBWT) on a 1:20 scale D8 unpowered configuration and a 1:11 scale
D8 fuselage-wing "beavertail" configuration, composed of the fuselage and wings only.
The fuselage chord and the wing span of the 1:20 scale D8 are 63.9 inches and 45
inches, respectively. The fuselage chord and the clipped wing span (68% of the total
wing span) of the 1:11 scale D8 are 114.52 inches and 80.64 inches, respectively.
Section 3.1 discusses the test setup of the two configurations in the wind tunnel and
the geometric simplifications made in the CFD. Section 3.2 discusses the comparisons
of lift distribution, drag, and boundary layer profiles. Section 3.3 summarizes the
chapter findings.
3.1
Computational Setup
The 1:20 scale wind tunnel experiments were focused on lift and drag as a function
of angle of attack. The 1:11 D8 beavertail configuration to determine the boundary
layer characteristics of the fuselage without tails, and it provided lift and drag as a
Figure 3-1 shows the Overflow surface grids and experimental setup for the 1:20 unpowered configuration. Figure 3-2(a) shows the nose of the fuselage approximately 0.4 tunnel heights downstream of the end of the contraction of the WBWT.
The 1:11 beavertail Overflow surface grids and experimental test setup are shown in Figure 3-3. The model had clipped wings, and the gap between the clipped wing tip and the tunnel wall was 0.25" or less. Figure 3-2(b) shows the nose of the aircraft is at the end of the tunnel contraction, so there is a need to include the tunnel contraction in the computations. Results using the contraction and using a constant area wind tunnel are discussed in section 3.2.1 where it is shown that the contraction better matches the experimental results.
The Overflow simulations as in Section 2.1. The aft support structure near the trailing edge of the fuselage is not captured in the Overflow models. The Beam-Warming approximation factorization numerical scheme is used because it has been shown to be the most robust [18]. The matrix dissipation scheme is selected as it better resolves the boundary layer than scalar dissipation [19]. Appendix A discusses the benefits of matrix dissipation over scalar dissipation. SST turbulence equations were chosen over the Spalart-Allamares turbulence model because they have been shown to better capture flows at high angle of attack and to be comparable at lower ai
[11] [20].
The geometric inputs that determine cell sizes were selected according to the results of a grid convergence study described in Appendix B. All Overflow simulations use a symmetry boundary condition to reduce computational resources. Wind tunnel walls are simulated as inviscid because the WBWT walls diverge to mitigate boundary layer growth. All simulations were performed at M = 0.13.3.2
Comparison of Simulations and Experiments
3.2.1
Computational Representation of the WBWT
Figure 3-4 shows the calculated lift curve for the 1:11 beavertail in a constant area wind tunnel and a wind tunnel with the WBWT contraction. The tunnel with
con-(a) Overflow (b) Scale Model in the WBWT Figure 3-1: Unpowered D8 1:20 configuration
End of Contraction Section
zL
Sx
(a) 1:20 Configuration
(b) 1:11 Configuration
Figure 3-2: Side view of 1:20 and 1:11 configurations in the WBWT
(a) Overflow (b) Scale Model in the WBWT Figure 3-3: Beavertail D8 1:11 configuration
traction more closely matches experiments than the straight wind tunnel, and the difference in lift between the two tunnels is approximately 2%.
Figure 3-5 shows the drag curve for the constant area wind tunnel, the wind
tunnel with contraction, and the experimental results. The contraction results are in closer agreement with the experimental results than the constant area tunnel with a reduction in error by > 9%. This is attributed to the buoyancy effect.
There are rows of static pressure probes along the wind tunnel wall as indicated
in Figure 3-6. Pressure measurements with the 1:11 beavertail model in the tunnel at a = 00 were measured experimental, and compared with computations.
The difference between the corresponding upper and lower sets of static pressures
(Rows D-A and I-L) are plotted in Figure 3-7 along with the Overflow CFD results. The Overflow grids represent the right half of the D8 only, so the calculations for
probe rows I and L are the same as rows D and A in Overflow. Good agreement is shown between Overflow and data implying that the tunnel operating conditions are
similar for experiments and computations.
3.2.2
Lift Force and Distribution
Figure 3-8 shows lift versus angle of attack for the 1:20 and 1:11 experiments and for
the computations. For the 1:20 model, Overflow gives lower lift at lower a and higher lift at higher a, and the experiments show stalling and flow separation occurring at
1.5-1- -0.5 -Overflow - Straight WT -Overflow - Contraction WT -Experimental Average -2 0 2 4 6 8 10 a
Figure 3-4: Lift curve for D8 1:11 beavertail configuration in a wind tunnel with straight walls and with a contraction and diffuser
0.1 -0.09 ---0.08 0.07 0 0 .0 5 - - ... I... ... -... ... 0.04 0.02 -Overflow - Straight WT 0.01 - -Overflow - Contraction WT -Experimental Average -2 0 2 4 6 8 10 a
Figure 3-5: Drag curve for D8 1:11 beavertail configuration in a wind tunnel with straight walls and with a contraction and diffuser
0.2 + Probes D-A + Probes I-L* 0.15- - Overflow 0.1-0.05 - 0- -0.05--0.1 I -1 -0.5 0 0.5 1 0.4- 0.3-0.2
RowsD/I X
X
X
X
X
X
-i .1 _ ... _ _ _ _ _ _ __... ... 0 -1 -0 .1 - -. -. .. . . -.. .-. -.. -. -. . -0.2RowsA/L X
X X
X
X
X
-0.3 - - --1 -0.5 0 0.5 1Figure 3-7: Difference in Cp between upper and lower pressure probes and probe locations in the WBWT with the 1:11 scale beavertail configuration
1.5 - 1-0. --- -1:2u uverriow 1:20 Exp ---1:11 Overflow 1:11 Exp 0, -2 0 2 4 6 8 10
Figure 3-8: Lift curve for D8 1:20 unpowered model and 1:11 beavertail configuration
lower & than the computations. For the 1:11 beavertail, Ovefflow has a lift slope
that differs by 15% relative to the experiments. The discrepancy in lift between calculations and experiments has a maximum of 18% and reduces as angle of attack increases.
Two causes are proposed for the difference between simulations and experiment. First, the WBWT had a non-symmetric cross sectional pressure distribution along y = 0 in the test section', which is not replicated in simulations as it uses a symmetry plane at y = 0. Second, Appendix A has shown the matrix dissipation scheme used in Overflow reduces the lift by 1.3-3.6% compared to a scalar dissipation scheme.
Table 3.1 shows the lift fraction carried by the fuselage for the 1:20 scale model. The fraction goes from 16-21% of the lift at angles of attack of 0* to 120, consistent with the work of Drela who calculated a lift fraction range of 19-20%
[11.
Figure 3-9 shows the local (sectional) CL distribution (whose integral equals the lift coefficient) for the 1:20 D8 fuselage for & = 20 and 80. The lift distribution along the fuselageTable 3.1: Calculated fuselage fraction of total lift for D8 1:20 unpowered model
a (0) Lift fraction carried by the D8 fuselage
0 0.158 2 0.169 4 0.176 6 0.184 8 0.192 10 0.201 12 0.205
is similar to that of Figure 1-2 showing the nose and the fuselage acting as a lifting
surface. The simulations also capture the higher static pressure at the rear of the D8, which decelerates the flow prior to it entering the engine. Agreement in the fuselage
lift fraction and lift distribution along the fuselage chord adds validation to the work
of Drela [1] and to the Overflow computations.
3.2.3
Drag Comparison
A drag comparison is given in Figure 3-10, for both 1:20 and 1:11 configurations.
Overflow gives lower values of drag than the experiments with the discrepancy
re-ducing as a increases. The maximum error is 20% relative to experiments. As with
the lift results, the discrepancy is believed to be to the WBWT non-symmetric cross
sectional pressure distribution in the test section and the matrix dissipation scheme
used.
3.2.4
Boundary Layer Characteristics
As stated in section 3.1, one purpose of the 1:11 beavertail test was to characterize
the fuselage boundary layer. A stagnation pressure rake was used to determine the
stagnation pressure at (i) the location where the engine would be and (ii) at the
trail-ing edge of the fuselage. Figure 3-11 shows profiles of stagnation pressure coefficient,
CP, = P'P-P't, at the centerline fuselage and where the center of the two engines would
Fuselage
Sectional
L1 2 3 4 5
xLf
6 7 8 9 10 11Figure 3-9: Computed sectional CL along the 1:20 D8 fuselage
0.1 -0.09 0.08 0.07 0.06- 0.05-0.04r 0.03k 0.02 0.01 .- .. ... -.. .... ... ....
..-
...
..
.. . . .. . . .. . . .. . -.. .... .... ... ... . .. ... .... .. .. ... . ...--.. . . .. .. ..*.. -.. .. ... ... .... -- - --- -1:20 Overflow -1:20 Exp -. .- --- -1:11 Overflow -1:11 Exp 0 2 4 6 8 10 aFigure 3-10: Drag polar for D8 1:20 unpowered model and 1:11 beavertail configura-tion 10 0
i
U.) -a = 2 -- = 8 5 0 ... ... . .... .. .. . .. .... ... ... ... .... .. lb . ... ... .... ... -2y/D = 0 1 0.9 0.8 0.7 z 0.6 0.5 0.4 0.3 0.2 0.1
_q
-- 1 C PtFigure 3-11: D8 1:11 beavertail boundary layer profiles at engine fan face locations
the calculations giving slightly thicker boundary layers, indicative of excess numeri-cal dissipation near the body. The boundary layer height 6* is < 11% thicker for the calculations relative to the experimental results. A reduction in numerical dissipation would lead to thinner boundary layers (see Appendix A), but would also reduce lift and drag..
Thicker boundary layers in the calculations are also seen in Figure 3-12, which shows Cp, contours for the near wake at the fuselage trailing edge for Overflow and experiments. Three common characteristics exists for calculations and the exper-iments. First, the wing wake can be seen and is connected to the fuselage wake. Second, the bottom portion of the fuselage wake is divided because of the mounting support structure. Third, trailing vortices are seen off the edges of the fuselage at approximately z/Dfan = 0.2 and y/Dfan = 41.2.
The bottom portion of the computed fuselage wake shows less dissipation than the experiments wake (lower Cp,). The lower dissipation in the calculations is a result of a reduction in the matrix dissipation coefficients, resulting in lower lift and drag,
-- Exp - Overflow -0. C Pt -1 C -t y/D = -0.526 y/D = 0.526
1.5 C.P 1 0.1 0.5 0.2 0.3 00 0.4 -0.5 0.5 -1 0.6 0.7 -1. -1 1 2 -2 -1
vB
1 2Overflow
Experiment
Figure 3-12: Near wake contours of Cp, at fuselage trailing edge of 1:11 Beavertail configuration
but a reduction in the maximum Cp, in the boundary layer profiles (Appendix A).
3.3
Summary and Conclusion
Comparison of numerical simulations from the Overflow code and experimental results for a D8 1:20 unpowered configuration and D8 1:11 beavertail configurations show:
1. Including the wind tunnel contraction improves the agreement in lift and drag by 3% between calculations and experimental results for the 1:11 beavertail 2. The calculated lift curve in Overflow is lower than the experiments with the
discrepancy reducing as a increased. The lift curve slope is in error by 15%.
3. The fuselage lift fraction varies from 16-21% as a varies from 00 to 120 and the lift distribution along its chord is similar to that in the analysis of the D8 by
Drela
[1.
4. The computations give a lower drag than the experiments for both configura-tions with an error of < 20%.
5. The calculated boundary layer profiles are thicker by < 11% (6* ) and the
regions of low Cp, are larger, than the experimental results. The discrepancy
Chapter 4
Assessment of the D8 Empennage
Redesign
The evolution of the engine sizing for the 1:11 D8 aircraft resulted in a redesign of the
empennage section of the D8 (tail of the fuselage and vertical tails) to accommodate
smaller engines. The redesigned fuselage was tested in the WBWT. This chapter
discusses the results for the previous and new empennage designs for an unpowered
configuration of the D8.
Section 4.1 describes the details and the purpose of the empennage redesign, section 4.2 discuses the effects of the redesign on lift, drag, and pressure distribution, and section 4.3 summarizes the chapter findings.
4.1
D8 Empennage Design
The aft section of the D8 integrated configuration fuselage guides the boundary layer
at the top of the fuselage into the engines for ingestion and decrease the velocity
before it enters the engine. The aft section of the fuselage needed to be designed to
be consistent with engine size. To meet the first purpose, the span of the fuselage
trailing edge was decreased relative to initial designs. Figure 4-1 shows the initial
design and the new design for right half of the fuselage. The redesign changed the
Y
x/D=
0.66
(a) Initial design
(b) New design
Figure 4-1: D8 fuselage design; top view
initial design. Local curvature at x/D > 0.66 was adjusted to ensure the boundary
layer would be diffused. The new design has a sharper drop in the z direction (normal to the fuselage) than the initial design as in Figure 4-2. The new design for the vertical tail has a decreased base chord and a smoother curve at the leading edge along the span to reduce loss.
4.2
Effects on Aerodynamic Forces
4.2.1
Lift and Pressure Distribution
Figure 4-3 shows lift coefficient versus angle of attack for the initial and new empen-nage designs. The new empenempen-nage has overall lift values 5% lower than the initial design. A difference in lift is also seen in the fuselage sectional pressure distribution in figure 4-4. As expected, both empennages have similar pressure distributions near the fuselage leading edge, but the two pressure distributions depart at x/D = 0.47. The new empennage's pressure distribution is lower than the initial design, resulting in lower lift. The difference in the pressure distribution curves is due to the new design's sharper drop in the z direction relative to the old design, which creates a larger pressure gradient
(a) Initial design
(b) New design
Figure 4-2: D8 tail design; side view
ZI
1.5---- Initial Empennage -- New Empennage
1
0.5 0 0 1 2 3 4 5 6 7 8Figure 4-3: Lift curve comparison of Empennage designs
4.2.2
Drag Coefficient
Figure 4-5 shows drag coefficient versus a for the initial and new empennage designs.
The new design has drag values < 12% higher relative to the initial design, with the difference decreasing with a. A breakdown of components of drag reveal the
difference is mainly due to differences in pressure drag from the sharper change in
local curvature and area of the new design relative to the initial design.
4.2.3
Additional Considerations
The redesign of the empennage yielded lower lift value with higher drag, but two
factors need to be considered in assessing the empennages. The first is possible losses
for the integrated design. The initial empennage design with a wider fuselage trailing
edge has excess area in the span-wise direction between the engine and vertical tail, resulting in a streamwise pressure gradient between the engine and the vertical tail
x 1-3 3
10
---Initial
Empennage-New
Empennage
U)U ... . -1 -~ -2 "O 12
3
4
5 xLrf6
7
8
9
10
11
/sl
ref:0 .1 .. ... - - Initial Empennage
0.09
-+-New Empennage
0.08
0.07 0.06 S 0.05- ...- . 0 .04 - -...0.03
-- 0.02-0 .0.02-0 1 - -... -. --- -.-S 12
3
4
5
6
7
8
a
surfaces to accelerate the oncoming flow, possibly leading to stagnation pressure loss.
The second consideration is the amount of fuselage boundary layer that is ingested.
The current engine fan diameter will occupy 94% of the span for the new design
(compared to 65% of the initial design) so each empennage results in a different fraction of ingested fuselage boundary layer. An increase in the BLI fraction results
in lower required power (Section 1.1.2).
4.3
Summary and Conclusion
Simulations for two empennage designs show that:
1. The new empennage design has 5% lower lift relative to the initial design.
2. The change in the curvature for the new empennage lowers the pressure distri-bution along the fuselage, resulting in lower lift and higher pressure gradients.
3. The drag for the new empennage is ; 12% higher than for the initial design
Chapter 5
Required Power for the 1:11 D8
Podded Configuration
In this chapter, we estimate the power requirement for the D8 podded configuration
using th power balance equation for aircrafts [5]. Section 5.1 discusses the power
bal-ance method that has been applied to obtain an estimate on the required power, and
section 5.2 presents the results of the application of the power balance to simulations
of the podded configuration.
5.1
Problem Setup
To support experiments at the NASA Langley Research Center's (LaRC) 14' x 22'
wind tunnel on a podded and integrated configuration, Simulations on a 1:11 podded
configuration in the LaRC wind tunnel have been performed. Figure 5-1 shows the
Overflow surface grids and the experimental test setup. The model support structure
is not included in these simulations.
The engines are simulated with an actuator disk surface that applies a uniform
pressure jump to the flow. The location of the actuator disk corresponds to the
midpoint location of the rotor blades in the physical engine. Dissipation values from
experimental and computational results for the 1:20 configuration lead to a nominal
pressure jump value of APt = 1.99 for the 1:11 podded configuration to achieve net
Figure 5-1: 1:11 D8 podded configuration surface grids inside NASA LaRC 14' x 22'
T
V PK
---r---
---
---
---
)1100_ _ _ _ __
-- 1 2
* ...
~I
'1 wing = 4Ds,wing + '&'w,uwing + Wbv,wingDwing
Figure 5-2: Power balance method applied to a non BLI configuration
horizontal force equilibrium1
. Three simulations were performed with 60%, 100%, and 140% of the nominal pressure jump to obtain a range of net horizontal force coefficient (CH) values that span the simulated cruise point CH = 0.
5.2
Application of Power Balance Method
5.2.1
Overview
Power balance methods provide an approach to evaluate the performance of highly integrated aircraft [5] [21]. The method balances power sources and dissipation. The engine propulsive power (PK) is the power source. Dissipation sources include surface dissipation (0,), vortex dissipation (0,), wake dissipation (qw), and jet dissipation
(%$).. Figure 5-2 2 shows an example of the power balance method for a non-BLI
aircraft, with PK equal to the sum of the dissipation terms (Owing + Os + OWO + 05).
Sato shows how the power balance method can be applied to BLI aircraft [5]. 'Personal Communication with D. Hall (8/20/2013)
0.1
-
Podded
0.09
0.08
0.07
0.06
a-0.05
0.04
0.03
0.02
0.01
0
-0.04
-0.02
0
0.02
0.04
CH
Figure 5-3: C, vs CH for 1:11 D8 podded configuration in the LaRC wind tunnel
5.2.2
Application to 1:11 D8 Podded Configuration
Figure 5-3 shows the results of the power balance. The horizontal force coefficient,
CH, represents the net horizontal force on the aircraft, with CH < 0 corresponding to net thrust and CH > 0 corresponding to net drag. The cruise horizontal force
coefficient of CH = 0 is calculated at CpK = 0.058. This is 14% larger than the Cp,
from the 100% nominal pressure jump input, indicating the dissipation was larger than the initial estimates that were used to calculate the nominal pressure jump.
5.3
Chapter Summary
The findings of Chapter 5 are:
1. Overflow power sweep simulations show cruise horizontal force coefficient CH
0 occurs at CpK= 0.058.
2. Analysis using experimental and computational results for the 1:20 configura-tion under-estimated the input power for CH = 0 by 14% for the 1:11 podded
Chapter 6
Summary, Conclusions and
Recommendations for Future Work
6.1
Summary and Conclusions
1. Simulations of 1:20 and 1:11 unpowered configurations using the Overflow code
have been carried out and compared with experiments conducted at MIT. The computations show lower lift and drag values than the experiments by up to 20% at some conditions
2. The computed fuselage lift fraction ranges from 16%-21% similar to the 19-20% calculated by Drela [1] for ce ranging from 0'-12'.
3. Computations of aircraft models in a constant area wind tunnel and a wind
tunnel with a upstream contraction have been made to represent MIT's Wright Brothers Wind Tunnel (WBWT). Simulations with the contraction resulted in a reduction in differences with experimental results for lift by 2% and drag by
9%.
4. An analysis of the effect of a design change to the D8 empennage has been carried out to allow for changes in engine sizing. The change resulted in de-creased sectional pressure loading and larger pressure gradients for the fuselage
x/D > 0.47, yielding decreased lift and increased drag. Considerations of the
boundary layer fraction ingested, with the engines occupying 94% of the span
for the new design compared to 65% for the initial design, suggest the redesign
will be advantageous from this perspective.
5. The power balance method of Drela [21] has been applied to the 1:11
pod-ded configuration and the simulations show the configuration requires an input
power Cp, = 0.058 at the simulated cruise point.
6.2
Recommendations for Future Work
1. Perform power sweep simulations, with the conditions of section 5.1 for the
1:11 D8 integrated configuration. Application of the power balance method will
determine the benefits of BLI, which can be defined as the difference in the
required input power to achieve a zero net horizontal force on the aircraft.
2. Simulations on the unpowered 1:11 D8 with the support structure at operating
test conditions should be performed to compare the Overflow calculation and
experimental results.
3. The experiments include different nozzle area ratios for the powered
configu-rations. Overflow simulations with different hub geometries could be made to
calculate the effects of area ratio on BLI benefits. Cp, contours for the
inte-grated configuration can identify high loss regions that should be addressed in
future redesigns.
4. Simulations of the podded and integrated at a = 4' and 6' are suggested to
Appendix A
Numerical Dissipation Schemes for
Low Mach and Reynolds Number
Flow
Overflow uses artificial numerical dissipation for central differences in solving the Navier Stokes equations. In order to improve the numerical stability characteristics of the solution. Overflow 2.1 has two classes of dissipation schemes: scalar and matrix
[8]. Scalar dissipation is commonly used because of its robustness in transonic and
sonic flow [22]. At lower Mach and Reynolds numbers, however scalar dissipation can produce non-physical solutions near solid boundaries [23j such as boundary layer velocity overshoot [19]. The overshoot is a result of too much energy being dissi-pated near the boundary, which is compensated by introducing energy away from the boundary to conserve energy. The excess dissipation at the surface also affects the skin friction coefficient Cf on the boundary, introducing error in lift and drag calculations.
A.1
Excess Numerical Dissipation
Boundary layer overshoots appeared in initial, fully converged simulations of the D8 1:20 and 1:11 models. Figure A-1 shows profiles of Cp, - Pt-Pt' along the center of
-0.6
-0.4
-0.2
0
0.2
Figure A-1: Numerical Boundary Layer Profiles Cp, for D8 1:20 Simulations
the fuselage (a = 0*). Cp, in the free stream should be 0, but Figure A-1 shows all
profiles exceed this value.
Figure A-2 shows a contour plot of Cp, along the center of the fuselage. It is seen
that mechanical energy is added to the flow near the leading edge of the fuselage
that grows in magnitude of Cp, at the trailing edge with a maximum overshoot of
Cp, = 0.03. The increase in size and intensity of stagnation pressure overshoot is
consistent with previous findings that the error in scalar dissipation grows as the flow
moves along a solid boundary [23].
To address this issue, Jespersen et al. [191 recommend using either an upwind
numerical scheme (in lieu of central difference) or using matrix dissipation in the
central difference scheme. Matrix dissipation was selected because it is more robust
than an upwind scheme [22]. The inputs for matrix dissipation are values for the
second and fourth order coefficients. The numerical simulations are for low Mach