Band-to-band Tunneling in Silicon Diodes and Tunnel Transistors
by
James Towfik Teherani
B.S. Electrical Engineering The University of Texas at Austin, 2008
Submitted to the Department of Electrical Engineering and Computer Science in Partial Fulfillment of the Requirements for the Degree of
Master of Science in Electrical Engineering and Computer Science at the
Massachusetts Institute of Technology June 2010
© 2010 Massachusetts Institute of Technology. All rights reserved.
Signature of Author: ____________________________________________________________ Department of Electrical Engineering and Computer Science May 18, 2010
Certified by: ____________________________________________________________ Judy L. Hoyt Professor, Electrical Engineering and Computer Science Thesis Supervisor
____________________________________________________________ Dimitri A. Antoniadis Professor, Electrical Engineering and Computer Science Thesis Supervisor
Accepted by: ____________________________________________________________ Terry P. Orlando Professor, Electrical Engineering and Computer Science Chairman, Department Committee on Graduate Theses
Band-to-band Tunneling in Silicon Diodes and Tunnel Transistors
by
James Towfik Teherani
Submitted to the Department of Electrical Engineering and Computer Science on May 18, 2010 in Partial Fulfillment of the Requirements for the Degree of
Master of Science in Electrical Engineering and Computer Science
Abstract
This work studies the effect of mechanically applied uniaxial strain on reverse-bias band-to-band tunneling current in n+/p+ vertical silicon diodes fabricated on {100} and {110} substrate
orientations. The Band Structure Lab and nextnano3 are used to analyze the change in band structure with uniaxial stress applied perpendicular to the tunneling direction along <100> and <110> crystal directions. A theoretical analysis based on the Wentzel-Kramers-Brillouin (WKB) approximation for tunneling probability combined with an uncoupled full-band Poisson equation solver and the calculated band structure changes is developed to model the experimental results. Reasonable agreement between experimental data and theoretical calculations is found when comparing the relative change in tunneling current at 1 V reverse-bias versus strain for different substrate orientation/strain configurations.
Thesis Supervisors: Judy L. Hoyt, Professor of Electrical Engineering
Table of Contents
Chapter 1: Motivation for Tunneling Field-Effect Transistor and Tunnel Diode Research ... 13
1.1 Potential Advantages of the Tunneling Field-Effect Transistor Compared to Conventional MOSFETs ... 15
Chapter 2: Introduction to Quantum Tunneling ... 17
2.1 Tunneling in One-Dimension ... 18
2.2 Band-to-band Tunneling in Diodes ... 21
2.2.1 Equations for Band-to-band Tunneling in Diodes ... 25
Chapter 3: Fabrication and Sample Preparation ... 30
3.1 Device Fabrication ... 30
3.2 Doping Profiles of Vertical Diodes ... 31
3.3 Sample Preparation ... 32
3.3.1 Cleavage Planes ... 32
3.4 Silicon Polishing Etch ... 33
3.5 Bending Apparatus ... 36
3.5.1 Calibration of the Bending Apparatus ... 37
3.5.2 Electrical Measurements of Strain Gauge ... 38
Chapter 4: The Stress/Strain Relation... 41
Chapter 5: Electrical Measurements and Results ... 49
5.1 Current-Voltage Data ... 50
Chapter 6: Theoretical Current Calculation ... 54
6.1 Band Structure Strain Analysis ... 54
6.1.1 Valence Band Parameters ... 56
6.1.2 Conduction Band Parameters ... 57
6.2 Poisson Equation Solution ... 59
6.3 Equations for Current Flux ... 60
6.4 Theoretical Calculation of the Relative Change in Current ... 63
6.4.1 Simplified Physical Analysis ... 67
6.4.2 Sources of Error in Theoretical Calculation ... 70
Chapter 7: Summary ... 71
Appendix A: Procedure for Bonding Strain Gauge to Samples ... 73
Appendix B: Calibration Measurements of the Bending Apparatus ... 74
Appendix C: Strain Calculation for Stress Applied Along the [100] Crystal Axis ... 75
Appendix D: Coordinate Transformation Calculated for Stress Along the [110] Crystal Axis ... 76
Appendix E: Comparison of Strained Band Structure Simulations ... 79
Appendix F: Valence Band E-k Diagrams ... 81
List of Figures
Figure 1. (a) Standard n-MOSFET structure. (b) n-TFET structure in which drain and source doping are no longer symmetrical. (c) Energy band diagram for the n-MOSFET in which current is carried by thermionic emission of electrons. (d) Energy band diagram for n-TFET in which gate voltage modulates the band-to-band tunneling barrier. ...14 Figure 2. Plane wave incident on a rectangular potential barrier. A portion of the incident
wave is transmitted and the rest is reflected at the potential barrier. ...19 Figure 3. Energy band diagram for a p-n diode with band-to-band tunneling. A particle with
nonzero perpendicular momentum (as defined by momentum oriented within the plane of the junction) tunnels across the band gap from the valence band at 𝑥 = 𝑎 to the conduction band at 𝑥 = 𝑏. The transition from valence band-like properties to conduction band-like properties occurs at 𝑥 = 𝑥0, and the overall tunneling barrier is indicated by the hatched
areas. ...22 Figure 4. Full band structure of unstrained silicon calculated using [10]. The inset shows the
first Brillouin zone for an FCC lattice with points of high symmetry indicated. Inset image from [11]. ...23 Figure 5. (a) E-k plot depicting the increased band gap incurred by perpendicular momentum.
(b) Band diagram of a p-n diode for a tunneling electron with zero perpendicular momentum in the valence band and conduction band. (c) Band diagram for a tunneling electron with non-zero perpendicular momentum in the valence band and conduction band. The perpendicular momentum causes an increase in the tunneling path as depicted. Both (b) and (c) have an E-k diagram superimposed on the band diagram to show the effect of perpendicular momentum. ...24 Figure 6. Vertical structure of the fabricated diodes. Image courtesy of P. Solomon, IBM
[15]. ...31 Figure 7. TSUPREM simulation of the vertical diode doping profile for different boron doses
in units of cm-2. Image courtesy of P. Solomon, IBM [5]. ...31 Figure 8. Geometries created from different ratios of hydrofluoric acid and nitric acid. The
circle represents the concentration of hydrofluoric acid and nitric acid used in this paper. Image from [16]. ...35
Figure 9. Plot of the average applied compressive strain before breakage for sawed+polished samples and cleaved samples. Error bars indicate standard deviation of the data. ...36 Figure 10. Bending apparatus (not drawn to scale). The load cell shown in the drawing was
not implemented. Image from [18]. ...36 Figure 11. Drawing of a strain gauge used for calibration. Image from [19]. ...38 Figure 12. Circuit diagram of the Wheatstone bridge used to measure the change in resistance
of the strain gauge. Image from [20]. ...39 Figure 13. Change of coordinates used in the analysis of <110> stress shown with respect to
crystal directions. ...44 Figure 14. Experimental IV plots for tunneling in the [001] direction for -0.13% to 0.39%
strain in the [110] direction. The relative change in the magnitude of current compared to the unstrained case at 0.7 V is quite small for all strains applied: +4.3% change for -0.13% strain and -11.9% change for 0.39% strain. ...50 Figure 15. Relative change in current compared to the unstrained case for the experimental
IV curve plotted in Figure 14. Tunneling is in the [001] direction. Uniaxial strain of -0.13% to 0.39% was applied along the [110] direction. ...51 Figure 16. Comparison of the experimental relative change in current versus strain for
different wafer/strain configurations and boron doses. The relative change in current is
evaluated at a reverse bias of 1 V. ...52 Figure 17. Change in forward-bias voltage at a constant current near the point of steepest
slope for different wafer/strain configurations. Changes in voltage are much less than the change in band gap at a given strain. Data points have a considerable uncertainty of
±0.5 mV indicated by error bars. ...53 Figure 18. Calculated band structures for bulk silicon using the Band Structure Lab [10].
(a) Uniaxial stress is applied along the <100> direction. The energy bands for the y and z conduction band lobes are identical. (b) Uniaxial stress is applied along the <110>
direction. The energy bands for the x and y conduction band lobes are identical. ...55 Figure 19. Change of coordinates used for calculating effective mass along the [110]
direction of the x-directed conduction band lobe. ...58 Figure 20. Net doping concentration used as input for the full-band Poisson solver. At 60 nm,
Figure 21. Energy band diagram calculated by full-band Poisson solver for a p-n junction under -1 GPa compressive stress in the [100] direction. (a) Band diagram with 0 V across the junction. (b) Band diagram with 1 V reverse-bias applied across the junction. Current is assumed to be small so quasi-Fermi levels remain constant throughout the device. Both
plots show the splitting of the energy bands due to uniaxial strain. ...60
Figure 22. Comparison of theoretically calculated and experimentally measured relative change in current at 1 V reverse bias. (a) Strain applied in [100] direction for [001] tunneling. (b) Strain applied in [110] direction for [001] tunneling. (c) Strain applied in [100] direction for [011] tunneling. (d) Strain applied in [110] direction for [-110] tunneling. ...64
Figure 23. Diagram illustrating the dependence of tunneling current with [100] stress. The left plot shows the change in the conduction band energy for the different lobes with stress. The right table lists the tunneling masses for the conduction band lobes and the approximate equation for current based on the contributing bands. The plots below the table are reproduced from Figure 22 to show the strain dependence of current. ...68
Figure 24. Diagram illustrating the dependence of tunneling current with [110] stress. The left plot shows the change in the conduction band energy for the different lobes with stress. The right table lists the tunneling masses for the conduction band lobes and the approximate equation for current based on the contributing bands. The plots below the table are reproduced from Figure 22 to show the strain dependence of current. ...69
Figure 25. (a) Top-view of strain gauge taped to silicon sample piece. (b) Side-view of the technique used to bond the strain gauge to the silicon sample. ...73
Figure 26. Comparison of band structure simulations for <100> directed uniaxial stress. ...79
Figure 27. Comparison of band structure simulations for <110> directed uniaxial stress. ...80
List of Tables
Table 1. Wafer orientations and desired bending directions...33 Table 2. Elastic compliance matrices for the two coordinate systems pictured in Figure 13.
Values for <100> oriented coordinate system are from [23]. Values for <110> oriented coordinate system are calculated using method described in this thesis. ...47
Chapter 1: Motivation for Tunneling Field-Effect Transistor
and Tunnel Diode Research
The great pace of the electronics industry can be attributed to the successful scaling of silicon transistors since the 1970s. However, beginning in the early 2000s, additional enhancement techniques beyond Dennard’s scaling law [1] were required to push technology to the next development node. This was achieved through the application of strain engineering and by use of novel materials such as high-𝜅 dielectrics and metal gates [2],[3]. Ultimately, the scaling of the traditional metal-oxide-semiconductor field-effect transistor (MOSFET) runs into serious roadblocks in the next ten years, and because of this many alternative transistor types are under investigation. In particular, new transistor operating principles, which can reduce power dissipation in integrated circuits, are of interest.
One type of alternative that has received attention is the tunneling field-effect transistor (TFET) [4]. Tunneling is a quantum mechanical effect where particles have a finite probability of transmission through an energy barrier due to their wave nature, and this effect becomes pronounced at nanometer length scales. Quantum mechanical tunneling is explained in depth in Chapter 2: Introduction to Quantum Tunneling. The TFET seeks to use tunneling as an
advantageous effect, where carriers are injected through a barrier instead of over a thermal barrier, as in a conventional MOSFET. A comparison of an n-MOSFET and basic n-TFET structure is shown in Figure 1a and Figure 1b below.
Figure 1. (a) Standard n-MOSFET structure. (b) n-TFET structure in which drain and source doping are no
longer symmetrical. (c) Energy band diagram for the n-MOSFET in which current is carried by thermionic
emission of electrons. (d) Energy band diagram for n-TFET in which gate voltage modulates the
band-to-band tunneling barrier.
In this thesis, the tunneling diode is studied as a tool to better understand the effects of band structure on the band-to-band tunneling phenomena in the TFET devices. In both the TFET and the tunnel diode, band-to-band tunneling occurs between the valence band of a p-region and the conduction band of an n-region. The main difference between the devices is the use of a third terminal (the gate contact) to modulate tunneling in the TFET. In the tunnel diode, tunneling is modulated by changing the bias across the p-n tunnel junction. Contrary to the TFET, the tunnel diode is a one-dimensional structure which is easier to fabricate and provides fundamental insight into the tunneling mechanism and its dependence on semiconductor properties.
In this work, silicon vertical tunnel diodes were fabricated on different substrates. Since an applied bias creates a vertical electric field, tunneling occurs preferentially along the wafer’s vertical crystallographic direction. Different substrate orientations allow different
crystallographic tunneling paths to be studied. A comparison of tunneling current for different substrate orientations provides insight into a preferential tunneling direction for the silicon
crystal. Applied mechanical uniaxial strain alters the band structure of the device in predictable ways. The strain breaks the band degeneracy to allow the effects of each band to be separated. From a device performance view, applied strain can increase or decrease tunneling in a specified direction so that device performance can be optimized for the desired application. In this work, strain is used as an instrument to better understand band-to-band tunneling under various band structure conditions.
While the ultimate goal of the broader research is to produce a CMOS-compatible low power transistor compared to the MOSFET, much of the current work is targeted at better understanding the band-to-band tunneling phenomena in devices. This also has implications for current MOSFETs; gate-induced drain leakage (GIDL)—a parasitic band-to-band tunneling effect at the drain-substrate junction caused by large electric fields between the gate and drain regions—becomes more troubling with every technology generation as the oxide thickness shrinks and fields increase. Knowledge gained from tunnel diode research can be utilized to decrease unwanted tunneling in MOSFETs [5]. Moreover, tunneling research may lead to devices and structures not yet conceived.
1.1 Potential Advantages of the Tunneling Field-Effect Transistor
Compared to Conventional MOSFETs
The TFET works by using the gate to modulate the width of a tunneling barrier, instead of the height of a barrier that carriers must surmount via thermionic emission. The transport of carriers in the n-MOSFET and n-TFET structures is depicted in Figure 1c and Figure 1d above. Since TFETs function via a tunneling mechanism, they have weak temperature dependence and potential for subthreshold swing below the kT/q thermal limit of 60 mV/decade at room
temperature [6]. It should be noted that indirect tunneling depends on phonon-electron
interactions for the change in momentum from the Γ-valley maximum to the X-valley minimum. The phonon occupation obeys Bose-Einstein statistics, and the number of phonons is sensitive to temperature; however, indirect tunneling can occur even with a zero phonon occupancy due to phonon emission by the tunneling particle. For this reason, tunneling is not exponentially dependent on temperature, and the overall tunneling rate is proportional to 1 + 2𝑁, where 𝑁 is the occupancy for phonons with the momentum required for the indirect transition [7].
A steep subthreshold swing allows for lower supply voltage VDD, and thus low power
device operation, as power scales as the square of VDD. A device with a steep subthreshold swing
requires less gate voltage for a given on-current to off-current ratio. The TFET research seeks to reduce the power dissipation of electronics while improving performance.
TFETs are not plagued by the same short channel effects as MOSFETs. Although the drain potential can affect the tunneling barrier at very short channel lengths, a reduction in VDD
enabled by the steep subthreshold swing of a TFET can likely lessen the effect. Therefore, the TFET device structure potentially allows for scaling to shorter channel lengths prolonging Moore’s Law, and these properties make TFETs a candidate for ultra-low power logic applications.
Chapter 2: Introduction to Quantum Tunneling
The concept of tunneling was first introduced with the advent of quantum mechanics in the second decade of the twentieth century. The quantum mechanical equations predict the wave nature of matter which asserts that matter exhibits wavelike properties under some conditions and particle-like properties under other conditions. The Schrödinger formulation of quantum mechanics presents an interesting phenomenon where a particle tunnels through an energy barrier, similar to evanescent wave coupling of electromagnetic waves [8]. The Schrödinger equation is given by
𝑖ℏ 𝜕
𝜕𝑡Ψ 𝒓, 𝑡 = 𝐻 Ψ 𝒓, 𝑡 (1)
where ℏ is Planck’s constant divided by 2𝜋, Ψ 𝒓, 𝑡 is the wave function at position 𝒓 and time 𝑡, and the Hamiltonian operator 𝐻 is defined as
𝐻 = − ℏ
2
2𝑚∇
2+ 𝑉(𝒓, 𝑡) (2)
𝑉(𝒓, 𝑡) is the potential energy that can vary with space and time. For a particle traveling in free space without any potentials, 𝑉(𝒓, 𝑡) is taken to be zero. Under these conditions, a plane wave of the form Ψ 𝒓, 𝑡 = 𝑒𝑖 𝑘𝑥 −𝜔𝑡 satisfies Equation (1) above where the wave vector 𝑘 is 2𝜋 divided by the wavelength, and the angular frequency 𝜔 is 2𝜋 times the frequency.
For tunneling through a potential barrier, the problem is simplified by using the method of separation of variables. With this method, a solution of the form Ψ 𝒓, 𝑡 = 𝑅 𝑟 𝑇 𝑡 is assumed which allows the problem to be broken up into a time-dependent and time-independent problem. 𝑅(𝑟) is the spatial component and 𝑇(𝑡) is the temporal component of the wave
function. The time-dependent problem is easily solved, leaving only the time-independent solution to be found. The time-independent Schrödinger problem for one-dimension becomes
𝐸𝜓 𝑥 = − ℏ
2
2𝑚 𝑑2
𝑑𝑥2𝜓 𝑥 + 𝑉 𝑥 𝜓 𝑥 (3)
where 𝐸 is the energy and 𝜓 𝑥 is the spatial component of the wave function along 𝑥. The combined wave function is given by
𝜓 𝑥, 𝑡 = 𝜓 𝑥 𝑒− 𝑖𝐸𝑡ℏ (4)
Moreover, a time-independent plane wave solution of the form 𝜓 𝑥 = 𝑒𝑖𝑘𝑥 satisfies
Equation (3) for any constant potential 𝑉0 in space. Plugging in the plane wave solution yields
the condition that
𝑘 = 2𝑚 𝐸 − 𝑉0
ℏ2 (5)
2.1 Tunneling in One-Dimension
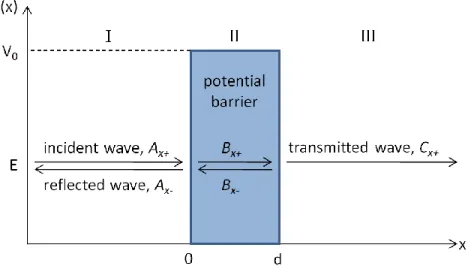
The problem of a particle impinging on a rectangular potential barrier is drawn in Figure 2. The particle is represented by an incident forward propagating plane wave with amplitude 𝐴𝑥+ and
energy 𝐸 traveling in a material with zero potential. A second material exists from 𝑥 = 0 to 𝑥 = 𝑑 with a potential 𝑉0 such that 0 < 𝐸 < 𝑉0.
Figure 2. Plane wave incident on a rectangular potential barrier. A portion of the incident wave is
transmitted and the rest is reflected at the potential barrier.
A forward propagating wave and a backward propagating wave is assumed in regions I and II due to reflection off the surfaces at 𝑥 = 0 and 𝑥 = 𝑑. No backward propagating wave is assumed for region III because no surface exists to reflect the forward-propagating transmitted wave. Using these assumptions as a starting point, an equation of the form below is assumed as the solution to the time-independent Schrödinger equation:
𝜓 𝑥 = 𝐴𝑥+∙ 𝑒𝑖𝑘𝐼𝑥+ 𝐴 𝑥−∙ 𝑒−𝑖𝑘𝐼𝑥, for 𝑥 ≤ 0 𝐵𝑥+∙ 𝑒𝑖𝑘𝐼𝐼𝑥 + 𝐵 𝑥−∙ 𝑒−𝑖𝑘𝐼𝐼𝑥, for 0 ≤ 𝑥 ≤ 𝑑 𝐶𝑥+∙ 𝑒𝑖𝑘𝐼𝐼𝐼𝑥, for 𝑥 ≥ 𝑑 (6)
Additionally, the following boundary conditions must be true for a valid wave function solution:
𝜓𝐼 0 = 𝜓𝐼𝐼 0 (7) 𝜓𝐼𝐼 𝑑 = 𝜓𝐼𝐼𝐼(𝑑) (8) 𝑑 𝑑𝑥𝜓𝐼 0 = 𝑑 𝑑𝑥𝜓𝐼𝐼(0) (9) 𝑑 𝑑𝑥𝜓𝐼𝐼 𝑑 = 𝑑 𝑑𝑥𝜓𝐼𝐼𝐼(𝑑) (10)
Using Equation (5), the wave vectors are found to be 𝑘𝐼 = 𝑘𝐼𝐼𝐼 = 2𝑚𝐸 ℏ2 (11) 𝑘𝐼𝐼 = 2𝑚(𝐸 − 𝑉0) ℏ2 = 𝑖 2𝑚(𝑉0− 𝐸) ℏ2 = −𝑖𝜅 (12) where 𝜅 = − 2𝑚(𝑉0− 𝐸) ℏ2 = 𝑖𝑘𝐼𝐼 (13)
𝜅 is a real number since 𝑉0 > 𝐸 in region II. Substituting Equation (12) into Equation (6), one finds that in the barrier (region II), the wave function is composed of exponential terms:
𝜓𝐼𝐼 𝑥 = 𝐵𝑥+∙ 𝑒𝑖𝑘𝐼𝐼𝑥 + 𝐵𝑥−∙ 𝑒−𝑖𝑘𝐼𝐼𝑥
= 𝐵𝑥+∙ 𝑒+𝜅𝑥 + 𝐵
𝑥−∙ 𝑒−𝜅𝑥
(14)
Taking the incident amplitude 𝐴𝑥 + to be unity, one can solve the set of four equations: Equations (7)-(10) and four unknowns: 𝐴𝑥−, 𝐵𝑥+, 𝐵𝑥−, 𝐶𝑥+. The transmission probability 𝑇(𝐸) can be calculated as the square of the absolute value of the amplitude of the transmitted wave since the initial and final 𝑘-vectors are the same:
𝑇 𝐸 = 𝐶𝑥+ 2 = 4𝐸 𝑉0− 𝐸 4𝐸 𝑉0− 𝐸 + 𝑉02sinh2 𝜋 𝑉0− 𝐸 𝐸𝑑 (15) where 𝐸𝑑 = ℏ 2𝜋2 2𝑚𝑑2 (16)
From this quantum mechanical analysis, a nonzero transmission coefficient is calculated for a particle with energy less than the barrier height. The particle is able to tunnel through the barrier with a finite probability. This is forbidden in classical mechanics as it would require the particle to have a negative kinetic energy since the total particle energy is the sum of the kinetic energy and potential energy; however, quantum mechanics shows that tunneling is a valid solution to the Schrödinger equation, and thus, a real phenomenon of particles.
2.2 Band-to-band Tunneling in Diodes
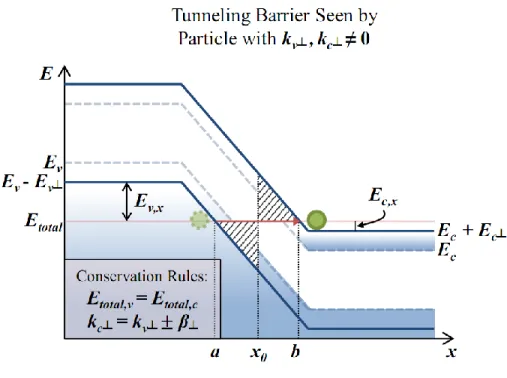
The tunneling of interest in this thesis is band-to-band tunneling in silicon diodes and TFETs. For band-to-band tunneling to occur, an electron in the valence band of the semiconductor tunnels across the band gap to the conduction band without the assistance of traps as shown in Figure 3. The band gap acts as the potential barrier that the particle tunnels across. For direct tunneling, an electron travels from the valence band to the conduction band without the absorption or emission of a phonon.
Figure 3. Energy band diagram for a p-n diode with band-to-band tunneling. A particle with nonzero
perpendicular momentum (as defined by momentum oriented within the plane of the junction) tunnels across
the band gap from the valence band at 𝒙 = 𝒂 to the conduction band at 𝒙 = 𝒃. The transition from valence
band-like properties to conduction band-like properties occurs at 𝒙 = 𝒙𝟎, and the overall tunneling barrier is
indicated by the hatched areas.
In the indirect tunneling process, a tunneling particle acquires a change in momentum by absorbing or emitting a phonon. Indirect tunneling is the main tunneling process in indirect semiconductors whose gamma-centered direct band gap, EΓ, is much greater than their indirect
band gap, EG, as is the case with silicon where EΓ = 3.4 eV and EG = 1.12 eV [9]. The full band
structure for silicon is shown in Figure 4. The direct tunneling process is negligible in silicon because the transmission probability decreases rapidly with increasing barrier height as seen in Equation (15). The electron tunneling through the band gap is akin to a particle tunneling through a potential barrier, and the most probable tunneling path is through the smallest barrier, which results in the two triangular barriers drawn in Figure 3 above.
Figure 4. Full band structure of unstrained silicon calculated using [10]. The inset shows the first Brillouin
zone for an FCC lattice with points of high symmetry indicated. Inset image from [11].
Figure 3 depicts band-to-band tunneling for a heavily doped p+/n+ diode with a constant electric field across the junction. An incident valence band electron with energy in the
x-direction tunnels across the band gap to a state in the conduction band. The electron tunnels from the valence band at 𝑥 = 𝑎 to the conduction band at 𝑥 = 𝑏, and the phonon interaction for a transition from valence band-like properties to conduction band-like properties occurs at 𝑥 = 𝑥0.
The tunneling barrier is indicated by the hatched areas in the figure. Perpendicular momentum increases the action integral of the potential barrier, defined below in Equation (19), and thus causes tunneling to decrease. For direct tunneling, the requirement for conservation of
perpendicular momentum causes an increase in the tunneling path shown in Figure 5. A particle with some perpendicular momentum in the valence band must tunnel to a state with the same perpendicular momentum in the conduction band, which results in a longer tunneling path.
Figure 5. (a) E-k plot depicting the increased band gap incurred by perpendicular momentum. (b) Band
diagram of a p-n diode for a tunneling electron with zero perpendicular momentum in the valence band and
conduction band. (c) Band diagram for a tunneling electron with non-zero perpendicular momentum in the
valence band and conduction band. The perpendicular momentum causes an increase in the tunneling path as
depicted. Both (b) and (c) have an E-k diagram superimposed on the band diagram to show the effect of
perpendicular momentum.
It should be noted that in the indirect tunneling process, the phonon does impart or absorb a change in the momentum of the particle. Therefore, the electron-phonon interaction of the indirect tunneling process decouples the perpendicular momentum of valence band and
𝐸𝑡𝑜𝑡𝑎𝑙 = 𝐸𝑐0,𝑛 + ℏ2𝑘𝑐2 2𝑚𝑐∗ = 𝐸𝑣0,𝑝 − ℏ2𝑘𝑣2 2𝑚𝑣∗ ± ℏ𝜔𝛽 (17) 𝑘𝑐⊥ = 𝑘𝑣⊥± 𝛽⊥ (18)
In Equation (18), 𝛽 is the wave vector of the phonon. Under the continuum
approximation, 𝛽 can be any value so that 𝑘𝑐⊥ is independent of 𝑘𝑣⊥. However, the energy imparted for a momentum transfer from the Γ-valley maximum to the X-valley minimum by a transverse acoustic phonon is approximately 18 meV [12]. Because this energy is quite small, the approximation is made that no change in total energy occurs with the phonon interaction, and the term ℏ𝜔𝛽 is neglected.
2.2.1 Equations for Band-to-band Tunneling in Diodes
The tunneling is calculated using the Wentzel-Kramers-Brillouin (WKB) approximation [13] which gives the transmission coefficient for a particle tunneling in the x-direction as
𝑇 ~ 𝑒𝑥𝑝 −2 𝜅𝑥𝑑𝑥
b a
(19)
The integral over 𝑑𝑥 is commonly referred to as the tunneling action integral—the larger the action integral, the smaller the transmission coefficient. For the case drawn in Figure 3, the particle transitions from an electron with valence band-like properties to an electron with conduction band-like properties at 𝑥0. We rewrite Equation (19) to reflect this:
𝑇 ~ 𝑒𝑥𝑝 −2 𝜅𝑣𝑥𝑑𝑥 𝑥0 𝑎 + 𝜅𝑐𝑥𝑑𝑥 𝑏 𝑥0 (20)
𝑘𝑣 = 2𝑚𝑣 𝐸𝑣(𝑥) − 𝐸 ℏ2 , 𝑘𝑐 = 2𝑚𝑐 𝐸 − 𝐸𝑣 𝑥 + 𝐸𝐺 ℏ2 (21) 𝑘𝑣 2 = 𝑘 𝑣𝑥2 + 𝑘𝑣⊥2 ⇒ 𝑘𝑣𝑥2 = 𝑘𝑣2− 𝑘𝑣⊥2 𝑘𝑐2 = 𝑘𝑐𝑥2 + 𝑘𝑐⊥2 ⇒ 𝑘𝑐𝑥2 = 𝑘𝑐2− 𝑘𝑐⊥2 (22) 𝜅𝑥 = 𝑖𝑘𝑥, 𝜅𝑣 = 𝑖𝑘𝑣, 𝜅𝑐 = 𝑖𝑘𝑐 (23) 𝜅𝑣𝑥 𝑖 2 = 𝜅𝑣 𝑖 2 − 𝑘𝑣⊥2 (24) 𝜅𝑣𝑥 = 𝜅𝑣2+ 𝑘 𝑣⊥2 𝜅𝑐𝑥 = 𝜅𝑐2+ 𝑘 𝑐⊥2 (25)
This implies that the transmission coefficient can be rewritten in terms of total momentum and perpendicular momentum as 𝑇 ~ 𝑒𝑥𝑝 −2 𝜅𝑣2+ 𝑘 𝑣⊥2 𝑑𝑥 𝑥0 𝑎 + 𝜅𝑐2+ 𝑘 𝑐⊥ 2 𝑑𝑥 𝑏 𝑥0 (26)
For a fixed energy, 𝜅𝑣 is constant by definition. Equation (26) shows that as transverse momentum 𝑘𝑣⊥ increases, the tunneling probability exponentially decreases for a constant 𝜅𝑣 (or
a fixed total energy). This equation can be simplified by first factoring 𝜅𝑣 and 𝜅𝑐 out of the
square root and then applying the Taylor series approximation that 1 + 𝛼 ≈ 1 +12𝛼, for 𝛼 ≪ 1:
𝑇 ~ 𝑒𝑥𝑝 −2 𝜅𝑣 1 +𝑘𝑣⊥ 2 𝜅𝑣2 𝑑𝑥 𝑥0 𝑎 + 𝜅𝑐 1 +𝑘𝑐⊥ 2 𝜅𝑐2 𝑑𝑥 𝑏 𝑥0 (27) 𝑇 ~ 𝑒𝑥𝑝 −2 𝜅𝑣𝑑𝑥 𝑥0 𝑎 + 𝜅𝑐𝑑𝑥 𝑏 𝑥0 − 𝑘𝑣⊥2 1 𝜅𝑣 𝑑𝑥 𝑥0 𝑎 + 𝑘𝑐⊥2 1 𝜅𝑐 𝑑𝑥 𝑏 𝑥0 (28)
From Equation (25), it can be seen that 𝜅𝑣 = 𝜅𝑣𝑥 𝑘𝑣⊥ = 0 ≡ 𝜅𝑣𝑥 ,0. Equation (28) can be rewritten in terms of 𝜅𝑣𝑥0 and 𝜅𝑐𝑥0 so that the transmission coefficient becomes
𝑇 ~ 𝑒𝑥𝑝 −2 𝜅𝑣𝑥 ,0𝑑𝑥 𝑥0 𝑎 + 𝜅𝑐𝑥 ,0𝑑𝑥 𝑏 𝑥0 − 𝑘𝑣⊥2 1 𝜅𝑣𝑥 ,0𝑑𝑥 𝑥0 𝑎 + 𝑘𝑐⊥2 1 𝜅𝑐𝑥 ,0𝑑𝑥 𝑏 𝑥0 (29)
The above equation can be written in terms of total energy and perpendicular momentum of the valence band and conduction band:
𝑇 𝐸, 𝑘𝑣⊥, 𝑘𝑐⊥ ~ 𝑒𝑥𝑝 −2 2𝑚𝑣𝑥 𝐸 − 𝐸𝑣 𝑥 ℏ2 𝑑𝑥 𝑥0 𝑎 + 2𝑚𝑐𝑥 𝐸𝑣 𝑥 + 𝐸𝐺 − 𝐸 ℏ2 𝑑𝑥 𝑏 𝑥0 − 𝑘𝑣⊥2 1 𝜅𝑣𝑥 ,0 𝑑𝑥 𝑥0 𝑎 + 𝑘𝑐⊥2 1 𝜅𝑐𝑥 ,0 𝑑𝑥 𝑏 𝑥0 (30)
For the constant field assumption, the energy of the valence band as a function of position is given by
𝐸𝑣 𝑥 = 𝐸𝑣0+ 𝑞𝐹𝑥 (31)
where the electric field, 𝐹, is negative for the case drawn in Figure 3 above. Additionally, the integral in Equation (30) is minimized when 𝜅𝑣𝑥 ,0 𝑥0 = 𝜅𝑐𝑥 ,0 𝑥0 which leads to
𝑥0 = 1
𝑞𝐹 𝐸 − 𝐸𝑣0−
𝑚𝑐𝑥
𝑚𝑐𝑥+ 𝑚𝑣𝑥𝐸𝐺 (32)
𝑇 𝑘𝑣⊥, 𝑘𝑐⊥ ~ 𝑒𝑥𝑝 −2 −2 3 (𝐸𝐺)1.5 𝑞𝐹ℏ 2𝑚𝑣𝑥𝑚𝑐𝑥 𝑚𝑣𝑥 + 𝑚𝑐𝑥 − −ℏ𝑘𝑣⊥ 2 𝑞𝐹 𝐸𝐺∙ 2𝑚𝑐𝑥 𝑚𝑣𝑥 1 𝑚𝑐𝑥 + 𝑚𝑣𝑥 −ℏ𝑘𝑐⊥2 𝑞𝐹 𝐸𝐺 ∙ 2𝑚𝑣𝑥 𝑚𝑐𝑥 1 𝑚𝑐𝑥 + 𝑚𝑣𝑥 (where F is negative) (33)
This equation can be further condensed with some algebra to
𝑇 𝑘𝑣⊥, 𝑘𝑐⊥ ~ 𝑒𝑥𝑝 −2 𝐸𝐺 0.5 𝑞 𝐹 ℏ 2𝑚𝑟 2 3𝐸𝐺 + 1 2 ℏ2𝑘𝑣⊥2 𝑚𝑣𝑥 + ℏ2𝑘𝑐⊥2 𝑚𝑐𝑥 (34) where 𝑚𝑟 is the reduced mass given by
𝑚𝑟 = 1 𝑚𝑣𝑥+ 1 𝑚𝑐𝑥 −1 = 𝑚𝑣𝑥𝑚𝑐𝑥 𝑚𝑣𝑥 + 𝑚𝑐𝑥 (35)
Using this equation, the transmission probability of a particle at a specific energy can be calculated. When the perpendicular momentum of the particle in the valence band and
conduction band is zero, the transmission coefficient is found to be
𝑇 𝑘𝑣⊥ = 0, 𝑘𝑐⊥ = 0 ~ 𝑒𝑥𝑝 −4 3
𝐸𝐺 1.5
𝑞 𝐹 ℏ 2𝑚𝑟 (36)
which agrees with the general treatment of tunneling in various texts [14].
For direct tunneling, the perpendicular momentum of the particle in the conduction band must equal the perpendicular momentum of the particle in the valence band in order to conserve perpendicular momentum as no phonon interaction occurs. Under this constraint, Equation (34) is written as
Direct tunneling: 𝑇 𝐸𝑣⊥ ~ 𝑒𝑥𝑝 −2 𝐸𝐺 0.5 𝑞 𝐹 ℏ 2𝑚𝑟 2 3𝐸𝐺 + 𝑚𝑣⊥ 𝑚𝑟 𝐸𝑣⊥ (37) Although tunneling in silicon occurs through an indirect process, the direct tunneling equation is used in the theoretical analysis of this thesis. Both equations are similar; however the indirect formulation allows for additional freedom of the perpendicular momenta in the valence and conduction bands as they are no longer required to be equivalent. In both cases, tunneling is dominated by particles with little perpendicular momentum so Equation (37) is used to simplify the analysis. Equation (37) will become the basis for the tunneling current calculation described in Chapter 6: Theoretical Current Calculation.
Chapter 3: Fabrication and Sample Preparation
The silicon tunnel diodes were previously fabricated at the IBM T. J. Watson Research Center in Yorktown, Heights, New York. The author prepared the samples and performed measurements on the devices during the summer of 2009 while interning at IBM.
3.1 Device Fabrication
The fabrication of the silicon tunnel diodes was completed at the IBM T. J. Watson Research Center in Yorktown Heights, New York. The local oxidation of silicon (LOCOS) method was used to create isolated areas, and the wafers were ion implanted to form the p-n junction of the diode. A sketch of the structure is drawn in Figure 6. In the experiment, three different wafer orientations were used: [001], [011], and [111]. The different wafer orientations enable
comparison of vertical tunneling along different crystallographic directions. For each of the three substrates, boron was implanted at 20 keV for eight different doses from 0.6x10¹⁴ to 7.5x1014 cm-2. Additionally, a 2 keV arsenic implant was completed for all devices with a dose of
2.5x1015 cm-2 to create the n+ top of the vertical diode. Many junctions were short-circuited due to metal spiking through the shallow implant. The devices were reworked and received an additional arsenic dose of 2.5x1015 cm-2 at 20 keV to prevent spiking through the n-region. The dopants were ion implanted through a mask with various layout geometries, but this thesis only focuses on the 5 µm and 10 µm structures of squares and circles. After the implants, the devices underwent a rapid thermal anneal at 1050˚C for 5 seconds.
Figure 6. Vertical structure of the fabricated diodes. Image courtesy of P. Solomon, IBM [15].
3.2 Doping Profiles of Vertical Diodes
After fabrication, the doping profile of the p-n junction for the various ion implants was carefully studied by Solomon et. al. [5] through multiple techniques. TSUPREM simulation of the
processing conditions yielded the results shown in Figure 7 below.
Figure 7. TSUPREM simulation of the vertical diode doping profile for different boron doses in units of cm-2.
3.3 Sample Preparation
The samples were bent along various directions so that different uniaxial stresses could be studied. Two bending directions of interest were the 100 and 110 families of directions. The 100 direction involved the simplest analysis as stress was applied to a primary crystallographic axis. Stress was also applied to the 110 directions as an additional measurement.
In order to apply stress along the desired directions, the wafer was cut into rectangular sample pieces such that the long side of the sample was directed along the desired strain direction. The wafer was split into samples by either cleaving the wafer or by using a dice saw. Cleaving has the advantage that the resulting cleavage plane is nearly atomically smooth with minimum damage for a nicely cleaved piece; however, only certain directions lie along the wafer’s cleavage planes, and cleaving must be done by hand with limited reproducibility. Wafer directions not lying along cleavage planes required the wafer to be sawed, creating mechanical damage along the path of the cut. Mechanical damage caused the stressed devices to break at a lower stress level.
In order to apply the maximum strain, wafers were cleaved along the desired bending directions if a cleavage plane existed. In the case that a cleavage plane did not exist for a specific direction, the sample was sawed along the direction followed by an isotropic silicon polishing etch to remove the saw damage.
3.3.1 Cleavage Planes
The crystallographic properties for each wafer orientation are listed in Table 1. Since wafer cleavage most likely occurs along 111 planes, the cleaving directions were calculated by the intersection of {111} planes with the wafer’s surface plane, given by the wafer orientation. To
find the cleaving direction for a (001) wafer, the intersection of the (001) plane with the {111} family of cleavage planes is calculated by taking the cross product of the two planes. For
example, the intersection of a (001) plane with a (111) plane is a line given by
0𝑥 + 0𝑦 + 1𝑧 × 1𝑥 + 1𝑦 + 1𝑧 = −1𝑥 + 1𝑦 + 0𝑧 (38) This calculation shows that the 1 10 direction is a cleaving direction for (001) wafers. Completing the above calculation for all planes in the {111} family shows that 110 is also a cleavage direction for (001) wafers.
Table 1. Wafer orientations and desired bending directions.
The desired bending directions are shown in Table 1 above. A 100 bending direction does not exist on the surface plane of a (111) wafer. Therefore, 100 bending cannot be applied to (111) wafers. The 100 bending directions for (001) and (011) wafers required sawing of the samples, while the samples bent along the 110 direction were cleaved.
3.4 Silicon Polishing Etch
The samples required sawing in order to achieve some of the bending directions. An isotropic silicon polishing etch was used to remove the mechanical damage created on the sides of the
samples from the sawing process. Following the work of [16], an isotropic silicon etch was developed from a combination of nitric acid (HNO3) and hydrofluoric acid (HF) to smooth out
any roughness and damage created by the sawing process. Nitric acid oxidizes silicon creating silicon dioxide (SiO2), and hydrofluoric acid subsequently dissolves the oxide. The intermediary
reactions created during the oxidation of silicon are quite complicated as discussed in [17]; however simplified reactions are listed below:
Oxidation: 3 𝑆𝑖(𝑠)+ 4 𝐻𝑁𝑂3(𝑎𝑞 ) → 3 𝑆𝑖𝑂2(𝑠)+ 4 𝑁𝑂(𝑔)+ 2 𝐻2𝑂(𝑙) (39)
Dissolution: 𝑆𝑖𝑂2(𝑠)+ 6 𝐻𝐹(𝑎𝑞 )→ 𝐻2𝑆𝑖𝐹6(𝑎𝑞 )+ 2 𝐻2𝑂(𝑙) (40)
Overall: 3 𝑆𝑖(𝑠)+ 4 𝐻𝑁𝑂3(𝑎𝑞 ) + 18 𝐻𝐹(𝑎𝑞 )→ 3 𝐻2𝑆𝑖𝐹6(𝑎𝑞 )+ 4 𝑁𝑂(𝑔)+ 8 𝐻2𝑂(𝑙) (41)
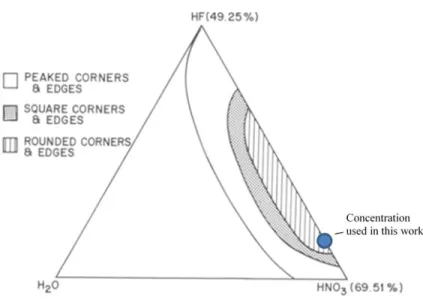
The characteristics of the silicon etch are dependent on the concentration of nitric acid to hydrofluoric acid as shown in Figure 8. An etch solution with nitric acid as the limiting reactant produces anisotropic etching as the oxidation rate is very dependent on electron concentration. Therefore, the oxidation rate varies along different crystallographic planes due to dissimilar electron densities of the crystal planes resulting in anisotropic etching. Conversely, when nitric acid is in excess, the reaction is limited by the diffusion rate of hydrofluoric acid to the surface of the sample. Since diffusion proceeds through an isotropic mechanism, this reaction results in isotropic etching. However, Schwartz and Robbins show that at very low concentrations of hydrofluoric acid, the etch pattern becomes anisotropic as the etch rate drops [16]. To explain this behavior, they hypothesize that the reaction is autocatalytic with one of the oxidation
reaction products acting as the catalyst. Recent research shows that intermediate nitrogen species play a large role in the reaction process, and more research is needed to clarify the etching of silicon in nitric acid and hydrofluoric solutions [17].
Figure 8. Geometries created from different ratios of hydrofluoric acid and nitric acid. The circle represents
the concentration of hydrofluoric acid and nitric acid used in this paper. Image from [16].
To remove the mechanical damage from the sawed wafer pieces, the author developed a polishing etchant of 17% concentrated hydrofluoric acid and 83% concentrated nitric acid. This etch produced a smooth specular surface and rounded the edges of the silicon sample as seen through an optical microscope. It was expected that such smooth, round edges would prevent any local points of high stress that lead to premature sample breakage. Indeed, the polishing etch improved the maximum amount of stress that could be applied to the samples before breaking by over 50% compared to unpolished sawed pieces. The benefits of the polishing etch are shown in Figure 9. The average compressive stress applied to the samples before breakage for the polished pieces was 0.38 GPa while the value for cleaved pieces was 0.31 GPa. The data indicates that all pieces, both cleaved and sawed, may benefit from a polishing etch before being strained.
Figure 9. Plot of the average applied compressive strain before breakage for sawed+polished samples and
cleaved samples. Error bars indicate standard deviation of the data.
3.5 Bending Apparatus
A flexure jig designed by the Scott Thompson group at the University of Florida was used to mechanically strain the samples. A drawing of the bending apparatus is shown in Figure 10 below.
Figure 10. Bending apparatus (not drawn to scale). The load cell shown in the drawing was not implemented. 0 0.05 0.1 0.15 0.2 0.25 0.3 0.35 0.4 0.45 0.5 Cleaved Samples
Sawed+Polished Samples
The 200mm wafers were cut into smaller sample pieces so that they could be loaded into the bending apparatus. A sample size of approximately 1.8 cm x 5.5 cm fit nicely into the apparatus and was easy to handle. The sample contacted four round stainless steel pins when loaded into the bending apparatus. Two pins were placed on the top of the sample, and two pins were placed at the bottom of the sample as seen in Figure 10. Stress was applied to the sample by rotating the nut at the bottom of the apparatus. This raises the stage on which the sample sits causing the sample to bend.
In the configuration pictured, the sample curvature exerts a tensile force on the top
surface of the sample piece as the stage is raised. In the opposite configuration, where the pins on the top of the sample are located closer together than the pins on the bottom, a compressive force is exerted. It should be noted that Figure 10 is not drawn to scale. In the actual bending
apparatus, the opening above the sample is much smaller, and the stage on which the sample rests is much bigger. From the picture, it looks as though the top pins cannot be moved closer together than the bottom pins. This is not the case in the real apparatus as both compressive and tensile strain can be applied to the samples.
3.5.1 Calibration of the Bending Apparatus
The bending apparatus was calibrated using commercial strain gauges purchased from Omega Engineering, Inc. The model number of the strain gauges was SGT-3F/350-TY11. The strain gauges function on the property that
Δ𝑅𝑔𝑎𝑢𝑔𝑒
𝑅𝑔𝑎𝑢𝑔𝑒 = 𝐺𝐹
Δ𝐿
𝐿 ≡ 𝐺𝐹 ∙ 𝜖 (42)
where 𝐺𝐹 is the gauge factor of the strain gauge which is dependent on the material properties of the gauge, 𝑅𝑔𝑎𝑢𝑔𝑒 is the resistance of the strain gauge, 𝐿 is the length of the gauge, and 𝜖 is the
strain along the length of the strain gauge. The gauge factor for the strain gauges used in this experiment was approximately 2.
Figure 11. Drawing of a strain gauge used for calibration. Image from [19].
The strain gauges were affixed to the surface of several test pieces using 910 Permabond (ethyl-2-cyanoacrylate adhesive commonly known as super glue) using the procedure listed in Appendix A: Procedure for Bonding Strain Gauge to Samples. Stress was applied to the test pieces using the bending apparatus by manually turning a nut located on the bottom of the flexure jig. The underside of the apparatus has a circle that is divided into 24 markings of 15 degrees of rotation each. The alignment marks on the nut allowed determination of the amount of rotation of the nut. At low stresses, the nut was carefully turned by hand while at higher stress, a wrench was used to rotate the nut.
3.5.2 Electrical Measurements of Strain Gauge
To determine the amount of strain applied by rotating the nut, the change in resistance of the strain gauge was measured. An accuracy of 0.01% strain was desired for the strain measurement, which required measuring 10 µV changes in signal. To facilitate the required accuracy, a
Wheatstone bridge was used to measure the change in resistance of the strain gauge as stress was applied. Figure 12 shows a circuit diagram of the Omega model BCM-1 Wheatstone bridge used in the electrical measurements where 𝑅𝑥 is the resistance of strain gauge.
Figure 12. Circuit diagram of the Wheatstone bridge used to measure the change in resistance of the strain
gauge. Image from [20].
In the circuit above, 𝑉𝑜𝑢𝑡 is given by
𝑉𝑜𝑢𝑡 = 𝑅3 𝑅3+ 𝑅𝑥 −
𝑅2
𝑅2+ 𝑅1 𝑉𝑖𝑛 (43)
In the Wheatstone bridge model used in the experiment, all the resistors were nominally 350Ω, and 𝑅3 was adjustable so that 𝑅3 = 𝑅𝑥 and 𝑉𝑜𝑢𝑡 = 0 at zero applied stress. By rearranging the above equation and making the approximation that Δ𝑅𝑥 2
2𝑅𝑥+Δ𝑅𝑥 ≈
Δ𝑅𝑥
4𝑅𝑥 for small changes in strain gauge resistance, we find that
Δ𝑅𝑥 𝑅𝑥 ≈ −4
𝑉𝑜𝑢𝑡
𝑉𝑖𝑛 (44)
Plugging this equation into Equation (42), the relation between measured voltage and strain is given by
𝜖 = −2𝑉𝑜𝑢𝑡
𝑉𝑖𝑛 (45)
Measurements were made on several wafer pieces with thicknesses between 720-740µm to correctly determine the amount of strain applied per rotation of the nut of the bending
apparatus, and the results are shown in Appendix B: Calibration Measurements of the Bending
Apparatus. On average, approximately 0.26% strain is applied to the sample per full rotation of
Chapter 4: The Stress/Strain Relation
The tensor form of Hooke’s law that relates stress and strain is given by
𝜎 = 𝒄𝜖 (46) where 𝑠𝑡𝑟𝑒𝑠𝑠 = 𝜎 ≡ 𝜎11 𝜎12 𝜎13 𝜎22 𝜎23 𝑠𝑦𝑚. 𝜎33 ≡ 𝜎𝑥𝑥 𝜎𝑥𝑦 𝜎𝑥𝑧 𝜎𝑦𝑦 𝜎𝑦𝑧 𝑠𝑦𝑚. 𝜎𝑧𝑧 , (47) 𝑠𝑡𝑟𝑎𝑖𝑛 = 𝜖 ≡ 𝜖11 𝜖12 𝜖13 𝜖22 𝜖23 𝑠𝑦𝑚. 𝜖33 ≡ 𝜖𝑥𝑥 𝜖𝑥𝑦 𝜖𝑥𝑧 𝜖𝑦𝑦 𝜖𝑦𝑧 𝑠𝑦𝑚. 𝜖𝑧𝑧 , (48)
and 𝒄 is the fourth-rank elastic stiffness matrix of size 3x3x3x3 relating stress and strain. The stress and strain are given by a 3x3 matrices where the notation 1, 2, and 3 represent the x, y, and
z coordinate axes aligned with the 100 , 010 , and 001 crystal axes respectively. The off-diagonal elements of the stress and strain matrices represent shear stresses (i.e. stress applied parallel to the surface of a material) and shear strains. Additionally, the diagonal components of the matrices represent normal stress or strain applied perpendicular to a surface. The matrices only have 6 unique values since they are symmetric (𝜎𝑖𝑗 = 𝜎𝑗𝑖 and 𝜖𝑖𝑗 = 𝜖𝑗𝑖). Due to this, stress
and strain are often rewritten in Voigt notation as a six element column vector, and Equation (46) is rewritten in matrix form as
(matrix form) 𝜎1 𝜎2 𝜎3 𝜎4 𝜎5 𝜎6 = 𝑐11 𝑐12 𝑐13 𝑐14 𝑐15 𝑐16 𝑐22 𝑐23 𝑐24 𝑐25 𝑐26 𝑐33 𝑐34 𝑐35 𝑐36 𝑐44 𝑐45 𝑐46 𝑠𝑦𝑚. 𝑐55 𝑐56 𝑐66 ∙ 𝜖1 𝜖2 𝜖3 𝛾4 𝛾5 𝛾6 (49)
where the mapping from tensor form to matrix form is shown below 𝜎11 𝜎12 𝜎13 𝜎22 𝜎23 𝑠𝑦𝑚. 𝜎33 ↔ 𝜎1 𝜎6 𝜎5 𝜎2 𝜎4 𝑠𝑦𝑚. 𝜎3
(tensor form) (matrix form)
(50) 𝜖11 𝜖12 𝜖13 𝜖22 𝜖23 𝑠𝑦𝑚. 𝜖33 ↔ 𝜖1 12𝛾6 12𝛾5 𝜖2 12𝛾4 𝑠𝑦𝑚. 𝜖3 (51) and 𝛾4 = 𝜖23 + 𝜖32 = 2𝜖23 𝛾5 = 𝜖13+ 𝜖31 = 2𝜖13 𝛾6 = 𝜖12+ 𝜖21 = 2𝜖12 (52)
In the convention used, the normal stresses are 𝜎1, 𝜎2, and 𝜎3, and shear stresses are 𝜎4, 𝜎5, and 𝜎6. Strains are defined by the same convention except for factors of two that appear in
the conversion from tensor form to matrix form for the off-diagonal elements. 𝛾 is the
engineering shear strain and is defined in Equation (52). Some references [21] use the average shear strain (where 𝜖4 ≡ 12𝜖23 +
1
2𝜖32) instead of engineering shear strain, so care must be taken to avoid errors when using equations from different references. A positive value indicates a tensile stress or strain, while a negative value indicates a compressive stress or strain.
The elastic stiffness matrix in the above equations is a symmetric matrix, and it can be further reduced to three independent coefficients due to the cubic symmetry of the silicon lattice [22]. Therefore, the elastic stiffness matrix for materials with a cubic lattice can be simplified to
𝜎1 𝜎2 𝜎3 𝜎4 𝜎5 𝜎6 = 𝑐11 𝑐12 𝑐12 0 0 0 𝑐12 𝑐11 𝑐12 0 0 0 𝑐12 𝑐12 𝑐11 0 0 0 0 0 0 𝑐44 0 0 0 0 0 0 𝑐44 0 0 0 0 0 0 𝑐44 ∙ 𝜖1 𝜖2 𝜖3 𝛾4 𝛾5 𝛾6 (53)
which can be rewritten as
𝜖1 𝜖2 𝜖3 𝛾4 𝛾5 𝛾6 = 𝑐11 𝑐12 𝑐12 0 0 0 𝑐12 𝑐11 𝑐12 0 0 0 𝑐12 𝑐12 𝑐11 0 0 0 0 0 0 𝑐44 0 0 0 0 0 0 𝑐44 0 0 0 0 0 0 𝑐44 −1 ∙ 𝜎1 𝜎2 𝜎3 𝜎4 𝜎5 𝜎6 = 𝑠11 𝑠12 𝑠12 0 0 0 𝑠12 𝑠11 𝑠12 0 0 0 𝑠12 𝑠12 𝑠11 0 0 0 0 0 0 𝑠44 0 0 0 0 0 0 𝑠44 0 0 0 0 0 0 𝑠44 ∙ 𝜎1 𝜎2 𝜎3 𝜎4 𝜎5 𝜎6 (54)
where the s is called the elastic compliance matrix.
4.1 Coordinate Transformation for the Stress/Strain Relation
In the experiment stress is applied along the 100 or 110 direction with all other stresses equal to zero. An example of strain calculated for a stress applied in the 100 direction is given in Appendix C: Strain Calculation for Stress Applied Along the [100] Crystal Axis. However, the analysis for the case of 110 directed stress is more complicated and requires matrix
transformations. Keep in mind that 𝜎𝑥𝑦 is not stress applied perpendicular to the xy-plane; rather, it is shear strain applied parallel to the x-surface in the y-direction. The x, y, and z coordinates are shown along the crystal coordinate axes in Figure 13. The primed axes represent a change of coordinates used in the analysis of 110 directed stress.
Figure 13. Change of coordinates used in the analysis of <110> stress shown with respect to crystal directions.
The transformation for any second-rank tensor to new coordinate axes is given by
𝑇′ = 𝑎𝑇𝑎𝑇 (55) where 𝑎 = 𝑎11 𝑎12 𝑎13 𝑎21 𝑎22 𝑎23 𝑎31 𝑎32 𝑎33 (56)
and 𝑎𝑖𝑗 is the direction cosine (or normalized dot product) between 𝑥𝑖′ and 𝑥𝑗:
𝑎𝑖𝑗 = 𝑥𝑖
′ ⋅ 𝑥 𝑗
𝑥𝑖′ 𝑥𝑗
(57)
For example, 𝑎23 is the cosine of the angle between the 𝑦′-coordinate axis and 𝑧-coordinate axis
The transformation matrix in vector form becomes quite cumbersome due to the notation of stress and strain as 6x1 column vectors. With some algebra, the transformation matrix for a symmetric second-rank tensor, such as stress, represented in vector notation is found to be
𝜎1′ 𝜎2′ 𝜎3′ 𝜎4′ 𝜎5′ 𝜎6′ = 𝑎112 𝑎 122 𝑎132 2𝑎12𝑎13 2𝑎11𝑎13 2𝑎11𝑎12 𝑎212 𝑎 222 𝑎232 2𝑎22𝑎23 2𝑎21𝑎23 2𝑎21𝑎22 𝑎312 𝑎 322 𝑎332 2𝑎32𝑎33 2𝑎31𝑎33 2𝑎31𝑎32 𝑎21𝑎31 𝑎22𝑎32 𝑎23𝑎33 𝑎22𝑎33 + 𝑎23𝑎32 𝑎21𝑎33+ 𝑎23𝑎31 𝑎21𝑎32+ 𝑎22𝑎31 𝑎11𝑎31 𝑎12𝑎32 𝑎13𝑎33 𝑎12𝑎33 + 𝑎13𝑎32 𝑎11𝑎33+ 𝑎13𝑎31 𝑎11𝑎32+ 𝑎12𝑎31 𝑎11𝑎21 𝑎12𝑎22 𝑎13𝑎23 𝑎12𝑎23 + 𝑎13𝑎22 𝑎11𝑎23+ 𝑎13𝑎21 𝑎11𝑎22+ 𝑎12𝑎21 ∙ 𝜎1 𝜎2 𝜎3 𝜎4 𝜎5 𝜎6 (58)
Furthermore, Equation (58) can be written compactly as 𝜎′= 𝜶𝜎
⇒ 𝜎 = 𝜶−1𝜎′ (59)
However, the transformation matrix for the strain vector defined in Equation (51) differs from the transformation matrix used for stress due to the factors of two that exist in the fourth through sixth elements of the strain column vector. To properly account for this, the
transformation of strain is given by
𝜖1′ 𝜖2′ 𝜖3′ 𝛾4′ 𝛾5′ 𝛾6′ = 𝑎112 𝑎122 𝑎132 𝑎12𝑎13 𝑎11𝑎13 𝑎11𝑎12 𝑎212 𝑎222 𝑎232 𝑎22𝑎23 𝑎21𝑎23 𝑎21𝑎22 𝑎312 𝑎322 𝑎332 𝑎32𝑎33 𝑎31𝑎33 𝑎31𝑎32 2𝑎21𝑎31 2𝑎22𝑎32 2𝑎23𝑎33 𝑎22𝑎33+ 𝑎23𝑎32 𝑎21𝑎33+ 𝑎23𝑎31 𝑎21𝑎32 + 𝑎22𝑎31 2𝑎11𝑎31 2𝑎12𝑎32 2𝑎13𝑎33 𝑎12𝑎33+ 𝑎13𝑎32 𝑎11𝑎33+ 𝑎13𝑎31 𝑎11𝑎32 + 𝑎12𝑎31 2𝑎11𝑎21 2𝑎12𝑎22 2𝑎13𝑎23 𝑎12𝑎23+ 𝑎13𝑎22 𝑎11𝑎23+ 𝑎13𝑎21 𝑎11𝑎22 + 𝑎12𝑎21 ∙ 𝜖1 𝜖2 𝜖3 𝛾4 𝛾5 𝛾6 (60)
which is written succinctly as
𝜖′= 𝜷𝜖
The strain transformation matrix, 𝜷, is similar to the stress transformation matrix, 𝜶, except that the bottom-left quadrant of 𝜷 is twice the bottom-left quadrant of 𝜶 and the top-right quadrant of 𝜷 is half the top-right quadrant of 𝜶. The algebraic expression relating the 𝜷 matrix to the 𝜶 matrix is found to be
𝜷 = 𝜶𝑇 −1 (62)
such that Equation (61) becomes
𝜖′= 𝜶𝑇 −1𝜖
⇒ 𝜖 = 𝜶𝑇𝜖′ (63)
While this equation looks somewhat complicated, the action of taking the transpose and then the inverse of 𝜶 results in arithmetic operations described in the paragraph above. This operation properly accounts for the factors of two introduced in Equation (51).
Applying the coordinate transformation to Equation (54) yields
𝜎′ = 𝜶𝜎 = 𝜶𝒄𝜖 = 𝜶𝒄𝜶𝑇𝜖′ = 𝒄′𝜖′ (64)
𝒄′ = 𝜶𝒄𝜶𝑇 (65)
𝒔′ = 𝒄′ −1 = 𝜶𝒄𝜶𝑇 −1 = 𝜶𝑇 −1𝒄−1𝜶−1 = 𝜶𝑇 −1𝒔𝜶−1 (66)
⇒ 𝜖′ = 𝒔′𝜎′ (67)
To complete the analysis for 110 directed stress, 𝑥′ is taken to be along the 110
direction, and 𝑦′ is taken to be along the 1 10 direction of the crystal as depicted in Figure 13.
Stress is applied along 𝑥′ with all other stresses equal to zero. For this change of coordinates, the
𝜶100→110 = 0.5 0.5 0 0 0 1 0.5 0.5 0 0 0 −1 0 0 1 0 0 0 0 0 0 0.5 2 −0.5 2 0 0 0 0 0.5 2 0.5 2 0 −0.5 0.5 0 0 0 0 (68)
Using Equations (65), (66), and (68), the elastic stiffness matrix and the elastic
compliance matrix for the new coordinate frame of reference can be calculated. The values of these matrices for silicon are displayed in Table 2 below.
𝟏𝟎𝟎 oriented coordinate system 𝒙 = [𝟏𝟎𝟎] 𝒚 = [𝟎𝟏𝟎] 𝒛 = [𝟎𝟎𝟏] 𝒄 = 165.7 63.9 63.9 0 0 0 63.9 165.7 63.9 0 0 0 63.9 63.9 165.7 0 0 0 0 0 0 79.6 0 0 0 0 0 0 79.6 0 0 0 0 0 0 79.6 , in GPa 𝒔 = 7.68 −2.14 −2.14 0 0 0 −2.14 7.68 −2.14 0 0 0 −2.14 −2.14 7.68 0 0 0 0 0 0 12.6 0 0 0 0 0 0 12.6 0 0 0 0 0 0 12.6 , in 10 −12 Pa 𝟏𝟏𝟎 oriented coordinate system 𝒙′ = [𝟏𝟏𝟎] 𝒚′ = [𝟏 𝟏𝟎] 𝒛′ = [𝟎𝟎𝟏] 𝒄′ = 194.4 35.2 63.9 0 0 0 35.2 194.4 63.9 0 0 0 63.9 63.9 165.7 0 0 0 0 0 0 79.6 0 0 0 0 0 0 79.6 0 0 0 0 0 0 50.9 , in GPa 𝒔′ = 5.91 −0.368 −2.14 0 0 0 −0.368 5.91 −2.14 0 0 0 −2.14 −2.14 7.68 0 0 0 0 0 0 12.6 0 0 0 0 0 0 12.6 0 0 0 0 0 0 19.6 , in 10 −12 Pa
Table 2. Elastic compliance matrices for the two coordinate systems pictured in Figure 13. Values for <100>
oriented coordinate system are from [23]. Values for <110> oriented coordinate system are calculated using
Using these matrices, the calculation of strain for a given stress along the 110 direction is straightforward. An example of a coordinate transformation completed for 110 stress is illustrated in Appendix D: Coordinate Transformation Calculated for Stress Along the [110]
Chapter 5: Electrical Measurements and Results
After the samples were prepared, current-voltage (IV) measurements were performed on the vertical diodes. Diodes with low excess current and a nearly ideal current-to-voltage slope in forward bias, indicating good junction quality and low trap density, were found, and the IV characteristic for the diode was then measured in both forward and reverse bias under strain at every quarter rotation of the nut of the bending apparatus. Previous calibration has shown that a quarter turn is approximately equal to 0.065% strain applied to the sample in the bending direction. The bending apparatus applies the same amount of strain per rotation of the nut for equal thickness sample pieces of any wafer orientation or bending direction within the limits of the approximations made in the linear theory of elasticity; however, the stress applied to the sample per rotation of the nut differs for different bending directions because of the anisotropic stiffness matrix for silicon.
For 100 bending, one full rotation of the nut of the bending apparatus creates 0.26% strain, and this translates to roughly 340 MPa of uniaxial stress in the bending direction. For 110 bending, one full rotation also creates 0.26% strain that is approximately equal to 440 MPa of uniaxial stress applied in the bending direction. Less stress is required to bend the wafer along the 100 crystallographic direction compared to the 110 crystallographic direction due to the atomic structure and bond orientation of the crystal; therefore, the effective Young’s
modulus relating stress and strain varies along different directions since the material is not
5.1 Current-Voltage Data
Figure 14 below shows the measured current-voltage (IV) plot for a 001 wafer with strain applied in the 110 direction. The specific sample that is plotted received a boron implant of 1.2x1014 cm-2 at 20keV. The plot exhibits backward-diode characteristics that are typical for the diodes measured in this thesis. When a sufficiently large forward bias (a negative voltage applied to the n-region) is applied, a nearly ideal current-voltage slope is seen; for the diode in Figure 14, the slope is 63 mV/decade of current. At smaller forward biases, the diode enters the trap limited regime where current is believed to be dominated by trap-assisted mechanisms. In reverse bias, the bands are aligned to favorably allow band-to-band tunneling.
Figure 14. Experimental IV plots for tunneling in the [001] direction for -0.13% to 0.39% strain in the [110]
The inset of Figure 14 is a zoomed in view of the IV curve showing the effect of strain on the measured tunneling currents. For the case pictured, increasing compressive strain resulted in an increase in the magnitude of current while a tensile strain resulted in a decrease. However, the relative change in magnitude of the current is quite small compared with other material
parameters that are affected by strain, such as mobility. The relative change in current for reverse bias at different strains is plotted in Figure 15 below.
Figure 15. Relative change in current compared to the unstrained case for the experimental IV curve plotted
in Figure 14. Tunneling is in the [001] direction. Uniaxial strain of -0.13% to 0.39% was applied along the
[110] direction.
As seen in Figure 15, compressive strain resulted in an increase in diode current while tensile strain resulted in a decrease in current for a 001 wafer with strain applied along the
110 direction. Similar results were also seen for 001 wafers with strain applied along the 100 direction, and 011 wafers with strain applied along the 100 direction. In all three of these wafer/strain configurations, tensile stress decreased the magnitude of current while compressive stress increased the current. However, in the case of 1 10 wafers with strain applied along the 110 direction, the opposite dependence between strain and change in current was observed, and the data is plotted in Figure 16 below.
Figure 16. Comparison of the experimental relative change in current versus strain for different wafer/strain
configurations and boron doses. The relative change in current is evaluated at a reverse bias of 1 V.
In Figure 17, the change in forward-bias voltage at a constant current around the point of steepest slope is plotted as a function of strain for different wafer/strain configurations. The measured change in voltage is much smaller than the calculated band gap changes with strain. The measurements have a large amount of uncertainty indicated by the error bars. The forward-bias experimental data is presented; however, this thesis does not provide explanation for the observed dependencies.
Figure 17. Change in forward-bias voltage at a constant current near the point of steepest slope for different
wafer/strain configurations. Changes in voltage are much less than the change in band gap at a given strain.
Data points have a considerable uncertainty of ±0.5 mV indicated by error bars.
The theoretical analysis used to explain the different dependencies of reverse bias tunneling current on stress is described in Chapter 6: Theoretical Current Calculation.
Chapter 6:
Theoretical Current Calculation
The theoretical simulations were performed at MIT in collaboration with Dr. Paul Solomon of IBM. The theoretical calculations for tunneling current consisted of two main parts: the calculation of the change in the band structure due to the applied strain and the calculation of current with the changed band properties.
6.1 Band Structure Strain Analysis
To calculate band structure changes with strain, the Band Structure Lab program created by Dr. Mathieu Luisier and others at Purdue’s Network for Computational Nanotechnology[10] was used. The Band Structure Lab uses the sp3s*d5 tight-binding method in the calculation of the band structure of silicon. The sp3s*d5 model uses a 40-band calculation: 10 basis states per atom ∙ 2 spins per state ∙ 2 atoms per lattice site = 40 bands. Shown in Figure 18 are the calculations for the changes in band structure with uniaxial stress applied along the 100 and 110
directions. While the code calculates the full band structure, only the bands of interest are plotted in the figure.
In addition to the Band Structure Lab, the nextnano3 simulation tool [24] was used to calculate the change in the valence bands with applied strain using a 6x6 𝑘 ⋅ 𝑝 method, and the Sentaurus Band Structure by Synopsys was used to calculate the conduction bands using an empirical pseudo-potential method [25]. Using multiple programs allowed comparison of simulation results for different methods of band structure calculation. Also, nextnano3 has the ability to calculate the bulk-3D dispersion for strained cases, which was used to calculate the density-of-states effective mass for the valence band that was dependent on energy due to the
non-parabolicity of the silicon valence bands. A comparison of the band edge calculations using the different programs is shown in Appendix E: Comparison of Strained Band Structure .
Figure 18. Calculated band structures for bulk silicon using the Band Structure Lab [10]. (a) Uniaxial stress is
applied along the <100> direction. The energy bands for the y and z conduction band lobes are identical. (b)
Uniaxial stress is applied along the <110> direction. The energy bands for the x and y conduction band lobes
are identical.
The changes in band structure were extracted using the Band Structure Lab and then used as inputs for calculating the band-to-band tunneling current as described in the next section. It

![Figure 4. Full band structure of unstrained silicon calculated using [10]. The inset shows the first Brillouin zone for an FCC lattice with points of high symmetry indicated](https://thumb-eu.123doks.com/thumbv2/123doknet/14142576.470649/23.918.116.838.111.538/figure-structure-unstrained-silicon-calculated-brillouin-symmetry-indicated.webp)

![Figure 6. Vertical structure of the fabricated diodes. Image courtesy of P. Solomon, IBM [15]](https://thumb-eu.123doks.com/thumbv2/123doknet/14142576.470649/31.918.297.631.104.386/figure-vertical-structure-fabricated-diodes-image-courtesy-solomon.webp)


![Figure 11. Drawing of a strain gauge used for calibration. Image from [19].](https://thumb-eu.123doks.com/thumbv2/123doknet/14142576.470649/38.918.351.574.204.464/figure-drawing-strain-gauge-used-calibration-image.webp)
