1
Creating and Editing "Digital Blackboard" Videos using Pentimento: With a Focus on Syncing Audio and Visual Components
by Alexandra Hsu
S.B., C.S. M.I.T., 2013, M.Eng., C.S. M.I.T, 2015 Submitted to the Department of Electrical Engineering
and Computer Science
in Partial Fulfillment of the Requirements for the Degree of Master of Engineering in Electrical Engineering and Computer Science
at the Massachusetts Institute of Technology June, 2015
Copyright 2015 Alexandra Hsu. All rights reserved. The author hereby grants to M.I.T. permission to reproduce and
to distribute publicly paper and electronic copies of this thesis document in whole and in part in any medium now known or hereafter created.
Author:
Department of Electrical Engineering and Computer Science May 22, 2015
Certified by:
Fredo Durand Thesis Supervisor May 22, 2015
Accepted by:
3
Creating and Editing "Digital Blackboard" Videos using Pentimento: With a Focus on Syncing Audio and Visual Components
by Alexandra Hsu
Submitted to the Department of Electrical Engineering and Computer Science May 22, 2015
In Partial Fulfillment of the Requirements for the Degree of Master of Engineering in Electrical Engineering and Computer Science
Abstract
Online education is a rapidly growing field and with the desire to create more online educational content comes the necessity to be able to easily generate and maintain that content. This project aims to allow for recording, editing, and maintaining “digital blackboard” style lectures, in which a handwritten lecture with voiceover narration is created. Current recording software requires that a lecture audio and visuals be recorded correctly in one take or they must be re-recorded. By utilizing vector graphics, a separation of audio and visual components, and a way for the user to be in control of the synchronization of audio and visuals, Pentimento is a unique piece of software that is specifically designed to record and edit online handwritten lectures.
5
Acknowledgements
I would like to thank the many people who helped me reach the completion of this thesis. First and foremost, I would like to thank my family for many years of support. Especially my mom, Stephanie Maze-Hsu, for reading countless papers and constantly helping me get through everything. I would also like to thank my brother Robert Hsu for always being there for a laugh. Additionally, I would like to thank my friends without whom I couldn’t have gotten to this point. Most importantly I would like to acknowledge Zach Hynes for his unending encouragement and support. Kevin Hsiue and Eric Kline both helped me immensely giving feedback and motivation as I wrote my thesis.
Professor Fredo Durand was a wonderful guiding force and mentor and was extremely
understanding about non-academic issues I faced during my undergraduate and graduate careers. Without his vision and his guidance this project wouldn’t be realized.
Jonathan Wang worked on this project with me and co-authored portions of this thesis. Without him I don’t think the Pentimento prototype would work.
Finally, I would like to thank all of the medical professionals who have helped patch me together enough to hand in this thesis.
There were times I thought I would never complete this document and the fact that I have is a testament to my amazing support system. Thanks to all of those people mentioned here and countless others, without whom I wouldn’t have been able to complete my thesis.
6 Table of Contents 1. Introduction ... 9 2. Background Information ... 10 2.1 Visual Edits ... 10 2.2 Audio Edits ... 11
3. Related Work and Current Solutions ... 12
4. Project Goals ... 14
4.1 Features ... 15
4.1.1 Implemented Recording Features ... 15
4.1.2 Implemented Editing Features ... 17
5. User Guide and Tutorial ... 18
5.1 The Main Recording UI ... 19
5.1.1 Recording Visuals ... 20
5.1.2 Editing Visuals ... 22
5.1.3 Recording Audio ... 23
5.1.4 Editing Audio ... 23
5.2 The Retimer ... 23
6. Code Organization Overview ... 26
6.1 Lecture ... 28 6.1.1 Lecture Model ... 28 6.1.2 Lecture Controller ... 29 6.2 Time Controller ... 30 6.3 Visuals ... 32 6.3.1 Visuals Model ... 32 6.3.2 Visuals Controller ... 33 6.3.3 Tools Controller ... 34 6.3.3.1 Visuals Selection ... 34 6.4 Audio ... 34 6.4.1 Audio Model ... 35
7
6.4.2 Audio Controller ... 35
6.4.3 Audio Playback ... 36
6.4.4 Audio Timeline ... 37
6.4.5 Audio Track Controller ... 37
6.4.6 Audio Segment Controller ... 37
6.4.7 Audio Plug-in ... 38 6.5 Retimer ... 38 6.5.1 Retimer Model ... 39 6.5.2 Retimer Controller ... 40 6.6 Thumbnails Controller ... 41 6.7 Undo Manager ... 41 6.8 Renderer ... 42
6.9 Save and Load Files ... 42
7. Future Work ... 43
7.1 Future Features ... 44
7.1.1 Recording ... 44
7.1.2 Editing ... 46
7.2 User Interface Additions ... 47
7.2.1 Main Visuals Recording and Editing UI ... 47
7.2.1 Audio and Retimer Timeline UI ... 48
7.3 Student Player ... 49
8. Conclusions ... 49
Appendix A: Documentation ... 51
A.1 Lecture ... 51
A.1.1 Lecture Model ... 51
A.1.2 Lecture Controller ... 52
A.2 Time Controller ... 54
A.3 Visuals ... 55
A.3.1 Visuals Model ... 55
8
A.4 Tools Controller ... 59
A.5 Audio ... 62
A.5.1 Audio Model ... 62
A.5.2 Audio Controller ... 65
A.5.3 Track Controller ... 68
A.5.4 Segment Controller ... 70
A.6 Retimer ... 71
A.6.1 Retimer Model ... 71
A.6.2 Retimer Controller ... 73
A.7 Thumbnails Controller ... 75
Appendix B: Example of Saved Lecture JSON Structure ... 76
9
1.
Introduction
With the growing popularity of online education through programs such as Khan Academy and MIT’s EdX, there is an increased need for an easier way to create educational video lectures. This project strives to simplify the process of creating these online videos and to make editing these videos much easier. In current solutions, an entire incorrect segment must be re-recorded to edit the lecture. There are many advantages to separately editing audio and written visual components of an online lecture, such as content being updated as years pass and not becoming obsolete. It will also be less frustrating and time consuming for educators to record presentations that do not have to be done correctly in one take.
The project focuses on the popular style exemplified by Khan Academy where an educator writes notes on a virtual blackboard as he or she gives a lecture or explains a topic. With these “blackboard lectures” students see the handwritten notes and drawings produced by the lecturer, while hearing a voiceover narration explaining the written content. Currently, creating these videos is done by recording the written notes using extremely basic tools. These tools essentially use a tablet and pen as input and screen capture to record the strokes in a simple paint program. Although this method is an improvement from merely taking a live video recording of the lecturer and the blackboard they are writing on, it still requires the educator to get everything correct in a single pass because there is no editing capability beyond cuts.
The technology created by the Pentimento project makes it easy to edit and update the content of each lecture. Pentimento was started by MIT Professor Fredo Durand for the purpose of
addressing the specific needs that arise when editing handwritten lecture content. The software is currently under development by Professor Durand and my thesis work involved taking the
10
Pentimento prototype (which can only be run on Mac OS) and converting it into a web based tool that can be used to record, edit, and view online lectures.
2.
Background Information
There are some key differences between editing a handwritten lecture, such as the ones that can be seen on Khan Academy or EdX, and editing a standard video or movie. Typical movies can be edited with cuts and if there are errors it often makes sense to re-record the entire scene or video. However, handwritten lectures introduce different types of errors and corrections that could ideally be fixed without having to remake a segment or worse, the entire lecture. For example, handwritten lecture style videos also often benefit from recording and editing the audio portions separately from the visuals. This minimizes cognitive load on the speaker while
recording [4] as well as providing the ability to independently correct mistakes that occur only in the audio recording or only in the visuals. In addition to allowing for temporal editing, such as moving visuals to a different time in the lecture, the new editing capabilities introduced by Pentimento facilitate correction of the following types of errors:
2.1 Visual Edits
• Correct existing lines: While writing a lecturer will often make a writing mistake that they would like to correct later, such as accidentally writing “x=…” instead of “y=…” In these cases, the software allows for modification of the strokes to change the “x” into a “y” without altering the timing of the writing or the synchronization with the audio. • Insert missing lines: As the lecture is recorded, the lecturer may omit something that they
11
“ x’ ”). While editing, this stroke can be added at the appropriate time in the lecture without altering the timing of the following strokes or synchronization with the audio. This can also be extended to include entirely new content, such as adding a clarifying step in a derivation.
• Move/resize drawings and text: Sometimes when viewing the video, the lecturer discovers that it would make more sense to arrange the text/visuals differently or that a certain visual should be made bigger or smaller. While editing they will have the ability to rearrange and resize these visual components without altering the timing of the strokes or synchronization with the audio.
2.2 Audio Edits
• Re-record and sync: This feature gives the lecturer the ability to only record the audio portion for a section of the lecture and have it remain synced with the visuals for that portion. This could be the first pass recording (e.g. recording audio after visuals have already been drawn) or an edited audio recording to correct a spoken error during the first pass of the lecture.
• Eliminate Silence: Often it takes longer to write something than to say it, which can lead to long silences in the lecture. Pentimento allows the visuals to be sped up to fill only the time that corresponds to speech and to eliminate these silences.
These differences require alternate tools and editing that currently available standard video editing software cannot provide. Pentimento strives to allow for these different types of video alterations and hopes to make it extremely easy for lecturers or others to edit the videos quickly and efficiently.
12
For visual edits, this will be accomplished by tracking the user’s drawing and writing inputs and representing the strokes as vectors, which can be modified later. By using a vector
representation, the position, size and speed at which the text and drawings are presented can be altered and updated after the recording has taken place. The ability to move and edit drawings and text allows the presenter to fix or change the focus of a section of the video without re-recording the whole thing. Pentimento uses the vectors to represent the lecture in a vector graphics format, which can be edited much more simply than the current representations in the form of raster graphics. Raster graphics are images that are displayed as an array of pixels (i.e. a computer screen or television) [6]. Vector representations offer various advantages over raster graphics representations, such as compatibility with differing resolutions and ease of
modification based on construction of vectors [10], and ease of modification based on construction of the vectors. The vectors can be formed either by storing two points and the connecting line segment, or storing a single point with an associated magnitude and direction [2]. Both of these constructions allow changes to be made fairly efficiently, since the image does not have to be redrawn. Instead, a parameter in the construction simply has to be modified to fix the problem.
3.
Related Work and Current Solutions
The current process for editing videos of this type is not quite so simple. Even the preeminent video editing tools (such as Apple’s Final Cut Pro, Adobe’s Premiere or Avid [4]) only allow traditional raster graphics to be edited and moved, but don’t facilitate the modification of handwritten videos stored as vectors. Some promising video editing work has been done to allow removal of segments of a video (selected from the video transcript) and then to seamlessly
13
transition between the portions of the video before and after the deletion [3]. However, these sorts of editing capabilities only address some of the difficulties with editing handwritten lectures. While these tools would be useful for changes such as removing long silences that occur while writing or helping to correct the speaker’s mistakes, they are unable to address and correct errors in the writing or help make significant changes to the content of the lecture.
Editing these videos isn’t the only challenge with current technologies; even creating
handwritten content for teaching purposes is somewhat difficult with currently available tools. There are very few ways to record, edit, and view freehand drawings [4]. Although there is some ability to animate the vector graphics with formats like SVG [9] the ability to easily maintain audio synchronization is not supported. More commonly, to give the appearance of real-time handwriting in web browsers Flash animation can be used [8]. However, this can be complex and it often requires using animated masks or other techniques [1], which can be difficult and requires a lot more effort and processing than simply recording a video of the handwritten content as it occurs. There is immense desire to create the appearance of handwritten lectures, and software has even been created to automatically create animations that give the appearance of handwriting [5]. However, none of these solutions allow for real time recording and post process editing of the actual writing in the ways that are necessary to record an effective video lecture.
The Khan Academy style videos are recorded using technology available for capturing live handwritten lectures. These are usually recorded using a screencast method, which involves digitally capturing a certain portion of a virtual whiteboard screen during a live lecture (i.e. capturing the screen as the lecture is written). These methods can produce videos similar to the
14
style we hope to achieve, but they often require extensive preparation to plan out exactly what will be said and when to say it to avoid having to re-record large portions of the lecture [7]. As mentioned above, a key feature of our software is the capability to easily edit or update lectures after they have been recorded, which is not a possibility with the screencast methods (especially separately editing the visual and audio components and keeping them synced in time).
4.
Project Goals
There is a clear need and audience for software that allows for straightforward recording and editing of digitally handwritten video lectures. Professor Durand has been developing this software, but his current prototype version is only compatible with Mac OS. In order to make the software easily accessible and widespread we are aiming to create a web based version to allow for easy recording, editing, and viewing of these online video lectures. There are many advantages to creating a web based software that we considered when deciding to develop a second prototype. Most importantly, it is accessible to anyone regardless of the operating system they are using. Secondly, many existing premiere video editing tools are extremely expensive and are not able to be used cross platform. Another advantage is that web based tools allow for easier collaboration because they do not require all parties to have the same software.
Ultimately, we hope to have an available web version that lecturers can easily use to record one of the handwritten whiteboard style lecture videos. The web version of Pentimento was written using JavaScript, HTML5, and CSS, as well as additional libraries including jQuery, jCanvas, wavesurfer.js, and spectrum.js. By using these technologies we have created a website prototype where lecturers can produce videos that can then be easily edited and updated after recording.
15
4.1 Features
To create the web version of Pentimento there is a minimum feature set that must be implemented to make the program useful and effective. As I worked towards my thesis, I assisted in designing and implementing the main interface and the key features to make the web version of Pentimento successful. The key features will be updated as users actually test the website and, in theory, iteratively updated to match user need. New features will also be implemented by future students. There are two components of the program: recording and editing. Each has specific features that will make the website functional, in addition to other features that would be nice for a user to have available but weren’t essential during the first prototype (discussed in the future work section).
4.1.1 Implemented Recording Features
Lecturers require recording capability to record both the audio and visual components of the lectures. During the recording phase the lecturer will write and draw the visual components of the lecture as well as record the corresponding audio explanation. To be able to do these tasks the software must support the following features:
Feature Function
Record Button This allows the lecturer to start the recording. Stop/Pause
Button
The lecturer is able to stop the recording at any point (and then resume recording from the same point later).
Pen Tool The main use of the software is to create handwritten lectures and the pen is the basic input tool used to write/create the visual input content.
Recording Canvas
The writing and drawing must be done on something resembling a virtual whiteboard. The canvas is the area of the screen devoted to creating the actual lecture content (i.e. this is the area that would be recorded using the typical
16 Feature Function
screen capture techniques). Insert New
Slide
The recording area consumes a finite space on the screen, but most lectures need more space available. Inserting a slide allows the lecturer to reveal new blank space to fill with content.
Selection of Visuals
While recording, the lecturer often needs to select content to move or delete. Note: Selection during recording is different than selection during editing. If something is selected while being recorded, that selection will be part of the final video.
Deletion of Visuals
During recording the lecturer may want to remove content. Note: Deletion during recording is different than deletion during editing. In the final video, something that was written and recorded and then deleted while recording will appear in the video and then the viewer will see it was removed (in contrast to deleting something while editing where the strokes will never appear in the video).
Time Display and Slider
While recording, the lecturer should be aware of how much time has elapsed in the recording. The time display shows the current recording time. The time slider, as part of the audio timeline, also allows the lecturer to choose when to insert a recording.
Separate Recording of Audio/Visuals
Lecturers have the ability to record solely audio, solely visuals or both components simultaneously, allowing for fine tuning the recording of the lectures.
Pen Color Many online handwritten lectures utilize changes in pen color to emphasize certain topics or at least vary the visuals to make it easy to quickly notice the key points.
Line Weight Similar to variations in pen color, being able to support different line weights allows lecturers more flexibility in the visual quality of their videos and allows different areas to be emphasized and stand out.
Recording Indicator
Sometimes it is difficult to tell if certain software is in recording mode or not, so we want to make it very obvious to the lecturer that the current actions are being recorded. Currently this is done by changing the “Recording Tools” label background to red, which probably is not obvious enough.
17 4.1.2 Implemented Editing Features
Once the lecture has been recorded, the lecturer (or another person) may proceed to edit the recorded content. The editing phase requires a different tool set than while recording because the post recording editing capabilities are crucial to saving time and maintaining the quality of the content. The essential editing capabilities are:
Feature Function
Play/Pause Buttons
Playback is an essential part of editing because it allows reviewing the portions of the video that have been recorded.
Time Slider Navigating to a certain point in the lecture is necessary to be able to edit parts of the recording at certain times. The time slider also allows the lecturer to choose when to start or stop playback.
Selection of Visuals
While editing, many tools require use of a selection tool, which allows for selection of certain components to edit (e.g. to delete them). Note: this selection tool is different than the selection tool used during the recording phase. Selections made while editing will not be seen as part of the final video.
Deletion of Visuals
Removing errors or unwanted content is an essential part of editing video lectures. Note: deletion during editing is different from deletions during recording. In the editing phase strokes that are deleted will be removed from the final video (as if they were never written).
Retiming and Resynchronization
There is a tool that allows realigning visual and audio components of the video in case they are recorded separately or some adjustments need to be made. This also allows for removing long silences introduced by writing taking longer than speaking and adjusting other places where the
visual/audio parts of the lecture may need to be edited separately and realigned. Additionally, temporal edits are necessary so that visuals are sped up or slowed down to match the speed of the audio. Note: the retimer is a separate user interface
Stroke Color This would allow the editor to change the color of a stroke for the duration of the video (whereas if the pen color is changed while recording, the original color would be maintained where it was already recorded).
18
Feature Function
Stroke Weight Similar to editing stroke color, this feature would allow the editor to change the weight of a stroke after recording and the new weight would be evident for the full duration of the recording for that stroke.
5.
User Guide and Tutorial
Pentimento was created to allow for easy creation and revision of handwritten “digital
blackboard” style lecture videos. However, Pentimento transcends current solutions by adding a simple editing component, which facilitates increased flexibility in updating lecture content once recording is completed. Other solutions barely allow editing beyond cutting content, but
Pentimento has much stronger editing capabilities, including separate editing and synchronization of audio and visual components.
This section walks a user through the Pentimento web software, detailing the user interface and explaining how to do simple recordings of lectures. Since Pentimento allows for non-linear recording and editing of lectures there are a lot of options for how to begin recording a lecture. The basic Pentimento lecture consists of handwritten strokes on slides with a voiceover lecture, but there are many choices for how to create this lecture. As a lecture is recorded the user has the option to insert slides for organizational purposes or simply to create a blank slate to record visuals on. The visuals are currently in the form of strokes, which appear as the handwritten part of the lecture. An audio track is created while recording audio and new audio segments are created by breaks in audio recording. The audio segments can be rearranged by the user after recording. Finally, the user has a chance to create synchronization points to connect specific audio and visual moments in the lecture, allowing for playback to show user selected visuals at a user specified audio time.
The first unique aspect of the Pentimento
separately or together. Once audio and visual components of a lecture have been recorded, the audio and visuals can be synchronized through the retimer. The second, and probably most important, innovation of Pentimento
the user to change content of the lecture (visual or audio) after recording same, it is much simpler to create an accurate, effective
Pentimento allows users to edit the lecture in many ways such as: (e.g. changing the color of visuals), inserting content at any ti and visual components to make the timing exactly what is desired.
5.1 The Main Recording UI
The main recording portion of the web interface is where a user visuals.
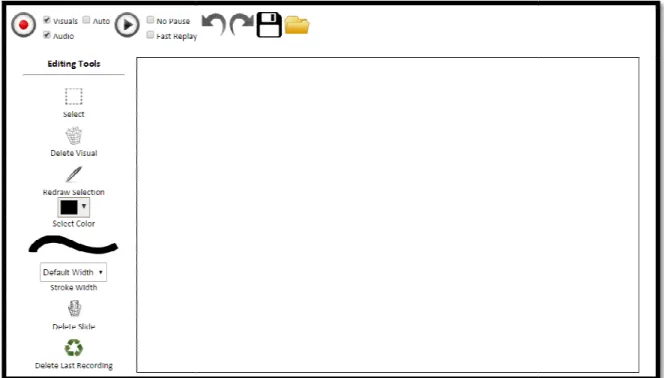
Figure 1: Main Pentimento Recording Interface (in editing mode) 19
Pentimento software is the ability to record audio and visuals separately or together. Once audio and visual components of a lecture have been recorded, the
chronized through the retimer. The second, and probably most Pentimento is the ability to edit the lecture after recording. By allowing the user to change content of the lecture (visual or audio) after recording and keep the timi
it is much simpler to create an accurate, effective, and up to date lecture video.
he lecture in many ways such as: updating layout and display (e.g. changing the color of visuals), inserting content at any time and synchronizing the audio and visual components to make the timing exactly what is desired.
The Main Recording UI
f the web interface is where a user can begin recording and editing
: Main Pentimento Recording Interface (in editing mode)
software is the ability to record audio and visuals separately or together. Once audio and visual components of a lecture have been recorded, the
chronized through the retimer. The second, and probably most is the ability to edit the lecture after recording. By allowing
keep the timing the and up to date lecture video.
updating layout and display me and synchronizing the audio
As a lecturer be
record just the visuals, just the audio or both. User tests
[4]. For simplicity here we will discuss how to record and edit each modality separately, but they can also be recorded at the same time.
5.1.1 Recording Visuals
The basis for recording visuals is the pen tool. Afte pen or mouse is placed on the main drawing canvas
of the lecture. Hitting stop in the top left corner then stops the recording. Figure 2: Record Button with
Recording Options (current state would record both visuals and audio)
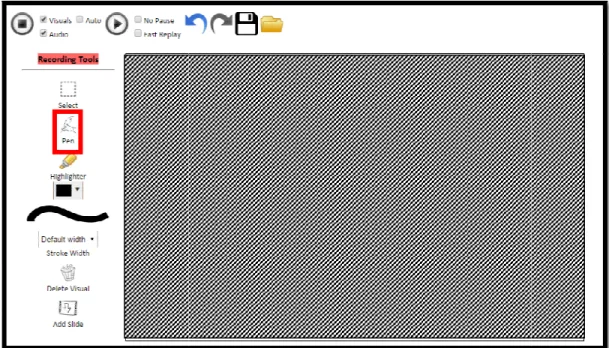
Figure 3: Main Recording User Interface (in Recording Mode) for lecturers. The recording canvas is
stop recording the stop button in the top left corner would be clicked.
20
As a lecturer begins recording he or she is given the option to record just the visuals, just the audio or both. User tests
indicated that most people choose to record the visuals first, then the audio and then add synchronization between the two e we will discuss how to record and edit each modality separately, but be recorded at the same time.
g visuals is the pen tool. After the record button is pressed,
on the main drawing canvas the resulting strokes will be recorded as part of the lecture. Hitting stop in the top left corner then stops the recording.
: Main Recording User Interface (in Recording Mode). The pen tool is highlighted as the main input for lecturers. The recording canvas is shaded to indicate space where the pen tool can be used. Finally to stop recording the stop button in the top left corner would be clicked.
gins recording he or she is given the option to record just the visuals, just the audio or both. User tests
indicated that most people choose to record the visuals first, then the audio and then add synchronization between the two e we will discuss how to record and edit each modality separately, but
button is pressed, any time the strokes will be recorded as part
. The pen tool is highlighted as the main input shaded to indicate space where the pen tool can be used. Finally to
While recording visuals, it is possible to select visuals and then resize, delete or
visuals. If a selection is made while in recording mode, that selection will become part of the recorded lecture, so when it is played back the person watching the
selection and any actions that have been
Additionally, the color and/or width of the pen strokes from the recording menu.
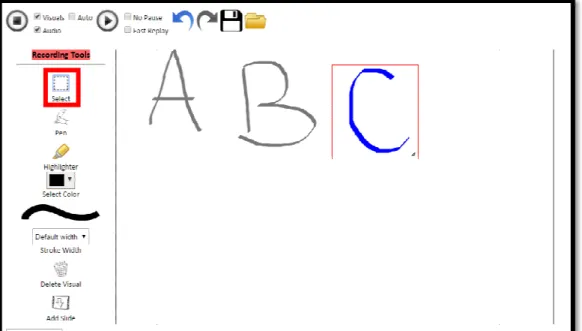
Figure 4: Using the Selection Tool. The selection tool is highlighted. In this example, selected and could be deleted, moved or resized by the user.
Figure 5: Pen Stroke Changes. On the left is the color palette to change the color of the pen strokes. The right image shows the available widths of
21
While recording visuals, it is possible to select visuals and then resize, delete or move those while in recording mode, that selection will become part of the recorded lecture, so when it is played back the person watching the lecture will be able to see the
that have been taken (e.g. moving the selected visuals).
color and/or width of the pen strokes can be adjusted by selecting these options : Using the Selection Tool. The selection tool is highlighted. In this example, the letter "C" is
selected and could be deleted, moved or resized by the user.
: Pen Stroke Changes. On the left is the color palette to change the color of the pen strokes. The right image shows the available widths of the pen tool.
move those while in recording mode, that selection will become part of the
lecture will be able to see the (e.g. moving the selected visuals).
by selecting these options the letter "C" is
A lecturer also has
This clears the canvas and allows for a blank slate while recording. Slides can be used as organizational tools, or simply to wipe the screen clean for more space.
Once some visuals have been recorded
5.1.2 Editing Visuals
When recording has stopped
user to make changes that are not recorded as part of the lecture, but instead change from the moment the visual appears. For example
of a stroke while editing will change the color of that stroke from the moment it was written, instead of changing it mid
happen if the color was changed during recording). Some other examples of visual edits are changing the width, resizing, moving, and deleting visuals. This allows for errors to be corrected (e.g. if something is misspelled visuals could be
Figure 6: Add Slide Button
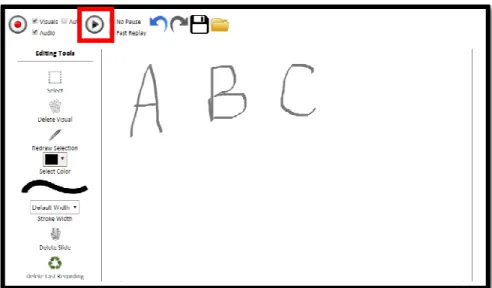
Figure 7: In editing mode visuals can be played back by clicking the play button (emphasized here)
Figure 8: Editing Toolbar
22
A lecturer also has the ability to insert a new slide by pressing the add
This clears the canvas and allows for a blank slate while recording. Slides can be used as organizational tools, or simply to wipe the screen clean for more space.
recorded they can be played back by hitting the play button.
When recording has stopped Pentimento enters editing mode. This allows a to make changes that are not recorded as part of the lecture, but instead change from the moment the visual appears. For example, changing the color of a stroke while editing will change the color of that stroke from the moment it was written, instead of changing it mid-playback (which is what would happen if the color was changed during recording). Some other examples of
dits are changing the width, resizing, moving, and deleting visuals. This allows for errors to be corrected (e.g. if something is misspelled visuals could be deleted in editing mode and the specific word could be
: In editing mode visuals can be played back by clicking the play button
the ability to insert a new slide by pressing the add slide button. This clears the canvas and allows for a blank slate while recording. Slides can be used as organizational tools, or simply to wipe the screen clean for more space.
the play button.
ers editing mode. This allows a to make changes that are not recorded as part of the lecture, but instead , changing the color of a stroke while editing will change the color of that stroke from the moment
playback (which is what would happen if the color was changed during recording). Some other examples of
dits are changing the width, resizing, moving, and deleting visuals. This allows for errors to be corrected (e.g. if something is misspelled the
re-recorded) and content to be updated
difficult to allocate space properly the first time
5.1.3 Recording Audio
While audio can be recorded at the same time as the visuals, many users choose to record it separate
speaking into the microphone. It is also possible to insert audio files, such as background music or audi
5.1.4 Editing Audio
The main type of audio edit that is
long silences. Often, if recording audio and visuals at the same time, writing takes longer than speaking, filling the lecture with long silences that can be deleted in the audio editing phase. Audio segments can also be rearranged or dragged to a different time.
5.2 The Retimer
Retiming is a key innovation of Pentimento
audio components of a lecture. This is a form of editing that affects t
playing visuals at a user specified time during the audio. To achieve this synchronization the user uses the retimer display as shown. The display is comprised of a thumbnail timeline, displaying snapshots of visuals at time i
Figure 9: Recording Only Audio
Figure 10: Audio Waveform displayed on the audio timeline
23
) and content to be updated. Layout changes are also common, since sometimes it is space properly the first time a lecture is recorded.
While audio can be recorded at the same time as the visuals, many users choose to record it separately. Recording audio is as simple as hitting record and then speaking into the microphone. It is also possible to insert audio files, such as background music or audio examples to enhance a lecture.
audio edit that is necessary in handwritten lectures of this kind is removing long silences. Often, if recording audio and visuals at the same time, writing takes longer than speaking, filling the lecture with long silences that can be deleted in the audio editing phase.
udio segments can also be rearranged or dragged to a different time.
Pentimento, allowing the user to resynchronize the visual and audio components of a lecture. This is a form of editing that affects the playback of the lecture, playing visuals at a user specified time during the audio. To achieve this synchronization the user uses the retimer display as shown. The display is comprised of a thumbnail timeline, displaying snapshots of visuals at time intervals throughout the lecture. These correspond to the
: Audio Waveform displayed on the audio timeline
. Layout changes are also common, since sometimes it is
While audio can be recorded at the same time as the visuals, many users choose ly. Recording audio is as simple as hitting record and then speaking into the microphone. It is also possible to insert audio files, such as
handwritten lectures of this kind is removing long silences. Often, if recording audio and visuals at the same time, writing takes longer than speaking, filling the lecture with long silences that can be deleted in the audio editing phase.
, allowing the user to resynchronize the visual and he playback of the lecture, playing visuals at a user specified time during the audio. To achieve this synchronization the user uses the retimer display as shown. The display is comprised of a thumbnail timeline,
audio timeline below. In between the thumbnails and the audio is the main feature of the retimer, where correspondences between audio and visuals are drawn.
To insert a new constrain and then
he or she
points are represented by arrows pointing to the point in the audio tim
point in the visual time. Note: Some constraints are added automatically at the beginning and end of recordings to preserve other constraint points. Automatic constraints are gray, while manually added constraints are black.
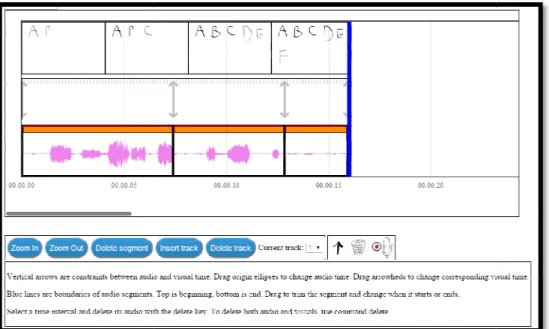
Figure 11: The Audio Timeline and Retimer. This displays the user interface that can be used to add synchronization points between visual and audio time in a lecture. The top displays thumbnails of the lecture visuals. The bottom is the audio waveform representing the lecture audio. In between is the retiming canvas, which allows the user to add synch
between the visuals (represented by thumbnails) and the audio (represented by an audio waveform).
Figure 12: Add Constraint Button
Figure constraints can
24
audio timeline below. In between the thumbnails and the audio is the main feature of the retimer, where correspondences between audio and visuals are drawn.
To insert a new constraint the “add constraint” button must be
the user must click on the place on the retimer timeline where wants to draw the correspondence. These synchronization points are represented by arrows pointing to the point in the audio time and the corresponding point in the visual time. Note: Some constraints are added automatically at the beginning and end of recordings to preserve other constraint points. Automatic constraints are gray, while manually added constraints are black.
: The Audio Timeline and Retimer. This displays the user interface that can be used to synchronization points between visual and audio time in a lecture. The top displays thumbnails of the lecture visuals. The bottom is the audio waveform representing the lecture audio. In between is the retiming canvas, which allows the user to add synchronization points between the visuals (represented by thumbnails) and the audio (represented by an audio
Figure 13: New constraint added to the constraints canvas by the user.
audio timeline below. In between the thumbnails and the audio is the main feature of the
t the “add constraint” button must be clicked n the retimer timeline where to draw the correspondence. These synchronization
e and the corresponding point in the visual time. Note: Some constraints are added automatically at the beginning and end of recordings to preserve other constraint points. Automatic constraints are gray, while
: The Audio Timeline and Retimer. This displays the user interface that can be used to synchronization points between visual and audio time in a lecture. The top displays thumbnails of the lecture visuals. The bottom is the audio waveform representing the lecture
ronization points between the visuals (represented by thumbnails) and the audio (represented by an audio
be sped up or slowed down appropriately to ensure that during playback the desired audio and visual points are played at the same time. Note: it is always the visual time being adjusted to correspond to the audio time (this decision was made because writing faster
much better than the lecturer suddenly talking faster or slower).
To delete a constraint a user simply click box over the constraint(s) he or she
This turns the selected constraints red (to
chosen). Then the user can click on the delete constraint(s) button to remove the correspondence.
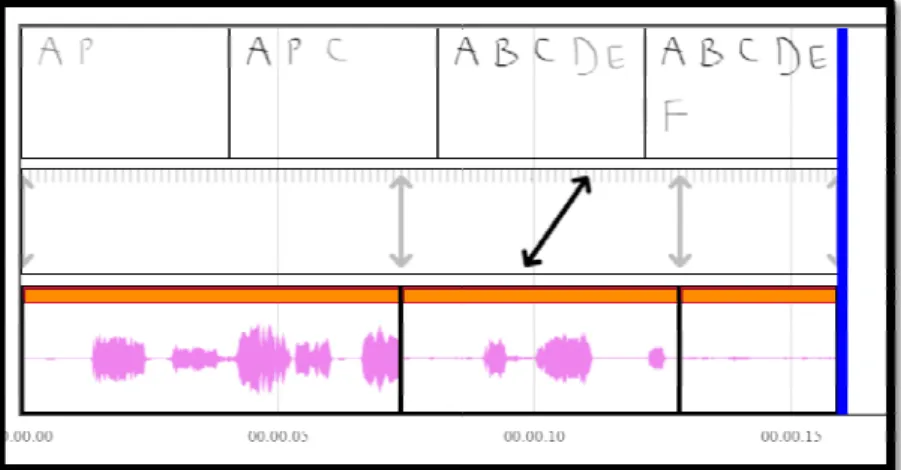
Figure 14: User dragging a constraint to synchronize a certain point in the audio (bottom of the arrow) with a new point in the visuals (the point the top of the arrow is dragged to)
Figure 15
Figure 16(a): Selected constraint (indicated by turning red)
25
To fine tune the audio and visual correspondence the user can drag the ends of the arrow to line up with the exact audio time and the exact visual time they would like to be played together. Then the visuals on either side of the constraint will p or slowed down appropriately to ensure that during playback the desired audio and visual points are played at the same time. Note: it is always the visual time being adjusted to correspond to the audio time (this decision was made because writing faster or slower flows much better than the lecturer suddenly talking faster or slower).
simply clicks within the constraints timeline and drag he or she wishes to remove.
the selected constraints red (to visually confirm that the desired constraint has been can click on the delete constraint(s) button to remove the
: User dragging a constraint to synchronize a certain point in the audio (bottom of the arrow) with a new point in the visuals (the point the top of the
15: User selecting a constraint to delete
Figure 16(b): Delete
Constraint(s) Button Figure 16(c): Selected
Constraint Removed
To fine tune the audio and visual correspondence the user can drag the ends of the arrow to line up with the exact audio time and the exact visual time they would like to be played together. Then the visuals on either side of the constraint will p or slowed down appropriately to ensure that during playback the desired audio and visual points are played at the same time. Note: it is always the visual time being adjusted to
or slower flows
within the constraints timeline and drags a selection
the desired constraint has been can click on the delete constraint(s) button to remove the
26
6.
Code Organization Overview
The base functionality of Pentimento is the ability to record a lecture. This process is initialized when a user clicks the record button and starts to record visuals and/or audio. This then begins the recording process in the LectureController, which propagates down to recording visuals and audio. As the user adds strokes on the main canvas these events are captured by the VisualsController and added to the visuals array in the current slide of the
VisualsModel. Similarly, the AudioController processes audio input and creates an audio segment which is stored in the current audio track. Recording input is continually added to these data structures and changes are also processed and added. For example, if a user decides to change the color of a stroke, that property transformation is added to the data structure for that visual. Ultimately, when a recording is completed, users can then go back and edit the recorded content. This process also stores property transforms and spatial transforms as part of the visuals data structure. Retiming is another key part of editing. When a user adds a constraint to the retiming canvas that constraint is processed and added to the constraints array with the associated visual and audio times to be synchronized.
All of these components are combined to create a Pentimento lecture. A lecture is the basic data structure and it is comprised of separate visual and audio pieces, each of which is organized into a hierarchy. The visuals are comprised of slides, each of which contains visual strokes written by the lecturer. These strokes are made up of vertices (points that are connected to display the stroke). The audio contains various tracks, each of which includes audio segments. The final component of a lecture is the retiming constraints, which are the synchronization information that unites the audio and visual components at a certain time.
The Pentimento code base is organized into a Model
pattern. The basis for any recording is the Lecture, which contains visuals, a
information. Each of these main components has a model and a controller, the details and specifications of which are outlined below. The models contain the specific data structures for each component, allowing lecture data
data to the view (the user interface), handling user inputs and making the necessary changes to the models, updating the lecture appropriately.
The web version of Pentimento was written using
Additional packages were used for displaying certain aspects of the user interface. jCanvas was used for displaying the retimer constraints, allowing a simple API for drawing and dragging the constraints, as well as selection and ot
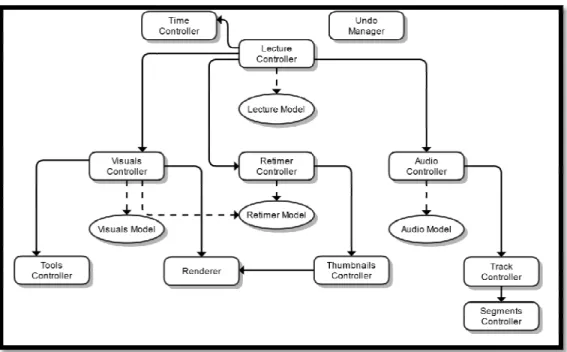
displaying audio wave forms. Spectrum.js is used as a color selection tool. Figure 17: All of the modules in the
in the file with the origin of the arrow to the module where the arrow is pointing. This allows for the file original file to access the functionality of the sub
27
code base is organized into a Model-View-Controller (MVC) architectural pattern. The basis for any recording is the Lecture, which contains visuals, audio and retiming information. Each of these main components has a model and a controller, the details and specifications of which are outlined below. The models contain the specific data structures for each component, allowing lecture data to be manipulated. The controllers connect the lecture data to the view (the user interface), handling user inputs and making the necessary changes to the models, updating the lecture appropriately.
was written using JavaScript, jQuery, HTML5 and
Additional packages were used for displaying certain aspects of the user interface. jCanvas was used for displaying the retimer constraints, allowing a simple API for drawing and dragging the constraints, as well as selection and other canvas interactions. Wavesurfer.js is used for
displaying audio wave forms. Spectrum.js is used as a color selection tool.
: All of the modules in the Pentmento code base. Arrows indicate that there is a reference in the file with the origin of the arrow to the module where the arrow is pointing. This allows for the file original file to access the functionality of the sub-file
Controller (MVC) architectural udio and retiming information. Each of these main components has a model and a controller, the details and specifications of which are outlined below. The models contain the specific data structures for
. The controllers connect the lecture data to the view (the user interface), handling user inputs and making the necessary changes to
, HTML5 and CSS. Additional packages were used for displaying certain aspects of the user interface. jCanvas was used for displaying the retimer constraints, allowing a simple API for drawing and dragging the
her canvas interactions. Wavesurfer.js is used for Pentmento code base. Arrows indicate that there is a reference in the file with the origin of the arrow to the module where the arrow is pointing. This allows for
6.1 Lecture
A Pentimento lecture is made up of visual and audio components. To allow the lecture to be played back correctly a Pentimento
synchronization information between the visuals and the audio.
6.1.1 Lecture Model
The LectureModel contains access to the
RetimerModel. Each of these models has a getter and a setter in the lecture model, establishing the places to store and update the data associated with each component of the
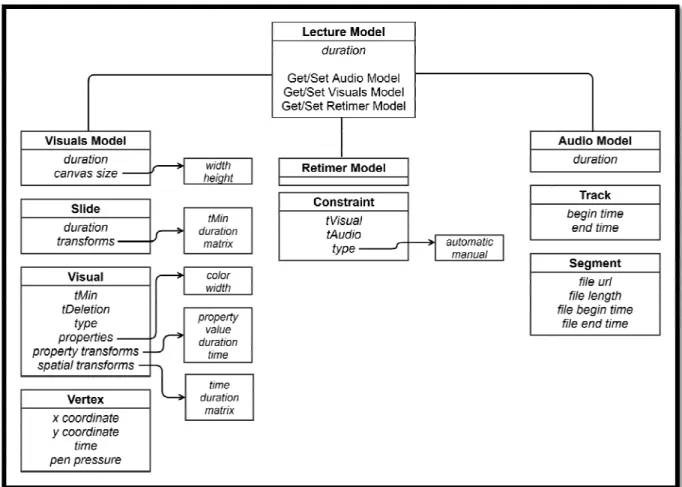
Figure 18: Illustration of the data types that comprise a Pentimento Lecture. At the highest level there is the lecture, which is comprised of visuals, audio, and retiming data.
28
lecture is made up of visual and audio components. To allow the lecture to be Pentimento lecture also contains a “retimer,” which stores the synchronization information between the visuals and the audio.
contains access to the VisualsModel, AudioModel and ese models has a getter and a setter in the lecture model, establishing the places to store and update the data associated with each component of the
of the data types that comprise a Pentimento Lecture. At the highest level there is the lecture, which is comprised of visuals, audio, and retiming data.
lecture is made up of visual and audio components. To allow the lecture to be lecture also contains a “retimer,” which stores the
and ese models has a getter and a setter in the lecture model, establishing the places to store and update the data associated with each component of the
29
lecture. The LectureModel also contains functionality for initializing and getting the total duration of the lecture, and for saving and loading a lecture to JSON.
6.1.2 Lecture Controller
The LectureController handles the UI functionality for recording and playback, undo and redo, and loading and saving lectures. It also serves as the entry point for the application through the $(document).ready( ) function. For recording and playback, it uses the
TimeController to start timing and then calls the appropriate methods in the audio and visuals controllers. The LectureController determines if the recording mode is visuals only, audio only, or both visuals and audio. This information is used in functions to start and stop recording a lecture.
During a recording, the LectureController creates a grouping for the UndoManager so that all undoable actions fall within that undo group. When the undo button is pressed, it calls a method in the LectureController that calls the undo method of the UndoManager and redraws all of the other controllers. The LectureController also registers a function as a callback to the UndoManager and the role of this function is to update the state of the undo and redo buttons so that each one is inactive if there are no undo or redo actions that can be
performed.
The LectureController is also responsible for initializing the process of creating and loading saved Pentimento files. This is discussed in the Save File section.
30
6.2 Time Controller
In a Pentimento lecture, time must be kept track of because visuals and audio of the lecture may operate on different timelines. The two timelines can occur if audio and visuals are recorded separately, or if the retimer is utilized to adjust visual time to coincide with certain audio times. The TimeController manages the “global time” of the lecture, or the time seen when the lecture is being played back (regardless of the corresponding time that the visuals being played were recorded at). The TimeController contains access to the current lecture time, as well as providing the necessary calls to start or stop keeping track of global lecture time.
When referring to time, there are four different time measurements.
1. “Real Time” refers to the time of the system clock. Real time is the time returned by the system clock when using the JavaScript Date object: new Date().getTime(). 2. “Global Time” or “Lecture Time” refers to the global time for the lecture that is kept by
the TimeController. The global time starts at 0 and the units are milliseconds. 3. “Audio Time” refers to the time used for keeping track of the audio elements. There is a
1:1 correspondence between global time and audio time, so audio time directly matches with the global time. Because of this, there is no real difference between the global time and the audio time. The only difference is that global time is used when referring to the time kept by the TimeController, and audio time is used when keeping track of the time in the context of the audio.
4. “Visual Time” is used when keeping track of the time for the visual elements, and it is aligned with the global time through the retimer and its constraints. All times from the
31
TimeController must be passed through the retimer in order to convert them into visual time.
The audio, visuals, and retimer need the TimeController in order to get the time, but the TimeController operates independently from the audio, visuals, and retimer. The
TimeController has functionality to get the current time, start timing (automatic time updating), allow a manual update of the time, and notify listeners of changes in the time. When the TimeController starts timing, the global time will begin to count up from its current time. Timing can be stopped with a method call to the TimeController. When the
LectureControllerbegins recording, it uses this timing functionality to advance the time of the lecture. Methods can also be registered as callbacks to the TimeController so that they are called when the time is updated automatically through timing or manually through the updateTimemethod.
Internally, timing works by keeping track of the previous real time and then using a JavaScript interval to trigger a time update after a predetermined real time interval. When the interval triggers, the difference between the current real time and previous real time is calculated and used to increment the global time. The current real time is saved as the previous time. The updateTimeCallbacks are called with the new global time as an argument. When timing is not in progress, the getTime method just returns the current time. However, when timing is in progress, the getTime method will get the current real time and calculate the difference between that and the previous time, just as it happen during an interval update. Effectively, this pulls the current global time instead of just observing an outdated global time. This allows a finer granularity of time readings during timing. This mechanism is important because if the time were
32
only updated every interval without pulling the most recent global time, then there would be visuals occurring at different times but still reading the same global time.
updateTimeCallbacks is not called when the time is pulled during a getTime call. This is to prevent an overwhelming number of functions getting called when there are a large number of getTime calls, such as those that occur during a recording when there are many visuals being drawn that require getTime to get the time of the visual.
The TimeController also has methods to check if it is currently timing and to check the beginning and ending times of the previous timing. The TimeController does not have any notion of recording or playback. It is the LectureController that uses the
TimeController timing to start a recording or playback.
6.3 Visuals
The visuals component of a Pentimento lecture is organized in a hierarchy. Slides are the base level, which contain visuals. Each type of visual then has a certain data structure associated with it. Currently, strokes are the only type of visual that has been implemented. Strokes are
comprised of vertices, which are points containing x, y, t and p coordinates (x and y coordinate position, time, and pressure respectively).
6.3.1 Visuals Model
The VisualsModel contains the constructors for all components of visuals. The
VisualsModel contains an array of slides, allowing slides to be created and manipulated. A slide provides a blank canvas for recording new visuals and allows the lecturer to have a level of
33
control over the organization of information. A slide contains visuals, slide duration and camera transforms.
The visuals themselves have many components including type (e.g. stroke, dot, or image), properties (e.g. color, width and emphasis), tMin (the time when the visual first appears), tDeletion (time when the visual is removed), property transforms (e.g. changing color or width) and spatial transforms (e.g. moving or resizing). Property transforms have a value, time and duration. Spatial transforms also have a time and duration, as well as containing a matrix associated with the transform to be performed.
Finally, to actually display the visuals, the type of visual is used to determine the drawing method. Currently, strokes are the only supported type of visuals and strokes are comprised of vertices. A vertex is represented by (x,y,t,p) coordinates, where x is the x position, y is the y position, t is the time and p is the pen pressure associated with that vertex.
6.3.2 Visuals Controller
The VisualsController has access to the VisualsModel and the RetimerModel. The VisualsController also utilizes the ToolsController and the Renderer. The VisualsController is responsible for drawing the visuals onto the canvas as the lecture is being recorded. As visuals and slides are added to the view by the user, the
VisualsController accesses the VisualsModel and adds the appropriate data structure. The VisualsController also allows the user to adjust properties of the visuals, such as the width and color.
34 6.3.3 Tools Controller
The ToolsController allows the user to manipulate which tool they are using while recording or editing the visuals of the lecture. The ToolsController allows switching of tools as well as indicating what to do with each tool while the lecture is recording or in playback mode. The ToolsController also creates the distinction of which tools are available in editing mode vs. in recording mode.
6.3.3.1 Visuals Selection
Visual elements can be selected by using the selection box tool. This tool works in both
recording and editing modes. In the VisualsController, the selection is an array of visuals that is under the selection box drawn by the user. For StrokeVisuals, the renderer uses different properties to display these visuals so that the user has feedback that the visuals have been selected.
The selection box itself is implemented on a separate HTML div on top of the rendering canvas. Inside this div, there is another div that is setup using jQuery UI Draggable and Resizable. This allows the box to be dragged and resized by the user. Callback methods are registered so that when the box is resized or dragged, a transform matrix will be created based on the change dimensions and position of the selection box. This transformation matrix is passed on to the VisualsModel.
6.4 Audio
Similar to the visuals, the audio components of Pentimento lectures are organized into a hierarchy with audio tracks being organized into segments. A lecture could contain multiple tracks (the simplest example being one track containing the narration of the lecture while a
35
second track contains background music). Each track is organized into separate segments (e.g. the audio associated with a slide).
6.4.1 Audio Model
The AudioModel consists of an array of audio tracks, where each audio track consists of an array of audio segments. An audio segment contains the URL for an audio clip, the total length of the clip, the start and end times within the clip, and the start and end locations within the track (audio time).
The top level AudioModel has functions to insert and delete tracks. The audio track class has functions to insert and delete segments. All functionality for modifying segments within a track is handled by the audio track. This includes shifting segments, cropping segments, and scaling segments. This is because no segments can overlap within a track, so modifying a segment requires knowledge of the other segments within that track to ensure that the operation is valid. The audio segment class has methods for converting the track audio time into the time within the clip and vice versa.
The AudioModel can be converted to and from JSON for the purpose of saving to and loading from a file. During the saving process, the audio clip URLs are converted into indices and the resources they point to are saved with filenames corresponding to those indices.
6.4.2 Audio Controller
The AudioController accesses the AudioModel so user changes can be applied. Within the AudioController there is also access to the track and segment controllers. Each track and segment is initialized when the user begins recording, which is processed through the
36
AudioController. The AudioController also handles the end of recording. In addition to handling recording, the AudioController is responsible for playback of the audio.
The audio TrackController contains access to all of the segments contained within that track. Each TrackController can also retrieve the track ID and the duration of the track. The TrackController also allows for manipulation of the segments within the track (dragging, cropping, inserting, and removing segments). The SegmentController handles access to specific segments and contains the means to display the audio segments.
6.4.3 Audio Playback
When the LectureController begins playback, it calls the startPlayback method in the AudioController, which starts the playback in the tracks. The TrackController uses a timer to start playback for the segments after a delay. The delay is equal to the difference between the segment start time and the current audio time. If the current audio time intersects a segment, then playback for that segment begins immediately. Playback uses the wavesurfer.js library to play the audio resource in the audio segments. When a segment playback starts, the SegmentController uses wavesurfer.js to start playing audio. The start point of the audio can be specified so that it can start playing in the middle of the audio clip if specified by the segment parameters.
Automatically stopping playback for the segment when the current audio time moves past the end of the segment is handled by wavesurfer.js by specifying the stop time for the audio clip. When playback is stopped in the LectureController, the stopPlayback method of the AudioController is called, and it stops playback in all of the TrackControllers, which
37
then stops playback in all of the SegmentControllers. These SegmentControllers manually stop any “wavesurfers” that are in the process of playing an audio clip.
6.4.4 Audio Timeline
The audio timeline is used for displaying the audio tracks to illustrate where the segments are in relation to the audio/global time. It also has a plug-in functionality so that other items can be displayed on the timeline. The timeline has a pixel-to-second scale which is used for drawing items on the timeline, and it has the functionality to change this scale by zooming in and out. This scale is illustrated through the use of labels and gradations.
6.4.5 Audio Track Controller
The TrackController draws the audio track from the model and handles playback for the track. It delegates playback for the individual segments to the SegmentController. It has the functionality for translating the UI events for editing the track into parameters that can be used to call the methods to change the audio model.
6.4.6 Audio Segment Controller
The SegmentController draws the audio segment from the model. It uses the Wavesurfer JavaScript library to display and play the audio files that are associated with the segments. It creates the view for the segments and registers the callbacks associated with the various UI actions such as dragging and cropping.
For the UI functionality of segment editing, the jQuery UI library is used. The Draggable and Resizable functionality is used to implement segment shifting and cropping, respectively. In order to enforce the constraint that the audio segments cannot overlap one another in the same track, the drag and resize functions tests to see if the new position of the segment view resulting
38
from the drag or resize action leads to a valid shift or crop action. If the action is invalid, the position of the segment view is restored to last valid position. The functionality for checking the validity of these operations resides in the AudioModel. The result is that the UI uses the AudioModel to check if the user actions are valid and the UI provides the relevant visual feedback to the user.
6.4.7 Audio Plug-in
Audio timeline plug-ins are a way to display additional views in the audio timeline. This is a useful feature because it allows those views to line up with the audio segments. For example, visual thumbnails that will be played at the corresponding audio time can be displayed. Since the audio time is used as the global time, it makes sense to visualize the information in this way. When the timeline is panned from side to side, the plug-in views also pan with the rest of the timeline. The plug-in is able to register a callback function that gets called when the timeline is zoomed in or out. This allows the plug-in to define its own implementation of what is supposed to happen when the pixel-to-second scale of the timeline changes.
The other components that currently use the plug-in functionality of the audio timeline are the retimer constraints view and the thumbnails view. For these views, it makes sense to display them as audio timeline plug-ins because it gives the user a sense of how the visual time relates to the audio time and how that relationship changes when retimer constraints are added and
modified.
6.5 Retimer
The retimer is one of the main innovations of the Pentimento lecture software. By allowing users to easily manipulate the synchronization between the visual and audio components of a
39
lecture, the retimer provides much needed flexibility in recording and editing lectures. The retimer contains constraints, which are the synchronization connections between a point in the audio time of the lecture and the visuals time of the lecture. Thus the retimer allows the playback of the lecture to have proper synchronization between the visuals timeline and the audio timeline.
6.5.1 Retimer Model
The RetimerModel provides the ability to manipulate constraints, including addition, deletion, shifting and access to the constraints. The RetimerModel contains an array of constraints, which are used to synchronize the audio and visual time. A constraint is comprised of a type (automatic or manual), an audio time and a visual time. Automatic constraints are inserted mechanically as the lecture is recorded (e.g. at insertion points or at the beginning/end of a recording). Manual constraints are added by the user to synchronize a certain point in the audio with a certain point in the visuals.
Adding constraints to the model requires finding the previous and next constraints (in audio time). Once these constraints have been determined, the visual time can be interpolated between the added constraint and the visual time of the two surrounding constraints, to allow for smooth playback. This is done because adding a constraint only affects the time of visuals between the two surrounding constraints.
When visuals or audio is inserted, automatic constraints are added to preserve the
synchronization provided by existing constraints. This requires shifting the existing constraints by the amount of time that is added by the insertion. This process is completed by making the constraints after the insertion point “dirty” until the insertion is completed. This means moving
40
the constraints to an audio time at “infinity” indicating they will be shifted. The original time is stored so that when the recording is completed the constraint times can be shifted by the
appropriate amount. To perform the shift, the “dirty” constraints are “cleaned” by shifting the original time that has been stored by the duration of the inserted recording (and removing the value of infinity from the constraint time).
6.5.2 Retimer Controller
The RetimerController has access to the RetimerModel, so that when a user
manipulates constraints the necessary updates can be made to the constraints data. The retimer controller also has access to the visuals and audio controllers so that synchronizations can be inserted properly.
Additionally, the RetimerController manages redrawing of constraints and thumbnails so that the view is properly updated when a user adds, drags or deletes a constraint. The
RetimerController interacts with the UI, so all user input events are handled properly. When a constraint is added by a user, the RetimerController handles converting the location of the click on the retiming canvas (in x and y positions) to the audio and visual time represented by that location. Similarly, when a user is selecting to delete a constraint, the RetimerController processes the selection area and locates the constraints within the selection by converting constraint times to positions on the retiming canvas. Dragging
constraints is also handled by the RetimerController and when a user stops dragging the RetimerController updates the RetimerModel to reflect the newly selected
41
6.6 Thumbnails Controller
The ThumbnailsController displays the visual thumbnails to the user (as part of the retimer and audio timeline display). The ThumbnailsController requires access to the Renderer to display the lecture visuals in a thumbnail timeline. The thumbnails are generated by calculating how many thumbnails will fit in the timeline (based on the length of the lecture). Then each thumbnail is drawn on its own canvas at the time in the middle of the time span represented by the thumbnail. The thumbnails are redrawn any time a user updates a recording or drags a constraint to update the visual or audio time synchronization.
6.7 Undo Manager
The UndoManager allows for undoing/redoing any action while recording or editing any component of a lecture. The UndoManager is organized into an undo stack and a redo stack. The stacks contain actions that can be undone or redone. Actions can be a single event or a collection of actions all of which would be undone or redone.
The UndoManager is integrated to work with the rest of the application by registering undo actions in the visuals, audio, and retimer models. For example, in the AudioModel, a segment can be shifted by incrementing the start and end times by a certain amount. The shift is then registered with the UndoManager, but the argument will be the inverse amount of the shift performed (e.g. if the segment was shifted +5 seconds the UndoManager would store an undo action shift moving the segment -5 seconds). If the action is undone the UndoManager, will then push the action onto the redo stack instead of the undo stack. Differentiating between undo and redo actions is handled by the UndoManager. In the implementation of the models, for each action, the code only needs to register the inverse action with the UndoManager.