Control and Design of A Single Degree-of-Freedom Magnetic Levitation Demonstration
By
Robert Baranowski
Submitted to the Department of Mechanical Engineering in Partial Fulfillment of the Requirements for the Degree of
Bachelor of Science in Mechanical Engineering
at the
Massachusetts Institute of Technology May 2006
© 2006 Robert Baranowski All rights reserved
The author hereby grants to MIT permission to reproduce and to
distribute publicly paper and electronic copies of this thesis document in whole or in part in any medium now known or hereafter created.
Signature
of Author
...
...
-Department of Mechanical Engineering --- , .- ,. ,, May 12, 2006
Certified
by ...
...
...
David L. Trumper echanical Engineering 1 eirvsorAccepted
by ...
...
John H. Lienhard V Professor of Mechanical Engineering Chairman, Undergraduate Thesis CommitteeARCHmVES
MASSACHUSETTS INSTITUTE OF TECHNOLOGY
I All n nn
I
Control and Design of
A Single Degree-of-Freedom
Magnetic Levitation Demonstration
byRobert Baranowski
Submitted to the Department of Mechanical Engineering On May 12, 2006 in Partial Fulfillment of the Requirements for the Degree of Bachelors of Science in
Mechanical Engineering
ABSTRACT
Controlling and stabilizing magnetic suspension systems is a difficult design task because several non-linearities and noise in both magnet physics and sensor performance can cause instability. This thesis investigates methods of building and controlling a stable, single degree-of-freedom magnetic suspension system that will be robust to changes in ambient conditions. Synchronous detection is a technique that is successfully
implemented in this hardware to create an optical position sensor that rejects a wide range of environmental light disturbances. Inspiration from two magnetic levitation
demonstration setups at MIT yields a new operating, stable levitator with improved robustness.
Thesis Supervisor: David L. Trumper Title: Professor of Mechanical Engineering
Table of Contents
Section 1: Overview ...
7
Section 2: Background ...
9
Section 2.1: General Setup ... 9
Section 2.2: Previous Magnetic Levitators ... 10
Section 3: The System ...
13
Section 3.1: Electromagnet Actuator ... 13
Section 3.2: Position Sensor ... 13
Section 3.2.1: Synchronous Detection Theory ... 15
Section 3.2.2: Light Source ... 17
Section 3.2.3: Light Detector ... 20
Section 3.3: Drive Circuitry ... 23
Section 3.4: Simulink Controller ... 24
Section 4: Performance ...
27
Section 5: Conclusions & Possible Further Study ...
31
1. Overview
This thesis examines the design of a single degree-of-freedom magnetic levitation system based on ideas from two MIT class demonstrations and improves upon Guy Marsden's design for a class project in 6.302, a class about feedback systems, using the same electromagnet actuator. The main focus of the modifications to this system is an optical position sensor that exhibits significant robustness to varying ambient conditions by utilizing synchronous detection. This paper introduces the two previous systems that inspired this work and then describes the current magnetic levitator design, addressing the construction of the hardware and also design of the feedback controller, and reports its performance with respect to loop stability and noise rejection.
2. Background
2.1. General Setup
The implementation of any magnetic levitator essentially involves examining pieces of the system as outlined in the block diagram in Figure 2-1 below.
voltage position
Figure 2-1: General Magnetic Suspension Feedback Block Diagram [1 ]
The electromagnet, generally a wound solenoid of wire, actuates the motion of a piece of ferrous metal (the levitated object), which in this case is suspended vertically below the magnet. This is done by running current through the solenoid to produce an upward force in the magnetized object large enough to offset its weight. Because this upward force grows greatly when the object approaches the magnet, and falls off when the object is farther away, negative feedback must be instituted to keep the object
suspended at a constant reference position. Here, a position control loop is implemented where the actual, measured vertical position of the levitated object is compared to the desired position, and this error signal drives the magnet circuitry to correct itself.
Compensation circuitry can then be added to address issues of loop stability and different performance characteristics.
The first order of business is to design an appropriate sensor, which is the main focus of this paper, so that there is a linear (or at least linearizable) function of position to
control voltage that is accurate and robust to ambient variations. A non-linear sensor would make all the tasks of compensation throughout the loop very difficult.
2.2. Previous Magnetic Levitators
For 6.302, an MIT course on feedback systems, students build a magnetic levitation system after a design by Guy Marsden [2]. A schematic diagram of his design
is shown below in Figure 2-2.
soft steel
bolt-soleno
Hall effect sense
permanent magne levitated object - analog control and power electonics - support stand
Figure 2-2: Schematic of Magnetic Levitator Using Hall Effect Sensor [1] This design depends on a Hall Effect sensor to measure the position of a permanent magnet attached to the levitated object by tracking the strength of its natural magnetic field at the end of the electromagnet and thus closing the feedback loop. Because the levitated object is a permanent magnet, the electromagnet can be used to repel as well as attract the object as the coil current is commanded from positive to negative levels. A setback of this design, however, is that the Hall Effect sensor not only measures the magnetic field produced by the levitated permanent magnet, but also the
actuating field from the electromagnet! This "cross-talk" between the actuator and the actual object affects the feedback signal and introduces some non-linearities.
A different approach to position control that eliminates this problem was implemented by Yi Xie for a lab demonstration for the MIT course 2.003 - "Modeling, Dynamics, and Control I" [3]. Using an optical sensor to measure the levitated object's position, any ferrous metal could be lifted, not necessarily a permanent magnet, since
opaqueness is required rather than magnetism. Figure 2-3 shows a photograph of this type of sensor, with a series of LEDs shining across a levitated steel ball and onto a photodetector.
Figure 2-3: Yi Xie's Optical Position Sensor [3]
The optical method removes the "cross-talk" that is present in the case of the Hall Effect sensor. But still, this method becomes sensitive to other ambient conditions; in particular, different levels of ambient light incident upon the photodetector pollute the sensor signal, resulting in erroneous read-outs of position. In Section 3, we present the current magnetic levitation system and how it uses synchronous detection to address this problem and achieve better noise rejection.
3. The System
The magnetic levitation system presented here follows the basic feedback loop topography as aforementioned in Section 2. The main modules in our control loop are the plant itself, or the physics of the electromagnet, a position sensor to employ the feedback signal, drive circuitry to actuate the electromagnet coil based on an error signal, and a controller algorithm implemented in Simulink using MATLAB. The design of each module is explained individually.
3.1. Electromagnet Actuator
The actuator is the same electromagnet used in Guy Marsden's design. It is a basic wire solenoid encased in plastic. A large steel bolt is used to attach the
electromagnet to the levitator stand and also act as a solid ferrous core. This allows a stronger magnetic field to be produced by the magnet to lift the object.
Experiments showed that the electromagnet coil has a resistance of about 15Q2 and an inductance of about 60mH. Because the lowest possible bandwidth for the coil itself is about 250Hz, and our overall system bandwidth is expected to be around 10Hz, we can drive the coil in voltage mode without being concerned with the dynamics in the coil. In other words, the coil dynamics are so much faster than our loop dynamics that they are dominated in operation.
3.2. Position Sensor
The sensor here is similar to that implemented by Yi Xie, but adds the function of synchronous detection of the light position signal so that ambient light noise can be largely rejected. The position sensor works by indicating position with a voltage
that is proportional to how much light the levitated object allows to fall on the photodetector. Figure 3-1 illustrates this concept:
Actuator
i~~~~~~~~~~
)) )Light
Detector
Sourc e
--I
LB1
1I
Figure 3-1: Scheme for Position Sensor [3]
The light source and detector are aligned such that the levitated object blocks light traveling between the two. For this scheme to work, the levitated object must block the
light such that no light impinges upon the detector when the object reaches the electromagnet, and the amount of light blocked must vary unilaterally with vertical position. This means the levitated object must be long and wide enough to cover the
entire area of the photodetector over the operating range. Light that would be allowed to reach the photodetector from around the object horizontally will throw off the
measurement. The actual implementation of this around the electromagnet is shown in the photograph in Figure 3-2 on the next page.
Controller
IjFigure 3-2: Photograph of Actual MagLev System
This general type of position sensor is the same as the one used in Yi Xie's levitator. One significant difference in this case is that the source of light is switched on and off rapidly so as to act as a high-frequency carrier for the actual position signal of
interest and the light detector acts to decode this very signal. The next three sections describe how this position sensing scheme is implemented to utilize the benefits of
synchronous detection.
3.2.1. Synchronous Detection Theory
Synchronous detection consists of first modulating an output waveform with some carrier signal at a frequency higher than the output's desired or expected bandwidth limit. Then, after this resulting signal, which is known as an amplitude-modulated (AM) signal, is transmitted to the intended receiver, the original output waveform is retrieved by multiplying the AM signal by the same carrier frequency and filtering out frequencies
above the bandwidth limit of the output. These low-pass filters are critical because the output of the demodulation operation produces not only the original baseband output
signal, but also higher order harmonics which contain the spectra of the output carried at multiples of the carrier frequency.
In this system's position sensor scheme, the output signal we wish to modulate and demodulate is the level of light intensity passing over the levitated object which is proportional to its position. Since this signal is expected to have a limited bandwidth
somewhere in the tens of Hertz, we use a carrier signal well above that range to avoid aliasing after the demodulation. The carrier we use is a square wave with a 1.3kHz frequency. An AM signal which consists of the desired position signal as the envelope of this carrier is constructed simply by turning the LEDs on and off at the 1.3kHz carrier frequency so that the photodetector sees a carrier waveform whose amplitude shrinks and grows as the levitated object moves up and down, respectively.
Once the AM signal is constructed, we use an integrated demodulator circuit from Analog Devices (the AD630) to demodulate it on the detector side and then filter it appropriately. Low-pass filters smooth out the higher-frequency content of the
demodulated signal so that only the frequencies of the levitated object's motion (in the tens of Hertz) is preserved.
One can see that ambient light that is not in the range of 1.3kHz will serve to increase the amplitude of the AM signal, though the lower-frequency "modulating" components of interest will only react to disturbances that oscillate at 1.3kHz. The low-pass filters effectively average the amplitude changes in the AM signal brought on by
ambient light to zero, as long as the ambient light is at frequencies well below or well above 1.3kHz.
3.2.2. Light Source
The source for light which is measured by our position sensor consists of five 5mm red LEDs, each of which can emit light at a maximum intensity of 3000
millicandela, aligned in series on a piece of printed circuit board. A photograph of the circuit is provided in Figure 3-3.
Figure 3-3: LED Light Source for Position Sensor
This arrangement produces a suitably bright and uniform area of light for the levitated object to block vertically.
To produce an AM signal that can be used for synchronous detection on the detector side, the LEDs are switched on and off at around 1.3kHz. This provides a square wave carrier on top of which the level of light indicating the object's position can sit. On
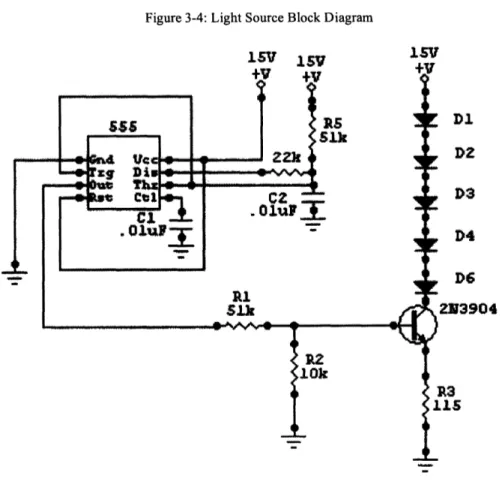
the next page, the block diagram in Figure 3-4 illustrates this concept and Figure 3-5 shows the circuit implementation.
LEDs Transistor Switches ON/OFF @ -1.3kHz ) ) ) )
Figure 3-4: Light Source Block Diagram
1SV 1 t 15V
Figure 3-5: Light Source Circuit Implementation
Essentially, the LEDs are powered from the + 15V power supply when the above transistor is ON and turn off when the transistor is OFF. The 555 timer triggers the
555 timer
Provides Trigger forLEDs
transistor's ON and OFF stages by creating a square wave at 1.3kHz that is applied to its base. This allows the circuit to work simply with a +15V power supply connected to it, instead of an additional signal generator triggering the LEDs.
The 555 timer is connected to oscillate in astable mode from the +15V power supply with a 50% duty cycle. The TRIGGER, DISCHARGE, and THRESHOLD pins of the 555 charge and discharge the timing capacitor through a resistor network with appropriate time constants to produce an oscillation from OV to 15V with frequency 1.3kHz at the OUTPUT pin. This waveform is used to trigger the five LEDs on and off.
To accomplish the switching itself, we use an NPN transistor as a switching current source for the LEDs. Each LED is rated for a typical voltage drop of 1.7V. This means that we can expect around ( 15V - (5 1.7V)) = 6.5V above ground to be applied to the collector. To avoid saturating the transistor, we want to make sure that the collector-emitter voltage does not exceed 0.3V (from the 2N3904 datasheet) and therefore that the emitter voltage not exceed 6.5V - 0.3V = 6.2V. To err on the safe side, we bring the emitter voltage down to around 2.5V by placing a resistive voltage divider between the 555 output (at 15V ON) and the transistor's base (which should be around a 0.6V diode drop higher than the 2V emitter voltage). The voltage divider's gain is about 0. 16. With this lower base voltage, we can now use the transistor as a reliable switch at 1.3kHz.
Because the LEDs are rated for a maximum current of 20mA and the
collector/LED current closely follows the emitter current, a 115 Ohm emitter resistor is chosen to yield a safe current of about 17mA through the LEDs. In this way, the 555 timer, the voltage divider, and the transistor stages produce an AM waveform of red light
across the area of the levitated object that can be demodulated at 1.3kHz to retrieve the pure object position signal.
3.2.3. Light Detector
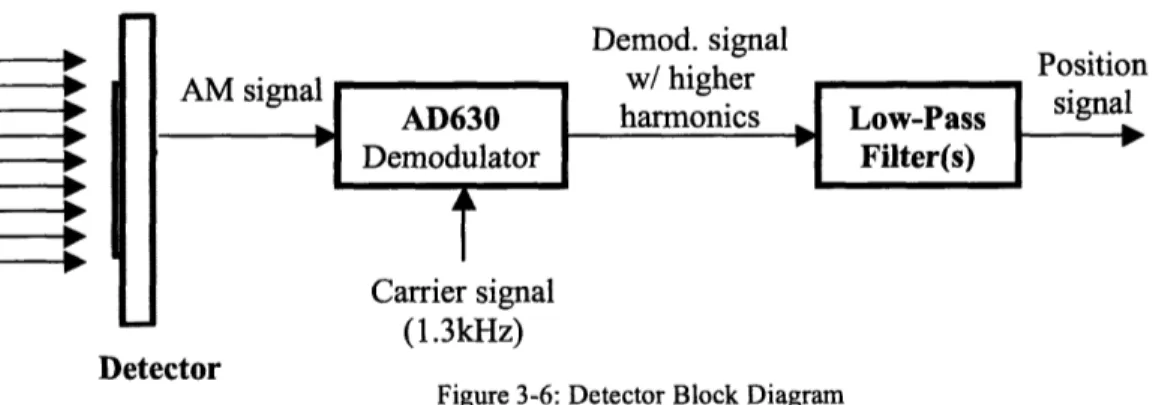
On the detector side, the incident AM light from the LEDs modulated by the position of the levitated object is demodulated and passed through a series of filters so that only the voltage waveform proportional to the levitated object's position remains. Figure 3-6 summarizes the function of the detector circuitry in a block diagram.
Detector
Figure 3-6: Detector Block Diagram
The element that detects incoming light is the Hamamatsu S5668-01 16-element photodiode array. Figure 3-7 is a photograph of this part as it is implemented.
Figure 3-7: Photo of Detector Circuit Board
It was found that photodiodes exhibit a more linear proportional response to incoming light than other devices, such as phototransistors. The S5668-01 produces current in the reverse-bias sense that is proportional to the light power shining on the device and is large enough to resolve positions over the 25mm range with which we are working. A schematic of ,-I 0 Wr
g
-W 1· II wThe parallel connection of the diodes allows all of their reverse current to sum together as more light shines on the chip. Because a voltage is required as an input into the demodulator, we convert the output current of the photodiodes to a voltage using a transresistance amplifier which scales the incoming current by the resistance of 4.7kQ2 and comes out negative. The maximum current was measured to be around 1 00A, which corresponds to the current produced by the detector when the object is below the entire detector.
The Analog Devices integrated circuit AD630 is used to demodulate the incoming amplified AM signal while producing a gain of two. The AD630 demodulates by
switching the AM input positive and negative with a frequency determined by the incoming carrier signal. A comparator in the AD630 switches the input signal when the carrier input switches above and below ground. Since the carrier signal from the 555 timer in the light source circuit goes from ground to 2.5V, a shift-down circuit is added to modify it so that it crosses OV at each transition and properly triggers demodulation.
The demodulated waveform from the AD630 now contains the desired baseband position signal along with higher order harmonics that must be filtered out in order to obtain a clean voltage that follows the position of the levitated object. This is
accomplished with two active first-order low-pass filters, each contributing a pole at around 156Hz. The bandwidth of these filters must be high enough to avoid detracting phase margin around loop crossover (around 10Hz) but low enough to adequately filter the 1.3kHz carrier. Section 3.4 elaborates on this constraint. But, because of the lower
completely smooth the output. For this reason, a second low-pass filter with the same time-constant is included in series.
3.3. Drive Circuitry
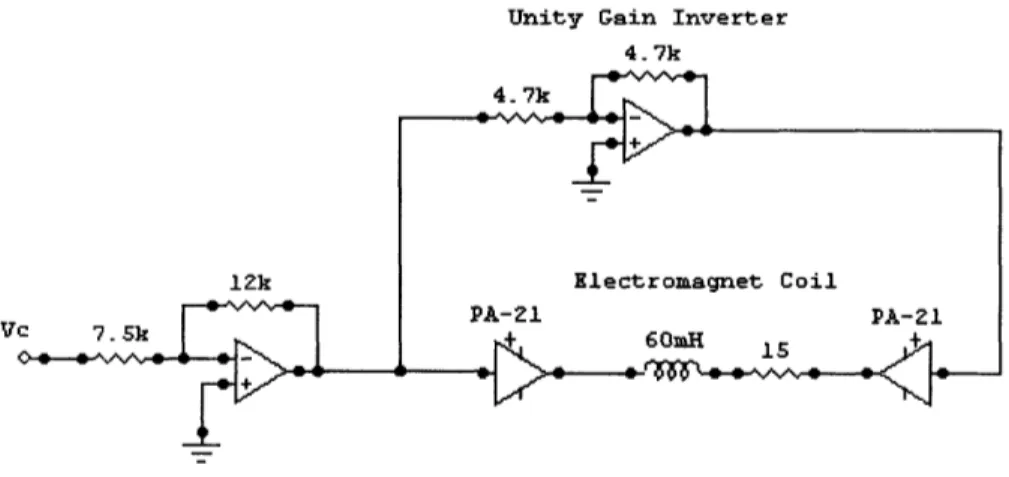
As mentioned in Section 3.1, the electromagnet coil exhibits dynamics that are significantly faster than loop crossover. Because of this, we are able to drive the coil in voltage mode, where the coil current is controlled simply by applying a voltage across the coil and there is a negligible effect from the back emf in the magnet. Figure 3-9 shows the choice of two PA-21 power amplifiers configured in bridge mode to produce the commanding coil current.
Unity Gain Inverter
4.7k 4 7k 12k Vc 7. k
0
0
_ _ 4 - I- I Electromagnet Coil PA-Z1 PA-21Figure 3-9: Electromagnet Coil Drive Circuitry
Each PA-21 is configured with an inverting gain of -2 and produces an equal and opposite voltage on respective sides of the coil. This setup provides a very nearly proportional relationship between current in the coil and input voltage.
3.4. Simulink Controller
The controller in our loop is a lead compensator implemented through the Simulink software in MATLAB. The sensed position signal is fed into a dSpace A/D converter at a 10kHz sampling rate and processed by a lead compensator of the form:
G,(s)=K
s+ 1
(3-1)
-rs+1
where ac is about 10.
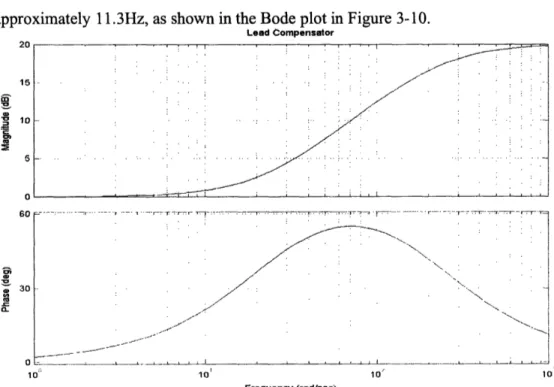
For our system, a ringing instability was found to occur at around 7Hz without any compensation. In other words, the levitated object oscillated without bound at this frequency. To stabilize the system, the compensator affords a positive phase margin around this frequency. The best stability performance resulted from placing the lead zero of the compensator at 3.5Hz and the pole at 35Hz, with a gain K of about .9. This arrangement yielded an additional bump in phase that peaks around 71 rad/s, or approximately 11.3Hz, as shown in the Bode plot in Figure 3-10.
Lead Compensator so 6O "o o 30 0 10 10 T 10. 10 Frequency (rad/sec)
Figure 3-10: Lead Compensator Frequency Response
- . - -. 7__ _~ _~ _ . ... . ...--
~~~~~~~~~~~~~~~~~''
~~..._.~._..._.-...-..~~.--
_~_:· ..-. L I--i _ ' , .- ;i-- ·---r..-- ·-- _. _ ·. _- ;L .L -~a,
:S S 2In the actual system, we must recall the two poles added to the loop transmission by the low-pass filter operation from the demodulation of the detected position signal. Figure 3-1 1 shows the combined effect of these poles and the lead compensator around our intended crossover frequency.
Lead Compensator with Two Low-Pass Filters
40.-- . X 30 _
p
20
. . 10- -. ...
0 - ,. .,....
. ... _ L.
.,
L . ... .. 0 ' -- - ' I .- .. -. . .- ..{. ~ ". ... ... 45 . . 7 . .7 -45 -90 -135 -18035 .... -- . . .. .. .. _ . . ... ... -... .. . -10 : ' 10 102 103 104 Frequency (rad/sec)Figure 3-1 1: Frequency Response of Lead Controller and Low-Pass Filters As the figure indicates, the theoretical phase margin added by the lead compensator is curtailed slightly (by about 10 degrees), but the effect is acceptable, experimentally granting enough phase margin for stable levitation anyway.
The Simulink interface was also useful in providing an easy way to apply a reference position input to the system which was compared against the measured signal from the position sensor. A bias current level was also implemented in Simulink so the appropriate amount of current to offset the effect of gravity could be applied to the magnet coil and the loop could operate on the error around that bias level. Furthermore, the gain parameter K in the lead compensator was also helpful in moving the loop
crossover frequency to where the lead compensator afforded the most phase margin. These parameters are important to tune correctly for stable performance when different objects are used, or a different floating gap size is desired.
4. Performance
Stable levitation is achieved using a levitated object that consists of a steel bolt wrapped in cardboard (to ensure that all vertical light to the detector is blocked by the object). The object and the entire working system are pictured below in Figure 4-1:
(a)
(b)
Figure 4-1: (a) Levitated Object (b) Magnetic Levitation System in Operation This configuration of object provided one that had low weight, large enough shape to cover all of the detector's width, significant ferrous material to lift, and decent rotational symmetry about the vertical axis whilst levitating.
Generally, the relationship of object position and actuating coil current is nonlinear, but we achieve a stable equilibrium by taking advantage of the small-scale linearity of the system about a chosen operating point. This linearization proves that stable levitation can happen using linear control theory in this case.
In the end, the magnetic levitation system runs properly, though it is sensitive to changes in operating point and the geometrical and physical qualities of the object to be levitated.
The performance of the position sensor employing synchronous detection
provides a continuous, nearly linear transfer function of voltage readout from the position of the levitated object. Figure 4-2 shows the measured relationship of the detector circuit's output voltage with respect to the distance away from the face of the electromagnet, which is measured as inches in the positive sense. A best fit line minimizing squared error is shown in red, with the equation:
Vsensor = 4.1443x,,bject + 0.0613 . (4-1)
Position Sensor Voltage vs. Position
5 4 2 1 0 0.2 0.4 0.6 0.8 1 1.2 1.4 Inches
Figure 4-2: Sensor Calibration Curve with Best-Fit Line
There are "bumps" in the curve that deviate from a linear fit, most likely caused by the non-uniformity of the light emitted by each LED, either by intensity or orientation with respect to the detector. Still, the sensor has good resolution over about a I inch range and yields a signal useful in accurately closing the feedback loop.
v= 4.1443x+.0613 00
0 /7
OZ 0,,/0 / O, 000<
1,01-100 I I I II~~~~~~~>9-Furthermore, ambient light is adequately rejected from all spectra, unless so much light falls onto the photodiodes in total that they begin to produce current in the forward direction and become nonlinear devices in our loop. Still, light of similar intensity to that produced by the source LEDs does not affect the position measurement enough to
compromise stability. This is the main goal of the synchronous detector. Its success is experimentally verified by shining light on the photodiode array from a continuoiusly lit LED identical to the ones in the sensor and noticing no change in stable levitation.
Without synchronous detection, this ambient light source would signal to the detector that the object is rapidly falling, command an increase in the coil current that is actually unnecessary, and lead to the object overshooting into the pole face of the magnet.
5. Conclusions & Possible Further Study
The finished system exhibits the validity of linear control design to make a nonlinear magnetic levitation system run in a conditionally stable mode and demonstrates the use of synchronous detection to reject ambient disturbances with regard to position measurement. Lead compensation proves an effective controller type for this kind of system. The system also provides a good tool to further investigate new methods of compensation and more detailed characteristics of the magnetic levitator model.
Moreover, the system is also useful in demonstrating what problems arise because of the way the position sensor works and the behavior of the magnet. For example, the system is designed to stabilize motion in one vertical degree of freedom. Lateral motion of the levitated object is not controlled in this scheme and sometime leads to instabilities in a new direction. Twisting of the object about a horizontal axis also exhibits a "side-fumbling" instability which cannot be controlled simply by this type of sensor. New sensor design is key to expanding the breadth of the levitator's stability into these additional degrees of freedom.
To improve the system so that it operates in a stable and self-controlled manner at different operating points without having to tune set points, gain switching schemes or feedback linearization could be employed. This would require a very accurate model of the system, however. Also, future work can be done to improve the robustness of the system's performance using different levitated objects. This might be handled by
imaging technology to determine the actual position of the light shining across the object, instead of reading a light intensity level. Even asymmetrical and smaller objects might be levitated in this way.
Ambient rejection can still likely be improved, by using the same synchronous detection scheme here, but also incorporating either light filters on the detector side or using infrared LEDs to eliminate noise from a wide range of light spectra regardless of carrier frequency of intensity. Directional filters can be useful too so that only light from a certain direction is read by the photodetector.
Overall, this system achieves stability in one degree of freedom and improves that stability's resilience to varying ambient conditions. However, this stability is limited by the nonlinearity of the electromagnetic plant and can stand to be improved in many ways.
References:
[1] "Lab 2 MagLev Project," 6. 302 Feedback Systens, November 2005.
http://web.mit.edu/6.302/www/maglev_F05
[2] Marsden, Guy. "Levitation!" Nuts and Volts Magazine, vol. 24, no. 9, pp. 58-61,
September 2003. http ://www.arttec.net/Press/N&V/Levitation.html
[3] Xie, Yi. "Mechatronics Examples For Teaching Modeling, Dynamics, and
![Figure 2-1: General Magnetic Suspension Feedback Block Diagram [1 ]](https://thumb-eu.123doks.com/thumbv2/123doknet/14476424.523293/9.918.163.745.315.448/figure-general-magnetic-suspension-feedback-block-diagram.webp)
![Figure 2-2: Schematic of Magnetic Levitator Using Hall Effect Sensor [1]](https://thumb-eu.123doks.com/thumbv2/123doknet/14476424.523293/10.918.227.707.351.703/figure-schematic-magnetic-levitator-using-hall-effect-sensor.webp)
![Figure 2-3: Yi Xie's Optical Position Sensor [3]](https://thumb-eu.123doks.com/thumbv2/123doknet/14476424.523293/11.918.272.631.451.702/figure-yi-xie-s-optical-position-sensor.webp)
![Figure 3-1: Scheme for Position Sensor [3]](https://thumb-eu.123doks.com/thumbv2/123doknet/14476424.523293/14.918.194.704.189.526/figure-scheme-position-sensor.webp)