Characterization of High-Power Lasers
The MIT Faculty has made this article openly available.
Please share
how this access benefits you. Your story matters.
Citation
Slater, John M., and Brian Edwards. “Characterization of
high-power lasers.” Laser Technology for Defense and Security VI. Ed.
Mark Dubinskii & Stephen G. Post. Orlando, Florida, USA: SPIE,
2010. 76860W-12. ©2010 COPYRIGHT SPIE--The International
Society for Optical Engineering
As Published
http://dx.doi.org/10.1117/12.848051
Publisher
SPIE
Version
Final published version
Citable link
http://hdl.handle.net/1721.1/58529
Terms of Use
Article is made available in accordance with the publisher's
policy and may be subject to US copyright law. Please refer to the
publisher's site for terms of use.
Characterization of High Power Lasers
John M. Slater
a, Brain Edwards
ba
Schafer Corporation, 2309 Renard Place SE, Suite 300, Albuquerque, NM, USA 87106;
bMIT Lincoln Laboratory, 244 Wood Street, Lexington, MA, USA 02420
ABSTRACT
This paper discusses methods for characterization of high power lasers. Specifically, these methods have been
developed for the High Energy Laser Joint Technology Office and used for independent, government-sponsored testing in the 25 and 100 kW phases of the Joint High Power Solid State Laser program. Primarily this paper addresses measurement of power and beam quality.
KEYWORDS: high power laser, characterization, beam quality, measurement
1. OVERVIEW
This paper describes measurement methods for characterization of high power lasers. It is intended to be helpful in promoting a common measurement approach. The methodology described results largely from experience in the 25 and 100 kW phases of the High Energy Laser Joint Technology Office, Joint High Power Solid State Laser program (HEL-JTO, JHPSSL).
The document is written at a fairly abstract level, concentrating on the underlying measurement principles, providing an explanation of what we consider to be good practice, and identifying items that need special attention. The method describes here is fairly simple and is intended provide an easily reproducible measurement in the sense that two measurement teams, each with separate equipment but with a common design approach, would agree on the key measurements for a given laser. Accordingly, we emphasize limited use of specialized components (e.g. wavefront sensors) that might be difficult to fully specify or difficult to duplicate between research groups. This is a power-in-the-bucket approach using a far-field pinhole and a hard-edge, defining aperture in the near field. We note that this simple measurement does not provide a complete characterization, i.e. it is far less complete than a map of the complex E-field at the output aperture. The latter may be necessary for detailed systems engineering, and by contrast the method described here is useful for a top-level characterization.
2. MEASUREMENT OF OUTPUT POWER
The approach that has now been used successfully to the 100 kW level is shown in Figure 1. There are essentially three pieces:
a) A known attenuation, of order 30-40 dB, provides a beam sample and passes most of the beam to an uncalibrated beam dump
b) Some intervening optics, with modest loss, e.g. 3 dB, that are calibrated with the aid of a sensor of known linearity c) A sensor that has been calibrated absolutely.
Each of these elements of Figure1 has considerations as described below.
Known Attenuation Ratio
This can be accomplished with multiple stages of attenuation via front-surface reflection from uncoated fused silica. With known index of refraction, wavelength, polarization, and angle of incidence, the reflection is then readily
calculated. For near-normal incidence each reflection provides roughly 14 dB attenuation, so that for example, only four stages are needed to reduce a 100 kW beam to levels at which the beam is easily manipulated, even with neutral density
filters. Figure 2 shows a single stage of attenuation. An anti reflection (AR) coating on the rear surface of this wedge is useful to reduce the power contained in secondary beam(s).
Assuming that the calibrated attenuation employs a series of front surface reflections (e.g. 2 or 4), there are several challenges to overcome:
a) Control secondary reflections to avoid scattered light. When the overall attenuation is large, e.g. of order 60 dB, even small levels of scattering can interfere with power and beam quality measurements. Careful use of shrouds and baffles is required. For a case with 100 kW incident power and an AR coating of reflectivity of 0.1%, about 100 watts of photons don't pass to the beam dump. These photons must be separated from the signal photons, which would be of order 250 mW if 4 stages of 14 dB attenuation were used.
b) Control secondary reflections to avoiding air turbulence. There are two air turbulence mechanisms to avoid: 1) heating of the air directly by the high power beam; and 2) secondary air heating via heated surfaces. Potentially-heated surfaces are those exposed to backscatter from the primary beam dump, and the secondary dump itself. c) Avoid thermal distortion in the first attenuating wedge. The first wedge (i.e. the wedge passing the full laser power)
must have low absorption in order that thermally induced distortion be avoided. This wedge is heated by front surface absorption (that may be worsened by surface contaminants), bulk absorption, and absorption of the AR coating on the rear surface. The AR coating absorption, typically of order 10 ppm, may dominate the heating. An example of very-low-absorption fused silica is Hereaus SUPRASIL 3001 with a rated bulk absorption of 0.25 ppm/cm at 1 micron. This material is suitable for first wedge use for at least the 100 kW CW, based on the JHPSSL experience. It is worth noting that it is the thermal gradients developed in the wedge that are generally the source of distortions; the average temperature is a problem only if the mount cannot accommodate thermal growth. The coupling of absorption to distortion in cases like this has been analyzed in the doctoral thesis of Ryan Lawrence1. d) Control polarization effects. Often it is desirable that the calibrated attenuation is independent of the polarization state of the laser. Generally the angle of incidence will be at least a few degrees off normal, hence reflectivity will differ for S and P polarization. One compensation for this is to use an even number of attenuation wedges, say two, and use an out-of- plane geometry such that the S-polarized photons on one wedge become the P-polarized photons on the other.
Absolutely Calibrated Power Meter
Referring to Figure 1 and the absolutely calibrated power meter, this meter preferably is calibrated by a standards group such as the National Institute of Standards and Technology in the USA. This absolute calibration may be transferred to other detectors, playing close attention to temporal bandwidth issues. A particular variation on Figure 1 would be that there are actually two power meters, a low bandwidth detector (e.g. thermopile) and a high bandwidth detector (e.g. a photodiode) .
Measuring the Loss of Intervening Optics
Referring again to Figure 1, we are assuming that there may be a significant number of intervening optics that provide manipulation in order that a large-diameter, high-power laser beam is matched to the smaller-diameter optics of the low-power diagnostic leg. These optics may include splitters, lenses, polarization filters, neutral density filters, etc. The attenuation of such optics must be measured if they lie in the path to the calibrated power meter. If a meter of known linearity is available, these losses can be measured directly by using this single meter (refer to Figure 1) at positions B and then C while a probe beam is inserted at position A.
3. MEASUREMENT OF BEAM QUALITY 3.1 General Comments
We begin by noting that a diffraction limited beam occupies a phase space that is measured as a product of a solid angle times an area. Example units are mm2 mrad2. But it is common to consider only one plane at a time, so the phase space
in this case is measured in mm mrad. We use that convention in all that follows.
Generally, BQ is a measure of how much phase space is actually occupied, expressed as a multiple of the phase space occupied by a diffraction limited beam. That is, 2 x DL would refer to a beam that occupies twice the ideal phase space,
and hence from a given beam director (i.e. a given diameter) diffracts twice as fast. Equivalently, at the target it has twice the diameter of the perfect beam.
Beams in general don't have well defined edges, so that any measure of the occupied phase space requires a definition of what constitutes the size of the beam, in both physical space and angle space. For the simple and well-defined case of a diffraction limited, untruncated Gaussian, and when the size in physical space (i.e. near field) and angle space (i.e. far field) are both measured by the e-2 points in intensity, then the phase space occupied, πrθ, is exactly λ. For 1 micron wavelength this gives 1 mm mrad.
Often the difference from one BQ definition to another stems from differences in how the size of the beam is defined. It could be the rms value, or the full width at half maximum, or the e-2 point, etc. We note that an rms definition of beam size is well behaved mathematically in envelope equations, but this definition has sensitivity to the far edges of the distribution function that may not be well suited to some laser applications.
3.2 Power-in-the Bucket Concepts
The approach used here for defining beam size is based on power-in-the-bucket (PIB) concepts. First, some terminology:
− PIB Curve – A two-dimensional plot showing enclosed power in the far field as a function of radius.
− Vertical BQ definition – Is a description of goodness of the beam using a single numerical value that is generated from the PIB curve. It is most meaningful when the beam is nearly diffraction limited.
− Horizontal BQ definition – Also a description of goodness of the beam using a single numerical value, and also generated from the PIB curve. It is useful even when the beam is much worse than diffraction limited.
3.2.1 Power in the Bucket Curve
Three example PIB curves are shown in Figure 3, each of which is simply the result of integrating the far-field irradiance distribution over a radius which varies according to abscissa label. A natural unit for that axis is the size of the central diffraction lobe, but by convention λ/D is often used instead, where λ is the wavelength and D is the diameter of the near field beam. In those units, the radius of the far field central lobe is 1.22 λ/D if the near field is a uniformly illuminated disk with a flat phase profile. When defining goodness of the beam, the measured PIB curve is compared to an agree-upon reference PIB curve, or ideal PIB curve, which is in turn generally calculated from an agreed-agree-upon ideal near field.
Specification of the Ideal Near Field Shape
Since the goodness of the beam depends on comparison of a measured PIB to an ideal PIB, with the latter being calculated from an ideal near field, the choice of this ideal near field is important. Note that it is the specified shape of the ideal near field, not it size, that matters. That’s because the underlying concept is that we’ll compare the measured far field pattern to the ideal far field pattern – with the near field of each scaled to the same size.
In specifying the ideal near field shape we will make the simplifying assumption that it has hard edges (as in a flat top beam). Then we can “measure” the size of the actual near field by forcing it through a mask of this shape and known size. With this, we have completely side stepped the complication of measuring the actual near field intensity
distribution, and from that defining where the edge lies via some algorithm. This is a considerable simplification, and it is applicable whenever a hard-edge near field is the appropriate point of reference.
Specification of the Far Field Bucket Shape
The ideal near field might be chosen to have a non-unity aspect ratio (e.g. to match the shape of a slab gain media). In such cases the ideal far field central lobe will not be round, and the shape of the far field bucket should be adjusted accordingly. Otherwise, the measured PIB curve responds differently to BQ errors on one axis as compared to equivalent errors on the other axis.
Referring again to Figure 3, if a single-parameter goodness value is needed, one conventional definition is the vertical
beam quality, which for the PIB method is defined using the ratio of the line segments AC and AB. Specifically,
. 1/2 ⎟⎟ ⎠ ⎞ ⎜⎜ ⎝ ⎛ = bucket same in power measured bucket in power ideal BQvertical (1)
By convention the bucket is the size of the ideal far field central diffraction lobe. More exactly, it’s defined by the calculated line of zero intensity surrounding the lobe. (As a detail, when the near field has limited spatial symmetry, there may be no well-defined line of zero intensity.) The square root appears in Equation 1 so that the vertical BQ scales as a ratio of lengths (e.g. beam diameters) rather than as a ratio of areas, thus being consistent with the horizontal definition below from a scaling perspective.
If the vertical beam quality is measured for the beam corresponding to the lowest line in the Figure 3, then the fraction of power in the bucket (i.e. at 1.22 λ/D) is only about 15 percent. Therefore for this beam, if we have knowledge of only the vertical BQ (but not the entire PIB curve), we would know that 15% of the power lies within 1.22 λ/D, but the whereabouts of the other 85% are unknown.
Accordingly, the vertical beam quality definition, if it is the only parameter reported, is of limited value for beams that are not close to diffraction limited. If we restrict use of this metric to cases in which ≥ 50% of the power falls within the bucket, then the region of applicability is roughly that BQvertical ≤ 1.3.
3.2.3 Horizontal Beam Quality
Considering the above discussion regarding limited usefulness of the vertical BQ when the vertical BQ value is not near unity, Figure 3 can be used to define a horizontal beam quality. Referring to a measured beam corresponding to the lower-most line, the horizontal BQ is defined as the ratio of segment DF to segment DE.
power same at radius ideal power given at radius actual BQhorizontal = (2)
In the figure the fraction of power is set arbitrarily at 75%, although there is no standard choice for this value. If a small value is chosen, e.g. 30%, then we have the problem that our metric doesn’t indicate where the majority of the photons are. If a large value is chosen, e.g. 95%, then we have the problem that beams with some power scattered to high angles (say 10% for this specific example) won’t be well described because 90% of the power may have been concentrated in a much smaller core.
The horizontal definition is useful for beams of any quality, particularly if the distribution function is roughly known, e.g. Gaussian. For a given beam, it is generally true that BQvertical ≠ BQhorizontal .
We emphasize that single-parameter BQ descriptions (e.g.horizontal BQ, vertical BQ) are less useful than knowledge of the entire PIB curve.
3.3 Power in the Bucket Measurement Details
Details of the PIB measurement, for generating either the single BQ value or the PIB curve, are provided in the
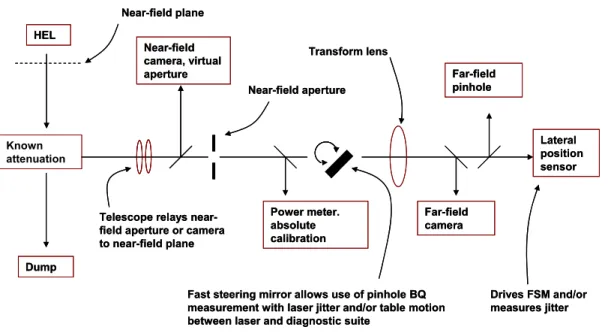
following subsections. These comments refer to the generic hardware configuration shown in Figure 4. As an overview and beginning in the upper left hand corner of the figure, the laser beam is attenuated by a known amount and then sent to the diagnostics station. The near-field beam may be truncated slightly by the near-field aperture, and can also be examined by a virtual aperture (i.e. a non-intercepting aperture). A telescope re-images this aperture and the camera to whatever plane is designated as the near-field plane. The absolute power meter is shown. A transform lens forms a far-field image at the locations of the far-far-field camera, far-far-field pinhole, and lateral position sensor. The latter provides a high bandwidth determination of the jitter power spectral distribution (PSD), from which the rms jitter value can be calculated. The fast steering mirror (FSM) shown may be needed if pinhole-based BQ measurements are not to be
3.2.2 Vertical Beam Quality
compromised by jitter. This mirror can be commanded by signals from the lateral position sensor so that the pinhole tracks the beam position. A similar system was used for the JHPSSL independent measurements2.
Details and hardware issues are discussed in the following subsections.
3.3.1 The Near Field Aperture
We've indicated in Section 3.2 that the PIB BQ method described here utilizes a hard-edged near-field aperture. Per Figure 4, this aperture is located in a low power position and thus is not damaged by the full power beam. Note that with our BQ definition (vertical, horizontal, or even PIB curve itself), this aperture must be close-fitting to the near-field beam, otherwise the measured BQ will inadvertently be worse than the actual BQ. This is because a near-field aperture that generously exceeds the beam size will result in a calculated ideal bucket that is unnecessarily small.
So in general, the size of this aperture would be reduced until it begins to intercept the beam. Since the power meter is downstream of the near field aperture (Figure 4), there is a general tradeoff between measured power and measured beam goodness. We can expand the size of the near field aperture and maximize the measured power, or we can shrink the near-field aperture and the far-field bucket expands so that the apparent BQ improves. The approach to this trade that worked well in the JHPSSL program was that the independent measurement team allowed each contractor to choose their near field aperture size, i.e. the contractor makes the trade between power and BQ as they desire. Note that, following the previous discussion, the shape of the near field would have been predetermined at the program outset. It should be clear, if for no other reason than the importance of demonstrating program goals, that the fitting of the near field aperture to the actual beam is sufficiently critical that real time imaging of the beam strike on this aperture is needed.
3.3.1.1 Identification of the Near-Field Plane
Also relevant to the fitting of the near field aperture to the beam is the issue of defining the physical location of the near
field plane with respect to the laser and diagnostic hardware. Ideally the near-field aperture of the diagnostic system lies
in this plane. However, the laser will have been designed with some near field plane in mind, and this will often not lie within the physical bounds of the diagnostics hardware.
Accordingly, the telescope in Figure 4 projects the near-field aperture to whatever position is agreed upon. When the laser and near-field aperture are rigorously in the near field of each other, as determined for example by a high mutual Fresnel number, then there is no need for this telescope. It will turn out that for large beams (>> 1 cm), and modest distances (<< 10 m), the telescope is not necessary. Calculation may be necessary to determine the impact of eliminating this telescope.
3.3.1.2 Use of a Virtual Near Field Aperture
If a complicated shape is chosen for the near field aperture, e.g. one carrying all the details of a segmented beam including the dead space, then the use of a physical near-field aperture becomes impractical due to the problem of getting correct alignment, correct size, and the desired tradeoff between BQ and power - all at the same time. In this case a virtual near field aperture could be considered (see Figure 4). In general this would be a camera-based aperture, projected to the desired near-field plane. This virtual aperture can be any shape, and the power falling outside the aperture can be computed from the image. But in Section 3.3.4 there is discussion of the problems of getting accurate power integrals from cameras, and that discussion can also be applied to the near field camera as one attempts to determine how much power falls outside the boundary of the aperture.
Assuming the camera works perfectly and that the power integrals are accurate, the problem remaining with this approach is that the far field pattern is affected by the photons that were outside the virtual aperture, hence the measurements of power and BQ are not self consistent. Therefore, before using this approach one should model the effect of these outside-the-aperture photons and ensure that their effect on the apparent BQ is acceptable.
We stress that a physical aperture is the gold standard for determination of near field size, and any other means of measurement would ideally be validated/calibrated against a physical aperture.
3.3.2 Relative Placement of the Near Field Aperture, Transform Lens, and Pinhole
Besides the placement issue of the near field aperture relative to the laser (Section 3.3.1.1), there is also a general issue regarding relative placement of the near field aperture, the transform lens, and the pinhole.
Consider first the separation between the transform lens and pinhole (or camera). Specifically, the question is whether to adjust the pinhole to the position of best focus, or to fix this distance to exactly f, the focal length. This is essentially a question as to whether we will allow focal errors (at the laser output) to be included in BQ or not, i.e. whether focal errors will be reported as worse BQ. Adjusting the pinhole to the position of best focus is equivalent to removing the focal error. A reasonable point of view is that since beam trains in general will be able to correct residual static focus, it is reasonable to do the same in the BQ measurement. But if dynamic focus is present, more consideration is needed. There are several more fine points to be aware of regarding the placement of the laser, the near field aperture, the transform lens, and the pinhole - all with respect to one another. Of course the basic notion of our PIB method is that the laser, near field aperture, and transform lens are all in the near field of each other and the laser beam is collimated. But other situations must be considered as realities of working with physically large systems are imposed (e.g. the diagnostic system may be in a different room than the laser). Here are some rules relevant to our geometry and the integrity of the measurement that come from Fourier optics3:
a) Between the near field aperture and transform lens, no spreading (or contraction) is allowed due to focal errors b) Between the near field aperture and transform lens, spreading due to diffraction (but not focus) is allowed, so long as
the far-field pinhole is then maintained at exactly distance f from the transform lens
c) If the laser beam expands (or contracts) while en route to the near field aperture due to focal error, that's allowed so long as it is only focus and not diffraction causing the expansion. As above, the effect of this focus (on the BQ result) can be removed by moving the pinhole to the position of best focus
d) If the laser beam expands while en route to the near field aperture due to diffraction, that is not acceptable.
It is interesting to point out that if the pinhole is located precisely at distance f from the transform lens, then the pinhole is precisely in the far field plane relative to the near field plane, independent of the distance from the near field plane to the transform lens.
3.3.3 Avoidance of Requiring Absolutely-Calibrated Detectors for Beam Quality
The PIB BQ measurement method requires that the ratio of the power in the bucket to the total power be measured. That is, the PIB BQ is really based on a ratio, not a power. One way to find this ratio is to measure the true power falling in the bucket on an absolute basis, and to also measure the total laser power on an absolute basis. If this involves two different detectors and two different optical paths, then this strategy may lead to problems of accuracy and reliability. An alternate method is to use a single detector in a self calibrating configuration. That is, the key PIB ratio is obtained with only a single optical path and single detector with known linearity. The PIB curve of Figure 5 extends to
sufficiently large bucket size that nearly all photons are captured at the largest bucket. In this case, we get the necessary ratio from reading just two points from the curve, i.e. two buckets as indicated by the dashed lines through points A and C. Dashed line A is the bucket for BQ determination, here arbitrarily chosen to be slightly larger than the ideal central lobe size, and dashed line B represents any bucket large enough to collect all the photons. From measurements at A and C buckets, the fraction of the total beam falling in the bucket A is determined. With these two measured points, the PIB
curve is not necessary for generating the BQ value so long as we know that the larger pinhole captures all the power.
One drawback to the idea of just using two pinholes is that there is no a priori way to know how large the angular acceptance of the larger pinhole needs to be. A necessary, but not sufficient, indication that the acceptance is large enough comes from measuring the whole PIB curve and observing that the slope does indeed tend to zero in the upper right hand corner. But even this indicator can be misleading for at least two reasons:
a) in the case that a camera is used to measure the PIB curve, there are potential problems that are discussed in the next section
b) there are cases in which the laser may produce a diffraction limited core, but at the same time also produces substantial additional energy at high angles. A laser employing beam combination via a diffractive optical element (DOE) can display this behavior if the beam phases or intensities are not adjusted properly.
We stress the importance of demonstrating that the PIB bucket values are actually normalized to 100% power. It is important that the far field angular acceptance of the diagnostic system exceeds the far field angular content of the laser. Each sensor in a complex optical system will in general have a different field of view, in both position and angle space. This must be accounted for, since the laser may have an unknown angular content.
3.3.4 Potential Difficulty with Camera-Based PIB Curves - The Value of Pinhole Measurements
Generally, the far-field PIB curve needed for self-calibrated BQ measurements (Section 3.3.3) can be generated either with a single detector (e.g. photodiode) and a series of pinholes, or from a camera image using integration in software. It was the experience of the independent measurement team for the JHPSSL program, that silicon-based CCD detectors (at lease those tried) may not have sufficient accuracy to generate reliable PIB curves. An indication of the problem was that apparently spurious photons were detected at large angles, so that the PIB curves did not asymptote as expected. The pinhole method should be held as the gold standard for PIB curves. Camera-based methods should be
validated/calibrated against pinholes. If pinholes are used, then two pinholes suffice to measure the PIB BQ; one pinhole chosen at the desired bucket size, and the other chosen large enough to be on the asymptote (Figure 5).
3.3.4.1 Combined Camera-Pinhole Approach
The basic problem with the camera is that if you want a self-calibrated PIB curve (Section 3.3.3), there may be a need to integrate the far field image to high values of λ/D (e.g. >> 10 ). But with such large integration areas, the PIB curve is unreliable since over much of the area the signal level is low and camera noise then becomes a problem. One solution is to constrain the camera integral to a smaller area. Figure 5 shows a camera-based PIB curve for a situation in which most of the energy is accounted for within 4 λ/D, and the bucket for the goodness measurement is arbitrarily chosen to be 1.5 λ/D. A strategy in this case is to normalize the camera curve at 4 λ/D with a pinhole of exactly that size. More precisely, this means there are two pinholes, one is 4 λ/D and the other is large enough to capture all photons. The ratio between these two signals is used to normalize the camera curve at 4 λ/D. Then the camera integral covers
comparatively little area of low signal and the accuracy of the PIB curve improves. When using this technique it is
important that the alignment of the pinhole with respect to the camera frame be established with precision.
The strategy of the above paragraph raises the question of why use the camera at all, considering that the smaller pinhole could have been chosen to match the 1.5 λ/D bucket exactly. Reasons are:
a) The desired bucket may not be round. The camera image can be integrated for any desired bucket shape, size, or rotation; the camera is completely flexible in this regard.
b) It is inconvenient to trace out the PIB curve with pinholes, this curve being more valuable than a single BQ value. c) This combined camera-pinhole strategy allows separation of jitter from BQ (see next section).
3.3.5 Pointing Jitter
Regarding beam jitter, the situation we are considering is that the laser may have internal jitter and that separation of the laser and diagnostics, e.g. they may be on separate tables, can lead to additional jitter. To be specific, we are considering that at the plane defining the near field, the beam is stable in space but not in angle. In Figure 4 the jitter is seen as movement of the far-field spot, and if time-averaged it is equivalent to an apparent worsening of the beam quality. Whether jitter is considered to be a component of the PIB-based BQ or not is a matter for the system engineers. But if BQ and jitter are taken to be separate, and one wishes to measure and report them separately, then there is a problem with pinhole-based measurements.
a) If a camera-based BQ measurement will be used, and if a short camera exposure time is available, then jitter can be frozen out. An exposure time of Δt freezes all jitter components at frequency f ≈ 1/(2πΔt) and lower. The BQ can be measured on a frame by frame basis, centering the bucket on the beam in each frame. These BQ values can be averaged as needed, and the rms jitter value (but not the jitter PSD) is also available from the same data. Note that
with the CCD's examined in the JHPSSL program, the camera integration (to calculate the PIB curve) became less reliable as the exposure time was shortened.
b) Use adaptive optics (AO) to make the pinhole track the laser beam. It may be possible to use an AO system already present (in the laser) to provide this function for the BQ measurement.
In both cases (a) and (b) there will be high frequency jitter components that cannot be separated from BQ. Lumping the high frequency component together with the usual BQ aberrations (i.e. terms higher than tilt and focus) is reasonable in a laser system in which down-stream tracking components have limited bandwidth.
The ideal reporting of jitter is a PSD (power spectral density) distribution function. This can be reliably measured from DC to high frequency components by lateral position sensors (Figure 4).
4. OTHER CHARACTERIZATION PARAMETERS 4.1 Determination of Turn-On Time and Pulsing Capability
Bringing the laser from a full-off to a full-on condition requires transitioning through various levels of readiness, each of which is associated with some minimum time interval. The time span from full-off to full-on is the sum of these transition intervals. The rate of power consumption for each readiness level may be important.
This subsection is written under the assumption that there exists a key transition from a Ready State to a Fire State that can be measured by observing the laser output when starting from a non-lasing condition. It is also assumed that this Ready State is defined by some suitably low electrical power draw from a systems standpoint, and that the system is capable of dwelling in this ready condition. The whole notion of Ready States and turn-on time must be considered in context of the planned application. If the critical resource is a cryogen supply, different considerations from those here may be appropriate.
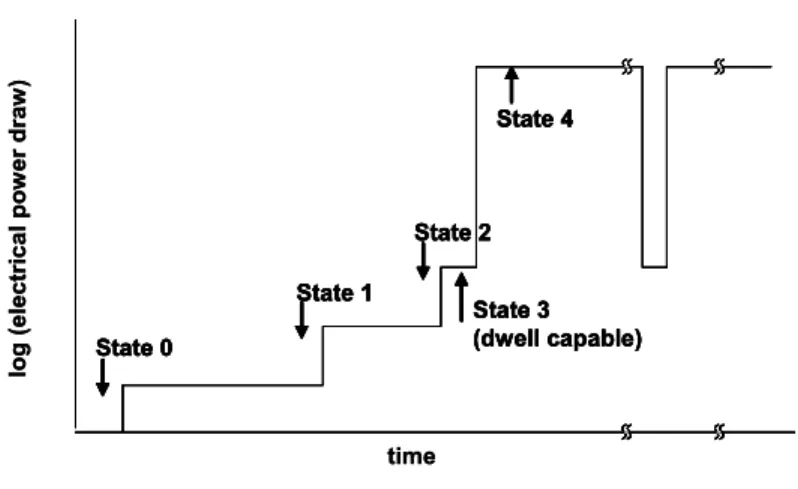
The laser can be characterized by specifying the minimum time associated with each level of readiness. A graphical representation of the turn on process is shown in Figure 6 based on the electrical draw as a key discriminant. State 0 is the cold start and State 4 is full laser power. States 1, 2, and 3 are arbitrary states of varying readiness. They could pertain, for example, to different degrees of thermal conditioning amongst the optical components and cooling subsystems.
Of particular interest will be State 3 and its associated power draw. This is the Ready State, from which the laser can be fired immediately, i.e. some fraction of a second. The turn-on time is then measured as the transition from the State 3 to State 4. Each application will have a specific definition and requirement value for this measurement. An example definition is that it is the time to achieve the program-specified power simultaneously with the specified beam quality, polarization state, and jitter.
Nominally some pulsing capability may also be needed, and this requirement must also be determined by the application. The requirement might be to demonstrate a particular pulse train, or demonstrate a maximum-allowed cycle time. If the system is repeatedly driven from Ready State to Fire State as fast as possible, then a cycle time can measured.
4.2 Efficiency
Assuming the case of an electrically driven laser, below are some useful terms for laser characterization relating to efficiency, along with proposed usage:
Electrical Efficiency - A general term that can be applied to any group of components.
Optical to Optical Efficiency - Conversion efficiency from pump power to laser power. This term always needs
detailed specification, particularly relating to how the pump power is determined (e.g. total diode emission, power absorbed by the gain media, power incident on gain media, etc).
Electro Optical Efficiency – A narrowly defined term for optical power produced divided by electrical power supplied
to drive the gain media. This term will be most useful when listed in conjunction with a given output power, beam quality, and explanation of at what point in the system the electrical power draw is measured (e.g. before or after power conditioning.) In a MOPA configuration (i.e. oscillator with amplifier), one would specify whether the low power stages are included.
Electrical Efficiency to Bucket - Similar to Electro Optical Efficiency, except that only the power falling in a specified
far-field bucket is counted. One would need to specify whether the electrical draw is only that for optical pumping, or if more system elements are included.
Wall Plug Efficiency - The overall system efficiency including all ancillary systems. Requires careful definition if
some of the ancillary functions are provided externally. In a laboratory setting, this efficiency would generally be determined by engineering analysis so that, for example, inefficient house cooling systems do not degrade the result. Except for the optical pump power and laser output power, measurement of these parameters should be straightforward using standard electrical test instrumentation that is subject to a periodic calibration protocol. An explanation of how/where each measurement is made must be included in any test report.
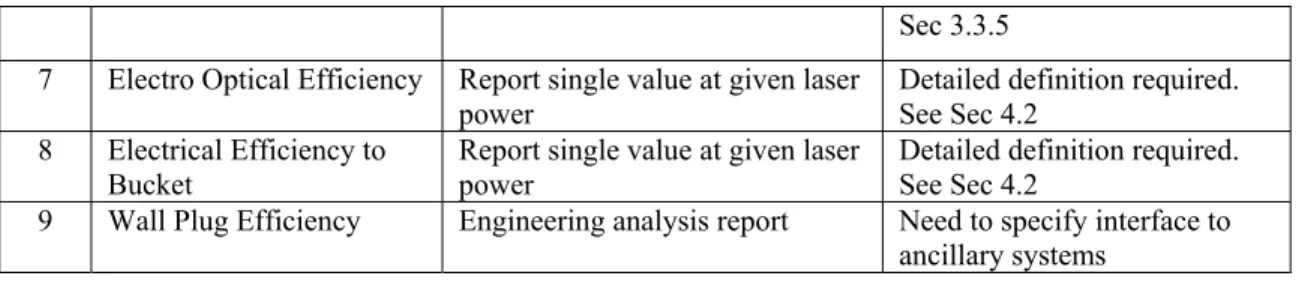
5. EXAMPLE OUTLINE OF CHARACTERIZATIONI REPORT
Table 1 is a generic report template identifying useful characterization parameters, written in the context of a contract deliverables list. It includes references to the preceding Sections, as well as some straightforward items not already discussed.
Table 1. Generic Characterization Report Template. It is assumed that a requirement has been identified for each parameter.
ID Parameter Deliverable Data Comments
1 Power, runtime Graph: power versus time. May
require evaluation of polarization state
Should be confirmed with independent measurement. See Sec 2.
2 Turn-on time Graph: power versus time. The
power draw of the Ready State should be stated
Detailed definition required. See Sec 4.1
3 Pulse Capability Graph: power versus time for
specified pulse train; Alternate: provide graph showing cycle time
Detailed definition required. See Sec 4.1
4 PIB Curve Graph: measured and ideal
curves
Should be confirmed with independent measurement. If physical apertures not used in near and far field, should calibrate against them. See Sec 3.
5 PIB-Based BQ Report single value along with
simultaneous beam power. Need identification of near field plane, near-field shape, and size/shape of far-field bucket
Same as above. Include both BQ-vert and BQ-horiz if BQ-vert > 1.3. See Sec 3.
6 Jitter Report PSD curve and rms values
To Primary Dump Outgoing HEL 14 dB attenuation To Secondary Dump Incoming HEL AR coated surface To Primary Dump Outgoing HEL 14 dB attenuation To Secondary Dump Incoming HEL AR coated surface
HEL Attenuation Known Ratio Beam Dump Near-Field Aperture Intervening Optics Absolute Power Measurement BQ Measurement C B A Sec 3.3.5 7 Electro Optical Efficiency Report single value at given laser
power Detailed definition required. See Sec 4.2
8 Electrical Efficiency to Bucket
Report single value at given laser power
Detailed definition required. See Sec 4.2
9 Wall Plug Efficiency Engineering analysis report Need to specify interface to
ancillary systems
ACKNOWLEDGMENTS
This work was supported by the High Energy Laser joint Technology Office under contract FA9451-05-F-0239.
REFERENCES
[1] Ryan C. Lawrence Thesis, "Active Wavefront Correction in Laser Interferometric Gravitational Wave Detectors". Doctoral Thesis, Massachusetts Institute of Technology, February (2003)
[2] Brian Edwards, Sal Di Cecca, Dan Murphy, Jack Slater, "JHPSSL Government Diagnostics System", presented at DEPS Tenth Annual Directed Energy Symposium, Huntsville, AL (2007).
[3] Joseph W. Goodman, Introduction to Fourier Optics, McGraw-Hill, San Francisco (1968)
FIGURES
Figure 1. Power Measurement Based on Use of a Known Attenuation and a Low-Power Sensor with Absolute Calibration
Figure 2. One stage of Front-Surface Attenuation Based on a Known Fresnel Reflection Coefficient. One secondary reflection is shown as dashed line; others exist.
0.00 0.10 0.20 0.30 0.40 0.50 0.60 0.70 0.80 0.90 1.00 0 1 2 3 4 5 6 7 8 9 10 Bucket radius [λ/D] Fr ac ti o n of po w e r i n bu cket B C D E F A HEL Dump Known attenuation Lateral position sensor Far-field camera Near-field camera, virtual aperture Near-field aperture Power meter. absolute calibration Far-field pinhole
Fast steering mirror allows use of pinhole BQ measurement with laser jitter and/or table motion between laser and diagnostic suite
Drives FSM and/or measures jitter Near-field plane
Telescope relays near-field aperture or camera to near-field plane Transform lens HEL Dump Known attenuation Lateral position sensor Far-field camera Near-field camera, virtual aperture Near-field aperture Power meter. absolute calibration Far-field pinhole
Fast steering mirror allows use of pinhole BQ measurement with laser jitter and/or table motion between laser and diagnostic suite
Drives FSM and/or measures jitter Near-field plane
Telescope relays near-field aperture or camera to near-field plane
Transform lens
Figure 3. Example PIB Curves. The left-most is a diffraction limited ideal PIB curve calculated for a uniformly illuminated disk with uniform phase. In this case the far field pattern is an Airy disk, and the size of the central diffraction lobe is indicated by point C. The other two curves are examples of a relatively high quality and a lesser quality beam. The labels A, B, etc. are used for reducing these curves to single-value BQ parameters as discussed in the text.
Figure 4. Generic hardware configuration for high power laser characterization that permits simultaneous measurement of laser parameters.
0 2 4 6 8 10 12 0.00 0.10 0.20 0.30 0.40 0.50 0.60 0.70 0.80 0.90 1.00 Bucket radius [λ/D] Fra ction o f p o w er in bucke t Bucket for BQ measurement A B C Bucket for camera normalization 0 2 4 6 8 10 12 0.00 0.10 0.20 0.30 0.40 0.50 0.60 0.70 0.80 0.90 1.00 Bucket radius [λ/D] Fra ction o f p o w er in bucke t Bucket for BQ measurement A B C Bucket for camera normalization log (electri ca l po w er dra w ) State 0 State 1 State 2 State 3 (dwell capable) State 4 State 0 State 1 State 2 State 3 (dwell capable) State 4 time log (electri ca l po w er dra w ) State 0 State 1 State 2 State 3 (dwell capable) State 4 State 0 State 1 State 2 State 3 (dwell capable) State 4 time
Figure 5. Use of Camera and Pinholes Together to Provide a Correctly Normalized PIB curve. The ratio A/B is measured by camera and the ratio B/C is measured by pinholes. Assuming that C represents essentially all of the beam (which must be verified), then point A is located properly as (A/B)*(B/C), which in this case is ≈ 0.40.
Figure 6. States of Operations Relevant to Determination of Start-Up time. Of primary interest is the Ready State (State 3) and for full-power Fire State (State 4).