Development and Optimization of High-throughput
Zebrafish Screening Platform
by Bryan Kyo Koo
B.S. in Electrical Engineering and Computer Science Massachusetts Institute of Technology, 2009
MASSACHUSETTS INSTITUTE OF TECHNOLOGY
SEP 2
9
2010
LIBRARIES
ARCHIVES
SUBMITTED TO THE DEPARTMENT OF ELECTRICAL ENGINEERING AND COMPUTER SCIENCE IN PARTIAL FULFILLMENT OF THE REQUIREMENT OF DEGREE OF
MASTER OF ENGINEERING IN ELECTRICAL ENGINEERING AND COMPUTER SCIENCE AT THE MASSACHUSETTS INSTITUTE OF TECHNOLOGY
May2010
@ 2010 Bryan Kyo Koo. All Rights Reserved.
The author hereby grants to MIT permission to reproduce and to distribute publicly paper and electronic copies of this thesis document in
whole or in part in any medium now known or hereafter created.
Signature of Author:
Ebpiwuiti ci becLricai ingineering
Certified by:
Professor of Electrical Engineering
Accepted by:
and Computer Science May, 2010
Mehmet Fatih Yanik and Computer Science Thesis Supervisor
Christopher J. Terman
Professor of Electrical Engineering and Computer Science Chairman, Department Committee on Graduate Theses
Development and Optimization of High-throughput
Zebrafish Screening Platform
by Bryan Kyo Koo
Submitted to the Department of Electrical Engineering and Computer Science on May, 2010 in Partial Fulfillment of the Requirements for the Degree of
Master of Engineering in Electrical Engineering and Computer Science
ABSTRACT
The high-throughput zebrafish screening platform is a revolutionary tool that enables subcellular precision in vivo whole animal screening of Danio Rerio. It can perform laser surgery and/or imaging in
less than twenty seconds per fish. This is a two orders of magnitude improvement from the existing manual method, which takes 10 to 15 minutes per fish. The platform also has the ability to rotate the fish in any angle for imaging or laser surgery. There has never been a platform that could align and
position a zebrafish consistently and efficiently in such manner before. This crucial functionality was realized through a design in which zebrafish was screened in a capillary tube.
Thesis Advisor: Mehmet Fatih Yanik
Table of Contents
. Introductntro...----.---.---.---.---n
2.2 Backgroundck...---.---..---.---.- I
2.1 Zebrafish in M odern Research...---.. . ---... I I
2.2 C. Elegans Whole-Animal In Vivo Screening ... 13
2.3 Current and Past Zebrafish In Vivo Screening... 14
2.4 Capillary for Ideal M icroscopy ... ... ... I 5 3. M icrofluidic Chip M ethod...---.... ---... 17
3. 1. Building M icrofluidic Chips... ---... 17
3.1.1 AutoCad ... ----.... ---... 17
3.1.2 DX F2G-Code ... ... - - - ... 18
3.1.3 G-Code M anipulation...- .... . ---...19
3.1.4 Fabrication...---... --.... ---... 20
3.2 M icrofluidic Chip Designs...---...21
3.2.1 Early Stage Design ...-- ...--- 21
3.2.2 M id Stage Design ...--.... . ---... 23
3.2.3 Last Stage Design... . ---...-24
4. Design of the High-throughput Screening Platform ... 27
4.1 Hardw are Com ponents...27
4. 1.1 Photodetector Unit... .... ---... --... 28
4.1.2 O bjective Cage Unit... ---...34
4.1.2 M ultiw ell Plate Stage...37
4.1.4 Syri nge Pum p ... 40
4.1.5 Pinch Valves ...---.. ---... 41
4.2 Software Com ponents... ... 42
4.2.1 Syringe Pum p Control ... 42
4.2.2 M otor Control ... ... 45
4.2.3 M ultiw ell Stage Control ...-... ...----48
4.2.4 Cam era & M achine Vision ... 49
4.2.5 O verall Control of the Platform ... 50
5. Platform Perform ance Testing... 53
5. 1.1 Swimming Bladder...--- ... . . ---... 53
5.1.2 Assessment Method...-... ---... 54
5.1.3 Assessment Result...---.... . ---... 56
5.2 Speed Measurement of Individual Parts of the System... 57
5.2.1 Assessment Method...---..---...58
5.2.2 Assessment Result...--....---...58
6. Imaging Capability of the Platform...----...--...60
7. Future W ork and Improvement ... ... 62
7.1 Confocal Imaging...---... ---... 62
7.2 Pipelined Screening...--...---...64
7.3 Ultrathin Borosilicate Capillary...65
8. Summary...- ... - --..-.. --... ---... 66
Table of Figures
Figure I Side-view of 2-day old Zebrafish... .. I I
Figure 2 C. Elegans (left) and Zebrafish (right) under flourescent light. C. Elegans have fewer marked neurons that are more visible. The main neurons are harder to view in zebrafish due to
flouresence noise from m inor neurons... 14 Figure 3 The Matlab interface of dxf2gcode. Top right window is Figure I: GUI for manually selecting
paths. Left window is Figure 2: a log of G-code converted thus far. Bottom right window is a 3-d diagram of G-code that has been converted thus far ... 18
Figure 4 One of the early chip designs. The red paths indicate the order that zebrafish navigates through the chip. The triangular structure on top right is the isolation chamber and the trapezoidal structure on the left is the immobilization chamber... 21 Figure 5 One of the mid-stage designs. Isolation chamber is the same as the design in Figure 4. However,
the immobilization chamber has been modified in this version... 23
Figure 6 Zebrafish immobilized imperfectly in the chamber. Notice the depression layer not quite pressed on the right side near the fish's head. This chamber was also too large...24 Figure 7 One of the late-stage designs. The immobilization chamber on the left is sloped towards the
bottom of the chip. The inlet and outlet channels funnel out. ... 25
Figure 8 Zebrafish trapped in the immobilization chamber of chip design in figure 7. Zebrafish is trapped at the deeper part of the chamber after the immobilization layer depressed on it. The fish in this picture is older and bigger than the ones that are commonly used for screening, which is why it does not quite fit in the cham ber ... 26
Figure 9 Schem atic D iagram of the Platform ... 28
Figure 10 The Signal Logic for the Photodetector Unit. The first peak represents the signal from an air
bubble, and the second peak represents the signal from a zebrafish. You see that with the two signals combined, zebrafish's signal has a bigger magnitude ... 3 I Figure I I The picture (left) and the input/output diagram of OPT301 Photodiode Integrated Circuit...32
Figure 12 T he inner circuitry of O PT 30 I ... 33
Figure 13 Circuit Design of the Photodetector unit. It is connected to four Nidaq ports. Note that the two LED's are integrated on the sam e board... 33
Figure 14 Diagram of Photodetector Unit. Green LED is shone right through the capillary on the photodiode, and the blue LED is shone perpendicular to the green light. Paths of light are all contained w ithin the black polyurethane block... 34
Figure 15 Photo of Jam eco Stepper M otor ... 36
Figure 16 Photo of Interinar BSD-02LH Motor Controller. The black socket with ten gold pins is where a rainbow cable can be plugged in. However, the wires can also be connected individual through the green screw-in ports on bottome left and top left of the picture. The four ports on the top right are the ports where the four lead wires from bipolar stepper motor connects...37
Figure 17 Photo of Prior H 10 I A Stage. ... 39
Figure 18 Diagram of Fish Loader/Dispenser in conjunction with one of the 96 wells on a plate. The narrower tip acts as an outlet to prevent pressure build-up during aspiration or dispensation...40
Figure 19 Photo of Tricontinent C3000 Precision Syringe Pump...41
Figure 20 Photo of Biochem-Valve 075P2NC I 2-02SQ Pinch Valve ... 41
Figure 21 Photo of Biochem-Valve 075P2NC I 2-02SQ Pinch Valve ... 42
Figure 22 The diagram of the
10-pin
connection of Interinar BSD-02LH Motor Controller...46Figure 23 Schematic Diagram of the screening platform. VI,V2,V3 are the pinch valves that function as the logic gates of the screening process. ... 5I Figure 24 GUI for the screening platform. (Left) Syringe GUI (Right top) Motor GUI (Right bottom) M ultiw ell G U I...52
Figure 25 Zebrafish with fully-developed swimming bladders (right) and with underdeveloped swimming b lad d e rs (left)...54
Figure 26 Zebrafish with edema. Internal organs, especially the yolk sack is more opaque and the chest cavity containing the heart is severely enlarged ... 55
Figure 27 Number of zebrafish larvae with fully developed swimming bladders after going through the
system at 200/400/200, 300/400/300, 400/400/400, respectively ... 56
Figure 28 Number of zebrafish larvae with fully developed swimming bladders between the control group and the group that went through the system at 400/400/400 speed...57 Figure 29 The images of wild type zebrafish (left) and astray zebrafish (right). The neuronal paths on the left form a clear X, whereas the ones on the right are randomly scattered from the brain to the eyes. ...--- ...--- ... . ---... 61
Figure 30 Digitally reconstructed image of confocal microscopic scans of zebrafish's head with
fluorescence in its vasculature. (Weistein Laboratory, NIH)...63 Figure 31 Tentative Schematic Diagram of the pipelined high-throughput screening platform. It operates
Table of Tables
Table I Attributes of some key animals used to model human disease. -, not relevant, or not a strength;
$, $$, $$$ and +, ++, +++, relative cost ($) and strength (+) of the model in each category ... 13
Table 2 List of Material used to build capillaries in optical and biological applications ... 15
Table 3 The functionalities of the I 0-pin connection of the motor controller...46
Table 4 The microstep sizes based on the states of MS I and MS2... 47
1. Introduction
My thesis work was part of a larger project to develop a high-throughput whole-animal bioscreening platform for zebrafish larvae at Professor Yanik's High-Throughput Neurotechnology Group in Massachusetts Institute of Technology Research Laboratory of Electronics. We aspired to create a platform that enables a high-throughput screening of zebrafish larvae in the order of one screen per 20 seconds, which is two orders of magnitude faster than the existing manual method, which is in between 15-20 minutes. We employed devices such as photodiode, computer controlled syringe pump, step motor. The computer interface was implemented in Matlab while the image capturing was done through the proprietary software provided by the camera itself. The project was targeted especially to the field of bio and neuronal research usage, because the completed platform could facilitate zebrafish screening in the volume unimaginable in the past.
The project was first incepted in the summer of 2008 by a summer researcher Hasan Celiker and a graduate student Cody Gilleland. The initial goal was to take the approach and methods of the C.
Elegans project within the lab headed by Chris Rohde and Cody, and apply it directly to zebrafish. The project was then put on halt after the summer until I came under Cody's supervision for the project during January of 2009. We continued the approach of imaging zebrafish in a microfluidic chip with until we decided that it would be more efficient and accurate to image the fish in a capillary tube. Afterwards, graduate students Carlos Pardo and Michael Chang took over the project on the summer of 2009 along with me. We also started seeking advice and supervision from a Bioengineering Department instructor, Steven Wasserman. There were also five additional researchers onboard for the summer who assisted in the development of the prototypes for the platform, management of the zebrafish, and experimenting with alternative data acquisition methods. The project, which continued with Carlos, Mike, and
I, culminated in a paper titled High-throughput subcellular-resolution in vivo vertebrate screening platform that
My role in the project before the change to capillary was to design and fabricate microfluidic chips. During the summer of 2009, I became responsible for a segment of the project that included more diverse tasks. First, I was in charge of finding an appropriate capillary for the zebrafish to be
imaged in instead of microfluidic chip. I was also in charge of designing and building a stepper motor system that would rotate the capillary under the objective both on software and hardware side with Carlos. Learning and interfacing the syringe pump for the entire system was a task shared with
Michael. Michael and I also developed the photodetector system, along with a few other components to the mechanical and fluidic aspects of the system. I was not involved with the selection and set up of the microscopes, laser, and the major decisions in which strains of zebrafish and assays to be used with the platform. I only observed and assisted in the actualization of the imaging part of the platform, but I did have a major role in testing and optimizing the mechanical controls.
In this thesis report, I first introduce some of the background material on the field of whole animal bioscreening and factors that played major roles in making decisions for the project. As a part of that effort, I give an overview of the microfluidic approach of the project. Then I describe the hardware and software design for the system excluding the microscopy aspect of it. The result section is divided
into two sections, first being the performance test including the health assessment and the speed measurement, and second being the demonstration of imaging capability of the platform with images taken during screening. Future works and improvements outline the work that has been done from January until May, and also other modifications and improvements that are in plans for the platform.
After the summary, appendices include basic knowledge and mechanism of the devices or software used in the platform.
2. Background
2.1 Zebrafish in Modern Research
Zebrafish, binomial name Danio Rerio, is an important model organism for vertebrae
development and gene function research. The value of zebrafish as a model for human disease has been substantiated by multiple recent publications that described of zebrafish mutations with diseases characteristic to humans. There is a rich set of genetic tools that are capable of locally modifying zebrafish gene to create mutations in various functions in the body, including the liver, eyes, the central nervous system, heart, and even blood. These genetic tools are only multiplying in numbers and as a result, zebrafish, which was initially envisioned as a model simply to bridge the gap between C elegans and lab rats, turned out to be a valuable model in its own right.'
Figure I Side-view of 2-day old Zebrafish.
Apart from its value as a model organism close to humans, zebrafish has many traits that make it very a convenient and useful for research. Its embryo develops rapidly, progressing from egg to larva in less than three days. It also takes only three months for the embryos to mature enough to procreate. The embryos are large, robust, and transparent, so are the larvae for the first 7 days of their life. They
develop externally to the mother.2 All these characteristics facilitate easier experimental manipulation
and observation than other common vertebrae model organism such as rattus norvegicus. Especially the
' Barut
transparency of larvae is unforeseen characteristic in any other vertebrae model organism. Furthermore, zebrafish is currently the only vertebrae model organism in millimeter scale used for bio research. It develops physiological traits such as the nervous system, circulatory system, and digestive systems that also exist in human bodies, yet it is several magnitudes of order smaller than rattus norvegicus in size and maturity rate.
A great merit of small organisms such as zebrafish and C. elegans is that only in their size is it possible to do a whole-animal screening with the entire organs and tissues under the microscope. There have been a plethora of these two model organisms with specific organs, neurons, and tissues marked with fluorescence dye. This enables a very accurate and clear imaging of those organs, which can be observed for mutation, deterioration, regenerations, and etc.
The maintenance of zebrafish is also more cost and space efficient than other model
organisms. Zebrafish facilities can grow 25-30 adult zebrafish in a cubic foot space in which only one to two lab rats can be grown. The fish only need to be fed twice a day to grow healthily. Each zebrafish can be mated as often as twice a week, producing 200-300 eggs per time. This is two orders of magnitude higher than rats, which only produce 15-20 pups per litter every month. Therefore, zebrafish can be used to screen assays in the scale unimaginable for rats due to the drastic difference in throughput. C. elegans share these merits in terms of throughput and volume, but the organism is far too removed from humans genetically and physiologically to do any reliable biomedical assay screening. Zebrafish is a very efficient organism to test assays before moving onto rat testing, since the latter takes much more resources and time.
It is difficult to find comparisons between the three organisms mentioned here (C. elegans, rats, and zebrafish) all together since C. elegans are drastically different from rats and zebrafish in many aspects, but there is a table of comparison among some of the model organisms in terms of their cost and their biological significance as a model organism published by Nature Review, part of which is listed on Table I.
Attribute of Disease Model Model Organism
Practical Issues
Fly
Zebrafish
Mouse
Rat
Husbandry Infrastructure
$
$
$$$
$$$
Cost Per
Animal
Per year
$
$
$$$
$$$
Characterized Inbred Strains + - ++++ +++
Outbred Laboratory Strains + +++ ++ ++
Anatomical Similarity - + ++ ++
Molecular or Genetic Similarity + ++ +++ +++
Pathological Similarity - ++ +++ +++
Storage; For Example, Freezing Sperm
No
Yes
Yes
Yes
Table I Attributes of some key animals used to model human disease'. -, not relevant, or not a strength; $, $$, $$$ and +, ++, +++, relative cost ($) and strength (+) of the model in each category
2.2 C. Elegans Whole-Animal In Vivo Screening
The effort to achieve automated, high-throughput whole animal screening has only started in past few years. The objective of my project was achieved with C. Elegans at High-throughput
Neurotechnology group by Zeng, Rohde, and Yanik whose work was published on Sub-cellular Precision
On-Chip Small-Animal Immobilization, Multi-Photon Imaging and Laser Imaging and Femtosecond-Laser Manipulation. They developed an automatic high-throughput screening system for C. elegans that
was capable of sub-cellular precision surgery and imaging. The complete immobilization of C. elegans was achieved by using depressive layers on silicone microfluidic chips. The chip described in the paper is capable of drug screening, microsurgery, and imaging at an unforeseen rate through a 2-D design and a
relatively simple control system.4
It later became apparent that some of the fundamental differences between the two organisms made the adaptation of technique unrealistic. C elegans' physiology is practically one
dimensional, requiring no rotational alignment. Focusing on a target neuron is also much easier because the organism is thin and it only has a few major neuronal paths, so it leaves very little chance of having much noise in the image. Due to a more complex neural network, there are very few strains of
Currie
zebrafish with fluorescence marks that just light up the few major neurons. Even in the latter case, it is often challenging to focus on the target neuron due to the thickness of the organism in comparison to the thickness of its neuron. C elegans are also much more resistant to physical pressure applied to them, whereas zebrafish is injured quite easily from the same depressive layers used to immobilize c elegans.
Figure 2 C. Elegans (left) and Zebrafish (right) under fluorescent light. C. Elegans have fewer marked neurons that are more visible. The main neurons are harder to view in zebrafish due to flouresence noise from minor neurons.
2.3 Current and Past Zebrafish In Vivo Screening
There have been several publications on in vivo screening of zebrafish with various methods and levels of success. Wang, Liu, and Sun from University of Toronto has devised a system where zebrafish
embryos are immobilized in wells through suction and grown into larvae while immobilized.5 Although
this method insured an immobilization of individual zebrafish without notable damage to the organism, there is no control over which direction that the fish would grow to be. Moreover, the method itself is
very limiting because the larva is always constrained in the well. It prohibits precise imaging or surgery and it is detrimental that the individual larva cannot be transported.
The one distinguishing characteristic of my thesis, which is imaging zebrafish larva in a capillary, has been implemented before by Funfak and Brosing as illustrated in Micro fluid segment technique for
screening and development studies. In their set-up, zebrafish embryos are aspirated in Teflon capillary
tubes and each of them occupies a section of medium that is separated within the tube by air bubbles.
Embryos then grow to be larvae in this long string of medium.6 However, this method is also severely
limiting since the organism cannot be manipulated or screened with drugs once they are put in the capillary. Although this system used automatic syringe pump and Teflon tubes like my project, it did not utilize the merits of the respective elements as we did in our project.
2.4 Capillary for Ideal Microscopy
The process of selecting the right kind of capillary for imaging was not a trivial step. Initial idea of capillary imaging was tested with a borosilicate capillary tube and the bright-field imaging displayed a promising performance with a high-level of resolution. However the difference between refractory index of borosilicate glass and water (all the imaging in the project was done with water immersion lenses) caused the image to blur due to light scatter. It was discovered that Teflon polymers generally had a closer index of refraction to water as can be seen on table 2.
Material Index of Refraction
Water (in 20 Celsius) 1.333
Borosilicate Glass 1.517
Quartz Glass 1.46
Teflon PTFE (Polytetrafluoroethylene) 1.35
Teflon FEP (Fluorinated Ethylene Propylene) 1.338
Table 2 List of Material used to build capillaries in optical and biological applications
Even among Teflon polymers, FEP had the closest index of refraction with a marginal difference of .005. There was some issue of autofluorescence in the material, since it wasn't completely clear, but it was the best among all the options due to its refractive index. The FEP capillaries were also easier to handle since unlike borosilicate ones, they were flexible. This also proved to be a good decision in the long run because we eventually will need to inject individual zebrafish with needles. This process would be possible with Teflon tubes that could be punctured without cracking due to its elasticity, but not with most glass. There was a possibility of using square borosilicate capillaries, which eliminated the need of matching index of refraction, but this option would have defeated the purpose of using capillary to begin with, which was to have the freedom of rotational imaging.
It should also be mentioned that imaging the fish through a gel was also considered. This method would have involved dropping the fish in a well filled with liquid form of agar gel and then mixing it with an agent to cure the liquid and solidifying it, resultantly trapping the fish inside. However, this method seemed highly unrealistic because the alignment would be even more difficult and cutting the fish from the oxygen source and encapsulating it in gel would most likely have negative influence on its health.
Most importantly, the process of curing and thawing the gel themselves would take much longer than 20 seconds, defeating the main goal of the platform.
3. Microfluidic Chip Method
The initial high-throughput zebrafish screening platform prototypes relied on microfluidic chip for a long duration due to the success of the C. Elegans project. Using microfluidic chips had many merits in automated screening for C. Elegans because they could be manipulated in a small chamber with precise fluidic control and surface manipulation. However, even with these capabilities, zebrafish proved to be too delicate and sophisticated to be controlled with methods employed by the C. Elegans project. However, this is not to say that there is no hope in employing microfluidics to high-throughput zebrafish screening. With more precise 3-D fabrication and possibly different kinds of silicone, it could be possible to create a chip that could effectively screen zebrafish larvae.
3.1. Building Microfluidic Chips
3.1.1 AutoCad
All of the chip design for this project were done in computer-aided design (in short CAD) software AutoCad. Although the software had 3-D capabilities, most of the designs were done in 2-D, since most of the chips were made from flat drill paths. Selected few designs later on in the project did have z-coordinate gradients of drill. It should be noted that the design from AutoCad is only a collection of drill paths. Within AutoCad program, there is no functionality to dictate anything on the design but the 2-d display of lines the software. The decisions and calculations of what size drill would mill out which drill path all had to be measured and calculated alongside the design. Therefore, it is often helpful to engrave the basic specs within the design file itself to avoid confusion in fabrication if it is possible.
3.1.2 DXF2G-Code
Once a design is completed using AutoCad, the file has to be saved in a DXF format. Matlab script called dxf2gcode was used to convert the DXF files into a machine code called G-code. When the script is activated, one of the designs can be chosen to be converted to drill paths. Once a file is chosen, Matlab displays three screens as shown below. Figure I on top right displays the design and enables you to assign the origin of the path coordinates, the scale of the design, and the drill paths. Figure 2 on the left displays the actual G-code that specifies the drill path, and figure 3 on the bottom right displays the visual 3-d path of the design that has been converted to G-code.
Figure 3 The Matlab interface of dxf2gcode. Top right window is Figure
I:
GUI for manuallyselecting paths. Left window is Figure 2: a log of G-code converted thus far. Bottom right window is a 3-d diagram of G-code that has been converted thus far.
The first step in this procedure is to set the origin then choose a segment on the design to decide the scale. For this project, each chip design had a segment on the bottom that was .04 inch long
for the purpose of scaling only. This was important because the CNC machine used for the project ran on inch scale, and it was important to uniformly design and convert the drill paths in inches. Every time the lines on the design are converted to drill paths, the drill depth and the drill movement speed need to be chosen. Since each chip usually needs two to three different drill bits to mill out the path, separate G-codes were created for respective drill bit.
3.1.3 G-Code Manipulation
As noted in the previous section, all the AutoCad designs in this project were done in 2-d, and 3-d element was added directly to the G-code. Following is a sample G-code.
GOO ZO.0300 XO.3197 YO.2231 GOI Z-0.1200 F1.5000 GO I XO.5197 Y0.2231 F1.5000 GO I X1.1197 Y0.2231 F1.5000 GO I X I.3197 Y0.2231 F1.5000 GOO ZO.0300
Outlining the first few steps of this code, the drill goes up by .03 (or move to z coordinate of .03) from wherever it was. Then it moves to x-coordinate of .3197 and y-coordinate of .2231. Afterward, it lowers the drill by .12 then move right to x=.5197 while staying on the same y-coordinate. Notice that the z-coordinate is not specified, because in G-code, unless noted, the z-coordinate stays the same from the previous location input.
It is actually possible to change the Z-coordinate within the same path. You can manually type in the z-coordinate since G-code is nothing more than a series of plain text. For example, if the drill needs to move up in Z-coordinate at a gradient of .06 inches at the either end of this path, following changes can be made.
GOO ZO.0300 XO.3 197 Y0.2231 GO I Z-0.1200 F1.5000 GO I XO.5197 Y0.2231 Z-.06 F1.5000 GO I X I.1 197 Y0.2231 F1.5000
GOI XI.3197 Y0.2231 Z-.12 F1.5000 GOO ZO.0300
Now the path is not on the same Z-plane, but instead the first and third paths are at a slope of .06 and -.06 respectively, outlining an isosceles trapezoidal path. Although occasionally
time-consuming, for more elaborate changes, this method was chosen whenever there was a need to make a z-coordinate gradient on the chip design.
3.1.4 Fabrication
Fabrication refers to all the physical and chemical steps necessary to build a microfluidic chip. First, the G-code is transferred to the Computer Numerical Controlled (in short, CNC) station. The file is then opened in the CNC program that runs the milling machine. For each drill path of the chip, the correct drill bit is manually replaced on the machine before drilling on a polycarbonate plate. Once the
polycarbonate plate is milled, the rough edges are smoothened out by carefully cutting off the remaining debris and cleaning the surface. Afterwards, the polycarbonate plate is vapor-polished with methylene chloride. Vapor polishing is executed by boiling the corrosive methylene chloride in a contained space and exposing the polycarbonate plate in the space to round out the channel and clear out the debris that are too small to be removed by corroding them with the methylene chloride fume. Following this, degassed polyurethane mixture is poured on the polycarbonate plate to create a black mold. It is then degassed again in a vacuum chamber to insure that there is no air bubble trapped in the liquid before it hardens. After the black mold is greased, polydimethylsiloxane (PDMS) is poured directly to create the microfluidic chips. The grease prevents the PDMS to get stuck to the surface, which can cause it to break. The pressure layer is fabricated on a separate crystal plate with multiple pressure layer patterns
by spin coating the wafer with PDMS to create a millimeter-thick membrane. The silicon chip and the pressure layer are bonded together by thermal bonding and then they are plasma-bonded in a vacuum on top of a glass slide. The reason that we bond it on glass instead of metal is to allow imaging through the plate.
3.2 Microfluidic Chip Designs
3.2.1 Early Stage Design
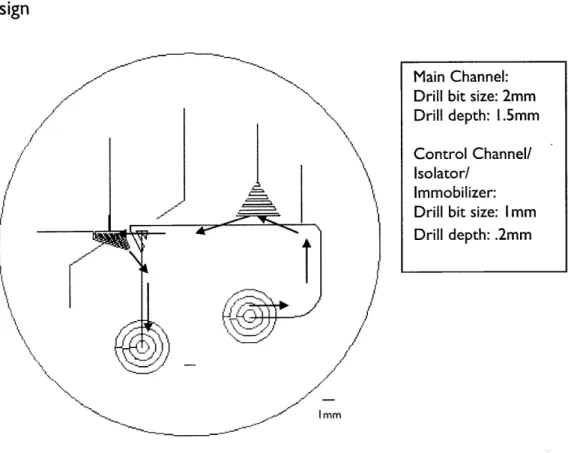
Figure 4 One of the early chip designs. The red paths indicate the order that zebrafish navigates through the chip. The triangular structure on top right is the isolation chamber and the trapezoidal structure on the left is the immobilization chamber.
First few microfluidic designs looked like Figure 4. The two concentric circles are the holes where syringe tips are positioned to let zebrafish in and out. The channel in blue is the main channel where the zebrafish travels down the chip. The purple lines on the periphery of the flow channel are the
Main Channel: Drill bit size: 2mm Drill depth: 1.5mm Control Channel/ Isolator/
Immobilizer: Drill bit size: I mm Drill depth: .2mm
control channels, which eject or absorb water to control the position of zebrafish in the chip. The control channels were milled out with drill bits small enough not to let any zebrafish body part through. The purple triangular region is an isolation chamber where the chip aspirates one zebrafish and let others go through the drain so the chip can insure that there is only one zebrafish in the chip. The trapezoidal chamber on the left is the immobilization chamber where it aspirates the zebrafish and presses down on it from the top with a depressive membrane. The red arrows on figure 3 indicate the path a zebrafish goes through in the chip during screening. It first enters the chip on the right bottom, then travels up the channel and gets isolated by the isolation chamber. Zebrafish is then pushed further
left and is eventually pressed down in the immobilization chamber. After screening/surgery/imaging is done, the zebrafish exits the chip through the other circular hole in the bottom left.
This design had a few problems that needed to be improved.
I) The inlets and the outlets were designed so that they come in perpendicular to the chip, but this caused zebrafish to hit the bottom of the chip and die upon arrival.
2) All the channels were too big. The flow channels had too much unnecessary space and even the control channels were big enough to cause zebrafish get stuck in them.
3) The immobilization chamber did not work very well because it was too big. A simple pressure layer like the one in C. Elegans chip was not effective in holding the zebrafish in position since zebrafish is not flat or small like C. Elegans.
3.2.2 Mid Stage Design
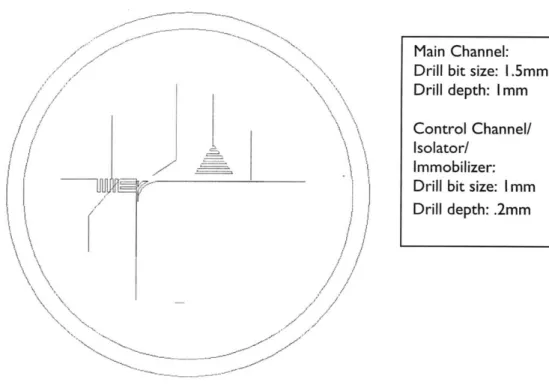
Figure 5 One of the mid-stage designs. Isolation chamber is the same as the design in Figure 4. However, the immobilization chamber has been modified in this version.
Since the early designs, there were many improvements on channel specifications and
immobilization chamber. First, the channel width and depth were smaller to accommodate the size of zebrafish better. The control channels were made narrower and shallower to prevent zebrafish from getting stuck in the chip. Lastly, and most markedly, a different design was used for immobilization chamber. Instead of being trapezoidal, this one was rectangular. The left half of the chamber was deep enough to let the zebrafish's head through, but narrow enough for its tail to go through. The right half was milled in a slope that made the depth of the chamber as deep as the flow channel. With this mechanism, we were hoping that by applying suction from the left end of the chip, zebrafish's tail would be positioned in a consistent manner.
This design, however, posed new challenges. The immobilization chamber was too wide, causing the fish to get stuck at different places every time. In addition, due to the chamber's depth near the flow
Main Channel: Drill bit size: I.5mm Drill depth: I mm Control Channel/
Isolator/ Immobilizer:
Drill bit size: Imm
channel, the depressive membrane on the fish was even less effective since the surface of the chamber that it was depressing on was not flat. You can see an attempt to immobilize a zebrafish in figure 6.
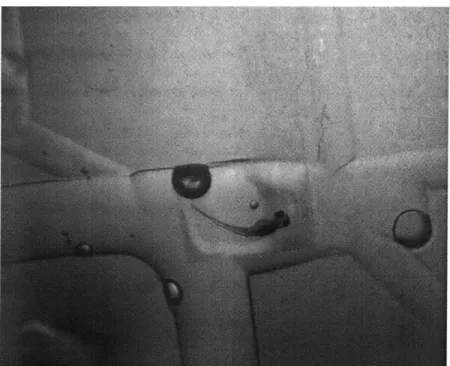
Figure 6 Zebrafish immobilized imperfectly in the chamber. Notice the depression layer not quite pressed on the right side near the fish's head. This chamber was also too large.
3.2.3 Last Stage Design
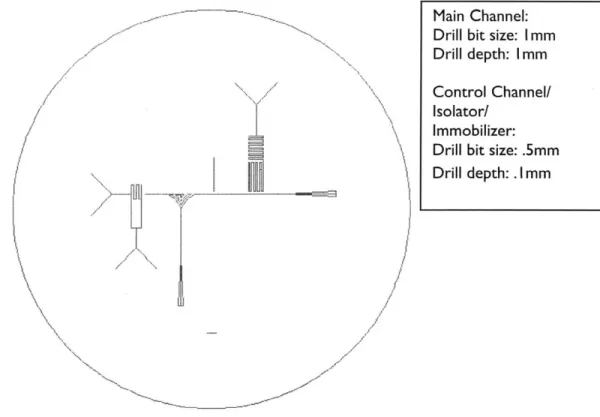
For this design, all the control channels were made even narrower and shallower by using .5mm-diameter drill bit. Also, the immobilization chamber was changed to employ a similar mechanism to the one in C Elegans chip designed by Zeng. The rectangular section was sloped so that the chamber got deeper as it got closer to the two separate control channels on the bottom. Although it is not visible through the 2-d Auto-cad plot, in G-code it was designed so that there is an extra room just big enough to fit one zebrafish. The mechanism in the design was to depress the immobilization depressive membrane to push the fish to the deeper side of the chamber, while supplementing the immobilization with the two suction channels. This is illustrated in figure 8. (The zebrafish used in the testing was older than 72hpf, which is why it does not fit in the room on the side)
Main Channel: Drill bit size: I mm
Drill depth: Imm
Control Channel/ Isolator/
Immobilizer:
Drill bit size: .5mm Drill depth: .Imm
T/
Figure 7 One of the late-stage designs. The immobilization chamber on the left is sloped towards the bottom of the chip. The inlet and outlet
channels funnel out.
Input and output holes of the flow channel were also changed for this design. They get wider and deeper at the tip in order to diagonally insert 3mm-thick metal tubes to the chip. This diagonal insertion prevented zebrafish from hitting the bottom of the chip as they entered, thus reducing the mortality rate of zebrafish entering the chip.
After this stage of the design, using microfluidic chip to screen zebrafish was put on hold. The major reason was that there was no clear prospect of aligning zebrafish in a consistent manner, which was the basis of the entire project. Moreover the more iterations and experiments we tried
manipulating zebrafish in microfluidic chips, the more we realize that using PDMS chips was not appropriate for the scale we were working with, which was more in millimeter scale than micrometer.
Figure 8 Zebrafish trapped in the immobilization chamber of chip design in figure 7. Zebrafish is trapped at the deeper part of the chamber after the immobilization layer depressed on it. The fish in this picture is older and bigger than the ones that are commonly used for screening, which is why it does not quite fit in the chamber.
4. Design of the High-throughput Screening Platform
There are largely two parts to this section: hardware and software components. The first section involves decisions and designs that shape the mechanical parts of the platform. The software interface of this system, which is in Matlab with a few components tested and supplemented in LabView, was partially adopted from the codes of Chris Rohde from C. Elegans group at the lab.
4.1 Hardware Components
The setup can be most easily described in order that zebrafish passes through it. Zebrafish is initially aspirated from a reservoir for mass screening, or manually from a Petri dish if there is a need to screen a select few animals. During the testing phase, a lot of the screening was done by aspirating the fish from Petri dish. Aspirated from the reservoir, the zebrafish passes through a photodetector unit which stops the flow once it recognizes a zebrafish. Afterwards, zebrafish is flown through the system at
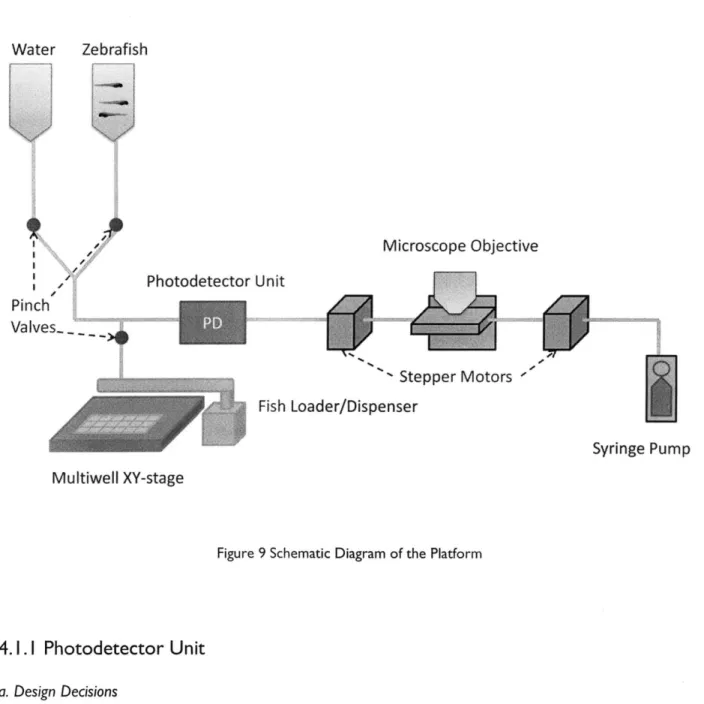
a slower pace until it gets under the microscope objective. At this stage, machine vision detects the fish through the signals from the camera, stopping the fish when it comes in view. After the fish is done with imaging under the objective, the zebrafish can be discarded, or dispensed and sorted in a multiwall plate. Figure 9 is the diagram of the prototype but it was not always the set-up that was used since most components were built and tested separately at points.
Microscope Objective
IlPhotodetector Unit
Pinch
Valves DFish
Stepper Motors
Loader/Dispenser
Syringe Pump
Multiwell XY-stage
Figure 9 Schematic Diagram of the Platform
4.1.1 Photodetector Unit
a. Design Decisions
Building an automated high-throughput system meant a few things in the early stage of its design. One of the most important deliverables was an ability to automatically bring the fish under the objective. After speculation, the best two methods seemed to be using photodetector or using machine vision.
Using the photodetector was successful in making the flow in the system stop when a fish entered the unit, but it was not so successful in transporting the fish right under the objective. This was because the distance that zebrafish travels in the tubes could not be controlled in a consistent manner even with a computer controlled syringe pump. The majority of the path that zebrafish passed through was made of
Water
Zebrafish
elastic silicon tube, which caused the ratio of distance traveled by zebrafish to amount of fluid aspirated by syringe pump fluctuate up to 15-20% at random.
One might ask why the photodetector system was not built right under the objective so that the zebrafish would be located right under the microscope when it's detected. This method posed two problems. First, due to the inherent delay caused by the time it takes for syringe pump to execute the signal sent from the program, the zebrafish always stopped past the photodetector unit. The elasticity of the tube contributed to this since it was observed that the fish still traveled through the tube by a centimeter or so after the syringe pump was stopped. Secondly, photodetector unit needed to be optically sealed in order to ensure that the photodetector did not detect other light sources in the laboratory or other parts of the system. Due to this physical constraint, it was not feasible to build the photodetector unit right under the objective even if there weren't the first problem.
Furthermore, even if this were not the case, it still would not have been efficient to just use photodetector as the sole mean of detecting and aligning the fish under the objective, because the alignment part will always require manual calibration of how much the syringe pump should aspirate for the fish to move from photodetector unit to the objective by trial and error. These two reasons led to using both the photodetector and machine vision for the platform.
The last question to be answered in this design was why not use only the machine vision instead of supplementing it with photodetector system that is not even that precise. The two reasons for this were the speed of the system and the need to isolate individual zebrafish in the screening process.
The first reason defeated the purpose of the platform of being high-throughput. From trial, we noticed that the machine vision can only detect the fish reliably at slower speed of the syringe pump
between 100 and 200 Hz, whereas the photodetector could detect them at speed as high as 400/400.
This was not an insurmountable amount of delay for the prototype, but it slowed down the basic functions of the platform by several seconds, which could double or triple the entire cycle duration. The
more crucial downside of running the system in slower speed throughout was that fish could actually swim away from the aspiration pressure at the bottom of the reservoir.
The second reason detracted from the reliability of the platform. If the flow was not stopped until the fish reached the objective, there was a high probability that there would be multiple zebrafish in the system already. By stirring the fish reservoir where the fish enters the system, we were able to
reliably decrease the frequency of the fish entering the tubes and sufficiently increase the average distance between each fish that enters the platform, but not well enough to let one fish go through the distance to reach the area under the objective consistently without having another fish entering the platform. Having extra fish in the platform was not detrimental, but it did decrease the efficiency and the reliability significantly. First, the extra fish needed to be discarded, which should be avoided as much as possible. Secondly, the fish that entered the system at unexpected point could end up in the syringe pump at the end of the cycle which is highly advised against by the manufacturer due to the fact that there is no good way of cleaning the inside of the syringe. Thirdly, extra fish could remain at random points of the system, and those fish would soon turn into carcasses which clog up and contaminate the entire tube.
b. Photodetector Mechanism
The photodetector system needed to distinguish the signal of the fish passing through from the signals from air bubbles and water. We decided to have a green LED shine light through the capillary to the photodiode so when a bubble or a fish goes through, there would be perturbation to the output signal. The initial design only had one LED illuminating the capillary from the top, down to the photodiode. This was problematic because the negative peaks from air bubbles were larger than the ones from zebrafish. Therefore, we added a blue LED on the side to solve this problem. The blue LED light from the side was perpendicular to the light path of the green light, so the only light that entered the photodiode was the light scattered from the capillary. Since the air bubbles scattered more light than
zebrafish, the sum of two signals resulted in a larger peak for zebrafish. This manipulation enabled the photodetector system to bypass the peaks from the air bubbles and only detect the peaks caused by zebrafish passing through.
Figure 10 The Signal Logic for the Photodetector Unit. The first peak represents the signal from an air bubble, and the second peak represents the signal from a zebrafish. You see that with the two signals combined, zebrafish's signal has a bigger magnitude.
c. Design
i. Photodiode
Opt3O1 from Burr-Brown was used as the photodiode for the photodetector unit. OPT301 is an opto-electronic integrated circuit containing a photodiode and a transimpedance amplifier. The 0.09 x 0.09 inch photodiode is operated at zero bias for excellent linearity and low dark current. The
-Signal from the top LED
inSignal from the side
*
LED
.Sum
of two signals
integrated combination of photodiode and transimpedance amplifier on the circuit prevents current
leakage, high noise pick-up and gain peaking.7
This product was chosen for several reasons. First, it had the operating voltage range of 2.25 to
18V which sufficiently covered the ideal working voltage of 5V. It was one of the very few integrated
circuit photodiode, which saved the effort of manually dealing with the internal impedance of the system. It was also packaged in a metal case that had through-hole extensions, which made it easier to integrate it and interface it with the Nidaq ports.
PIN CONFIGURATION
Top View common V+ NC 1 \ 7 Photodiode -i \ AreC 1 M.0FeebackNOTE: Metal package is intemally connected to common (Pin 8).
Figure I I The picture (left) and Circuit
the input/output diagram of OPT301 Photodiode Integrated
v+
v-Figure 12 The inner circuitry of OPT30I
ii. Photodetector Unit Circuit Design
The photodetector circuit includes the photodiode, a capacitor for reduced noise, and two solid state LED lamps. The circuit was built on a I" X I" breadboard with four wires from a rainbow cable: white wire for the output from the photodiode, red for the supply voltage of 5V, blue for the supply voltage of -5V, and black for ground. The figure outlines the circuitry around the photodiode.
+5V
GND
Capacitor to reduce noise
Voutput
in the output signalFigure
13
Circuit Design of the Photodetector unit. It is connected to four Nidaq ports. Note that the two LED's are integrated on the same board.iii. Photodetector Unit Physical Design
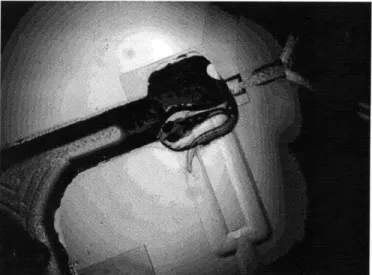
In order to seal the unit from outside light, the entire system was enclosed in a plastic black box. To make sure that the light was concentrated on the capillary passing through the system without outside scattering, a block of Polyurethane was cut into a square piece with holes drilled through them so that the capillary goes through the center, while the photodiode was placed under and LED lamps on top and from the side perpendicularly, as seen in Figure 14.
Figure 14 Diagram of Photodetector Unit. Green LED is shone right through the capillary on the photodiode, and the blue LED is shone perpendicular to the green light. Paths of light are all contained within the black polyurethane block
4.1.2 Objective Cage Unit
a. Design Decision
All the imaging for the platform was done with water immersion lenses. Water immersion technique enables a high-level magnification with less diffraction problem since the water's index of refraction is much closer to that of glass, which most lenses are made of. It also enables the objective to
immerse in the water that covers the cells, tissues, or organisms rather than having to image through a cover glass. For our platform, we needed to contain the Teflon tube in the water while being able to rotate the tube around during imaging. The tubes were fixed on shaft collars around stepper motors on both sides of the objective, which enabled computer-controlled rotation.
b. Teflon Tube Holder
The part that held the Teflon tube was built using a 1/8" thick polycarbonate plate. It was milled out into a square piece and with a rectangular area milled out with ledges around the boundary. In this milled out area, a .9inch by .4inch cover glass was placed with water-repellent grease on the edge to make it leak-proof. On both sides of the milled out area, a hole of 1/32" inch was drilled to let the Teflon tube pass through. This was one of the two parts of the platform that zebrafish passed through the Teflon tube rather than silicon tube, the other being inside the photodetector. Teflon was not flexible enough to be clamped down on the stepper motors on the sides or link to other tubes through Y-collar or capillary extensions.
c. Stepper Motors
One of the greatest appeals of the platform is that it can rotate the animal while screening. This is a crucial functionality since zebrafish, unlike C. Elegans, is a quite large and sophisticated. There are certain organs that are only visible at certain angles, so it is very important to be able to align the fish at least in the 3 perpendicular representative views: dorsal (top surface), ventral (bottom surface), and lateral (side surface).
The motors used in the cage set-up were stepper motors from Jameco. It had the step size of
1.8 degrees, which was more than precise enough for our usage. It was chosen also because it was light
and small compared to its counterparts with similar power output. The supply voltage was 12VDC,
which was within the range of voltage that could be provided by the power source used in the lab. In order to secure the silicon tubes on the motors, a pair of motor shaft collars that can hold the tubes
with socket set screws were built.8
Figure 15 Photo of Jameco Stepper Motor
d. Motor Controllers
Most stepper motors, especially low-cost ones like the Jameco model, do not have built-in controllers or the necessary connections to interface with computers directly. They usually need motor drivers that can control it and even break down its step interval to smaller microsteps. The model used for this platform was Interinar BSD-02LH Step Motor Driver.
This model was chosen for many reasons. First, its inputs can be controlled by 10-pin rainbow cable, which makes the physical interface much simpler and organized than wiring every input individually.
It can microstep at full-, half-, quarter-, and sixteenth- steps for any standard bipolar stepper motors. It operates at a current as high as 2.5A, and outputs up to 30V, which are both above the normal
operating range for the Jameco motors.9 It also has many safety features such as cross-current circuit
protection, under-voltage lockout protection, and thermal lockout protection. It also possesses a very sizeable heat sink. These criteria are very important because the motor driver that was used with previous prototypes short-circuited often and overheated very rapidly while performing screening.
BSD-02LH has not failed during screening besides from human errors.
'
Jameco
9 neiaFigure 16 Photo of Interinar BSD-02LH Motor Controller. The black socket with ten gold pins is where a rainbow cable can be plugged in. However, the wires can also be connected individual through the green screw-in ports on bottome left and top left of the picture. The four ports on the top right are the ports where the four lead wires from bipolar stepper motor connects.
e. Cage
The physical cage itself was built with modified Thorlab parts and the two Jameco Motors. The motors were modified by putting two thread holes on two of the four holes on the back of the motor. Two solid aluminum plates were milled out with two paths that the motors could be secured with screws through the thread holes. These plates with the motors were held together by two foot-long posts. The entire cage was secured on XYZ stage system by the two posts.
4.1.2 Multiwell Plate Stage
a. Multiwell
In order to test a large library of assays on hundreds of fish, it is crucial to be able to organize them after screening. The most appropriate and standard container for this purpose is a 96-multiwell
plates. The individual wells in the multiwell this size has more than enough room for a fish to survive for a few days. For this project, round-bottom wells were used for the following reasons: The round bottom made it easier for syringe tips to aspirate zebrafish from the well, since there were no corners at the bottom.
As a matter of fact, zebrafish are small enough to fit in the wells of 384-multiwell plates. This switch, which will not involve much recalibration of the platform, can improve the system by four folds. However, there is a disadvantage in the health of zebrafish when raised in a smaller space. Ideally, the water in each reservoir of 96-well plate needs to be refilled daily to keep the living condition optimal. The wells in 384-multiwell plates are more than four folds smaller than the wells of 96-well plate, likely
resulting in a living condition undesirable for long term growth. However, there was no noticeable difference between fish whose water have been refilled daily and the ones that have not been. There was no comparative health assessment done between zebrafish in a 96-well plate and a 384-well plate,
but it should be considered in the future if the platform does adopt 384-well plates.
b. XY Stage
The multiwell plates were placed in a computer-controlled stage that could control its X-Y
coordinate accurately. The initial model used for the project was Prior H 10 IA. It was secured by four
6-inch Thorlab posts on the optical table to keep it immobile. The Prior stage actually overqualified for the purpose of directing the dispenser to the well, considering that the minimum step size for the Prior stage is I pm, and the distance between two adjacent wells in 96-well plate is 9mm.
Figure 17 Photo of Prior H 101 A Stage.
c. Zebrafish LoaderlDispenser
The mechanism for getting the fish in and out of the capillary from the wells was not as
straightforward as expected. Simply dipping the end of the Tygon silicon tubing was not a great strategy since silicon tube was too flaccid. Furthermore, it was discovered that aspiration of fish is more effective when the opening of the tube was wider, despite the fact that this decreased the pressure.
The design that resolved these issues was composed of two channels. We used a long metal syringe tips about 2 inches long that were secured by having them punctured through a PDMS block. The PDMS block also served as a sealer for the well that was being aspirated to ensure a more secure aspiration and prevent leakage. The inner pressure was balanced out by the second syringe tip that was connected to an open channel. The inner diameter of these tips was approximately three times as large as the Tygon tubing. The PDMS block with the syringe tips punctured through it was glued to a
Fish Loader/Dispenser
PDMS Block
Well -w
Figure
18
Diagram of Fish Loader/Dispenser in conjunction with one of the 96 wells on a plate. The narrower tip acts as an outlet to prevent pressure build-up during aspiration or dispensation4.1.4 Syringe Pump
Syringe Pump plays a crucial role in this platform. It dictates the speed and acceleration of the flow in the tubing, which needs to be controlled and interfaced with practically all the other components in the platform such as the photodetector, pinch valves, and the camera. The product chosen for this task was Tricontinent C3000 model. We connected a 25ml syringe for our usage with minimum flow
precision of 5pl. The device takes 24VDC, through three kinds of hardware interfaces: RS232, RS485,
and CAN. For our platform, we interfaced the device to the computer through RS232. The syringe pump can be used to control 3 different flow connections with an adapter, but for this platform, only one connection was sufficient.
Figure 19 Photo of Tricontinent C3000 Precision Syringe Pump
4.1.5 Pinch Valves
The flow within the platform is relatively simple but it still involves fluid flowing in different directions for each steps. The apparatus we used to control these flows along with the syringe pumps were computer-controlled pinch valves. These pinch valves operate by pressing on the capillary on its high state, and releasing it in its low state. The product we chose was Biochem Valve model
075P2NC I 2-02SQ. The product operated on 12VDC, and the valve was fit for tubes with outer
dimension between 1/16" and 1/8". Another important factor to consider while using pinch valves is the elasticity and adhesiveness of the capillary tubes. The silicone tube that was used for most of the channel in the platform was elastic enough that repeatedly applying pressure to stop the flow did not cause it to deform or stay stuck. However, when we tried Teflon PTFE and FEP with pinch valves, the capillary tubes were immediately damaged and bent.
Figure 21 Photo of Biochem-Valve 075P2NC I 2-02SQ Pinch Valve
4.2 Software Components
4.2.1 Syringe Pump Control
The Syringe pump is a central component of the platform outside of the parts involved with
imaging. It controls the flow of the fluid inside the entire platform with accuracy of Spl. ' It needs to
interface with the rest of the system at all times, especially with the photodetector and the camera. There are three separate communication protocols that C3000 recognizes: OEM, DT, and CAN protocols. Since DT is designed to be used with a terminal emulator program with simpler syntax, DT was chosen for the Matlab Interface. In the DT protocol, a command can be inputted from the computer, but the syringe pump itself prints answer commands every time it performs an action. For this part of the project, we will focus only on the commands from the computer to the device.
a. DT Protocol
DT protocol operates in the following syntax: I. The start character: ASCII symbol "/"
The start character, which is always "/" in DT protocol, indicates the beginning of the message. 2. Pump Address
The pump address indicates which channel on the adapter that the syringe pump would be sending or receiving a flow from. For this version of the platform, the syringe pump only had one channel connected to the system, with the other channel connected to a waste container. If pump address is missing in the command, the syringe assumes that the command is for the pump channel that it is currently set to.
3. Data Block
This is the content of the command in ASCII. All commands must be followed by ASCII character "R" in order to run/execute.
4. End Character: Carriage Return [CR]
End of the message is indicated by the carriage return, which can is standard on hyperterminal. In Matlab, the end character can be set by setting the terminator protocol as CR while
establishing connection with the port.
b. Important C3000 Commands
There are dozens of C3000 software commands that can be used all across the three types of protocol. Not all commands manifest their feedback through physical motion from the pump. Some of the commands are only used to change settings such as speed and direction whereas some commands are used to report the status of the pump to the computer. Among them, the following essential
commands were used to run our high-throughput platform. Note that C3000 commands are case-sensitive. i. Control Commands R G<n> T
Execute Command String
Repeat command sequence n times (If n=0, the loop continues forever) Terminate Command
ii. Initialization Command
Z<n> Initialize plunger, emptying out the liquid in the syringe
We use n=0 for initialization, meaning that the plunger moves with full force during the process.
iii. Plunger Movement Commands A<n>
P<n> D<n>
Move plunger to absolute position, 3000 being the physical maximum of C3000 relative pickup, meaning the plunger pulls fluid into the syringe
relative dispense, meaning the plunger pushes fluid out of the syringe
For P and D, although the inputs are relative, if the syringe pump reaches either end of syringe's motion capacity, the motion will stop and it will print error message to the computer.
iii. Valve Commands
I Move valve to input position
0 Move valve to output position
iv. Set Commands v<n>
V<n> c<n>
Set start velocity in Hz Set top velocity in Hz Set cutoff velocity in Hz
Hz that we use to describe plunger speed refers to half-step/second. The amount of liquid depends on
the size of the syringe connected to the pump. As mentioned before, it can be as small as 5pl. The
speeds set by the set command do not change until the pump is reinitialized by command [Z].
c. Command Input
All of these commands can be entered in a string as long as it is shorter than 255 characters, including the starting and ending character. For example, if the user wants to dispense 300 steps equivalent amount of liquid, he will input the following steps.
I. /1ZOR
2. / v200V400c200R 3. /1ID300R
This will first initialize the pump, set the speed, and then dispense 300 full steps of liquid. Of course, the entire process could have been entered in a single string like the following:
/I ZORv200V400c200RID300R
If you want to keep aspirating fluid from the system, you can put a following command, /IP55000D5500GOR
This will repeat the IP25000D2500 in a loop until the program crashes.
4.2.2 Motor Control
As described in the hardware component section of this thesis, the motor controller we used, BSD-02LH, receives 5V signals through a I 0-pin rainbow cable that can be connected to the computer through a Nidaq card. Through the 10 pins as shown in figure, you can control how fast, how much, and in which direction the motor moves.