Design, Construction, and Testing of a Prototype
Robotic Leg for Controls Experiments
by
Paula Marie Countouris
Submitted to the Department of Mechanical Engineering in Partial Fulfillment of the Requirements for the degree of
Bachelor of Science in Mechanical Engineering
at the
MASSACHUSETTS INSTITUTE OF TECHNOLOGY
ARCHIVES
MASSACHUSETTS INST UTEJUN 28 2012
[
LBRAES
June 2012
©
Massachusetts Institute of Technology 2012. All rights reserved.Author ... ...
Department of Mechanical Engineering May 31, 2012
Certified by.
....
.
...
Russell L. Tedrake, PhD
Associate Professor of Computer Science and Engineering
Thesis Supervisor
Accepted by..
... ... ...John H. Leinhard V
Samuel C. Collins Professor of Mechanical Engineering
Design, Construction, and Testing of a Prototype Robotic
Leg for Controls Experiments
by
Paula Marie Countouris
Submitted to the Department of Mechanical Engineering on May 31, 2012, in Partial Fulfillment of the
requirements for the degree of
Bachelor of Science in Mechanical Engineering
Abstract
The complex underactuated legs used in the FastRunner robot, designed by the Florida Institute for Human and Machine Cognition, are designed with multiple link-ages and nonlinear springs to exploit the natural dynamics of the system in order to achieve extraordinary agility and efficiency. One way to control such a complex, un-deractuated system is to use a model-based control design approach based on robust nonlinear control.
To develop a platform to test this physics based control design on the FastRunner leg, a free swinging underactuated robot leg was designed and constructed for bench-top controls experiments. A stand with motor to actuate the leg and a basic control system for the bench-top setup were also designed and implemented. To verify the performance of the leg, actuation, and the control setup, an open-loop step response, sinusoidal response, and chirp response were executed on the prototype leg setup.
Future work includes redesign of the system electronics, construction of a system of equations that describes the leg, and completion of system identification.
Thesis Supervisor: Russell L. Tedrake, PhD Title: Associate Professor
Acknowledgments
This thesis could not have been completed without the help and support of the following people and I am deeply grateful for your help.
To Russ Tedrake, for creating an incredible research lab, for the opportunity to work on this really cool project, and for guidance throughout.
To Andy Barry, the invaluable code monkey who made all the sensing and software a reality.
To Johnny Godowski for such amazing creativity and energy.
To Ron Wilken, Michael Posa, Ryuma Niiyama, Zachary Jackowski, the members of the Locomotion Group and the IHMC team, who supplied invaluable knowledge, experience, and an inspiring work environment.
Contents
Abstract ... .... ... .... 3 Acknowledgments . . . . 5 Table of Contents 7 List of Figures 9 1 Introduction 11 2 Leg Hardware 13 2.1 FastRunner Leg Design . . . . 132.2 Modified Leg Prototype . . . . 14
2.2.1 Joints and Linkages . . . . 15
2.2.2 Hip and Pelvis . . . . 16
2.2.3 Achilles Linkage . . . . 17
3 Actuation Hardware 19 3.1 Motor Specifications . . . . 19
3.2 M otor M ount . . . . 20
4 Control Hardware and Software 23 4.1 Motor Controller . . . . 23
4.1.1 Pow er . . . . 24
4.2 Sensing . . . . 25
4.2.2 Motion Capture. . . . . 27
5 Testing 29 5.1 Open Loop Control . . . . 29
5.1.1 Step Input and System Delays . . . . 29
5.1.2 Continuous Sinusoidal Input . . . . 30
5.1.3 Chirp Input . . . . 31
5.2 Proportional-Derivative (PD) Control . . . . 31
6 Conclusion 35 Bibliography . . . . 37
List of Figures
1-1 Proposed Rendering of FastRunner Robot designed by the IHMC 2-1 Linkages, Joints, and Spring Elements in the Prototype Leg Design
2-2 Prototype Leg Design . . . .
2-3 Modified Joint Design . . . . .
2-4 Hip Design . . . .
2-5 Achilles Linkage Design ... Motor and Motor Mount Setup Close-up of Motor Mount Setup Leg Mount to Motor Shaft . Control System Diagram... Millipak Sevcon Motor Controller Power Elements Diagram . . . . . 4-4 Tether used to constrain Optical E 4-5 Optotrak Motion Capture Active-n
. . . . 19 . . . . 20 . . . . 2 1 . . . . 24 . . . . 25 . . . . 26
ncoder to Motor Mount . . . . 27
arkers . . . . 28
System Response to Step Input . . . . System Response to Continuous Sinusoidal Input FastRunner Desired Foot Motion . . . . System Response to Chirp Signal . . . . 30 32 . . . 33 . . . 34 11 13 . . . . 14 . . . . 15 . . . . 16 . . . . 1 7 3-1 3-2 3-3 4-1 4-2 4-3 5-1 5-2 5-3 5-4
Chapter 1
Introduction
The FastRunner Robot, a dynamic bipedal running robot designed by the Florida Institute for Human and Machine Cognition, aims to mesh a biologically inspired design with the capability of running in excess of 10 m/s.
1I
1
Figure 1-1: Proposed Rendering of FastRunner Robot designed by the IHMC. Image
reproduced with permission from IHMC1]
The complex underactuated legs used in the FastRunner robot are designed with multiple linkages and nonlinear springs to exploit the natural dynamics of the system
in order to achieve extraordinary agility and efficiency. One way to control such a complex, underactuated system is to use a model-based control design approach based on robust nonlinear control, a new control approach that extends the tools from robust linear control to legged robots with nonlinear dynamics.
To develop a platform to test this physics based control design on the FastRunner leg, a free swinging underactuated robot leg was designed and constructed for bench top experiments. This thesis describes four components: designing and constructing an improved copy a prototype robotic FastRunner leg, designing and constructing a stand with motor to actuate the leg, designing and constructing a basic control system for the bench-top setup, and testing the free swinging leg.
Chapter 2
Leg Hardware
2.1
FastRunner Leg Design
Pelvis(Hip
Knee
Ankte
Figure 2-1: Linkages, Joints, and Spring Elements in the Prototype Leg Design Blue
elements represent links, green elements represent joints, and orange elements repre-sent springs.
The design of the FastRunner robot leg, based on the bone structure of an ostrich, can be broken into various linkages joints, and spring members. Figure 2-1 shows the
basic design of the linkages in used in the leg prototypes.
The links, pictured in blue, include the pelvis/hip, thigh/femur, shin/tibia, cal-caneal, foot, toes. The joints, pictured in green, starting from the top include the hip, knee, and ankle. Spring members, pictured in orange include the Achilles link-age, knee spring, and anti-gravity spring. The natural dynamics of these coupled linkages and elastic elements enable the leg to efficiently swing and achieve a desired foot motion. This planar model of the leg, which does not include the toes, has four degrees of freedom.
A simple prototype based on these linkages, joints, and springs was designed and
constructed by John Godowoski. The prototype, shown in Figure 2-2a, was a 1/2 scale model and, when shaken by hand, achieved a desirable foot motion.
(a) Original (b) Modified
2.2
Modified Leg Prototype
For this thesis, a copy of the original prototype, shown in Figure 2-2b was designed and machined to create a mountable test leg with a smooth, more repeatable motion. Drawings and CAD model were constructed from the original prototype. The revised prototype leg was constructed in the CSAIL machine shop using basic tools and machines, including the mill, lathe, and computer controlled water jet. The original prototype also included three foot joints and toes however the toe joints are not included in the redesign.
2.2.1
Joints and Linkages
The most significant change on the modified design was the addition of ball bearings and shafts at each joint and the redesign of the joints.
Figure 2-3: Modified Joint Design: Includes ball bearings, shoulder bolts, and
Addition of Bearings and Shafts
In the original prototype, each joint consisted of machine bolts rotating through holes in the raw aluminum extrusion. Threads of the bolts rubbed wore against the holes and increased friction in the joint. The screws of the joints did not have any locking elements and were prone to vibrating loose and falling off as the leg was swung.
In the modified design, shown in Figure 2-3, ball bearings were placed on the internal extrusion at each joint and the shoulder bolts press fit through the external extrusion. Precision stainless steel shoulder bolts were used as the pivots for the joints. These bolts provide a smooth surface for the bearings in the joints. The bolts were shimmed to length and then preloaded with lock washers and nuts.
Symmetric Design and Decreasing Shaft Moment
In the original design, the two cut aluminum extrusion linkages which were joined were offset from each other. This offset caused a moment in the shaft, further exacerbating the friction and wear in each joint. In the modified design, linkages were designed so that the extrusions nested within each other, also shown in Figure 2-3. This symmetric design reduced the moment in the joint shaft, thus reducing friction and wear.
2.2.2
Hip and Pelvis
In the original design, the hip was constructed using two 4inx1in aluminum extru-sion pieces bolted together, shown in Figure 2-4a. The springs, mounted in blocks, extruded out of the one side of the hip and rocked a lever back and forth. The hip pieces could not be fully tightened together and the external lever posed difficulty for mounting the leg at the hip to the actuator.
For the revised prototype, a sturdy, mountable hip was designed. The two main plates of the hip, shown in Figure 2-4b were water-jetted out of 1/4" aluminum plates, and separated with 1/2" bronze standoffs. The hip springs and hip lever were
(b) Modified Prototype
Figure 2-4: Hip Design
contact time as the springs in the original design. Use of two plates instead of the extrusion results in a more robust design and allows the hip springs to be mounted internally.
2.2.3 Achilles Linkage
In the original prototype, the Achilles linkage was constructed with two concentric aluminum tubes sliding past one another. An external compression spring, shown in Figure 2-5a, extends the linkage and is mounted in a way which makes it difficult to change out the spring for springs of different spring constants.
The modified design, shown in Figure 2-5b, internalizes the spring and uses linear ball bearings. Internalizing the spring keeps the spring concentric with the linkage and allows to easily switch springs for those with different spring constants. The linear bearings allow for up to a 2 degree misalignment between the shafts, reduces friction in the linkage, and results in a more consistent motion. The linear bearings are mounted in aluminum blocks and held with two aluminum plates. The shaft that slides through the bearings is stepped such that the shaft limits the range of motion of the linkage.
(a) Original Prototype (b) Modified Prototype
Figure 2-5: Achilles Linkage Design
The modified linkage is assembled with four 2in long 4-40 flat head screws which connect the bearing blocks with aluminum standoffs. In future designs, it is recom-mended that the flat head screws are replaced with countersunk, hex head machine
screws for ease in assembly. It is also recommended that the shaft connection near
Chapter 3
Actuation Hardware
In the bench-top setup, a high-torque motor swings the FastRunner bench-top leg, as shown in Figure 3-1. The hip of the leg is mounted directly to the output shaft of the motor and switches directions at a specified rate to swing the leg.
3.1
Motor Specifications
The motor used in the setup was a ME0709 a brush-type permanent magnet DC motor manufactured by Motenergy Inc, Slinger, Wisconsin. At peak amperage, the
ME0709 is capable of supplying over 40Nm of torque, significantly higher than the
expected torque values for the system based on simulation[2].
Although using a gear reducer seems to be the natural choice for this high torque low speed system, the disadvantages to gear reducers include high effective inertial mass and errors due to backlash. Both of these are detrimental to physics based control, and since size and weight were not main factors for this bench-top setup, a large, direct drive DC motor was chosen.
3.2
Motor Mount
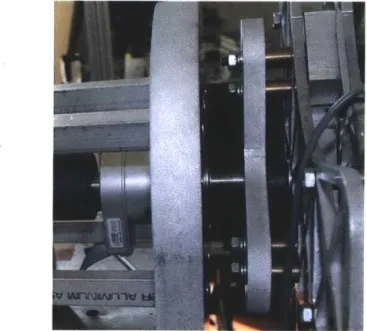
A motor mount was designed which connected the leg to the motor and cantilevered
the leg over the the edge of a 42" in high machine table. Figure 3-2 shows the motor mount setup, which included a reinforced machine table, a bottom mounting plate, two vertical motor mount plates, the four standoffs and the shaft coupling.
Figure 3-2: Close-up of Motor Mount Setup
were reinforced with diagonal braces. The height of the table allows for adequate leg clearance off the ground, and also allows for the leg to be setup to run on the lab's treadmill.
Bolted to the machine table was the bottom mounting plate. This plate was water-jetted out of 1" thick aluminum with mounting holes to the table and mounting holes to the vertical plates. The mounting holes to the vertical plates were counter-bored. This plate was then cantilevered over the edge of the machine table to allow room for the leg to swing freely.
The two vertical plates were water-jetted out of 1" thick 6061 Aluminum. Each had 8 mounting holes for the motor and one center through-hole for the motor output shaft. For the plate next to the motor, the center hole was recessed on the mill to allow clearance for the shaft coupling. For the plate next to the leg, the bolt holes for the standoffs were counter-bored so that the leg fit as closely to the plate as possible. The plates were separated using four standoffs. 3/8-16" bolts extended from the plate near the leg, through the standoffs, through the vertical plate near the motor, and threaded onto the motor.
Figure 3-3: Leg Mount to Motor Shaft
shaft of the motor to the 3/4" diameter shaft of the leg and optical encoder. The motor shaft mounts to the leg through a plate on the back of the leg. The motor shaft is pinned to the leg with a set screw as well as a shaft collar locked between the plate and the hip plates, shown in Figure 3-3.
Chapter 4
Control Hardware and Software
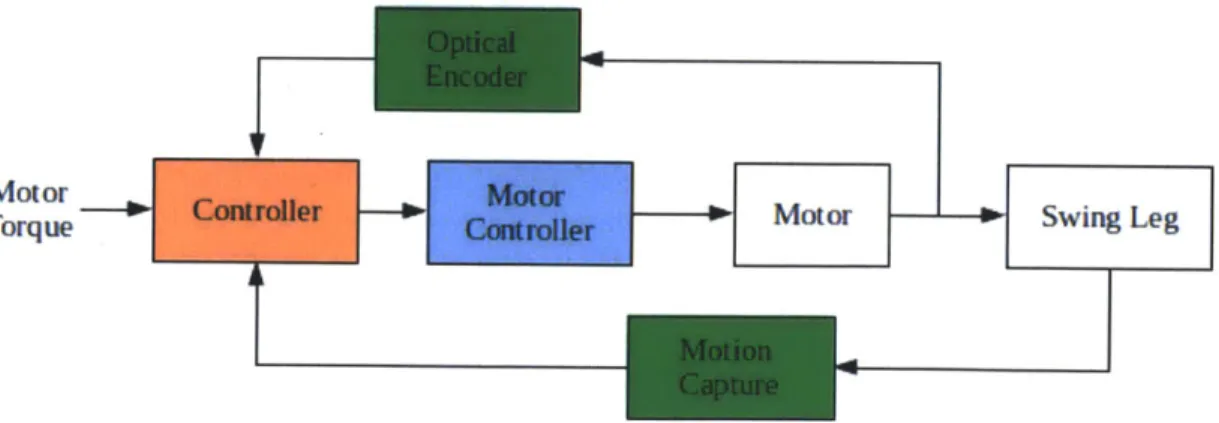
The control hardware and software are key parts to system which provide power, control the leg swing, and measure the system performance. Figure 4-1 shows the general configuration for system control.
Motor Motor
Swing Leg
Torque
Figure 4-1: Control System Diagram Blue elements represent the motor controller
and power components, the orange elements represent the system controller, and the green elements represent the sensing elements.
The boxes colored in blue represent the motor controller and power components; their configuration is described in Section 4.1. The system controller, represented by the orange box, and the sensing, the green boxes, is described in section 4.3.
4.1
Motor Controller
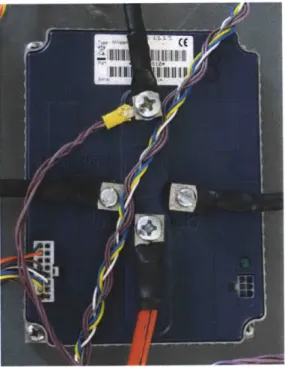
The Millipak Sevcon DC motor controller, shown in Figure 4-2, is used to send mo-tor commands to the hip actuamo-tor in the bench-top setup. The momo-tor controller was originally purchased for an autonomous forklift project, and was reused for this project.
Figure 4-2: Millipak Sevcon Motor Controller The connector in the lower left hand
corner connects the controller to the host computer and line contactor. The two horizontal lines provide power to the motor. The red line at the bottom center is connected to the power supply, and the black line at the top center is connected to ground.
Three inputs control the leg movement: forward, reverse, and speed. The forward and reverse are both binary analog inputs which control the direction of the motor. The speed input to the controller is a voltage input and ranges from 0-5v [2]. The
minimum value supplied to the motor controller which swings the leg is 0.2V.
After testing with the Millipak M3, it was determined that the controller intro-duced a hard coded delay on the order of 1 second into the system. Since such a large delay is highly undesirable for this system, a Galil controller with Amtek amplifier
thesis were performed using the Millipak M3 controller.
4.1.1
Power
Figure 4-4 shows setup of power elements to motor controller. The three key ele-ments for the system include the power supply, the line contactor, the fuse, and the emergency switch.
Figure 4-3: Power Elements Diagram
The power supply, a Sorensen 35V, 35A supply, provides power to the motor controller, and thus to the actuator. The motor is connected to a 10OAmp fuse which ensures that the system does not draw excessive current from the power supply.
The line contactor acts as a high current switch that cuts power to motor controller if the input signals to the motor controller are incorrect or if the emergency stop is activated. The emergency stop and the motor controller allow for monitoring of the system and in cases where the motor becomes overly excited and loses control, power is cut to the motor.
4.2
Sensing
To determine the input angle of the hip and the angles between each of the leg linkages, two sensing techniques were used: optical encoding and motion capture. The optical encoder measured the hip angle and the motion capture measured the angles of the linkages.
4.2.1
Optical Encoder
To determine the angular position input to the leg, an optical encoder was mounted to the output shaft of the motor. An optical encoder is an electrical mechanical device that converts rotary displacement into pulse signals.
The encoder used at the hip joint was a US digital HB6M quadrature optical encoder with a resolution of 10,000 positions per 360 degree cycle of the output shaft[3]. The HB6M encoder chosen featured a bronze hollow bore that slips over the motor output shaft and locked into place with two 6-32 set screws.
Figure 4-4: Tether used to constrain Optical Encoder to Motor Mount
To fully constrain the encoder with respect to the shaft, a flexible anti-rotation tether, shown in Figure 4-5, was mounted to the encoder and to a single point of the motor mount. Rigidly mounting the encoder to the motor mount would over constrain the system and introduce errors to the optical encoder measurements. The flexible tether also compensates for shaft run out of up to 0.030" axial and 0.010" total indicated run-out[3].
4.2.2 Motion Capture
Optotrak motion capture system was used to track the movements of the different leg linkages throughout testing. The Optotrak 3D Investigator (manufactured by Northern Digital Inc., Waterloo, Ontario, Canada) is a sophisticated position-sensing camera, which uses three infrared-emitting diodes (IREDs) on active markers, shown in Figure 4-5.
Figure 4-5: Optotrak Motion Capture Active-markers
These active markers are individually strobed at a high rate and their positions measured by the trinocular camera system. The camera is connected to a control unit which relays information between the markers to the camera sensor and relays information to the host computer. The system used has an accuracy of up to 0.1 mm and resolution of 0.01mm[5].
Five active markers were placed on the leg, to determine the linkage position and joint angles of each linkage in the 4 DOF planar model, shown in Figure 2-1. The trinocular camera was setup approximately 10ft from the leg, and was positioned such that the markers were constrained to move in a 2D plane.
The software and setup of the Optotrak system was done by Andrew Barry, a current PhD candidate in the Robot Locomotion group.
Chapter 5
Testing
To verify the performance of the leg, actuation and the control setup and to determine any problems with the setup, three open loop control tests and a simple PD control test were executed on the prototype leg setup.
5.1
Open Loop Control
An open loop controller was written in MATLAB to swing the leg with various input signals. Linkage angles, foot position, and hip angle, were recorded for each test to determine system response and system delays. The data collected will be used for system identification.
5.1.1 Step Input and System Delays
To determine delays in the system, a step voltage was supplied to the leg and the system response was recorded. Figure 5-1 shows the system response in time to various step signals. The leg was swung both forward and backward for each step signal and similar results were reached for both directions.
Motor input voltages of less than 0.2V did not move the leg. For input signals of greater than 0.7V, the leg swung past 90 degrees, would continue to rotate, and no longer maintained a fixed position.
-0.82
0 10 20 30 40 50 W0 70 80 W
Time(s)
Figure 5-1: System Response to Step Input
The system shows a significant delay, on the order of 1-1.2 seconds compared to the input signal, even for relatively low perturbations. Since the message rate of the software in the host computer and the message rate of the Labjack both exceed 400Hz, the significant delays are likely due to hard coding and/or wiring of the motor controller.
5.1.2
Continuous Sinusoidal Input
To simulate a more realistic driving torque at the hip, various sinusoidal inputs was were tested on the leg. Figure 5-2 shows the system response in time to a selection of sinusoidal inputs.
The range of optimal frequencies to drive the leg ranged from 4-9Hz and the range of optimal voltages ranged from .65-1.2V. The tests shown in Figure 5-2, can be com-pared to the desired foot trajectory, shown in Figure 5-3. For certain inputs, the system response varied trial to trial for identical inputs and initial conditions. This was most likely due to very slight inconsistencies in leg initialization and
miscommu-1 0.5 I
I
0 -0.5 -1 -1 -15 Time(s)(a) Amplitude = 0.7V, Frequency = 4Hz, Offset = OV
1 0.5 [ 0 -0.5 F -1 -1 Time(s)
(b) Amplitude = 1.OV, Frequency = 7Hz, Offset = OV
1.5 -1 1 0.5 -.0 2 4 6 8 10 12 14 Time(s) 1.5 1 0
i
-1 -1 -0.5 0 U(M) 0.5 1 1.5(c) Amplitude = 0.7V, Frequency = 7Hz, Offset = -0.4V
Figure 5-2: System Response to Continuous Sinusoidal Input: The plots on the left
compare changes in the input to changes in the motor output. The plots on the right show the x-y position of the leg's foot.
-1 -0.5 0 0.5 1 1.5 9(m) -1 -0.5 0 0.5 1 9(m) 1.5 3 i i -I I 1 2 i i i i i i i i ._5 0.5 [
%11
-0.50.5 0.4 0.3 0.2 0.1 0 -0.1 -0.2 -o.3 -0.4 -0.5 -0.4 -0.2 0 0.2 U(.N) - 0
Figure 5-3: FastRunner Desired Foot Motion: The FastRunner leg was swung by hand
on the test bench with the desired foot trajectory and the foot position was recorded.
5.1.3 Chirp Input 5 10 Time(s) 15 20 a El a-= 1.5 1 .5 0 .5 -1 -1.-1.5 -1 -0.5 0 0.5 y(m) 1 1.5 Figure 5-4: System of 0.5 V and ranged
Response to Chirp Signal: Input chirp signal had an amplitude
in frequency from 0.5 Hz to 20 Hz.
To obtain data of the system performance to a varying input, a chirp signal with constant amplitude and varying frequency was tested as an input to the leg. Figure
1.5 1 0.5 0 -0.5 (-I) C -1 -1.5' I 0.4 0.6
Q4.0t jm
will be used for system identification and modeling of the leg.
5.2
Proportional-Derivative (PD) Control
To implement a simple controller on the FastRunner leg, a proportional-derivative (PD) controller was tested on the bench-top setup. The leg was swung by hand with the desired motion, shown in Figure 5-3, and the hip angle was recorded with the optical encoder. The PD control minimized the error between the desired hip motion and actual hip motion.
The PD control was unsuccessful and the complex system did not produce signif-icant results for a range of gains. For small gains, the system was unable to follow the desired trajectory and for large gains, the system was highly unstable. The PD control for the leg setup was not successful likely due to the long delay in the motor controller.
Chapter 6
Conclusion
The effort of this thesis was to to build and test a robotic leg for controls experiments and a free swinging underactuated robot leg and test bench was successfully designed, constructed, and tested.
Further steps are needed before a model-based control design approach based on robust nonlinear control can be tested on this bench- top setup: redesign of the system electronics, construction of a system of equations that describes the leg, and completion of system identification. From the testing, it was determined that the electronics used in the project, specifically the motor controller which was from a previous project, were not appropriate for this application. The motor controller was not purchased for the project, but was reused from a previous project. A proper motor controller without hard coded delays will make a significant difference on the actuation and control of the leg. A system of equations for the leg will be generated using a model of the leg created in URDF, Unified Robot Description Format. Finally, system identification will be performed on the leg to better estimate the inertial tensors and joint frictions of the leg. With this system model, different robust nonlinear control can be tested on the bench-top leg setup.
Bibliography
[1] FastRunner, "ME0709 Brush-Type DC Motor," Florida Insti-tute for Human and Machine Cognition, 2010. [Online]. Avail-able:http://www.ihmc.us/groups/fastrunner/. [Accessed: May 17, 2012].
[2] Motenergy, "ME0709 Brush-Type DC Motor," Motenergy.com, 2011. [Online]. Available:http://www.motenergy.com/me0709.html. [Accessed: May 10, 2012].
[3] Sevcon USA, Inc., Millipak 4QPM Controller Manual, Southborough, MA: Sevcon
USA, Inc., 2004.
[4] US Digital, "HB6M Hollow Bore Optical Encoder," US Digital, 2012. [Online]. Available:http://www.usdigital.com/products/encoders/incremental/rotary/hollow-bore/hb6m. [Accessed: May 14, 2012].
[5] Northern Digital Inc., "3D Investigator Motion
Cap-ture System," Northern Digital Inc, 2012. [Online].
Available:http://www.ndigital.com/lifesciences/3dinvestigator-motioncapturesystem.php. [Accessed: May 13, 2012].
[6] S. Cotton, I. Olaru, M. Bellman, T. van der Ven, J. Godowski, and J. Pratt.
"FastRunner: A fast, efficient and robust bipedal robot. concept and planar
sim-ulation." In Proceeding of the IEEE International Conference on Robotics and
Automation (ICRA), St. Paul, Minnesota. 2012
[7] M. Posa and R. Tedrake, "Direct Trajectory Optimization of Rigid Body
![Figure 1-1: Proposed Rendering of FastRunner Robot designed by the IHMC. Image reproduced with permission from IHMC1]](https://thumb-eu.123doks.com/thumbv2/123doknet/14722542.570771/11.918.353.556.604.941/figure-proposed-rendering-fastrunner-robot-designed-reproduced-permission.webp)