Augmenting the Software Testing Workflow with
Machine Learning
by
Bingfei Cao
Submitted to the Department of Electrical Engineering and Computer
Science
in partial fulfillment of the requirements for the degree of
Masters of Engineering in Electrical Engineering and Computer Science
at the
MASSACHUSETTS INSTITUTE OF TECHNOLOGY
June 2018
© Massachusetts Institute of Technology 2018. All rights reserved.
Author . . . .
Bingfei Cao
Department of Electrical Engineering and Computer Science
June 2018
Certified by. . . .
Kalyan Veeramachaneni
Principal Research Scientist
Thesis Supervisor
Accepted by . . . .
Katrina LaCurts
Chair, Master of Engineering Thesis Committee
Augmenting the Software Testing Workflow with Machine
Learning
by
Bingfei Cao
Submitted to the Department of Electrical Engineering and Computer Science on June 2018, in partial fulfillment of the
requirements for the degree of
Masters of Engineering in Electrical Engineering and Computer Science
Abstract
This work presents the ML Software Tester, a system for augmenting software testing processes with machine learning. It allows users to plug in a Git repository of the choice, specify a few features and methods specific to that project, and create a full machine learning pipeline. This pipeline will generate software test result predictions that the user can easily integrate with their existing testing processes.
To do so, a novel test result collection system was built to collect the necessary data on which the prediction models could be trained. Test data was collected for Flask, a well-known Python open-source project. This data was then fed through SVDFeature, a matrix prediction model, to generate new test result predictions. Several methods for the test result prediction procedure were evaluated to demonstrate various methods of using the system.
Thesis Supervisor: Kalyan Veeramachaneni Title: Principal Research Scientist
Acknowledgments
I would like to sincerely thank Kalyan Veeramachaneni for all the help and guidance he gave me throughout this project. Whenever I was lost, he guided me in the right direction and pushed me to do what I needed to do. Without him, this project wouldn’t have been possible. Similarly, I’d also like to acknowledge all the lab members of DAI for creating a wonderful environment to work in.
I would also like to thank Manuel Campo and Carles Sala for the amazing work they did as collaborators on the project. Though they were added very late in to the year, they were able to get a lot done and greatly aided in improving the quality and efficiency of the code. I look forward to seeing how they can continue to push the project forward.
I’d also like to acknowledge the generous funding support from Accenture under their “AI for Software Testing” program.
Finally, outside of the lab, I’d like to thank all my friends for giving me an amazing four years here and my family for helping get me to where am I today.
Contents
1 Introduction 13
1.1 Test Failure Prediction . . . 17
1.2 Proposing ML Software Tester . . . 18
2 Integrating with Git 21 2.1 Git . . . 21
2.1.1 Basics of Git . . . 22
2.1.2 Git History . . . 23
2.1.3 Git and Test Data . . . 24
2.2 Generating Test Results . . . 24
2.2.1 Getting All Commits . . . 25
2.2.2 Why Run Tests on Every Commit? . . . 25
2.2.3 Data Collection Architecture . . . 27
2.2.4 Output Data Format . . . 30
3 Running Tests and Collecting Results 33 3.1 TestRunner implementation . . . 33 3.1.1 scripts . . . 33 3.1.2 get_test_results . . . 34 3.1.3 clean_repo . . . 35 3.1.4 Performance . . . 35 3.2 Alternative Implementation . . . 37
3.3.1 Test Data Metrics . . . 40
3.3.2 Challenges with the Flask Repository . . . 43
3.4 Working with Other Projects . . . 45
4 Predicting test results 47 4.1 Prediction Problem and Possible Solutions . . . 47
4.2 Data Format . . . 49
4.2.1 Converting Data from Data Collection . . . 50
4.2.2 Matrix Ordering . . . 51
4.3 Matrix Completion . . . 51
4.3.1 Collaborative Filtering and SVD . . . 52
4.3.2 SVDFeature . . . 53 4.3.3 Feature Selection . . . 53 4.4 One-shot Approach . . . 53 4.4.1 Algorithm . . . 54 4.4.2 Matrix Bucketing . . . 54 4.4.3 Evaluation . . . 55
4.4.4 Positives and Drawbacks . . . 55
4.5 Iterative Approach . . . 56 4.5.1 SVDFeature Wrapper . . . 57 4.5.2 Iterative API . . . 58 4.5.3 Usage . . . 60 4.5.4 Evaluation . . . 60 5 Conclusion 63 5.1 Future Work . . . 63
A Data Collection for New Repositories 65 A.1 Python Environments . . . 65
A.2 Test Scripts . . . 65
List of Figures
1-1 Example usage of pytest . . . 14
1-2 Continuous integration workflow . . . 15
1-3 Test time comparisons . . . 17
1-4 Example test result matrix . . . 18
1-5 Overview of ML Software Tester . . . 19
2-1 Git commit structure . . . 22
2-2 Git tree structure . . . 23
2-3 Travis CI build diagram . . . 27
2-4 Data collection inheritance diagram . . . 30
2-5 Data format after data collection . . . 31
3-1 Pytest verbose output . . . 35
3-2 Pytest failure output . . . 37
3-3 Pytest non-verbose output . . . 38
3-4 Python file parsing for test names . . . 39
3-5 Example appearances of skipping tests . . . 39
3-6 Histograms of commit numbers . . . 42
4-1 Comparison of approaches to matrix completion . . . 49
4-2 SVD illustration . . . 52
4-3 One-shot prediction plots . . . 56
4-4 Wrapper for models . . . 57
List of Tables
3.1 Test count for Flask . . . 41
3.2 Failure count for Flask . . . 43
3.3 Failure percentages for Flask . . . 43
4.1 Matrices bucketed into number of failures . . . 54
Chapter 1
Introduction
Over the last few years, software engineering has become one of the fastest growing industries in the U.S. [19]. Software has been integrated into all parts of daily life, from devices such as phones and laptops to everyday behaviors like paying for purchases or making commutes. It’s nearly impossible to find an interaction today that is not mediated at some point using software.
With this boom, the software engineering industry has had to rapidly mature. Given the ubiquitous presence of software, said software needs to be engineered to be reliable and fault-tolerant. As a result, software engineering has adopted a set of best practices to ensure its products can be reliably used. Among these best practices -and perhaps the most critical - is software testing. Software projects are expected to have a comprehensive test suite that ensures the software works correctly in every use case. Any test failure is considered a critical error, and are rarely allowed in public releases or production software.
This importance of software testing has necessitated the development of a suite of tools that streamline the testing process. After all, making sure developers have the easiest time writing and running their tests ensures extensive testing is an easy habit to adopt. Testing frameworks are important pieces of software that aid in the test writing process. They provide functionality that allows developers to easily create test cases. They also often provide command line tools to run all the tests written with the framework, and output logs that contain the results. For example, pytest
[8] is a popular testing framework for Python based projects. Tests are written in files named either test_*.py or *_test.py, and calling pytest from the command line automatically finds and runs all such tests. Example usage can be seen in figure 1-1. 1 def inc (x):
2 return x + 1
3 def test_answer (): 4 assert inc (3) == 5 5
(a)pytest output
Figure 1-1: Example usage of pytest. At the top is an example of what a test file may look like. In the bottom, the output of running pytest is shown. pytest first reports some metadata about the environment it was run in, such as the version of Python and the operating system. Next, it reports the results of running the tests. We see here that the sample test failed, and in this case it provides a stacktrace to aid in debugging the test failure.
Writing an extensive test suite is just one half of testing. The other is ensuring the software continues to consistently pass these tests whenever updates are made to it. Unfortunately, it is difficult to rely on developers consistently manually testing their code. This is further complicated when the code is expected to run on a variety of “platforms”. Here, we use “platforms” as a catch-all term for any variation in the testing environment. For example, mobile applications may be tested on different versions of iOS and Android, web applications may be tested on different browsers, and software libraries may be tested on different versions of the language they are built in. Just as tests should consistently pass on any single platform, they are also
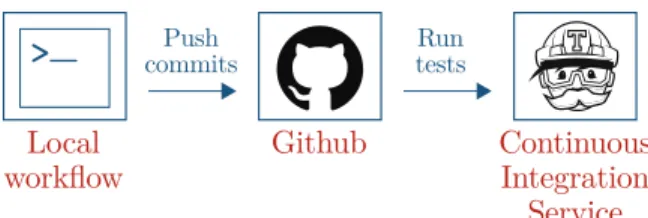
Github Push commits Continuous Integration Service Run tests
Figure 1-2: Diagram illustrating continuous integration workflow. Developers develop code locally and add it to a centralized source, which then automatically tests through the CI service.
expected to work across these platforms. However, setting up the full multitude of platforms can be difficult in local development environments, and could slow down the development process. Alternatively, in large workforces there may be special QA teams that handle the testing process. However, as they are usually divorced from actually building the project, they may not have the same set of knowledge as the developers to ensure tests are fully run.
To aid in this, continuous integration (CI) services have become major parts of the software engineering workflow. These services allow developers to setup servers whose role is to take new code, build it, and run various jobs over it to check its functionality. These jobs need not all be testing related, and allow developers to run a wide variety of metrics over their code. Nevertheless, a big use case for CI services is in automated testing, as they enable the entire test suite to be run whenever new code is uploaded to a project. Furthermore, the servers they provide are easily configurable, allowing developers to set up the appropriate platforms across their CI servers and ensure their test suite is run appropriately across all supported platforms. The success of these services has enabled projects of all forms and sizes to use them, from massive industry software to pet projects run by individual developers.
All of these tools and services aim to make testing as simple and convenient as possible. As a result, developers and testers are able to write many tests, as they aim to extensively test their code. This is especially apparent when testers are not developers, and aren’t familiar with the code, thus requiring an even greater number of tests to ensure all parts of their software’s functionality are tested.
simple cases, as the number of tests increases to the hundreds or even thousands, ever-increasing amounts of time are required to run them all. For projects with only several hundred tests, a full run-through can take several minutes; in larger projects, test times can approach the point where they actively harm a developer’s productivity [16]. While at first glance, taking minutes to run a test suite may not seem too problematic, any delays in a developer’s workflow can quickly add up, especially when running the entire test suite locally is impractical and they need to rely on their CI’s automated testing, which adds further time. This is further exacerbated by the growing complexity of software, the wide variety of platforms, and the greater number of complicated possible use cases, all of which need to be simulated via increasingly complex and longer-running tests to ensure things work in a wide variety of scenarios. Keeping these tests running fast is thus an active area of dev-ops work, requiring developers to ensure that the tests and testing environments they create are optimized for maximum test efficiency. Countless guides exists for debugging slowdowns in test runs [10], and CI tools themselves provide functionality for ensuring testing is as fast as possible.
However, it is important to realize why fast test suites are important. After all, while the tests are running, why can’t a developer move on to working on a new feature? They are blocked from doing so because of the possibility of failing test cases. Because any failure is considered unacceptable in standard software engineering practice, developers must ensure failures are exposed for as little time as possible. Furthermore, a test failing often points to bugs in the code which must be immediately addressed so that so that later additions aren’t broken by a buggy initial state. Therefore, developers are most interested in quickly finding failing test cases. If these failures are reported early on in the testing process, developers are better able to catch, identify, and fix their bugs, and send in new versions of their code for testing. On the other hand, if these failures are reported near the end of the test running procedure, the developer would have to wait a significantly longer time before being able to become productive again and fix these issues. It is thus of great interest for testing services to be able to develop methods to identify test cases that are most
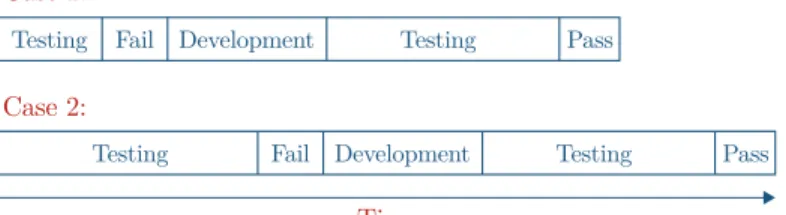
Case 1:
Time Case 2:
Testing Fail Development Testing Pass
Testing Fail Development Testing Pass
Figure 1-3: Diagram illustrating example of how early detection of failures can impact developer efficiency. If a test fails early on, the developer can iterate over the development again sooner and reach a fully passing suite earlier, while if one fails at the end, the development time can take significantly longer.
prone to failure, and queue these first, enabling faster feedback to their users.
1.1
Test Failure Prediction
The concept of predicting software failures is not new. Recent advancements in data processing and machine learning have allowed predictive models to be formed in a wide variety of domains, and software testing is no exception. Automatic bug detection has been a large area of research, and successful models have been built that can find bugs by combing through source code [17]. Other models are able to automatically create tests based on existing features in a project, and maintain those tests as those features change [4]. Finally, extensive research has been done in predicting testing results based on the project source code [18]. These last set of results are the most interesting to us, as we wish to be able to directly predict what tests may fail when new code is added to a project.
However, it is important to note that those past works have relied on source code analysis to make predictions. Their models need to go through either the actual code files or the compiled binaries to extract features that can then be fed into their predictive models. The need for good features requires time spent experimenting with different sets of features to find one that can lead to the best predictions. Then, even if a good set is found, if predictions are to be made on another project further work is required to re-extract those features from code that may be in a different format or follow a different coding style. These steps are difficult and time consuming, and
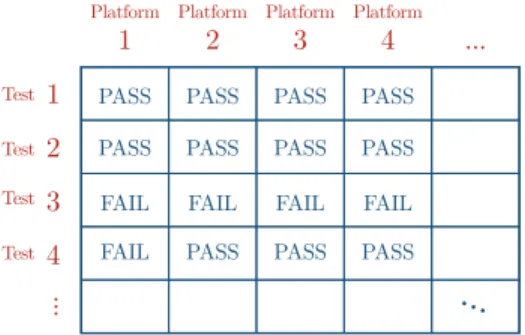
require intimate knowledge of the software project that is being used. Platform Platform Platform Platform
Test Test Test Test 1 1 2 3 4 2 3 4 ... ... PASS PASS FAIL FAIL
FAIL FAIL FAIL PASS PASS PASS PASS PASS PASS
PASS PASS PASS
...
Figure 1-4: Example test result matrix. Entries in this matrix are either PASS for passing tests or FAIL for failing tests.
Instead, we attempt to create a system for test result prediction solely from past test results. Specifically, a single run of a test suite can be used to create a matrix of results, where each row represents a unique test case and each column represents a platform that is tested on. Then, each entry in the matrix represents the pass/fail result of that test case on that platform 1. The dataset thus consists of all runs of the test suite across a project’s history (builds, releases, commits), represented as a series of these matrices.
With this formulation, the dataset format is consistent across different projects of any type, written in any language; no extra work is to customize the system for varying features across projects, and instead a single interface can be used to take the data and train a model to make predictions. Such an interface allows for easy extensibility and thus wider adoption across projects.
1.2
Proposing ML Software Tester
In this work we propose ML Software Tester (MLT), a machine learning tool to augment software testing. It is a system that uses test result data, as described above, to train its predictive models for test result prediction. It needs only this data, not requiring any other form of feature extraction from the source code.
1There can actually be other possible values for each entry besides pass/fail. See section 2.2.4 for
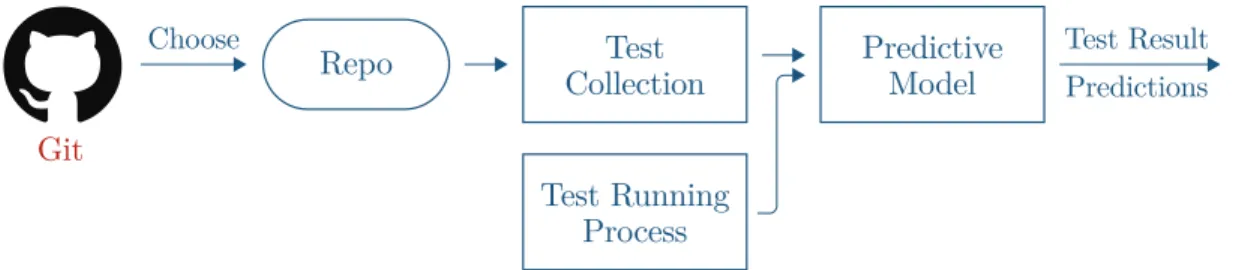
Test Running Process Predictive Model Test Collection Repo
Choose Test Result
Predictions
Git
Figure 1-5: An overview of the layout of ML Software Tester. From a Git repository, users are able to collect data on the history of test results. They can then use this data to augment their existing test running process with a predictive model that can make predictions on future test results.
In developing MLT, we did not just develop a predictive modeling methodology, but also created a usable tool for the “worlds leading software development platform” -GitHub. As a result our system can be used in two ways:
• Software projects using Git or GitHub: For git repositories, MLT is an end-to-end tool that able to take a Git project and extract the test result data across the history of the project. It can then feed this extracted data into various predefined models, train them, and use them for future predictions on new commits.
• Other projects: Users must extract the test result data themselves and format it according to the above specification. They can then use our api to build their own tool form making predictions on new releases, builds or commits.
Thus, MLT has 2 primary modules that:
• Collect the set of test result data from the history of a Git project • Train and provide models that perform the test result prediction
The system is designed to be an initial framework for applying machine learning to software test result prediction. It was built to work for a small set of selected projects, and comes with built-in data collection and model training procedures for those selected projects. However, it is also designed to be easily extensible to projects beyond this initial scope. While users will need to provide some level of customization
based on their choice of project, the scope of this customization is limited to specific functionality that is easy to understand and work with. We were able to evaluate a basic prediction model given data from one of these projects, and found it effective in generating test result predictions that can aid in the testing process.
In chapters 2 and 3, we will discuss the data collection process and how it was applied to Flask, one of the largest open-source Python projects.
In chapter 4, we discuss the prediction model portion and evaluate its effectiveness. In chapter 5, we conclude with future work to improve the system.
Chapter 2
Integrating with Git
In this chapter we describe the first half of MLT, integration with Git. It generates the test result data in a standardized format that can be used in a variety of machine learning models. The system is designed to be extensible across different software projects, allowing the user to choose the relevant software test result data and how it is collected. Its only limitation is the requirement that the projects be based on Git version control. However, we do not consider this a significant limitation as Git is by far the most popular version control, and a large majority of modern software uses it [14]. Additionally, Github, the major platform for hosting software projects, is based on Git, and houses nearly all major projects, hosting over 60 million repositories [11].
2.1
Git
Machine learning models require extensive data to train themselves. To do so, we hope to have access to all (or nearly all) of the test results across the history of a given software project. This section details the basics of Git version control, how it allows for access to the test result data we desire, and why the data collection process relies on Git’s functionality.
2.1.1
Basics of Git
Git is a version control system that allows users to easily collaborate on software projects in a distributed manner. With it, after users make changes to a part of a codebase, they make a commit. Each commit contains information about what parts of the code were changed from the commit preceding it, with a pointer to that preceding commit. Commits also contain unique hash strings that are used as identifiers. From a software/project management perspective, these commits allow large projects with many developers to easily keep track of code changes, and manage what parts of the software get updated and released.
92ec2 Scott Scott tree size commit author committer inital commit of my project 98ca9.. 0de24 34ac2 Scott tree size commit parent author Scott committer add feature #32 -utility to add new formats f30ab.. Snapshot A 184ca 98ca9 Scott tree size commit parent 34ac2.. author Scott committer Snapshot B Snapshot C
Figure 2-1: A graphic illustrating the basic commit structure of Git. In this example, there are 3 commits, identified by the 3 hashes above the blocks. Each commit points to the commit made immediately before it, so 98ca9 is the oldest commit while f30ab is the newest. Each commit contains a few attributes, such as tree, author, committer, and description. The tree points to a hash of the contents of the directory the commit is on, the author and committer refer to identifiers for the developers that wrote the changes and made the commit, and the description is a committer-specified description of the changes made on the commit.
Git actually uses a tree model to keep track of all of a project’s commits, allowing multiple commits to share the same preceding commit. When two commits diverge from a single commit, they are considered on separate “branches”. In standard software engineering practice, there is a primary master branch that represents the “realest” version of the codebase - that is, the version that is publicly available to users. To make changes, developers make branches off this primary master branch. When they
have finalized their branch, they make a “pull request” to have their code merged into the main master branch. Other developers, often the primary maintainers of the project, can then approve or deny these requests, and if approved the changes will be added to the master branch. Thus, the standard branches of a Git project are this main master branch and all the pull request branches that have or haven’t been merged into master. An example of this tree structure can be seen in figure 2-2.
98ca9 34ac2 f30ab 87ab2 master HEAD
c2b9e testing
Figure 2-2: A graphic illustrating the tree structure of Git. Here there are two branches: master and testing. They diverge from the commit f30ab, with master having the commit 87ab2 and testing having the commit c2b9e.
Figure 2-2 shows not just the hash identifiers for each commit, but also 3 additional identifiers: HEAD, master, and testing. Master and testing are identifiers for the two branches, and point to the latest commit on each branch. HEAD is a pointer to the commit that the user is currently viewing locally, so in the figure the user is viewing the latest commit on master. All of these pointers are dynamically updated when new commits are made. They act as an alternate way to refer to commits beyond the hash strings.
2.1.2
Git History
Commits are not only for recording changes to code. Each commit also records a “snapshot” of the entire state of the codebase. Users are able to view any such snapshot by changing where HEAD is pointing. Because, HEAD is just a pointer, it can be updated to point to any commit, and thus any such snapshot can be viewed.
The command to update HEAD is git checkout id, where id is an identifier for the commit. Upon doing so, HEAD is set to point to commit id, and the user is brought back to the state of the codebase when the commit was made. This replaces all contents of files maintained in the project to the contents of these files at the time the commit was made, allowing users to view and use this previous version of code.
Because every commit keeps track of its preceding commit, the entire past history of commits is available, so any commit that was made can be viewed. This includes both previous states of the master branch as well as intermediate states of pull requests other developers were working on. We thus have access to the entire history of the software projected, segmented into discrete timestamps at each commit. These actions are reversible, so at any point it is simple to return to the most recent state of the codebase.
2.1.3
Git and Test Data
How does focusing on Git give us access to the test result data we want? As made clear from the structure of Git, we can visit any previously snapshotted instance of a given Git-based project. However, test result data is not explicitly saved at each commit. Instead, all of the tests can be run on this old version - because all files have been changed back to their old state, this is now testing the old version of the code. By parsing the resulting logs from running these tests, we can thus collect the data we want. We thus have a procedure for collecting a large amount of test result data:
Generate a list of all commits For each commit:
Checkout the commit Run all tests
Parse logs and accumulate data
As popular repositories will be on the order of thousands of commits, we are able to collect plenty of data to train our models on for that repository.
2.2
Generating Test Results
2.2.1
Getting All Commits
There are two components in finding all commits of a repository: the main master branch and all of the side pull-request branches. It is important for us to extract test result data from commits from both components, and not just to increase the amount of data obtained. Because the master branch is the most public-facing and exposed to regular users, it is critical for commits on this branch to be release quality and contain minimal, if any, bugs. Thus, nearly all tests from these commits will be passing, which, while still valid data, will contain minimal failing examples. In contrast, pull request branches can have intermediate commits that are not release quality. These commits are significantly more likely to contain failing examples, so we make sure to visit these commits as well.
Finding all commits along the main master branch is simple. Every commit has a pointer to its parent, and Git provides a simple syntax for finding parent commits: if a commit’s id is id, then its parent’s id is given by id~{1}, its parent’s parent’s by id~{2}, and so on. We can thus start from the most recent commit on master, and iterate through parents until no parent exists.
Getting all pull request commits is more involved. We first modify the .git/config file in the root directory of the repository to pull all branches marked with pr. Each of these branches will have the form origin/pr/id, where id is a counter for each pull request. For each of these branches, we then run the below command to find all commits on this branch but not on the master branch.
git log origin/pr/id --not
$(git for-each-ref --format=\’%(refname)\’ refs/heads/ | grep -v "refs/heads/origin/pr/id")
2.2.2
Why Run Tests on Every Commit?
One thing that may be concerning about the above procedure is the need to re-run all the tests at every commit, a process that can take a very long time. Having to explicitly run the software requires setting up the project and its dependencies
in whatever environment is being used, which is further complicated by changing dependencies when earlier commits are visited. Finally, further work needs to then be done on building parsing mechanisms that can convert the output of the testing procedure into the data format we desire.
It may be surprising that all this effort needs to be expended in the first place. Almost all large projects use some form of continuous integration to automatically run all tests whenever new code is added. These CI tools provide public APIs that allow for querying over the history of a project and extracting various logs and metadata. Given the availability of this information, it initially seems obvious that querying whatever CI tool a project is using for test information is the ideal method.
However, upon further inspection, relying on CI tools for the data has some critical flaws stemming from the fact that their APIs are not designed with our specific use case in mind - easily extracting specific test result data. Instead, they are designed more from a general dev-ops perspective, providing information about whatever processes have been set up to run when new code is added.
As a case study, consider TravisCI, one of the most popular CI tools that is also free to use for open-source projects. Its API is focused around queries for builds, detailing an instance of new code being added to a project composed of of many jobs (individual tasks that the new code is run through). These jobs will include logging that describes what was done in the job. Of course, some of these jobs are test-related, and we could use their logs to extract our data of interest. Unfortunately, it is difficult to differentiate between which are test-related and which aren’t without manual inspection of the logs, and because these APIs are rate-limited, trying to consume all the logs is slow. Furthermore, we still confront the issue of having to create a parser to extract the data format we want from the logs, which is compounded by being limited to whatever command was used to generate the logs, rather than being free to choose our own. Finally, initial testing revealed some reliability issues in some of the API results, including returning commit IDs that were not actually present in the repository and thus finding results that couldn’t be confirmed.
Build Job 1 Job 2 Job 3 Log 1 Test output: ... Log 2 Test output: ... Log 3 Coverage output: ...
Figure 2-3: A diagram of the objects made available in the Travis CI API. We have access to builds, which themselves point to several jobs run on that build. Each job has a log that contains the output of whatever code was run in that job. In this example, we see jobs 1 and 2 were responsible for testing, and have logs we would like to examine. However, job 3 was responsible for generating a coverage report, which we do not care about, but would have to build functionality to differentiate it. data. While we had to set up the software manually, we then had full knowledge of where in the history of the project we were when running tests, the ability to control what kind of testing we wanted to run to produce the easiest logs to work with, and complete reliability in being able to reproduce our data.
2.2.3
Data Collection Architecture
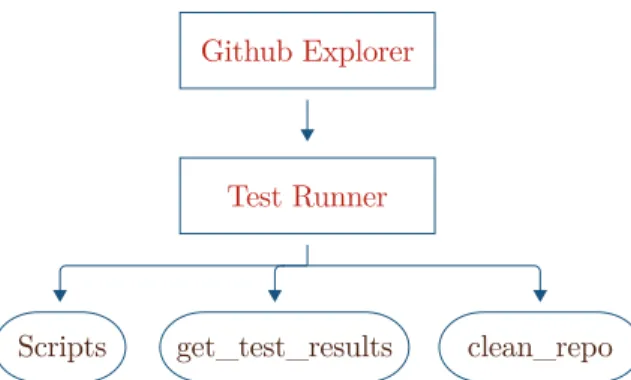
Having explained the choice in Git, we now describe our data collection system archi-tecture. It consists of two parts - the GithubExplorer interface and the TestRunner interface. The GithubExplorer interface handles working with and navigating around a Git repository. It contains various helper methods that can call out to Git commands, extract information about a repository or its commits, and run code on a certain commit. It is designed to be agnostic to whatever project is being worked on, requiring only a Git repository.
The TestRunner handles the interaction with the actual test running software. Unlike the standards of Git repositories, test running is much more variable. Even the command that should be called to run the test can vary greatly between different projects. Thus, any interface for working with tests needs to be be primarily extensible by the end-user, allowing them to specify how they want tests run and how they want
the resulting logs to be parsed. This part of the interface then primarily handles the process of actually running the test scripts and parsers, and logging their outputs. GithubExplorer
The GithubExplorer is the interface for interacting with Git. It has provides several methods to obtain information about a repository’s commits and its commit structure. The methods that are most relevant to end users are:
• Initialization: initialize with two arguments - a path to the repository of interest and a path to a file that will be used to cache commits. This second argument is used for performance reasons, see section 3.1.4 for more details.
• get_all_commits: Returns a list of all commits of a repository. Refer to section 2.2.1 for how to obtain this list.
• do_on_commit: Runs a function on a specified commit. In this use case, it is used to run the testing functionality on each commit.
TestRunner
TestRunner is a subclass of GithubExplorer, and is the interface that users will directly work with. It uses the Git functionality from GithubExplorer to traverse the commit history of a repository, run the tests, and save the test result data. Because the individual methods for running tests and parsing the logs may vary across commits, users are expected to modify the functionality of TestRunner by creating new subclasses of TestRunner that override specific methods. The methods that are relevant to end users are:
• Initialization: initialize with four arguments - the first two are the same as above, a path to a directory that will store the test result data, and a list of files that will be run as test scripts, one for each platform to be tested on. The test scripts are expected to be customized to each individual project.
• test_all_commits: Runs tests on all commits and saves the test result data. This is the function that will be run by the end user to initiate the data collection procedure. It runs each of the scripts on each commit, saving the results as follows:
– The test result data is pickled and stored in
data_dir/{commit_sha}_results.pickle, where commit_sha is the hash identifier for the commit the tests were run on. We specify the form of the test result data in section 2.2.4
– Any errors that occur in the testing procedure that are unrelated to the tests themselves are logged and saved in data_dir/{commit_sha}_errors. • get_test_results: Parses a testing log string and outputs a tuple of the
platform identifier string and test result data. Test result data format is specified in section 2.2.4. This is the function that is expected to be overwritten by the user to adapt to their repository of choice.
• clean_repo: Cleans the repository of intermediate files leftover from testing. May be overwritten by end user if needed, though we provide a basic default for Python projects.
There are thus 3 areas of customization: the scripts argument used for initialization, get_test_results, and clean_repo. Each is designed to have a clear limit in scope, so users are able to easily add in their custom features. The rest of the functionality provided in GithubExplorer and TestRunner is designed to be agnostic to what is done with those 3 items, so users can choose how they implement those items without worrying about their interactions with other parts of the interfaces.
The interaction that users do have to plan for is between the scripts initialization argument and their implementation of get_test_results. get_test_results is meant to parse through the output of the test logs that outputted from the test scripts the user passes in, so users have full control over what kind of logging they would like to occur and how to parse that logging. Users are then able to choose scripting
Scripts get_test_results clean_repo Github Explorer
Test Runner
Figure 2-4: A diagram of the inheritance in the data collection architecture. TestRunner inherits from GithubExplorer, and the user should write a new class that inherits from TestRunner and overwrite the get_test_results and clean_repo functions, and specify their own scripts argument.
options that will make logging as simple as possible. For an example of each of these implementations, refer to section 3.
2.2.4
Output Data Format
get_test_results is expected to output a specific format for the test result data. The data should be a dictionary that maps test name strings to string representations of the test results. The test names should be unique identifiers for a test, which remain the same across commits. The results should be one of the following strings:
• ’PASSED’ • ’FAILED’ • ’SKIPPED’
• ’ERRORED’, which occurs when an errors occurs while running the test that isn’t related to the functionality of the test or source code
The resulting pickled data has slightly different format. The pickled objects are dictionaries that map string identifiers for each platform to the test result data on that platform, as described above. Figure 2-5 illustrates this overall format.
Thus, beyond the actual results of the tests, users are also expected to parse out an identifier for the platform and identifiers for each test from the testing logs. The
{ Platform 1:
{Test 1: PASSED, Test 2: FAILED, ...}, Platform 2:
{Test 1: PASSED, Test 3: ERRORED, ...}, ....
}
Figure 2-5: Illustrates the data format of nested dictionaries. At the top level, each platform name maps to another dictionary. In each of these dictionaries, test names map to their results on that platform.
testing scripts they use should thus ideally be simple to parse so these items can be extracted. The test names in particular are crucial to maintaining consistency across commits when the data is used to train models. If the test scripts are unable to provide detailed output with the test names, users may have to implement more elaborate parsing schemes to extract these names from the source code files. For details on this process, refer to section 3.2.
It is important to note that this test result data does not take the matrix form introduced earlier. A separate module, DataHandler, handles the conversion from these pickled objects to matrix forms. We chose to use this intermediate format for several reasons:
• Ease of interpretability: Python dictionaries are naturally easy to work with, allowing users to easily understand the data they have collected. Users are easily able to query these dictionaries to see the which tests on which platforms had which results. This also allows users to easily create scripts that can analyze the data and generate interesting metrics, such as ratio of failures to successes. • Checking data correctness: After generating the test result data, we want to
be able to double check the reliability of the data. Because this kind of test data is not readily available, we have no way to automatically check the correctness of our results. We thus want a representation where it is easy to check the correctness of the underlying data. With a dictionary, this is simple - simply run the test suite on the same commit, find the failing tests, and check that those and only those tests are marked as failing in the dictionary.
• Flexibility Tying into the ease of use, this format is extremely flexible, particu-larly in conversions to other formats. This is especially important for our use case, where we aim to create an flexible pipeline that is amenable to various projects and models. We specifically are able to easily convert these dictionaries into the matrices we use for our models - see section ??.
Chapter 3
Running Tests and Collecting Results
In this chapter we present an example of the implementation of the TestRunner interface defined in section 2.2.3. This example is for Python projects that use pytest as a testing framework. As Pytest is very popular for Python, projects, this example provides a useful starting point in demonstrating how TestRunner can be successfully implemented. We then provide results on running this implementation with Flask, a large open-source Python project [3].
3.1
TestRunner implementation
We detail the implementation of the three custom parts of TestRunner here.
3.1.1
scripts
Python projects are generally tested across different versions of Python. We thus need to implement scripts to run tests across each relevant version of Python. To handle the different versions, we use the pyenv library [7]. pyenv provides a simple method of installing and using multiple python installations in a single local environment. For example, if we want to use versions 2.6, 2.7, and 3.6 of Python, we can simply call pyenv install 2.6, pyenv install 2.7, and pyenv install 3.6 to install, and use each version with python2.6, python2.7, and python3.6. In the same vein, we
also have access to the respective versions of pip, Python’s package manager, with pip2.6, pip2.7, and pip3.6 [6]. We use these separate versions of pip to install the necessary dependencies for the project we are working with for each version of Python, and are then able to run tests on all versions.
Each individual script then takes the following form: cd {path to Flask directory}
python3.6 -m pytest -v --continue-on-collection-errors
where the above is an example for Python 3.6. Scripts for the other versions of Python look essentially similar, replacing only the version of Python used in the second line.
We note two other key arguments used in the second line
1. -v enables verbose mode for pytest, providing output of the form shown in figure 3-1, which is simple to work with and parse.
2. –continue-on-collection-errors prevents pytest from automatically error-ing out on collection errors. Collection is the process through which pytest identifies and prepares the test functions in a project’s test files. In testing, we found errors in the collection process occur due to dependency issues that were difficult to get around (see section 3.3.2) in a specific few test files. However, we wanted to still be able to run the other tests that were collected properly to obtain some data from these instances, which this flag allowed us to do.
3.1.2
get_test_results
By using the -v flag, we have a simple way of collecting all of the test names and their associated results. The example output in figure 3-1, shows the associated test file is also displayed with the test name, but we ignore the file as we want our data to be agnostic to the specific files the tests are located in. We can easily go line-by-line and extract the appropriate test names and associated test results, as well as the Python version from the first line.
Figure 3-1: Example output from running pytest -v. In the first line, versioning information about the environment can be seen. Following that, each test name and its result can be seen. Along with the shown FAILED and PASSED results, there can also be ERRORED and SKIPPED results.
3.1.3
clean_repo
After running the test suite, we delete all *.pyc files, so subsequent test runs do not run into errors with these leftover files. This is provided as the default functionality of clean_repo, and should be sufficient for most Python projects.
3.1.4
Performance
Our implementation is not designed to optimize performance. The time to run all the tests depends on the number of tests, commits and platforms to run across, the complexity of the tests, and the choice of testing script. These factors can all vary greatly across different projects, and is out of our control.
Some steps were taken to ensure quickly iterating on the collection process and testing that it was functional was efficient. After getting all commits with get_all_commits, we write the commits to a file to skip having to re-find these com-mits on later runs, which is a costly operation when there are thousands of comcom-mits. Additionally, before running tests on a commit, we can optionally check if data for that commit has already been collected; if so, we can choose to skip rerunning the test suite on that commit. These steps help make repeating the procedure quicker,
which is useful when testing different scripting and parsing procedures to ensure they work. However, they don’t help in speeding up the procedure when all the data needs to be collected.
One potential avenue for performance improvements is parallelism. Our system runs tests in a sequential fashion, running the entire test suite on each platform one-by-one before continuing to the next commit. Because each run of a test suite is independent from any other run, running them in parallel appears like a straightforward approach to increasing performance. However, there are several issues that prevent a straightforward concurrent approach:
1. Inability to parallelize across commits: Viewing different commits changes the state of the filesystem. Thus, two processes cannot run tests on different commits for a single repository at the same time. One way to get around this would be cloning the repository multiple times, with each process running the test in its own clone.
2. Uncertainty in parallelizing across platforms: The ability to parallelize across platforms is uncertain, and may not be possible for certain applications. Different platforms may require running different test environments concurrently, which may not interact well together. If any intermediate files are created, there may also be filesystem-level issues if multiple processes try to access them at the same time.
3. Difficulty in implementing distributed approaches: A solution to both of the above listed problems would be a distributed approach that could run parts of the test suites across different machines. However, such an approach would require work in building a distributed system to handle task allocation and result accumulation, as well as the infrastructure around setting up and using several machines.
We decided to stick with a sequential approach for its simplicity of implementation. Nevertheless, parallel approaches that could speed up the rate of test collection would greatly aid in the ease of usage of our system.
3.2
Alternative Implementation
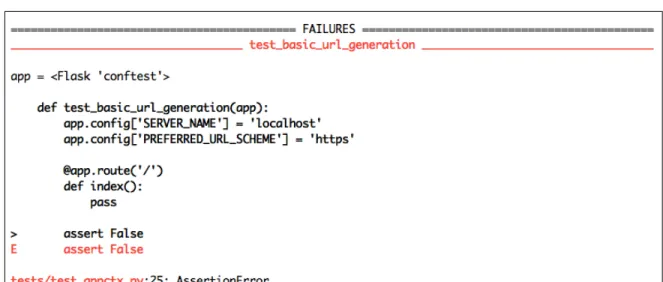
Above, we used the -v flag to allow for simple parsing of test names. However, a flag with similar behavior may not be present in all testing frameworks, so we present an alternative method of implementing get_test_results in this section that does not rely on this flag. Without this flag we may not get detailed information as was shown in Figure 3-1 where the result showed exactly which one of the tests with in a .py failed and which passed. If the flag is not present the results may look like:
tests/test_appctx.py ...F...
To successfully parse these cases, we present mechanisms to extract the correct information information. Test results usually return a status of FAILED, PASSED or SKIPPEDor ERRORED. Below we explain how we handle each in our new implementation. Extracting Failed or Errored results: When a test fails, testing frameworks by default provide information about that failing test case. This information includes a snippet of the code that failed, an error message, and, most relevant to us, the name of the test. As shown in figure 3-2, this test name is easy to extract. Similar output is given when tests are in the ERRORED state, so those cases are similarly simple to handle.
Figure 3-2: Example output from pytest when a test fails. The test name appears in the second line, and is easy to extract.
for the two other possible test results: PASSED and SKIPPED. Output for these test results can be seen in figure 3-3. The log no longer provides the test names associated with each result; however, we need these associations to be able to correctly create our data matrices.
Figure 3-3: Example output from pytest when run without -v flag. Only the test filename appears, so we cannot associate any test names with particular results. Here, the dots signal tests passing, and the s signals a skipped test. However, we do not know which dot corresponds to which test, and which test the s coressponds to.
Because we have access to the repository’s files, we can instead parse the test files to find the appropriate test names. From the output shown in figure 3-3, we know the names of the files that contained tests, so we know to parse those files to identify the test functions. Even if the log did not contain these names, identifying test files would still be straightforward. In almost all cases, test files are contained in a certain directory and are named a certain way. For example, in Python the convention is to have a directory named tests, and each test file is prefixed by test_; similar conventions hold in other languages [1] [13].
Once we identified the test files, we needed to parse out the test functions themselves. This is also straightforward: test functions have similar naming conventions as test files, usually being prefixed by test_ or Test. Additionally, many libraries exist that can convert code files in a variety of languages into abstract syntax trees (ASTs), which simplify parsing. For example, in Python there is an ast library that can convert any Python file into an AST [2]. From this AST, it is simple to identify functions and check if the name of those functions match the format of a test function. We can thus collect all of the test functions in a test file in this manner.
If all of the tests in a file pass, we can then simply assign all the test names found from that file a passing result. However, things are complicated when tests are skipped. We must then identify which of the tests that were parsed from the file were skipped instead of passed. This is further complicated by the fact that there is more than one method of marking if a test should be skipped. Figure 3-5 shows two different ways
Regex
AST
Representation functionsList of AST Python File ... ... ... ... 1 2
[f ,f ,...]
[test-
1, test-
2, ...]
Figure 3-4: Diagram for how to parse Python file for test names. From the input Python file, we use ast to convert it to an AST representation. It is then straightforward to extract the list of functions in the file, and run a regex over their names to identify which are tests.
tests were skipped in the Flask codebase. Having to handle multiple cases requires a more complex parsing scheme, especially with regards to cases like the bottom example in the figure, where we then need to check all variables instantiated in the file to see if they are related to a skip marker.
1 @pytest . mark . skipif (not PY2 , reason ='This only works under Python ←˒
2. ')
2 def test_meta_path_loader_without_is_package ( request , ←˒
modules_tmpdir ):
3
1 need_dotenv = pytest . mark . skipif (
2 dotenv is None , reason ='dotenv is not installed ' 3 )
4 @need_dotenv
5 def test_load_dotenv ( monkeypatch ): 6
Figure 3-5: Two examples of methods to cause a test to be skipped. In the top, a simple flag is set directly above the test. In the second, a separate variable is used as the flag.
Overall, the parsing scheme is relatively simple except for when we need to handle skipped tests. However, having to handle these skips causes a significant rise in the complexity of the implementation and the amount of knowledge about the underlying codebase needed. These issues are in direct conflict with our goals of allowing our system to be easily used across projects. Thus, if one is forced to rely on direct parsing of test files, we recommend ignoring these complicated cases; instead, we recommend a simple solution that is able to capture most of the test results. In our tests, to handle skips we simply searched for cases similar to the top half of figure 3-5, where the
skip marker appears directly above the test function. In the other cases, we simply discarded all the results from the test file, as we couldn’t differentiate between which tests passed and which were skipped. This allowed us to still collect the results of 90% of all tests, a significant majority. However, when we could, we still used the implementation described in section 3.1, as it was significantly more reliable and easier to implement.
3.3
Collecting Test Results from Flask
We now present the result of running the data collection process with Flask. Flask is a popular Python web framework. As with many open-source projects, it is hosted on Github, with thousands of commits and hundreds of contributors. It was the first project we tested with our system, and guided many of the decisions made in designing the system. It was chosen as the first project to test with for several reasons. It had good documentation, specifically with regards to setting it up and running tests. Running the test suite was relatively quick, taking about a minute, allowing quick iteration. At the same time, it had a fair number of tests, at around 400, as well as commits, with over 3000, providing a good initial quantity of data to use with our models. Finally, as with most Python projects, its platforms were different versions of Python, which were easy to work across with its testing procedure.
We implemented the components of TestRunner with the implementations de-scribed in section 3.1, and then ran test_all_commits. This process was run on an AWS t2.large instance [12], and took approximately 12 hours to find all results.
3.3.1
Test Data Metrics
Raw Counts: In total, Flask had 3112 commits. However, as described in sec-tion 3.3.2, not all commits had their tests successfully run. We show our statistics for the number of test results we were able to collect in table 3.1.
It is important to note that Flask did not support all versions of Python from its inception. It supported only Python 2.6 when it was first released, later adding Python
Python version Number of commits with tests Total number of tests 2.6 2177 299317 2.7 1930 298781 3.3 1200 297316 3.4 1200 297316 3.5 1200 297316 3.6 1200 297316
Table 3.1: Statistic on tests collected for each version of Python.
2.7 and then Python 3.x support. In particular, all Python 3.x versions were added at the same time, explaining why all of them have the exact same number of commits and tests. This staggered support thus explains the later versions having fewer commits. However, as we can see in the original Python 2.6, almost 1000 commits still did not have any tests, arising from difficulties in collecting all test results that we describe in section 3.3.2.
While Python 2.6 had almost double the number of commits as the 3.x versions, this is a significantly smaller relative fraction of tests. The same holds for comparisons between Python 2.7 and the 3.x versions. To investigate this, we plotted histograms of the number of commits versus number of tests for three of the versions, which are shown in figure 3-6. From it, we can see a significant number of commits in Python 2.6 and 2.7 have only one or two tests. When we ignore those commits, the remaining histograms are identical. Thus, those early commits did not actually contribute a significant number of tests.
Test Failure Occurrences
We also measured the rate of occurrences of test failures. This metric is particularly important to us as it provides a rough signal of the quality of our data in training models. If test failures are extremely rare, and an overwhelming percentage of the data is just tests passing, it would become significantly harder for a model to learn to
0 100 200 300 400 0 200 400 600 Number of tests Numb er of commits Complete Python2.6 0 100 200 300 400 0 200 400 600 Number of tests Complete Python2.7 0 100 200 300 400 0 200 400 600 Number of tests Complete Python3.6 250 300 350 400 0 20 40 60 80 100 Number of tests Numb er of commits Partial Python2.6 250 300 350 400 0 20 40 60 80 100 Number of tests Partial Python2.7 250 300 350 400 0 20 40 60 80 100 Number of tests Partial Python3.6
Figure 3-6: Histograms of number of tests and number of commits with that number of tests. The spikes on the left edges of the histograms in the top row are due to a large number of early commits with only 1 or 2 tests. After ignoring those cases, we see a much more balanced distribution.
identify failures.
We found a total of 825 commits had at least one failure, and 1534 test suite runs had at least one failure, where a test suite run is a single execution of the test suite on a single version. Table 3.2 shows a more detailed breakdown of the occurrences of test failures across the various versions. In it, we see in most versions of the commits have no failures. Interestingly, versions 3.3 and 3.6 have a significantly larger number of commits with some failures, with the number actually being larger than the number of commits without failures for 3.6.
We show a breakdown of failure occurrences in percentages in table 3.3. We see that test failure rate is at least .004% across versions, with commit failure rates of at least .03%. These rates were high enough to be comfortable to use this data to test potential prediction models.
Number of failures Python version 0 1 2-10 11-100 >100 2.6 2099 30 29 7 5 2.7 1851 31 29 7 5 3.3 857 283 34 12 5 3.4 1040 40 98 8 5 3.5 1110 42 26 8 5 3.6 366 680 138 5 2
Table 3.2: Statistics on number of commits with certain numbers of failures.
Python version Total number of failures Percentage of tests that failed Percentage of commits with failures
2.6 1352 .0045% .033% 2.7 1352 .0045% .037% 3.3 1705 .0057% .278% 3.4 1733 .0062% .126% 3.5 1368 .0046% .068% 3.6 1682 .0057% .688%
Table 3.3: Percentages of tests that failed and commits with failures.
3.3.2
Challenges with the Flask Repository
We ran into some challenges and some edge cases while collecting our test result data, which we document here.
handled automatically by our system. However, setup can vary wildly among projects, and the steps for setup may not be easily scriptable. In this case, even though setting up and using pyenv was simple, it was not easily scriptable, thus requiring manually running commands on the command line. This extended to installing the required dependencies to run the test suite. We were thus unable to build a system to handle this part of the procedure automatically or through user-provided scripts.
Need to refresh after a running tests on a commit: We ran into issues in the process of collecting the tests. On our first attempt, more than half of the commits had no test results. On further investigation, we discovered this was due to leftover *.pyc files from previous runs creating compatibility issues. This prompted the creation of the clean_repo function.
Need to re-install older versions of the dependencies: Once this was fixed, we still found a significant number of commits had no test results. These commits were the older commits in the project, with the errors occurring because the code relied on importing old versions of the dependencies. Because these versions of the dependencies were incompatible with the versions we installed in the initial setup, and we had no re-installation process, the tests were unable to run. A re-installation process could have fixed these errors, but implementing one would have required complicated scripts to remove and update the dependencies. Additionally, without explicitly checking the dependencies, we would have had to rerun this re-installation process at every commit, which would’ve caused the collection process to take significantly longer. We decided we had collected a sufficient amount of data without having this extra level of sophistication, and did not implement such a process.
Older commits did not use pytest: Finally, upon manual inspection of some of the older commits, we found the testing procedure actually differed. In these older commits, running pytest did not work; instead, other commands, such as make test, were the correct approach. Because this information was not available beyond manually inspection of the commits and their documentation, handling this automatically did not appear feasible. These commits were among the earliest 1000 commits on the project, and had very few to no tests, so we did not lose much data from not properly
collecting results from these commits.
3.4
Working with Other Projects
This chapter has focused on Flask to outline the general test collection process on a real project. While our test collection procedure was designed to be easily extensible, some of the choices we made for collecting tests across Flask were specific to its test running process and don’t carry over well to other projects. To handle this, our collaborators extended the test collection process to several new projects. They were also able to address various issues outlined in section 3.3.2. Their contributions are described in appendix A.
Chapter 4
Predicting test results
After collecting the test result data, we now wish to build models to solve the test result prediction problem. In this section, we detail the models we use, how we convert the data we saved previously into a format appropriate for the models, our evaluation algorithm for these models, and the results.
4.1
Prediction Problem and Possible Solutions
What is the prediction problem?: Before we begin, we define the prediction problem in a concrete manner:
Given commits 𝐶1...𝑚and matrices for test results for each of those commits 𝑇1...𝑚 predict the test results 𝑇𝑚+1 for 𝐶𝑚+1
where 𝑖, 𝑗 entry in the matrix 𝑇 has results for test 𝑖 when executed on platform 𝑗. In order to build a general purpose system we cannot use any source code analysis from 𝐶𝑚+1 or previous commits.
Using past history only: On first thought, one might guess given a new commit and a past history of test results, we could predict which tests fail using their past history. However, in this setup we wouldn’t have any information about the current commit, as we are not using any source code analysis. If we only rely on our past history, as seen in section 3.3.1, most of the past history consists of commits with no
failures. Then, the best guess for any commit would be that there are no failures -clearly, not an interesting result.
Formulation as a matrix completion problem: Instead, we posit the prediction problem as a matrix completion problem. Specifically, we propose the following: for a new commit, we choose some subset of tests to initially have the results of. Based off the results of this subset, we then make predictions of the results for the remaining tests. In terms of the matrix formulation, we will initially fill in part of the test matrix with its true values. We then use our model to create predictions for the values of the remaining entries of the matrix. The core intuition behind this is that there are tests that share attributes with each other, such that if any one test passes or fails it gives information on if other tests are more likely to pass or fail. Hence, from the result of one test we have information from which we can predict the results of the other tests.
Given that we posit this problem as a matrix completion problem we can then approach making predictions in two ways:
1. One-shot: After filling in the initial portion of the matrix, we make predictions on all other entries of the matrix.
2. Iterative: We fill in a small initial portion of the matrix, then make predictions. From those predictions, we select those that have the highest level of confidence, and find the real values to compare the predictions. We then fill in those real values into the matrix and repeat.
Both approaches are discussed in the following sections. We also have two choices for how to incorporate the history of test results:
• Computing features using historical data for tests and platforms and using those features to do feature based matrix completion (used in the following sections). • Appending the matrix 𝑇𝑚+1 with results from 𝑇1...𝑚 (left as future work).
Model Model One-shot: Input 1 ... ... ? 0 ? Predictions 1 ... ... 1 0 0 Predictions 1 1 1 0 0 Iterative: Input 1 1 1st round repeat Check with real values ? 0 ? ?? ?? ? ? ?? ?? ?? ? ? ?? ? ? ?? ?? ?? 1 1 0 0 ?? ?? ? ? ?? ?? ??
Figure 4-1: Comparison of approaches to matrix completion. In the one-shot approach, after filling in an initial portion of the matrix, we make predictions on all other entries. In contrast, in the iterative approach, after one round of predictions we compare the highest confidence predictions to the real values, replace errors with the real values, and repeat.
4.2
Data Format
Regardless of which approach is taken, both have the same goal - predicting the unfilled entries of a partially filled matrix. We specify the exact form of this matrix here.
The matrices we use have one row for every unique test and one column for every platform that is tested on. Each entry in the matrix is then the result of the test specified by the entry’s row on the platform specified by the entry’s column. If the test passed on the platform, the entry’s value is 0, and if it failed it is 1. These values were chosen because our goal is failure detection, so we consider passing as the default state and failures as notable events. Any other result has value NaN. We roll together all other results into the same value as other representations have significant drawbacks: • If there are n possible results, representing each with an integer between 1 and n: this introduces a concept of ordering that doesn’t make sense in the context of test results.
• One-hot encoding: matrix completion algorithms expect numbers as entries of the input matrices, not vectors.
.
NaNis thus the simplest way of handling these other results, and our models simply ignore entries with these values.
4.2.1
Converting Data from Data Collection
In section 2.2.4, we specified the format that we saved the test result data in as nested dictionaries, where keys to the first layer were platform names, and keys to the second layer were test names, with the final layer being the test results. From this format, it is simple to create the corresponding data matrices:
Iterate over all dictionaries to collect all n test names and all m platform names
Associate each test name with an index in 1..n Associate each platform name with an index in 1..m For each dictionary:
Create a new matrix X with n rows and m columns Initialize every entry in X to NaN
For each platform name in the dictionary: i = index associated with platform name For each test name on that platform:
j = index associated with test name if test result is PASSED:
X[i, j] = 0
else if test result is FAILED: X[i, j] = 1
From this procedure, the value NaN occurs in 3 cases: 1. A test had result SKIPPED
2. A test had result ERRORED
3. The test did not exist on that commit
By handling the third case by using NaN, we are thus able to standardize the sizes of all matrices that are generated from a project, allowing the models we use to expect the same size matrix for any data that we feed into it.
4.2.2
Matrix Ordering
From the above procedure, we are thus able to generate a matrix for every commit. When we use these matrices in our prediction model, we also want to specify which matrices are considered the "past" for a given matrix of interest, so we can use these "past" matrices to train our models. To do so, we generate an ordering of commits based off the timestamp that they were committed. We can then sort our list of matrices corresponding to this commit ordering, so that the matrices corresponding to commits with earlier timestamps appear before commits with later timestamps.
4.3
Matrix Completion
Now that we have our data and the problem we wish to solve, we turn our attention to how we can solve the matrix completion problem.
We first note that our problem is very similar to another matrix completion problem - the Netflix prize [5]. In the Netflix prize, the dataset consists of a single large matrix, where each row represents a user and each column represents a movie. An entry in a matrix represents the rating a user gives to a movie. Many entries in the matrix are empty, and the goal is to predict the values of these empty entries to recommend new movies to users.
Parallels between the Netflix prize and our problem are clear. The Netflix users map to individual tests, and the movies map to the different platforms1. On a new
commit, we will have some of the entries already filled in, and we want to predict values in the other entries to recommend what tests to run that might cause failures.
4.3.1
Collaborative Filtering and SVD
Many of the most successful approaches to solving the Netflix prize involved collabo-rative filtering and SVD [20]. Collabocollabo-rative filtering is a method that uses preferences of other users to help make recommendations for a specific user. SVD is one such approach to collaborative filtering that factorizes an input matrix and uses this fac-torization to help make predictions on unfilled entries of the matrix. A detailed description of SVD can be found in figure 4-2.
Dimensions: (m, n)
(m, s)
(s, s)
(s, n)
entry i, j, is rating user i gave movie j line i is fecture vector of user i S1 S2 S3... T column j is feature vector of movie jX: rating Matrix ~~ featuresu: user S: scaling factor V: movie features
~~
Figure 4-2: An illustration of how SVD decomposes a matrix, in the context of the Netflix prize. Given an input ratings matrix X of dimension (m, n), it factorizes it into 3 components: U of dimension (m, s), S of dimension (s, s), and V of dimension (s, n), where s < m, s < n. U represents the feature vectors of each user, V represents the feature vectors of each move, and S is a scaling factor. Reducing the dimensionality of the feature vectors to s leads to the approximation. If we multiply U, S, and V, we create a new ratings matrix that will have predictions where X was initially empty.
Approaches based on SVD are easily applicable to the Netflix problem, as they are able to factorize the single giant input matrix into smaller feature matrices, and use these to fill in the empty entries. However, in our test result prediction problem we also want to integrate information from past commits’ matrices to make predictions on our commit’s matrix. SVD is meant to only be applied to a single matrix, so it is not clear how to integrate the past commit matrices into predictions for a current commit’s matrix.