Publisher’s version / Version de l'éditeur:
Vous avez des questions? Nous pouvons vous aider. Pour communiquer directement avec un auteur, consultez la
première page de la revue dans laquelle son article a été publié afin de trouver ses coordonnées. Si vous n’arrivez pas à les repérer, communiquez avec nous à [email protected].
Questions? Contact the NRC Publications Archive team at
[email protected]. If you wish to email the authors directly, please see the first page of the publication for their contact information.
https://publications-cnrc.canada.ca/fra/droits
L’accès à ce site Web et l’utilisation de son contenu sont assujettis aux conditions présentées dans le site LISEZ CES CONDITIONS ATTENTIVEMENT AVANT D’UTILISER CE SITE WEB.
Student Report (National Research Council of Canada. Institute for Ocean Technology); no. SR-2006-30, 2006
READ THESE TERMS AND CONDITIONS CAREFULLY BEFORE USING THIS WEBSITE. https://nrc-publications.canada.ca/eng/copyright
NRC Publications Archive Record / Notice des Archives des publications du CNRC :
https://nrc-publications.canada.ca/eng/view/object/?id=e6d6f8eb-f32f-40ec-bf21-b84b4babcd84 https://publications-cnrc.canada.ca/fra/voir/objet/?id=e6d6f8eb-f32f-40ec-bf21-b84b4babcd84
NRC Publications Archive
Archives des publications du CNRC
For the publisher’s version, please access the DOI link below./ Pour consulter la version de l’éditeur, utilisez le lien DOI ci-dessous.
https://doi.org/10.4224/8895707
Access and use of this website and the material on it are subject to the Terms and Conditions set forth at
Configuring and securing wireless networks
Thistle, S.
SR-2006-30
Configuring and Securing Wireless Networks
S. Thistle December 2006
DOCUMENTATION PAGE
REPORT NUMBERSR-2006-30
NRC REPORT NUMBER DATE
December 2006
REPORT SECURITY CLASSIFICATION
Unclassified
DISTRIBUTION
Unlimited
TITLE
Configuring and Securing Wireless Networks
AUTHOR(S)
Stephen Thistle
CORPORATE AUTHOR(S)/PERFORMING AGENCY(S)
Institute for Ocean Technology, National Research Counsel, St. John’s NL
PUBLICATION
SPONSORING AGENCY(S)
IMD PROJECT NUMBER NRC FILE NUMBER
KEY WORDS
Network, Wireless, Security
PAGES III,16, App. A-B FIGS. 14 TABLES SUMMARY
Currently a wireless network is in the process of being installed in the offshore engineering basin (OEB) and clear water tow tank (CWT) area. This is a pilot project with future plans to expand the proposed network to include the entirety of the Institute for Ocean Technology (IOT) building. This network will prove to be
especially useful in the OEB and CWT areas since the physical layout of the areas are large and open. Currently model tests in the OEB use either Bluetooth radios or an 802.11G wireless network for data collection. The new wireless network will be able to provide a more standardized and secure method of data collection for future tests. Also this network will allow workers to easily setup and work in various areas of the building without first having to find a network connection point. This report documents the steps taken to install and configure this wireless network at the Institute for Ocean Technology and may be used as a guide to aide in the
installation of future additions to the network. In conjunction with this, this report will also outline some of the steps required to configure client computers to connect to the network.
ADDRESS National Research Council
Institute for Ocean Technology Arctic Avenue, P. O. Box 12093 St. John's, NL A1B 3T5
National Research Council Conseil national de recherches
Canada Canada
Institute for Ocean Institut des technologies
Technology océaniques
CONFIGURING AND SECURING WIRELESS NETWORKS
Sr-2006-30
Stephen Thistle
Table of Contents:
1.0 INTRODUCTION ...1
2.0 HARDWARE INSTALLATION...2
2.1 Wlan Access Point 2330 ... 2
2.2 Ethernet Routing Switch ... 3
2.3 Wlan Security Switch 2380 ... 4
3.0 SOFTWARE CONFIGURATION...5
3.1 Ethernet Routing Switches... 5
3.2 Wlan Security Switch ... 7
3.3 Wlan Management Software... 7
4.0 CLIENT CONFIGURATION ...12
5.0 RECOMMENDATIONS...14
List of Figures: Figure 1. Equipment Purchased for use with the wireless network ... 2
Figure 2. Location of Installed Access Point ... 3
Figure 3. 5520 Switch Ports Connected to Access Points ... 3
Figure 4. Current Setup of the IOT Network ... 5
Figure 5. VLAN Configuration Menu for Ethernet Routing Switch... 6
Figure 6. WMS Services Connection Window ... 8
Figure 7. WMS Default Configuration Page ... 9
Figure 8. WMS VLAN Members Window ... 10
Figure 9. WSS Configuration Screen After Adding A WSS... 10
Figure 10. 802.1x Radius Server Select Screen ... 11
Figure 11. Windows Network Connections Window... 12
Figure 12. Windows Wireless Network Properties Window ... 13
Figure 13. Download Speed vs. Wireless Card Used ... 14
Figure 14. Sample Image of a Wi-Spy Recording ... 15
Appendices
Appendix A. Configuration of WSS as of Nov. 24 Appendix B. Selected Bibliography
CONFIGURING AND SECURING WIRELESS NETWORKS
1.0 INTRODUCTION
A properly configured wireless network can have many benefits when used in conjunction with a conventional computer network. Wireless connection points can allow for the deployment of a network in areas that may have been
impractical to network using conventional networking methods. Wireless networks also allow users to connect from any location within a predetermined range and gives users the ability to roam between connection points. As with any technology the advantages provided by wireless networks does not come without its potential problems. Given the open nature of wireless networks, data security becomes a major concern. A multi-layered approach to network security should be used to ensure the integrity of data on the network and coupled with this, a proactive method of monitoring wireless network activity and signal propagation should be used.
Currently a wireless network is in the process of being installed in the offshore engineering basin (OEB) and clear water tow tank (CWT) area. This is a pilot project with future plans to expand the proposed network to include the entirety of the Institute for Ocean Technology (IOT) building. This network will prove to be especially useful in the OEB and CWT areas since the physical layout of the areas are large and open. Currently, model tests in the OEB use either Bluetooth radios or an 802.11G wireless network for data collection. The new wireless network will be able to provide a more standardized and secure method of data collection for future tests. Also, this network will allow workers to easily setup and work in various areas of the building without first having to find a network
connection point. This report documents the steps taken to install and configure this wireless network at the Institute for Ocean Technology and may be used as a guide to aide in the installation of future additions to the network. In conjunction with this, this report will also outline some of the steps required to configure client computers to connect to the network.
Throughout this report you will notice shorthand representation of computer commands. The -> symbol is used to represent chained commands. For example the command Click start then select settings then select control panel would be represented as click ‘start’->’settings’->’control panel’. Some commands will have choices available to the user. The pipe symbol (|) will be used to represent a choice between possible entries. These choices will be displayed in the following format {choice1 | choice2}. Also commands that require the user to enter data will be referenced using the following symbols <data>. For example if a command is to type “set address’ followed by an ip address it will be written as “set ip-address <ip-ip-address>”.
2.0 HARDWARE INSTALLATION
The first step that was completed in setting up the wireless network was the installation of the hardware. The hardware that was installed includes a WLAN Security Switch 2380, Wlan Access Point 2330, VPN Router Contivity 1750, Ethernet Routing Switch 5520-48t and Ethernet Routing Switch 5510-48t. Figure 1, which is visible below illustrates the amount and type of equipment that was purchased for use with the wireless network. Also included in Figure 1 is the Wlan Management System. The Wlan Management System is software used for the configuration of the wireless network.
Figure 1. Equipment Purchased for use with the wireless network
Product Name Vender Type Part Number Quantity Wlan Security Switch 2380 Nortel Hardware DR4001E71 1 Vpn Router Contivity 1750 Nortel Hardware DM1401149 1 Wlan Access Point 2330 Nortel Hardware DR4001082 6 Wlan Management System Nortel Software DR4010001-4.0 1 Ethernet Routing Switch 5520-48t Nortel Hardware AL1001E05 2 Ethernet Routing Switch 5510-48t Nortel Hardware 216719-AR05 1
2.1 Wlan Access Point 2330
Access points (AP’s) are the most important part of any wireless network. The AP is a transmitter and receiver of data between the network and the wireless client. Currently AP’s can operate using a number of standards as recognized by the IEEE. The first standard is 802.11a. This standard allows for data
transmission rates up to 54 Mbps using the 5GHz band however range is typically limited to 50 meters from the transmitter. The next standard used by AP’s is the 802.11b standard. This standard operates in the 2.4GHz band with a maximum transmission rate of 11Mbps but range has been increased to
approximately 100 meters from the AP. The final common standard used for data transmission is the 802.11G standard. Like 802.11b this standard also operates in the 2.4Ghz band and allows for transmission up to 100 meters away from the AP’s. The 802.11b standard however has a higher maximum transmission rate then the older 802.11b standard at 54Mbps. A new standard 802.11n is currently in the ratification process and will feature further improved data rates of up to 540 mbps.
A site survey was preformed by Triware to determine how many access points were needed and where they should be placed. Based on these
recommendations six Wlan Access Point 2330’s were installed. Four access points were installed in the CWT area and two were installed in the OEB [Fig. 2]. The 2330’s feature two internal radios one 802.11a and one 802.11b/g. The
802.11a radio has been disabled since most clients will support 802.11b/g communications.
Figure 2. Location of Installed Access Point
The installed access points were then connected to terminal closet 3 (TC3) and terminal closet 4 (TC4) using unshielded twisted pair (UTP) cables. The 2330’s use UTP cable to provide communications with the network, as well, as power using power over Ethernet (poE). Two TC’s had to be used to connect the AP’s because UTP cable has a maximum transmission distance of 100m.
2.2 Ethernet Routing Switch
A network connection and power over Ethernet source is required in order to utilize the AP 2330’s. For this reason we installed a Ethernet routing switch 5520 in each of the terminal closets where the AP’s were terminated. Besides
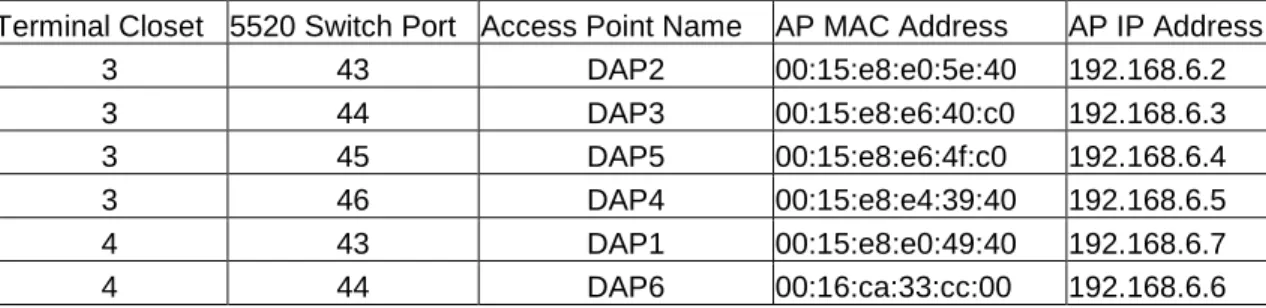
providing power and network communications to each AP, the 5520 switches also provide network connectivity to any network connections terminated at the TC. Figure 3 below lists the ports on the 5520 that have been connected to the access points and lists some of the attributes of the AP’s.
Figure 3. 5520 Switch Ports Connected to Access Points
Terminal Closet 5520 Switch Port Access Point Name AP MAC Address AP IP Address 3 43 DAP2 00:15:e8:e0:5e:40 192.168.6.2 3 44 DAP3 00:15:e8:e6:40:c0 192.168.6.3 3 45 DAP5 00:15:e8:e6:4f:c0 192.168.6.4 3 46 DAP4 00:15:e8:e4:39:40 192.168.6.5 4 43 DAP1 00:15:e8:e0:49:40 192.168.6.7 4 44 DAP6 00:16:ca:33:cc:00 192.168.6.6
In the case of TC4, 70 network connections were terminated in the closet. Since the 5520 only has 48 network ports a 5510 was also installed in a stack
configuration. A stack configuration allows two or more switches to be configured to act as a single device. By stacking a 5510 with our 5520 we doubled the amount of network connection points available from 48 to 96. To setup a stack configuration a unit select switch on the back of the Ethernet switch selected to be the base must be set to on. All other Ethernet switches in the configuration must have unit select set to off. It is important to note that in stacked
configurations all members of the stack must have the same version of the operating software installed in order to function correctly. Once each switch was installed properly in the TC’s the 5520 switches were connected by a Gigabit interface converter (Gbic) to patch panels that connect the TC’s to the passport located in the Building Computer Room (BCR).
2.3 Wlan Security Switch 2380
In order to configure the AP’s with ip addresses and security and service policies a Wlan Security Switch (WSS) is needed. The WSS provides a common device which can be used to configure all AP’s connected to the network. The WSS was installed in the BCR and ports 1 and 2 were connected to a 5510 switch that was connected to the passport. Two ports were connected because each port was to be configured in a separate virtual LAN or VLAN. The configuration of VLAN’s will be further explained in the software configuration section of this paper. Figure 4 below shows the currently installed hardware on the IOT network and the relation between the various pieces of hardware. The yellow boxes mark the newly installed hardware for the wireless network.
Figure 4. Current Setup of the IOT Network
3.0 SOFTWARE CONFIGURATION
Once the hardware has been installed it must be configured to operate on the IOT network. This section outlines the steps taken to configure the installed equipment on the IOT network including the Ethernet routing switches, WSS and the Wlan Management Software. This will include the setup of VLAN’s as well as the setup of remote management methods for administration of the network and the basic configuration of the AP’s.
3.1 Ethernet Routing Switches
The first step to configuring an Ethernet routing switch is changing the default passwords. The Nortel switches have default passwords of ‘user’ for read privileges and ‘secure’ for read/write privileges. Since these default passwords are publicly available the passwords should be changed prior to connection to the network. The passwords may be set using the following command: ‘set password {read-only | read-write} <password>’. The type of password to be changed should be entered in the {read-only | read-write} field and the new
password should be entered in the <password> field. Each Ethernet routing switch was assigned an IP address in order to allow remote administration using telnet. This was done using the command line interface with the command ‘ip address {stack | switch} <ip address> netmask <subnet mask> where <ip address> is the address to be assigned to the switch and <subnet mask> is 255.0.0.0. Stack refers to switches in a stacked configuration while switch would be entered for a single switch configuration. We have assigned the switch in TC3 an ip address of 10.20.3.1 and the stack in TC4 was assigned 10.20.4.1. Next to enable Telnet administration the following command was used: ‘ telnet-access enable’. This allows users to connect to the switch remotely to perform
administrative tasks.
The final step to configuring the switches is to assign VLAN’s to the ports.
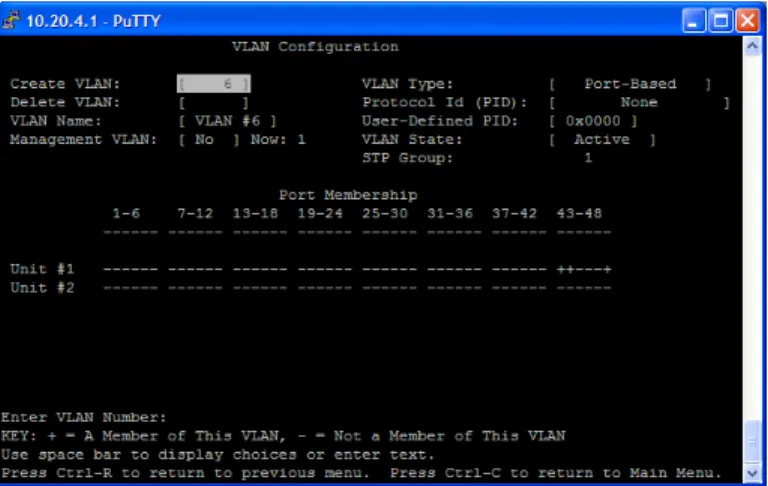
VLAN’s segments traffic into groups. Members of a VLAN only receive traffic sent to their specific VLAN. We have decided to use a separate VLAN, called vlan6, for our wireless traffic to separate the wireless network from the IOT network. This is used as a security feature to ensure that even if unauthorized users gain access to the wireless network sensitive data on the IOT LAN remains safe. To configure a VLAN first the VLAN must be added to the switch. This can be accomplished by connecting to the switch through telnet. Using the graphical user interface (GUI) select ‘Switch Configuration’->’VLAN Configuration’->’VLAN Configuration’. This will display the VLAN configuration page [Fig 5].
Figure 5. VLAN Configuration Menu for Ethernet Routing Switch From the VLAN Configuration menu highlight the ‘Create VLAN’ field and enter the number of the VLAN to be created followed by ‘Enter’. This creates the VLAN. In Figure 5 a VLAN named VLAN 6 was created. To add ports to the VLAN scroll to the port membership field and highlight the port that is to be added. Press the space bar on the port that is to be added and press ‘Enter’. This will change the – symbol into a + symbol denoting the port has been added to the VLAN. In Figure 5 ports 43, 44 and 48 are members of VLAN 6. Ports 43 and 44 are connected to the AP’s while port 48 provides a link via Gbic to the
passport for network communications. Port 48 is also a member of vlan1 meaning it receives communications destined for both VLANs.
3.2 Wlan Security Switch
As with the Ethernet routing switches the first step to configure the WSS is to assign a new password for the WSS. To set the password first a connection is made to the WSS using a serial connection and terminal window. Type ‘set enable pass’ followed by the enter key to set the password. The user will be prompted for the old password. Since no password has been set press enter again to be prompted for the new password. After entering the new password press enter and type the new password again to confirm. Finally press enter to finalize the change. ‘Password changed’ will be displayed provide all information is entered correctly.
Next telnet should be enabled to allow remote administration. Before telnet may be used the WSS must first have an ip address assigned. The ip address can be set using the command ‘set system ip-address <ip address>’ where the desired ip address is entered in doted notation in the <ip address> field. We selected an ip address of 10.20.0.7 for the management ip address of the WSS. Finally enable telnet using the command ‘set ip telnet server enable’ followed by enter.
3.3 Wlan Management Software
Once the WSS is properly configured the Wlan Management Software (WMS) may be used to configure the wireless networks. It should be noted that the wireless network may be configured without the use of WMS using the WSS command line interface. The WMS is the preferred method of configuration since it provides a simpler to use GUI interface. The installation of the WMS is
relatively straightforward and can be done on a Windows computer simply by inserting the cd and following the install wizard. When installing the software the user will be asked whether to install the WMS client and services or client only. Select client and services. Client only may be used to connect to a server already running the WMS services however a licence is needed for each client computer. Once the WMS software is installed it can be run by clicking ‘Start->programs->Nortel->WMS->WMS. When WMS is initially launched the user will be prompted for a serial number and licence. The serial number is recorded on the WMS installation cd and the licence was sent by Nortel. Both may be found in the license file in \\knarr\PCmgr$\Software\Nortel\WMS\. One important note is the WMS licence provided by Nortel only allows for the WMS software to be installed on a computer with the name ‘tesla’. Currently the WMS software is installed on a notebook computer however future plans include moving the WMS to a
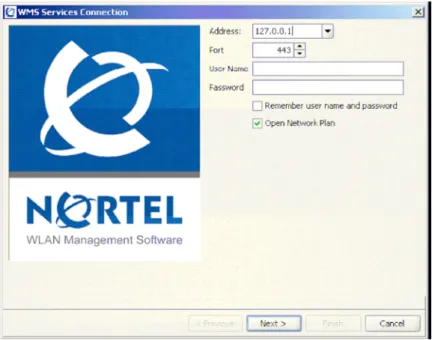
page the user will be brought to the connection page [Fig. 6]. Enter an ip address of 127.0.0.1 in the address field. 127.0.0.1 is a standard ip loopback address that tells the WMS client to connect to the services run on the local computer. Enter the administrative username and password, select ‘Open Network Plan’ and press ‘Next’ to launch the WMS software.
Figure 6. WMS Services Connection Window
Once WMS is running it may be used to configure the wireless network. The WMS software is to complex to explain all of the possible configurations however This guide will explain some of the key steps involved in the setup of the wireless network using this system.
When WMS is first launched the user will be presented with the default WMS planning screen [Fig. 7]. The first step in the setup is to create a mobility domain. This can be done by selecting ‘Mobility Domain’ under the ‘Create’ heading on the right hand portion of the screen. This will launch the create mobility domain wizard. Enter the name of the mobility domain in the name field and press ‘Next’. Next the user will be presented with a list of available WSS’s to add to the
mobility domain. Since we have not yet configured any WSS in the WMS
software the list should be empty. Select ‘Next’. Finally the user will be prompted to select a WSS to act as a seed for the mobility domain. Again the drop down list will be empty so press ‘Finish’ to complete the setup of the mobility domain. At this time the country code of the WSS should be set. Select ‘Country Code’ from the setup tab. Select ‘Canada (Ca)’ from the country drop down box and press ‘Next’->’Finish’ to complete the country code initialization.
Figure 7. WMS Default Configuration Page
Next the WSS should be added to the mobility domain. Select ‘Nortel Wireless Security Switch’ under the create menu. This will launch the WSS setup wizard. Enter a name for the WSS in the ‘WSS name’ field and select ‘2380’ as the ‘WSS Model’. Select the current WSS software version from the ‘Software version’ drop down box. Currently the WSS is using version 4.1.11. Enter the WSS enable password in the ‘Enable password’ field. This allows WMS to modify the
configuration of the WSS. Select ‘Next’ to continue with the wizard. Next the user will be prompted for the WSS ip address. Enter 10.20.0.7 which is the
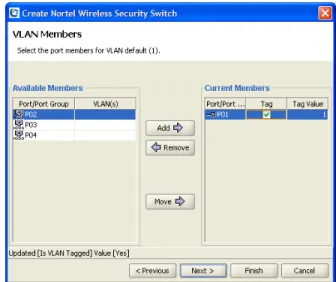
management ip address of the WSS and select ‘Next’. This will bring the user to the VLAN setup window [Fig. 8]. Select ‘P01’ from the ‘Available Members’ box and select ‘Add’. This will add port 1 as a member of VLAN 1. Select ‘Tag’ and then select ‘Next’ to continue. Next the user will be prompted for the default gateway. Enter 255.0.0.0 and press ‘next’ to continue. To complete the setup of the WSS select ‘Finish’. Do not assign a mobility domain to the WSS yet as it will fail since our mobility domain does not have a seed WSS.
.
Figure 8. WMS VLAN Members Window
Once the wizard completes the main window will be changed to include the WSS on the tree view on the left [Fig. 9]. Select the newly created WSS from the ‘Seed’ drop down box and press ‘Save’ to save changes.
Figure 9. WSS Configuration Screen After Adding A WSS
The tree view contains three separate groups of options: System, Wireless and AAA. System controls system settings such as message logging rules, VLAN membership and port configuration. The Wireless group contains information on the wireless networksuch as AP configuration and RF interference. The AAA group can be used to configure authentication, authorization and accounting services for the wireless network.
To fully configure the WSS the ports must be properly configured. This can be done by selecting the ‘Ports’ option under ’System’. Once the port list is
presented select ‘RJ45’ from the ‘PHY Media Type’ drop down box for both port 1 and port 2 and select ‘Save’. Only ports 1 and 2 are set since at present they are the only ports connected to the network. Next VLANs should be assigned. To create a VLAN select the ‘VLAN’ option under ‘system’. Next Select ‘VLAN’ in the create window, this launches the create VLAN wizard. When the wizard launches enter a name for the VLAN and enter the ‘VLAN ID’ number. We created a VLAN named Wireless-vlan with id number 6 for our wireless network. Select ‘Next’ to proceed to the next step. The user will be presented with a list of ports to add to the VLAN. Select the ports to add to the VLAN by clicking on the port name followed by the ‘Add’ button. Click the ‘Tag’ box and select ‘Next’ to continue. Finally enter the ip address to be used as the interface for the VLAN and press ‘Finish’. In our setup we used 192.168.6.128/24. The /24 signifies a 24 bit subnet mask which is equivalent to 255.255.255.0
Next the network should be setup with a service profile. Service profiles are setup to provide a central set of security settings for a given SSID or Service Set Identifier. To configure a service profile select ‘Wireless services’ under
‘Wireless’. Next under the create tab select ‘802.1x Service Profile’. This will launch a setup wizard. Select ‘Next’ to proceed with the setup. Enter a name for the profile in the ‘Name’ field and an SSID in the ‘SSID’ field and select ‘Next’. Next the user will be prompted to select the type of encryption to be used. WPA or WPA2 should be selected as they are more secure then the WEP method of encryption. Select ‘Next’ to continue. Next the user is asked to select the type of cipher key to use. AES or TKIP encryption should be used since WEP is
relatively insecure. Select ‘Next’ to continue. Finally the user will be prompted for the radius server to be used [Fig. 10].
If a radius server has not been configured a local database on the WSS may be used. Select ‘Local EAP-TLS’ to use the local database. Next click on ‘LOCAL’ from the list of available servers and press ‘Add’. Click ‘Next’ to continue. Next the user will be prompted to assign a VLAN to the SSID created. Select the name of the wireless VLAN from the drop down box to assign all traffic using the
wireless network to a VLAN and press ‘Next’. The next step is to create a user in the local database. Select ‘Create’ to launce the new user wizard. Enter a
username and password in the appropriate fields and select ‘Finish’ to complete adding the user. Select ‘Finish’ again to close the 802.1x service profile wizard. Once the wizard closes deselect the ‘Beacon’ box and select save. When beacon is selected the AP’s will beacon their SSID which makes the SSID visible to all users within range. With beaconing disabled the client must know the network name in order to create a connection.
4.0 CLIENT CONFIGURATION
Once the wireless network is configured and available for general use clients will have to be configured for use on the network. Although the final configuration of the network is subject to change the following will outline the basic steps required to connect to the wireless network. To configure a windows computer to connect to the wireless network first select Start->Settings->Network Connections. This will open the window similar to the one shown in Figure 11. Right click on ‘Wireless Network Connection’ and select ‘properties’.
Figure 11. Windows Network Connections Window
From the properties window select the ‘Wireless Network’ tab. Click the ‘Add’ button to enter the information for the IOT wireless network. First enter the network name into the ‘Network Name (SSID)’ field. Next select ‘WPA’ from the
‘Network Authentication’ drop down list and select ‘TKIP’ from the ‘Data encryption’ drop down list. Next select the ‘Authentication’ tab and select ‘Protected EAP (PEAP)’ under the ‘EAP type’ dropdown box. Deselect ‘Authenticate as computer when computer information is available’. [Fig 12] As the final step select ‘Properties’ under the ‘Authentication’ tab. From the properties window deselect ‘Validate server certificate’ and select ‘Secured Password (EAP-MSCHAP v2)’ from the ‘Select Authentication Method’ dropdown menu. Finally select the configure button and in the subsequent pop up box deselect ‘Automatically use my Windows logon name and password (and domain if any).’ and press ‘OK’.
Figure 12. Windows Wireless Network Properties Window After configuring Windows to connect to the network once the user is within range of the network the computer will attempt to connect. The user will be
prompted with a dialog box requesting a username and password. The user must enter the username and password supplied by the computer systems group to finalize the connection to the network. Once connected the user will have access to the public Internet. If a connection is needed to data on the corporate network such as a shared network drive or their desktop computer the VPN client must be used to connect to the network. A comprehensive guide to installing and
configuring the VPN client was written by Ray Wadden and can be found in a shared network folder at \\karfe\PCcommon\Software\VPN\nortel\nortel-vpn-setup.doc.
5.0 RECOMMENDATIONS
There are a number of procedures available to improve the efficiency and security of the wireless network. Wireless signal can seep beyond the walls of the building. Once the wireless network is configured a survey around the perimeter of the building should be preformed to ensure unauthorized users are unable to connect to the network from outside the building. If excessive amounts of signal escape in an area the transmission power of nearby AP’s should be reduced. This should be adjusted carefully to ensure adequate coverage within the building while limiting the amount of signal escaping.
Different network card in client computers will cause different levels of service to users. This can be affected by the strength of the wireless cards antenna or the standards used to transmit data. During the research for this paper testing of the different wireless cards was preformed on some of the Computer Systems groups’ sign-out computers. Four network cards found in IOT notebooks were tested against the 802.11b/g wireless network that was setup for model testing. Although the data transfer rates may not be representative of those of our wireless network the test does illustrate the difference in the wireless cards.
Download Speed vs. Wireless Card Used
0 100 200 300 400 500 600 700 Wireless Card D o w n lo a d S p e e d (k b p s ) Test 1 481.9 306.1 132.3 253.4 Test 2 572.8 190 144.7 194 Test 3 481.9 237.6 253.2 137.6 Average 512.2 244.5666667 176.7333333 195 Intel® Pro/wireless 2915 abg Intel® Pro/100 P Mobile Combo Adapter
Intel® PRO/Wireless 2200BG
Compaq WLAN MultiPort W200
Figure 13. Download Speed vs. Wireless Card Used
Figure 13 shows that the Intel (R) Pro/wireless 2915 appears to be the most efficient wireless card. This card type can be found in Compaq nc6230 notebook computers such as pc000045. The other 3 network cards preformed similarly when tested which is surprising since the Compaq WLAN MultiPort W200 is only 802.11b compliant which should yield lower transfer rates.
The final recommendation this analysis will make is to be aware of potential sources of interference. A spectrum analyzer may be used to monitor the amount of RF radiation or noise in the 2.4Ghz band. We have purchase a simple
spectrum analyzer called the Wi-Spy to monitor such interference in areas where our wireless network is in operation. Readings have been made in 11 locations in the OEB and Tow Tank areas and may be viewed using the Wi-Spy software. If problems with connectivity are noticed in an area these recordings may be used as a reference point for determining whether a new source of RF energy has been introduce. Recordings were made both with our AP’s on and off. Also recordings were made of potential interference sources in the area such as the Bluetooth radios used by the electronics group and microwaves located in the area. Figure 14 shows a typical sample of a Wi-Spy recording. The green peaks represent the maximum value of RF energy at a given frequency. The yellow line displays the RF energy present at any given time. The most important marker is the brown area. This represents the average RF energy on a frequency from the beginning of measurement. Large average energies indicate a consistent source of interference is being applied. These consistent sources pose the greatest threat to reliable wireless service. The sample Wi-Spy recordings and a drawing indicating the tested locations may be found in the PCmgr$ share at
\\knarr\PCmgr$\Wi-Spy\.
Figure 14. Sample Image of a Wi-Spy Recording
There is no such thing as total security when implementing a network especially when the transmission medium used is open such as in wireless networks.
However by following the procedures and recommendations outlined in this guide a wireless network can be created which is easy to access and at the same time
secure. Proactive steps should be taken in the future to ensure the network remains secure. These steps include a policy of changing the authentication passwords for wireless access and monitoring of client connections for unusual behaviour such as repeated failed access attempts or users connecting at odd hours. If such action is taken the benefits provided to IOT by the wireless networks far outweighs the potential risks.
Appendix A
======== show version details =========
Mobility System Software, Version: 4.1.11 REL Copyright (c) 2005 - 2006 Nortel. All rights reserved.
Build Information: (build#0) REL_4_1_rel11_branch 2006-06-13 16:17:00 Label: REL_4.1.11.0_061306
Build Suffix: -d-O1-nortel Model: 2380
Hardware
Mainboard: version 2 ; revision 02 ; FPGA version 5 CPU Model: 750 (Revision 3.1)
Serial number STP1W7017E Flash: 4.1.0.393 - md0a
Kernel: 3.0.0#662: Tue Jun 13 14:29:05 PDT 2006 BootLoader: 4.10 / 4.1.10
Port/DAP AP Model Serial # Versions --- --- --- --- - /1 2330 STP1W20P0T H/W : 03 F/W1 : 5.7 F/W2 : 5.7 S/W : 4.1.11.0_061306_1617_ BOOT S/W : 4.1.11.0_061306_1617_ fingerprint: xx:xx:xx:xx:xx:xx:xx:xx:xx:xx:xx:xx:xx:xx:xx - /2 2330 STP1W20P3C H/W : 03 F/W1 : 5.7 F/W2 : 5.7 S/W : 4.1.11.0_061306_1617_ BOOT S/W : 4.1.11.0_061306_1617_ fingerprint: xx:xx:xx:xx:xx:xx:xx:xx:xx;xx:xx;xx:xx:xx:xx - /3 2330 STP1W20VKR H/W : 03 F/W1 : 5.7 F/W2 : 5.7 S/W : 4.1.11.0_061306_1617_ BOOT S/W : 4.1.11.0_061306_1617_ fingerprint: xx:xx:xx:xx:xx:xx:xx:xx:xx:xx:xx:xx:xx:xx:xx - /4 2330 STP1W20SQ0 H/W : 03 F/W1 : 5.7 F/W2 : 5.7 S/W : 4.1.11.0_061306_1617_ BOOT S/W : 4.1.11.0_061306_1617_ fingerprint: xx:xx:xx:xx:xx:xx:xx:xx:xx:xx:xx:xx:xx:xx:xx - /5 2330 STP1W20VMK H/W : 03 F/W1 : 5.7 F/W2 : 5.7
S/W : 4.1.11.0_061306_1617_ BOOT S/W : 4.1.11.0_061306_1617_ fingerprint: xx:xx:xx:xx:xx:xx:xx:xx:xx:xx:xx:xx:xx:xx:xx - /6 2330 STP1W211XM H/W : 03 F/W1 : 5.7 F/W2 : 5.7 S/W : 4.1.11.0_061306_1617_ BOOT S/W : 4.1.11.0_061306_1617_ fingerprint: xx:xx:xx:xx:xx:xx:xx:xx:xx:xx:xx:xx:xx:xx:xx ========= show system details =========
=============================================================== =================
Product Name: 2380
System Name: IOT-Wireless System Countrycode: CA
System Location: St. Johns System Contact: IOT System IP: 10.20.0.7 System idle timeout:3600
System MAC: 00:16:CA:3B:9F:44
=============================================================== ================= Boot Time: 2006-11-15 15:08:59 Uptime: 8 days 19:54:39 =============================================================== =================
Fan status: fan1 OK fan2 OK fan3 OK Temperature: temp1 ok temp2 ok temp3 ok PSU Status: Lower Power Supply AC ok DC ok Memory: 160.05/465.03 (34%)
=============================================================== =================
========= show vlan =========
Admin VLAN Tunl Port
VLAN Name Status State Affin Port Tag State ---- --- --- --- --- --- --- ---
1 default Up Up 5
1 none Up 6 Wireless-vlan Up Up 5
2 none Up
Unassigned network ports: 3,4
========= show interface ========= * = From DHCP
---- --- --- --- --- --- --- 6 Wireless-vlan 192.168.6.128 255.255.255.0 YES Up ipv4 1 default 10.20.0.7 255.0.0.0 YES Up ipv4
========= show mobility-domain ========= Mobility Domain name: IOT-mobile-dom Member Stat
10.20.0.7 STATE_UP SEED ========= show roaming vlan ========= VLAN MX IP Address Affinity --- --- --- Wireless-vlan 10.20.0.7 5 default 10.20.0.7 5
========= show ap status all =========
DAP: 1, IP-addr: 192.168.6.7 (vlan 'Wireless-vlan'), AP model: 2330, manufacturer: Nortel, name: dap1
fingerprint: ad:d0:50:d3:26:a7:fd:48:02:41:23:3d:81:f0:d5:af
==================================================== State: operational (encrypted)
CPU info: Atheros:MIPS32 speed=220000000 Hz version=AR5312, ram=16777216 s/n=STP1W20P0T hw_rev=03
Uptime: 0 hours, 42 minutes, 49 seconds
Radio 1 type: 802.11g, state: configure succeed [Enabled] operational channel: 6 (Auto) operational power: 18 (Auto) bssid1: 00:15:e8:e0:49:40, ssid: XXXXXXX
Radio 2 type: 802.11a, state: configure succeed [Disabled] (Sweep mode) operational channel: 52 (Auto) operational power: 18 (Auto)
bssid1: 00:15:e8:e0:49:41, ssid: XXXXXXX
DAP: 2, IP-addr: 192.168.6.2 (vlan 'Wireless-vlan'), AP model: 2330, manufacturer: Nortel, name: dap2
fingerprint: cb:71:3e:87:95:45:95:5b:11:bb:31:58:20:4e:49:90 ==================================================== State: operational (encrypted)
CPU info: Atheros:MIPS32 speed=220000000 Hz version=AR5312, ram=16777216 s/n=STP1W20P3C hw_rev=03
Uptime: 0 hours, 43 minutes, 23 seconds
Radio 1 type: 802.11g, state: configure succeed [Enabled] operational channel: 1 (Auto) operational power: 17 (Auto) bssid1: 00:15:e8:e0:5e:40, ssid: XXXXXXX
Radio 2 type: 802.11a, state: configure succeed [Disabled] (Sweep mode) operational channel: 48 (Auto) operational power: 17 (Auto)
bssid1: 00:15:e8:e0:5e:41, ssid: XXXXXXX
manufacturer: Nortel, name: dap3
fingerprint: c2:dc:5c:27:be:1c:7b:3c:88:7d:de:87:e3:53:7e:c7
==================================================== State: operational (encrypted)
CPU info: Atheros:MIPS32 speed=220000000 Hz version=AR5312, ram=16777216 s/n=STP1W20VKR hw_rev=03
Uptime: 0 hours, 43 minutes, 24 seconds
Radio 1 type: 802.11g, state: configure succeed [Enabled] operational channel: 6 (Auto) operational power: 18 (Auto) bssid1: 00:15:e8:e6:40:c0, ssid: XXXXXXX
Radio 2 type: 802.11a, state: configure succeed [Disabled] (Sweep mode) operational channel: 60 (Auto) operational power: 18 (Auto)
bssid1: 00:15:e8:e6:40:c1, ssid: XXXXXXX
DAP: 4, IP-addr: 192.168.6.5 (vlan 'Wireless-vlan'), AP model: 2330, manufacturer: Nortel, name: dap4
fingerprint: 3d:61:8b:79:8d:4c:1a:fe:a5:13:be:99:9c:bd:55:62
==================================================== State: operational (encrypted)
CPU info: Atheros:MIPS32 speed=220000000 Hz version=AR5312, ram=16777216 s/n=STP1W20SQ0 hw_rev=03
Uptime: 1 hours, 2 minutes, 35 seconds
Radio 1 type: 802.11g, state: configure succeed [Enabled] operational channel: 1 (Auto) operational power: 17 (Auto) bssid1: 00:15:e8:e4:39:40, ssid: XXXXXXX
Radio 2 type: 802.11a, state: configure succeed [Disabled] (Sweep mode) operational channel: 36 (Auto) operational power: 17 (Auto)
bssid1: 00:15:e8:e4:39:41, ssid: XXXXXXX
DAP: 5, IP-addr: 192.168.6.4 (vlan 'Wireless-vlan'), AP model: 2330, manufacturer: Nortel, name: dap5
fingerprint: 03:1a:5e:b1:d1:15:14:6e:c8:b1:16:fb:de:07:f4:d7
==================================================== State: operational (encrypted)
CPU info: Atheros:MIPS32 speed=220000000 Hz version=AR5312, ram=16777216 s/n=STP1W20VMK hw_rev=03
Uptime: 1 hours, 2 minutes, 51 seconds
Radio 1 type: 802.11g, state: configure succeed [Enabled] operational channel: 6 (Auto) operational power: 18 (Auto) bssid1: 00:15:e8:e6:4f:c0, ssid: XXXXXXX
Radio 2 type: 802.11a, state: configure succeed [Disabled] (Sweep mode) operational channel: 56 (Auto) operational power: 18 (Auto)
DAP: 6, IP-addr: 192.168.6.6 (vlan 'Wireless-vlan'), AP model: 2330, manufacturer: Nortel, name: dap6
fingerprint: 97:bc:54:48:e0:11:ed:97:cc:bd:1f:43:9d:c6:42:49
==================================================== State: operational (encrypted)
CPU info: Atheros:MIPS32 speed=220000000 Hz version=AR5312, ram=16777216 s/n=STP1W211XM hw_rev=03
Uptime: 0 hours, 42 minutes, 48 seconds
Radio 1 type: 802.11g, state: configure succeed [Enabled] operational channel: 11 (Auto) operational power: 17 (Auto) bssid1: 00:16:ca:33:cc:00, ssid: XXXXXXX
Radio 2 type: 802.11a, state: configure succeed [Disabled] (Sweep mode) operational channel: 40 (Auto) operational power: 17 (Auto)
bssid1: 00:16:ca:33:cc:01, ssid: XXXXXXX
========= show fdb =========
* = Static Entry. + = Permanent Entry. # = System Entry. $ = Authenticate Entry VLAN TAG Dest MAC/Route Des [CoS] Destination Ports or VCs/[Protocol Type] ---- ---- --- --- --- 1 0 00:b0:d0:da:17:5e 1 1 0 00:15:60:9e:99:69 1 1 0 00:05:1b:00:f2:8c 1 1 0 00:50:da:5f:ec:35 1 1 0 00:10:5a:1e:bf:e2 1 1 0 00:0b:cd:1d:12:76 1 1 0 00:11:43:eb:2f:3c 1 1 0 00:11:85:f1:49:11 1 1 0 00:02:a5:1c:75:15 1 1 0 00:00:21:ea:35:26 1 1 0 00:0c:6e:47:07:94 1 1 0 00:0c:29:44:5f:f8 1 1 0 00:02:a5:fd:5c:52 1 1 0 00:0f:3d:f3:dc:b0 1 1 0 00:17:f2:4d:a7:fd 1 1 0 00:12:79:bd:74:42 1 1 0 00:15:60:9e:81:f8 1 1 0 00:50:8b:da:8b:cc 1 1 0 00:02:a5:fd:5b:26 1 1 0 00:0c:6e:47:19:a8 1 1 0 00:0b:cd:1e:a9:77 1 1 0 00:16:35:7a:b7:28 1 1 0 00:50:8b:c2:55:5d 1 1 0 00:02:a5:fc:29:4f 1 1 0 00:13:72:0b:11:2f 1
1 0 00:02:a5:26:2a:a4 1 1 0 00:0e:7f:a5:84:0e 1 1 0 00:01:02:d4:2a:87 1 1 0 00:12:79:5d:92:ac 1 1 0 00:15:60:9c:e0:9c 1 1 0 00:08:02:32:67:f9 1 1 0 00:0e:7f:a4:5e:af 1 1 0 00:0f:b0:76:05:60 1 1 0 00:08:02:31:a9:03 1 1 0 00:50:8b:8d:6f:4e 1 1 0 00:0e:7f:a4:19:10 1 1 0 00:0e:7f:a5:84:30 1 1 0 00:15:60:9c:e0:8f 1 1 0 00:0e:0c:34:31:94 1 1 0 00:14:22:fd:6c:71 1 1 0 00:14:22:bb:e5:45 1 1 0 00:13:d3:21:45:86 1 1 0 00:0b:cd:02:1f:69 1 1 0 00:0b:cd:1e:78:8e 1 1 0 00:0b:cd:1f:de:bf 1 1 0 00:11:85:f1:47:54 1 1 0 00:14:38:1c:d5:91 1 1 0 00:0f:b0:9f:d7:de 1 1 0 00:13:72:0b:41:53 1 1 0 00:15:60:9c:e2:8a 1 1 0 00:13:d3:a4:23:45 1 1 0 00:14:c2:e7:11:c1 1 1 0 00:60:6d:21:26:f7 1 1 0 00:01:e6:a8:e2:fe 1 1 0 00:12:79:5d:8c:5d 1 1 0 00:12:79:5d:97:4c 1 1 0 00:12:79:5e:8a:67 1 1 0 00:08:74:4f:6b:52 1 1 0 00:15:60:9e:81:d8 1 6 0 00:15:e8:e6:40:c0 2 1 0 00:c0:26:c0:a9:e9 1 1 0 00:16:d4:23:5d:d3 1 1 0 00:02:a5:02:01:fa 1 1 0 aa:00:04:00:22:f8 1 1 0 00:12:79:bd:71:62 1 1 0 00:12:79:5e:89:2f 1 1 0 00:0e:7f:6c:b0:78 1 1 0 00:07:e9:0e:2a:62 1 1 0 00:80:2d:57:c5:81 1 1 0 00:15:60:9e:80:0f 1 1 0 00:0e:7f:6d:dc:53 1
1 0 00:14:c2:e4:0a:2a 1 1 0 00:12:79:5e:8e:f4 1 1 0 00:0b:cd:1d:12:74 1 1 0 00:c0:85:32:66:81 1 1 0 00:02:a5:fc:76:be 1 1 0 00:02:a5:fc:76:01 1 1 0 00:02:a5:fd:59:91 1 1 0 00:08:02:31:b3:b0 1 1 0 00:12:79:5d:8d:a0 1 1 0 00:12:79:5e:8f:2a 1 1 0 00:14:38:ba:a6:5c 1 1 0 00:20:ed:78:d7:13 1 1 0 00:01:02:d4:29:74 1 1 0 00:01:02:e8:43:79 1 1 0 00:13:21:f8:ef:fb 1 1 0 00:0f:1f:74:74:88 1 6 0 00:11:58:12:b8:01 2 1 0 00:15:60:a6:81:f2 1 1 0 00:03:ba:84:d9:a7 1 1 0 00:03:4b:be:ad:9f 1 1 0 00:60:fd:bb:3f:7a 1 1 0 00:01:81:fc:86:0f 1 1 0 00:15:60:51:53:57 1 1 0 00:0e:7f:a4:5f:10 1 1 0 00:0e:7f:a5:83:5a 1 1 0 00:04:ac:4c:73:4a 1 1 0 00:12:79:5e:8e:77 1 1 0 00:12:79:5d:98:57 1 1 0 00:14:c2:c2:99:41 1 1 0 00:14:c2:c2:bf:19 1 1 0 aa:00:04:00:27:f8 1 1 0 00:11:58:12:b8:01 1 1 0 00:11:95:53:e1:37 1 1 0 aa:00:04:00:23:f8 1 1 0 aa:00:04:00:20:f8 1 1 0 00:b0:d0:b6:f0:d4 1 1 0 aa:00:04:00:1c:f8 1 1 0 aa:00:04:00:26:f8 1 1 0 aa:00:04:00:24:f8 1 1 0 00:00:5e:00:01:04 1 1 0 00:14:22:52:0a:fb 1 6 0 00:16:ca:3b:9f:44 # CPU 1 0 00:0e:7f:a4:5e:d8 1 1 0 00:04:dc:52:bc:a7 1 1 0 00:02:a5:fd:5b:12 1 1 0 00:00:f8:1e:be:eb 1
1 0 00:12:3f:21:30:84 1 1 0 00:12:79:5d:93:09 1 1 0 00:0e:7f:a4:5e:d3 1 1 0 00:02:a5:fd:5c:34 1 1 0 00:0e:7f:66:ac:37 1 1 0 00:0e:7f:a5:84:2b 1 1 0 00:0e:7f:a4:5e:bc 1 1 0 00:08:74:35:1b:c9 1 6 0 00:15:e8:e6:4f:c0 2 1 0 00:50:da:5f:eb:f7 1 1 0 00:02:a5:e1:65:a5 1 1 0 00:14:38:1c:35:71 1 1 0 00:08:02:33:d2:2d 1 6 0 00:15:e8:e0:5e:40 2 1 0 00:08:74:4f:6b:59 1 1 0 00:02:a5:41:81:36 1 1 0 00:0e:7f:a4:5e:c8 1 1 0 00:01:e6:40:40:4e 1 1 0 00:01:e6:a8:d2:99 1 1 0 00:0e:7f:42:30:e6 1 1 0 00:15:60:9c:e1:c5 1 1 0 00:15:60:9c:e2:ab 1 1 0 00:0e:7f:66:ac:73 1 1 0 00:16:35:7a:b6:d1 1 1 0 00:16:35:78:2e:4c 1 1 0 00:50:8b:f7:8e:64 1 1 0 00:0e:7f:de:29:e6 1 1 0 00:0b:cd:1d:aa:22 1 1 0 00:08:74:34:af:77 1 1 0 00:50:b7:30:02:4d 1 1 0 00:15:60:9c:dd:59 1 1 0 00:50:da:5d:13:40 1 1 0 00:0f:b5:6d:80:93 1 1 0 00:30:c1:8e:c4:f8 1 1 0 00:18:71:69:f8:4e 1 1 0 00:13:20:62:da:a5 1 1 0 00:10:5a:cd:e5:e5 1 1 0 00:02:a5:77:f0:ec 1 1 0 00:14:c2:e2:19:e0 1 1 0 00:13:72:7f:f3:17 1 1 0 00:14:c2:c2:bf:16 1 1 0 00:02:a5:fc:2a:fd 1 1 0 00:e0:4c:00:0a:9d 1 1 0 00:e0:81:52:a0:c4 1 1 0 00:17:31:e3:6a:80 1 1 0 00:16:35:7a:b6:94 1
1 0 aa:00:04:00:1d:f8 1 1 0 00:02:2e:f3:72:26 1 1 0 00:02:a5:1c:a2:67 1 1 0 00:11:85:f1:4a:43 1 1 0 00:16:35:74:f5:5c 1 1 0 00:11:85:7b:3f:48 1 1 0 00:13:d3:a4:23:4e 1 1 0 00:17:a4:fc:c7:81 1 1 0 00:10:4b:70:55:89 1 1 0 00:0e:7f:a4:5e:e7 1 1 0 00:02:a5:fd:1d:4f 1 1 0 00:00:e2:4f:f1:a3 1 1 0 00:15:60:9e:7f:5c 1 1 0 00:15:60:9e:80:17 1 1 0 00:12:79:59:3d:e8 1 1 0 00:12:79:5e:8a:7a 1 1 0 00:20:6b:51:81:6f 1 6 0 00:16:ca:33:cc:00 2 6 0 00:15:e8:e0:49:40 2 1 0 00:04:75:8d:b6:e1 1 6 0 00:15:e8:e4:39:40 2 1 0 00:16:ca:3b:9f:44 # CPU Total Matching FDB Entries Displayed = 185
dynamic= 183, static= 0, permanent= 0, system= 2, authenticate= 0 ========= show dap status =========
DAP: 1, IP-addr: 192.168.6.7 (vlan 'Wireless-vlan'), AP model: 2330, manufacturer: Nortel, name: dap1
fingerprint: ad:d0:50:d3:26:a7:fd:48:02:41:23:3d:81:f0:d5:af
==================================================== State: operational (encrypted)
CPU info: Atheros:MIPS32 speed=220000000 Hz version=AR5312, ram=16777216 s/n=STP1W20P0T hw_rev=03
Uptime: 0 hours, 42 minutes, 49 seconds
Radio 1 type: 802.11g, state: configure succeed [Enabled] operational channel: 6 (Auto) operational power: 18 (Auto) bssid1: 00:15:e8:e0:49:40, ssid: XXXXXXX
Radio 2 type: 802.11a, state: configure succeed [Disabled] (Sweep mode) operational channel: 52 (Auto) operational power: 18 (Auto)
bssid1: 00:15:e8:e0:49:41, ssid: XXXXXXX
DAP: 2, IP-addr: 192.168.6.2 (vlan 'Wireless-vlan'), AP model: 2330, manufacturer: Nortel, name: dap2
fingerprint: cb:71:3e:87:95:45:95:5b:11:bb:31:58:20:4e:49:90 ==================================================== State: operational (encrypted)
CPU info: Atheros:MIPS32 speed=220000000 Hz version=AR5312, ram=16777216 s/n=STP1W20P3C hw_rev=03
Uptime: 0 hours, 43 minutes, 23 seconds
Radio 1 type: 802.11g, state: configure succeed [Enabled] operational channel: 1 (Auto) operational power: 17 (Auto) bssid1: 00:15:e8:e0:5e:40, ssid: XXXXXXX
Radio 2 type: 802.11a, state: configure succeed [Disabled] (Sweep mode) operational channel: 48 (Auto) operational power: 17 (Auto)
bssid1: 00:15:e8:e0:5e:41, ssid: XXXXXXX
DAP: 3, IP-addr: 192.168.6.3 (vlan 'Wireless-vlan'), AP model: 2330, manufacturer: Nortel, name: dap3
fingerprint: c2:dc:5c:27:be:1c:7b:3c:88:7d:de:87:e3:53:7e:c7
==================================================== State: operational (encrypted)
CPU info: Atheros:MIPS32 speed=220000000 Hz version=AR5312, ram=16777216 s/n=STP1W20VKR hw_rev=03
Uptime: 0 hours, 43 minutes, 24 seconds
Radio 1 type: 802.11g, state: configure succeed [Enabled] operational channel: 6 (Auto) operational power: 18 (Auto) bssid1: 00:15:e8:e6:40:c0, ssid: XXXXXXX
Radio 2 type: 802.11a, state: configure succeed [Disabled] (Sweep mode) operational channel: 60 (Auto) operational power: 18 (Auto)
bssid1: 00:15:e8:e6:40:c1, ssid: XXXXXXX
DAP: 4, IP-addr: 192.168.6.5 (vlan 'Wireless-vlan'), AP model: 2330, manufacturer: Nortel, name: dap4
fingerprint: 3d:61:8b:79:8d:4c:1a:fe:a5:13:be:99:9c:bd:55:62
==================================================== State: operational (encrypted)
CPU info: Atheros:MIPS32 speed=220000000 Hz version=AR5312, ram=16777216 s/n=STP1W20SQ0 hw_rev=03
Uptime: 1 hours, 2 minutes, 35 seconds
Radio 1 type: 802.11g, state: configure succeed [Enabled] operational channel: 1 (Auto) operational power: 17 (Auto) bssid1: 00:15:e8:e4:39:40, ssid: XXXXXXX
Radio 2 type: 802.11a, state: configure succeed [Disabled] (Sweep mode) operational channel: 36 (Auto) operational power: 17 (Auto)
bssid1: 00:15:e8:e4:39:41, ssid: XXXXXXX
DAP: 5, IP-addr: 192.168.6.4 (vlan 'Wireless-vlan'), AP model: 2330, manufacturer: Nortel, name: dap5
==================================================== State: operational (encrypted)
CPU info: Atheros:MIPS32 speed=220000000 Hz version=AR5312, ram=16777216 s/n=STP1W20VMK hw_rev=03
Uptime: 1 hours, 2 minutes, 51 seconds
Radio 1 type: 802.11g, state: configure succeed [Enabled] operational channel: 6 (Auto) operational power: 18 (Auto) bssid1: 00:15:e8:e6:4f:c0, ssid: XXXXXXX
Radio 2 type: 802.11a, state: configure succeed [Disabled] (Sweep mode) operational channel: 56 (Auto) operational power: 18 (Auto)
bssid1: 00:15:e8:e6:4f:c1, ssid: XXXXXXX
DAP: 6, IP-addr: 192.168.6.6 (vlan 'Wireless-vlan'), AP model: 2330, manufacturer: Nortel, name: dap6
fingerprint: 97:bc:54:48:e0:11:ed:97:cc:bd:1f:43:9d:c6:42:49
==================================================== State: operational (encrypted)
CPU info: Atheros:MIPS32 speed=220000000 Hz version=AR5312, ram=16777216 s/n=STP1W211XM hw_rev=03
Uptime: 0 hours, 42 minutes, 48 seconds
Radio 1 type: 802.11g, state: configure succeed [Enabled] operational channel: 11 (Auto) operational power: 17 (Auto) bssid1: 00:16:ca:33:cc:00, ssid: XXXXXXX
Radio 2 type: 802.11a, state: configure succeed [Disabled] (Sweep mode) operational channel: 40 (Auto) operational power: 17 (Auto)
bssid1: 00:16:ca:33:cc:01, ssid: XXXXXXX
========= show dap global ========= DAP Serial Id MX IP Address
--- --- --- 0 10.20.0.7 HIGH 0 10.20.0.7 HIGH 0 10.20.0.7 HIGH 0 10.20.0.7 HIGH 0 10.20.0.7 HIGH 0 10.20.0.7 HIGH 0 10.20.0.7 HIGH 1 stp1w20p0t 10.20.0.7 HIGH 2 stp1w20p3c 10.20.0.7 HIGH 3 stp1w20vkr 10.20.0.7 HIGH 4 stp1w20sq0 10.20.0.7 HIGH 5 stp1w20vmk 10.20.0.7 HIGH 6 stp1w211xm 10.20.0.7 HIGH
Total number of entries: 12
DAP Serial Id DAP IP Address MX IP Address --- --- --- --- 0 192.168.6.7 10.20.0.7 0 192.168.6.2 10.20.0.7 0 192.168.6.5 10.20.0.7 0 192.168.6.3 10.20.0.7 0 192.168.6.4 10.20.0.7 0 192.168.6.6 10.20.0.7 1 stp1w20p0t 192.168.6.7 10.20.0.7 2 stp1w20p3c 192.168.6.2 10.20.0.7 3 stp1w20vkr 192.168.6.3 10.20.0.7 4 stp1w20sq0 192.168.6.5 10.20.0.7 5 stp1w20vmk 192.168.6.4 10.20.0.7 6 stp1w211xm 192.168.6.6 10.20.0.7
========= show dap unconfigured ========= ========= show configuration ========= # Configuration nvgen'd at 2006-11-24 11:04:25 # Image 4.1.11.0
# Model 2380
# Last change occurred at 2006-11-23 16:59:52 set trace login level 5
set ip dns server 10.1.1.2 PRIMARY set ip dns server 10.5.5.1 SECONDARY set ip route default 10.1.1.254 1
set ip route 10.20.0.7 0.0.0.0 192.75.14.128 2 set ip dns domain iot.nrc.ca
set ip dns enable
set log session enable severity info set log trace enable severity critical
set log server 10.1.1.2 severity critical local-facility 5 set dot1x wep-rekey disable
set system name xx:xx:xx:xx:xx:xx:xx:xx:xx:xx:xx:xx:xx:xx:xx set system ip-address 10.20.0.7
set system countrycode CA set system contact IOT set system location St. Johns set timezone newfoundland -3 30
set service-profile iot-service ssid-name XXXXXXX set service-profile iot-service wpa-ie enable
set service-profile iot-service cipher-tkip disable set service-profile iot-service cipher-ccmp enable set service-profile iot-service ssid-type clear set service-profile iot-service psk-raw
xx:xx:xx:xx:xx:xx:xx:xx:xx:xx:xx:xx:xx:xx:xx set radius client system-ip
set enablepass password xx:xx:xx:xx:xx:xx:xx:xx:xx:xx:xx:xx:xx:xx:xx set authentication xx:xx:xx:xx:xx:xx:xx:xx:xx:xx:xx:xx:xx:xx:xx set user admin password encrypted 03070b0616037254471d203a set user wlan-user password encrypted 0211085a054b1a32495c set user wlan-user group wlan-group
set user wlan-user attr mobility-profile iot-mobility set user wlan-user attr ssid XXXXXXX
set user wlan-user attr vlan-name Wireless-vlan
set usergroup wlan-group attr vlan-name Wireless-vlan set mobility-profile name iot-mobility port all dap 1,2,3,4,5,6 set location policy permit vlan Wireless-vlan if dap 1,2,3,4,5,6 set radio-profile default service-profile iot-service
set radio-profile default auto-tune power-config enable set banner motd !IOT Wireless ServerAccess is restricted.! set dap security require
set dap auto mode enable set dap auto radiotype 11g
set dap 1 serial-id stp1w20p0t model 2330 set dap 1 name dap1
set dap 1 fingerprint ad:d0:50:d3:26:a7:fd:48:02:41:23:3d:81:f0:d5:af set dap 1 radio 1 mode enable
set dap 1 radio 1 auto-tune min-client-rate 9 set dap 2 serial-id stp1w20p3c model 2330 set dap 2 name dap2
set dap 2 fingerprint cb:71:3e:87:95:45:95:5b:11:bb:31:58:20:4e:49:90 set dap 2 radio 1 mode enable
set dap 3 serial-id stp1w20vkr model 2330 set dap 3 name dap3
set dap 3 fingerprint c2:dc:5c:27:be:1c:7b:3c:88:7d:de:87:e3:53:7e:c7 set dap 3 radio 1 mode enable
set dap 4 serial-id stp1w20sq0 model 2330 set dap 4 name dap4
set dap 4 fingerprint 3d:61:8b:79:8d:4c:1a:fe:a5:13:be:99:9c:bd:55:62 set dap 4 radio 1 mode enable
set dap 5 serial-id stp1w20vmk model 2330 set dap 5 name dap5
set dap 5 fingerprint 03:1a:5e:b1:d1:15:14:6e:c8:b1:16:fb:de:07:f4:d7 set dap 5 radio 1 mode enable
set dap 6 serial-id stp1w211xm model 2330 set dap 6 name dap6
set dap 6 fingerprint 97:bc:54:48:e0:11:ed:97:cc:bd:1f:43:9d:c6:42:49 set dap 6 radio 1 mode enable
set ip https server enable set ip telnet server enable set port 1 name management set port media-type 1 rj45
set vlan 6 port 2 set vlan 1 port 1
set spantree enable port 1 1 set spantree enable vlan 6 set spantree enable port 2 6
set interface 6 ip 192.168.6.128 255.255.255.0
set interface 6 ip dhcp-server enable start 192.168.6.1 stop 192.168.6.254 set interface 1 ip 10.20.0.7 255.0.0.0
set interface 1 ip dhcp-server disable start 10.0.0.1 stop 10.255.255.254 set mobility-domain mode seed domain-name IOT-mobile-dom
set rfdetect log disable set ntp enable
set ntp server 10.1.1.2 set ntp server 192.75.14.50
========= show timedate ========= Fri Nov 24 2006, 11:04:25 newfoundland ========= show log buffer -100 =========
APM Nov 24 09:24:31.322501 CRITICAL AP_NOTICE: image delivered OK on dap 6 APM Nov 24 09:22:17.703965 CRITICAL AP_NOTICE: image delivered OK on dap 1 APM Nov 24 09:19:47.485517 CRITICAL AP_NOTICE: image delivered OK on dap 2 APM Nov 24 09:17:20.205699 CRITICAL AP_NOTICE: image delivered OK on dap 3 APM Nov 24 09:13:26.513853 CRITICAL AP_NOTICE: image delivered OK on dap 5 APM Nov 24 09:05:31.608795 ERROR AP_NOTICE: AP left after booting on dap 5 state 6
APM Nov 24 09:05:30.600967 ERROR AP_NOTICE: AP left after booting on dap 3 state 6
APM Nov 24 10:21:49.755022 CRITICAL AP_NOTICE: image delivered OK on dap 1 APM Nov 24 10:21:48.715910 CRITICAL AP_NOTICE: image delivered OK on dap 6 APM Nov 24 10:21:15.427439 CRITICAL AP_NOTICE: image delivered OK on dap 3 APM Nov 24 10:21:14.072480 CRITICAL AP_NOTICE: image delivered OK on dap 2 APM Nov 24 10:02:18.425782 ERROR AP_NOTICE: AP left after booting on dap 1 state 6
APM Nov 24 10:02:02.050672 CRITICAL AP_NOTICE: image delivered OK on dap 4 APM Nov 24 10:01:46.178937 CRITICAL AP_NOTICE: image delivered OK on dap 5 APM Nov 24 10:01:29.991745 ERROR AP_NOTICE: AP left after booting on dap 3 state 6
APM Nov 24 09:59:28.184097 CRITICAL AP_NOTICE: image delivered OK on dap 3 APM Nov 24 09:59:07.498326 ERROR AP_NOTICE: AP left after booting on dap 2 state 6
APM Nov 24 09:56:16.762140 CRITICAL AP_NOTICE: image delivered OK on dap 2 APM Nov 24 09:50:16.702552 CRITICAL AP_NOTICE: image delivered OK on dap 1 APM Nov 24 09:49:55.905202 ERROR AP_NOTICE: AP left after booting on dap 6 state 6
APM Nov 24 09:36:59.202338 ERROR AP_NOTICE: AP left after booting on dap 1 state 6
APM Nov 24 09:36:03.077135 ERROR AP_NOTICE: AP left after booting on dap 2 state 6
APM Nov 24 09:36:02.063562 ERROR AP_NOTICE: AP left after booting on dap 3 state 6
APM Nov 24 09:36:01.045882 ERROR AP_NOTICE: AP left after booting on dap 5 state 6
APM Nov 24 09:35:59.030233 ERROR AP_NOTICE: AP left after booting on dap 4 state 6
APM Nov 24 09:05:16.544195 ERROR AP_NOTICE: AP left after booting on dap 6 state 6
APM Nov 24 09:05:14.528546 ERROR AP_NOTICE: AP left after booting on dap 1 state 6
APM Nov 24 09:03:58.836860 CRITICAL AP_NOTICE: image delivered OK on dap 4 APM Nov 24 09:03:57.887410 CRITICAL AP_NOTICE: image delivered OK on dap 5 APM Nov 24 09:03:54.190934 CRITICAL AP_NOTICE: image delivered OK on dap 2 APM Nov 24 09:03:53.120031 CRITICAL AP_NOTICE: image delivered OK on dap 3 APM Nov 24 09:02:02.716265 ERROR AP_NOTICE: AP left after booting on dap 4 state 6
APM Nov 24 09:02:01.692108 ERROR AP_NOTICE: AP left after booting on dap 5 state 6
APM Nov 24 09:02:01.680987 ERROR AP_NOTICE: AP left after booting on dap 3 state 6
APM Nov 24 09:02:00.667311 ERROR AP_NOTICE: AP left after booting on dap 2 state 6
APM Nov 23 17:00:24.892731 CRITICAL AP_NOTICE: image delivered OK on dap 1 APM Nov 23 17:00:23.382756 CRITICAL AP_NOTICE: image delivered OK on dap 6 APM Nov 23 17:00:23.121801 CRITICAL AP_NOTICE: image delivered OK on dap 5 APM Nov 23 17:00:23.051329 CRITICAL AP_NOTICE: image delivered OK on dap 3 APM Nov 23 17:00:22.872071 CRITICAL AP_NOTICE: image delivered OK on dap 4 APM Nov 23 17:00:21.335726 CRITICAL AP_NOTICE: image delivered OK on dap 2 APM Nov 23 16:37:27.963041 ERROR AP_NOTICE: AP left after booting on dap 6 state 6
APM Nov 23 16:37:27.961034 ERROR AP_NOTICE: AP left after booting on dap 5 state 6
APM Nov 23 16:37:27.950137 ERROR AP_NOTICE: AP left after booting on dap 4 state 6
APM Nov 23 16:37:26.941832 ERROR AP_NOTICE: AP left after booting on dap 3 state 6
APM Nov 23 16:37:26.933731 ERROR AP_NOTICE: AP left after booting on dap 2 state 6
APM Nov 23 16:37:26.922759 ERROR AP_NOTICE: AP left after booting on dap 1 state 6
APM Nov 23 15:57:34.345402 CRITICAL AP_NOTICE: image delivered OK on dap 5 APM Nov 23 15:57:33.799065 CRITICAL AP_NOTICE: image delivered OK on dap 3 APM Nov 23 15:57:33.302585 CRITICAL AP_NOTICE: image delivered OK on dap 6 APM Nov 23 15:57:32.913341 CRITICAL AP_NOTICE: image delivered OK on dap 1
APM Nov 23 15:57:32.497782 CRITICAL AP_NOTICE: image delivered OK on dap 2 APM Nov 23 15:57:32.316555 CRITICAL AP_NOTICE: image delivered OK on dap 4 APM Nov 23 15:56:26.595520 ERROR AP_NOTICE: AP left after booting on dap 6 state 6
APM Nov 23 15:56:26.593804 ERROR AP_NOTICE: AP left after booting on dap 5 state 6
APM Nov 23 15:56:26.591698 ERROR AP_NOTICE: AP left after booting on dap 4 state 6
APM Nov 23 15:56:26.580616 ERROR AP_NOTICE: AP left after booting on dap 3 state 6
APM Nov 23 15:56:26.572577 ERROR AP_NOTICE: AP left after booting on dap 2 state 6
APM Nov 23 15:56:26.561549 ERROR AP_NOTICE: AP left after booting on dap 1 state 6
APM Nov 21 12:18:18.422440 CRITICAL AP_NOTICE: image delivered OK on dap 4 APM Nov 21 12:18:17.954085 CRITICAL AP_NOTICE: image delivered OK on dap 6 APM Nov 21 12:18:17.889857 CRITICAL AP_NOTICE: image delivered OK on dap 1 APM Nov 21 12:18:17.855940 CRITICAL AP_NOTICE: image delivered OK on dap 5 APM Nov 21 12:18:17.384700 CRITICAL AP_NOTICE: image delivered OK on dap 2 APM Nov 21 12:18:17.209689 CRITICAL AP_NOTICE: image delivered OK on dap 3 MP Nov 21 12:17:43.508537 ALERT DAP 6 AP Reset: TAPA reboot by Mx
MP Nov 21 12:17:43.508445 ALERT DAP 5 AP Reset: TAPA reboot by Mx MP Nov 21 12:17:43.507144 ALERT DAP 4 AP Reset: TAPA reboot by Mx MP Nov 21 12:17:43.507022 ALERT DAP 3 AP Reset: TAPA reboot by Mx MP Nov 21 12:17:43.503168 ALERT DAP 2 AP Reset: TAPA reboot by Mx MP Nov 21 12:17:43.485130 ALERT DAP 1 AP Reset: TAPA reboot by Mx
APM Nov 21 12:14:45.613625 CRITICAL AP_NOTICE: image delivered OK on dap 1 APM Nov 21 12:14:45.187158 CRITICAL AP_NOTICE: image delivered OK on dap 4 APM Nov 21 12:14:45.159986 CRITICAL AP_NOTICE: image delivered OK on dap 5 APM Nov 21 12:14:45.141029 CRITICAL AP_NOTICE: image delivered OK on dap 6 APM Nov 21 12:14:44.963779 CRITICAL AP_NOTICE: image delivered OK on dap 3 APM Nov 21 12:14:44.265558 CRITICAL AP_NOTICE: image delivered OK on dap 2 MP Nov 21 12:14:10.773389 ALERT DAP 6 AP Reset: TAPA reboot by Mx
MP Nov 21 12:14:10.753391 ALERT DAP 5 AP Reset: TAPA reboot by Mx MP Nov 21 12:14:10.742782 ALERT DAP 4 AP Reset: TAPA reboot by Mx MP Nov 21 12:14:10.725224 ALERT DAP 3 AP Reset: TAPA reboot by Mx MP Nov 21 12:14:10.714752 ALERT DAP 2 AP Reset: TAPA reboot by Mx MP Nov 21 12:14:10.696876 ALERT DAP 1 AP Reset: TAPA reboot by Mx
APM Nov 17 11:48:52.177696 CRITICAL AP_NOTICE: image delivered OK on dap 6 APM Nov 17 11:48:51.577931 CRITICAL AP_NOTICE: image delivered OK on dap 1 MP Nov 17 11:48:32.638352 ALERT DAP 6 AP Reset: TAPA reboot by Mx
MP Nov 17 11:48:32.619236 ALERT DAP 1 AP Reset: TAPA reboot by Mx MP Nov 17 11:42:15.827741 ALERT DAP 1 ap_agent: Boot Code Cemented.
APM Nov 17 11:42:15.816916 CRITICAL AP_NOTICE: image delivered OK on dap 1 MP Nov 17 11:42:10.542052 ALERT DAP 6 ap_agent: Boot Code Cemented.
MP Nov 17 11:41:56.663193 ALERT DAP 1 AP Reset: Bootcode download complete MP Nov 17 11:41:51.113720 ALERT DAP 6 AP Reset: Bootcode download complete APM Nov 17 11:41:43.475045 CRITICAL AP_NOTICE: image delivered OK on dap 1 APM Nov 17 11:41:37.845885 CRITICAL AP_NOTICE: image delivered OK on dap 6 MP Nov 17 11:21:28.747676 ALERT DAP 3 ap_agent: Boot Code Cemented.
APM Nov 17 11:21:28.745165 CRITICAL AP_NOTICE: image delivered OK on dap 3 MP Nov 17 11:21:27.887725 ALERT DAP 5 ap_agent: Boot Code Cemented.
APM Nov 17 11:21:27.885330 CRITICAL AP_NOTICE: image delivered OK on dap 5 ========= dir =========
=============================================================== =================
file:
Filename Size Created
file:configuration 29 KB Nov 23 2006, 16:59:52 Total: 29 Kbytes used, 208329 Kbytes free
=============================================================== =================
Boot:
Filename Size Created
boot0:bver 38 bytes Jan 24 2006, 23:38:54 boot0:nt804020.rel 10103 KB Jan 24 2006, 23:38:22 *boot1:nt804111.rel 10203 KB Nov 15 2006, 14:47:56 Boot0: Total: 10103 Kbytes used, 2136 Kbytes free
Boot1: Total: 10203 Kbytes used, 2056 Kbytes free
=============================================================== =================
temporary files:
Filename Size Created
core:build_details 401 bytes Nov 15 2006, 15:08:59 core:command_audit.cur 57 KB Nov 23 2006, 16:59:52 Total: 57 Kbytes used, 91461 Kbytes free
========= show license ========= Serial Number : STP1W7017E
40 ports are enabled
========= show rfdetect data ========= Total number of entries: 72
Flags: i = infrastructure, a = ad-hoc
c = CCMP, t = TKIP, 1 = 104-bit WEP, 4 = 40-bit WEP, w = WEP(non-WPA) BSSID Vendor Type Port/Radio/Ch Flags RSSI Age SSID
--- --- --- --- --- ---- --- --- 00:0e:35:a4:10:8c Intel intfr DAP 1/1/11 a--- -81 45 WI-FIFI 00:0e:35:a4:10:8c Intel intfr DAP 2/1/11 a--- -62 4 WI-FIFI 00:0e:35:a4:10:8c Intel intfr DAP 4/1/11 a--- -61 2 WI-FIFI 00:0e:35:a4:10:8c Intel intfr DAP 3/1/11 a--- -65 4 WI-FIFI 00:0e:35:a4:10:8c Intel intfr DAP 5/1/11 a--- -66 4 WI-FIFI
00:0e:35:a4:10:8c Intel intfr DAP 6/1/11 a--- -88 14 WI-FIFI
00:11:95:53:e1:37 Unknown rogue DAP 1/2/52 i--- -68 15 default-11a 00:11:95:53:e1:37 Unknown rogue DAP 2/2/52 i--- -58 4 default-11a 00:11:95:53:e1:37 Unknown rogue DAP 4/1/6 i--- -56 2 default 00:11:95:53:e1:37 Unknown rogue DAP 3/2/52 i--- -63 4 default-11a 00:11:95:53:e1:37 Unknown rogue DAP 5/2/52 i--- -65 4 default-11a 00:11:95:53:e1:37 Unknown rogue DAP 6/2/52 i--- -74 14 default-11a 00:15:e8:e0:49:40 Unknown known DAP 2/1/6 i--- -67 4 XXXXXXX 00:15:e8:e0:49:40 Unknown known DAP 4/1/6 i--- -72 2 XXXXXXX 00:15:e8:e0:49:40 Unknown known DAP 3/1/6 i--- -72 4 XXXXXXX 00:15:e8:e0:49:40 Unknown known DAP 5/1/6 i--- -71 19 XXXXXXX 00:15:e8:e0:49:40 Unknown known DAP 6/1/6 i--- -59 14 XXXXXXX 00:15:e8:e0:49:41 Unknown known DAP 2/2/48 i--- -73 4
00:15:e8:e0:49:41 Unknown known DAP 4/2/36 i--- -80 2 00:15:e8:e0:49:41 Unknown known DAP 3/2/60 i--- -69 34 00:15:e8:e0:49:41 Unknown known DAP 5/2/56 i--- -74 49 00:15:e8:e0:49:41 Unknown known DAP 6/2/40 i--- -61 14
00:15:e8:e0:5e:40 Unknown known DAP 1/1/1 i--- -74 15 XXXXXXX 00:15:e8:e0:5e:40 Unknown known DAP 4/1/1 i--- -63 2 XXXXXXX 00:15:e8:e0:5e:40 Unknown known DAP 3/1/1 i--- -67 4 XXXXXXX 00:15:e8:e0:5e:40 Unknown known DAP 5/1/1 i--- -71 4 XXXXXXX 00:15:e8:e0:5e:40 Unknown known DAP 6/1/1 i--- -79 14 XXXXXXX 00:15:e8:e0:5e:41 Unknown known DAP 1/2/52 i--- -69 75
00:15:e8:e0:5e:41 Unknown known DAP 4/2/36 i--- -66 2 00:15:e8:e0:5e:41 Unknown known DAP 3/2/60 i--- -64 109 00:15:e8:e0:5e:41 Unknown known DAP 5/2/56 i--- -63 4 00:15:e8:e0:5e:41 Unknown known DAP 6/2/40 i--- -72 29
00:15:e8:e4:39:40 Unknown known DAP 1/1/1 i--- -80 15 XXXXXXX 00:15:e8:e4:39:40 Unknown known DAP 2/1/1 i--- -67 4 XXXXXXX 00:15:e8:e4:39:40 Unknown known DAP 3/1/1 i--- -67 4 XXXXXXX 00:15:e8:e4:39:40 Unknown known DAP 5/1/1 i--- -58 4 XXXXXXX 00:15:e8:e4:39:40 Unknown known DAP 6/1/1 i--- -83 29 XXXXXXX 00:15:e8:e4:39:41 Unknown known DAP 1/2/52 i--- -71 60
00:15:e8:e4:39:41 Unknown known DAP 2/2/48 i--- -57 4 00:15:e8:e4:39:41 Unknown known DAP 3/2/60 i--- -59 64 00:15:e8:e4:39:41 Unknown known DAP 5/2/56 i--- -55 154 00:15:e8:e4:39:41 Unknown known DAP 6/2/40 i--- -83 59
00:15:e8:e6:40:c0 Unknown known DAP 1/1/6 i--- -73 15 XXXXXXX 00:15:e8:e6:40:c0 Unknown known DAP 2/1/6 i--- -64 4 XXXXXXX 00:15:e8:e6:40:c0 Unknown known DAP 4/1/6 i--- -62 2 XXXXXXX 00:15:e8:e6:40:c0 Unknown known DAP 5/1/6 i--- -68 4 XXXXXXX 00:15:e8:e6:40:c0 Unknown known DAP 6/1/6 i--- -74 14 XXXXXXX 00:15:e8:e6:40:c1 Unknown known DAP 1/2/52 i--- -69 225
00:15:e8:e6:40:c1 Unknown known DAP 2/2/48 i--- -65 19 00:15:e8:e6:40:c1 Unknown known DAP 4/2/36 i--- -69 62 00:15:e8:e6:40:c1 Unknown known DAP 5/2/56 i--- -71 4